
Source Four PAR - Lighting ETC - Free user manual and instructions
Find the device manual for free Source Four PAR ETC in PDF.
User questions about Source Four PAR ETC
0 question about this device. Answer the ones you know or ask your own.
Ask a new question about this device
Download the instructions for your Lighting in PDF format for free! Find your manual Source Four PAR - ETC and take your electronic device back in hand. On this page are published all the documents necessary for the use of your device. Source Four PAR by ETC.
USER MANUAL Source Four PAR ETC
DECLARATION OF CONFORMITY
We, Electronic Theatre Controls, Europe Limited
Unit 5, Victoria Industrial Estate, London W3 6UU United Kingdomdeclare under sole responsibility that the product
Product name: CE Source FourPAR
Product type/model: CE Source FourPAR (PAR-EA, PAR-MCM)
Lot: n/a
Batch / Serial number: n/a
Item numbers: one of each model to which this declaration relates is in conformity with the following standards:
EN60598-1:1993 Luminaires, General requirements and tests
EN60598-17:1989 Specification for luminaires for stage lighting, television, film, and photographic studios.
Following the provisions of EU LV Directive(s) 73/23/EEC
London, United Kingdom Mr. Adam Bennette
(Place of issue) (Name of authorised person)
22^nd Jan 1997
Adam Bennett
(Date of issue) (signature of authorized person)
Electronic Theatre Controls Europe Ltd. Registered office:
Unit 5, Victoria Industrial Estate, Grant Thornton House
Victoria Road, London W3 6UU U.K. Melton St., London, NW1 2BW, England
Telephone (+44) 181 896 1000 Registered in England No.3057796
Fax (+44) 181 896 2000 VAT No. 662 9487 90
natural_image
Pure geometric diagram with intersecting lines and circles, no text or symbols present
natural_image
Pure geometric diagram with intersecting lines and a circular pattern (no text or symbols)CE Source FourPAR ....3
CE Source FourPAR instructions .... 5
Safety warnings .... 5
Wiring information 6
Accessories 6
HPL lamps 6
CE Source FourPAR lenses 8
Colour frame retaining clip 10
Cleaning the reflector .... 10
Portable appliance test (PAT) guidelines 11
English Deutsch Français Español
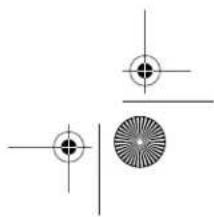
| 1 | YokeBügel Lyre Lira | |||
| 2 | Primary suspension yoke mounting holes | Hauptaufhängelöcher für Hängebügel | Trous de montage de la lyre de la suspension principale | Orificios para el montaje de la lira de la suspensión primaria |
| 3 | Earth continuity cable | Erdungskabel Cable de mise à la terre Cable de tierra | ||
| 4 | Lamp housing | Lampengehäuse Compartiment lampe Portalámparas | ||
| 5 | Spring clip | Federklammer Pince à ressort Clip de sujeción | ||
| 6 | Lens rotation ring | Linsendrehring | Bague de rotation de la lentille | Anillo para girar la lente |
| 7 | Tabs | Vorsprünge | Butée de retenue | Lengüetas |
| 8 | Safety cable (400SC) | Sicherungsseil (400SC) | Câble de sécurité (400SC) | Cable de seguridad (400SC) |
| 9 | Secondary suspension point | Befestigungsmöglichkeit für Sicherungsseil | Point de suspension secondaire | Punto secundario de suspensión |
| 10 | Colour frame holder | Farbrahmenhalter | Glissière porte-filtre | Marco portafiltros |
| 11 | Lens | Linse | Lentille | Lente |
| 12 | Colour frame (407CF) | Farbrahmen (407CF) | Porte-filtre (407CF) | Portafiltros (407CF) |
| 13 | Safety screen | Schutzgitter | Grille de protection | Rejilla de seguridad |
| 14 | Lens catcher | Linsenhalterung | Guide de la lentille | Enganche de la lente |
| 15 | Retaining clip | Sicherungsbügel | Clip de mantien | Clip de seguridad |
| 16 | Yoke locking knob | Bügelfeststellschraube | Poignée de serrage de la lyre | Maneta para fijar la lira |
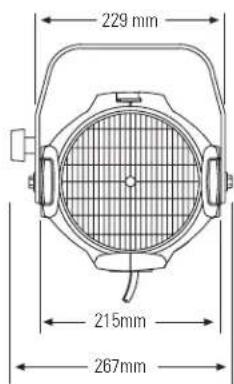
CE Source FourPAR • 3

natural_image
Pure geometric diagram with crosshair and concentric circle patterns (no text or symbols)Specifications • Technische Daten Spécifications • Especificaciones
Weight:-3.4 kg
Gewicht:-3,4 kg
Poids-3.4 kg
Peso-3,4 kg


CE Source FourPAR instructions
Safety warnings
The CE Source FourPAR is intended for professional use only. Read entire User Manual before using equipment. Please note the following safety warnings before use:
- Do not mount the CE Source FourPAR on or near a flammable surface.
- Do not operate the CE Source FourPAR without a lens installed.
• Install the safety screen before turning the luminaire on. - Mount and support the luminaire only by the primary suspension yoke holes. Suspend the luminaire from a hook clamp or a stand mount, using a securely tightened steel bolt (up to 12mm∅), washer and locking nut.
- In addition to primary suspension, make sure a safety cable (Model #400SC) or chain is attached to the secondary suspension point on the luminaire (see page 3).
• Always hang the CE Source FourPAR with the colour frame retaining clip in the locked position.
• Always replace the lamp if it becomes damaged or thermally deformed. - Use the luminaire in dry locations only, where humidity does not exceed 90 percent. Luminaire is not intended for outdoor use.
- Disconnect the unit from power before all cleaning and maintenance.
- Keep the CE Source FourPAR-EA luminaire at least 2.0 meters from anything it is shining on. Lighted objects at this distance or greater will not exceed 90^ temperature from a projected light.
- Keep the CE Source FourPAR-MCM luminaire at least 0.9 meters away from anything it is shining on. Lighted objects at this distance or greater will not exceed 90^ temperature from a projected light.
- CE Source FourPAR-EA and CE Source FourPAR-MCM maximum ambient temperature: T_g=45^ .
- CE Source FourPAR-EA maximum exterior surface temperature: T_max = 175^ .
- CE Source FourPAR-MCM maximum exterior surface temperature: T_max = 270^ .
- A multilanguage label sheet is included with this manual. Affix the label of the appropriate language over the existing warning label on the extension yoke. Do not cover the ETC trademark or CE mark.
PAR EA
2.0m
PAR MCM
0.9m
English
Wiring information
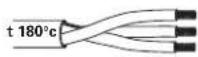
A plug of at least 2.5 amp (220/240V) rating should be attached to the luminaire's mains lead. The wires in the mains lead are 1.5mm^2 each and coloured in accordance with the following code:
| Green and Yellow: | Earth |
| Blue: Neutral | |
| Brown: Live |
WARNING! This luminaire must be earthed.
Current rating:
120V/5 amp maximum 240V/2.5 amp maximum
Operating frequency: 50/60Hz
Accessories
Colour frame (190mm sq/170mm inside diameter) 407CF
Safety cable (80cm) 400SC
C-clamp 400CC
Very Narrow Spot lens 400-VNSP
Narrow Spot lens 400-NSP
Medium Flood lens 400-MFL
Wide Flood lens 400-WFL
Set of four CE Source FourPAR lenses (VNSP, NSP, MFL, WFL)
400LS4
Set of five CE Source FourPAR lenses Clear Flat, VNSP, NSP, MFL, WFL)
400LS5
HPL lamps
HPL lamps are tungsten halogen lamps.
Important: Verify that the HPL lamp you use is suitable for the voltage at your facility. 115V, 120V, 230V, and 240V HPL lamps are available. Operating lamps above their rated voltage reduces lamp life and can cause premature lamp failure.
WARNING! Do not use lamps other than HPL in CE Source FourPAR luminaires. Use of lamps other than HPL will void CE safety conformity and warranty.
6 • CE Source FourPAR


| Lamp code Watts Volts Color temp Ave rated life | ||||
| Euro. | HPL 575/230 | 575 230 | 3,200°K 400 hour | |
| HPL 575/240 575 | 240 3 | 200°K 400 hour | ||
| American | HPL 375/115 375 | 1153,250°K 300 hour | ||
| HPL 375/115X 3 | 75 115 | 3,050°K 1,000 hour | ||
| HPL 550/77 550 | 77 3,250°K 300 hour | |||
| HPL 550/77X 550 | 77 3,050°K 2,000 hour | |||
| HPL 575/115 575 | 1153,250°K 300 hour | |||
| HPL 575/115X 5 | 75 115 | 3,050°K 2,000 hour | ||
| HPL 575/120 | 575 120 | 3,250°K 300 hour | ||
Installing the HPL lamp
Always replace the lamp if it becomes damaged or deformed.
- Disconnect the unit from power before installing the lamp.
WARNING! Let lamp cool before changing.
- Loosen the knurled bolt on the back of the lamp housing and pull the housing straight out from the back of the luminaire.
- Remove the HPL lamp from its box, holding it by the base.
Note: To avoid premature lamp failure, do not touch the lamp glass with your fingers. If you touch the lamp during installation, clean it carefully with rubbing alcohol and a clean, lint-free cloth before operation.
- Line up the flat sides of the lamp base with the brackets on either side of the socket (Figure 1).
- Push down on the lamp base until the lamp is firmly seated. Make sure that the lamp is fully seated, with the bottom of the lamp heat sink flush to the lamp housing casting.
Caution! Improperly installed lamps cause premature lamp failure and socket problems.
- To reinstall the lamp housing, center it on the reflector and the bolt hole, then tighten the knurled bolt to secure the lamp housing in place.
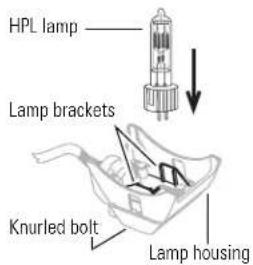
Figure 1
English
CE Source FourPAR lenses
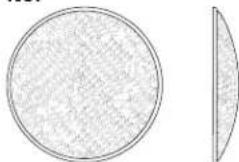
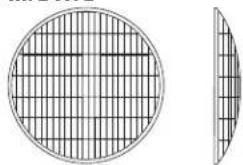
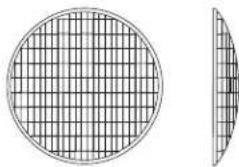
There are five available lenses for the CE Source FourPAR. The MFL lens comes installed in the luminaire; the VNSP, NSP and WFL are packed with the luminaire; and the CL (14°) is an optional accessory that you can order. The CL lens provides maximum beam intensity.
You can identify the lens type or beam spread by the lens texture.
Caution! Never operate the CE Source FourPAR without a lens in place.
VNSP

natural_image
Simple geometric shapes: a circle and a sector with a vertical line (no text or symbols)Very narrow spot Clear glass 15° Round beam shape
NSP
natural_image
Two abstract geometric shapes: a circular grid pattern on the left and a sectoral arc on the right (no text or symbols)Narrow spot Stipple glass (slight diffuse texture) 19" Round beam shape
MFL WFL
natural_image
Two circular diagrams showing a grid pattern on the left and a separate sector on the right, both without any text or symbols.Medium flood Fewer facets, sized 6 x 22mm 21° x 34° Oblong beam shape
natural_image
Diagram showing a circular grid pattern on the left and a separate curved segment on the right (no text or symbols)Wide flood Many facets, sized 6 x 12mm 30° x 51° Oblong beam shape
8 • CE Source FourPAR
Removing a lens
Change lenses if they become cracked or badly scratched.
WARNING! Unplug the luminaire before attempting to remove or install a lens.
- CE Source FourPAR lenses get hot while the unit is on. Let the luminaire cool before handling the lens.
- Place the luminaire on a flat, stable work surface. Do not install or remove lenses with the unit hanging in the air.
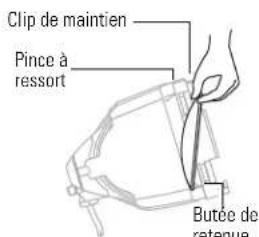
- Remove the safety screen by squeezing the screen clip with your thumb and forefinger. Pull the screen out (Figure 2).
- Position the lens rotation ring with the spring clip located at the top of the unit, directly below the retaining clip (Figure 3).
- Tilt the front of the luminaire down at least 45 degrees.
- Press the spring clip with your finger to release the lens (Figure 2).
- Allow the lens to drop forward from under the clip.
- When the lens drops, remove your finger, allowing the lens to slide forward until it rests on the lens catchers (Figure 4).
- Carefully remove the lens from the luminaire.
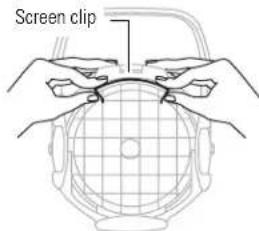
Figure 2
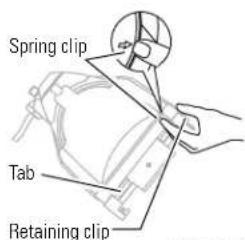
Figure 3
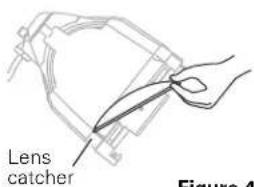
Figure 4
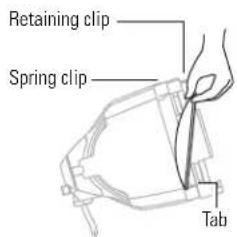
Figure 5
Installing a lens
- Position the luminaire with the front of the unit (the lens side) facing you and tilted slightly (Figure 5).
- Position the lens rotation ring with the spring clip located at the top of the luminaire, directly below the retaining clip.
- Hold the lens by the edge, and position it so the convex side faces the back of the luminaire (Figure 5).
Note: Installing the lens with the convex side out will not impair the optics, BUT it will make lens removal difficult and reduce gel life. - From the top of the luminaire, slide the lens behind the lens catchers and position its base behind the tabs on the bottom of the lens rotation ring.
- Gently push the top of the lens inward until it snaps behind the spring clip.
- Install the safety screen before using. To install the safety screen, squeeze the screen clip with your thumb and forefinger and place the safety screen in the lens rotation ring. The screen clip must be placed below the retaining clip (Figure 2).

English
Colour frame retaining clip
The colour frame holder is equipped with a spring-loaded retaining clip that prevents colour frames and accessories from falling out.
Important: Only hang the CE Source FourPAR with the colour frame retaining clip in the locked position (Figure 6).
Important: Use only colour frames or snoots with 170mm inside diameter.
- Release the retaining clip by pushing it sideways. The retaining clip opens.
- Insert the colour frame.
- Press the retaining clip down until it locks into position.
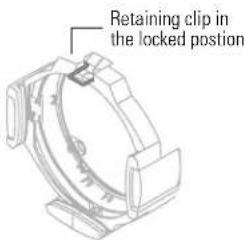
Figure 6
Cleaning the reflector
Caution! Do not use glass and window cleaners on the reflector. Chemicals in these cleaners will harm the reflective coating.
Caution! Do not use paper towels or harsh materials to wipe the reflector. These materials can scratch the surface of the reflector.
WARNING! Unplug the luminaire before attempting to clean reflector.
- Remove the lamp housing. See Installing the HPL lamp page 7.
- Remove the lens and safety screen so that you can access the reflector from the front of the luminaire. See Removing a lens page 9.
- Remove dust with a blast of oil free air, or wipe with a clean, soft, lint-free cotton cloth. If this is not sufficient to remove dust, go to step 4. Otherwise, go to step 6.
- Dampen a clean, soft, lint-free cotton cloth with a mild, soapy water solution and gently wipe the reflector.
- Remove any soapy water residue with a clean, soft, lint-free cotton cloth dampened with water.
- Reinstall a lens and safety screen before using the luminaire.
- To reinstall the lamp housing, center it on the reflector and the bolt hole, then tighten the knurled bolt to secure the lamp housing in place.
10 • CE Source FourPAR


Portable appliance test (PAT) guidelines
What is PAT?
The Portable Appliance Test is a set of tests that must be administered to electrical equipment in the UK and some locations in Europe to ensure safety.
The tests are typically carried out using a small PAT device. The PAT device connects to a power source and then attaches to the product via an electrical outlet and test probes. The PAT provides a simple pass or fail result, allowing rapid testing of large inventories.
The following guidelines provide instructions for applying the PAT to the Source Four PAR.
Testing New Luminaires
Source Four PAR luminaires now include a specific PAT point where the test clip is attached, as shown in the figure below. The PAT test is comprised of two tests: the ground test and the insulation test.
Ground Test
The ground test indicates the safety of the ground connection to the burner unit and reflector-housing parts. The connection could become live if the insulation failed. It is not necessary to test continuity to either the lens tube or the yoke, as these are separated by metallic shields.
Follow the steps below to ground test a Source Four PAR luminaire.
- Plug the luminaire into the PAT outlet and attach the test clip to the PAT point on the luminaire.
- Set the PAT device to test at 10 amperes and press the GO/TEST button.
If your PAT device doesn't allow you to change the amperage, it can still be used for the test. However, the earth tether, which connects the burner assembly to the body of the unit, may get hot enough to cause injury and could become permanently discoloured. This is normal for test currents above approximately 20 amperes.
The PAT device should read less than 0.5 ohms. Most Source Fours give a reading of less than 0.1 ohms, if in good condition.
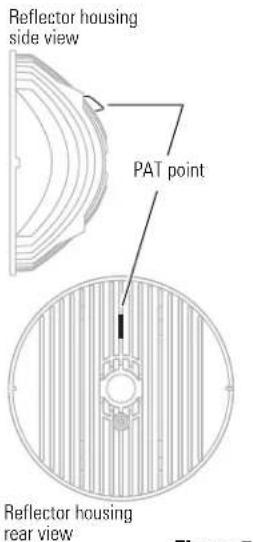
Figure 7
English
The Insulation test
The insulation proves that the internal insulation is in good condition. You can use standard PAT devices to perform the insulation test. Follow the steps below to test the luminaire's insulation.
- Plug the luminaire into the PAT outlet and attach the test clip to the PAT point on the luminaire.
- Set the PAT device to test at 500 volts D.C., then press the G0/TEST button.
A reading below 1M ohms indicates a possible or imminent failure. Moisture build-up around the lamp holder or in the connector or foreign matter accumulated around electrical connections can cause a low reading.
Why a Source Four PAR may give a fail reading
The majority of appliances must fulfill a ground resistance requirement of 0.1 ohms or less. Some simple, low-cost PAT devices assume the 0.1 requirement and do not offer a method for reading the actual resistance or for setting the fail level to 0.5 ohms. These devices may provide a fail reading for an acceptable unit if the resistance is slightly above 0.1 ohms. If in doubt, check with your PAT device supplier and verify that the PAT device can correctly test a luminaire for the 0.5 ohm condition.
How often to test
Your local regulatory authority has guidelines on the testing frequency.
natural_image
Simple geometric shapes: a circle and a sector with a vertical line (no text or symbols)natural_image
Two circular diagrams with textured fill, one divided into two segments (no text or symbols)natural_image
Diagram showing a circular grid pattern on the left and a separate curved section on the right (no text or symbols)natural_image
Diagram showing a circular grid pattern on the left and a separate curved segment on the right (no text or symbols)natural_image
Simple geometric shapes: a circle and a sector with a curved line (no text or symbols)natural_image
Two abstract geometric shapes: a circular grid pattern on the left and a sectoral arc on the right, both without any text or symbols.natural_image
Diagram showing a circular grid pattern on the left and a separate curved segment on the right (no text or symbols)natural_image
Diagram of a circular grid pattern with a side view showing a curved edge (no text or symbols)natural_image
Line drawing of a hand holding a pen, pointing at a mechanical component (no text or symbols)Figure 4
natural_image
Simple geometric shapes: a circle and a sector with a vertical line (no text or symbols)natural_image
Two abstract geometric shapes: a circular grid pattern on the left and a semi-circular sector on the right (no text or symbols)natural_image
Two circular diagrams showing a grid pattern on the left and a separate curved line on the right, both without any text or symbols.natural_image
Diagram showing a circular grid pattern on the left and a separate curved shape on the right (no text or symbols)natural_image
Pure geometric diagram with intersecting lines and circular shapes (no text or symbols)

natural_image
Pure geometric diagram with intersecting lines and central circles (no text or symbols)Español


34 • CE Source FourPAR


CES4Par(4Lang)BackCov.fm Page 35 Tuesday, August 31, 1999 2:40 PM


CES4Par(4Lang)BackCov.fm Page 36 Tuesday, August 31, 1999 2:40 PM


CES4Par(4Lang)BackCov.fm Page 37 Tuesday, August 31, 1999 2:40 PM


Electronic Theatre Controls
North America 3030 Laura Lane • Middleton, Wisconsin 53562 • USA
Tel: (+1) 608 831 4116 • Fax: (+1) 608 836 1736
Europe 5 Victoria Industrial Estate • Victoria Road • London W3 6UU
Tel: (+44) 181 896 1000 • Fax: (+44) 181 896 2000
Asia Room 605-606 • Tower III, Enterprise Square • 9 Sheung Yuet Road • Kowloon Bay • Hong Kong Tel: (+852) 2799 1220 • Fax: (+852) 2799 9325
World Wide Web: http://www.etcconnect.com • Email: mail@etcconnect.com
Copyright 1998. Specifications subject to change.
CE Source FourPAR is protected by US Patent Number 5,268,613 and Japanese Patent Number
2,501,772. US and International Patents Pending. 7061M1005. Revised 11/98.