Source Four Mini LED - Lighting ETC - Free user manual and instructions
Find the device manual for free Source Four Mini LED ETC in PDF.

| Product Type | LED Ellipsoidal Spotlight |
| Light Source | 75W RGBW LED (Red, Green, Blue, White) |
| Beam Angle | Interchangeable lens barrels: 5°, 10°, 14°, 19°, 26°, 36°, 50° |
| Color Temperature | Variable from 2,800K to 8,000K (adjustable) |
| Dimming | 0-100% smooth dimming with multiple curves (Linear, Square, etc.) |
| Control Protocols | DMX512 (5-pin), RDM, Ethernet (sACN, Art-Net), Wireless via optional module |
| Power Input | 100-240 VAC, 50/60 Hz, auto-ranging |
| Power Consumption | 75W (max) |
| Dimensions (L x W x H) | 12.5 x 5.5 x 5.5 in (318 x 140 x 140 mm) |
| Weight | 7.5 lbs (3.4 kg) |
| Housing Material | Die-cast aluminum with black powder coat finish |
| Cooling | Passive convection (no fans) for silent operation |
| IP Rating | IP20 (indoor use only) |
| Mounting | Yoke with two 1/4-turn fasteners, accepts C-clamp or pipe clamp |
| Accessories Included | Lens barrel (19° standard), power cable (5 ft), gel frame holder, 5-pin DMX cable (3 ft) |
| Safety Features | Thermal protection, safety cable attachment point, CE and ETL listed |
| Maintenance | Clean lens and housing with a soft, dry cloth; check airflow vents periodically |
| Spare Parts Available | LED module, lens barrels, DMX boards, power supplies (contact ETC dealer) |
| Warranty | 2 years parts and labor |
| Operating Temperature | 14°F to 104°F (-10°C to 40°C) |
| Compliance | RoHS, WEEE, cULus (pending) |
Frequently Asked Questions - Source Four Mini LED ETC
User questions about Source Four Mini LED ETC
0 question about this device. Answer the ones you know or ask your own.
Ask a new question about this device
Download the instructions for your Lighting in PDF format for free! Find your manual Source Four Mini LED - ETC and take your electronic device back in hand. On this page are published all the documents necessary for the use of your device. Source Four Mini LED by ETC.
USER MANUAL Source Four Mini LED ETC
Source Four Mini LED
User Manual
Part Number: 7063M1220 Rev: F
Released: 2020-02
To view a list of ETC trademarks and patents, go to etcconnect.com/ip. All other trademarks, both marked and not marked, are the property of their respective owners.
ETC intends this document, whether printed or electronic, to be provided in its entirety.
Table of Contents
Introduction 1
Basic Assembly.... 2
Install a Lens Tube.... 3
Install a Canopy or Track Fixture ..... 4
Install a Canopy Fixture. 4
Install a Track Fixture. 6
Use the AD1 Track Adapter ..... 7
Adjustments 8
Adjust the Yoke Position.... 8
Set the Angle with the Yoke 8
Lock the Rotation on the Canopy and Track Fixtures 8
Focus the Beam....9
Shape the Beam....9
Project a Pattern.... 10
Use the Color Frame Holder ..... 10
Adjust the C-clamp on the Portable Fixture (120 V Only) 11
Clean the Glass Lens 11
Introduction
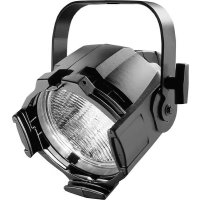
The Source Four Mini LED has three available mounting options:
- Portable: The portable fixture includes a miniature C-clamp and yoke-mounted driver, and has a permanently installed power cord with 3-prong Edison connector. Region-specific connectors are available. Contact ETC for available options. Use L5-15 plugs on branch circuits with L5-15 receptacles only.
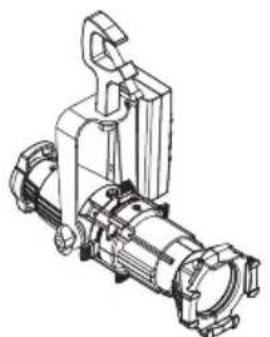
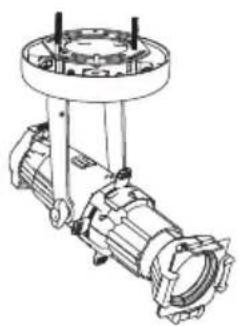
- Canopy-mount and track-mount: The canopy-mount fixture and track-mount fixture both include an integral driver.
There are four lens tube sizes available for each mounting option: 19°, 26°, 36°, and 50°. A lens tube must be installed prior to use of the Source Four Mini LED.
natural_image
Technical line drawing of a mechanical device with no visible text or symbolsPortable TrackCanopy
natural_image
Technical line drawing of a mechanical assembly with no visible text or symbols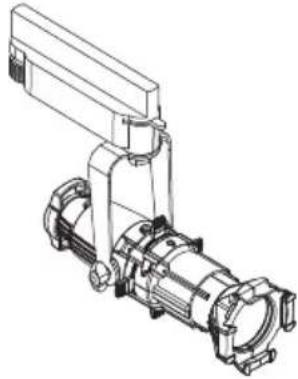
natural_image
Technical line drawing of a mechanical pump or motor assembly (no text or symbols)
Note: The miniature C-clamp for the portable fixture is included only with the 120 V fixture. For the 240 V fixture, use an M10 bolt to secure a clamp (provided separately) to the fixture.

WARNING: Please note the following safety warnings before use:
- Do not mount the fixture on or near combustible surfaces.
- Do not operate the fixture without a lens installed.
- Always hang the fixture with the retaining clip on the color frame holder in the locked position.

WARNING: To reduce the risk of fire and electric shock, use the track-mount fixture only with the DataTrack (EUTRAC®) track system.

INSTRUCTIONS PERTAINING TO A RISK OF FIRE, ELECTRIC SHOCK, EXPOSURE TO EXCESSIVE UV RADIATION, OR INJURY TO PERSONS
IMPORTANT SAFETY INSTRUCTIONS
WARNING - To reduce the risk of FIRE, ELECTRIC SHOCK, EXPOSURE TO EXCESSIVE UV RADIATION, OR INJURY TO PERSONS:
1) Do not touch hot lens, guard, or enclosure.
2) Do not remain in light if skin feels warm.
3) Do not look directly at lighted lamp.
4) Keep lamp away from materials that may burn.
5) External temperature after 5 minutes of full-brightness operation 50^ C ( 122^ F).
6) External temperature when steady state is achieved 67^ C ( 152.6^ F).
SAVE THESE INSTRUCTIONS
Install a Lens Tube
A lens tube must be installed prior to use of the Source Four Mini LED. There are four lens tube sizes available: 19°, 26°, 36°, and 50°.
| Lens Tube Description |
| 4M19LT 19° Source Four Mini Lens Tube Only Black |
| 4M19LT-1 19° Source Four Mini Lens Tube Only White |
| 4M19LT-5 19° Source Four Mini Lens Tube Only Silver |
| 4M26LT 26° Source Four Mini Lens Tube Only Black |
| 4M26LT-1 26° Source Four Mini Lens Tube Only White |
| 4M26LT-5 26° Source Four Mini Lens Tube Only Silver |
| 4M36LT 36° Source Four Mini Lens Tube Only Black |
| 4M36LT-1 36° Source Four Mini Lens Tube Only White |
| 4M36LT-5 36° Source Four Mini Lens Tube Only Silver |
| 4M50LT 50° Source Four Mini Lens Tube Only Black |
| 4M50LT-1 50° Source Four Mini Lens Tube Only White |
| 4M50LT-5 50° Source Four Mini Lens Tube Only Silver |
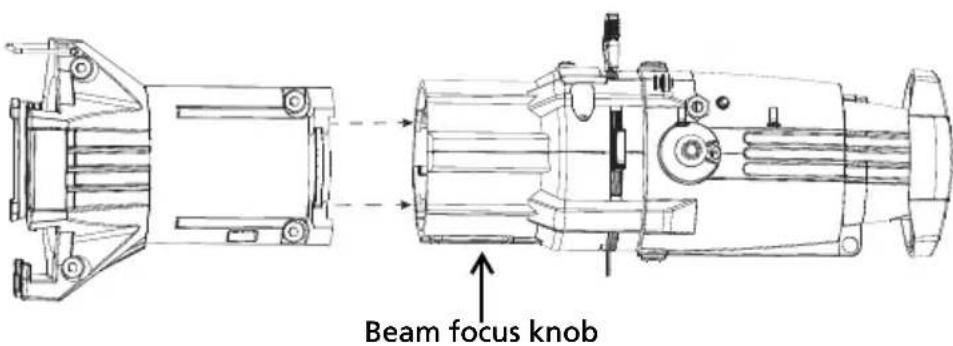
1: Unscrew the beam focus knob from the loose lens tube.
2: Slide the lens tube into the shutter barrel.
3: Install the beam focus knob.
Install a Canopy or Track Fixture

WARNING:
- TURN OFF POWER at main fuse or breaker box and verify that the power is off before proceeding with installation.
- Wiring must meet local and national codes.
- Do not mount the fixture on or near combustible surfaces.
- Do not operate the fixture without a lens installed.
• Always hang the fixture with the retaining clip on the color frame holder in the locked position.
Install a Canopy Fixture
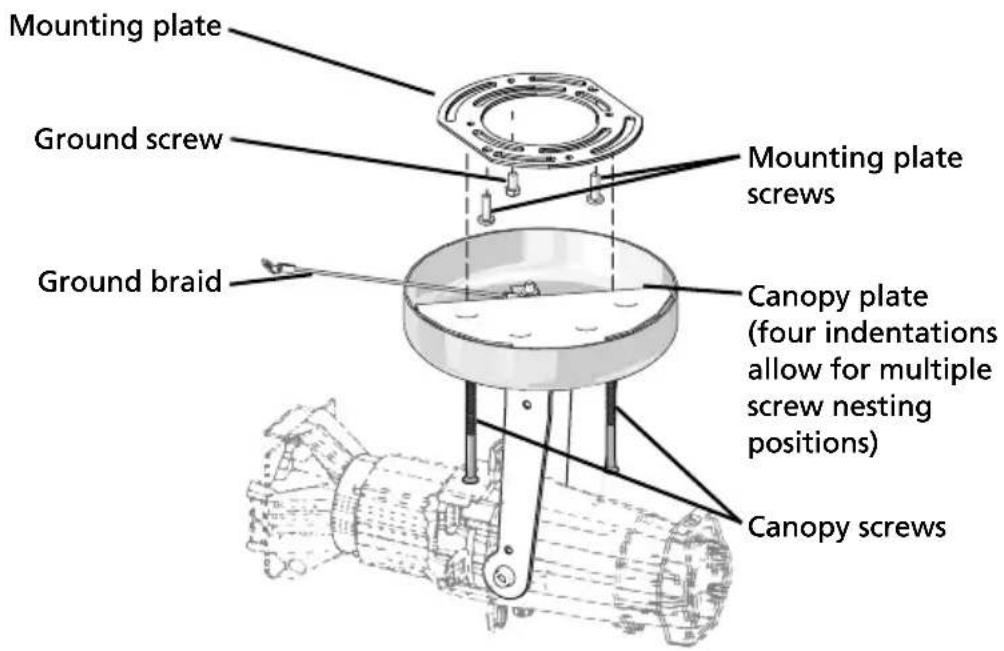
1: Remove the mounting plate from the fixture by removing the two canopy screws and the ground screw. Set the ground screw safely aside.
2: Using the mounting plate screws, secure the mounting plate to the installed electrical box, which is not included.
CAUTION: The metal canopy plate has built-in indentations allowing the mounting plate screws to nest into the canopy plate. For an ideal flush mount installation you may need to rotate the plate to accommodate these indentations. See the following image.
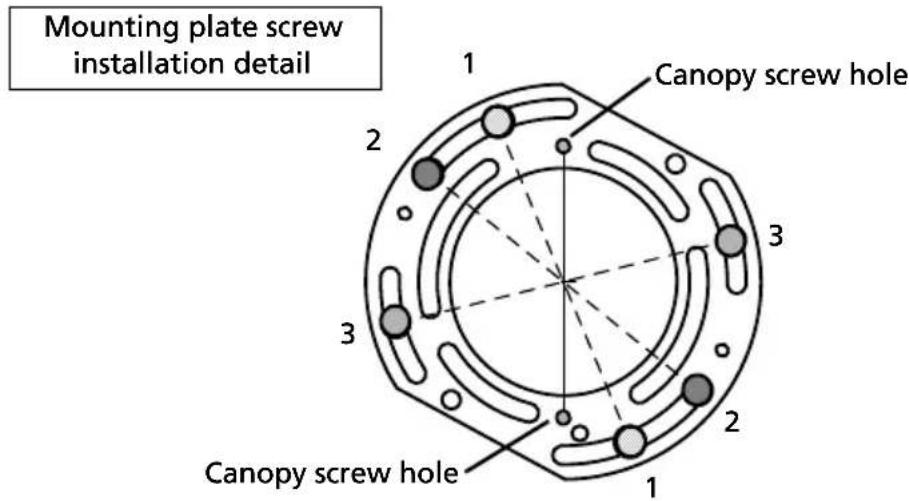
Install the mounting plate screws in one of the three position-pairings shown. Only the slots on the outer circumference will allow a true flush mounting.
3: Place the copper ground braid loop over the ground screw and attach the ground screw to the electrical box.
4: Connect the building ground wire to the ground wire on the fixture, following local electrical codes.
5: Connect your supply power wires to the lamp wiring using the included two-position WAGO® connectors.
- For 120V fixtures: Connect the black wire to line and the white wire to neutral.
- For 230V fixtures: Connect the brown wire to line and the blue wire to neutral.
6: While keeping in mind the mounting plate orientation, use the canopy screws to secure the fixture to the mounting plate.
7: Open all four of the shutter blades by sliding them outward until they stop.
8: Install a gobo and gel as desired and confirm that they are properly secured.
9: Restore power at the main fuse.
10: Focus the fixture as desired.
Install a Track Fixture

WARNING: To reduce the risk of fire and electric shock, use the track-mount fixture only with the DataTrack (EUTRAC) track system.

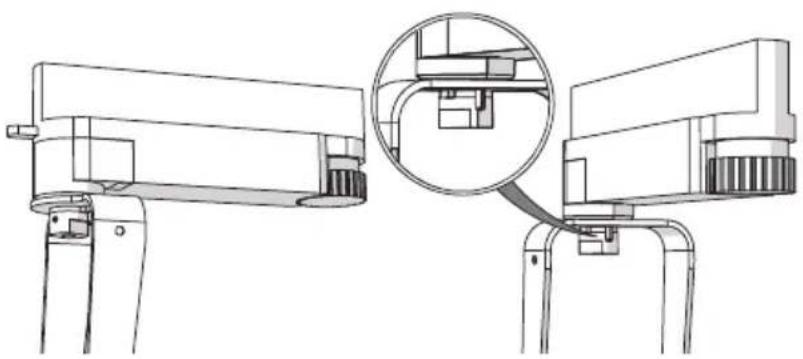
1: Insert the track adapter into the track. The adapter will only fit one way into the track with the tabs of the adapter in the groove of the track.
2: Lock the adapter into place.
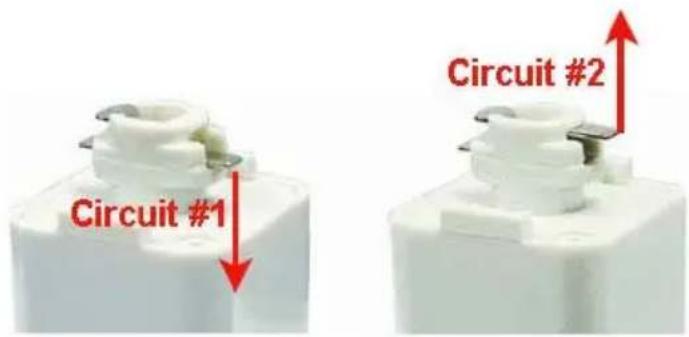
3: Select circuit 1 or 2 using the circuit selection wheel. (The 230V track adapter has a three-circuit selector knob.)
4: Focus the fixture.
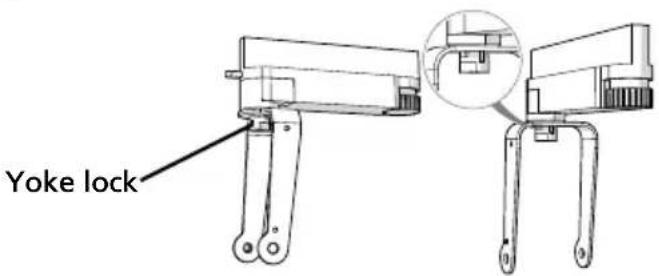
5: Lock the fixture into place using the yoke lock.
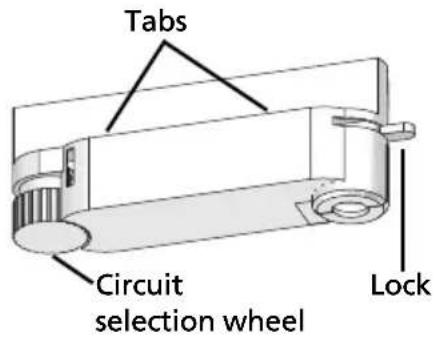
Cable protection posts on both the yoke lock and the yoke prevent the fixture from rotating a full 360°. To lock the yoke in place use a 1.5 mm Allen wrench.
natural_image
Technical line drawing of a mechanical device with a magnified inset showing internal components (no text or symbols)Use the AD1 Track Adapter
ETC offers the option of installing a track-mounted fixture with an adapter that is compatible with Halo Track Systems. Halo Track Systems are not available from ETC, but the Source Four Mini LED fixture can be custom-ordered from ETC with the AD1 track adapter.
Both single and double circuit track can be accommodated with this adapter.
- For single circuit track, push the tab on the adapter to the lower position.
- For double circuit track, push the tab to the upper position.
To install a fixture with the AD1 adapter:
1: Pull back on the retaining sleeve.
2: Insert the adapter into the track with the gold tabs parallel to the track.
3: Release the sleeve and rotate until you feel the adapter snap securely into place.
Adjustments
Adjust the Yoke Position
The Source Four Mini LED provides multi-positioning capabilities within its yoke for overall fixture angle.
Set the Angle with the Yoke

1: Loosen the yoke locking knob. Do not remove the knob.
2: Tilt the fixture to the desired position.
3: Tighten the yoke locking knob.
Lock the Rotation on the Canopy and Track Fixtures
1: Rotate the fixture to the desired position. To protect the wiring, the fixture cannot rotate completely around.
2: Insert a 1.5 mm Allen wrench into the small hole on the yoke lock.
3: Turn wrench to tighten the yoke lock.
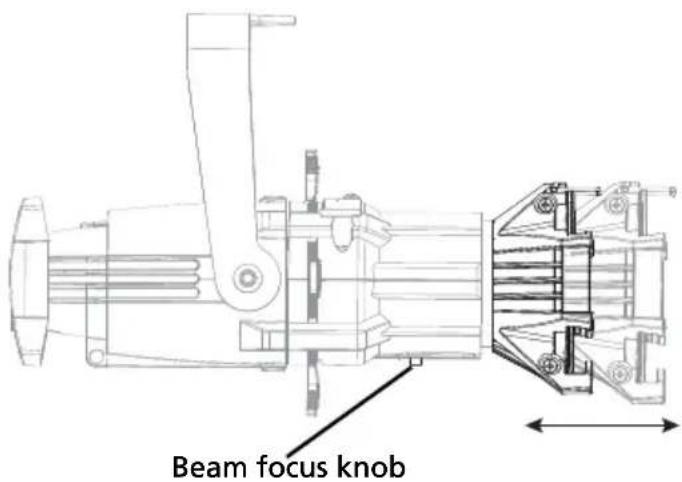
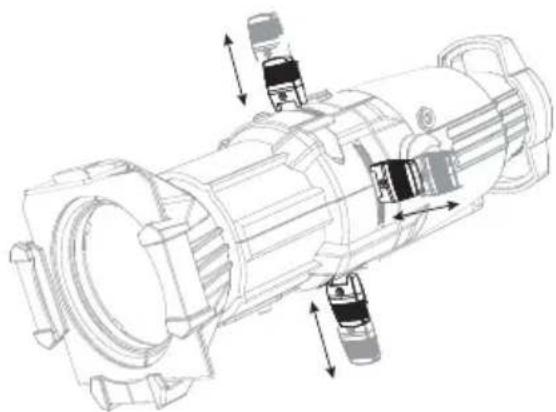
Focus the Beam
1: Loosen the beam focus knob located under the barrel. Do not remove the knob.
2: Slide the lens tube forward or backward to achieve the desired beam edge.
3: Once the fixture is focused, tighten the beam focus knob.
Shape the Beam
Shape the beam with the four shutters or with a pattern.
The Source Four Mini LED has four shutters: left, right, top, and bottom. Each shutter can be pulled out or pushed in to create the desired beam shape.
natural_image
Technical line drawing of a mechanical assembly with internal components and directional arrows (no text or labels)Project a Pattern
The Source Four Mini LED has a pattern holder slot on the top side of the shutter barrel, in front of the shutter. It accommodates an E-size (37.5 mm with a 25.4 mm image area) pattern holder.
Use an optional donut in the color frame holder to enhance pattern projection.
When the slot is not in use, a small sheet metal cover secured with a Phillips screw prevents light leakage.
1: Use a Phillips screwdriver to loosen the screw on the slot cover. Do not remove the screw.
2: Slide the cover completely forward to expose the slot.
3: Insert the pattern holder.
4: Slide the slot cover back toward the shutters until it meets the pattern handle. Leave enough space to move the handle.
5: Secure the slot cover by tightening the screw.
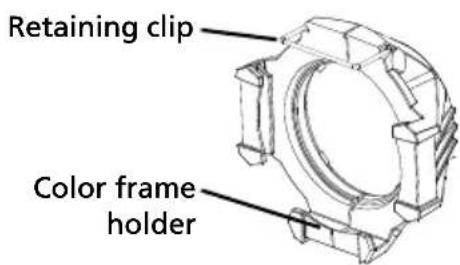
Use the Color Frame Holder
The Source Four Mini LED comes equipped with a 2^3/4 " or 70 mm color frame, which is a metal frame used to hold color media (often referred to as gel) in front of the lens. The color frame holder is equipped with a retaining clip that prevents the color frame from falling out.
Additional accessories are available that also fit into the color frame holder. Those accessories are top hat, short top hat, half hat, short half hat, and donut. When you use an accessory, install the color frame in the rear slot of the holder.

WARNING: Make sure the color frame is locked in position with the retaining clip.

Note: The color frame should be inserted with the open side down.
1: Release the retaining clip by gently pushing it up.
2: Insert the color frame.
3: Lock the retaining clip by gently pushing it down.
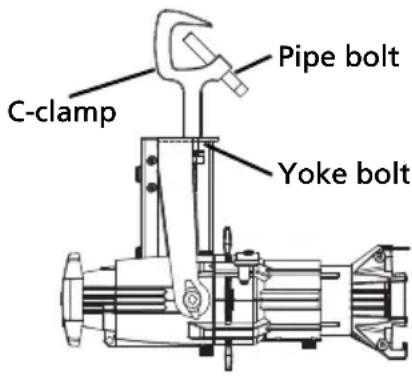
Adjust the C-clamp on the Portable Fixture (120 V Only)
The C-clamp attaches the fixture to the mounting pipe and allows you to adjust the position of the fixture once it is mounted. The C-clamp will fit a 3/8" to 1" pipe.
1: Tightly fasten the C-clamp to the yoke with the provided yoke bolt and lock washer.
2: Place the C-clamp on the mounting pipe, and then tighten the pipe bolt to secure it.
3: Loosen the C-clamp yoke bolt and rotate the yoke to the desired position.
4: Tighten the bolt to lock the fixture.

CAUTION: Tighten the C-clamp pipe bolt to about 18 in/lb (approximately finger tight plus up to one-quarter turn). Do not use excessive force.

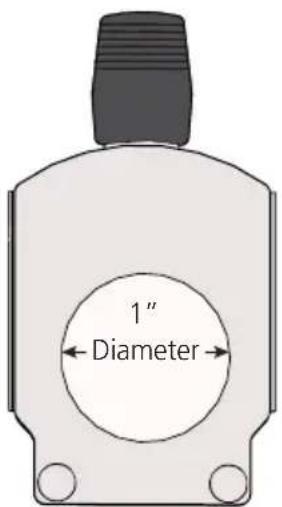
Note: The Source Four Mini LED yoke has a C-clamp hole with a .406" diameter.
Clean the Glass Lens

WARNING: Do not use ammonia-based or other harsh commercial cleaners. Clean lens only as directed.
Commercially available glass cleaning agents should be avoided as they may contain ammonia, other harsh chemical detergents, or abrasive agents. These cleaners may damage the glass surface and the anti-reflective coatings. Do not immerse or soak the glass in any cleaning solution.
1: Remove the beam focus knob from the barrel.
2: Remove the lens tube from the barrel.
3: Remove dust with a blast of oil-free air or wipe with a clean, lint-free cloth. Isopropyl alcohol, distilled water, or a 50%-50% mixture of each can be used to clean the glass surface.
4: Slide the lens tube back into the barrel with the color frame retainer clip on the top.
5: Reinstall the beam focus knob.