
KMT5115 - Toaster KITCHENAID - Free user manual and instructions
Find the device manual for free KMT5115 KITCHENAID in PDF.

| Product Type | Toaster |
| Brand | KitchenAid |
| Model | KMT5115 |
| Power | 1600 W |
| Voltage | 120 V |
| Frequency | 60 Hz |
| Number of Slots | 2 |
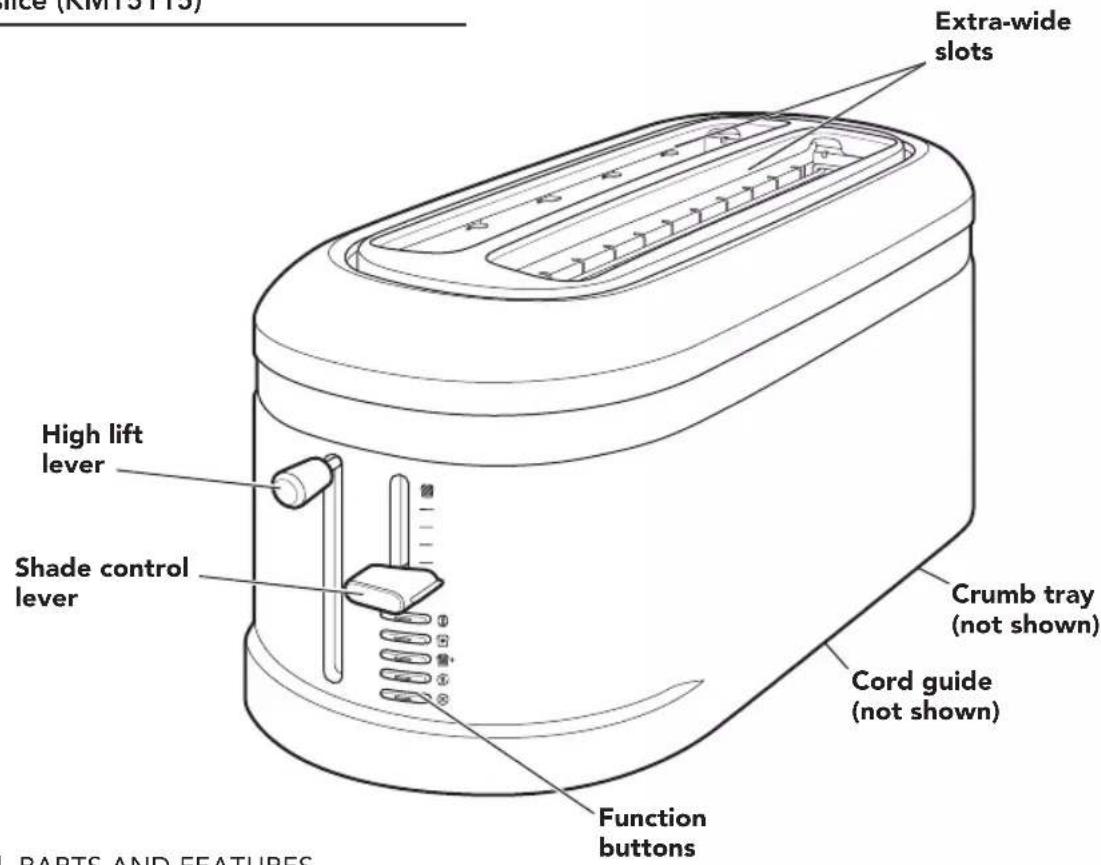
| Extra Wide Slots | Yes |
| Functions | Toast, Bagel, Defrost, Reheat, Just a Little Longer, Cancel |
| Bagel Function | Toasts the inside of a bagel without burning the outside |
| Defrost Function | Defrosts food before toasting |
| Reheat Function | Quickly reheats already toasted food |
| Just a Little Longer Function | Extends toasting without changing the setting |
| Cancel Function | Stops the cycle and lifts the bread |
| Browning Control | Control lever, continuous adjustment |
| High Lift | Allows lifting the bread above the toaster |
| Crumb Tray | Removable, empty after each use |
| Power Supply | Mains, 120 V ~ 60 Hz |
| Plug | 3-prong with ground |
| Power Cord | Short (non-detachable) |
| Warranty | 1 year (hassle-free replacement first year) |
Frequently Asked Questions - KMT5115 KITCHENAID
User questions about KMT5115 KITCHENAID
0 question about this device. Answer the ones you know or ask your own.
Ask a new question about this device
Download the instructions for your Toaster in PDF format for free! Find your manual KMT5115 - KITCHENAID and take your electronic device back in hand. On this page are published all the documents necessary for the use of your device. KMT5115 by KITCHENAID.
USER MANUAL KMT5115 KITCHENAID
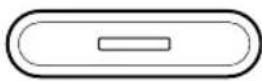
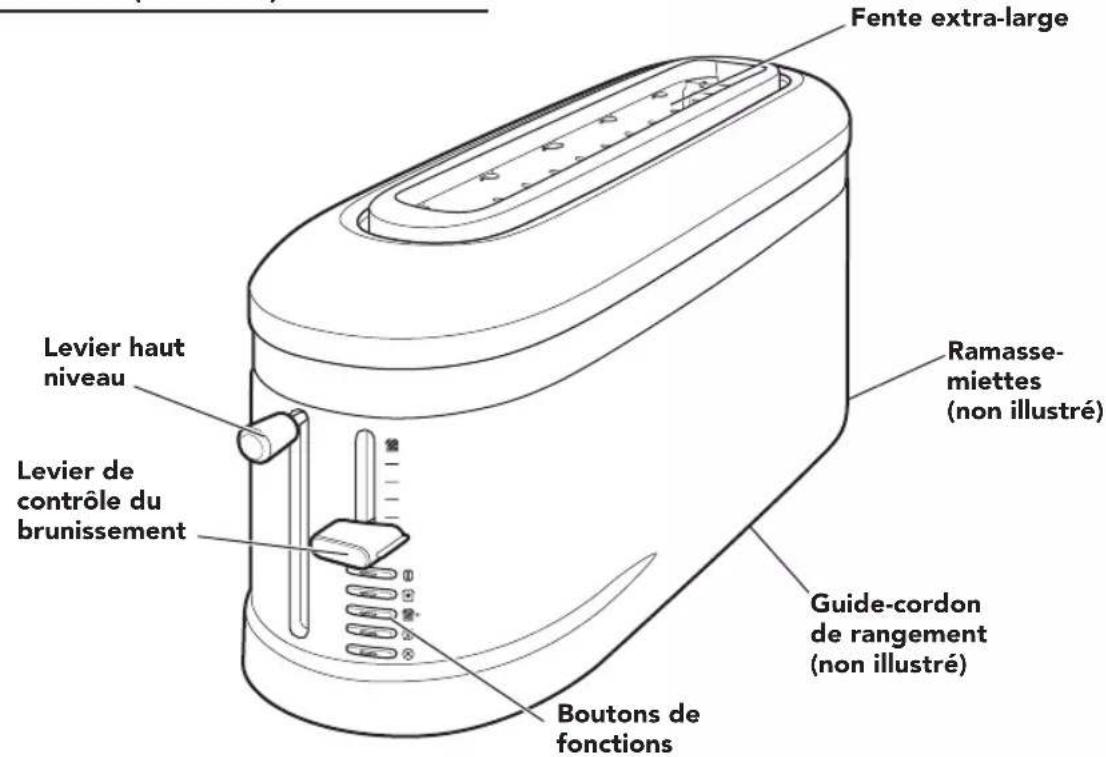
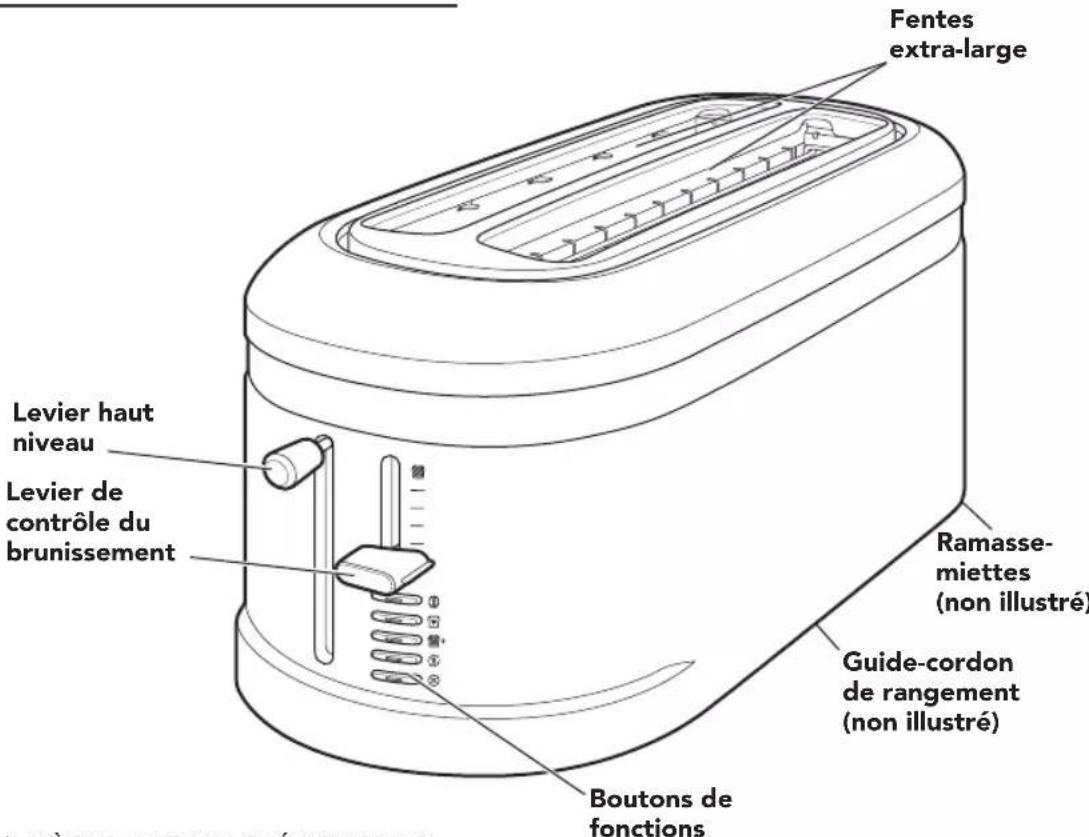
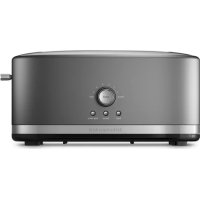
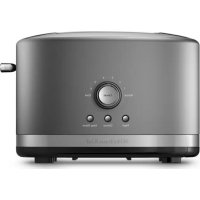
PARTS AND ACCESSORIES

2-slice (KMT3115)
4-slice (KMT5115)
2 | PARTS AND FEATURES
TOASTER SAFETY
Your safety and the safety of others are very important.
We have provided many important safety messages in this manual and on your appliance. Always read and obey all safety messages.

This is the safety alert symbol.
This symbol alerts you to potential hazards that can kill or hurt you and others.
All safety messages will follow the safety alert symbol and either the word "DANGER" or "WARNING." These words mean:
DANGER
You can be killed or seriously injured if you don't immediately follow instructions.
WARNING
You can be killed or seriously injured if you don't follow instructions.
All safety messages will tell you what the potential hazard is, tell you how to reduce the chance of injury, and tell you what can happen if the instructions are not followed.
IMPORTANT SAFEGUARDS
When using electrical appliances, basic safety precautions should always be followed, including the following:
- Read all instructions.
- Do not touch hot surfaces. Use handles or knobs.
- To protect against electrical shock, do not immerse cord, plugs, or Toaster in water or other liquid.
- Close supervision is necessary when any appliance is used by or near children.
- Unplug from outlet when not in use and before cleaning. Allow to cool before putting on or taking off parts.
- WARNING - To prevent electric shock, unplug before servicing.
- Do not operate the Toaster with a damaged cord or plug, or after the Toaster malfunctions or is dropped or damaged in any manner. Return the Toaster to the nearest Authorized Service Center for examination, repair, or adjustment.
- Do not use outdoors.
- To disconnect, turn any control to "OFF", then remove plug from wall outlet.
- The use of accessories not recommended or sold by KitchenAid may cause fire, electric shock, or injury.
- Do not let the cord hang over the edge of the table or counter, or touch hot surfaces.
- Do not place on or near a hot gas or electric burner, or in a heated oven.
TOASTER SAFETY
- Do not use Toaster for other than intended use.
- Oversized foods, metal foil packages, or utensils must not be inserted in the Toaster as they may involve a risk of fire or electric shock.
- A fire may occur if the Toaster is covered with or touching flammable material, including curtains, draperies, walls and the like when in operation.
- Do not attempt to dislodge food when the Toaster is plugged in.
- Do not operate Toaster unattended.
- When heating toaster pastries, always use the lightest toast color setting.
SAVE THESE INSTRUCTIONS
This product is designed for household use only.
ELECTRICAL REQUIREMENTS
WARNING

Electrical Shock Hazard
Plug into a grounded 3 prong outlet.
Do not remove ground prong.
Do not use an adapter.
Do not use an extension cord.
Failure to follow these instructions can result in death, fire, or electrical shock.
Voltage: 120V
Frequency: 60 Hz
Wattage: KMT3115 900 W
KMT5115 1600W
NOTE: Your Toaster has a 3 prong grounded plug. To reduce the risk of electrical shock, this plug will fit in an outlet only one way. If the plug does not fit in the outlet, contact a qualified electrician. Do not modify the plug in any way.
Do not use an extension cord. If the power supply cord is too short, have a qualified electrician or technician install an outlet near the appliance.
A short power supply cord (or detachable power supply cord) should be used to reduce the risk resulting from becoming entangled in or tripping over a longer cord.
USING THE TOASTER
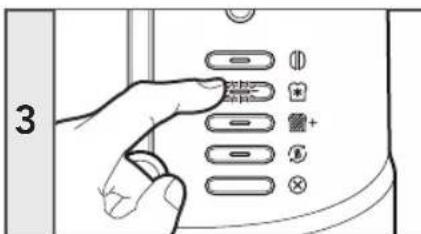
FUNCTION BUTTONS

BAGEL
Toasts the inside of a cut bagel without burning the bagel's outside surface.

DEFROST
Defrost and toasts frozen food.
A LITTLE LONGER
Allows you to toast something for just "a little longer".

REHEAT
Quickly reheats previously toasted food.


CANCEL
Cancels the toasting cycle and raises your bread for removal.
GETTING STARTED
Before using your Toaster for the first time, check the extra-wide slot(s) and remove any packing or printed material that might have fallen inside during shipping or handling.
IMPORTANT: To avoid damage to the Toaster, do not probe inside the toaster slots with any metal objects, including utensils.

WARNING
Electrical Shock Hazard
Plug into a grounded 3 prong outlet.
Do not remove ground prong.
Do not use an adapter.
Do not use an extension cord.
Failure to follow these instructions can result in death, fire, or electrical shock.
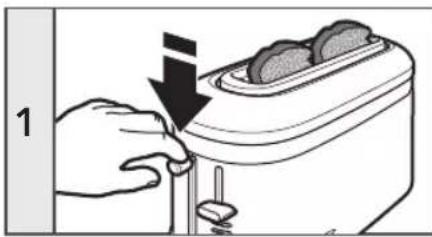
1
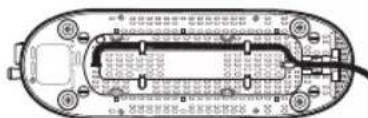
Tuck the power cord into the channel of the cord guide on the bottom of the Toaster so that it exits from the rear of the Toaster beneath the crumb tray. Plug into a grounded 3 prong outlet.
NOTE: You may see light smoke the first time you use the Toaster. This is normal. The smoke is harmless and will soon dissipate.
USING THE TOASTER
TOASTING
NOTE: All images shown are of the 2-slice Toaster, model KMT3115.

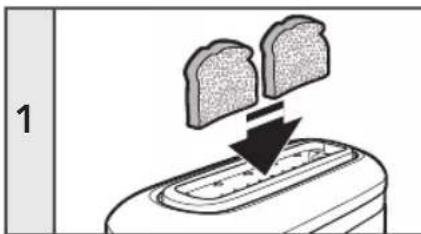
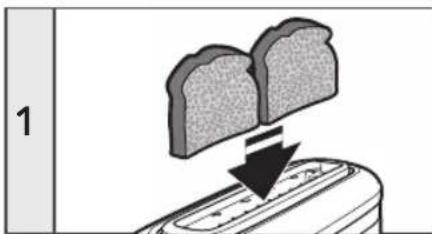
Insert bread or other food to be toasted into the slot(s).
TIP: For even toasting, toast only one bread type and thickness at a time. If toasting bagels, be sure to press the Bagel button (O) See "Toasting bagels."
NOTE: The age, type, and moisture level of different breads may require different shade settings. For example, dry bread will brown more rapidly than moist bread and will require a lighter setting.
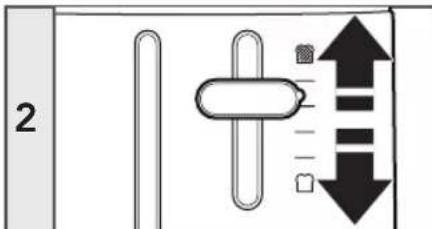
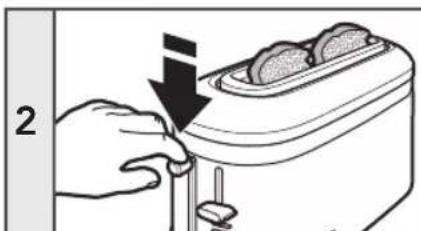
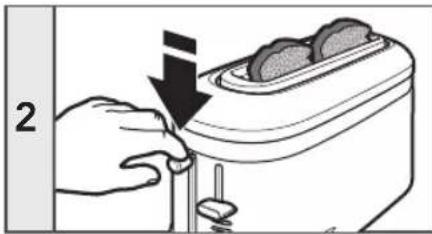
Select your desired shade by raising the shade control lever for darker toasting or lowering the lever for lighter toasting.
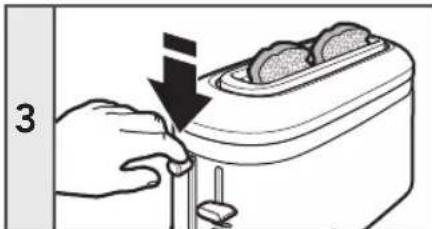
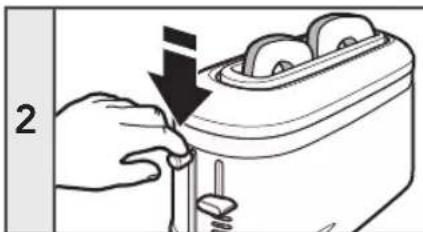
Press down on the high lift lever to start the toasting cycle. The toast will pop up automatically at the end of the cycle and the Toaster will turn off.
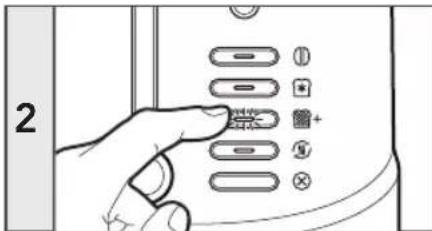
NOTE: If using a function button, you must lower the high lift lever first before selecting the function. The LED light next to the function will be lit while the function is in use.
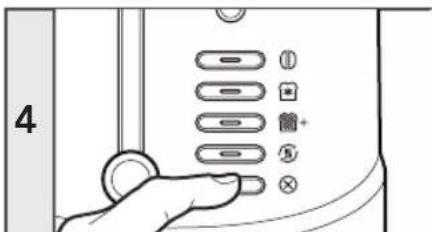
To cancel toasting at any time, press (Cancel). The toast will pop up and the Toaster will turn off.
TIP: For smaller items, lift up on the high lift lever to raise toast above the top of the Toaster.
TOASTING BAGELS
Your Toaster features a special setting for bagels, ensuring optimal heating time for the best results. The heating elements will adjust to nicely toast the inside of a cut bagel without burning the outside surface.
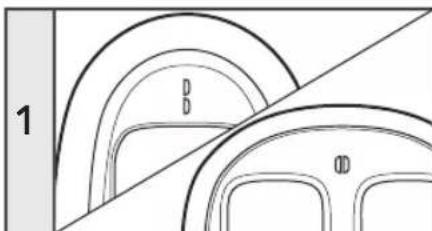
Insert bagels as indicated by the bagel icon on top of the Toaster.
USING THE TOASTER
With the shade control lever set to your desired shade, press down on the high lift lever to start the toasting cycle.
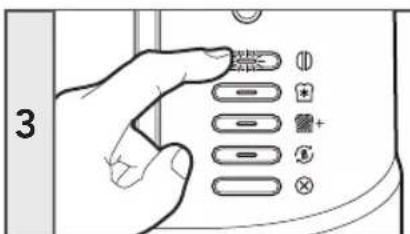
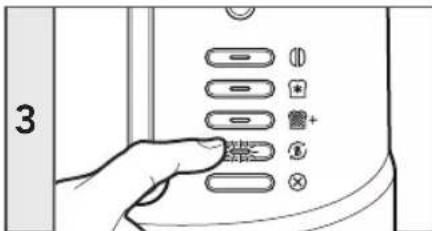
Press the Bagel indicator light will glow. The bagel(s) will pop up automatically at the end of the cycle and the Toaster will turn off.
TIP: The Bagel function can be used at the same time as the Defrost function.
DEFROST
The Defrost function adds extra time to the toasting cycle to defrost frozen items before toasting them.
Insert bread or other food to be toasted into the slot(s).
With the shade control lever set to your desired shade, press down on the high lift lever to start the toasting cycle.
Press the Defrost indicator light will glow. The toast will pop up automatically at the end of the cycle and the Toaster will turn off.


USING THE TOASTER
A LITTLE LONGER
This function allows you to toast something for just "a little longer" at the touch of a button without changing your favorite setting. Use this function after the toasting cycle is complete and the toast has risen.
Press down on the high lift lever to lower the toast again into the Toaster to resume toasting.
Press The toast will pop up automatically at the end of the cycle and the Toaster will turn off.
REHEAT
This function allows you to quickly reheat previously toasted foods.
Insert the previously toasted food into the slot(s).
NOTE: Do not place food with butter or any other topping in the Toaster. Use the Reheat function with dry foods only.
Press down on the high lift lever to start the toasting cycle.
Press The toast will pop up automatically at the end of the cycle and the Toaster will turn off, or you may press at any time to cancel the function.
NOTE: No shade adjustment is necessary - the Reheat function overrides whatever shade level you have set.
CARE AND CLEANING
CLEANING THE TOASTER
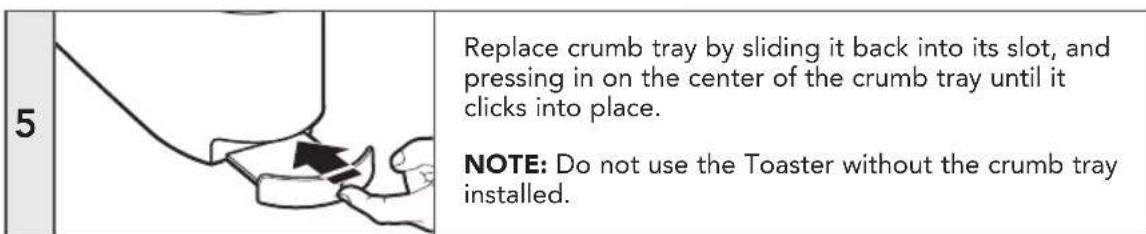
IMPORTANT: The crumb tray will be hot immediately following a toasting cycle. Allow the Toaster to cool before emptying the crumb tray.
IMPORTANT: Unplug the Toaster and let it cool before cleaning.
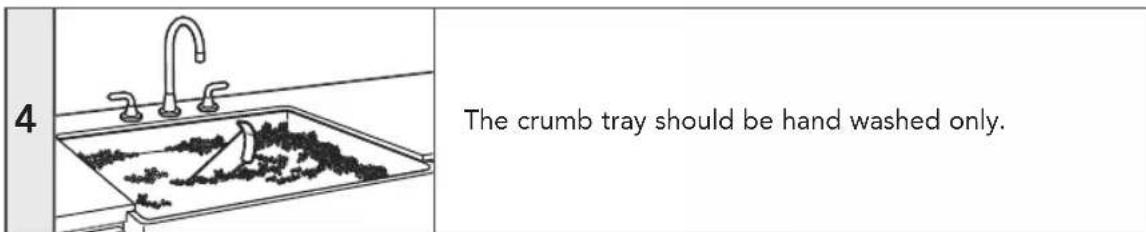
NOTE: For consistent browning results, empty the crumb tray after each use.
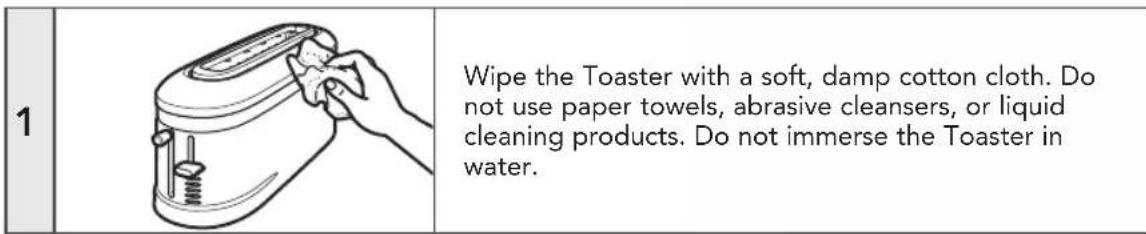
NOTE: If grease or oil splatters on the Toaster, wipe splatters away immediately using a clean, damp cotton cloth.
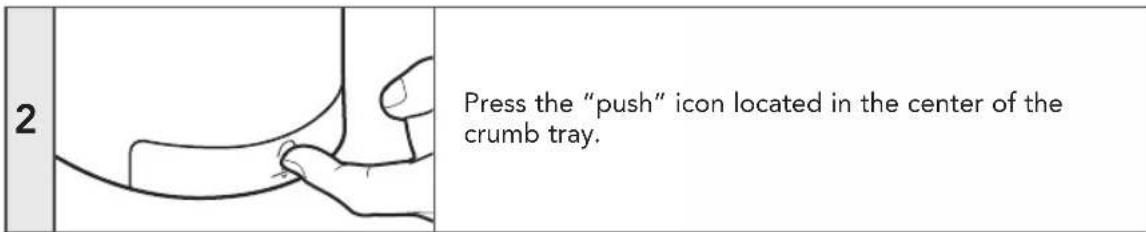

IMPORTANT: Be sure to open the crumb tray by pressing the "push" icon. Forcing the crumb tray open may damage the crumb tray.
NOTE: KitchenAid does not recommend the use of a toaster cover.
WARRANTY AND SERVICE
KITCHENAID® TOASTER WARRANTY FOR THE 50 UNITED STATES, THE DISTRICT OF COLUMBIA, PUERTO RICO, AND CANADA
This warranty extends to the purchaser and any succeeding owner for Toasters operated in the 50 United States, the District of Columbia, Puerto Rico, and Canada.
| Length of Warranty: One Year Full Warranty from date of purchase. | |
| KitchenAid Will Pay for Your Choice of: | Hassle-Free Replacement of your Toaster. See the next page for details on how to arrange for service, or call the Customer eXperience Center toll-free at 1-800-541-6390. OR The replacement parts and repair labor costs to correct defects in materials and workmanship. Service must be provided by an Authorized KitchenAid Service Center. |
| KitchenAid Will Not Pay for: | A. Repairs when your Toaster is used in other than normal single family home use. B. Damage resulting from accident, alteration, misuse or abuse. C. Any shipping or handling costs to deliver your Toaster to an Authorized Service Center. D. Replacement parts or repair labor costs for Toasters operated outside the 50 United States, District of Columbia, Puerto Rico, and Canada. |
| DISCLAIMER OF IMPLIED WARRANTY; LIMITATION OF REMEDIES IMPLIED WARRANTYES, INCLUDING TO THE EXTENT APPLICABLE WARRANTYES OF MERCHANTABILITY OR FITNESS FOR A PARTICULAR PURPOSE, ARE EXCLUDING TO THE EXTENT LEGALLY PERMISSIBLE. ANY IMPLIED WARRANTYES THAT MAY BE IMPOSED BY LAW ARE LIMITED TO ONE YEAR, OR THE SHORTEST PERIOD ALLOWED BY LAW. SOME STATES AND PROVINCES DO NOT ALLOW LIMITATIONS OR EXCLUSIONS ON HOW LONG AN IMPLIED WARRANTY OF MERCHANTIBILITY OR FITNESS LASTS, SO THE ABOVE LIMITATIONS OR EXCLUSIONS MAY NOT APPLY TO YOU. IF THIS PRODUCT FAILS TO WORK AS WARRANTED, CUSTOMER'S SOLE AND EXCLUSIVE REMEDY SHALL BE REPAIR OR REPLACEMENT ACCORDING TO THE TERMS OF THIS LIMITED WARRANTY. KITCHENAID AND KITCHENAID CANADA DO NOT ASSUME ANY RESPONSIBILITY FOR INCIDENTAL OR CONSEQUENTIAL DAMAGES. This warranty gives you specific legal rights and you may also have other rights which vary from state to state or province to province. | |
WARRANTY AND SERVICE
HASSLE-FREE REPLACEMENT WARRANTY—50 UNITED STATES, DISTRICT OF COLUMBIA, AND PUERTO RICO
We're so confident the quality of our products meets the exacting standards of KitchenAid that, if your Toaster should fail within the first year of ownership, KitchenAid will arrange to deliver an identical or comparable replacement to your door free of charge and arrange to have your original Toaster returned to us. Your replacement unit will also be covered by our one year limited warranty.
If your Toaster should fail within the first year of ownership, simply call our toll-free
Customer eXperience Center at 1-800-541-6390 Monday through Friday.
Please have your original sales receipt available when you call. Proof of purchase will be required to initiate the claim. Give the consultant your complete shipping address (no P.O. Box numbers, please).
When you receive your replacement Toaster, use the carton, packing materials, and prepaid shipping label to pack up your original Toaster and send it back to KitchenAid.
HASSLE-FREE REPLACEMENT WARRANTY—CANADA
We're so confident the quality of our products meets the exacting standards of the KitchenAid brand that, if your Toaster should fail within the first year of ownership, we will replace your Toaster with an identical or comparable replacement. Your replacement unit will also be covered by our one year limited warranty.
If your Toaster should fail within the first year of ownership, simply call our toll-free
Customer eXperience Center at 1-800-807-6777 Monday through Friday.
Please have your original sales receipt available when you call. Proof of purchase will be required to initiate the claim. Give the consultant your complete shipping address.
When you receive your replacement Toaster, use the carton, packing materials, and prepaid shipping label to pack up your original Toaster and send it back to KitchenAid.

ARRANGING FOR SERVICE AFTER THE WARRANTY EXPIRES, OR ORDERING ACCESSORIES AND REPLACEMENT PARTS

In the United States and Puerto Rico:
For service information, or to order accessories or replacement parts, call toll-free at 1-800-541-6390 or write to:
Customer eXperience Center, KitchenAid Small Appliances, P.O.Box 218,St. Joseph,MI 49085-0218
Outside the United States and Puerto Rico:
Consult your local KitchenAid dealer or the store where you purchased the Toaster for information on how to obtain service.
For service information in Canada:
Call toll-free 1-800-807-6777.
For service information in Mexico:
Call toll-free 01-800-0022-767.
/ ^M ©2019 KitchenAid. All rights reserved. KITCHENAID and the design of the stand mixer are trademarks in the U.S. and elsewhere. Used under license in Canada.
PIÉCES ET CARACTERISTIQUES
PIÉCES ET ACCESSOIRES
2 tranches (KMT3115)

4 tranches (KMT5115)
CONSIGNES DE SECURITE DU GRILLE-PAIN
Customer eXperience Center, KitchenAid Small Appliances, P.O. Box 218, St. Joseph, MI 49085-0218
Apodaca, N.L. Mexico 66634
Linea Telefonica gratuite nacional: 01800-0022-767
www.kitchenaid.com.mx
p.m. Sábados de 8:00 a.m. a 2:00 p.m.
E-mail: kitchenaidCAM@whirlpool.com
www.kitchenaid-ca.com
Colombia
web: www.kitchenaid.com.do
PRODUCT QUESTIONS OR RETURNS
QUESTIONS SUR LE PRODUIT OU LES RETOURS
PREGUNTAS SOBRE EL PRODUCTO O DEVOLUCIONES
USA: 1.800.541.6390 | KitchenAid.com
CANADA: 1.800.807.6777 KitchenAid.ca
MEXICO: KitchenAid.com.mx
LATIN AMERICA: KitchenAid-Latam.com

KitchenAid
©2019 KitchenAid. All rights reserved. KITCHENAID and the design of the stand mixer are trademarks in the U.S. and elsewhere. Used under license in Canada.

- TOASTER SAFETY
- Your safety and the safety of others are very important.
- DANGER
- WARNING
- IMPORTANT SAFEGUARDS
- When using electrical appliances, basic safety precautions should always be followed, including the following:
- SAVE THESE INSTRUCTIONS
- USING THE TOASTER
- FUNCTION BUTTONS
- BAGEL
- DEFROST
- A LITTLE LONGER
- REHEAT
- CANCEL
- GETTING STARTED
- Electrical Shock Hazard
- TOASTING
- TOASTING BAGELS
- CARE AND CLEANING
- CLEANING THE TOASTER
- WARRANTY AND SERVICE
- HASSLE-FREE REPLACEMENT WARRANTY—CANADA
- In the United States and Puerto Rico:
- Outside the United States and Puerto Rico:
- PIÉCES ET CARACTERISTIQUES
- CONSIGNES DE SECURITE DU GRILLE-PAIN
- Colombia
- KitchenAid
Brand : KITCHENAID
Model : KMT5115
Category : Toaster