GPA141 - Hand blender KRUPS - Free user manual and instructions
Find the device manual for free GPA141 KRUPS in PDF.
| Product type | Immersion blender |
| Brand | Krups |
| Model | GPA141 |
| Category | Small appliances |
| Use | Domestic |
| Functions | Blending, whisking, chopping |
| Speeds | Variable with dial |
| Display | LCD speed screen |
| Included accessories | Blending attachment, whisk with attachment block, mini chopper (0.7 L bowl, lid, blade), 0.8 L graduated mixing bowl, wall mount |
| Mixing bowl capacity | 0.8 L |
| Mini chopper capacity | 0.7 L |
| Blending attachment material | Plastic or metal (depending on model) |
| Max food temperature | 80 °C |
| Safety | Very sharp blades; unplug before handling |
| Cleaning | Motor unit and mini chopper lid not immersible; other parts dishwasher-safe |
| Storage | Wall mount (horizontal fixing, 80 mm spacing) |
| Spare parts available | Baby chopper ref. 0192151 |
| Repairability | Contact an authorized repairer |
Frequently Asked Questions - GPA141 KRUPS
User questions about GPA141 KRUPS
0 question about this device. Answer the ones you know or ask your own.
Ask a new question about this device
Download the instructions for your Hand blender in PDF format for free! Find your manual GPA141 - KRUPS and take your electronic device back in hand. On this page are published all the documents necessary for the use of your device. GPA141 by KRUPS.
USER MANUAL GPA141 KRUPS
natural_image
Black and silver Krupa electric toothbrush with digital display and power cord (no visible text or symbols)Français p 1
Dutch p 5
English p 9
Deutsch p 13
Italiano p 17
Español p 21
Português p 25
Dansk p 29
Norsk p 33
Swedish p 37
Suomi p 41
Ελληνικά p 45

natural_image
3D mechanical part diagram with labeled component 'J' (no text or symbols beyond label)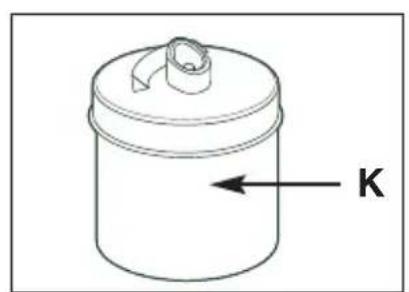
natural_image
Simple line drawing of a cylindrical container with a lid and an arrow labeled 'K' pointing left (no text or symbols beyond label)Français
natural_image
Illustration of a microwave oven with open door and steaming cup (no text or symbols)natural_image
Illustration of a microwave oven with open door and steaming cup (no text or symbols)Thank you for having chosen an appliance from our range. This product is intended solely for the preparation of food within the home.
Please read the operating instructions carefully before first using your appliance: we may not be held responsible for any incorrect use of the appliance.
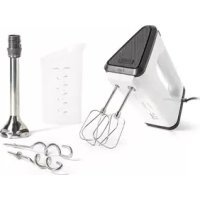
Description
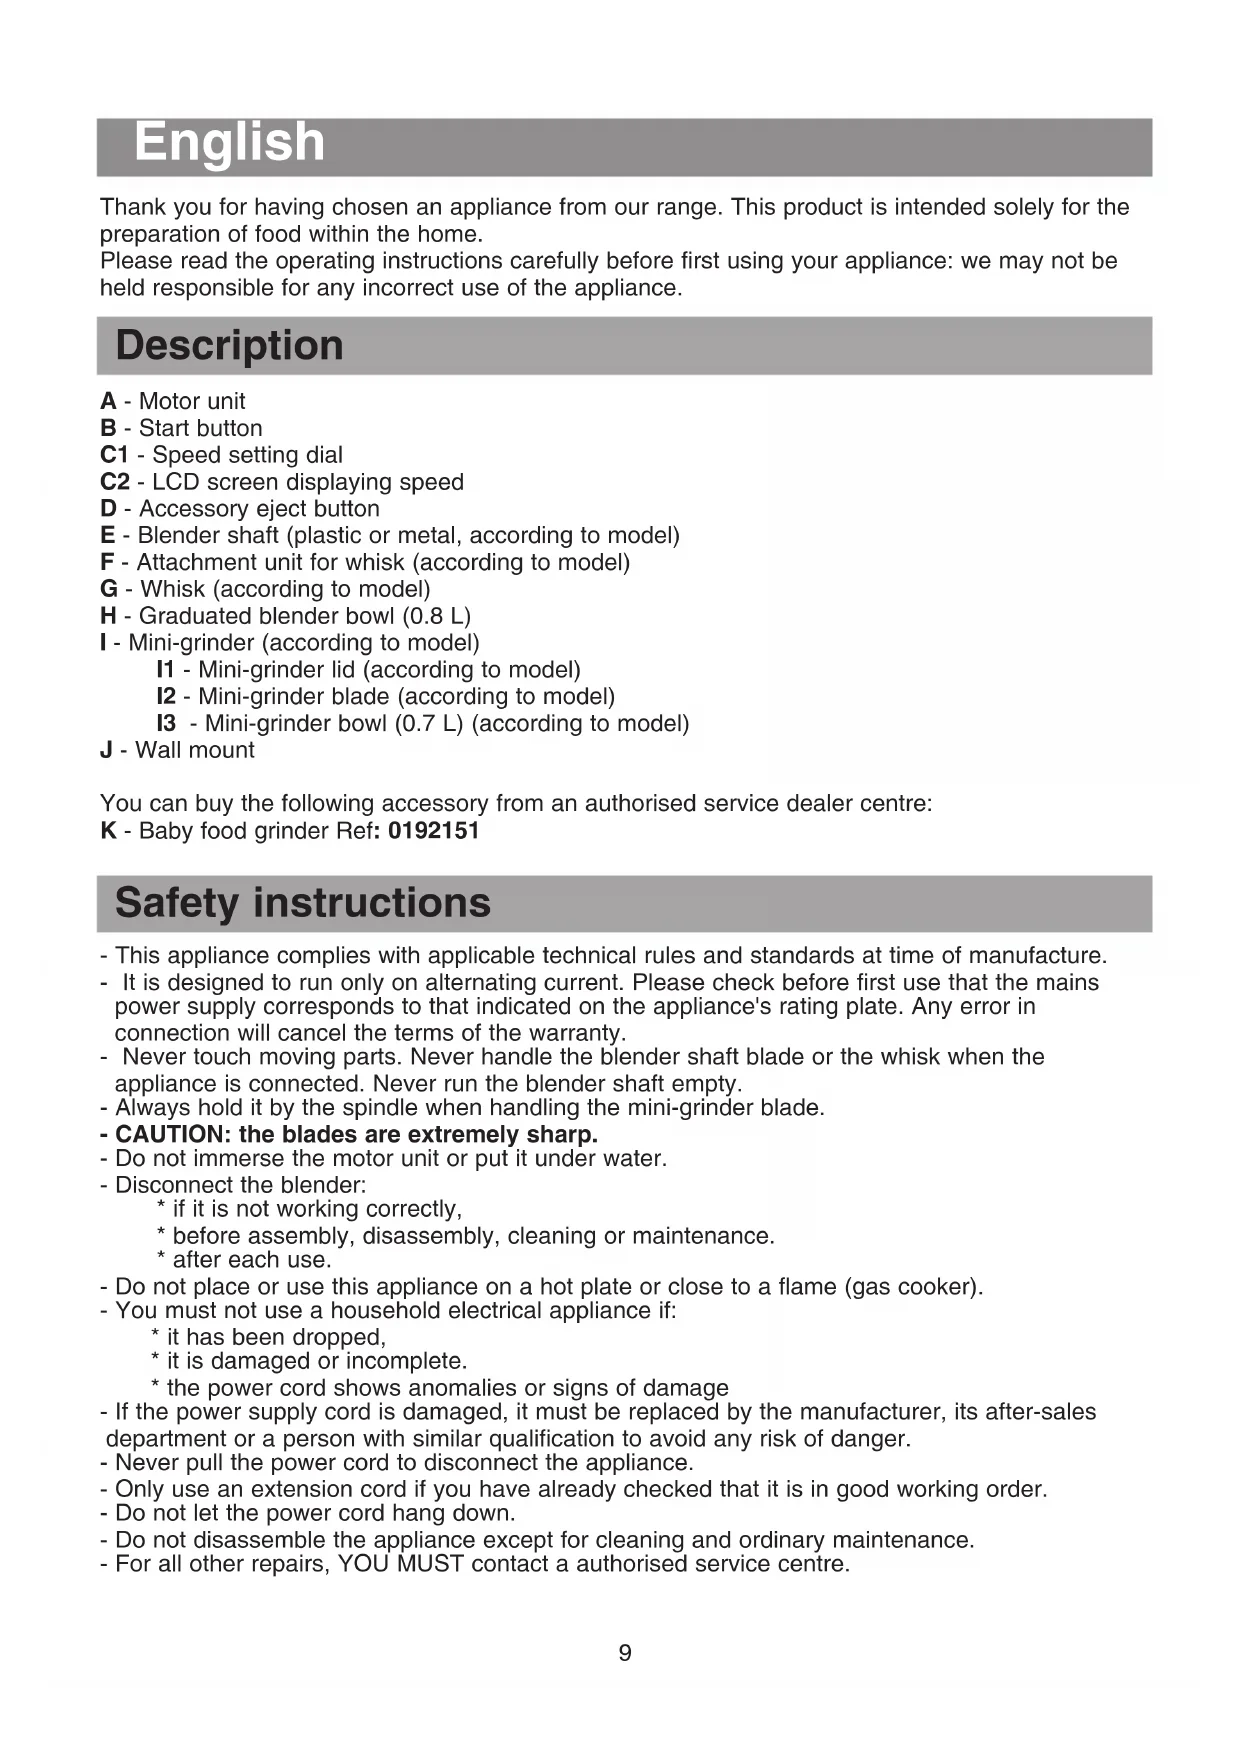
A - Motor unit
B - Start button
C1 - Speed setting dial
C2 - LCD screen displaying speed
D - Accessory eject button
E - Blender shaft (plastic or metal, according to model)
F - Attachment unit for whisk (according to model)
G - Whisk (according to model)
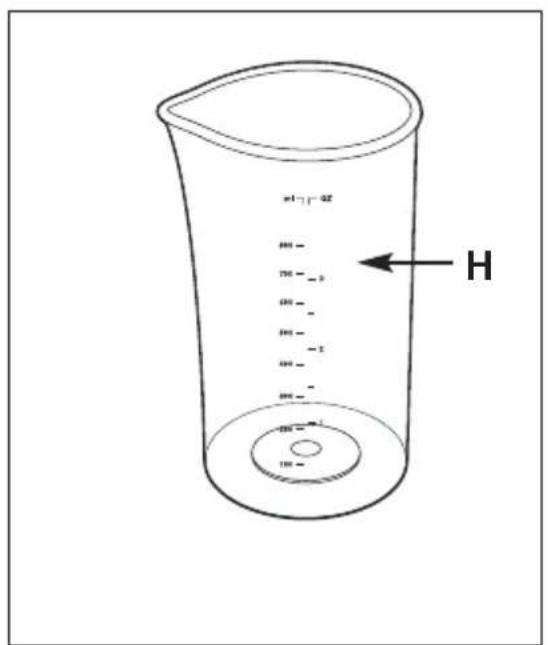
H - Graduated blender bowl (0.8 L)
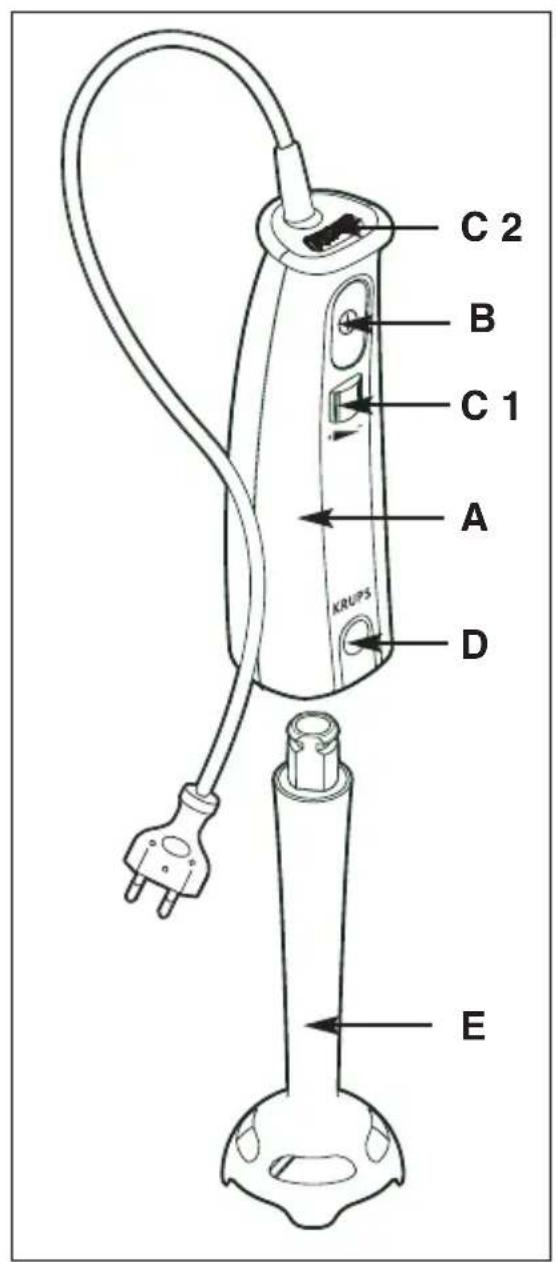
I - Mini-grinder (according to model)
I1 - Mini-grinder lid (according to model)
I2 - Mini-grinder blade (according to model)
I3 - Mini-grinder bowl (0.7 L) (according to model)
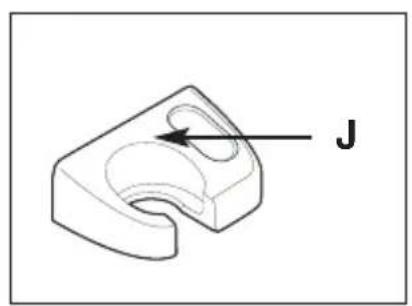
J - Wall mount
You can buy the following accessory from an authorised service dealer centre:
K - Baby food grinder Ref: 0192151
Safety instructions
- This appliance complies with applicable technical rules and standards at time of manufacture.
- It is designed to run only on alternating current. Please check before first use that the mains power supply corresponds to that indicated on the appliance's rating plate. Any error in connection will cancel the terms of the warranty.
- Never touch moving parts. Never handle the blender shaft blade or the whisk when the appliance is connected. Never run the blender shaft empty.
- Always hold it by the spindle when handling the mini-grinder blade.
- CAUTION: the blades are extremely sharp.
- Do not immerse the motor unit or put it under water.
- Disconnect the blender:
* if it is not working correctly,
* before assembly, disassembly, cleaning or maintenance.
* after each use.
- Do not place or use this appliance on a hot plate or close to a flame (gas cooker).
- You must not use a household electrical appliance if:
* it has been dropped,
* it is damaged or incomplete.
* the power cord shows anomalies or signs of damage
- If the power supply cord is damaged, it must be replaced by the manufacturer, its after-sales department or a person with similar qualification to avoid any risk of danger.
- Never pull the power cord to disconnect the appliance.
- Only use an extension cord if you have already checked that it is in good working order.
- Do not let the power cord hang down.
- Do not disassemble the appliance except for cleaning and ordinary maintenance.
- For all other repairs, YOU MUST contact a authorised service centre.
- This product has been designed for domestic use only. Any commercial use, inappropriate use or failure to comply with the instructions, the manufacturer accepts no responsibility and the guarantee will not apply.
- People whose physical, sensorial or mental capacities do not allow them to use the appliance without risk must only use it under assistance or supervision of a responsible adult.
- This appliance is not a toy. Never leave the blender in reach of children without supervision. Do not play with the appliance.
- Do not use the blender shaft or the whisk in the mini-grinder bowl.
User instructions
Before first use, clean your accessories with soapy water. Rinse and dry them carefully.
CAUTION: the blades are extremely sharp
Using the blender shaft:
Insert the shaft (E) onto the motor unit (A) until you hear the “click” that tells you it has locked. Your blender is ideal to prepare sauces, soups, cocktails, milk-shakes, mayonnaises, pancake mixes, waffle mixes and baby food preparations.
To avoid splashing, first plunge the blender shaft into your preparation, connect the appliance and then press the start button (B). Use the dial (C) to set the speed, which will be displayed on LCD screen (C2). Make a rotating and up and down movement to improve even blending of the food.
After use, disconnect the appliance then press the eject button (D) to disassemble the blender shaft accessory.
Using the whisk:
Fit the whisk (G) into the attachment unit (F), then slot the assembly onto the motor unit (A) until you hear the “click” that tells you it has locked. You can use the whisk to make light preparations (pancake mix, whip egg white, whip cream, etc.). Connect the appliance then press the start button (B). Use the dial (C) to set the speed, which will be displayed on LCD screen (C2).
Disconnect the appliance before pressing the eject button (D) to disassemble the whisk accessory.
Using the mini-grinder:
Before using the mini-grinder:
1 – First remove the protector from the blade (I2) then fit it carefully in the bowl (I3) on the central axis. Remember to replace the protector once you have finished your preparation.
2 – Put the food into the bowl.
3 - Fit the lid (I1) and then the motor unit (A) on the lid (I1).
4 – Connect the appliance then press the start button (B). Use the dial (C) to set the speed, which will be displayed on LCD screen (C2).
Use the mini-grinder to chop parsley, condiments, meat (150 g), hazelnuts (125 g), breadcrumbs, baby food, etc. The bowl (I3) should be 2/3 full at most.
natural_image
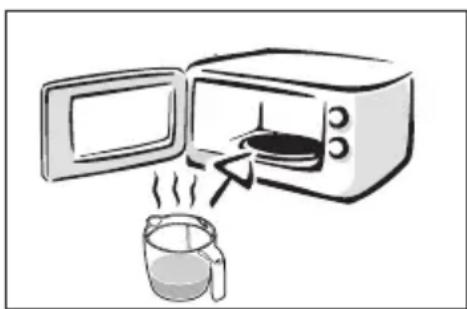
Illustration of a microwave oven with a steaming cup of coffee being poured into it (no text or symbols)Using the microwave oven:
You can use the grinder bowl and the blender bowl to heat up liquid preparations (soups, etc) in the microwave oven on condition that you do not add fat and that the metallic axis of the bowl is covered by the preparation.
Practical hints
- To avoid spillages, when blending or whipping, the bowl should be 2/3 full at most.
- The preparation must at least cover the lower part of the blender shaft for the mix to be successful.
- Remove bone and gristle from meat before putting it in the bowl.
- When blending hot preparations, remove the cooking utensil (eg saucepan) from the heat source.
- Leave hot food to cool for a while before putting them in the bowl.
- Do not blend food and liquids at a temperature higher than 80°C (175°F).
- For fibrous foods (leeks, celery, asparagus, etc.) clean the blender shaft regularly during use while following the safety instructions for disassembly and cleaning.
- For fruit-based preparations, first cut up the fruit and remove pips and stones.
- Do not use the appliance with hard food like coffee beans, ice cubes, sugar, cereals and chocolate.
- Do not use the blender shaft or the whisk in the mini-grinder bowl.
- After using any of the accessories, leave the unit to rest for 60 seconds before making another heavy food preparation.
Recipes
| Mayonnaise: blender shaft, 10 seconds at speed 5 | Put 1 egg yolk, 1 tablespoon mild mustard, 1 tablespoon wine vinegar, salt and pepper into the graduated blender bowl (H) and start to blend then gradually pour in 1/4 litre of oil while making up and down movements. |
| Vegetable soup: blender shaft, 30 seconds at speed 6 | Boil 500 g chopped potatoes, 400 g sliced carrots, 1 sliced keek, salt, pepper in 1.8 litres of water in a large saucepan for 30 mins. Blend together. |
| Pancake mix: whisk, 60 seconds at speed 2 | 200 g flour, pinch of salt, 1/2 litre milk, 40 g melted butter, 3 eggs. |
| Chantilly cream: whisk, 2 minutes at speed 4 | 2 sachets icing sugar, 200 g fresh cream. |
| Mini-grinderProceed by pulses until you obtain the desired result.speed 6 | Almonds (125 g) 15 sRusks (40 g) 10 sParsley (30 g) 5 sCooked ham (150 g) 8 sOnions cut into quarters (200 g) 6 s |
| Baby grinderspeed 6 | Using this accessory, you can grind 45 g of (belly) pork in 3 seconds cut into cubes. |
Cleaning
- CAUTION: the blades are extremely sharp.
- Always disconnect the appliance before cleaning it.
- Do not put the appliance, power supply cord or plug into water or any other liquid.
- Never put the motor unit (A), the attachment unit for the whisk (F) or the mini-grinder lid (I1) in the dishwasher.
- Never immerse these parts in water or put them under the tap. Clean with a moist sponge.
- You can clean the blender shaft (E) (knife facing upwards), whisk (G) (whisk side facing upwards), graduated mixing (H), blade (I2) and the mini-grinder bowl (I1) in the dishwasher.
- We advise you to clean the blender shaft immediately after each use. If the plastic parts become discoloured by food like carrots, rub them with a cloth soaked in cooking oil and then clean as usual.
Storage
Use the wall mount (J) to always have your blender ready to hand.
To secure your wall mount, drill two attachment points horizontal to each other with a gap of 80 mm then place the mount the right way up on the attachment screws.
Electrical or electronic product at end of service life

Environment protection first!
Your appliance contains valuable materials which can be recovered or recycled.
Leave it at a local civic waste collection point.
HELPLINE: if you have any product problems or queries, please contact our Customer Relations Team first for expert help and advice.
0845 602 1454 - UK
(01) 461 0390 - IRELAND
or consult our website - www.krups.co.uk