
VT40X - Guitar amp VOX - Free user manual and instructions
Find the device manual for free VT40X VOX in PDF.
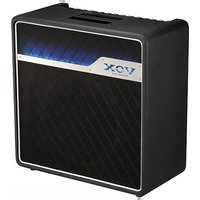
| Product Type | Modeling Guitar Amplifier |
| Brand | VOX |
| Model | VT40X |
| Power Supply | DC 19 V Power Adapter (included) |
| Power Consumption | 3.42 A |
| Output Power | 40 W RMS at 4 ohms |
| Speaker | 10 inches, 5 ohms |
| Number of Amp Models | 11 (up to 20 via Editor/Librarian software) |
| Built-in Effects | PEDAL1 (4 types), PEDAL2 (4 types), REVERB (4 types), noise reduction |
| Memories | 33 preset programs (60 via software) + 8 user |
| Connectors | Input, AUX IN, headphone, USB, Foot Switch |
| Functions | Built-in tuner, adjustable auto power-off, Manual/Preset mode |
| Optional Foot Controller | VOX VFS5 |
| Maintenance | Clean with a dry, clean cloth |
| Safety | Avoid liquids, use only the supplied adapter |
| Repairability | Tubes replaceable by a qualified VOX technician |
| Included Accessories | Power adapter, user manual |
| Amp Class | Switchable A/AB |
| Bias | Adjustable (cold/hot) via BIAS SHIFT knob |
| Compatibility | Editor/Librarian software (Windows/Mac/iOS) |
Frequently Asked Questions - VT40X VOX
User questions about VT40X VOX
0 question about this device. Answer the ones you know or ask your own.
Ask a new question about this device
Download the instructions for your Guitar amp in PDF format for free! Find your manual VT40X - VOX and take your electronic device back in hand. On this page are published all the documents necessary for the use of your device. VT40X by VOX.
USER MANUAL VT40X VOX
Using the unit in the following locations can result in a malfunction.
- In direct sunlight
- Locations of extreme temperature or humidity
- Excessively dusty or dirty locations
- Locations of excessive vibration
- Close to magnetic fields
Power supply
Please connect the designated AC adapter to an AC outlet of the correct voltage. Do not connect it to an AC outlet of voltage other than that for which your unit is intended.
Interference with other electrical devices
Radios and televisions placed nearby may experience reception interference. Operate this unit at a suitable distance from radios and televisions.
Handling
To avoid breakage, do not apply excessive force to the switches or controls.
Care
If the exterior becomes dirty, wipe it with a clean, dry cloth. Do not use liquid cleaners such as benzene or thinner, or cleaning compounds or flammable polishes.
Keep this manual
After reading this manual, please keep it for later reference.
Keeping foreign matter out of your equipment
Never set any container with liquid in it near this equipment. If liquid gets into the equipment, it could cause a breakdown, fire, or electrical shock. Be careful not to let metal objects get into the equipment. If something does slip into the equipment, unplugging the AC adapter from the wall outlet. Then contact your nearest VOX dealer or the store where the equipment was purchased.
Apple, iPad, iPhone, and iPod touch are trademarks of Apple Inc., registered in the U.S. and other countries.
* All product names and company names are the trademarks or registered trademarks of their respective owners.
DECLARATION OF CONFORMITY (for USA)
Responsible Party: KORG USA INC.
Address: 316 SOUTH SERVICE ROAD, MELVILLE, NY
Telephone:1-631-390-6500
Equipment Type :MODELING GUITAR AMPLIFIER Model : VT20X / VT40X
This device complies with Part 15 of FCC Rules.
Operation is subject to the following two conditions: (1) This device may not cause harmful interference, and
(2) this device must accept any interference received, including interference that may cause undesired operation.
THE FCC REGULATION WARNING (for USA)
NOTE: This equipment has been tested and found to comply with the limits for a Class B digital device, pursuant to Part 15 of the FCC Rules. These limits are designed to provide reasonable protection against harmful interference in a residential installation. This equipment generates, uses, and can radiate radio frequency energy and, if not installed and used in accordance with the instructions, may cause harmful interference to radio communications. However, there is no guarantee that interference will not occur in a particular installation. If this equipment does cause harmful interference to radio or television reception, which can be determined by turning the equipment off and on, the user is encouraged to try to correct the interference by one or more of the following measures: Reorient or relocate the receiving antenna.
- Increase the separation between the equipment and receiver.
- Connect the equipment into an outlet on a circuit different from that to which the receiver is connected.
- Consult the dealer or an experienced radio/TV technician for help.
If items such as cables are included with this equipment, you must use those included items.
Unauthorized changes or modification to this system can void the user's authority to operate this equipment.
Notice regarding disposal (EU only)

When this "crossed-out wheeled bin" symbol is displayed on the product, owner's manual, battery, or battery package, it signifies that when you wish to dispose of this product, manual, package or battery you must do so in an

approved manner. Do not discard this product, manual, package or battery along with ordinary household waste. Disposing in the correct manner will prevent harm to human health and
potential damage to the environment. Since the correct method of disposal will depend on the applicable laws and regulations in your locality, please contact your local administrative body for details. If the battery contains heavy metals in excess of the regulated amount, a chemical symbol is displayed below the "crossed-out wheeled bin" symbol on the battery or battery package.
IMPORTANT NOTICE TO CONSUMERS
This product has been manufactured according to strict specifications and voltage requirements that are applicable in the country in which it is intended that this product should be used. If you have purchased this product via the internet, through mail order, and/or via a telephone sale, you must verify that this product is intended to be used in the country in which you reside. WARNING: Use of this product in any country other than that for which it is intended could be dangerous and could invalidate the manufacturer's or distributor's warranty. Please also retain your receipt as proof of purchase otherwise your product may be disqualified from the manufacturer's or distributor's warranty.
About data
The contents of memory can be lost due to an unexpected malfunction caused by incorrect operation or some other reason. Be sure that you have saved important data on PC. Please be aware that Korg will accept no responsibility for any damages which may result from loss of data.
Thank you for purchasing the VOX Valvetronix VT20X/VT40X modeling guitar amplifier. To help you get the most out of your new amplifier, please read this manual carefully.
Table of Contents
Main Features. 3
Setup. 4
Auto power-off function 4 Enabling/disabling the auto power-off function 4
Panel description and functions 4 Top panel. 4 Rear Panel. 7
About the three modes 7 Preset programs mode (recalling a preset program) .7 Manual mode. 7 User program mode (recalling a user program) .8
Saving a program 8
Restoring the factory settings 8
Using the tuner 9
Using the foot switch (VOX VFS5) 9 Operations in user program mode. 9 Foot switch operations in Preset or Manual modes.. 10
Connecting to a computer via USB 10
About the amp models and effect types 10
Amp models. 10
PEDAL1 effects 11
PEDAL2 effects 12
REVERB effects 12
Noise reduction 12
Specifications 13
Song preset programs. 65
Main Features
- The multi-stage tube amplifier circuit in the pre-amp allows the VT20X/VT40X to reproduce the unique distortion, touch sensitivity, and the response that is characteristic of classic tube amps.
- The revamped algorithm recreates analog circuits and allows users to adjust parameters such as the gain and bias (operating point) of the tube in real time, resulting in an authentic amplifier experience.
- When using certain models, the amp can be switched between Class A and Class AB operation and, by altering the impedance variation of the speaker, it can reproduce a sound unique to a tube power amplifier.
- Manage programs and customize amps and effects by using the included Editor/Librarian software that is compatible with Windows, Mac or iOS.
- The power level control lets you adjust the output wattage of the power amp.
- Sophisticated modeling technology is used to provide numerous amp models and high-quality effects.
- You can simultaneously use up to four effects including noise reduction.
- Create your custom sound using the desired amp and effect combination, then easily save it as one of eight programs (two banks × four channels). Saved programs can easily be switched from the top panel or with an optional foot switch (sold separately).
- For each amp model, three preset programs with preset songs are provided to reproduce the tones of classic hits played by famous guitarists.
- Manual mode lets you use the VT20X/VT40X as a conventional guitar amp. The physical positions of the actual knobs will be reflected in the sound.
- The built-in tuner allows for easy tuning of your guitar.
- The AUX IN jack allows you to connect an external audio player, allowing you to play guitar along with recorded music.
Setup
- Turn the POWER LEVEL knob (p. 5) on the amp all the way down.
- Connect the included AC adapter to the DC12V jack (p. 7) (DC19V jack on the VT40X), and then plug the AC adapter into an AC outlet.
Only use the specified AC adapter. Using any other AC adapter may cause malfunctions.
- Plug the cable that's connected to your guitar into the INPUT jack. If an audio player will be used, connect it to the AUX IN jack.
- Hold down the power button until the LED on the top panel lights up and the amp is turned on.
Tip To turn off the amp, hold down the power button until the LED turns off.
- Slowly raise the POWER LEVEL knob (p. 5) to adjust the volume.
The tubes may produce a noise until they have warmed up. This is not a malfunction.
Auto power-off function
The amp has an auto power-off function. With this function, the amp is automatically turned off if there is no operation or input for approximately 1 hour. When the amp is turned off, it is not turned back on, even if a knob or selector is operated. After the amp is turned off, turn it on again.
When the input level is extremely low or there is very little change in the sound, the auto power-off function may be activated. In addition, depending on the settings and environment, the amp may interpret noise as input, even if the guitar is not being played.
The auto power-off function will not operate while the amp is connected using a USB cable.
Tip As the factory default setting, the auto power-off function is enabled.
Enabling/disabling the auto power-off function
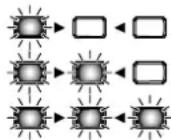
- While holding down the PEDAL2 button (p. 6), turn on the amp. The illumination of the effect selection buttons (PEDAL1, PEDAL2 and REVERB) (p. 6) show the current setting.

This illustration shows the VT40X.
- Press the PEDAL2 button to switch between enabling and disabling the function.
- Wait without performing any operation for a few seconds. The setting is applied, and the amp automatically returns to normal operation.
Panel description and functions
Top panel
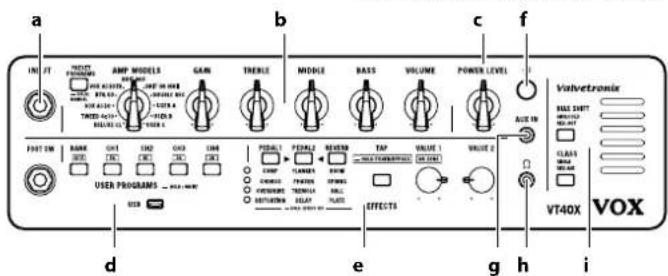
INPUT
a. INPUT jack
This is where you plug in your guitar.

b. Amp section
PRESET PROGRAMS button
This switches between the preset programs mode and manual mode.
Press the PRESET PROGRAMS button once to enter the preset programs mode. Each press of the button switches the setting in the following order: preset A (green), preset B (yellow-green), preset C (red).
Hold down the PRESET PROGRAMS button for at least one second to switch to manual mode ("About the three modes" on page 7).
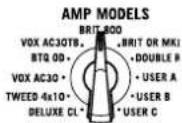
AMP MODELS knob
This selects the amp model.
The characteristics and location of the gain and tone controls in the circuit will change according to the amp model that is selected. Additionally, the parameters in the valve section and noise reduction are switched to the standard settings
for each amp model. In preset programs mode, this knob is used to recall a preset program.
Tip At USER A, USER B and USER C, an amp model customized by using Editor/Librarian software can be stored.
GAIN knob
This adjusts the pre-amp gain of the selected amp model. This setting will change the amount of the pre-amp's distortion.
TREBLE, MIDDLE and BASS knobs
These adjust the high, mid, and low-frequency ranges. The changes that are produced differ depending on the selected amp model.
Tip The Editor/Librarian software, can be used to make more detailed adjustments to the tone.


TREBLE

MIDDLE

BASS

VOLUME knob
This adjusts the level of volume that is output from the pre-amp to the power amp. This setting will alter the amount of power amp distortion.
The amount of power amp distortion is also affected by the GAIN knob. On some settings, there will be almost no distortion.
c. POWER LEVEL knob
This adjusts the output level of the power amp while maintaining the level of power amp distortion.
The POWER LEVEL setting is not saved with the programs.
Tip This also adjusts the output level from the headphones jack (p. 6) when headphones are plugged into the jack. However, the input from the AUX IN jack (p. 6) is not affected.
d. USER PROGRAMS section
FOOT SW jack
You can connect an optional VOX VFS5 foot switch here. For more information on using the foot switch, refer to "Using the foot switch (VOX VFS5)" on page 9.
You must connect or disconnect the VFS5 when the power is off. Malfunctions or damage may occur if you connect or disconnect the foot switch while the power is on.
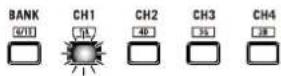
BANK button and channel buttons (CH1, CH2, CH3 and CH4)
Use the BANK button to select a channel bank, and then press a channel
button to select a channel (program) within the bank ("About the three modes" on page 7). These buttons are also used to save new programs ("Saving a program" on page 8).
When the tuner function is engaged, these buttons will display the tuning status ("Using the tuner" on page 9).
VOLUME

POWER LEVEL

FOOT SW

CH3

HOLD:WHOLE
CH4
[
USB port
Use this port and a commercially available USB cable to connect your amplifier to a computer, etc.


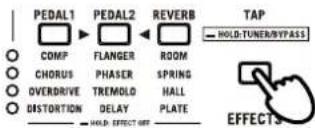
e.EFFECTS section
Effect selection buttons (PEDAL1, PEDAL2 and REVERB) Effect type LEDs
Use these buttons to adjust the effects and choose an effect type. The selected button will begin blinking to indicate that it has been chosen to be edited. Use the TAP button and VALUE 1 and VALUE 2 knobs to adjust the selected effect. Press any effect selection button while it is blinking to select an effect type.
Effect selection buttons PEDAL1 PEDAL2 REVERB COMP FLANGER ROOM CHORUS PHASER SPRING OVERDRIVE TREMOLO HALL DISTORTION DELAY PLATE HOLL EFFECT UP Effect type LEDs
An effect type LED will illuminate to indicate your selection. Hold down an effect selection button to turn it off and turn off the effects.
When the tuner function is engaged the effect selection buttons will display the tuning status ("Using the tuner" on page 9).
Tip The buttons for effects not being used will turn off.
Tip More detailed adjustments can be made to effects by using Editor/ Librarian software.
TAP button
This sets the modulation speed and delay time for effects. The interval between two presses of the TAP button will be set as the speed/time. The TAP button will blink according to the specified speed/time.


Tip To set a precise speed/time that matches the tempo of a song, press the TAP button several times along with the beat of the song. Hold down the TAP button for at least one second to bypass all effects and engage tuner function ("Using the tuner" on page 9).
VALUE 1 and VALUE 2 knobs
These adjust the parameters of the effects. When the tuner function is engaged, the VALUE 1 knob adjusts the noise reduction.
VALUE 1
VALUE 2
The available parameters differ depending on the effect ("About the amp models and effect types" on page 10).
Tip Using Editor/Librarian software, more detailed adjustments can be made to the tone.
f. Power button
Hold down this button to turn the VT20X/VT40X on or off.

g. AUX IN jack
Connect the analog output of an audio device to this jack. You can connect an audio player to this jack, then play along on your guitar while listening to your favorite songs.
AUX IN

Adjust the volume for the headphones jack with the connected device.
h. Headphones jack
Use this jack if you want to output directly to a mixer or recording device, or when you want to use headphones. The signal that is output from this jack is taken from directly before
8

the power amp, and the cabinet response of the guitar amp is applied to it.
When a device is connected to this jack, no sound will be output from the internal speaker.
A Be sure to connect a stereo plug to this jack.
i. Tubes/Valves section
Tip When the amp model is changed, the parameters in the valve section are returned to the standard settings for each amp.
BIAS SHIFT button
This adjusts the bias for the tubes. When the operating point of the tube is changed the character of the distortion will change. Each press of the BIAS SHIFT button switches it in the following order: off -> green -> red.
BIAS SHIFT
GRIK

Off: This mode uses the standard bias voltage, Operating the amplifier at its nominal function.
Green (COLD): This mode uses a lower bias voltage. Each note can be clearly heard, and unique sustain can be achieved.
Red (HOT): This mode uses a higher bias voltage. It can add more dynamics to an overdriven sound.
CLASS button
This changes the operation of the power amp section. Each press of the CLASS button switches it in the following order: green > red.

Green (A): Operates in Class A and produces a straightforward and intuitive response.
Red (AB): Operates in Class AB and produces unique tonal nuances through compression and crossover distortion.
The Class A/AB setting does not affect the output from the headphones jack.
Tubes/Valves
The tubes may break if they are exposed to an impact. If a tube breaks, please seek repairs.
Rear Panel
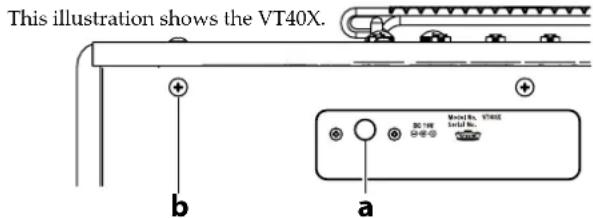
a. DC12V (VT20X) jack, DC19V (VT40X) jack
Connect the included AC adapter here.
The AC adapter is designed specifically for the VT20X / VT40X. Do not use any other adapter, otherwise a malfunction may occur.
b. Grounding Screw
Use this screw to ground the unit. To do so, loosen the screw and attach a grounding wire.
Tip Depending on how the unit is connected to other devices, you may feel a slight electrical stimulation if a soft part of your skin touches a connected guitar or a metal part of the unit. This is caused by a very weak current that is harmless to humans. If this bothers you, use this grounding screw to ground the unit to an external earth.
About the three modes
Preset programs mode (recalling a preset program)
In preset programs mode, preset programs can be recalled with the AMP MODELS knob. When this is selected, the various settings, for example, for GAIN, TREBLE, MIDDLE, BASS, VOLUME and the effect, will be automatically switched. Refer to the table at the end for the list of songs programmed for each amp model.
Switching to preset programs mode
Press the PRESET PROGRAMS button once to enter preset programs mode; the button will illuminate.
Recalling a preset program
While the PRESET PROGRAMS button is lit, turn the AMP MODELS knob. Regardless of the positions of the knobs on the top panel, the preset program set up for the selected amp model will be recalled. In the preset programs mode, each press of the PRESET PROGRAMS button switches the preset program in the following order: A, B, C. The button lights up in green, yellow-green, red.
Manual mode
When the VT20X/VT40X is in Manual mode, it will behave like a conventional guitar amp. In this mode, the setting positions of all selectors and knobs in the amp section are simply applied to the sound.
Switching to manual mode
Hold down the PRESET PROGRAMS button for at least one second to switch to manual mode; the PRESET PROGRAMS, BANK and channel buttons turn off.
When in manual mode, if a parameter (effect, noise reduction, valve section setting, etc.) not set by a knob is changed, that setting is automatically saved. That setting will be recalled the next time that the manual mode is entered.
User program mode (recalling a user program)
In user program mode, the program saved in the channel of the bank, which can be selected by pressing the BANK and channel buttons, is recalled, and all amp and effect parameters are automatically switched to the saved settings.
Switching to user program mode
Press the BANK button or a channel button to enter user program mode; the BANK and channel buttons light up.
Recalling a user program
Press a channel button to switch the channel, and the program saved in the channel is recalled. Press the BANK button to switch the bank, and the channel with the same number as that selected in the previous bank is recalled.
Tip If an optional (VOX VFS5) foot switch (sold separately) is connected and being used, you can use your foot to switch the bank and channel. For details, refer to "Using the foot switch (VOX VFS5)" on page 9.
Saving a program
After adjusting the various knobs and buttons on the top panel to create your desired sound, it can be saved (written) as a user program.
Tip When saving programs to channels within the same bank, start the procedure from step 3.
-
Hold down the BANK button for at least 0.5 second. The BANK button blinks.
-
Press the BANK button to select the bank where the program will be saved. Tip To cancel the write operation, press the TAP button.
- Hold down the channel button of the save location for at least 2 seconds (until the button changes from blinking to lit). The program is saved to the channel, and the bank and channel for the save location are selected.
Any program previously saved at that location is overwritten. In other words, the program previously saved at the location selected in step 3 is erased.
The bypass setting of the effect and the POWER LEVEL setting are not saved with the program.
If, while creating a sound in the preset programs mode or the user program mode, you switch to another program or to manual mode or turn off the amp before saving the sound that you are creating, the changes that you made will be lost.
Restoring the factory settings
Here's how to restore all settings of the VT20X/VT40X to their factory-set state.
When this operation is done, all programs saved to channels as well as all settings, such as custom amp settings stored from the Editor/Librarian software, will be reset to the factory defaults.
1. Turn off the power.
2. While holding down the CH1 and CH4 buttons, turn on the amp. After the BANK and channel buttons blink, release the pressed buttons. Tip If you decide to cancel initialization at this point, press the TAP button.
3. Hold down the BANK button for at least 2 seconds (until the button changes from blinking to lit). After the BANK and channel buttons change from blinking to lit, initialization begins. Initialization is completed after about 1 to 2 seconds, and the amp enters the preset programs mode.
Never turn off the power while initialization is in progress.
Using the tuner
The tuner function allows you to easily tune a guitar that's connected to the INPUT jack.
- Hold down the TAP button for at least 1 second. All effects, except noise reduction, are bypassed, and the tuning function is turned on.
- Play any open string on the guitar.
Be careful not to play any of the other strings.
- Roughly tune the string until the button (BANK and channel buttons) indicating the string that was played lights up.
- While checking the effect selection buttons, correctly tune the guitar.
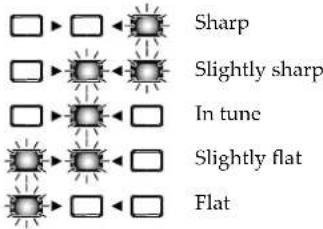
- Press the TAP button to turn off the tuner function and cancel bypass.
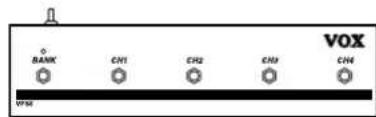
Using the foot switch (VOX VFS5)
If an optional VOX VFS5 foot switch (sold separately) is connected to the FOOT SW jack on the amp, you can use your foot to switch the bank and
You must connect or disconnect the foot switch while the power is off. Malfunctions or damage may occur if you connect or disconnect the foot switch while the power is on.
Do not press two or more foot switches simultaneously. Doing so may cause malfunctions.
Operations in user program mode Switching the bank and channel (BANK and CH1 to CH4 switches)
Press a switch on the VFS5 to change the bank or channel.
If you press a VFS5 switch in preset programs mode or manual mode, the amp will not switch to user program mode. In addition, a program cannot be saved by holding down a channel (CH1 to CH4) switch on the VFS5.
Use of the top panel will not be reflected by the VFS5's LEDs.
Tap to set the speed/time (CH1 to CH4 switches) Press the switch with the same number as the selected channel to set the speed and time for the PEDAL2 effect. The interval between two presses of the switch will be set as the speed and time.
Specifying the VFS5 operation
Hold down the switch with the same number as the selected channel for at least 3 seconds to perform the same operation as in preset programs mode or manual mode; the effect selection buttons blink briefly. To return to the previous operation, hold down the CH3 switch for at least 3 seconds. (The BANK and channel buttons blink briefly.)
Foot switch operations in Preset or Manual modes Tap to set the speed/time (CH3 switch)
Press the CH3 switch on the VFS5 to set the speed and time for the PEDAL2 effect. The interval between two presses of the switch will be set as the speed and time.
Effect on/off (CH1, 2, 4 switches)
Press the CH1, CH2 or CH4 switch on the VFS5 to switch on/off the corresponding PEDAL1, PEDAL2 or REVERB effect.
Connecting to a computer via USB
By connecting the amp to a computer using a commercially available USB cable, the Editor/Librarian software on the computer can be used to manage programs and customize amps/effects. The VT20X/VT40X can also be connected to an iOS device (iPad or iPhone) by using the Apple USB camera adapter.
Tip Install a USB-MIDI driver in order to use the Editor/Librarian software on the computer. Download the newest versions of the drivers and software from the VOX website (www.voxamps.com).
Tip For details on using the Editor/Librarian software, refer to the documentation included with the software.
About the amp models and effect types
This section provides details on the amp models, the various types of PEDAL1, PEDAL2 and REVERB effects as well as noise reduction.
Unnatural distortion may occur, depending on the amplifier and effector settings. If this occurs, adjust the amp and effect parameters.
If a parameter not available on the top panel is changed in the Editor/Librarian software, the tone may become quite different from the original amp model or effect type.
Amp models
Tip Using the Editor/Librarian software, you can select more amp models than those listed below, and you can store your favorite amp models at USER A, USER B and USER C.
Tip In the factory default setting, BOUTIQUECL, BRIT 1959 and BOUTIQUE METAL are stored at USER A, USER B and USER C, respectively.
1. DELUXE CL
This dual channel, 22W blackface 60's design used 6V6 power tubes and a tube-driven spring reverb to produce a big sound at a lower wattage. Our modeling is based on the Vibrato channel of this amp.
2. TWEEED 4x10
This models a 4 × 10^ combo amp from 1959 that was originally designed for bass guitar. Its smooth and crisp overdrive sound will respond sensitively to your picking dynamics and to the volume of your guitar.
3. VOX AC30
This models the Normal channel of the AC30. The clear high range of the Celestion alnico "Blue" speaker, as well as the rich midrange, deliver a captivating clean sound.
4. BOUTIQUE OD (BTQ OD)
This models the overdrive channel of a high-quality amp that was known as the Overdrive Special, which was produced only by special order. The wonderful sustain obtained by raising the GAIN control is smooth and soulful.
5.VOX AC30TB
This models an AC30 amp with the "top boost" circuit of the 1964 AC30. It delivers a smooth and refined top end, a majestically deep overdrive, and a rich, brilliant clean sound.
6. BRIT 800
This models a British 100W single-channel head with master volume that was made in 1983. Turn the GAIN control all the way up to get the thick, snarling hard rock and heavy metal sound that dominated the 80's.
7. BRIT OR MKII
This is based on a distinctly colored British 100W head that features two channels and a tube driven spring reverb. This amp model delivers everything from characteristic British crunch, perfect for classic rock and blues, to modern, high-gain sounds, ideal for hard rock and metal.
8. DOUBLE REC
This models the modern high-gain channel from a wild beast of an amp. Its deep and loose low-end, sparkling highs, and monstrous gain are ideal for guitars tuned as low as possible, or for metal acts wielding seven-string guitars.
9. USER A [BOUTIQUE CL]
This models the clean channel of a high-quality amp that was produced only on special order, and was known as the overdrive special. With a beautifully rounded low range, a sharp midrange attack, and a sweet treble register, this is ideal for single coil pickups.
10. USER B [BRIT 1959]
This models the high treble channel of a classic hand-wired head made in England during the early 60's. Raising the volume of this 100W amp all the way produces the signature crunch that will forever be the sound of rock'n'roll.
11. USER C [BOUTIQUE METAL]
This models the crushing high-gain sound that emanated from a German-made 100W four-channel amp head. We chose the "Heavy" channel, which delivers a startling tightness when played with a dropped-D metal tuning.
PEDAL1 effects
1.COMP
This models a compressor that produces a clean, percussive and mellow sustain.
| Knob Parameter Effect | ||
| VALUE 1 SENS | Adjusts the sensitivity. Turn the knob toward the right to increase the compression and sustain. | |
| VALUE 2 LEVEL Adjusts the output level. | ||
2. CHORUS
This models a classic lush analog chorus unit.
| Button/Knob Parameter Effect |
| TAP SPEED Adjusts the modulation speed. |
| VALUE 1 SPEED Adjusts the modulation speed. |
| VALUE 2 DEPTH Adjusts the modulation depth. |
3. OVERDRIVE
This models a well-known overdrive pedal in a green box; the remarkable warmth of its sound has made it a timeless effect.
| Knob Parameter Effect | |
| VALUE 1 GAIN Adjusts the distortion (boost) volume. | |
| VALUE 2 TONE Adjusts the tone. | |
4. DISTORTION
This is a classic Japanese-made distortion unit in an orange box.
| Knob Parameter Effect | |
| VALUE 1 GAIN Adjusts the distortion (boost) volume. | |
| VALUE 2 TONE Adjusts the tone. | |
PEDAL2 effects
1. FLANGER
This models a truly classic analog flanger that's associated with a great guitarist of today who is honored by many as "the godfather of two-handed tapping."
| Button/Knob Parameter Effect |
| TAP SPEED Adjusts the modulation speed. |
| VALUE 1 SPEED Adjusts the modulation speed. |
| VALUE 2 DEPTH Adjusts the modulation depth. |
2. PHASER
This models a popular analog phaser in an orange box.
| Button/Knob | Parameter Effect | |
| TAP SPEED Adjusts the modulation speed. | ||
| VALUE 1 SPEED Adjusts the modulation speed. | ||
| VALUE 2 RESONANCE Adjusts the amount of resonance. | ||
3. TREMOLO
This models the acclaimed tremolo circuit built into a classic American amp.
| Button/Knob Parameter Effect |
| TAP SPEED Adjusts the modulation speed. |
| VALUE 1 SPEED Adjusts the modulation speed. |
| VALUE 2 DEPTH Adjusts the tremolo depth. |
4. DELAY
This models an acclaimed analog tape echo. Originally, echo was created by a tape head, and the delay time was specified by changing the speed of the motor.
| Button/Knob Parameter Effect |
| TAP TIME Adjusts the delay time. |
| VALUE 1 LEVEL Adjusts the mix amount of the delay sound. |
| VALUE 2 FEEDBACK Adjusts the amount of feedback. |
REVERB effects
Adjust the mix amount of the reverb sound with the VALUE 1 knob and the reverb duration with the VALUE 2 knob.
1. ROOM
This reverb type simulates a typical room that contains numerous early reflections.
2. SPRING
This simulates the spring reverb that's built into many guitar amps.
3. HALL
This models the reverberation and echo of a large concert hall.
4. PLATE
This models a classic plate reverb unit usually found in recording studios.
Noise reduction
This applies a noise-reducing effect.
As with amps and effects, noise reduction must be set for each program. If, while changing settings in the preset programs mode or the user program mode, you switch to another program or to manual mode or turn off the amp before saving the settings, the changes that you made will be lost.
When the amp model is changed, the noise reduction setting is returned to the standard setting for each amp.
- Hold down the TAP button to bypass the effects (the tuner function is turned on).
- Turn the VALUE 1 knob to adjust the sensitivity of noise reduction. Turn the knob to the right to increase the noise-reducing effect. When this knob is fully turned to the left, noise reduction is turned off.
Depending on your guitar, increasing the sensitivity of noise reduction too much may cause interruptions in the sound.
- Press the TAP button to cancel bypass.
Global noise reduction setting
The noise level changes depending on the guitar being used, the power supply and other external factors. When the operating environment is changed, overall adjustments can be made while maintaining the different sensitivities specified for each program.
This setting does not affect programs in which noise reduction has been turned off.
1. While holding down the TAP button, turn on the amp.
The illumination of the effect selection buttons shows the current setting.
- Press the TAP button or turn the VALUE 1 knob to change the setting.
- Wait without performing any operation for a few seconds. The setting is applied, and the amp automatically returns to normal operation.
Specifications
Number of amp models: 11 (20 when using Editor/Librarian software)
Number of effects
PEDAL1 types: 4
PEDAL2 types: 4
Reverb type: 4
Noise reduction: 1
Low

Medium
Number of programs
Preset: Number of amp models: 33 (60 when using
Editor/Librarian software)
User: 8 (two banks x four channels)
Input/output jacks: INPUT jack, AUX IN jack, Headphones
jack, FOOT SW jack, USB (Type B) port
Power amp output
VT20X: Maximum approx. 20 W RMS @ 5 ohms
VT40X: Maximum approx. 40 W RMS @ 5 ohms
Speaker
VT20X:8"5ohms
VT40X:10"5ohms
Signal processing
A/D conversion: 24-bit
D/A conversion: 24-bit
Power supply
VT20X: AC adapter jack (DC 12V)
VT40X: AC adapter jack (DC 19V)
Current consumption
VT20X: 2.50A
VT40X: 3.42A
Dimensions (W× D× H)
VT20X: 410 × 225 × 347 ~mm / 16.14 × 8.86 × 13.66 inches
VT40X: 462 × 225 × 404 ~mm / 18.19 × 8.86 × 15.91 inches
Weight
VT20X: 7.3kg / 16.09 lbs
VT40X: 9.5kg / 20.94 lbs
Included items: AC adapter, owner's manual
Options (sold separately): VOX VFS5 foot switch
- Specifications and appearance are subject to change without notice for improvement.
Precautions
Emplacement

USER PROGRAMS HOLD:WHITE
prise FOOT SW, port USB (Type B)
Conversion A/N: 24 bits
Conversion N/A: 24 bits
Alimentation
VT20X:
Dimensions (L x P x H)
VT20X: 410 × 225 × 347 ~mm
VT40X: 462× 225× 404mm
Poids
VT20X:7.3kg
VT40X:9.5kg
Accessoires fournis:
Song preset programs

- Power supply
- Interference with other electrical devices
- Handling
- Care
- Keep this manual
- Keeping foreign matter out of your equipment
- DECLARATION OF CONFORMITY (for USA)
- THE FCC REGULATION WARNING (for USA)
- Notice regarding disposal (EU only)
- IMPORTANT NOTICE TO CONSUMERS
- About data
- Table of Contents
- Main Features
- Setup
- Auto power-off function
- Enabling/disabling the auto power-off function
- Panel description and functions
- a. INPUT jack
- b. Amp section
- PRESET PROGRAMS button
- AMP MODELS knob
- GAIN knob
- TREBLE, MIDDLE and BASS knobs
- TREBLE
- MIDDLE
- BASS
- VOLUME knob
- c. POWER LEVEL knob
- d. USER PROGRAMS section
- FOOT SW jack
- BANK button and channel buttons (CH1, CH2, CH3 and CH4)
- VOLUME
- POWER LEVEL
- FOOT SW
- CH3
- HOLD:WHOLE
- CH4
- [
- USB port
- e.EFFECTS section
- Effect selection buttons (PEDAL1, PEDAL2 and REVERB) Effect type LEDs
- TAP button
- VALUE 1 and VALUE 2 knobs
- f. Power button
- g. AUX IN jack
- h. Headphones jack
- i. Tubes/Valves section
- BIAS SHIFT button
- CLASS button
- Tubes/Valves
- Rear Panel
- a. DC12V (VT20X) jack, DC19V (VT40X) jack
- b. Grounding Screw
- About the three modes
- Preset programs mode (recalling a preset program)
- Switching to preset programs mode
- Recalling a preset program
- Manual mode
- Switching to manual mode
- User program mode (recalling a user program)
- Switching to user program mode
- Recalling a user program
- Saving a program
- Restoring the factory settings
- Using the tuner
- Using the foot switch (VOX VFS5)
- Operations in user program mode Switching the bank and channel (BANK and CH1 to CH4 switches)
- Specifying the VFS5 operation
- Foot switch operations in Preset or Manual modes Tap to set the speed/time (CH3 switch)
- Effect on/off (CH1, 2, 4 switches)
- Connecting to a computer via USB
- About the amp models and effect types
- Amp models
- DELUXE CL
- TWEEED 4x10
- VOX AC30
- BOUTIQUE OD (BTQ OD)
- 5.VOX AC30TB
- BRIT 800
- BRIT OR MKII
- DOUBLE REC
- USER A [BOUTIQUE CL]
- USER B [BRIT 1959]
- USER C [BOUTIQUE METAL]
- PEDAL1 effects
- 1.COMP
- CHORUS
- OVERDRIVE
- DISTORTION
- PEDAL2 effects
- FLANGER
- PHASER
- TREMOLO
- DELAY
- REVERB effects
- ROOM
- SPRING
- HALL
- PLATE
- Noise reduction
- Global noise reduction setting
- Specifications
- Precautions
- Emplacement
- Song preset programs
Brand : VOX
Model : VT40X
Category : Guitar amp