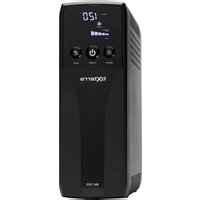
BM550LCD - Uninterruptible power supply Bxterra - Free user manual and instructions
Find the device manual for free BM550LCD Bxterra in PDF.
User questions about BM550LCD Bxterra
0 question about this device. Answer the ones you know or ask your own.
Ask a new question about this device
Download the instructions for your Uninterruptible power supply in PDF format for free! Find your manual BM550LCD - Bxterra and take your electronic device back in hand. On this page are published all the documents necessary for the use of your device. BM550LCD by Bxterra.
USER MANUAL BM550LCD Bxterra
This bXterra product is constructed to provide unmatched power protection, quality and performance for the duration of its lifetime. Please take a few minutes to register your new product at www.bXterra.com/registration. Registration certifies your product's warranty, confirms your ownership in the event of a product loss or theft and entitles you to free technical support. Please register your product now to receive the benefits of bXterra ownership.
SAFETY INSTRUCTIONS
SAVE THESE INSTRUCTIONS: This manual contains important instructions that should be followed during installation and maintenance of the UPS and its batteries.
- This unit is intended for installation in a controlled environment (a temperature-controlled and indoor area free of conductive contaminants). Please avoid installing the UPS in locations where there is standing or running water, dust, direct sunlight or excessive humidity.
- This UPS utilizes voltage that may be hazardous. Do not attempt to disassemble the unit. Only factory service personnel may perform repairs.
- Connect your UPS directly to a properly-grounded AC power outlet with fuse or circuit breaker protection. Do not plug the unit into an outlet that is not grounded. Turn off and unplug the unit if you need to de-energize it.
- Not for use in a computer room as defined in the Standard for the Protection of Electronic Computer/Data Processing Equipment, ANSI/NFPA 75.
- To reduce the risk of fire, connect only to a circuit provided with 20 amperes maximum branch circuit over current protection in accordance with the National Electric Code, ANSI/NFPA 70.
- For best performance, keep the indoor temperature around the unit between 32^ F and 104^ (0^ and 40^)
- Do not attach medical equipment or non-computer related items, such as life-support equipment, microwave ovens, or vacuum cleaners to the UPS. bXterra does not sell equipment meant for life-support or medical applications. Visit our website for more information about devices appropriate to plug into this UPS.
- Only stand or set up the UPS in the direction specified in the Installation and Operation section of this manual. Do not block fans and leave adequate space around all sides of the UPS for proper ventilation. Do not expose the unit to direct sunlight and do not install the unit near heat-emitting appliances such as a space heater or furnace. This could negatively impact the unit's internal cooling system and cause product
damage not covered under warranty.
- Do not plug the UPS input into its own output. Do not attach a power strip or surge protector to the UPS.
- Do not modify the UPS's plug and do not use an adapter that would eliminate the UPS's ground connection.
- Do not use extension cords to connect the UPS to an AC outlet.
- If the UPS receives power from a motor-powered AC generator, the generator must provide clean, filtered, computer-grade output. Consult your generator's manual to see if it meets these specifications.
- The main power outlet that supplies the UPS should be easily accessible and near the UPS.
- To reduce the risk of fire or electric shock, do not use the unit on any transportation such as airplanes or ships. The effect of shock or vibration caused during transit and the damp environment can cause the unit to short out.
BATTERYWARNINGS:
Servicing of batteries should be performed or supervised by personnel knowledgeable about batteries and the required precautions. When replacing batteries, replace with the same type and number of batteries or battery packs. CAUTION: Do not dispose of batteries in a fire. The batteries may explode.
CAUTION: Do not open or mutilate batteries. Released electrolytes are harmful to the skin and eyes. It may be toxic.
CAUTION: A battery can present a risk of electrical shock and high short-circuit current. Contact with any part of a grounded battery can result in electrical shock.
The following precautions should be observed when working on batteries:
a) Remove watches, rings or other metal objects
b) Use tools with insulated handles
c) Wear rubber gloves and boots
d) Do not lay tools or metal parts on top of batteries
SAFETY INSTRUCTIONS CONTINUED
e) Disconnect charging source and load prior to installing or maintaining the battery
f) Remove battery grounds during installation and maintenance to reduce likelihood of shock. Remove the connection from ground if any part of the battery is determined to be grounded.
CAUTION: RISK OF EXPLOSION IF BATTERY IS REPLACED BY AN INCORRECT TYPE.
Please recycle your batteries. Refer to local regulations for disposal requirements or if you are in the USA please call 1-877-723-
1297 or visit www.call2recycle.org for more information about recycling your batteries.
Thank you for choosing a bXterra Uninterruptible Power Supply. This UPS system is ENERGY STAR® certified and uses our GreenTech™ High-Efficiency Design to consume less power, reduce heat and improve UPS operation.
INSPECTION
Inspect your UPS upon purchase. The following items should be inside:
UPS System User Manual USB A+B Type Cable
Remove the UPS from its package and inspect it for damage that may have occurred during shipping. If any damage is discovered, re-pack the unit and return it to the place of purchase.
Determine the Power Requirements of Your Equipment
- To determine the power requirements of your equipment, ensure that the equipment plugged into the outlet does not exceed the UPS's rated capacity. If the rated capacity of the unit is exceeded, the UPS may overload and shut down or the circuit breaker may trip.
- There are many factors that can affect the amount of power that your equipment will require. We suggest that the load placed on the battery outlets not exceed 80% of the UPS's capacity.
CONNECT TO UTILITY POWER
Connect the AC power cord to utility power. The UPS will start to charge its internal battery. For best results, charge the battery for six hours prior to initial use. When the UPS is plugged into an AC outlet, the battery will automatically charge whether the UPS is turned on or not.
PLUG IN EQUIPMENT
Battery Backup Outlets
With the UPS turned off and unplugged, connect equipment requiring battery backup to the "Battery Backup" outlets. These outlets
provide battery backup, EMI filtering, line conditioning, and surge protection. Battery power is automatically provided in case of power failure.
Surge Protected Outlets
Connect other devices requiring surge protection to the "Surge Protected" outlets. These outlets do not provide power during power failure.
DO NOT plug a laser printer, paper shredder, copier, space heater, vacuum cleaner, sump pump or other large electrical device into the UPS. The power requirements of these devices will overload and possibly damage the UPS.
Connect Modem/Phone Line
This UPS protects a single line (1 in/1 out) phone, modem, or fax machine from surges. To protect a fax machine, phone or modem, connect a telephone or network cable from the wall jack outlet to the IN jack of the UPS. Connect a telephone cable or network cable from the OUT jack of the UPS to a fax machine, telephone, modem or network device.
TURN THE UPS ON
To turn on the UPS unit, press the power switch for at least two seconds. The LCD will light up. If an overload is detected, the UPS will turn off and the unit will beep continuously. To fix this, turn the UPS off and unplug at least one piece of equipment from the battery power-supplied outlets. Make sure the Circuit Breaker button is depressed and turn the UPS on again. To turn off the UPS unit, press the power switch again. The LCD will turn off.
MUTE ON/OFF
Press the mute button to turn an alarm on or off. For more information about the mute button, please refer to the LCD Display section of this manual.
INSTALL SOFTWARE
Connect one end of the USB cable to a PC and the other end to the USB port at the rear of the UPS.
Download the latest version of PowerFrame™ software from www.bxterra.com to your hard drive. Follow on-screen instructions to complete the software installation.
For optimal battery charge, always leave the UPS plugged into the AC outlet.
To store the UPS for an extended period of time, cover the unit and fully charge the battery before disconnecting from AC power. While in storage, recharge the battery every three months to prolong optimal battery life.
CERTIFICATIONS
FCC COMPLIANCE
NOTE: This equipment has been tested and found to comply with the limits for a Class B digital device, pursuant to Part 15 of the FCC Rules. These limits are designed to provide reasonable protection against harmful interference in a residential installation. This equipment generates uses and can radiate radio frequency energy and, if not installed and used in accordance with the instructions, may cause harmful interference to radio communications. However, there is no guarantee that interference will not occur in an installation. If this equipment does cause harmful interference to radio or television reception, which can be determined by turning the equipment off and on, the user is encouraged to try to correct the interference by one or more of the following measures:
-Reorient or relocate the receiving antenna
-Increase the separation between the equipment and receiver
-Connect the equipment to an outlet on a different circuit than the one to which the receiver is connected
-Consult an experienced radio/TV technician for help
WARNING: Changes or modifications not expressly approved by the party responsible for compliance could void the user's authority to operate the equipment.
GREENTECH™ UPS HIGH-EFFICIENCY DESIGN
A highly-efficient bXterra GreenTech UPS can reduce your negative environmental impact and save you money. By implementing high-quality components and leading-edge design, GreenTech UPS systems strive to deliver improved UPS performance resulting in less energy waste and heat buildup.
ROHS DIRECTIVE
Aside from being ENERGY STAR® compliant, we are committed to and supporters of the Restriction of Hazardous Substances (RoHS) directive, which strictly limits the use of six hazardous substances (lead, mercury, cadmium, hexavalent chromium, polybrominated biphenyls (PBBs) and polybrominated diphenyl ether (PBDE)) in electrical equipment.


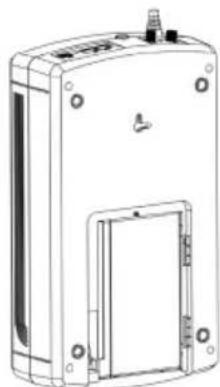
PRODUCT OVERVIEW
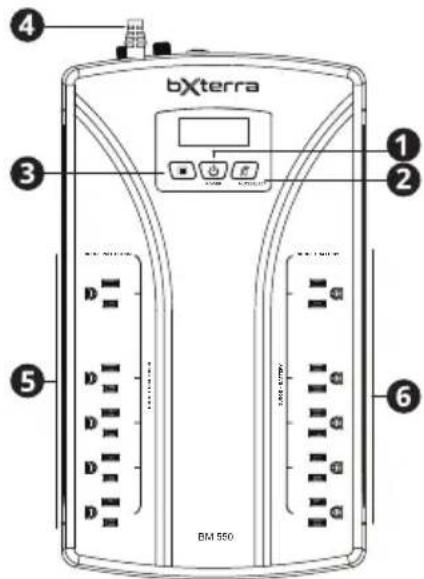

1. Power switch
Used as the master on/off switch for the UPS as well as for equipment connected to the battery power-supplied outlets.
2. Mute button
Hold this button for more than one second to place the unit in Silent Mode or silence the alarm.
3. Select button
Use this to cycle through messages and options on the LCD display.
4. AC input
Connect the main power cord of the UPS here.
5. Surge protected outlets
These outlets protect connected equipment in case of a power surge.
6. Battery backup/Surge outlets
These outlets provide battery backup power and surge protection to connected devices.
7. USB port
This port can connect the UPS to any computer to download the UPS-monitoring software, PowerFrame™. Instructions for this procedure can be found in the Installation and Operation section of this manual.
8. Phone/network surge protection
These ports protect equipment from surges over a single phone line or network connection.
9. Circuit breaker
This breaker provides overload and fault protection. If it trips, remove some of the load then reset it by pressing it in.
10. Coax surge protection
These ports protect equipment from surges over a coaxial line.
BATTERY REPLACEMENT

STEP1:
Remove battery cover by removing the screw on the back of the unit.
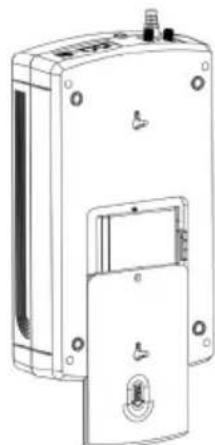
STEP 2:
Push the battery cover down as shown above.
STEP 3:
Disconnect the two battery cables and pull out the battery from the case. Replace the battery with the same specifications and number as your previous battery.
| MODE POWER | BUTTON LED | LCD DISPLAY DESCRIPTION AUDIO | ||
| Turning On the UPS ON | 888 | When the UPS starts up, these icons will illuminate for three seconds | Continuous beeping for two seconds | |
| Site Wiring Fault in Standby Mode | Off | 888 | flash every five seconds | Off |
| AC Mode On | 120 OUTPUT | 1. Output voltage 2. Output frequency 3. Load percent 4. Input voltage 5. Input frequency 6. Estimated time 7. Battery level Press button to cycle through the displayed information. | Off | |
| 60 OUTPUT | ||||
| 27 OUTPUT | ||||
| 120 INPUT | ||||
| 60 INPUT | ||||
| 21 RUN TIME | ||||
| 31 RUN TIME | ||||
| Site Wiring Fault in AC Mode | On | E08 OUTPUT | 1. Indicator is flashing every second 2. E08 and normal AC Mode will take turns flashing every five seconds | Off |
| AC Mode in Mute On | 120 OUTPUT | indicator will display | Off (The mute function can be set, but can only be used in Battery Mode) | |
| AC Mode Overload Alarm | On | 120 OUTPUT | indicator is flashing every second | Beeping every 0.5 seconds |
| Battery Mode On | 21 RUN TIME 120 OUTPUT 68 OUTPUT 27 OUTPUT 8 INPUT 8 INPUT 34 | 1. Estimated time 2. Output voltage 3. Output frequency 4. Load percent 5. Input voltage 6. Input frequency 7. Battery level Press button to cycle through the displayed information. | Beeping every 10 seconds | |
| LOAD OUTPUT 68 OUTPUT 27 OUTPUT 8 INPUT 8 INPUT 34 | Press button to cycle through the displayed information. | |||
| Low Battery Alarm On | 90 RATC CAP RUN TIME indicator is flashing every second | Beeping every second | ||
| Battery Mode with Overload Alarm | On | 90 RATC CAP RUN TIME indicator is flashing every second | Beeping every 0.5 seconds | |
| Battery Mode in Mute | On | 90 RATC CAP RUN TIME indicator will display | The UPS will not sound an alarm until after an event occurs, such as low battery, overload, etc. | |
| Output Short Circuited | On | 801 | Disconnect short-circuited loads and restart the UPS | Continuously beeping |
| Overload Fault On | 802 | Turn off the UPS. Disconnect all loads and restart the UPS. Plug in equipment one at a time and make sure not to exceed the UPS rating for load capacity. | Continuously beeping | |
| Battery Mode Output High Fault | On | 804 | Call for service immediately | Continuously beeping |
| Overcharge Fault On Call for service | 805 | Immediately | Continuously beeping | |
| MODE POWER | BUTTON LED | LCD DISPLAY DESCRIPTION AUDIO | ||
| Low Battery Fault On | 886 | Charge the UPS for at least 12 hours or replace the battery | Continuously beeping | |
| Backlight During faults and alarms, the backlight will always stay on. In other modes, the backlight will light up when the device's buttons are pressed. If no buttons are pressed within 20 seconds, the backlight will turn off. | ||||
TROUBLESHOOTING
| PROBLEM POSSIBLE CAUSE SOLUTION | ||
| Nothing is displayed on the LCD screen | The UPS is not on | Press the power button to turn the UPS on |
| The battery voltage is too low Charge | the battery for at least 6 hours | |
| The battery is faulty Replace the battery | ||
| The UPS is always on Battery Mode | The power cord is loose | Check that the power cord is plugged in properly |
| The UPS beeps continuously Please check the LCD Display table on Page 6 for details | ||
| Battery backup time is too short | The battery voltage is too low Charge | the battery for at least 6 hours |
| There is an overload | Unplug some noncritical devices. Please verify that the load matches the UPS capabilities. | |
| The battery is defective | Contact support@bxterra.com for assistance | |
| The surge protection outlets are not providing power | The circuit breaker has tripped from an overload | Turn the UPS off and unplug one piece of equipment. Wait 10 seconds, reset the circuit breaker then turn the UPS on again. |
| The UPS will not turn on | The on/off switch is designed so the user must press the button for at least 2 seconds to turn it on | Turn the UPS off. Wait 10 seconds then turn it on again. |
| The unit is not plugged into an outlet | The unit must be connected to a properly grounded outlet providing 110/120V and 50/60 Hz | |
| The battery is worn out | Contact bXterra at support@bXterra.com about replacement batteries | |
TECHNICAL SPECIFICATIONS
| MODEL BM550LCD BM750LCD BM850LCD | |
| Topology Standby | |
| INPUT | |
| Voltage 120V | |
| Frequency Range 50/60 Hz ± 5 Hz (auto sensing) | |
| Input Voltage Range 88 - 139V | |
| MODEL BM550LCD BM750LCD BM850LCD | |||
| Circuit Breaker 12A | |||
| Plug Type NEMA 5-15P | |||
| Plug Style Right Angle, 45° Offset | |||
| Power Cord 6 ft | |||
| OUTPUT | |||
| VA/W 550VA/330W 750VA/420W 850VA/450W | |||
| On Battery Voltage | 120 VAC ± 5% | ||
| On Battery Frequency | 50/60 Hz ± 1Hz | ||
| On Battery Waveform | Simulated Sine Wave | ||
| Outlet Type NEMA 5-15R | |||
| Outlets - Total 10 | |||
| Battery & Surge 5 | |||
| Surge-Only 5 | |||
| Overload Protection Internal Circuit Limiting/Circuit Breaker | |||
| Transfer Time 4ms Typical | |||
| BATTERY | |||
| Runtime at Half Load(min) 9 10 8 | |||
| Runtime at Full Load(min) 2 | 3 | 2 | |
| Battery Type | Leakproof and maintenance-free sealed lead acid battery. | ||
| Battery Size | 12V/7.0Ah | 12V/9.0Ah | 12V9.0Ah |
| Battery Model | DJW12-7.0/MS7-12 | DJW12-9.0/MS9-12 | |
| Battery Quantity | 1 | ||
| User Replaceable | Yes | ||
| Recharge Time | 8 Hours | ||
| SURGE PROTECTION & FILTERING | |||
| Surge Suppression | 1,030 Joules | 1,030 Joules | 1,030 Joules |
| Phone RJ11/ Ethernet RJ45 | Yes | ||
| EMI/RFI Filtration | Yes | ||
| MANAGEMENT & COMMUNICATIONS | |||
| Multi-status LCD Panel | Voltage, Frequency, Runtime, Load Capacity, Battery Capacity, Muted, Wiring Fault | ||
| HID Compliant USB Port | Yes | ||
| LED Indicators | Power On | ||
| Management Cable | USB Cable | ||
| Audible Alarms | On Battery, Low Battery, Overload, Fault | ||
| Software | PowerFrame™ Personal UPS monitoring software | ||
| PHYSICAL | |||
| Form Factor | Compact Desktop | ||
| Dimensions (in) L x W x H | 13 x 7.48 x 3.46 | ||
| Weight (lbs) | 7.59 | 8.78 | 8.78 |
| MODEL BM550LCD BM750LCD BM850LCD | |||
| CERTIFICATIONS | |||
| Safety | cTUVus (Conforms to UL1778 5th Edition & CSA 22.2 no. 107.3-14 / R: 2014), FCC DOC Class B, ENERGY STAR® certified | ||
| Environmental | RoHS Compliant | ||
| WARRANTY | |||
| Product Warranty | 3 Year Limited Warranty | ||
| Directly Connected Equipment Guarantee | 125,000150,000 | $200,000 | |
Product specifications are subject to change without prior notice
WARRANTY INFORMATION
Your bXterra product comes with a Limited 3-Year Warranty. bXterra warrants this product, if used appropriately and in full accordance with all applicable instructions, to be free from original defects in material and workmanship for 3 years from the date of initial purchase. If the product can be proven defective in material or workmanship during that 3-year period, bXterra will, subject to the full terms and limitations of the product's Limited Warranty available on our website, repair or replace that product. bXterra will act on its own discretion as the sole remedy for bXterra's breach of its Limited Warranty. Full details of this Limited Warranty and bXterra's Directly Connected Equipment Guarantee can be found on our website at www.bxterra.com/warranty or at the individual product's page on our website. Please register your product at www.bxterra.com/ registration to certify your product's warranty.
CONSIGNES DE SECURITE
INFORMATIONS DE GARANTIE
© 2018 Bxterra Power Technology, a subsidiary and trademark of APX Power Technology LLC, USA. All Rights Reserved. bXterra and the bXterra logo are trademarks of APX Power Technology LLC, USA. All other trademarks are property of their respective owners. Imagery and specifications may differ from actual products and are subject to change without notice.