FSM1605 - Steam cleaner BLACK & DECKER - Free user manual and instructions
Find the device manual for free FSM1605 BLACK & DECKER in PDF.
| Product type | Steam mop |
| Brand | Black & Decker |
| Model | FSM1605 |
| Power | 1300 W |
| Voltage | 220-240 V |
| Water tank capacity | 350 ml |
| Weight | 2.7 kg |
| Heating time | Approximately 15 seconds |
| Steam production time (first use) | Up to 45 minutes |
| Suitable surfaces | Varnished parquet, laminate, linoleum, vinyl, tile, stone, marble |
| Disinfection function | Kills 99.9% of bacteria (with microfibre pad, 90 s) |
| Included accessories | 1 cleaning pad, removable tank |
| Spare parts | Cleaning pads FSMP20-XJ (sold separately) |
| Safety | Unplug before maintenance; do not direct steam towards electrical components |
| Warranty | 24 months |
| Wall hook | Yes (on the handle) |
Frequently Asked Questions - FSM1605 BLACK & DECKER
User questions about FSM1605 BLACK & DECKER
0 question about this device. Answer the ones you know or ask your own.
Ask a new question about this device
Download the instructions for your Steam cleaner in PDF format for free! Find your manual FSM1605 - BLACK & DECKER and take your electronic device back in hand. On this page are published all the documents necessary for the use of your device. FSM1605 by BLACK & DECKER.
USER MANUAL FSM1605 BLACK & DECKER
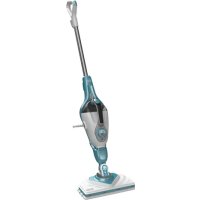
Your BLACK+DECKER™ FSM1605 and FSM1615 steam mop has been designed for sanitising and cleaning sealed hardwood, sealed laminate, linoleum, vinyl, ceramic tile, stone and marble floors. This appliance is intended for indoor household use only.
Safety Instructions
Warning! Read all Safety, Maintenance, Service manual carefully before operating this appliance. Read all of this manual carefully before operating this appliance.
Safety of others
- This appliance can be used by children aged from 8 years and above and persons with reduced physical, sensory or mental capabilities or lack of experience and knowledge if they have been given supervision or instruction concerning use of the appliance in a safe way and understand the hazards involved.
- Children shall not play with the appliance. Cleaning and user maintenance shall not be made by children without supervision.
- If the supply cord is damaged, it must be replaced by the manufacturer, its service agent or similarly qualified persons in order to avoid a hazard.
- The plug must be removed from the socket-outlet before cleaning or maintaining the appliance.
- The liquid or steam must not be directed towards equipment containing electrical components, such as the interior of ovens.
- The appliance shall not be left unattended while it is connected to the supply mains;
- The appliance is not to be used if it has been dropped, if there are visible signs of damage or if it is leaking;
- keep the appliance out of reach of children when it is energized or cooling down.
Labels on appliance
The following pictograms along with the date code are shown on the appliance.

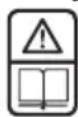
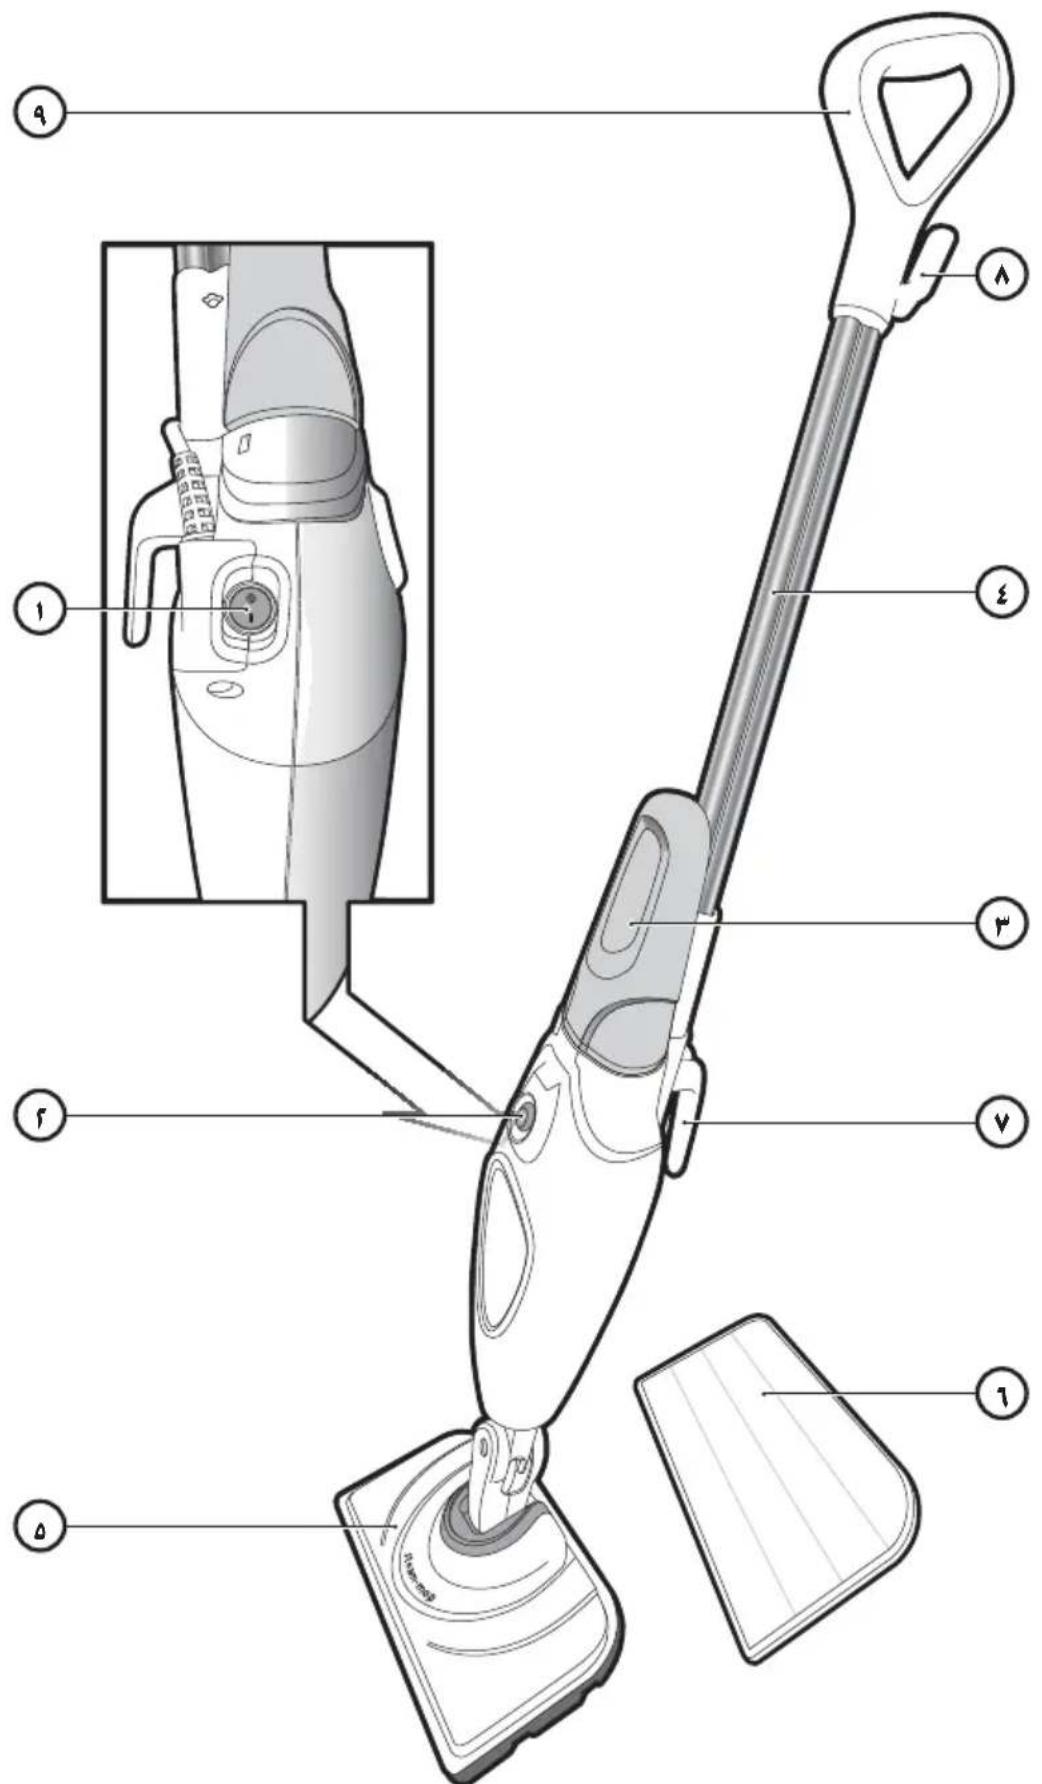
Features
- On/off switch
- Steam operate button
- Removable water tank
- Handle
-
Steam Head
-
Steam Head cleaning pad
- Bottom cable tidy hook
- Top cable tidy hook
- Grip
- Hanging bracke
Assembly

Warning! Before attempting any of the following instructions, make sure that the appliance is switched off and unplugged and the appliance is cold and does not contain any water.
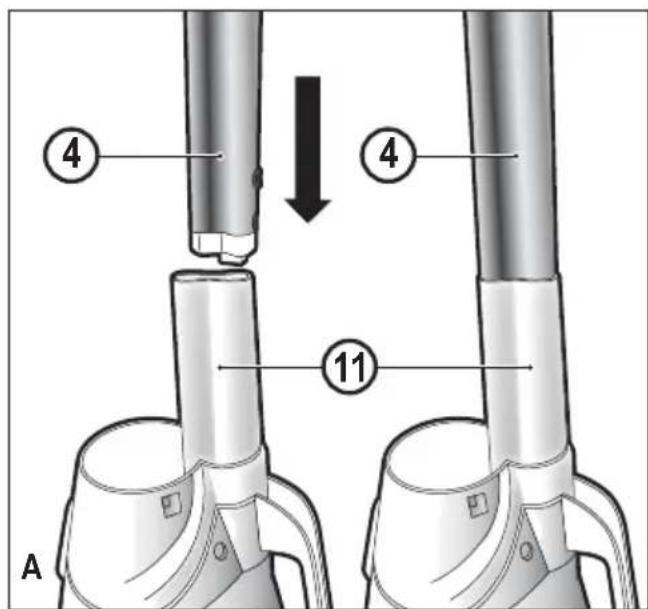
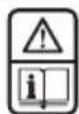
Attaching the handle (Fig. A)
- Slide the bottom end of the handle (4) into the top end of the stem mop body (11) until it clicks into place. The arrow on the handle (4) should be aligned with the top of the steam mop body (11).
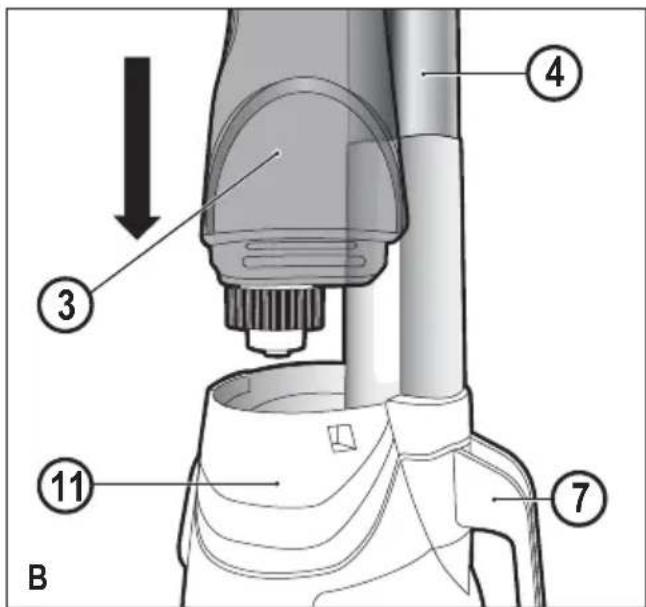
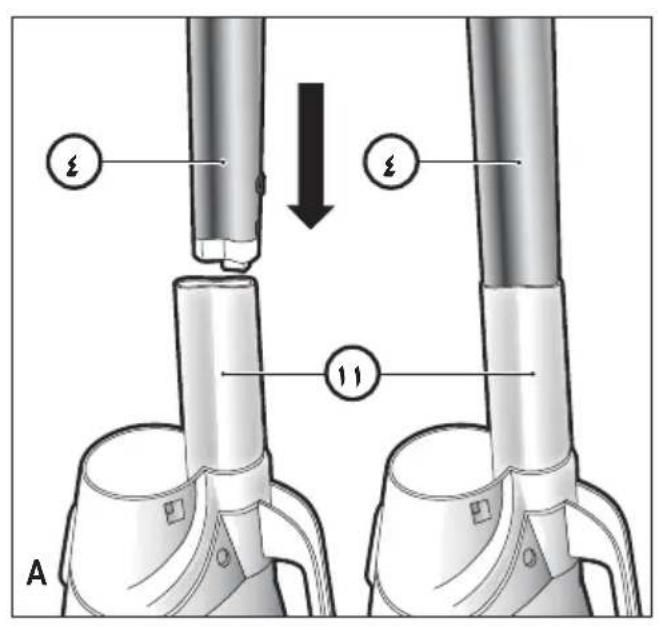
Atta ching the water tank (Fig. B)
- Slide the water tank (3) into the steam mop body (11), ensure that the water tank is firmly seated.
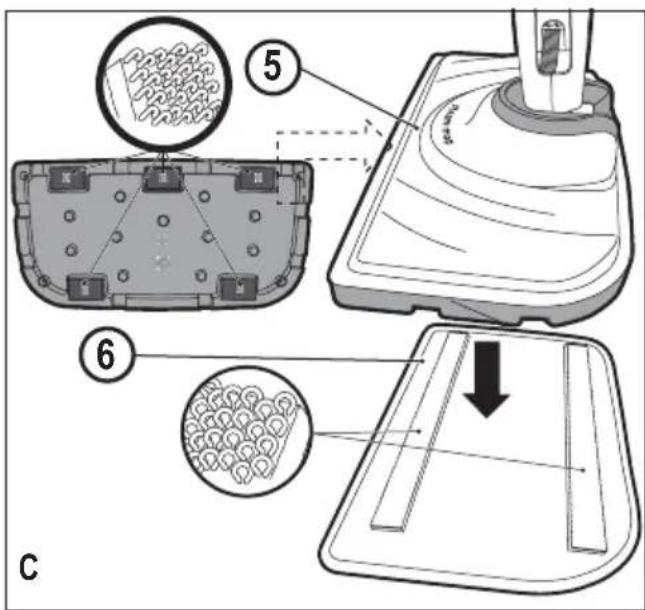
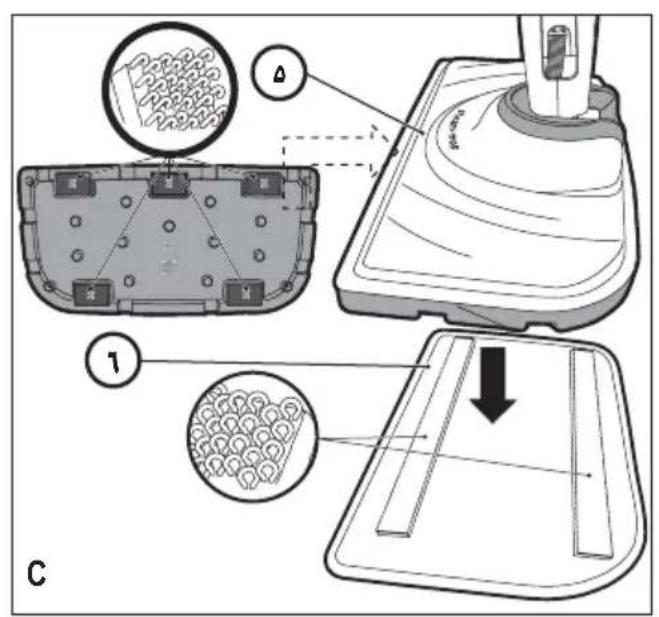
Attaching a cleaning pad (Fig. C)
Replacement cleaning pads are available from your BLACK+DECKER dealer :- (cat no. FSMP20-XJ).
- Place a cleaning pad (6) on the floor with the velcro 'loop' side facing up.
- Lightly press the steam mop down onto the cleaning pad (6).
Caution: Always place your steam mop with the handle (4) supported in the upright position when stationary and make sure the steam mop is turned off when not in use.
Removing a cleaning pad
Caution! Always wear suitable shoes when changing the cleaning pad on your steam mop. Do not wear slippers or open toed footwear.
- Return the handle (4) to the upright position and turn the steam mop 'OFF'.
- Wait until the steam mop cools down (approximately 5 minutes).
- Lift the steam mop away from the cleaning pad freeing it from the velcro faste ning.
Caution! Always place your steam mop with the handle (4) supported in the upright position when stationary and make sure the steam mop is turned off when not in use.
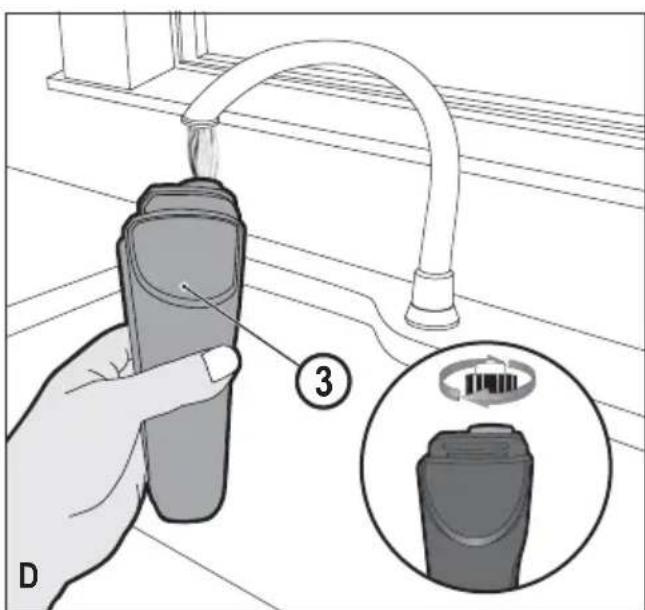
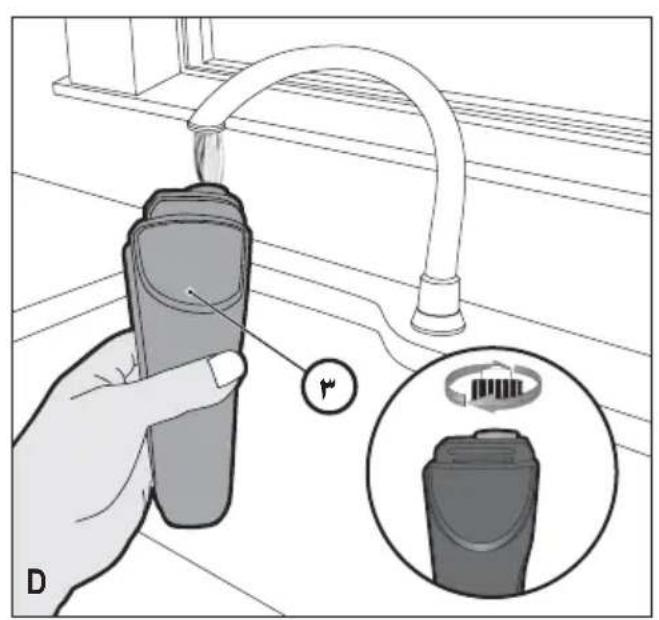
Filling the water tank (Fig. D)
The water tank on your steam mop is removable for convenient and easy filling.
Note! Fill the water tank with clean tap water.
Note! In areas of hard water, the use of de-ionised water is recommended.
- Remove the water tank (3).
- Remove the filter cap by unscrewing in an anti-clockwise direction.
- Fill the water tank (3) with water.
Warning! Your water tank has a 350ml capacity. Do not over fill the tank.
- Replace the filter cap by screwing in a clockwise direction.
- Re-fit the water tank (3).
Note! Ensure the filter cap is firmly secured.
Note! Do not use chemical cleaners with your steam mop water tank.
Use
Important! This unit will kill 99.9% of bacteria and germs when used in accordance with the instructions in this manual and with the micro fibre pad fitted and a continuous run time of 90 seconds.
Switching on and off
- To switch the appliance on, press the ON/Off button (1). It takes approximately 15 seconds for the steam mop to heat up.
- Press the steam operation button (2). This will operate the pump and the unit will begin to produce steam.
- To stop steam generation, turn the steam operation button (2) to off. This will maintain power to the boiler for quicker start up.
- To switch the appliance off, press the ON/Off button (1).
Caution! Never leave the steam mop in one spot on any surface for any period of time. Always place the steam mop with the handle (4) supported in the upright position when stationary and make sure the steam mop is turned off when not in use.
Caution! Always empty the steam mop after use.
Note! When first filled or after running dry, it can take up to 45 seconds for steam to be produced.
Hints for optimum use
General
Caution: Never use the steam mop without first attaching a cleaning pad.
- Always vacuum or sweep the floor before using the steam mop.
- The easiest way to use the appliance is to tilt the handle to a 45^ angle and clean slowly, covering a small area at a time.
- Do not use chemical cleaners with your steam mop. To remove stubborn stains from vinyl or linoleum floors, you
can pre-treat with a mild detergent and some water before using the steam mop.
Steam Cleaning
- Place a cleaning pad (6) on the floor with the velcro 'loop' side facing up.
- Lightly press the steam mop down onto the cleaning pad (6).
- Connect the steam mop to the mains.
- Press the ON/OFF button (1). It takes approximately 15 seconds for the steam mop to heat up.
- Press the steam operate button (2). After a few seconds, steam will start to come out of the steam head.
Note! When first filled or after running dry, it can take up to 45 seconds for steam to be produced.
- It takes a few seconds for steam to enter the cleaning pad. The steam mop will now glide easily over the surface to be sanitized/cleaned.
- Push and pull the steam mop slowly across the surface to thoroughly steam clean each section.
- When you have finished using the steam mop, return the handle (4) to the upright position, making sure that it is supported and turn it OFF. Wait until the steam mop cools down (approximately five minutes).
Caution! It is important to monitor the water level in the water tank (3). To refill the water tank and continue to sanitize/ clean stand the mop upright making sure that the handle is supported and turn the steam mop 'OFF'. Unplug the unit from the electrical wall outlet, remove and refill the water tank (3).
Caution! Never leave the steam mop in one spot on any surface for any period of time. Always place the steam mop with the handle (4) supported in the upright position when stationary and make sure the steam mop is turned off when not in use.
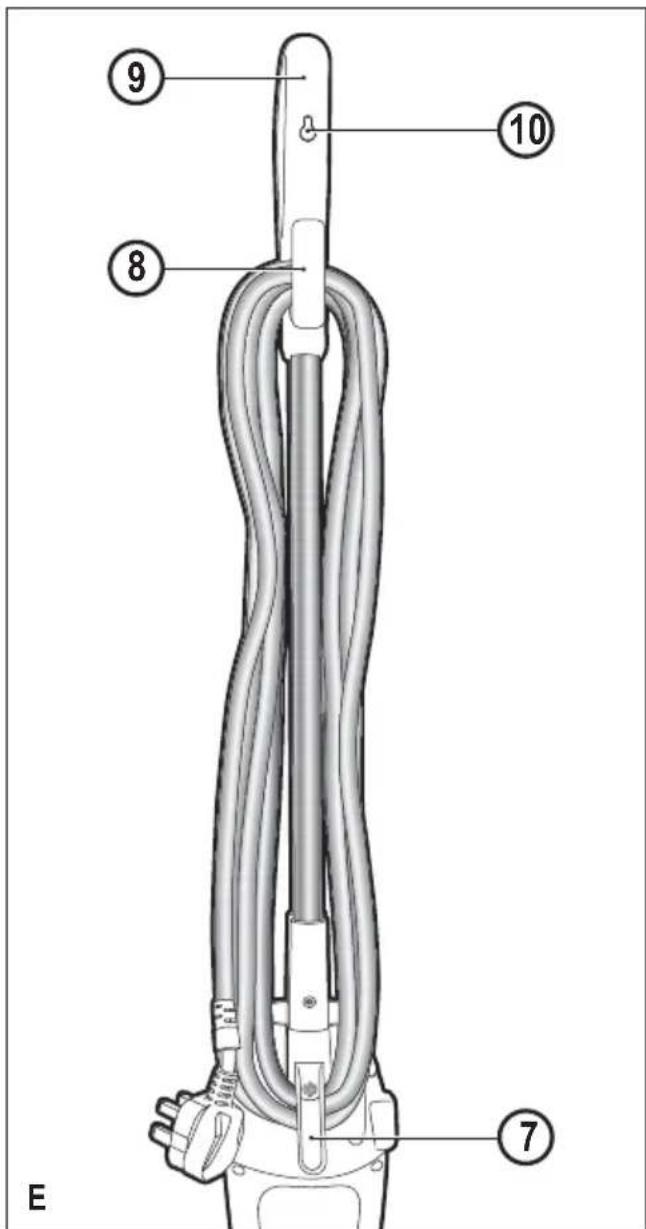
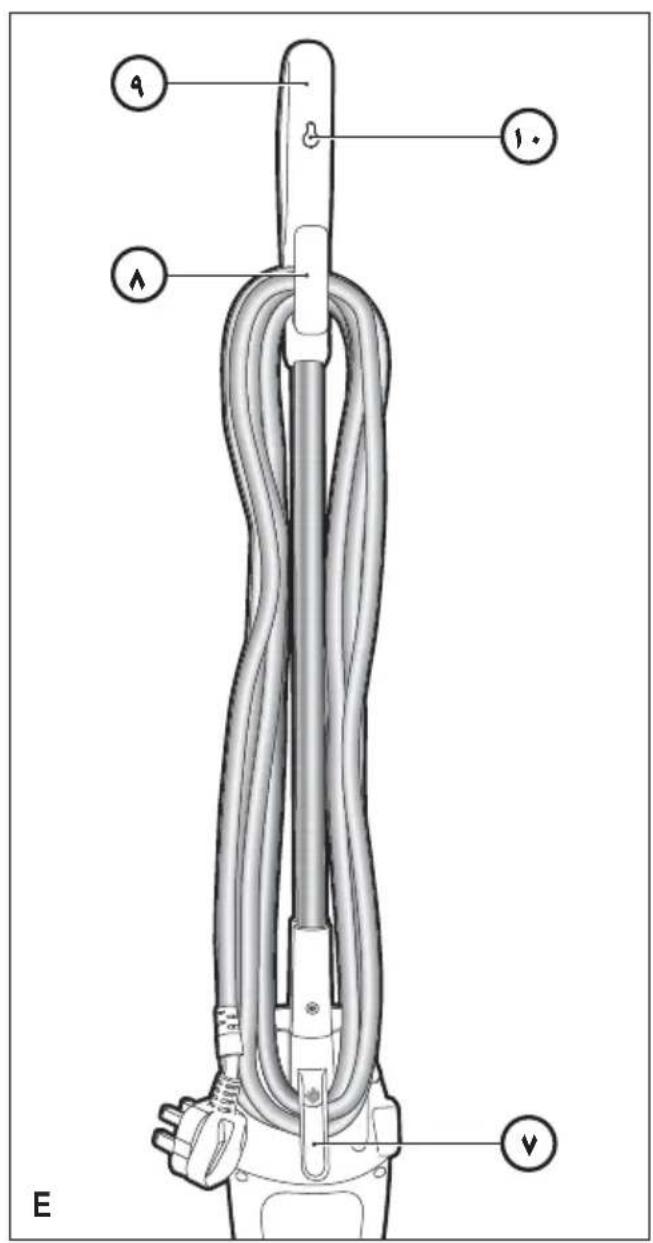
After use (Fig. E)
- Turn the steam mop 'OFF'. turn the steam operation button (2) to off and then press the ON/OFF button (1).
- Wait until the steam mop cools down.
- Unplug the steam mop from the electrical wall outlet.
- Empty the water tank.
- Remove the cleaning pad (6) and wash it ready for next use.
- Clip the supply cable around the cable tidy hooks (7 and 8)
- There is a hanging bracket (10) built into the hand grip (9) which allows your steam mop to be hung from a suitable hook on the wall. Always ensure that your wall hook is capable of supporting the weight of the steam mop safely.
Technical Data
| FSM1605 (Type 1) | FSM1615 (Type 1) | ||
| Voltage Vac | 220-240 | 220-240 | |
| Power W 13 | 00 1300 | ||
| Tank Capacity ml | 350 350 | ||
| Weight kg 2 | 7 | 3.1 | |
Troubleshooting
If your appliance seems not to operate properly, follow the instructions below. If this does not solve the problem, please contact your local BLACK+DECKER repair agent.
| Problem | Step | Possible solution |
| The steam mop is not turning on | 1. | Check the unit is plugged in at the wallsocket. |
| 2. | Check the unit is switched on using the ON/OFF switch (1) | |
| 3. | Check the fuse in the plug. | |
| The steam mop is not producing steam | 4. | Check the water tank (3) is full and correctly Fitted. Note: When first filled or after running dry it can take up to 45seconds for steam to be produced. |
| 5. | Check the steam generation button is in the ON position. | |
| The steam mop stops producing steam during use | 6. | Check step 1, then 2, then 3. |
| The steam mop stops producing too little steam during use | 7. | Check step 4, then 2, then 3 |
| The steam mop is producing too little steam during use | 8. | Check step 4 |
| Where can I get further information/ accessories for my steam mop | 9. | Refer to the assembly chapter of the manual for correct fitting of parts and accessories. |
dispose of it with other household waste. Make this product available for separate collection.
- Black+Decker provides a facility for recycling Black+Decker products once they have reached the end of their working life. This service is provided free of charge. To take advantage of this service please return your product to any authorised repair agent who will collect them on our behalf.
- You can check the location of your nearest authorised repair agent by contacting your local Black+Decker office at the address indicated in this manual. Alternatively, a list of authorized Black+Decker repair agents and full details of our after-sales service and contact are available on the Internet at: www.2helpU.com.
Warranty
Black+Decker is confident of the quality of its products and offers an outstanding warranty.
This warranty statement is in addition to and in no way prejudices your statutory rights.
The warranty is valid within the territories of the Member States of the European Union and the European Free Trade Area.
If a Black+Decker product becomes defective due to faulty materials, workmanship or lack of conformity, within 24 months from the date of purchase, Black+Decker warranty to replace defective parts, repair products subjected to fair wear and tear or replace such products to ensure minimum inconvenience to the customer unless:
The product has been used for trade, professional or hire purposes;
The product has been subjected to misuse or neglect;
The product has sustained damage through foreign objects, substances or accidents;
Repairs have been attempted by persons other than authorised repair agents or Black+Decker service staff.
To claim on the warranty, you will need to submit proof of purchase to the seller or an authorised repair agent. You can check the location of your nearest authorised repair agent by contacting your local Black+Decker office at the address indicated in this manual.
Alternatively, a list of authorised Black+Decker repair agents and full details of our after-sales service and contacts are available on the Internet at: www.2helpU.com.
Protecting the environment

Separate collection. This product must not be disposed of with normal household waste.
Should you find one day that your Black+Decker product needs replacement, or if it is of no further use to you, do not
Usage prévu
J 1 J 1 J 1 J 1 J 1 J 1 J 1 J 1 J 1 J 1 J 1 J 1 J 1 J 1 J 1 J 1 J 1 J 1 J 1 J 1 J 1 J 1 J 1 J 1 J 1 J 1 J 1 J 1 J 1 J 1 J 1 J 1 J 1 J 1 J
J 1 J 1 J 1 J 1 J 1 J 1 J 1 J 1 J 1 J 1 J 1 J 1 J 1 J 1 J 1 J 1 J 1 J 1 J 1 J 1 J 1 J 1 J 1 J 1 J 1 J 1 J 1 J 1 J 1 J 1 J 1 J 1 J 1 J 1 J
()a aalpcooLaiyaiyaiyaiyaiyaiyaiyaiyaiyaiyaiyaiyaiyaiyaiyaiyaiyaiyaiyaiyaiyaiyaiyaiyaiyaiyaiyaiyaiyaiyaiyaiyaiyaiyaiyaiyaiyaiyaiyaiyaiyaiyaiyaiyai
i j 251 251 251
Joojoo jie 51j Joojjll
Jl 100000000000000000000000000000000000000
aJll 1i jiljll jy 20 11 Jl 30 20
S OBC = S BOC + S_ CBA
jaiyipiaiyiyolblai
aaii i 1
29
a 2015
a111 aal all
2gjzaiallJol! jglalj
sJo 5 sJio aikio auii oohy iiaii l
aill jy. 2jll liluLo a5Ls Lkio
Lgjglao gaoaal juiell ljjjno j
aLall aallll 1
y^2x^2 + 5x - 6 = 0
gS1 111111111111111
b^2 - 5b^2 = 4
ailll 1e JwJyjll aolllg jbjai
.()
ylll lllllllllllllllll
j0113j()()ON/OFF jj
aJzll aawll all 10
2019
3_2 与 3 = 1 : 1
gaaal plaee
FSMFSFM
BLACK+DECKERTM
aolalbXgJzallgaaalll aaijgl 20
aas jiallal lil
a_1 = 2

aXlll L
Ss, aill lalil no s iis glo 1 j
Lgll ne Jgao giai I
Lgai I
Igai y
()
gall flll l11 1 (2) aoll lll flll p
.1 kall g aill iie liu s y j 11 11 11
pue 10 (2) aall 1c u gall pssll jy j
(11) aarll
()
jglai Ly jll aay 10 o all jz
aaii aiai iiaii aaii iiaii jilj jil jil jil jil jil jil jil jil jil jil jil jil jil jil jil jil jil jil jil jil jil jil jil jil jil jil jil jil jil jil jil jil jil jil jil jil jil jil jil jil jil jil
jz 1 a
A aoc o 100000000000000000000000000000000000000000000000000000000000000000000000000
aIg y 1y jll Jib 2j
jglal jn y jy jlll l 15 j 1
Jluiu Juii jui jie jg jgi dai aai ll k g
aikoo jgi jgi jgi iil lll
abii jgi jgi jgi jgi jgi jgi jgi jgi
jll lccgagall aalall jlll cnn goggcoa aill
jLJ

aia
/1
dall JlaLo jj 130
1
1
1111111111111111
Names & Addresses for BLACK + DECKER Service Concessionaries
ALGERIA: Sarl Outillage Corporation, DW, B&D Pet, HHD, 08, Rue Med Boudiaf (ex TELLA Achen) Cheraga, Alger, Tel: 00213-0-21375130/ 00213-0-21375131, Fax: 00213-0-21369667, Email: hakim.merdjadi@outillage-dz.com;
nefissa. merdjadi@outillage-dz.com; sidahmed.merdjadi@outillage-dz.com. AZERBAJAN: Kontakt - NN LLC, HHD, M.Qashqay 43, Baku Azerbaijan Az1000, Tel: 00994 12 408 20 50, Mob: +994503442204, Fax: 00994 12 411 70 90, eganjaly@hotmail.com. BAHRAIN: Alfouz Services Co. WLL, Tubli, DW, B&D PET, HHD, P.O. Box 26562, Tubli, Manama, Tel: +973-17783562/ 17879987, Fax: 17783479, Email: alfouz@batelco.com.bh. EGYPT: Anasia Egypt for Trading S.A.E. (Mentreade), HHD, P.O. Box 2443, 9, Mostafa Refaat Street, Sheraton Heliopolis 11361, Cairo, Tel: 00202 22684159, Fax: 00202 22684169, Email: wael.salah@anasia.com; nevien.elbeshbishy@anasia.com. ETHIOPIA: Seif Tewfik Sherif, DW, B&D PET, HHD, Arada Sub City, Kebele 01/02, Global Insurance Bldg, 2nd Flr, Room 43, P.O. Box 2525, Addis Ababa, Tel: 00-251-11-1563968/ 1563969, Fax: 00-251-11-1558009, Email: seif@ethionet.et; nawanag@ethionet.et; seifudint@hotmail.com. IRAQ: Financial Links, B&D PET, HHD, Kazzaz Building Arasat Al-Hindia, Block No: 629, Street: 31, Building No: 1, Baghdad, Iraq, Tel: 00964-(0)780-195-2223/ +964-(0)781-3763044, Email: info@financiallinks-truevalue.com. JORDAN: Bashiti Hardware (Palestine), B&D pet, HHD,"93 King Abdullah, 2nd St., Opp ELBA House, P.O. Box 3005, Amman 11953, Tel: 00962-6-5349098, ext.11, Fax: 00962-6-5330731, Email: manal@bashithardware.com; info@bashithardware.com;
rami@bashithardware.com. KENYA: Zylog Enterprises Ltd. (T/A Leading Concepts), HHD, IPS Building,Kaunda Street, P.O. Box 40877-00100, Nairobi, Tel: 00254-20-6905000, Fax: 00254-20-6905111, Email: admin@alibhaishariff.co.ke; leading@alibhaishariff.co.ke; info@alibhaishariff.co.ke. LEBANON: Aces Service Centre (Est. F.A.Ketaneh SA), HHD, P.O. Box 90-102, Nahr El Mot, Seaside Highway, Pharaon Building, Beirut, Tel: 00961-1-898989/ + 961-(1)-262626, Fax: 0096-1-1245880, Email: Nissrine.haji@aces.com.lb; Nassim.aziz@aces.com.lb; Johnny.sailian@aces.com.lb; Paul.tahan@aces.com.lb. LIBYA: North Africa Trading (El Ghoul Brothers), DW, B&D Pet, HHD, P.O. Box 348, 7 October Street 11, Benghazi, Tel: 00218-061-3383994, Fax: 00218-092-7640688, Email: nagte.ly@gmail.com; CC: nagte.dpt@gmail.com; elghol@technpower.com. North Africa Trading ( El Ghoul Brothers), DW, B&D Pet, HHD, AlBarniq Dewalt Center, Mokhazin-elsukar St., ElFallah, Tripoli, Tel: 00218-021-3606430, Fax: 00218-092-6514813, Email: nagte.ly@gmail.com; cc: (nagte.dpt@gmail.com; elghol@technpower.com. Homeworld Co., HHD, Senidal St. Amr Ibn Elaaas Road, Benghazi, Libya, P.O. Box 18182, Salmany, Tel: 00218-61-9094183, ext. 103, Fax: 00218.61.9094123, ext. 108, Email: nagte.ly@gmail.com. MAURITIUS: J.M. Goupille & Co.Ltd. The Brandhouse Ltd., HHD, Rogers Industrial Park 1, Riche Terre, Mauritius, Tel: 00230-2069450/ +230-207-1700, Fax: 00230-2483188/ 00230-2069474, Email: claims service centre@goupille.mu; stephanie.bijou@gmail.com; beatrice.li@gmail.com; sharon.laprovidence.jmg@gmail.com, tim.moszuti@goupille.mu; Cc.
Jfrancois.dromart@goupille.mu; mario.catherine@goupille.mu; gerard.gouges@goupille.mu. MOROCCO: UATS, HHD, "No. 37, Lotissement KADIRIA, km 10 Route, Eljadida, LISASSFA, Casablanca, Morocco, Tel: 00212-522652602, Fax: 00212-522652603, Email: farah1406@yahoo.fr; noureddine.uats@gmail.com. OMAN: Oman Marketing & Service Co.(Omasco), Wattayah/ Muscat, HHD, B&D PET, P.O. Box 2734, Behind Honda Showroom, Wattayah, Oman, Tel: +968 24560232/ 24560255, Fax: 24560993, Email: npservice@omasco.com.om; Cc. ashok.balan@omasco.com.om, damodaran pillai@omasco.com.om; unnikrishnan@omasco.com.om. Oman Marketing & Service Co.(Omasco), Sohar, HHD, B&D PET, Al Ohi, Sohar, Oman, Tel: +968 26846379, Fax: 26846379, Email: sooraj.neeran@omasco.com.om. Oman Marketing & Service Co.(Omasco), Salalah, HHD, B&D PET, Sanaya, Salalah, Oman, Tel: +968 23212290, Fax: 23210936, Email: rajagopal.pr@omasco.com.om. Omar Mohammed Ali Bawain Trading Co., Salalah, Al-Awqadain, PC 217, P.O.Box 112, Salalah, Sultanate of Oman, Tel: +968 23214874, Fax: 23214874/ 23211878, Email: jthin@omartrad.com. PAKISTAN: Ammar Service & Spares, B&D PET, HHD, Office No 6068, 6th Floor Central Plaza, Behind Gul Plaza Marston Road, Karachi, Tel: 0092-21-32426905/ 021-32775252, Fax: 0092-21-32427214, Email: babji93@yahoo.com. QATAR: Al MUTFah Service Centre, Doha, HHD, B&D PET, Al Wakrah, Road, P.O. Box 875, Doha, Qatar, Tel: +974 44650880/ 44650110/ 44446868, Fax: 44441415/ 44662599, Email: service@almuftah.com; almuftah@almuftah.com. SAUDI ARABIA: Fawaz Ebrahim Al Zayani Trading Est., Dammam, DW, B&D PET, HHD, P.O. Box 76026, Al Raka: 31952, Tel: +966-3-8140914, Fax: 8140824, Email: dewaltdammam@hotmail.com; (vinoderakatyil@yahoo.com); Website: www.fawazalzayanigroup.com. Fawaz Ebrahim Al Zayani Trading Est., Makkah, DW, B&D PET, HHD, 4753-Wali Alashed, Makkah, 9130-24353 Tel: +966-12-8140914/ 581121778, Fax: 128140914, Email: meraj2515@gmail.com. Banaja Trading Co. Ltd., Riyadh, HHD, P.O. Box 566, Riyadh-11421, Tel: +966-1-4124444, Fax: 4033378, Email: jjophilip@hotmail.com. Banaja Trading Co. Ltd., Jeddah, HHD P.O. Box 366,Jeddah-21411Tel:+966-2-6511111,Fax: 6503668 Email: afouad@banaja.com; ijophilip@hotmail.com. SOUTH AFRICA: Benray Tool Wholesalers C.C., B&D PET, HHD, 460 Koeberg Road Cape Town South Africa Tel: 021-551-7244 Fax: 021-552-6395 Email: dewaltct@benray.co.za. Stanley Black & Decker-RSA,BED,PET,HHD 199 Winze Drive Stormill Ext 9 Roodepoort Tel:(271) 472-0454Fax:(271) 472-0482Email: service@sbdinc.co.za; vincent.roets@sbdinc.co.za; jacquesvincent.roets@sbdinc.com. SRI LANKA: Delmege Forsyth & Co. Ltd., DW,B&D Pet,HHD,Delmege Forsyth & Co.Ltd,Lifestyle Cluster, 101,Vinayalankara Mawatha Colombo 10,Sri LankaTel:+94-11-2688462/+94-11-2 Email:dgeservice@delmege.com; Samith.lifestyle@delmege.com cc: Jayantha.lifestyle@delmege.com. TUNISIA:Societe Tunisienne De Maintenance (STM), B&D Pet, HHD,Rue De La Physique.Nouvelle Zone Industrielle Ben Arous 2013 Ben Arous,TUNISIA.Tel:+216-79-389687,Fax:+216-71-385154 Email: importa@stqu.com.UAE: (Abu Dhabi) Galaxy Equipment Trading Abu Dhabi DW,B&D PETHHD,Madinath Zayed (Baada Zaid), Abu Dhabi P.C. 58910Tel:+971-2-8844279Fax:8844297Email: galaxyeq@eim.ae; galaxyeq@emirates.net.ae.Light House Electrical,Abu Dhabi,DW,B&D PET,HHD,P.O.Box 120,Abu Dhabi,Tel:+971-2-6726131Fax:6720667Email: dewalt_lhe@hotmail.com Light House Electrical MusaffahDW,B&D PETHHD,P.O.Box 120,Abu Dhabi,Tel:+971-2-5548315Fax: 5540461 Email: dewalt_lhe@hotmail.com. (Al Ain) Zillion Equipment and Spare Parts Trading LLC.Al Ain,DW,B&D PET,HHD,P.O.Box 19740Opp.Bin Sadal/ Trimix Redymix Sanaiya,AI Ain Tel:+971-3-7216690Fax:7216103Email: zilliontrdg@gmail.com. (Dubai) BLACK & DECKER (OVERSEAS) GmbH,Dubai,DW,B&D PET,HHD,P.O.Box 5420DubaiTel:+971-4-8127400/ 8127406Fax: 2822765Email service.mea@sbdinc.com. (Ras Al Khaimah) Mc Coy Middle East LLC,Ras Al Khaimah,DW,B&D PET,HHD,P.O.Box 10584,Ras Al KhaimahTel:+971-7-2277095Fax: 2277096,Email:mccoyrak@gmail.com. (Sharjah) Mc Coy Middle East LLC SharjahDW,B&D PET,HHD,P.O.Box 25793SharjahTel:+971-6-5395931Fax:5395932Email:mccoy@emirates.net.ae; mccoydewalt@gmail.com.UGANDA: Anisuma Investment & Service Ltd. (Jacky's Electronics), HHD,J.R Complies,Ware house No.5 Plot No.101. 3rd Industrial Area,Jinja Rd,KampalaTel:00256-414237106Mob:00256 779429501 Email
ha.service.uganda@anisuma.com. YEMEN: Middle East Trading Co. (METCO) DW, B&D Pet, HHD, 5th Flr. Hayel Saeed Anam Bldg. Al-Mugamma St. Taiz, Yemen, Tel: +00967-4-213455, Fax: 00967-4-219869, Email: metco@metcotriding.com; sami@metcotriding.com. Middle East Trading Co. (METCO) DW, B&D Pet, HHD, Mualla Dakka, Aden, Tel: 00967-2-222670, Fax: 00967-2-222670, metco@metcotriding.com; sami@metcotriding.com. Middle East Trading Co. (METCO), DW, B&D Pet, HHD, Hayel st., Sana'a, Yemen, Tel: 00967-1-204201, Fax: 00967-1-204204, Email: metco@metcotriding.com; sami@metcotriding.com.

WARRANTY REGISTRATION CARD
YOUR NAME
YOUR ADDRESS
POSTCODE
DATE OF PURCHASE
DEALER'S NAME & ADDRESS/