
C90 - Binoculars CELESTRON - Free user manual and instructions
Find the device manual for free C90 CELESTRON in PDF.
| Product Type | Maksutov-Cassegrain Spotting Scope |
| Brand | Celestron |
| Model | C90 |
| Model Number | 52268 |
| Aperture | 90 mm (3.5 inches) |
| Focal Length | 1250 mm |
| Focal Ratio | f/13.9 |
| Optical Coatings | Multi-coated |
| Finder | 8x21 Image Correcting Finder |
| Eyepiece Included | 1.25 inch Plossl 32 mm (39x magnification) |
| Angular Field of View | 1.3° (with 32 mm eyepiece) |
| Linear Field of View | 68 ft @ 1000 yds / 23 m @ 1000 m |
| Eye Relief | 20 mm |
| Near Focus | 4.6 m (15 ft) |
| Length (with diagonal and eyepiece) | 41 cm (16 in) |
| Weight (with diagonal and eyepiece) | 2.3 kg (5 lb) |
| Mounting to Tripod | 1/4 x 20 threaded hole (integrated tripod adapter) |
| Care and Cleaning | Use an optic cleaning kit; store in carrying case |
| Safety | Never look directly at the Sun; risk of eye damage |
| Warranty | Limited Lifetime Warranty (USA and Canada) |
| Optional Accessories | Additional 1.25 inch eyepieces, photo adapter, Celestron tripod |
Frequently Asked Questions - C90 CELESTRON
User questions about C90 CELESTRON
0 question about this device. Answer the ones you know or ask your own.
Ask a new question about this device
Download the instructions for your Binoculars in PDF format for free! Find your manual C90 - CELESTRON and take your electronic device back in hand. On this page are published all the documents necessary for the use of your device. C90 by CELESTRON.
USER MANUAL C90 CELESTRON
C90mm Maksutov Spotting Scope - #52268
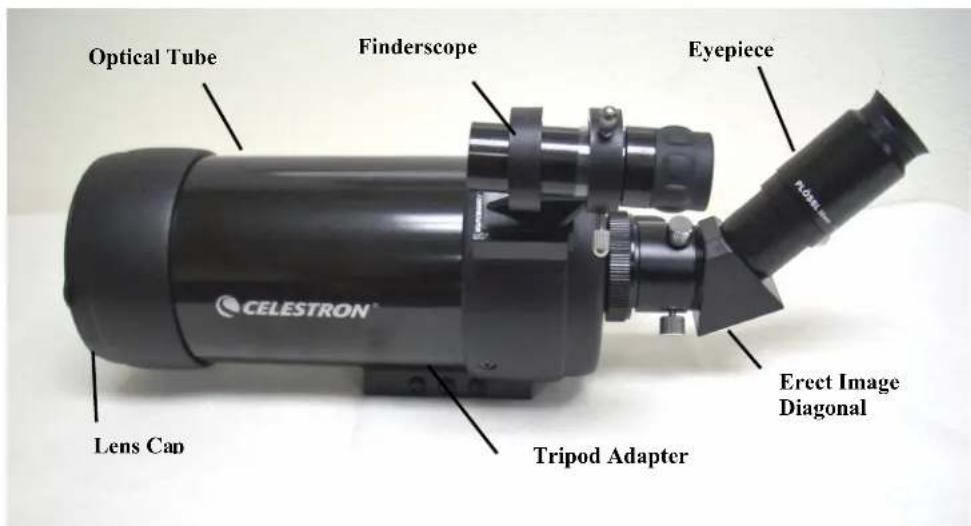
Congratulations on your purchase of a Celestron spotting scope! Whether your interest is in sports, bird watching, nature, wildlife, casual astronomy, or other activities, this spotting scope offers very high optical quality to allow you years of viewing pleasure.
Assembly
To attach the Erect Image Diagonal and an Eyepiece:
- Remove any caps from the rear of the optical tube, the erect image diagonal, and the eyepiece.
- Loosen all thumbscrews on the rear part of the optical tube and the erect image diagonal so that the threads do not protrude into the barrels.
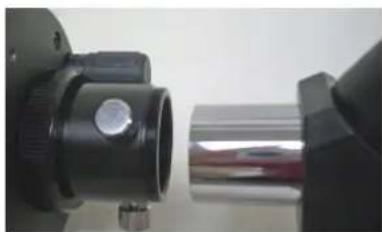
- Slide the chrome portion of the erect image diagonal into the rear of the optical tube as shown in the left image below. Then, tighten the thumbscrews to hold the erect image diagonal in place.
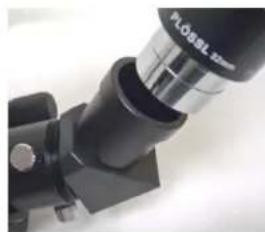
- Slide the chrome portion of the eyepiece (use the 32mm) into the erect image diagonal (see right image below). Then, tighten the thumbscrew to hold the eyepiece in place.
- To use other eyepieces of varying powers, reverse the installation of the eyepiece above and install other eyepieces. Any 1.25" eyepiece will work with this spotting scope. Celestron offers a wide selection of optional eyepieces.
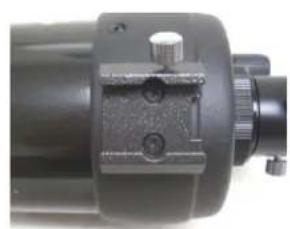
To attach the 8x21 Erect Image Finderscope:
The finderscope is an aid to locating objects to view as it is an 8 power instrument with a much wider field of view than the spotting scope itself. The finderscope itself comes pre-assembled and is mounted inside the bracket of the finderscope.
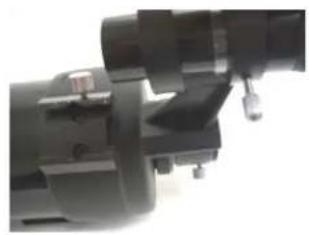
- Loosen the thumbscrew on the mounting bracket on the optical tube (left image below).
- Slide the finder bracket (with finderscope attached) into the mounting bracket on the optical tube (center image below).
- The finderscope bracket will slide in from the back. The finderscope should be oriented so that the objective lens (larger piece of glass) is toward the front end of the spotting scope.
- Tighten the thumbscrew on the mounting bracket to hold the finderscope firmly in place. The finderscope is correctly attached as shown in the right image below.

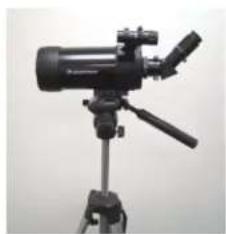
To Attach your Spotting Scope to a Photo/Video Tripod
Attach your spotting scope to a rigid photo/video tripod before trying to observe as the size and power of the spotting scope requires a solid tripod to be able to see sharp and steady views. On the bottom of the spotting scope is a tripod adapter (see image on pg. 1) which has 1/4 × 20 threaded holes and this will allow you to attach your tripod to the spotting scope. Celestron offers optional photo/video tripods.
Using your Spotting Scope
Prior to using your spotting scope, remove the front lens cap.
Warning Note: Never look directly at the Sun with the naked eye or with your spotting scope as eye damage may result.
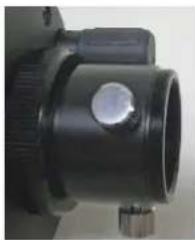
Focusing
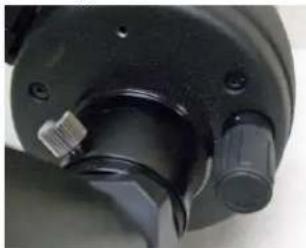
The C90 spotting scope focusing mechanism controls the position of the primary mirror which slides back and forth on the primary baffle tube. Turn the focusing knob (see image to the left and the knob is located in the bottom right area) until the image is sharp. If the knob will not turn, the primary mirror has reached the end of its travel on the focusing mechanism. Turn the knob in the opposite direction until the image is sharp. Once an image is in focus, turn the knob clockwise to focus on a closer object and counterclockwise for a more distant object. A single turn of the focusing knob moves the primary mirror only slightly. Therefore, it will take many turns to go from close focus (approximately 15 feet) to infinity. For astronomical viewing, out-of-focus star images are very diffuse making them difficult, if not impossible, to see. If you turn the focus knob too quickly, you can go right through focus without seeing the image. For best results, your first astronomical target should be a bright object (like the Moon) so that the image is visible even when out of focus.
Note: If changing eyepieces to use different powers on the same subject, you will have to refocus.
Aligning the Finderscope:
- To make things a little easier, you should align the finderscope during the day when it is easier to locate objects.
- Choose a conspicuous object that is over 500 yards away. This will eliminate any possible parallax effect
- Point your spotting scope at the target and center it in the main optics of the spotting scope (using the 32mm eyepiece).
- Check the finderscope to see where the object is located in the field of view.
- Adjust the three small thumbscrews on the finder bracket, tightening one while loosening another, until the cross hairs are centered on the target
Accurate alignment of the finder will make it much easier to find objects in the main optical tube.
Note: If the image is not sharp (out of focus) with the finderscope, rotate the eyepiece end of the finderscope until you achieve a sharp focus.
Using different Eyepieces & Calculating Magnification
You can use different eyepieces to achieve different powers, field of views, etc.
To determine the magnification of your spotting scope, simply divide the focal length of the spotting scope by the focal length of the eyepiece used. In equation format, the formula looks like this:
Focal Length of Spotting scope (mm) Magnification = Focal Length of Eyepiece (mm)
Let's say, for example, you are using the 32mm Plossl eyepiece. To determine the magnification you simply divide the focal length of your spotting scope (1250mm) by the focal length of the eyepiece, 32mm. Dividing 1250 by 32 yields a magnification of 39 power.
Although the power is variable, each instrument under average skies has a limit to the highest useful magnification. The general rule is that 60 power can be used for every inch of aperture. For example, the C90 is 3.5 inches in diameter. Multiplying 3.5 by 60 gives a maximum useful magnification of 210 power. Although this is the maximum useful magnification, most observing is done in the range of 20 to 35 power for every inch of aperture which is 70 to 123 times for the C90 spotting scope. Lower powers give you brighter images but experiment to see what is best for you.
Attaching a Camera
- T-Adapter threads are built into the rear of the spotting scope (see right portion of image to the left). With a camera specific T-ring, a Digital SLR (or SLR) camera can be attached to the spotting scope.
- Remove the erect image diagonal and eyepiece from the rear cell of the tube.
- Thread the T-Ring onto the rear opening which contains the threads (T-Adapter) - see image to the left.
- Mount your camera body onto the T-Ring the same as you would any other lens.
Note: Since digital cameras (not digital SLR cameras) do not use the T-system to mount cameras to lenses, spotting scopes, telescopes, etc. you need a different way to be able to use them to take photos. Celestron offers a Universal Digital Camera Adapter (Model # 93626) which makes it easy to attach most digital cameras to your spotting scope.
Maintenance
To protect your spotting scope when not being used, put on all lens covers and caps to keep the optics clean and then put the scope in its backpack. If your optics could use cleaning, use an optiese cleaning kit and follow the instructions.
| SPECIFICATIONS | 52268 | |
| C90 Spotting Scope | ||
| Optical Design Maksutov-Cassegrain | ||
| Aperture | ||
| Focal Length 1250mm | ||
| Focal Ratio f/13.9 | ||
| Optical Coatings Multi-Coated | ||
| Finderscope, Erect Image 8x21 | ||
| Eyepiece - 1.25" Plossl | 32mm (39x) | |
| Angular Field of View | 1.3° w/32mm | |
| Linear FOV - ft@1000yds / m@1000m | w/32mm - 68/23 | |
| Eye Relief | 20mm | |
| Near Focus | 15 feet (4.6m) | |
| Length w/diagonal & eyepiece | 16" (41cm) | |
| Weight w/diagonal & eyepiece | 5# (2.3Kg) | |
| Note: Specifications subject to change without notice or obligation | ||
Warranty
Celestron Spotting Scopes have the Celestron No Fault Limited Lifetime Warranty for the U.S.A. and Canadian customers. For complete details of eligibility and for warranty information on customers in other countries visit the Celestron website.

CELESTRON
2835 Columbia St.
Torrance, CA 90503 U.S.A.
www.ccelcstron.com ©2010 All Rights Reserved Printed in China 01-10