Monarch 7i VR - Laser pointer NIKON - Free user manual and instructions
Find the device manual for free Monarch 7i VR NIKON in PDF.
| Product Type | Laser rangefinder |
| Brand | Nikon |
| Model | Monarch 7i VR |
| Category | Laser pointer |
| Dimensions (L x H x D) | 99 x 75 x 48 mm (3.9 x 3.0 x 1.9 in) |
| Weight (without battery) | Approximately 200 g (7.1 oz) |
| Power source | 1 CR2 lithium battery (3 V DC) |
| Battery life | Approximately 3,300 continuous measurements (at 20 °C) |
| Magnification | 6x |
| Effective objective diameter | 21 mm |
| Measurement range (actual distance) | 7.3 – 915 m / 8 – 1,000 yds |
| Display accuracy | 0.1 m / 0.1 yd |
| VR function (vibration reduction) | Automatically activates when power is turned on |
| Target priority mode | First target priority / Distant target priority |
| Water resistance | Waterproof up to 1 m for 10 minutes (battery compartment protected IPX4) |
| Operating temperature | -10 °C to +50 °C / 14 °F to 122 °F |
| Laser classification | Class 1M (IEC 60825-1) |
| Lens care | Use a soft brush and a lint-free cloth; pure alcohol for stubborn stains |
| Repairability | Do not disassemble; contact authorized dealer for any repairs |
| Auto power off | After approximately 8 seconds of inactivity |
| Manufacturer's warranty | Not applicable if disassembled or modified |
Frequently Asked Questions - Monarch 7i VR NIKON
User questions about Monarch 7i VR NIKON
0 question about this device. Answer the ones you know or ask your own.
Ask a new question about this device
Download the instructions for your Laser pointer in PDF format for free! Find your manual Monarch 7i VR - NIKON and take your electronic device back in hand. On this page are published all the documents necessary for the use of your device. Monarch 7i VR by NIKON.
USER MANUAL Monarch 7i VR NIKON
Cautions before use 5-7
[Getting to know the Laser Rangefinder]
Key features 8
Nomenclature/Composition 9
Internal display 10
[Functions]
VR (Vibration Reduction) function.... 11
Target priority mode.... 11
[First step]
Inserting/Replacing battery.... 12
[Mode settings]
Operation overview 13
Changing the distance display unit (m/YD) (F1)... 14
Changing the measurement display mode (F2)... 15
Changing the target priority mode (F3) 16
[Measurement]
Adjusting diopter 17
Measuring.... 17
Single measurement.... 18
Continuous measurement.... 18
[Technical notes]
Specifications 19-20
Troubleshooting/Repair 21-22
[Introduction]
Thank you for purchasing the Nikon Laser Rangefinder MONARCH 7i VR.
Before using this product, please read these instructions thoroughly to ensure correct usage.
After reading, please keep this manual handy for easy reference.
● About the manual
- No part of the manual included with this product may be reproduced, transmitted, transcribed, stored in a retrieval system, or translated into any language in any form, by any means, without Nikon's prior written permission.
- Nikon will not be held liable for any errors this manual may contain.
- The appearance of this product and its specifications are subject to change without notice.
● About controls for radio interference
• This device complies with Part 15 of the FCC Rules. Operation is subject to the following two conditions:
(1) This device may not cause harmful interference, and
(2) This device must accept any interference received, including interference that may cause undesired operation.
- This equipment has been tested and found to comply with the limits for a Class B digital device, pursuant to Part 15 of the FCC Rules and to EU EMC directive. These limits are designed to provide reasonable protection against harmful interference in a residential installation. This equipment generates, uses and can radiate radio frequency energy and, if not installed and used in accordance with the instructions, may cause harmful interference to radio communications. However, there is no guarantee that interference will not occur in a particular installation. If this equipment does cause harmful interference to radio or television reception, which can be determined by turning the equipment off and on, the user is encouraged to try to correct the interference by one or more of the following measures:
- Reorient or relocate the receiving antenna.
- Increase the separation between the equipment and receiver.
- Consult the dealer or an experienced radio/TV technician for help.
This Class B digital apparatus meets all requirements of the Canadian Interference-Causing Equipment Regulations.
● About measurement results
This Nikon Laser Rangefinder is a basic rangefinder. Its results cannot be used as official evidence.
■ Cautions before use
Please observe the following guidelines strictly so you can use the equipment properly and avoid potentially hazardous problems. Before using this product, read thoroughly the "Cautions before use" and instructions on correct usage accompanying the product. Keep this manual within reach for easy reference.
WARNING
This indication alerts you to the fact that any improper use ignoring the contents described herein can result in potential death or serious injury.
CAUTION
This indication alerts you to the fact that any improper use ignoring the contents described herein can result in potential injury or material loss.
SAFETY PRECAUTIONS (Laser)
The Nikon Laser Rangefinder uses an invisible laser beam. Be sure to observe the following:
Warning
- Do not press the PWR button while looking towards the optics from the objective side. Failure to do this may negatively affect or damage your eyes.
- Do not aim at the eye.
- Do not point the laser at people.
- Do not look at the laser with another optical instrument such as through lenses or binoculars, nor with the naked eye. This may result in damage to the eyes.
- When not measuring, please keep your fingers away from the PWR button to avoid accidentally emitting the laser beam.
- When not in use for an extended period, please remove the battery from the body.
-
Do not disassemble/remodel/repair the Nikon Laser Rangefinder. The emitting laser may be harmful to your health. A product that has been disassembled/remodeled/repaired is not guaranteed by the manufacturer.
-
Keep the Nikon Laser Rangefinder out of reach of children when stored.
- If the Nikon Laser Rangefinder's body cover is damaged, or if it emits a strange sound due to dropping or some other cause, remove the battery immediately and stop using.
SAFETY PRECAUTIONS
(Monocular)
The Nikon Laser Rangefinder employs a monocular in its optical system in order to aim at the target. Be sure to observe the following:
Warning
- Never look directly at the sun, an intense light or the laser beam when using the Nikon Laser Rangefinder.
Cautions
- When not using the Nikon Laser Rangefinder, do not push the PWR button.
- Do not use this product while walking. Failure to observe this may cause injury or malfunction as a result of walking into something, hitting others, falling or other accidents.
- Do not swing around by the strap. This may result in hitting others and cause injury.
- Do not place this product in an unstable place. Failure to observe this may result in falling or dropping and cause injury or malfunction.
- Keep the plastic bag used to wrap
this product or other small parts out of reach of children.
- Prevent children from putting the rubber eyecup or small parts, etc. into their mouths. If children swallow such parts, consult a doctor immediately.
- If using the rubber eyecup for a long period of time, some people may suffer skin inflammation. If any symptoms occur, stop using it and consult a doctor immediately.
- When carrying the Nikon Laser Rangefinder, store it in the case.
- If your Nikon Laser Rangefinder should fail to operate correctly, discontinue use immediately and consult with your local dealer for instructions on where to send it for repair.
SAFETY PRECAUTIONS
(Lithium battery)
If handled incorrectly, the battery may rupture and leak, corroding equipment and staining clothing. Be sure to observe the following:
- Install the battery with the + and - poles positioned correctly.
- The battery should be removed when exhausted or during extended periods of non-use.
- Do not short the end terminal of the battery chamber.
- Do not carry together with keys or coins in a pocket or bag, it may short and cause overheating.
- Do not expose the battery to water, or a flame. Never disassemble the battery.
- Do not charge the lithium battery.
- If liquid from a damaged battery comes into contact with clothing or skin, rinse immediately with plenty of water. If liquid from a damaged battery enters the eyes, rinse immediately with clean water, then consult a doctor.
- When disposing of the battery, follow your local area regulations.
SAFETY PRECAUTIONS
Cautions
- This product is not designed for use underwater.
- Rain, water, sand and mud should be removed from the rangefinder body surface as soon as possible, using a soft, clean cloth.
- If the Nikon Laser Rangefinder is exposed to sudden changes in temperature, water condensation may occur on lens surfaces. Do not use the product until the condensation has evaporated.
- Do not leave the Nikon Laser Rangefinder in a car on a hot or sunny day, or near heat-generating equipment. This may damage or negatively affect it.
- Do not leave the eyepiece in direct sunlight.
The condenser effect of the lens may damage the internal display surface.

CARE AND MAINTENANCE
Lenses
- When removing dust on the lens surface, use a soft oil-free brush.
- When removing stains or smudges like fingerprints from the lens surface, wipe the lenses very gently with a soft clean cotton cloth or quality oil-free lens tissue. Use a small quantity of pure alcohol (not denatured) to wipe stubborn smudges. Do not use velvet cloth or ordinary tissue, as it may scratch the lens surface. Once the cloth has been used for cleaning the body, it should not be used again for the lens surface.
Main body
- Clean the body surface with a soft, clean cloth after blowing away dust with a blower* lightly. Do not use benzene, thinner, or other cleaners containing organic solvents.
*A blower is rubber cleaning equipment that blows air from a nozzle.
Storage
• Water condensation or mold may occur on the lens surface because of high humidity. Therefore, store the Nikon Laser Rangefinder in a cool, dry place.
After use on a rainy day or at night, thoroughly dry it at room temperature, then store in a cool, dry place.

Symbol for separate collection applicable in European countries
This symbol indicates that this battery is to be collected separately.
The following apply only to users in European countries.
- This battery is designated for separate collection at an appropriate collection point. Do not dispose of as household waste.
- For more information, contact the retailer or the local authorities in charge of waste management.

Symbol for separate collection applicable in European countries
This symbol indicates that this product is to be collected separately.
The following apply only to users in European countries.
- This product is designated for separate collection at an appropriate collection point. Do not dispose of as household waste.
- For more information, contact the retailer or the local authorities in charge of waste management.
[Getting to know the Laser Rangefinder]
Key features
• Measurement range of actual distance: 7.3-915 meters/8-1,000 yards
- VR (Vibration Reduction) function is employed for reducing the vibrations caused by hand movement
- Horizontal distance mode and actual distance mode can be easily switched
- Target Priority Switching System for measuring overlapping subjects
• High-quality 6x finder with multilayer coating
- Larger ocular for easy viewing
- Press and hold down the PWR button to activate the continuous measurement function
• Automatic power shut-off (approx. 8 sec. unoperated from standby screen)
- Waterproof and fogproof, but not designed for underwater usage (the battery chamber is rainproof)
• Invisible/Eyesafe EN/IEC Class 1M Laser
The Nikon Laser Rangefinder uses an invisible laser beam for measuring. It measures the time the laser beam takes to travel from the rangefinder to the target and back. Laser reflectivity and measurement results may vary according to climatic and environmental conditions, as well as the color, surface finish, size, shape and other characteristics of the target.
The following conditions facilitate measuring:
- Cloudy weather
- Bright-colored target
- Large-size target
- When laser incidence to the target's reflective surface is straight
Measurement may be inaccurate or fail in the following cases:
• In snow, rain or fog
- Small or slender target
- Black or dark target
• Target has stepped surface
- Moving or vibrating target
- When measuring the surface of water
• Target measured through glass
- When the target is glass or a mirror
- When laser incidence to the target's reflective surface is oblique
Nomenclature/Composition
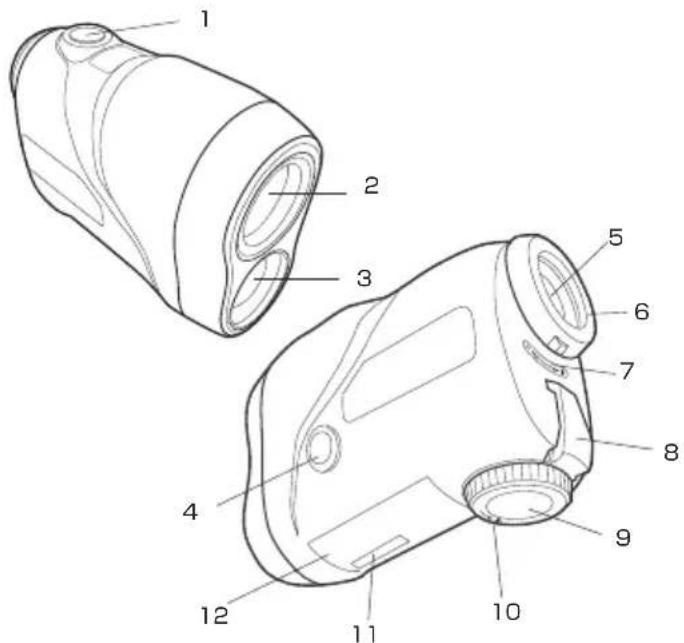
Composition
- Body ....x1
- Strap ....x1
- Case ....x1
-
Lithium battery (CR2) ....x1
-
PWR button (POWER ON/Measurement button)
- Monocular objective lens/Laser emission aperture
- Laser detector aperture
- MODE button
- 6x monocular eyepiece
- Eyecup/Diopter adjustment ring
- Diopter index
- Strap eyelet
- Battery chamber cover
- Battery chamber cover "Open" indication
- Product number label
12.Indication
IEC60825-1 CLASS 1M LASER PRODUCT DO NOT EXPOSE USERS OF TELESCOPIC OPTICS. FDA CLASS I LASER PRODUCT THIS PRODUCT COMPLIES WITH

*The carabiner-like ring that comes with the case is for the purpose of carrying the Laser Rangefinder only. Do not hang anything heavy on it, nor tug on it strongly. It cannot be used for climbing.
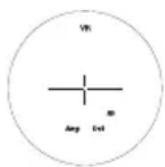
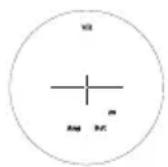
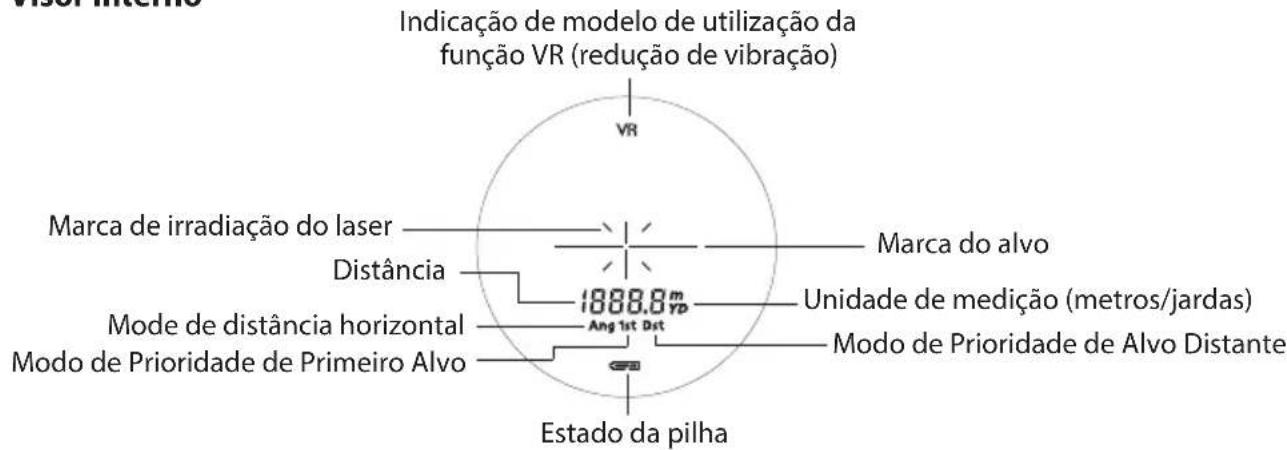
Internal display
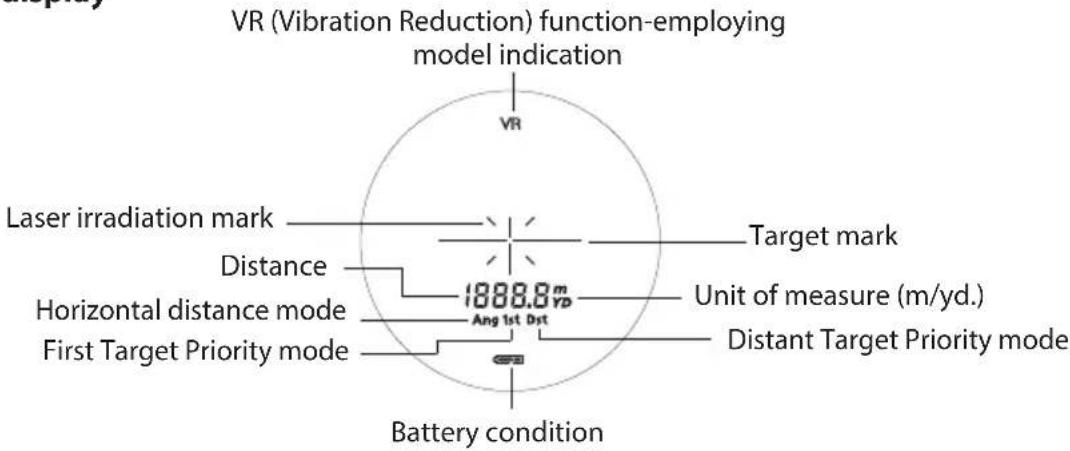
——: Aim at the target you want to measure. Position the target at the center of the reticle.
: Appears while the laser is being irradiated for a measurement. Do not look towards the objective lens side while this mark is shown.
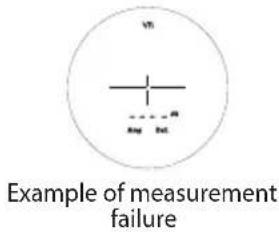
- - - - : "Failure to measure" or "Unable to measure"
*Because the internal display of this product is enlarged by the eyepiece, dust may sometimes be seen. This will not, however, affect the measurement accuracy.
[Functions]
■ VR (Vibration Reduction) function
● ON and OFF
The VR (Vibration Reduction) function is activated concurrently when the Laser Rangefinder is ON.
When the Laser Rangefinder is OFF, the VR (Vibration Reduction) function automatically turns off.

■ Target priority mode (First Target Priority mode/Distant Target Priority mode)
This Nikon Laser Rangefinder employs the First Target Priority/Distant Target Priority switching system. (Factory default setting is Distant Target Priority mode.)
When measuring overlapping subjects:
First Target Priority mode displays the distance of the closest subject and Distant Target Priority mode displays that of the farthest subject.
[First step]
■ Inserting/Replacing battery
1. Type of battery
3V CR2 lithium battery x1
2. Inserting/Replacing battery
2-1. Open the battery chamber cover
Rotate the battery chamber cover counterclockwise and remove it. It may not open easily due to its rubber packing for water resistance.
2-2. Insert the battery/Replace the old battery with a new one
Insert a new battery correctly positioned following the indication seal inside the chamber.
The [+] pole should be positioned toward the inside of the chamber. If the battery is not inserted correctly, the Nikon Laser Rangefinder will not operate. When replacing the battery, remove the old battery then insert a new one.
2-3. Close the battery chamber cover
Rotate the battery chamber cover clockwise to screw it into the body. It may not close easily due to the rubber packing for water resistance, but continue to turn it all the way until it stops. Confirm that the cover is securely closed.
3. Battery level indicator
*The battery condition mark in the internal display warns when the battery needs to be replaced.
| Display Description | ||
| After power on, displays for 2 seconds only. | Sufficient power available. | |
| After power on, displays for 2 seconds only. | Power getting low.Prepare to replace the battery. | |
| Displayed continuously. | Low. Battery should be replaced with a new one. | |
| Blinks. After blinking 3 times, automatically powers off. | Power exhausted.Replace the battery. | |
[Mode settings]
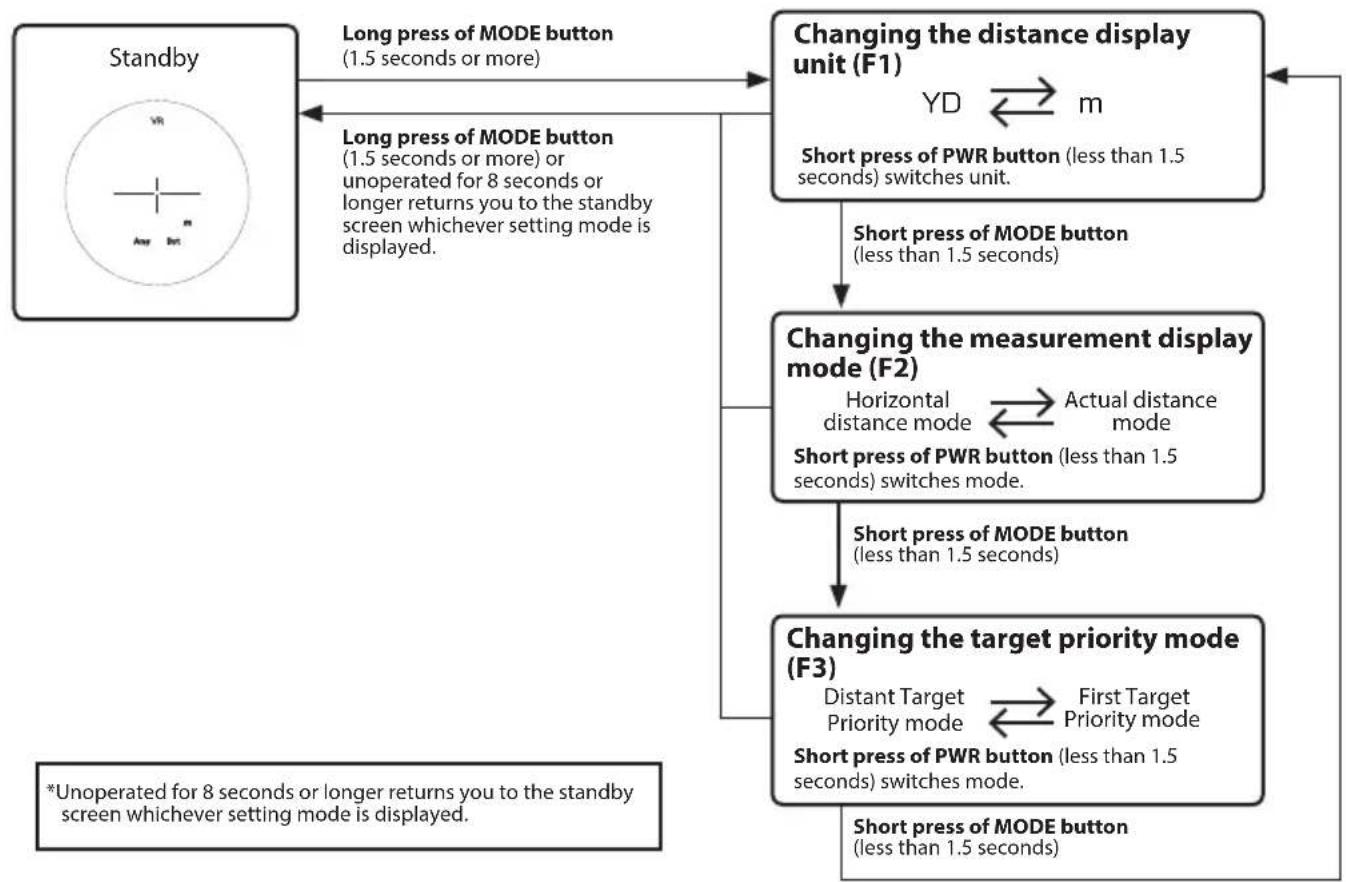
Operation overview
flowchart
graph TD
    A["Standby"] -->|Long press of MODE button (1.5 seconds or more)| B["Changing the distance display unit (F1)"]
    B -->|Short press of PWR button (less than 1.5 seconds) switches unit.| C["Changing the measurement display mode (F2)"]
    C -->|Short press of MODE button (less than 1.5 seconds)| D["Changing the target priority mode (F3)"]
    D -->|Short press of PWR button (less than 1.5 seconds) switches mode.| E["*Unoperated for 8 seconds or longer returns you to the standby screen whichever setting mode is displayed."]
    B -->|YD ↔ m| F["Short press of PWR button (less than 1.5 seconds)"]
    C -->|Horizontal distance mode ↔ Actual distance mode| G["Short press of PWR button (less than 1.5 seconds) switches mode."]
    D -->|Distant Target Priority mode ↔ First Target Priority mode| H["Short press of PWR button (less than 1.5 seconds) switches mode."]
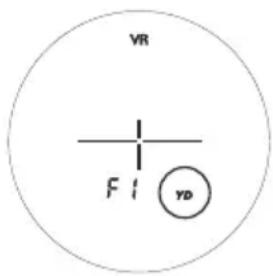
■ Changing the distance display unit (m/YD) (F1)
Factory default setting is yard (YD).
- From standby, a long press (1.5 seconds or more) of the MODE button displays the setting menu of the distance display unit (F1).
- Short press (less than 1.5 seconds) of the PWR button switches units of meter and yard.
- After setting, a short press (less than 1.5 seconds) of the MODE button displays the setting menu of the measurement display mode (F2).
When setting is completed, a long press (1.5 seconds or more) of the MODE button or unoperated more than 8 seconds returns you to standby.

flowchart
graph LR
    YD --> m
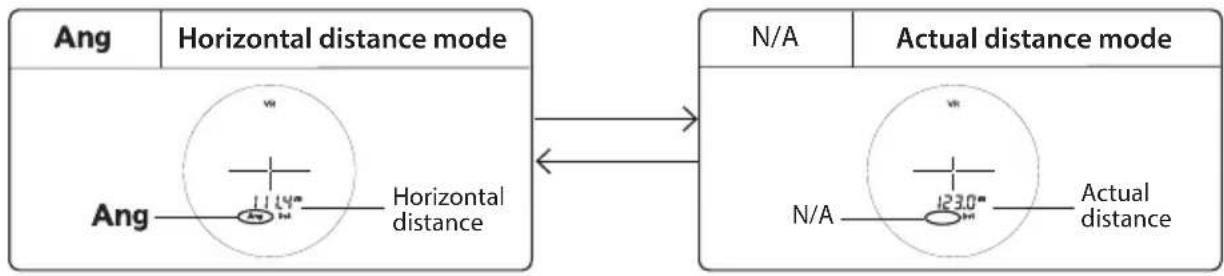
■ Changing the measurement display mode (F2)
Horizontal distance mode and actual distance mode can be switched.
Factory default setting is horizontal distance mode.
- From standby, a long press (1.5 seconds or more) of the MODE button, then a short press (less than 1.5 seconds) of the MODE button displays the setting menu of the measurement display mode (F2).
- Short press (less than 1.5 seconds) of the PWR button switches the measurement display mode.
- After setting, a short press (less than 1.5 seconds) of the MODE button displays the setting menu for target priority mode (F3).
When setting is completed, a long press (1.5 seconds or more) of the MODE button or unoperated more than 8 seconds returns you to standby.
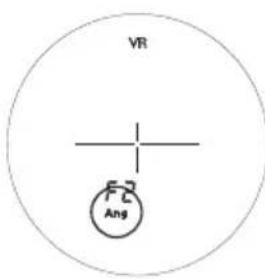
Displayed item differs according to the setting mode.
flowchart
graph LR
    A["Ang"] --> B["Horizontal distance mode"]
    C["Ang"] --> D["Horizontal distance"]
    E["N/A"] --> F["Actual distance mode"]
    G["N/A"] --> H["Actual distance"]
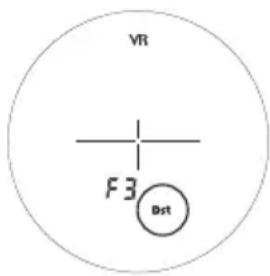
■ Changing the target priority mode (F3)
This Nikon Laser Rangefinder employs the First Target Priority/Distant Target Priority switching system.
Factory default setting is Distant Target Priority mode.
- From standby, a long press (1.5 seconds or more) of the MODE button, then a short press (less than 1.5 seconds) of the MODE button twice displays the setting menu of the target priority mode (F3).
- Short press (less than 1.5 seconds) of the PWR button switches the target priority mode.
- After setting, a long press (1.5 seconds or more) of the MODE button or unoperated more than 8 seconds returns you to standby.
[First Target Priority mode/Distant Target Priority mode]
When measuring overlapping subjects:
First Target Priority mode displays the distance of the closest subject and Distant Target Priority mode displays that of the farthest subject.

flowchart
graph LR
    Dst --> 1st
[Measurement]
Caution — Controls, adjustments or usage of procedures other than those specified herein may produce negative effects or damage to your health due to laser radiation.
*Before measuring, be sure to confirm each mode setting.
*Please refer to each section on how to set each mode.
■ Adjusting diopter
Adjust the diopter to obtain a clear internal display in the viewfinder.
First, rotate the diopter adjustment ring counterclockwise until it comes to a complete stop.
Next, turn on the power and rotate the diopter adjustment ring back and forth until the internal display comes into focus.
Measuring
- Turn on the power.
(Automatic power shut-off after approx. 8 seconds unoperated.)
Immediately after power-on
Standby
- Aim at the target.
Position the target at the center of the target mark.
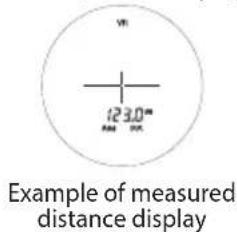
- Pressing the PWR button starts measurement.
After measurement, the result is displayed for approx. 8 seconds, then power automatically turns off. If you press the PWR button during power-on, another measurement starts.
Single measurement
Pressing the PWR button once starts single measurement, then displays the results.
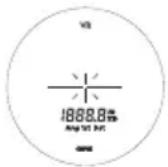
Continuous measurement
Press and hold down the PWR button to start continuous measurement up to approx. 8 seconds. During measurement, the measured result is displayed consecutively while the laser irradiation mark is blinking. If you release your finger from the button, continuous measurement stops.
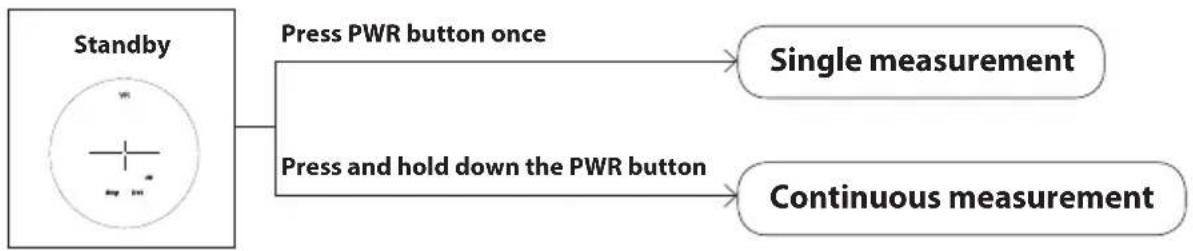
flowchart
graph TD
    A["Standby"] --> B["Press PWR button once"]
    A --> C["Press and hold down the PWR button"]
    B --> D["Single measurement"]
    C --> E["Continuous measurement"]
[Technical notes]
Specifications
| Model MONARCH 7i VR | |
| Measurement system | |
| Measurement range (actual distance) | 7.3-915 meters/8-1,000 yards |
| Distance display (increment) Every 0.1m/yd. | |
| Optical system | |
| Magnification (x) 6 | |
| Effective diameter of objective lens (mm) | 21 |
| Angular field of view (real) (°) 7.5 | |
| Eye relief (mm) 18.0 | |
| Exit pupil (mm) 3.5 | |
| Diopter adjustment ±4m | -1 |
| Others | |
| Operating temperature (°C/°F) | -10 — +50/14 — 122 |
| Operating humidity (%RH) 80 or less (without dew condensation) | |
| Power source | CR2 lithium battery x 1 (DC 3V)Automatic power shut-off (after approx. 8 sec. unoperated) |
| Dimensions (L x H x W) (mm/in.) 99 x 75 x 48/3.9 x 3.0 x 1.9 | |
| Weight (g/oz.) Approx. 200/7.1 (without battery) | |
| Structure | Waterproof (up to 1m/3.3 ft. for 10 minutes)*, fogproofBattery chamber is rainproof — JIS/IEC protection class 4 (IPX4) equivalent (under Nikon's testing conditions)** |
| Electromagnetic compatibility | FCC Part15 SubPartB class B, EU:EMC directive, AS/NZS, VCCI classB, CU TR 020 |
| Environment | RoHS, WEEE |
| Laser | |
| Laser classification | IEC60825-1: Class 1M/Laser ProductFDA/21 CFR Part 1040.10:Class I Laser Product |
| Wavelength (nm) 905 | |
| Pulse duration (ns) 9 | |
| Output (W) 20 | |
| Beam divergence (mrad) | Vertical: 1.8, Horizontal: 0.25 |
\* Waterproof models
This Nikon Laser Rangefinder is waterproof, and will suffer no damage to the optical system nor observation if submerged or dropped in water to a maximum depth of 1 meter/3.3 feet for up to 10 minutes.
The Nikon Laser Rangefinder offers the following advantages:
- Can be used in conditions of high humidity, dust and rain without risk of damage to internal functions.
- Nitrogen-filled design makes it resistant to condensation and mold.
Observe the following when using the Nikon Laser Rangefinder:
- The unit is not a sealed structure, so it should not be operated nor held in running water.
- If any moisture is found on movable parts of this equipment, stop using it and wipe it off.
**The battery chamber is rainproof, not waterproof. Water may enter the device if the Rangefinder is submerged in water. If water enters the battery chamber, wipe out any moisture and allow time for the chamber to dry.
Battery life
Continuous operation: Approx. 3,300 times (at approx. 20°C)
This figure may differ according to conditions such as temperature and other factors. Use only as a guide.
- The battery supplied with this Nikon Laser Rangefinder is for operation checking. Due to natural electrical discharge, the life of this battery will likely be shorter than that noted above.
- If water enters the battery chamber due to submersion, dry the battery chamber well, then replace the battery.
Troubleshooting/Repair
If the Nikon Laser Rangefinder fails to function as expected, check the list below before consulting your local dealer or the store where you purchased it.
- If there is a problem with the product.
| Problem Cause/Solution | |
| • Does not turn on | • Press the PWR button (top of the body).• Check battery is inserted correctly.• Replace the battery with a new one. |
| • Unable to measure• Anomalous result | • Confirm each mode setting.• Confirm if it can measure a large target close to you (example: a building approx. 15m/yd. ahead of you).• Clean the lens surface if necessary. |
| • Do not know if the VR (Vibration Reduction) function is working | • Compare the vibration of the target in the viewfinder when the Laser Rangefinder is ON and OFF.• While the Laser Rangefinder is ON, the VR (Vibration Reduction) function is always activated. |
| • Cannot turn off the VR (Vibration Reduction) function | • The VR (Vibration Reduction) function is activated concurrently when the Laser Rangefinder is ON. When the Laser Rangefinder is OFF, the VR (Vibration Reduction) function automatically turns off.• The VR (Vibration Reduction) function cannot be switched on and off. |
| • There are minute motion sounds when the power turns on and off | • Due to the VR (Vibration Reduction) system motor, minute motion sounds occur. These sounds are normal, please continue to use the Laser Rangefinder. |
| • [E] is displayed in the internal display | • Failure indication. Please contact your local dealer or the store where you purchased the product. |
- If you require a repair, please contact your local dealer or the store where you purchased the product. Do not repair or disassemble. It may result in a serious incident. Please note that Nikon is not responsible for any direct or indirect damage if the user attempts repair or disassembly.
Español
CONTENIDO
[Introducción]
Introducción 24
Componentes
• Cuerpo .....x1
• Correa .....x1
• Caja ......x1
IEC60825-1 CLASS 1M LASER PRODUCT DO NOT EXPOSE USERS OF TELESCOPIC OPTICS. FDA CLASS I LASER PRODUCT THIS PRODUCT COMPLIES WITH 21CFR1040.10 (c)(d)AND (e)
MADE IN CHINA
flowchart
graph LR
    YD --> m

flowchart
graph LR
    Dst --> 1st
[Medición]
Composition
• Boîtier .....x1
• Lanière ..... x1
• Housse ..... x1
• Pile au lithium (CR2) ...x1
IEC60825-1 CLASS 1M LASER PRODUCT DO NOT EXPOSE USERS OF TELESCOPIC OPTICS. FDA CLASS I LASER PRODUCT THIS PRODUCT COMPLIES WITH 21CFR1040.10 (c)(d)AND (e)

flowchart
graph LR
    A["YD"] <--> B["m"]
flowchart
graph LR
    Dst --> 1st

[Mesure]
Composição
IEC60825-1 CLASS 1M LASER PRODUCT DO NOT EXPOSE USERS OF TELESCOPIC OPTICS. FDA CLASS I LASER PRODUCT THIS PRODUCT COMPLIES WITH 21CFR1040.10 (c)(d)AND (e)

Visor interno
flowchart
graph LR
    YD --> m
Printed in China (295K)1E/1605