
LaserForce - Laser pointer NIKON - Free user manual and instructions
Find the device manual for free LaserForce NIKON in PDF.


| Product Type | Nikon LaserForce Laser Rangefinder |
| Measurement Range (Actual Distance) | 5-730 m / 6-800 yd |
| Distance Display Increment | 1 m/yd |
| Accuracy (Actual Distance) | ±1 m/yd (shorter than 100 m/yd), ±2 m/yd (100 m/yd and over) |
| Magnification | 6× |
| Effective Diameter of Objective Lens | 20 mm |
| Angular Field of View (Real) | 6.0° |
| Eye Relief | 16.7 mm |
| Exit Pupil | 3.3 mm |
| Diopter Adjustment | ±4 m⁻¹ |
| Dimensions (L × H × W) | 91 × 73 × 37 mm (3.6 × 2.9 × 1.5 in) |
| Weight (without battery) | Approx. 130 g (4.6 oz) |
| Power Source | CR2 lithium battery ×1 (DC 3V) |
| Battery Life | Approx. 10,000 measurements (at 20°C/68°F) |
| Auto Power Off | After approx. 8 sec of inactivity |
| Laser Classification | IEC60825-1: Class 1M Laser Product; FDA/21 CFR 1040.10: Class I Laser Product |
| Wavelength | 905 nm |
| Pulse Duration | 20 ns |
| Output | 15.2 W |
| Beam Divergence | Vertical: 2.5 mrad, Horizontal: 0.2 mrad |
| Water Resistance | Rainproof (equivalent to JIS/IEC protection class 4 IPX4) |
| Operating Temperature | -10°C to +50°C (14°F to 122°F) |
| Operating Humidity | 80% or less (without dew condensation) |
| Measurement Modes | Golf mode (slope adjusted distance + actual distance), Actual distance mode |
| Display Unit Options | Yards (YD) or meters (m) |
Frequently Asked Questions - LaserForce NIKON
User questions about LaserForce NIKON
0 question about this device. Answer the ones you know or ask your own.
Ask a new question about this device
Download the instructions for your Laser pointer in PDF format for free! Find your manual LaserForce - NIKON and take your electronic device back in hand. On this page are published all the documents necessary for the use of your device. LaserForce by NIKON.
USER MANUAL LaserForce NIKON
手入れ・保守に関するご注意
レンズ
①直線距離(Gモード時)
---:測定失敗、または測定不能
②ターゲットマーク
natural_image
Pure mechanical diagram showing a circular ring with hatched fill and an arrow indicating rotation (no text or symbols)視度調整リング
■ 測定する
電源オン直後
natural_image
Simple circular diagram with a plus sign and a diagonal line, no text or symbols present.ターゲットマーク
Thank you for purchasing the Nikon laser rangefinder. Before using the product, read this manual thoroughly to ensure proper use. Safety and operation precautions are on page 16. After reading this manual, keep it in a readily accessible place for future reference.
○● About the manual
- No part of the manual may be reproduced, transmitted, transcribed, stored in a retrieval system, or translated into any language in any form, by any means, without Nikon's prior written permission.
- Illustrations and display content shown in this manual may differ from the actual product.
- Nikon will not be held liable for any errors this manual may contain.
- The appearance, specifications, and capabilities of this product are subject to change without notice.
○● About controls for radio interference
- This device complies with Part 15 of the FCC Rules. Operation is subject to the following two conditions:
(1) This device may not cause harmful interference, and
(2) This device must accept any interference received, including interference that may cause undesired operation.
- This equipment has been tested and found to comply with the limits for a Class B digital device, pursuant to Part 15 of the FCC Rules and to EU EMC directive. These limits are designed to provide reasonable protection against harmful interference in a residential installation. This equipment generates, uses and can radiate radio frequency energy and, if not installed and used in accordance with the instructions, may cause harmful interference to radio communications. However, there is no guarantee that interference will not occur in a particular installation. If this equipment does cause harmful interference to radio or television reception, which can be determined by turning the equipment off and on, the user is encouraged to try to correct the interference by one or more of the following measures:
- Reorient or relocate the receiving antenna.
- Increase the separation between the equipment and receiver.
- Consult the dealer or an experienced radio/TV technician for help.
Notice for customers in Canada
CAN ICES-3(B)/NMB-3(B)
■ SAFETY AND OPERATION PRECAUTIONS
Strictly observe the guidelines contained in this manual in order to use this product safely and prevent possible injury or property damage to you and others. Understand the contents thoroughly for correct use of the product.
WARNING
This indicates that improper use by ignoring the contents described herein can result in potential death or serious injury.
CAUTION
This indicates that improper use by ignoring the contents described herein can result in potential injury or material loss.
SAFETY PRECAUTIONS (Laser)
This product uses an invisible laser beam. Be sure to observe the following:
WARNING
- Do not press the PWR button while looking into the laser emission aperture. You may damage your eyes.
- Do not aim at eyes.
- Do not point the laser at people.
- Do not look at lasers with other optical instruments such as lenses or binoculars. You may damage your eyes.
- When not measuring, keep your fingers away from the PWR button to avoid accidentally emitting the laser.
- When not in use for an extended period, remove the battery.
- Do not disassemble or remodel the product. The laser emission may be harmful to your health. If the product is disassembled, remodeled, or repaired, it is no longer guaranteed by the manufacturer.
- Store the product in a place out of reach of children.
SAFETY PRECAUTIONS (Monocular)
WARNING
- Never look directly at the sun, intense light, or lasers while using this product. It may seriously damage the eyes or cause blindness.
- Keep this product at least 5 cm (2 in.) away from medical devices such as cardiac pacemakers. Magnets built into the product and accessories may affect medical devices if placed too close.
CAUTION
- Keep the plastic bag used to wrap this product or other small parts out of reach of children. The bag may block their mouths and noses and cause them to suffocate.
- Be careful of children inadvertently swallowing small parts or accessories. If children swallow such parts, see a doctor immediately.
- Turn off this product when not in use.
- When carrying this product, store it in the case.
- If this product fails to operate correctly for any reason, discontinue use immediately and consult with a Nikon authorized service representative.
- Do not leave this product in an unstable place. It may fall and cause injury or malfunction.
- Do not use this product while walking. You may walk into something or fall and cause injury or malfunction.
- Do not swing this product by the strap. You may hit others and cause injury.
- The rubber parts of this product (such as the eyecup) may deteriorate if used or stored for a long period of time. The deteriorated rubber may attach on clothes and cause stains. Check their condition before use, and consult with a Nikon authorized service representative if a defect is found.
- Using the rubber eyecup for extended periods of time may cause skin inflammation. If you develop any symptoms, stop use and see a doctor immediately.
PRECAUTIONS (Lithium battery)
Incorrect use may cause the lithium battery to rupture or leak, which will corrode the device or stain your hands and clothing. Be sure to observe the following:
- Install the battery with the + and – poles positioned correctly.
- Remove the battery when this is depleted or will not be used for extended periods.
- Keep the battery away from fire or water. Never disassemble the battery.
- Do not charge the lithium battery.
- Do not short the terminal of the battery chamber.
- Do not carry the battery together with keys or coins in a pocket or bag. You may short the battery and cause overheating.
- If liquid leaked from the lithium battery comes into contact with clothing or skin, rinse with plenty of water. If it enters the eyes or mouth, rinse with water and consult a doctor immediately.
- When disposing of the lithium battery, follow your local area regulations.
HANDLING AND OPERATION PRECAUTIONS
- Do not subject this product to physical shock.
- If you accidentally apply strong physical shock or drop the product and suspect a malfunction, consult with your local dealer or a Nikon authorized service representative immediately.
- Do not use the product underwater.
- Wipe off any rain, water, sand, or mud on the product as soon as possible with a soft, clean cloth.
- When this product is exposed to extreme temperature changes (suddenly brought from a cold place to a warm place or vice versa), the lens surfaces may get cloudy. Do not use the product until the cloudiness has disappeared.
- Do not leave the product in a car on a hot or sunny day, or near heat generating equipment.
- Do not leave the eyepiece in direct sunlight. The condenser effect of the lens may damage the internal display surface.
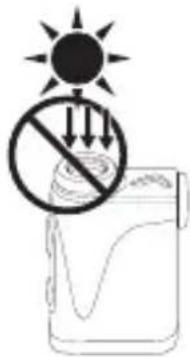
CARE AND MAINTENANCE PRECAUTIONS
LENS
Be careful that you do not directly touch the lens surface with your hands when cleaning it. Remove dust or lint with a blower*. For fingerprints or other stains that cannot be removed with a blower, wipe the lens with a dry soft cloth or cleaning cloth for eyeglasses, using a spiral motion that starts at the center of the lens and working towards the edges. Wiping too firmly or wiping with a hard material may damage the lens. If this fails, gently wipe the lens using a cloth lightly dampened with commercial lens cleaner.
MAIN BODY
After gently removing dust with a blower, clean the body surface with a soft, clean cloth. After use at a seaside, wipe off salt that may be on the body surface with a damp, soft, clean cloth, and then wipe with a dry cloth. Do not use benzene, thinner, or other cleaners containing organic solvents.
STORAGE
Water condensation or mold may occur on lens surfaces because of high humidity. Therefore, store the product in a cool, dry place. After use on a rainy day or at night, thoroughly dry it at room temperature, then store in a cool, dry place.
* A rubber cleaning tool that blows air from a nozzle.

Symbol for separate collection applicable in European countries
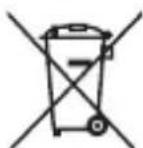
This symbol indicates that this battery is to be collected separately.
The following apply only to users in European countries.
- This battery is designated for separate collection at an appropriate collection point. Do not dispose of as household waste.
• For more information, contact the retailer or the local authorities in charge of waste management.

Symbol for separate collection applicable in European countries
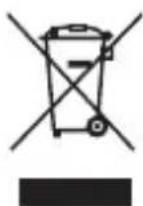
This symbol indicates that this product is to be collected separately.
The following apply only to users in European countries.
- This product is designated for separate collection at an appropriate collection point. Do not dispose of as household waste.
- For more information, contact the retailer or the local authorities in charge of waste management.
Getting to know the laser rangefinder
■ About the laser
This product uses an invisible laser beam for measurement. It measures the time the laser beam takes to travel from the rangefinder to the target and back. Laser reflectivity and measurement results may vary according to climatic and environmental conditions, as well as the color, surface finish, size, shape and other characteristics of the target.
Measurement may be inaccurate or fail in the following cases:
• In snow, rain or fog
- Small or slender target
- Black or dark target
• Target has uneven surface
- Moving or vibrating target
- When measuring the surface of water
• Target measured through glass
- When the target is glass or a mirror
- When laser incidence to the target's reflective surface is oblique
■ About measurement results
This device is a basic rangefinder. Its measurement results cannot be used as official evidence.
■ Nomenclature/Composition
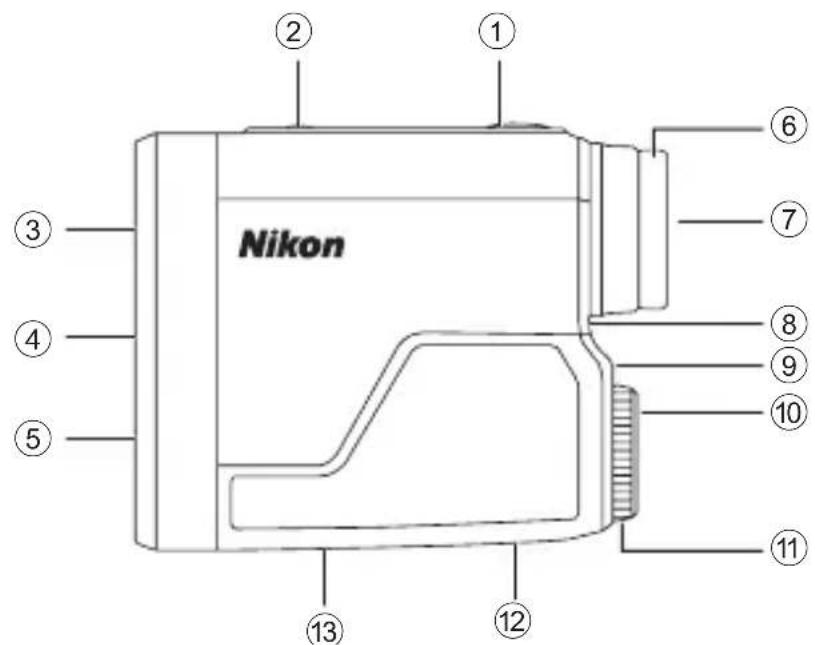
① PWR button (POWER ON/Measurement button)
② MODE button
③ Monocular objective lens
④ Laser emission aperture
⑤ Laser detector aperture
⑥ Eyecup/Diopter adjustment ring
⑦ 6× monocular eyepiece
⑧ Diopter index
⑨ Strap eyelet
⑩ Battery-chamber cover "Open" indication
⑪ Battery-chamber cover
⑫ Product number label
⑬ Indication
IEC60825-1 CLASS 1M LASER PRODUCT DO NOT EXPOSE USERS OF TELESCOPIC OPTICS.
COMPLIES WITH
21CFR1040.10
AND 1040.11
CAN ICES-3(B)/NMB-3(B)
UK CA CE 10 EAC

• Lithium battery (CR2) ×1
■ Internal display
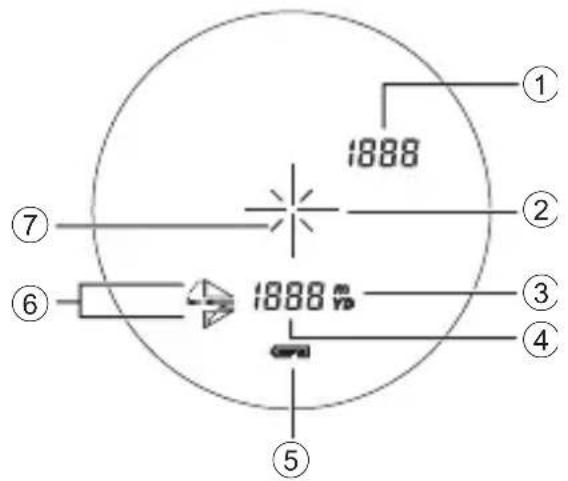
① Actual distance at golf mode setting
---: "Failure to measure" or "Unable to measure"
② Target mark
+: Aim at the target you want to measure.
Position the target at the center of the mark.
③ Unit of measure (m: meter/YD: yard)
④ Distance
---: "Failure to measure" or "Unable to measure"
⑤ Battery level indicator
• : Sufficient power available.
• : Power getting low.
- ☐: Low. Replace the battery. If the icon flashes, the product will automatically turn off.
⑥ Measurement display mode indications
⑦ Laser irradiation mark
×: Appears while the laser is being irradiated for measurement. Do not look towards the objective lens side while this mark is shown.
- The internal display of this product is enlarged by the eyepiece. Although you may see dust that has entered, it does not effect the accuracy of measurement.
Inserting the battery
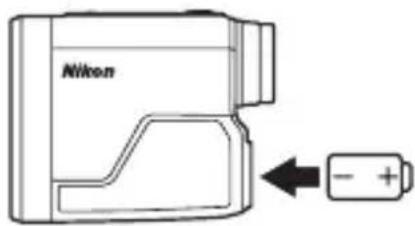
-
Rotate the battery-chamber cover counterclockwise to open the cover.
-
Insert the 3V CR2 lithium battery. Follow the battery insertion mark inside the battery chamber to insert the + and - ends of the battery in the correct orientation.
-
Replace the cover and rotate it clockwise until it stops rotating. Make sure that the cover is securely attached to maintain its water resistance capabilities.
Changing the settings
○● Menu options
① Measurement display mode (default: golf mode)
Select from two modes according to your golf playstyle. The displayed information differs depending on the mode.
| Golf mode: Slope adjusted distance (horizontal distance ± height) and actual distance | N/A | Actual distance mode |
| Incline Decline | 123—Actual distance 163—Slope adjusted distance (horizontal distance ± height) | N/A Actual 123°—distance |
② Distance display unit (default: YD)
Select YD (yards) or m (meters) for the display unit of the measurement results.
○● Menu operations
- Press the PWR button to turn on the product, and look at the internal display through the eyepiece.
- Press the MODE button to change the settings as described below.
- To change the measurement display mode: The setting switches every time you press the MODE button.
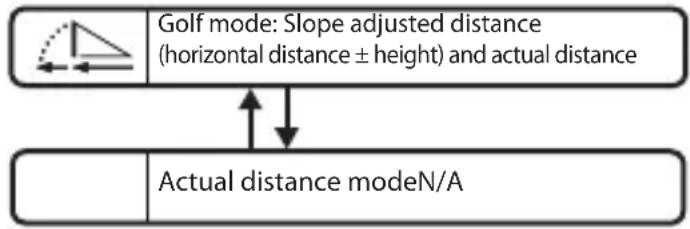
flowchart
graph TD
    A["Golf mode: Slope adjusted distance (horizontal distance ± height) and actual distance"] --> B["Actual distance modeN/A"]
    B --> A
- To change the distance display unit: The setting switches every time you press and hold the MODE button.

flowchart
graph LR
    A["YD (yard) (meter)"] --> B["m"]
Notes:
- The setting is saved even when the product is turned off.
Measurement
⚠️ CAUTION: Controls, adjustments or usage of procedures other than those specified herein may produce negative effects or damage to your health due to laser radiation.
■ Adjusting the focus of the internal display
If the internal display is difficult to see, adjust the focus with the following procedure.
- Press the PWR button to turn on the power.
- Look through the eyepiece and rotate the diopter adjustment ring until the internal display comes into focus.
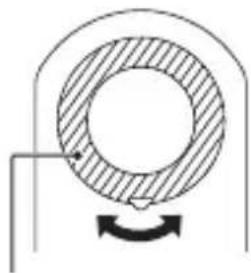
natural_image
Pure mechanical diagram showing a ring with hatched fill and rotational arrow (no text or symbols)Diopter adjustment ring
■ Measuring
- Press the PWR button to turn on the power. If you do not operate the buttons for about 8 seconds, the power turns off automatically.
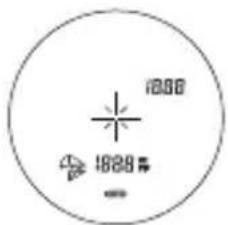
Immediately after power-on
- Aim at the target. Position the center of the target mark on the target.
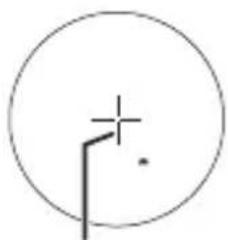
natural_image
Simple geometric diagram with a circle, a plus sign, and a diagonal line (no text or symbols)Target mark
-
Press the PWR button to measure.
-
Single and continuous measurements are available. *1
- The product may vibrate for approx. 0.2 seconds (LOCKED ON QUAKE).*2
• After measurement, the result is displayed for approx. 8 seconds, then the power turns off automatically.
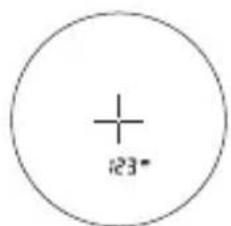
Example of measured distance display
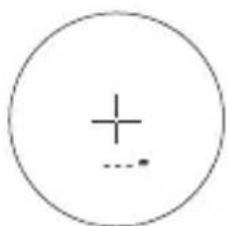
Example of measurement failure
- Press the PWR button while the power is on to measure again.
*1 Single measurement versus continuous measurement
- Single measurement: Pressing the PWR button once starts single measurement, then displays the results. If measurement fails, measurement continues automatically for up to about 4 seconds until results are obtained.
- Continuous measurement: Press and hold down the PWR button to start continuous measurement up to approx. 8 seconds. During measurement, the measured result is displayed continuously while the laser irradiation mark is blinking. If you release your finger from the button, continuous measurement stops.
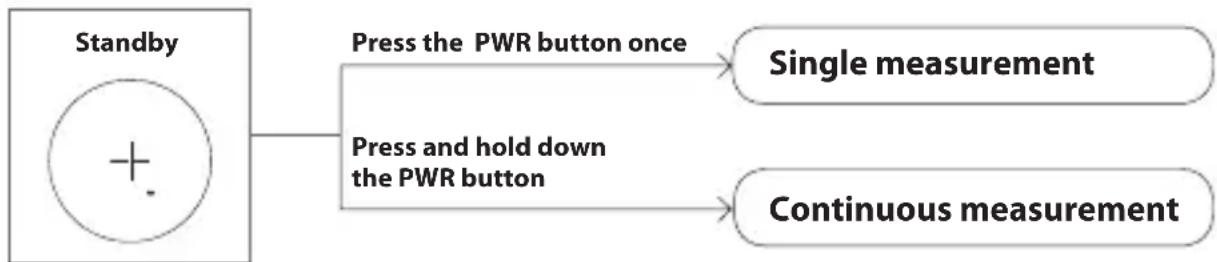
flowchart
graph LR
    A["Standby"] --> B["Press the PWR button once"]
    A --> C["Press and hold down the PWR button"]
    B --> D["Single measurement"]
    C --> E["Continuous measurement"]
*2 LOCKED ON QUAKE (first target priority detection notice function)
When measuring overlapping subjects, such as a flagstick (first target) with trees in the background (distant target), the product vibrates to notify you that the distance to the closest subject (first target) is displayed.
- Single measurement: When measuring overlapping subjects and the distance to the closest subject is displayed, the product vibrates briefly.
- Continuous measurement: Same as single measurement. The product also vibrates briefly when displayed figures shift to a closer subject.
- When measuring a flagstick at a golf course Keep targeting the flagstick at the center of the target mark with the continuous measurement function to minimize the effects of hand shake.
Technical notes
■ Specifications
| Measurement range (actual distance) | 5-730 m/6-800 yd. |
| Distance display (increment) | 1 m/yd. |
| Accuracy (actual distance)^*1 | ±1 m/yd. (shorter than 100 m/yd.) ±2 m/yd. (100 m/yd. and over) |
| Magnification (×) 6 | |
| Effective diameter of objective lens (mm) | 20 |
| Angular field of view (real) (°) | 6.0 |
| Eye relief (mm) 16.7 | |
| Exit pupil (mm) 3.3 | |
| Diopter adjustment ±4 m | -1 |
| Dimensions (L × H × W) (mm/in.) | 91 × 73 × 37/3.6 × 2.9 × 1.5 |
| Weight (g/oz.) Approx. | 130/4.6 (without battery) |
| Operating temperature (°C/°F) | -10 — +50/14 — 122 |
| Operating humidity (%RH) | 80 or less (without dew condensation) |
| Power source | CR2 lithium battery × 1 (DC 3V) Automatic power shut-off (after approx. 8 sec. unoperated) |
| Structure Rainproof | *2 |
| Electromagnetic compatibility | FCC Part15 SubPartB class B, EU:EMC directive, AS/NZS, VCCI classB, CU TR 020, ICES-003, GB: Electromagnetic Compatibility Regulations |
| Environment RoHS, WEEE | |
| Laser classification | IEC60825-1: Class 1M/Laser Product FDA/21 CFR Part 1040.10: Class I Laser Product |
| Wavelength (nm) 905 | |
| Pulse duration (ns) 20 | |
| Output (W) 15.2 | |
| Beam divergence (mrad) | Vertical: 2.5, Horizontal: 0.2 |
- The specifications of the product may not be achieved depending on the target object's shape, surface texture and nature, and/or weather conditions.
*1 Under Nikon's measurement conditions.
*2 This product is equivalent to JIS/IEC protection class 4 (IPX4) (under Nikon's testing conditions). This rating does not guarantee the water resistance performance of the unit or that it will be free from damage or problems under all conditions. Please observe the following when using:
- Do not operate or hold the product in running water.
- If any moisture is found on movable parts of this product, stop using the product and wipe it off.
Battery life
Approx. 10,000 measurements (at approx. 20°C (68°F))
This figure may differ according to conditions such as temperature and other factors. Use only as a guide.
- The battery supplied with this product is for operation checking. Due to natural electrical discharge, the life of this battery will likely be shorter than that noted above.
■ Troubleshooting/Repair
If this product fails to function as expected, check the list below before consulting your local dealer or the store where you purchased it.
○● If there is a problem with the product
Does not turn on
- Press the PWR button (top of the body).
- Check that the battery is inserted correctly.
- Replace the battery with a new one.
Unable to measure / Anomalous result
- Confirm the settings.
- Confirm if it can measure a large target close to you (example: a building approx. 15 m/yd. ahead of you).
- Clean the lens surface if necessary.
○● When requesting for repair
Please contact your local dealer or the store where you purchased the product. Do not disassemble. It may result in a serious incident.
Please note that Nikon is not responsible for any direct or indirect damage if the user attempts to disassemble the product.
소개
■ 먼저 읽어 주십시오
관리 및 유지보수 예방책
렌즈
① 골프 모드 설정 시 실제 거리
전원이 켜진 후 즉시
natural_image
Simple geometric diagram with a circle, a plus sign, and a perpendicular line (no text or labels)목표물 표시
- PWR 버튼을 눌러 측정하십시오.
- 手入れ・保守に関するご注意
- レンズ
- ■ 測定する
- ○● About the manual
- ○● About controls for radio interference
- ■ SAFETY AND OPERATION PRECAUTIONS
- WARNING
- CAUTION
- SAFETY PRECAUTIONS (Laser)
- SAFETY PRECAUTIONS (Monocular)
- PRECAUTIONS (Lithium battery)
- HANDLING AND OPERATION PRECAUTIONS
- CARE AND MAINTENANCE PRECAUTIONS
- LENS
- MAIN BODY
- STORAGE
- Symbol for separate collection applicable in European countries
- Getting to know the laser rangefinder
- ■ About the laser
- Measurement may be inaccurate or fail in the following cases:
- ■ About measurement results
- ■ Nomenclature/Composition
- ■ Internal display
- Inserting the battery
- Changing the settings
- ○● Menu options
- ① Measurement display mode (default: golf mode)
- ② Distance display unit (default: YD)
- ○● Menu operations
- Notes:
- Measurement
- ■ Adjusting the focus of the internal display
- ■ Measuring
- Technical notes
- Battery life
- ■ Troubleshooting/Repair
- Does not turn on
- Unable to measure / Anomalous result
- 소개
- ■ 먼저 읽어 주십시오
- 관리 및 유지보수 예방책
- 렌즈
Brand : NIKON
Model : LaserForce
Category : Laser pointer