USER MANUAL imageRUNNER 1730i CANON
User's Guide Read this guide first.
Please read this guide before operating this product.
After you finish reading this guide, store it in a safe place for future reference.
imageRUNNER 1750i/1740i/1730i User's Guide

Manuals for the Machine
The manuals for this machine are organized as shown below. Please refer to them for detailed information. Some manuals may not be needed for certain system configurations and products purchased.

Guides with this symbol are printed manuals.
• Installation of the Machine
- Legal Notices
- Setup Instructions
- Quick Reference for Basic Operations
- Basic Operations
- Troubleshooting
- Copying Instructions
- Sending and Fax Instructions
- Remote User Interface Instructions
• Network Connectivity
• Security Management
• Color Network ScanGear Instructions
• USB Memory Media Printing Instructions
• PS/PCL/UFRII LT Printer Instructions
- Windows Printer Driver Instructions
- Windows Fax Driver Instructions

Guides with this symbol are PDF manuals included on the accompanying CD-ROM.
Starter Guide
User's Guide (This Document)
Easy Operation Guide
Reference Guide
Copying Guide
Sending and Facsimile Guide
Remote UI Guide
System Settings Guide
Network ScanGear Guide
Printer Guide
Windows Printer Driver Guide
Windows Fax Driver Guide


How This Manual Is Organized
Chapter 1 Precautions for the Machine Installation
Chapter 2 Before You Start Using the Machine
Chapter 3 Accompanying CD-ROMs
Chapter 4 Routine Maintenance
Chapter 5 Troubleshooting
Chapter 6 Appendix
Includes the descriptions of available paper stock and Index.
Contents
Preface vii
How to Use This Manual....vii
Symbols Used in This Manual . . . . . . . . . . . . . . . . . . . . . . . . . . . . . . . . . . . . . . . . . . . . . . . . . . . . . . . . . . . . . . . vii
Keys and Buttons Used in This Manual . . . . . . . . . . . . . . . . . . . . . . . . . . . . . . . . . . . . . . . . . . . . . . . . . . . . . . . . . . . . . . . . . . . . . . . . . . . . . . . . . . . . . . viii
Illustrations Used in This Manual . . . . . . . . . . . . . . . . . . . . . . . . . . . . . . . . . . . . . . . . . . . . . . . . . . . . . . . . . . . . . . . . . . . . . . . . . . . . . . . . . . . . . . . . viii
Displays Used in This Manual ix
Abbreviations Used in This Manual ix
Trademarks ...... x
Operations and Terms Used in the Manuals x
Available Features....xii
Legal Notices....xiii
Product Name xiii
EMC requirements of EC Directive ..... xiii
R&TTE Directive....xiii
Laser Safety xiii
Additional Information xiv
International ENERGY STAR Program ...... xv
IPv6 Ready Logo ...... xv
WEEE Directive ..... xvi
Copyright....xvii
Third Party Software....xvii
Disclaimers.... xviii
Legal Limitations on the Usage of Your Product and the Use of Images . . . . xviii
Super G3 xix
Important Safety Instructions.... xx
Installation xx
Power Supply ..... xxi
Handling . xxii
Maintenance and Inspections .... xxv
Consumables .... xxvii
Other Warnings ....xxvii
Chapter 1 Precautions for the Machine Installation
Installation Location and Handling 1-2
Installation Precautions....1-2
Avoid Installing the Machine in the Following Locations .....1-2
Select a Safe Power Supply....1-4
Provide Adequate Installation Space....1-5
Moving the Machine....1-5
Handling Precautions....1-6
Chapter 2 Before You Start Using the Machine
What This Machine Can Do ....2-2
Setup Flow....2-6
Cable Connection ....2-9
Using the Machine as a Local Printer (USB Connection) .....2-9
Sharing the Machine with Other Network Users .....2-10
Using Ethernet 2-10
Using the Machine as a Fax Device....2-12
Turning ON/OFF the Machine .....2-13
Turning ON the Main Power....2-13
When the Machine Is Turned ON for the First Time .....2-14
Using the Control Panel Power Switch (Sleep Mode) 2-22
Turning OFF the Main Power .2-22
Chapter 3 Accompanying CD-ROMs
User Manual CD-ROM 3-2
System Requirements 3-2
Using the CD-ROM Menu ....3-3
UFRII LT User Software....3-4
Contents of CD-ROM....3-4
System Requirements 3-5
UFRII LT Printer Driver 3-5
Color Network ScanGear 3-5
Installation 3-7
PCL User Software 3-8
Contents of CD-ROM....3-8
System Requirements 3-9
Installation 3-9
PS User Software....3-10
Contents of CD-ROM....3-10
System Requirements 3-11
Installation 3-11
Fax Driver Software (Optional) 3-12
Contents of CD-ROM ....3-12
System Requirements....3-13
Installation 3-13
Chapter 4 Routine Maintenance
Paper Drawers 4-2
Loading Paper 4-3
Adjusting a Paper Drawer to Hold a Different Paper Size 4-5
Replacing the Toner....4-8
Routine Cleaning ....4-13
Platen Glass and Underside of the Feeder 4-13
Feeder Scanning Area and Rollers 4-14
Consumables 4-18
Paper Stock 4-18
Toner 4-19
Be careful of counterfeit toners .....4-19
Drum Unit 4-19
Staple Cartridge .....4-20
Genuine Supplies. 4-20
Chapter 5 Troubleshooting
Clearing Paper Jams ....5-2
Right Side of the Machine .....5-3
Paper Drawer 1 ....5-6
Feeder 5-9
Service Call Message ....5-12
Restarting the Machine .....5-12
Using the Machine with Limited Functions....5-13
Requesting Repairs from the Control Panel....5-14
Contacting Your Local Authorized Canon Dealer . . . . . . . . . . . . . . . . . . . . . . . . . . . . . . . . . . . . . . . . . . . . . . . . . . 5-16
Chapter 6 Appendix
Available Paper Stock....6-2
Checking the Machine's IP Address....6-4
Index 6-5
Preface
Thank you for purchasing the Canon imageRUNNER 1750i/1740i/1730i. Please read this manual thoroughly before operating the machine to familiarize yourself with its capabilities, and to make the most of its many functions. After reading this manual, store it in a safe place for future reference.
How to Use This Manual
Symbols Used in This Manual
The following symbols are used in this manual to explain procedures, restrictions, handling precautions, and instructions that should be observed for safety.

WARNING
Indicates a warning concerning operations that may lead to death or injury to persons if not performed correctly. To use the machine safely, always pay attention to these warnings.

CAUTION
Indicates a caution concerning operations that may lead to injury to persons if not performed correctly. To use the machine safely, always pay attention to these cautions.

IMPORTANT
Indicates operational requirements and restrictions. Be sure to read these items carefully to operate the machine correctly, and avoid damage to the machine or property.

NOTE
Indicates a clarification of an operation, or contains additional explanations for a procedure. Reading these notes is highly recommended.

Indicates an operation that must not be performed. Read these items carefully, and make sure not to perform the described operations.
The following tables provide a few examples of how keys to be pressed are expressed in this manual:
- Control Panel keys
| Keys Example | |
| Control Panel Key icon + (Key Name) (Additional Functions) |
| Touch Panel Display | [Key Name] [OK], [Cancel], etc. |
| [Key Icon] [], [], etc. | ▼ ▲ |
- Buttons and Other Objects on Computer Operation Screens
| Buttons and Other Objects Example |
| [Button Name] [OK] | |
| [UI Name] + menu, dialog box, etc. [File] | menu, [Print] dialog box, etc. |
Illustrations Used in This Manual
The machine illustrations used in this manual are those of the imageRUNNER 1750i with the following optional equipment attached: Staple Finisher-H1 and Cassette Module-Y1 (triple-tiered).
natural_image
Line drawing of a beige Caso printer with multiple rack units and a central control panel (no text or symbols)
Displays Used in This Manual
Screen shots used in this manual may differ from actual displays depending on the machine configuration.
The keys and buttons to be pressed or clicked are marked with a , as shown below.
When multiple keys or buttons can be pressed or clicked, all of them will be marked. Select the keys or buttons best suited to your needs.
Abbreviations Used in This Manual
In this manual, product names are abbreviated as follows:
Microsoft Windows 2000 operating system: Windows 2000
Microsoft Windows XP operating system: Windows XP
Microsoft Windows Vista operating system: Windows Vista
Microsoft Windows 7 operating system: Windows 7
Microsoft Windows Server 2003 operating system: Windows Server 2003
Microsoft Windows Server 2008 operating system: Windows Server 2008
Microsoft Windows operating system: Windows
Trademarks
Macintosh and Mac OS are trademarks of Apple Inc., registered in the U.S. and other countries.
Windows, Windows logo, Windows Vista and Windows Vista logo are trademarks or registered trademarks of Microsoft Corporation in the U.S. and/or other countries.
Other product and company names herein may be the trademarks of their respective owners.
Operations and Terms Used in the Manuals
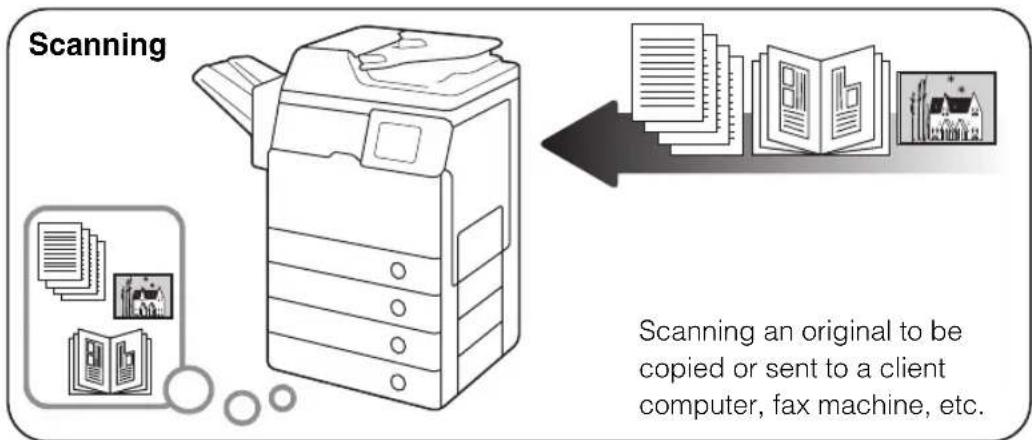
This machine makes effective use of memory to perform print operations efficiently. For example, as soon as the machine has scanned the original that you want to copy, it can immediately scan the next person's original. You can also print from this machine, using a function other than the Copy function. In this machine, these operations take place in a complex way, so that not only copies, but also various kinds of prints may sometimes have to wait their turn before they can be printed.
To avoid confusion when reading the manuals, the terms, “scanning,” “printing,” and “copying,” used throughout the manuals are defined below. When making a copy, the process of scanning originals and printing copies may be described as separate functions.
flowchart
graph LR
    A["Scanning"] --> B["Scanning an original to be copied or sent to a client computer, fax machine, etc."]
    B --> C["Scanning"]
    style A fill:#f9f,stroke:#333
    style B fill:#ccf,stroke:#333
    style C fill:#cfc,stroke:#333
flowchart
graph LR
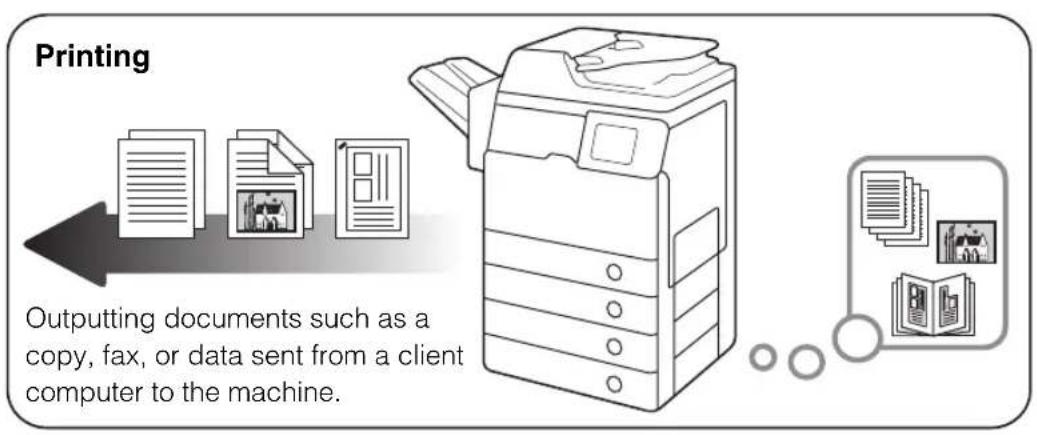
A["Printing"] --> B["Outputting documents such as a copy, fax, or data sent from a client computer to the machine"]
B --> C["Printer"]
C --> D["Outputting document transmission"]
D --> E["Outputting file transmission"]

flowchart
graph LR
    A["Printing data scanned from an original, followed by finishing options, such as stapling."] --> B["Copying"]
    B --> C["File transmission"]
    C --> D["Final output"]
Available Features
The procedures described in the manuals assume the machine fully equipped with the optional equipment. Depending on the system configuration and product purchased, some features described in the manuals may not be functional. The table below shows the available features on a product basis.
√: Standard equipped
opt.: Optional
| Model | Copy | Send Fax | | Print | Remote Scan/ Remote UI | Drawer | Searchable PDF (OCR) |
| USB Media/ UFRII LT | PCL | PS | Barcode 1 2/3/4 | | |
| imageRUNNER 1750i | √ | √ | opt. opt. opt. opt. opt. opt. opt. opt. opt. opt. opt. opt. opt. opt. opt. opt. opt. opt. opt. opt. opt. opt. opt. opt. opt. opt. opt. opt. opt. opt. opt. opt. opt. opt. opt. opt. opt. opt. opt. opt. opt. opt. opt. opt. opt. opt. opt. opt. opt. opt. opt. Opt. Opt. Opt. Opt. Opt. Opt. Opt. Opt. Opt. Opt. Opt. Opt. Opt. Opt. Opt. Opt. Opt. Opt. Opt. Opt. Opt. Opt. Opt. Opt. Opt. Opt. Opt. Opt. Opt. Opt. Opt. Opt. Opt. Opt. Opt. Opt. Opt. Opt. Opt. Opt. Opt. Opt. Opt. Opt. Opt. Opt. Opt. Opt. Opt. Opt. | opt. opt. opt. opt. opt. opt. opt. opt. opt. opt. opt. opt. opt. opt. opt. opt. opt. opt. opt. opt. opt. opt. opt. opt. opt. opt. opt. opt. opt. opt. opt. opt. opt. opt. opt. opt. opt. opt. opt. opt. opt. opt. opt. opt. opt. opt. opt. opt. opt. Opt. | opt. opt. opt. opt. opt. opt. opt. opt. opt. opt. opt. opt. opt. opt. opt. opt. opt. opt. opt. opt. opt. opt. opt. opt. opt. opt. opt. opt. opt. opt. opt. opt. opt. opt. opt. opt. opt. opt. opt. opt. opt. opt. opt. opt. opt. opt. opt. Opt. Opt. Opt. | opt. | √ | √ | √ | √ | √ |
| imageRUNNER 1740i | √ | √ | opt. opt. opt. opt. opt. opt. opt. opt. opt. opt. opt. opt. opt. opt. opt. opt. opt. opt. opt. opt. opt. opt. opt. opt. opt. opt. opt. opt. opt. opt. opt. opt. Opt. Opt. Opt. Opt. Opt. Opt. Opt. Opt. Opt. Opt. Opt. Opt. Opt. Opt. Opt. Opt. Opt. Opt. | opt. opt. opt. opt. opt. opt. opt. opt. opt. opt. opt. opt. opt. opt. opt. opt. opt. opt. opt. opt. opt. opt. opt. opt. opt. Opt. Opt. Opt. Opt. Opt. Opt. Opt. Opt. Opt. Opt. Opt. Opt. Opt. Opt. Opt. Opt. Opt. Opt. Opt. Opt. Opt. Opt. Opt. Opt. Opt. | opt. | √ | √ | √ | √ | √ | √ |
| imageRUNNER 1730i | √ | √ | opt. opt. opt. opt. opt. opt. opt. opt. opt. opt. opt. opt. opt. opt. opt. opt. opt. Opt. Opt. Opt. Opt. Opt. Opt. Opt. Opt. Opt. Opt. Opt. Opt. Opt. Opt. Opt. Opt. Opt. Opt. Opt. Opt. Opt. Opt. Opt. Opt. Opt. Opt. Opt. Opt. Opt. Opt. Opt. Opt. Opt. | opt. opt. opt. opt. opt. opt. opt. opt. opt. opt. opt. opt. opt. opt. opt. opt, | opt. | √ | √ | √ | √ | √ | √ |

NOTE
- For more information on the available features, see “What This Machine Can Do,” on p. 2-2.
- For more information on the optional equipment, see Chapter 4, "Optional Equipment," in the Reference Guide.
Product Name
Safety regulations require the product's name to be registered. In some regions where this product is sold, the following name(s) in ( ) may be registered instead.
imageRUNNER 1750i/1740i/1730i (F159200)
EMC requirements of EC Directive
This equipment conforms with the essential EMC requirements of EC Directive. We declare that this product conforms with the EMC requirements of EC Directive at nominal mains input 230 V, 50 Hz although the rated input of the product is 220 to 240 V, 50/60 Hz. Use of shielded cable is necessary to comply with the technical EMC requirements of EC Directive.
R&TTE Directive

This equipment (F159200) conforms with the essential requirements of EC Directive 1999/5/EC and is usable in EU. (Only for models with facsimile functionality.)
(For Europe only)
Canon Inc./Canon Europa N.V.
Laser Safety
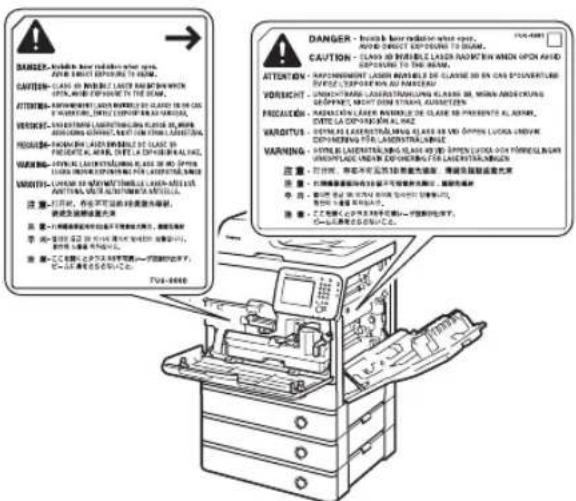
This product is certificated as a Class 1 laser product under IEC60825-1:2007 and EN60825-1:2007. This means that the product does not produce hazardous laser radiation.
Since radiation emitted inside the product is completely confined within protective housings and external covers, the laser beam cannot escape from the machine during any phase of user operation. Do not remove protective housings or external covers, except as directed by the equipment's manual.
When servicing or adjusting the optical system of the product, be careful not to place screwdrivers or other shiny objects in the path of the laser beam. Also, accessories such as watches and rings should be removed before working on the product. The reflected beam, whether visible or invisible, can permanently damage your eyes.
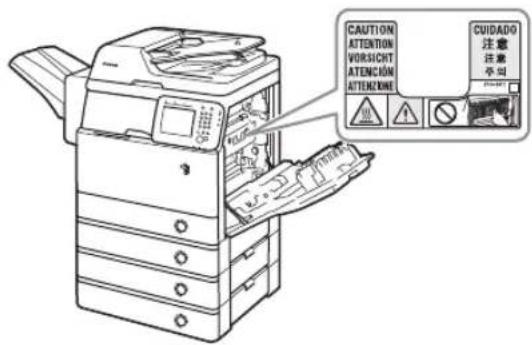
The labels shown below are attached to the machine's internal part and next to the toner supply port behind the front cover.
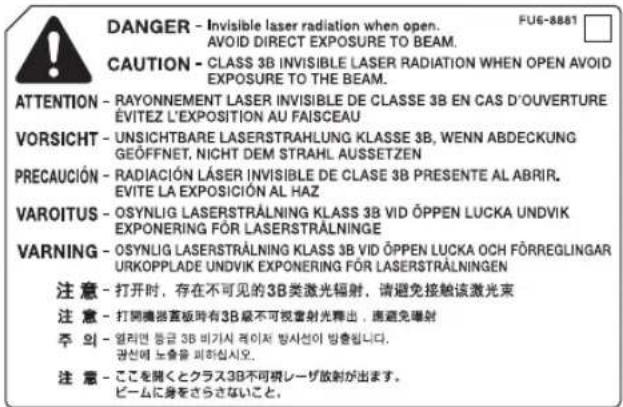
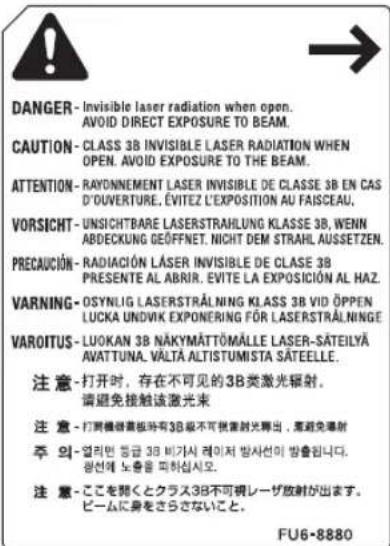
This product has been classified under IEC60825-1:2007 and EN60825-1:2007, which conform to the following classes:
CLASS 1 LASER PRODUCT
LASER KLASSE 1
APPAREIL Á LASER DE CLASSE 1
APPARECCHIO LASER DI CLASSE 1
PRODUCTO LÁSER DE CLASE 1
APARELHO A LASER DE CLASSE 1
LUOKAN 1 LASER-TUOTE
LASERPRODUKT KLASS 1
CAUTION
Use of controls, adjustments, or performance of procedures other than those specified in the manuals may result in hazardous radiation exposure.
International ENERGY STAR Program

As an ENERGY STAR® Partner, Canon Inc. has determined that this machine meets the ENERGY STAR Program guidelines for energy efficiency.
The International ENERGY STAR Office Equipment Program is an international program that promotes energy saving through the use of computers and other office equipment. The program backs the development and dissemination of products with functions that effectively reduce energy consumption. It is an open system in which business proprietors can participate voluntarily. The targeted products are office equipment, such as computers, displays, printers, facsimiles, and copiers. The standards and logos are uniform among participating nations.
IPv6 Ready Logo

The protocol stack included in this machine has obtained the IPv6 Ready Logo Phase-1 established by the IPv6 Forum.
WEEE Directive

European Union (and EEA) only.
These symbols indicate that this product is not to be disposed of with your household waste, according to the WEEE Directive (2002/96/EC), the Battery Directive (2006/66/EC) and/or your national laws implementing those Directives.
If a chemical symbol is printed beneath the symbol shown above, in accordance with the Battery Directive, this indicates that a heavy metal (Hg = Mercury, Cd = Cadmium, Pb = Lead) is present in this battery or accumulator at a concentration above an applicable threshold specified in the Battery Directive.
This product should be handed over to a designated collection point, e.g., on an authorized one-for-one basis when you buy a new similar product or to an authorized collection site for recycling waste electrical and electronic equipment (EEE) and batteries and accumulators. Improper handling of this type of waste could have a possible impact on the environment and human health due to potentially hazardous substances that are generally associated with EEE.
Your cooperation in the correct disposal of this product will contribute to the effective usage of natural resources.
For more information about the recycling of this product, please contact your local city office, waste authority, approved scheme or your household waste disposal service or visit www.canon-europe.com/environment
(EEA: Norway, Iceland and Liechtenstein)
Copyright
Copyright 2011 by Canon Inc. All rights reserved.
No part of this publication may be reproduced or transmitted in any form or by any means, electronic or mechanical, including photocopying and recording, or by any information storage or retrieval system without the prior written permission of Canon Inc.
Third Party Software
Third Party Software
This product includes third-party software modules. Use and distribution of this software modules, including any updates of such software modules (collectively, the "SOFTWARE") are subject to conditions (1) through (9) below.
(1) You agree that you will comply with any applicable export control laws, restrictions or regulations of the countries involved in the event that this product including the SOFTWARE is shipped, transferred or exported into any country.
(2) Rights holders of the SOFTWARE retain in all respects the title, ownership and intellectual property rights in and to the SOFTWARE. Except as expressly provided herein, no license or right, expressed or implied, is hereby conveyed or granted by rights holders of the SOFTWARE to you for any intellectual property of rights holders of the SOFTWARE.
(3) You may use the SOFTWARE solely for use with the Canon product you purchased (the "PRODUCT").
(4) You may not assign, sublicense, market, distribute, or transfer the SOFTWARE to any third party without prior written consent of rights holders of the SOFTWARE.
(5) Notwithstanding the foregoing, you may transfer the SOFTWARE only when (a) you assign all of your rights to the PRODUCT and all rights and obligations under the conditions to transferee and (b) such transferee agrees to be bound by all these conditions.
(6) You may not decompile, reverse engineer, disassemble or otherwise reduce the code of the SOFTWARE to human readable form.
(7) You may not modify, adapt, translate, rent, lease or loan the SOFTWARE or create derivative works based on the SOFTWARE.
(8) You are not entitled to remove or make separate copies of the SOFTWARE from the PRODUCT.
(9) The human-readable portion (the source code) of the SOFTWARE is not licensed to you.
Disclaimers
The information in this document is subject to change without notice.
CANON INC. MAKES NO WARRANTY OF ANY KIND WITH REGARD TO THIS MATERIAL, EITHER EXPRESS OR IMPLIED, EXCEPT AS PROVIDED HEREIN, INCLUDING WITHOUT LIMITATION, THEREOF, WARRANTIES AS TO MARKETABILITY, MERCHANTABILITY, FITNESS FOR A PARTICULAR PURPOSE OR USE OR NON-INFRINGEMENT. CANON INC. SHALL NOT BE LIABLE FOR ANY DIRECT, INCIDENTAL, OR CONSEQUENTIAL DAMAGES OF ANY NATURE, OR LOSSES OR EXPENSES RESULTING FROM THE USE OF THIS MATERIAL.
Legal Limitations on the Usage of Your Product and the Use of Images
Using your product to scan, print or otherwise reproduce certain documents, and the use of such images as scanned, printed or otherwise reproduced by your product, may be prohibited by law and may result in criminal and/or civil liability. A non-exhaustive list of these documents is set forth below. This list is intended to be a guide only. If you are uncertain about the legality of using your product to scan, print or otherwise reproduce any particular document, and/or of the use of the images scanned, printed or otherwise reproduced, you should consult, in advance, with your legal advisor for guidance.
Super G3

Super G3 is a phrase used to describe the new generation of fax machines that use ITU-T V.34 standard 33.6 Kbps* modems. Super G3 High Speed Fax machines allow transmission times of approximately 3 seconds* per page which results in reduced telephone line charges.
* Approximately 3 seconds per page fax transmission time based on CCITT/ITU-T No.1 Chart, (JBIG, Standard Mode) at 33.6 Kbps modem speed. The PSTN (Public Switched Telephone Network) currently supports 28.8 Kbps modem speeds or slower, depending on telephone line conditions.

Important Safety Instructions
Please read these “Important Safety Instructions” thoroughly before operating the machine. As these instructions are intended to prevent injury to the user or other persons or destruction of property, always pay attention to these instructions. Also, since it may result in unexpected accidents or injuries, do not perform any operation unless otherwise specified in the manuals. Improper operation or use of this machine could result in personal injury and/or damage requiring extensive repair that may not be covered under your Limited Warranty.
Installation

WARNING
- Never block the ventilation slots and louvers on the machine. These openings are provided for proper ventilation of working parts inside the machine. Blocking these openings can cause the machine to overheat. Never place the machine on a soft surface, such as a sofa or rug.
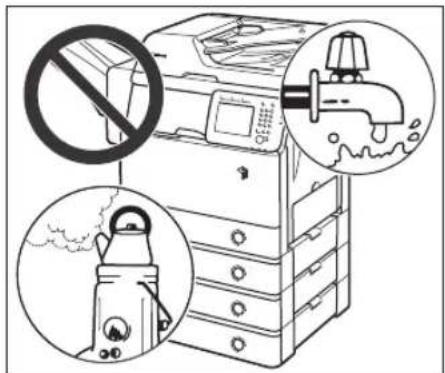
- Do not install the machine in the following locations:
- A damp or dusty location
- A location near water faucets or water
- A location exposed to direct sunlight
- A location subject to high temperatures
- A location near open flames
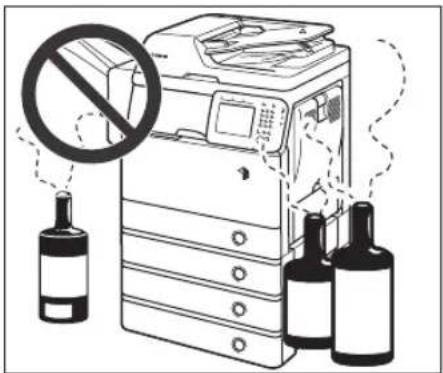
- Do not install the machine near alcohol, paint thinner, or other flammable substances. If flammable substances come into contact with electrical parts inside the machine, it may result in a fire or electrical shock.
- Do not place the following items on the machine. If these items come into contact with a high-voltage area inside the machine, it may result in a fire or electrical shock. If these items are dropped or spilled inside the machine, immediately turn OFF the main power switch, and disconnect the power cord from the power outlet. Then, contact your local authorized Canon dealer.
- Necklaces and other metal objects
- Cups, vases, flowerpots, and other containers filled with water or liquids
CAUTION
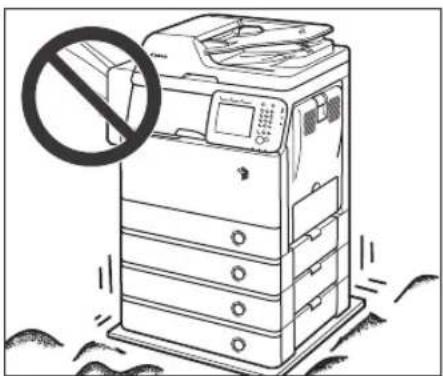
Do not install the machine in unstable locations, such as unsteady platforms or inclined floors, or in locations subject to excessive vibrations, as this may cause the machine to fall or tip over, resulting in personal injury.
Power Supply
WARNING
- Do not damage or modify the power cord. Also, do not place heavy objects on the power cord, or pull on or excessively bend it, as this could cause electrical damage and result in a fire or electrical shock.
- Keep the power cord away from a heat source; failure to do this may cause the power cord coating to melt, resulting in a fire or electrical shock.
- Do not connect or disconnect the power cord with wet hands, as this may result in electrical shock.
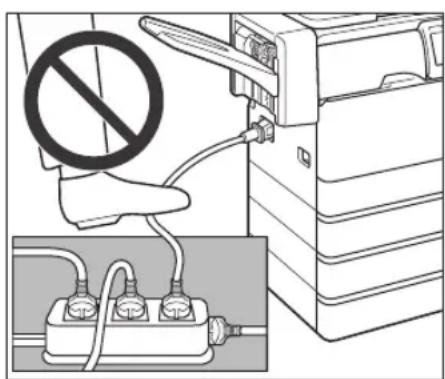
- Do not connect the power cord to a multiplug power strip, as this may cause a fire or electrical shock.
- Do not bundle up or tie the power cord in a knot, as this may result in a fire or electrical shock.
- Insert the power plug completely into the power outlet, as failure to do so may result in a fire or electrical shock.
-
Do not use power cords other than the power cord provided, as this may result in a fire or electrical shock.
-
As a general rule, do not use extension cords. Using an extension cord may result in a fire or electrical shock. If an extension cord must be used, however, use one rated for voltages of 220 - 240 V AC and over, untie the cord binding, and insert the power plug completely into the extension cord outlet to ensure a firm connection between the power cord and the extension cord.
- Do not use power supplies with voltages other than those specified herein, as this may result in a fire or electrical shock.
- Always grasp the power plug when disconnecting the power cord. Pulling on the power cord may expose or snap the core wire, or otherwise damage the power cord. If the power cord is damaged, this could cause current to leak, resulting in a fire or electrical shock.

IMPORTANT
Leave sufficient space around the power plug so that it can be unplugged easily. If objects are placed around the power plug, you will be unable to unplug it in an emergency.
Handling

WARNING
- Do not attempt to disassemble or modify the machine. There are high-temperature and high-voltage components inside the machine which may result in a fire or electrical shock.
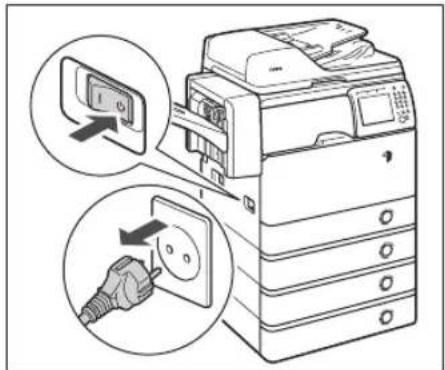
- If the machine makes strange noises, or gives off smoke, heat, or strange smells, immediately turn OFF the main power switch, and disconnect the power cord from the power outlet. Then, contact your local authorized Canon dealer. Continued use of the machine in this condition may result in a fire or electrical shock.
- Do not use highly flammable sprays near the machine. If gas from these sprays comes into contact with the electrical components inside the machine, it may result in a fire or electrical shock.
- To avoid damage to the power cord and creating a fire hazard, always turn OFF the main power switch, and unplug the interface cable when moving the machine. Otherwise, the power cord or interface cable may be damaged, resulting in a fire or electrical shock.
- Make sure that the power plug is firmly inserted into the power outlet if the machine was moved. Do not use the machine while the connection is loose, as doing so may cause a fire.
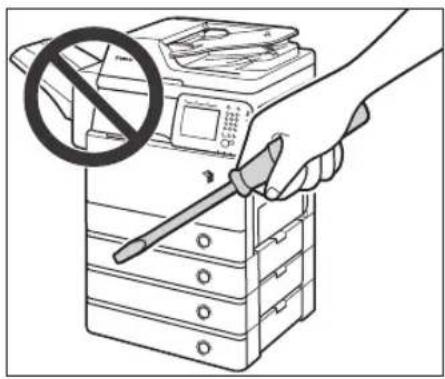
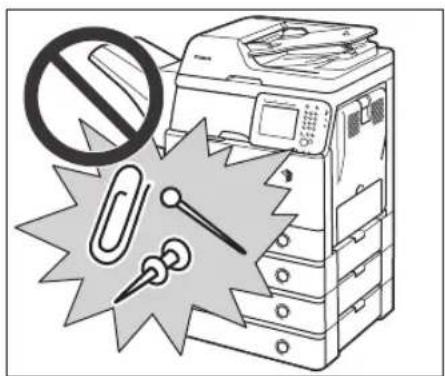
- Do not drop paper clips, staples, or other metal objects inside the machine. Also, do not spill water, liquids, or flammable substances (alcohol, benzene, paint thinner, etc.) inside the machine. If these items come into contact with a high-voltage area inside the machine, it may result in a fire or electrical shock. If these items are dropped or spilled inside the machine, immediately turn OFF the main power switch, and disconnect the power cord from the power outlet. Then, contact your local authorized Canon dealer.
CAUTION
- Do not place heavy objects on the machine, as they may tip over and fall resulting in personal injury.
- Lower the feeder gently to avoid catching your hands, as this may result in personal injury.
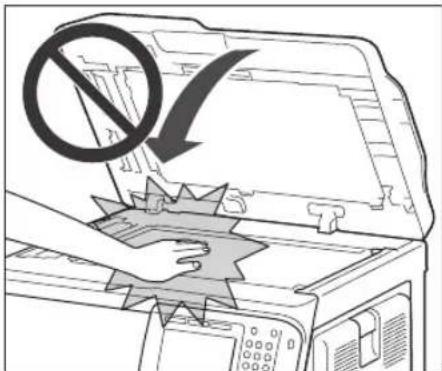
- Do not press down hard on the feeder when using the platen glass to make copies of thick books. Doing so may damage the platen glass and result in personal injury.
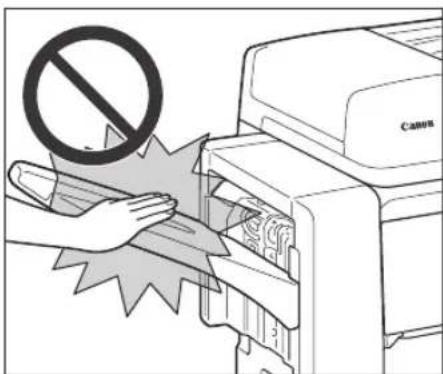
- Do not place your hands, hair, clothing, etc., near the exit and feed rollers. Even if the machine is not in operation, your hands, hair, or clothing may get caught in the rollers, which may result in personal injury or damage if the machine suddenly starts printing.
- Paper that has just been output from the machine may be hot. Be careful when removing or aligning paper from the output tray. Touching paper right after it is output may result in low-temperature burns.
- Do not touch the finisher while the machine is printing, as this may result in personal injury.
- Do not place your hand in the following parts of the finisher, as this may result in personal injury:
- Tray
- Stapler unit (where stapling is performed)
Staple Finisher-H1
- The laser beam can be harmful to human bodies. Since radiation emitted inside the product is completely confined within protective housings and external covers, the laser beam cannot escape from the machine during any phase of user operation. Read the following remarks and instructions for safety.
- Never open covers other than those instructed in the manuals.
- Do not remove the following caution labels which are attached to the machine. If the labels have been removed, contact your local authorized Canon dealer.
- If the laser beam escapes from the machine, exposure may cause serious damage to your eyes.
- Controlling, adjusting, or operating the machine in ways not mentioned in the manuals for this machine may cause dangerous radiation to escape from the machine.

IMPORTANT
Turn OFF the control panel power switch for safety when the machine will not be used for a long period of time, such as overnight. Also, turn OFF the main power switch, and disconnect the power cord for safety when the machine will not be used for an extended period of time, such as during consecutive holidays.
Maintenance and Inspections
WARNING
- When cleaning the machine, first turn OFF the main power switch, then disconnect the power cord. Failure to observe these steps may result in a fire or electrical shock.
- Disconnect the power cord from the power outlet regularly, and clean the area around the base of the power plug's metal pins and the power outlet with a dry cloth to ensure that all dust and grime is removed. If the power cord is connected for a long period of time in a damp, dusty, or smoky location, dust can build up around the power plug and become damp. This may cause a short circuit and result in a fire.
- Clean the machine using a slightly dampened cloth with a mild detergent mixed with water. Do not use alcohol, benzene, paint thinner, or other flammable substances. Check detergent for flammability prior to use. If flammable substances come into contact with a high-voltage area inside the machine, it may result in a fire or electrical shock.
- There are some areas inside the machine which are subject to high-voltages. When removing jammed paper or when inspecting the inside of the machine, do not allow necklaces, bracelets, or other metal objects to touch the inside of the machine, as this may result in burns or electrical shock.
- Do not burn or throw used toner cartridges into open flames, as this may cause the toner remaining inside the cartridges to ignite, resulting in burns or a fire.
- Make sure that the power plug is firmly inserted into the power outlet after cleaning the machine. Do not use the machine while the connection is loose, as doing so may cause a fire.
-
Check the power cord and power plug regularly. If the following conditions occur, contact your local authorized Canon dealer, as the condition may cause a fire:
-
There are burn marks on the power plug.
- The blade on the power plug is deformed or broken.
- The power goes OFF and ON when the power cord is bent.
- There are cuts, cracks, or indentations on the power cord.
- A part of the power cord becomes hot.
- Check the power cord and power plug regularly to make sure that they are not handled in the following manner, as this may result in a fire or electrical shock:
- The connection part of the power plug is loose.
- Stress is being applied to the power cord by a heavy object or by affixing it with staples.
- The power plug is loose.
- The power cord is tied in a bundle.
- The power cord protrudes into a walkway.
- The power cord is in front of a heater.

CAUTION
- The fixing unit and its surroundings inside the machine may become hot during use. When removing jammed paper or when inspecting the inside of the machine, do not touch the fixing unit and its surroundings, as doing so may result in burns or electrical shock.
- When removing jammed paper or when inspecting the inside of the machine, do not expose yourself to the heat emitted from the fixing unit and its surroundings for a prolonged period of time. Doing so may result in low temperature burns, even if you do not touch the fixing unit and its surroundings directly.
- When removing jammed paper or replacing the toner cartridge, take care not to allow the toner to come into contact with your hands or clothing, as this will dirty your hands or clothing. If they become dirty, wash immediately with cold water. Washing with warm water will set the toner, and make it impossible to remove the toner stains.
- When removing paper which has become jammed inside the machine, remove the jammed paper gently to prevent the toner on the paper from scattering and getting into your eyes or mouth. If the toner gets into your eyes or mouth, wash immediately with cold water and immediately consult a physician.
- When loading paper or removing jammed originals or paper, take care not to cut your hands on the edges of the originals or paper.
- When removing paper which has become jammed inside the machine, take care not to cut your hands or injure yourself on the inside of the machine. If you cannot remove the paper, contact your local authorized Canon dealer.
- When removing a used toner cartridge, remove the cartridge carefully to prevent the toner from scattering and getting into your eyes or mouth. If the toner gets into your eyes or mouth, wash immediately with cold water and immediately consult a physician.
- Do not dismantle the toner cartridge, as doing so may cause the toner to fly out and enter your eyes or mouth. If the toner gets into your eyes or mouth, wash immediately with cold water and immediately consult a physician.
- If toner escapes from the toner cartridge, make sure not to ingest the toner or allow it to directly touch your skin. If toner touches your skin, wash it away with soap and water. If your skin still feels irritated after washing it, or you ingest toner, consult a doctor immediately.
Consumables
WARNING
- Do not burn or throw used toner cartridges into open flames, as this may cause the toner remaining inside the cartridges to ignite, resulting in burns or a fire.
- Do not store toner cartridges or paper in places exposed to open flames, as this may cause the toner or paper to ignite, resulting in burns or a fire.
CAUTION
- Keep toner and other consumables out of the reach of small children. If these items are ingested, consult a physician immediately.
- Do not dismantle the toner cartridge, as doing so may cause the toner to fly out and enter your eyes or mouth. If toner gets into your eyes or mouth, wash immediately with cold water and immediately consult a physician.
- If toner escapes from the toner cartridge, make sure not to ingest the toner or allow it to directly touch your skin. If toner touches your skin, wash it away with soap and cold water. If your skin still feels irritated after washing it, or you ingest toner, consult a doctor immediately.
- When discarding used toner cartridges, put the cartridges into a bag to prevent the toner remaining inside the cartridges from scattering, and dispose of them in a location away from open flames.
Other Warnings
WARNING
For cardiac pacemaker users:
This product emits low level magnetic flux. If you use a cardiac pacemaker and feel abnormalities, please move away from the product and consult your doctor.
Precautions for the Machine Installation

This chapter describes the precautions for installing the machine.
Installation Location and Handling 1-2
Installation Precautions 1-2
Handling Precautions....1-6
Installation Location and Handling
This section describes precautions for the installation location and handling. Read this section prior to using the machine.
Installation Precautions
Avoid Installing the Machine in the Following Locations
■ Avoid locations subject to temperature and humidity extremes, whether low or high.
For example, avoid installing the machine near water faucets, hot water heaters, humidifiers, air conditioners, heaters or stoves.
natural_image
Illustration of a printer with a prohibition symbol (no text or labels present)
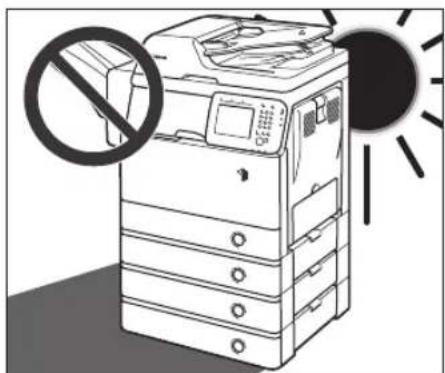
■ Avoid installing the machine in direct sunlight.
If this is unavoidable, use curtains to shade the machine. Be sure that curtains do not block the machine's ventilation slots or louvers, or interfere with the electrical cord or power supply.
■ Avoid poorly ventilated locations.
This machine generates a slight amount of ozone or other odors during normal use. Although sensitivity to ozone or other odors may vary, this amount is not harmful. Ozone or other odors may be more noticeable during extended use or long production runs, especially in poorly ventilated rooms. It is recommended that the room be appropriately ventilated, sufficient to maintain a comfortable working environment, in areas of machine operation.
■ Avoid locations where ammonia gas is emitted.
■ Avoid locations that are subject to vibration.
For example, avoid installing the machine on unstable floors or stands.
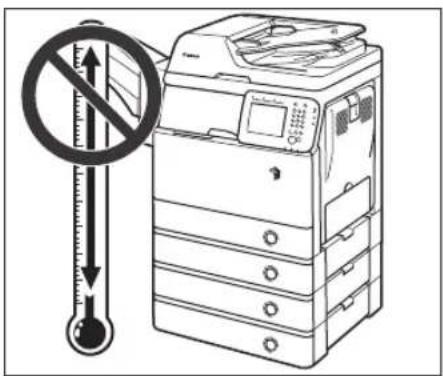
■ Avoid exposing the machine to rapid changes in temperature.
If the room in which the machine is installed is cold but rapidly heated, water droplets (condensation) may form inside the machine. This may result in a noticeable degradation in the quality of the printed image, the inability to properly scan an original, or the outputs having no printed image at all.
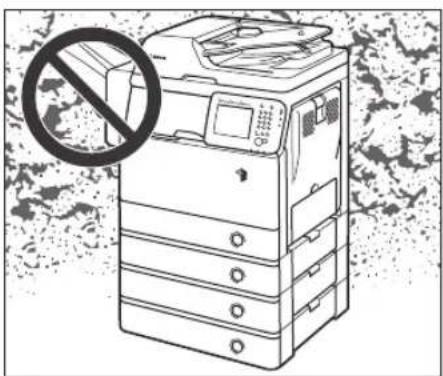
■ Avoid locations where a considerable amount of dust accumulates.
- Avoid locations near volatile or flammable materials, such as alcohol or paint thinner.
■ Avoid installing the machine near computers or other precision electronic equipment.
Electrical interference and vibrations generated by the machine during printing can adversely affect the operation of such equipment.
■ Avoid installing the machine near televisions, radios, or similar electronic equipment.
The machine may interfere with sound and picture signal reception. Insert the power plug into a dedicated power outlet, and maintain as much space as possible between the machine and other electronic equipment.
■ Contact an authorized Canon dealer if communication is unavailable.
Depending on your locale or your telephone connection, you may be unable to perform data communication. In this case, contact your local authorized Canon dealer.
Select a Safe Power Supply
■ Plug the machine into a standard 220 - 240 V AC, three-wire grounded outlet.
■ Make sure that the power supply for the machine is safe, and has a steady voltage.
■ Do not connect other electrical equipment to the same power outlet to which the machine is connected.
■ Do not connect the power cord to a multiplug power strip, as this may cause a fire or electrical shock.
■ The power cord may become damaged if it is often stepped on or if heavy objects are placed on it. Continued use of a damaged power cord can lead to an accident, such as a fire or electrical shock.
■ The power cord should not be taut, as this may lead to a loose connection and cause overheating, which could result in a fire.
If excessive stress is applied to the connection part of the power cord, it may damage the power cord or the wires inside the machine may disconnect. This could result in a fire. Avoid the following situations:
- Connecting and disconnecting the power cord frequently
- Tripping over the power cord
- Bending the power cord near the connection part, and applying continuous stress to the power outlet or the connection part
- Applying excessive force on the power plug
Provide Adequate Installation Space
■ Provide enough space on each side of the machine for unrestricted operation.
View from Above
(When the optional Staple Finisher-H1 is attached)
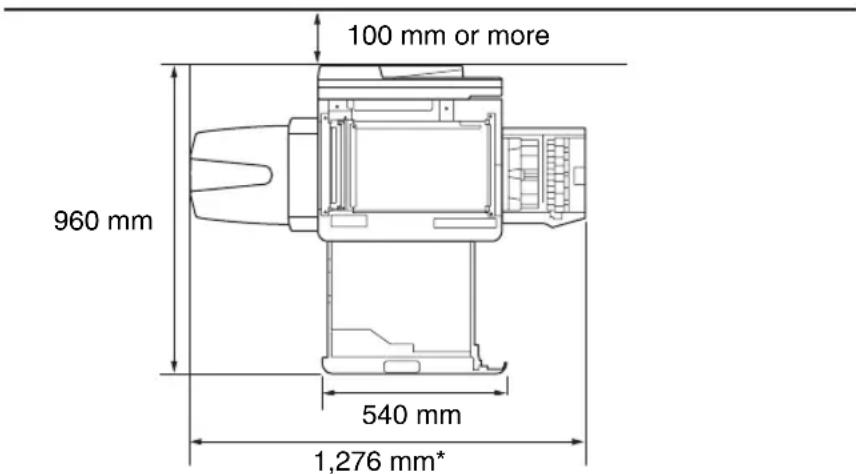
* The width is 941 mm when no options are attached.
Moving the Machine
If you intend to move the machine, even to a location on the same floor of your building, contact your local authorized Canon dealer beforehand. Do not attempt to move the machine yourself.
Handling Precautions
■ Do not attempt to disassemble or modify the machine.
■ Be careful not to spill liquids or drop any foreign objects, such as paper clips or staples inside the machine. If a foreign object comes into contact with electrical parts inside the machine, it may cause a short circuit and result in a fire or electrical shock.
If there is smoke or unusual noise, immediately turn the main power switch OFF, disconnect the power cord from the power outlet, and then contact your local authorized Canon dealer. Using the machine in this state may cause a fire or electrical shock. Also, avoid placing objects around the power plug so that the machine can be disconnected whenever necessary.
■ Do not turn the main power switch OFF or open the front covers while the machine is in operation. This may result in paper jams.
■ Some parts inside the machine are subject to high-voltages and temperatures. Take adequate precautions when inspecting the inside of the machine. Do not carry out any inspections not described in the manuals.
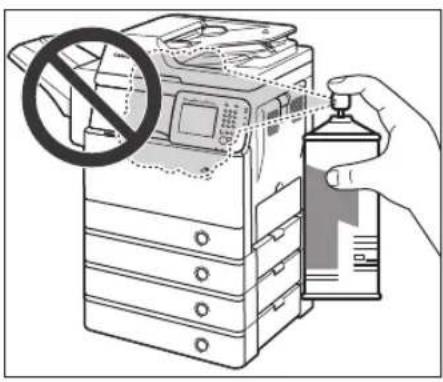
■ Do not use flammable sprays, such as spray glue near the machine. There is a danger of ignition.
natural_image
Illustration of a printer with a magnified inset showing a hand pressing down on a curved surface (no text or symbols present)
■ For safety reasons, turn OFF the control panel power switch of the machine when it will not be used for a long period of time, such as overnight. As an added safety measure, turn OFF the main power switch, and disconnect the power cord when the machine will not be used for an extended period of time, such as during consecutive holidays.
This machine generates a slight amount of ozone or other odors during normal use. Although sensitivity to ozone or other odors may vary, this amount is not harmful. Ozone or other odors may be more noticeable during extended use or long production runs, especially in poorly ventilated rooms. It is recommended that the room be appropriately ventilated, sufficient to maintain a comfortable working environment, in areas of machine operation.
■ Use a modular cable shorter than three meters.
■ Use a USB cable shorter than three meters.
Before You Start Using the Machine
2
CHAPTER
This chapter describes the machine's basic features, setup flow, how to connect cables, and how to turn ON/OFF the machine.
What This Machine Can Do 2-2
Setup Flow 2-6
Cable Connection....2-9
Using the Machine as a Local Printer (USB Connection) .....2-9
Sharing the Machine with Other Network Users 2-10
Using the Machine as a Fax Device. 2-12
Turning ON/OFF the Machine. 2-13
Turning ON the Main Power 2-13
Using the Control Panel Power Switch (Sleep Mode) .....2-22
Turning OFF the Main Power 2-22
All the elements you will ever need in a digital multitasking machine
The imageRUNNER 1750i/1740i/1730i incorporates a rich array of input and output features that can greatly enhance your efficiency.
Equipped with features that meet the needs of document work in a digitized office, the imageRUNNER 1750i/1740i/1730i represents the ultimate in digital multitasking machines.
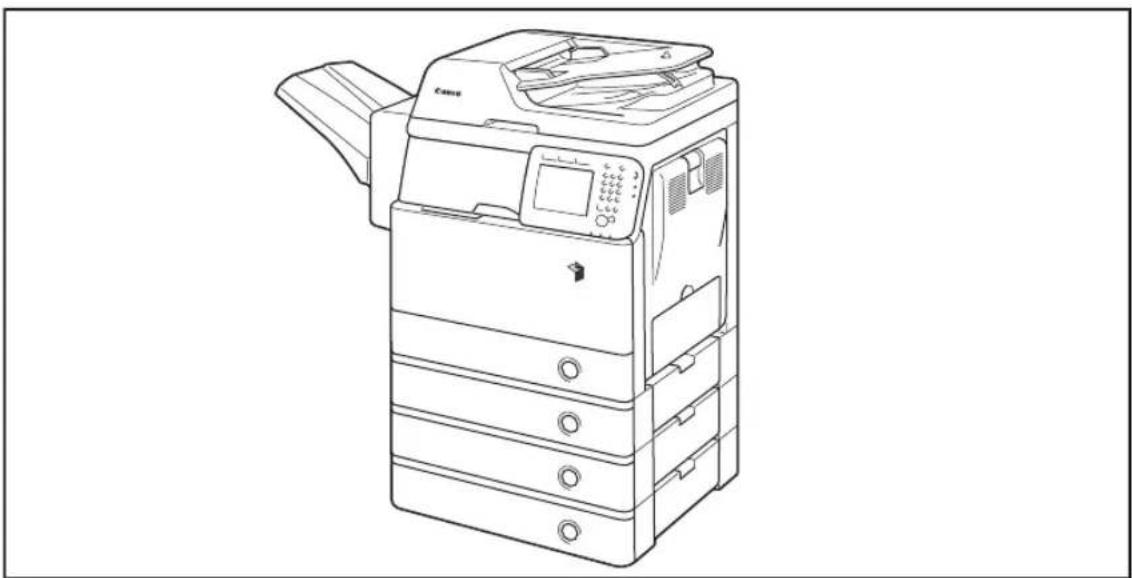
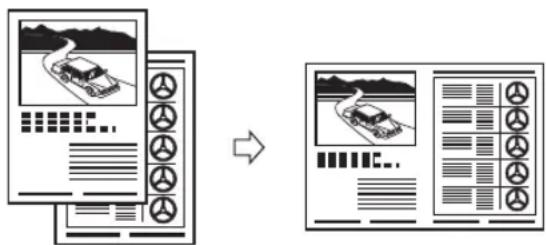
Copying
In addition to basic copying functions, convenient new functions are provided to increase your productivity, such as Image Combination, which enables you to automatically reduce two- or four-page originals to fit on the selected paper size.
(See the Copying Guide.)
flowchart
graph LR
    A["Start"] --> B["Truck Tracking"]
    B --> C["Truck Navigation"]
    C --> D["Truck Control Signals"]
    D --> E["Final Navigation Panel"]
    style A fill:#f9f,stroke:#333
    style E fill:#bbf,stroke:#333
2 on 1 Combination
Sending
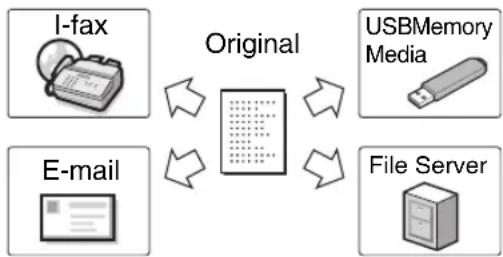
The Send function enables you to send scanned image or document data to file servers or USB memory media or by e-mail or I-fax. The function supports a variety of file formats, including TIFF, JPEG, and PDF (with some variants) for either black-and-white or color scans. (The available file formats vary depending on the modes selected and the machine configuration.)
These file formats offer you greater flexibility in accommodating digital workplace environments.
(See the Sending and Facsimile Guide.)
flowchart
graph TD
    A["I-fax"] --> B["Original"]
    C["E-mail"] --> B
    D["USBMemory Media"] --> B
    E["File Server"] --> B
Faxing\*
The machine's Super G3 fax function is compatible with most Super G3 fax machines used in office environments.
If the fax driver is installed, you can send facsimiles from your computer.
(See the Sending and Facsimile Guide.)
Original Fax
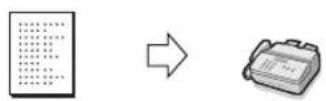
* The Fax function is available only when the optional Super G3 Fax Board-AJ1 is attached to the machine.
Printing
This machine uses UFRII LT (Ultra Fast Rendering II LT) Technology, which utilizes a newly invented printing algorithm to minimize file processing and achieve maximum performance. You can also use the machine as a PCL (Printer Command Language)/PS (PostScript) emulation printer.
(See the Windows Printer Driver Guide.)
If you are printing TIFF/JPEG files, you can print them from a USB memory device by inserting it directly into the machine and selecting the desired images on the touch panel display. (See the Printer Guide.)
With the optional Barcode Printing Kit, the BarDIMM function is also available.
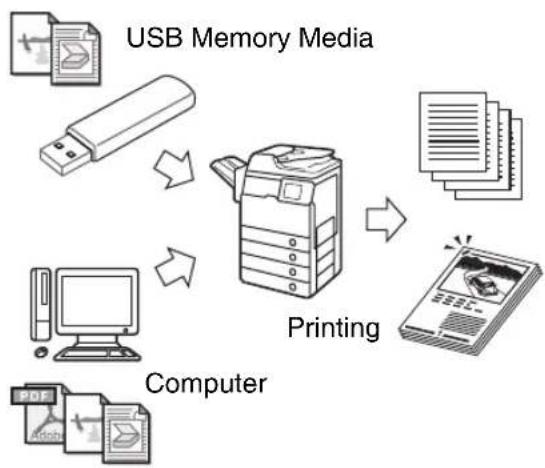
flowchart
graph TD
    A["USB Memory Media"] --> B["Printing"]
    C["Computer"] --> B
    D["PDF"] --> B
    B --> E["Output"]
Network Scanning
The Remote Scan function enables you to use the machine as a conventional scanner. You can scan a document using the machine, and read the data in a TWAIN-compliant application on your computer. To use this function, the machine must be connected to an IPv4 network and the Color Network ScanGear must be installed on your computer.
(See the Network ScanGear Guide.)
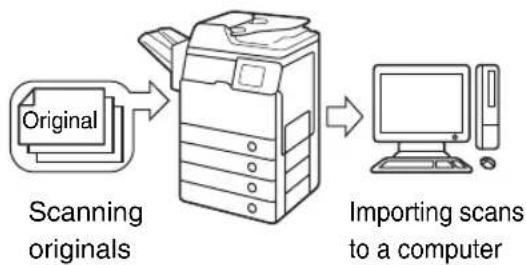
flowchart
graph LR
    A["Original"] --> B["Scanning originals"]
    B --> C["Computer"]
    C --> D["Importing scans to a computer"]
Remote User Interface
The machine can be connected to a network using Ethernet. Connecting to a network enables you to use the Remote UI.
With the Remote UI, you can perform functions from your computer's Web browser, such as confirming the status of the machine and job operations and making various settings.
Once the Ethernet interface port is configured properly, the machine can be controlled and set up from a computer through the Remote UI and network. (See the Remote UI Guide.)
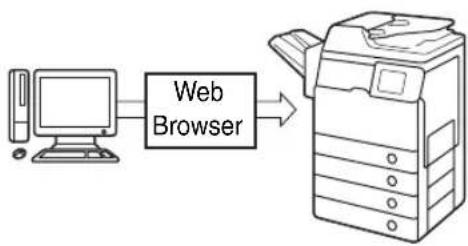
You can protect the machine from unauthorized access by setting department/user IDs. If these IDs are set, only the users who enter the correct ID and password can gain access to the machine. (See the System Settings Guide.)
If your network is designed to require user authentication, the machine offers flexible solutions as listed below.
-Authorized Send
(See the Sending and Facsimile Guide.)
-IEEE802.1X authentication
(See the System Settings Guide.)

natural_image
Illustration of a padlock with a key inserted, no text or symbols present
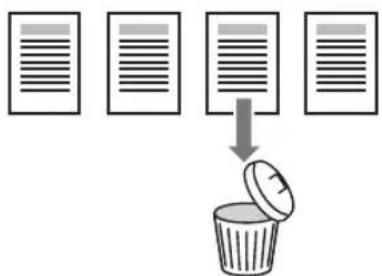
System Monitor
The System Monitor screen enables you to check the status of the machine and cancel copy, sending (TX)/receiving (RX), and print jobs. The job information is recorded as a log and can be viewed in list form.
You can also check the status of consumables loaded in the machine.
(See the Reference Guide.)
flowchart
graph TD
    A["Document 1"] --> C["Tray to Trash Bin"]
    B["Document 2"] --> C
    D["Document 3"] --> C
    E["Document 4"] --> C
Energy Conservation
You can conserve power efficiently by setting the Sleep mode.
You can put the machine into the Sleep mode manually by pressing the control panel power switch, or you can specify a preset time for the machine to enter the Sleep mode. To reactivate the machine, press the control panel power switch again.
(See the Reference Guide.)

Versatile Configurations
The Additional Functions menu enables you to make the machine's basic settings, as well as customize specific functions to suit your needs. You can access the menu by pressing 📄
(Additional Functions).
(See the Reference Guide.)
The machine is equipped with a wide variety of functions, some of which may require optional equipment or specific setups to become fully functional. To identify what functions require procedures be completed before using the machine, look at the setup flow provided below. Use the tables (if included) to see which functions require the corresponding procedure. (The procedure is required for the functions with a “√.”)

NOTE
For available functions on a product basis, see "Available Features," on p. xii.
1 Cable Connection (See "Cable Connection," on p. 2-9.)
Connect the machine to your computer or network using the USB or Ethernet cable. If the Fax function is available, connect the telephone cable to the machine and the wall jack.
| Copy | Send Fax | | Print | Remote Scan | Remote UI |
| E-Mail/ I-Fax | to File Server | to USB Media | Stand-alone | from Computer |
| √ | √ | | √ | √ | ^* | √ | √ |
* Cable connection is not required for printing from a USB memory media device.
2 Initial Setup (See "Turning ON/OFF the Machine," on p. 2-13.)
When the machine is turned ON for the first time, the initial setup screens appear on the touch panel display. Perform the following setup items as required:
• Language and country/region
- Mixing the toner
- Date & Time Settings
- Fax settings (unit telephone number, unit name, and telephone line type)
- IP address settings
| Copy | Send Fax | | Print | Remote Scan | Remote UI |
| E-Mail/ I-Fax | to File Server | to USB Media | Stand-alone | from Computer |
| √ | √ | √ | √ | √ | √ | √ | √ | √ |
3 License Registration\* (Activation) (See the System Settings Guide.)
Activate the functions that require license registration by performing the following:
- Obtain a license key from the Canon Web site.
- Enter the license key via the touch panel display to activate the function.
* License registration is required only for the following system options:
- Color Send Searchable PDF Kit-E1
- Barcode Printing Kit-B1
4 TCP/IP Network Settings (See the System Settings Guide.)
Specify the machine's network address and establish a connection to a computer on your network. After successfully connecting the machine to the network, configure the machine for the network environment.
| Copy | Send Fax | | Print*1 | Remote Scan | Remote UI |
| E-Mail/ I-Fax | to File Server | to USB Media*1 | Stand-alone | from Computer |
| √ | √ | | | √(Network connection only)*2 | √(Network connection only)*2 | √ | √ |
*1 TCP/IP network settings are not required for sending documents to or printing documents from USB memory media. When using USB memory media for these purposes, you need to set the machine configuration beforehand. (See Chapter 4, "Setting the Send Function," and Chapter 7, "Other System Settings," in the System Settings Guide.)
*2 TCP/IP network settings are not required when printing/faxing is performed from a computer via USB connection.
5 E-mail/I-Fax Settings (See the System Settings Guide.)
E-mails/I-faxes are sent/received through the SMTP server. E-mails/I-faxes can also be received through a POP3 server. To send/receive e-mails/I-faxes, specify the following:
- The machine's e-mail address
- The SMTP server
- The POP3 server
| Copy | Send Fax | | Print | Remote Scan | Remote UI |
| E-Mail/ I-Fax | to File Server | to USB Media | Stand-alone | from Computer |
| √ | | | | | | | |
6 Fax Settings (See the Sending and Facsimile Guide.)
Before sending/receiving faxes, you must specify the following:
- Telephone line type
- Unit telephone number (the machine's fax number)
- Unit name
| Copy | Send Fax | | Print | Remote Scan | Remote UI |
| E-Mail/ I-Fax | to File Server | to USB Media | Stand-alone | from Computer |
| | | | (√) * ( ) *√ | | | |
* Fax settings can be performed during the initial setup. Perform fax settings only when they are skipped during the initial setup.
7 Software Installation (See Chapter 3, "Accompanying CD-ROMs.")
To print, fax, or scan documents from your computer, you must install the following drivers or utility software:
- Print: UFRII LT, PCL, or PS printer driver
- Fax: Fax driver
- Remote Scan: Color Network ScanGear
| Copy | Send Fax | | Print | Remote Scan | Remote UI |
| E-Mail/ I-Fax | to File Server | to USB Media | Stand-alone | from Computer |
| | | | | √ | √* | √ | |
* Software installation is not required for printing from a USB memory media device.
8 Setup on the File Server (See the System Settings Guide.)
Before sending your data to a computer on the network, you must set up the computer as a file server. You can send data over a TCP/IP network to any of the following:
- FTP servers
- Shared folders (Windows 2000/XP/Vista/7/Server 2003/Server 2008)
- Shared folders (Samba)
| Copy | Send Fax | | Print | Remote Scan | Remote UI |
| E-Mail/ I-Fax | to File Server | to USB Media | Stand-alone | from Computer |
| | √ | | | | | | |
Cable Connection
This section describes how to connect the machine to a computer or network.
If you want to use the machine as a local printer, you can connect the machine directly to a computer with a USB cable. If the machine is shared by a group of network users, a 10BASE-T/100BASE-TX LAN cable is required.

IMPORTANT
A USB cable or a network cable is not included in this package. Please obtain a suitable cable for your computer or network.
Using the Machine as a Local Printer (USB Connection)
If you want to use the machine as a local printer, you can connect the machine and a computer using a USB cable. The machine is USB 2.0 high-speed* compatible.
After establishing the connection between the machine and the computer, you must install the drivers and utilities that match the operating system on your computer. For more information on the utility software, see Chapter 3, "Accompanying CD-ROMs."
* This depends on the specifications of the operating system on your computer.
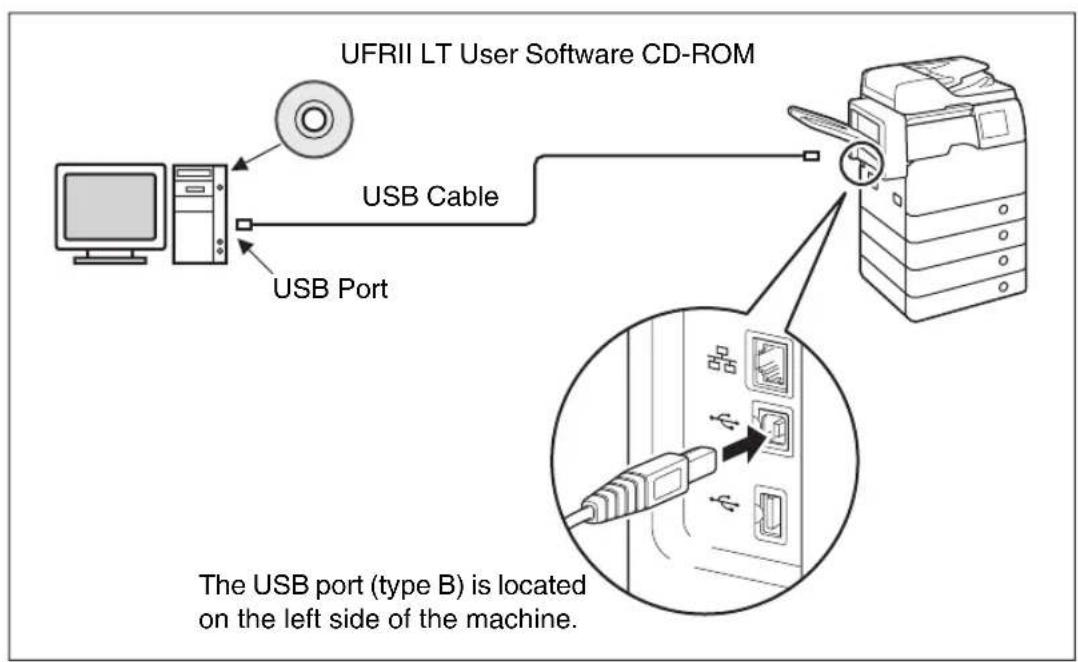
flowchart
graph TD
    A["User Device"] -->|USB Port| B["CD-ROM"]
    B --> C["USB Cable"]
    C --> D["Computer"]
CAUTION
- Before you connect the USB cable to the machine while the main power switch is ON, make sure that the ground line is connected. If the ground line is not connected, connecting the USB cable to the machine while the main power switch is ON may result in electric shock.
- If you connect or disconnect the USB cable while the main power switch is ON, do not touch the metal parts around the connector. Doing so may result in electric shock.
IMPORTANT
- To prevent your machine or computer from operating poorly, do not connect or disconnect the USB cable in the following situations:
NOTE
The appropriate USB interface for Windows 2000/XP/Vista/7/Server 2003/Server 2008 is USB 2.0 Hi-Speed/USB Full-Speed (USB 1.1 equivalent). For more information, consult your local authorized Canon dealer.
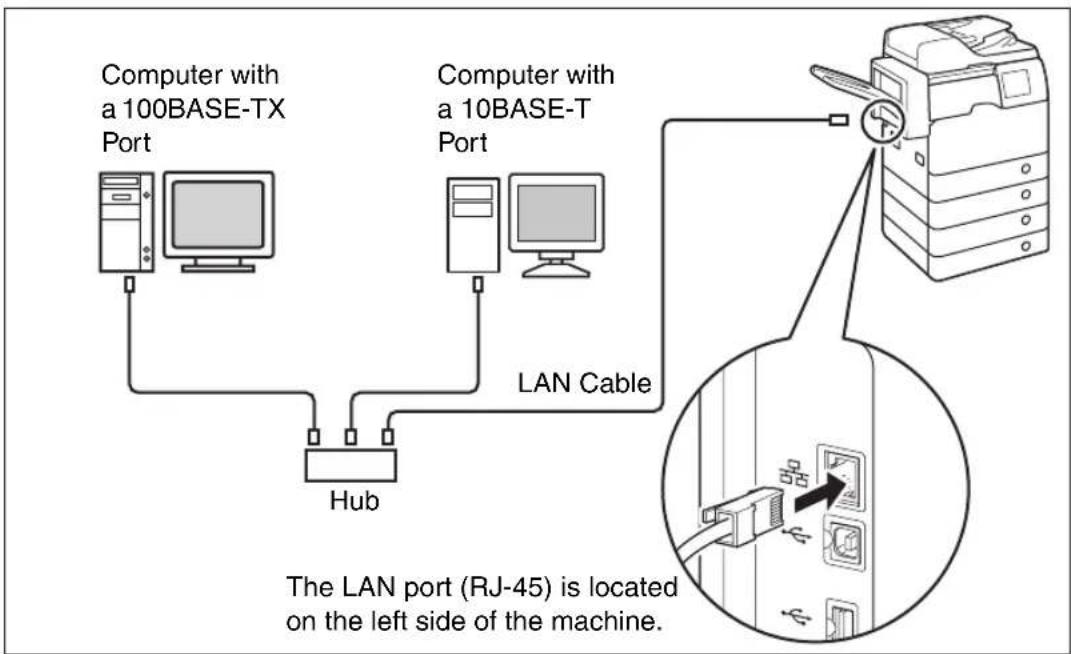
Sharing the Machine with Other Network Users
The machine supports TCP/IP, which enables it to be shared by multiple network users. The machine supports both 10BASE-T and 100BASE-TX connections that can be used in most LANs.
Using Ethernet
Connect the machine's LAN port to a hub port using the following types of cable:
- When connecting to a computer with a 10BASE-T port: a Category 3 (or higher) twisted pair LAN cable
- When connecting to a computer with a 100BASE-TX port: a Category 5 (or higher) twisted pair LAN cable

CAUTION
When connecting the interface cable or network cable, be sure to observe the following precautions in order to avoid electrical shock:
- Turn OFF the main power switch before disconnecting the power cord from the power outlet. (See “Turning OFF the Main Power,” on p. 2-22.)
- Turn OFF the computer and disconnect the power cord from the power outlet.

IMPORTANT
You cannot use the machine as a repeater, bridge, or gateway.

NOTE
- The machine can automatically detect the Ethernet speed (10BASE-T or 100BASE-TX).
- In a mixed 10BASE-T/100BASE-TX environment, devices on the network (hubs, routers, etc.) must support the mixed environment. For more information, contact your local authorized Canon dealer.
Using the Machine as a Fax Device
With the optional Super G3 Fax Board-AJ1 attached, the machine can be used as a traditional fax machine. Connect a modular cable to the machine as shown below. For more information on the telephone line, contact your local telephone company.
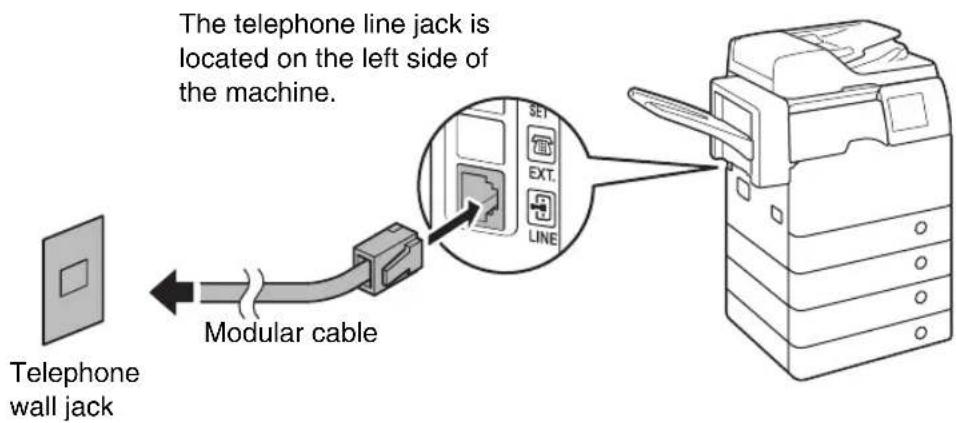

IMPORTANT
Before using the fax function, you must set the machine configuration. Fore more information, see Chapter 1, "Introduction to Send and Fax Functions," in the Sending and Facsimile Guide.
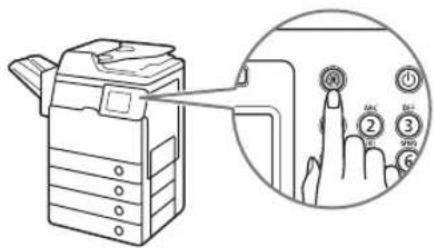
Turning ON/OFF the Machine
The machine has two power switches: the main power switch and the control panel power switch. When the main power switch is turned ON, the control panel power switch is also turned ON. If you turn OFF the control panel power switch, the machine enters the Sleep mode. If you want to shut down the machine, turn OFF the main power.
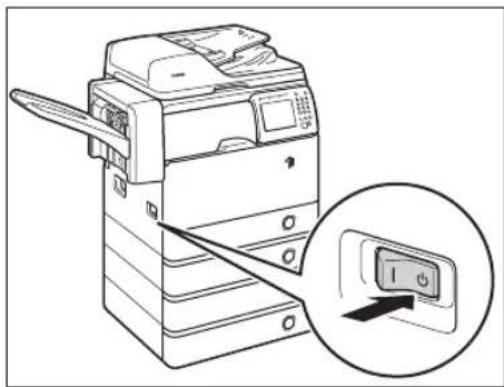
Turning ON the Main Power
This section explains how to turn ON the main power.

NOTE
For instructions on how to turn OFF the main power, see "Turning OFF the Main Power," on p. 2-22.
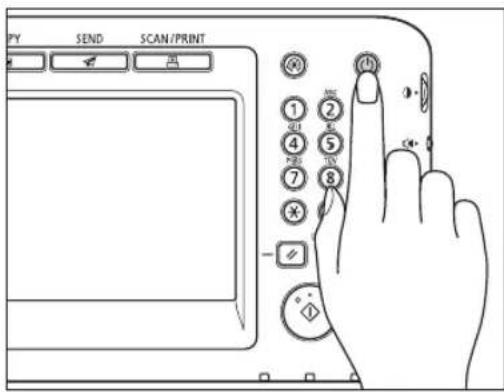
1 Make sure that the power plug is firmly inserted into the power outlet.

WARNING
Do not connect or disconnect the power cord with wet hands, as this may result in electrical shock.

Press the main power switch (located on the left side of the machine) to the "I" side.
The main power indicator on the control panel lights up when the main power is turned ON.

IMPORTANT
If the main power indicator does not light up, make sure that the power cord is properly inserted into the machine's socket.
3
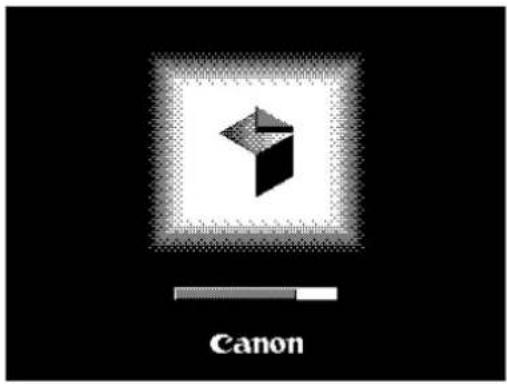
natural_image
Pixelated 3D cube icon with a horizontal bar labeled 'Canon' below, no other text or symbols present.
Wait until the machine is ready to scan.
The screen on the left is displayed until the machine is ready to scan.

The screen on the left is displayed when the machine is ready to scan.

IMPORTANT
If the machine is turned ON for the first time, the display language selection screen appears. In this case, proceed to perform the initial setup. (See "When the Machine Is Turned ON for the First Time," on p. 2-14.)

NOTE
- If the machine is managed with department IDs or user IDs, the log-in screen appears. In this case, enter your department ID or user ID (and password). (See Chapter 2, "Basic Operations," in the Reference Guide.)
- You can select the top screen of the desired function that appears when the machine is turned ON. (See Chapter 3, “Configuring the Machine’s Basic Settings,” in the Reference Guide.)
When the Machine Is Turned ON for the First Time
When the machine is turned ON for the first time, the initial setup screens (Setup Guide) appear on the touch panel display, navigating you to perform the following basic setup items:
• Language and country/region
- Mixing the toner
- Date & Time Settings
- Fax settings (unit telephone number, unit name, and telephone line type)
- IP address settings
Follow the procedure below to quickly set the machine configuration and use its basic functions immediately.

NOTE
- If the machine's main power is turned OFF before the initial setup items are completed, the Setup Guide will re-appear the next time the machine is turned ON.
- The setup items after mixing the toner can be skipped and configured later from the Additional Functions menu. (See Chapter 2, "Basic Operations," in the Reference Guide.)
1
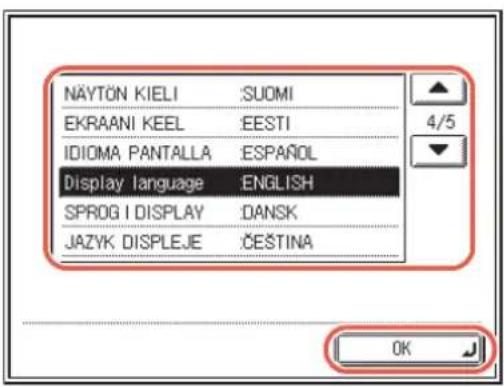
Press [▼or [ ] until the desired language appears in the list → select the language → press [OK].
2
![[Select Country/Region] Select a country/region. Country/Region United Kingdom (GB) Germany (DE) France (FR) Italy (IT) Spain (ES) Netherlands (NL) 1/5 OK](/content/2026/03/528383/images/7bef64079c07653003126186c54735b167fbccd0ecfe60c5158478e78d133919.jpg)
Press [▼or [ ] until the desired country or region appears in the list → select the country or region → press [OK] to restart the machine.
The machine is restarted.
3
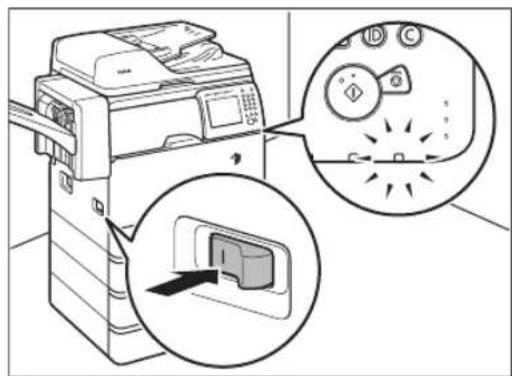
Mix the toner.
![[Mix Toner] After inserting the toner and drum, press the [Start] key to start mixing the toner. Start](/content/2026/03/528383/images/859832c6e35a4b4dd3322049ff0c454702f1ace06d9c5792a376f10539e84eca.jpg)
☐ Make sure that the toner cartridge and the drum unit are installed in the machine → press [Start] to start mixing the toner.
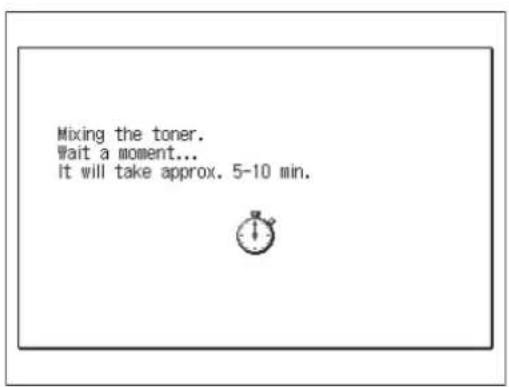
☐ Wait until the machine completes mixing the toner (about five to 10 minutes).
The screen on the left is displayed until the machine completes mixing the toner.
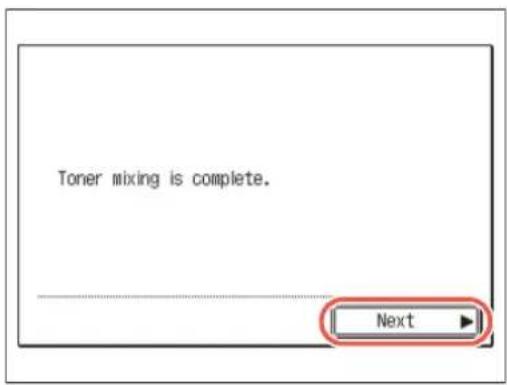
☐ When the screen on the left is displayed, press [Next].
4 Specify the Date & Time Settings.
If you want to configure the settings later, press [Next] to skip this step.
![Ready to copy. [Date & Time Settings] Use the numeric keys. 30/09 2011 17:22 Time Zone Settings DaylightSaving Time Settings -- -- -- -- -- Next System Monitor](/content/2026/03/528383/images/ccf7ac9fac688089fa729da753ba415fe1170a93abf95245ee31063f95491ba3.jpg)
☐ Enter the current date and time using Ⓧ (numeric keys).
Enter the day, month, and year, and then the time in 24-hour notation:
DD/MM YYYY hh:mm
Example) 10:05 p.m. on May 6, 2011
→ 06/05 2011 22:05

NOTE
If you make a mistake when entering numbers, press Ⓒ (Clear) → enter the correct numbers.
![[Date & Time Settings] Use the numeric keys. 30/09 2011 17:22 [30/09 2011 17:00] Time Zone Settings DaylightSaving Time Settings Next System Monitor](/content/2026/03/528383/images/43be7b9758bb466823241fdc907b3a3d99adb355973c80a113428e0596d1d620.jpg)
☐ Press [Time Zone Settings].
![Ready to copy. [Time Zone Settings] GMT-1:00 GMT 0:00 GMT+1:00 GMT+2:00 GMT+3:00 GMT+3:30 3/5 Cancel OK System Monitor](/content/2026/03/528383/images/d39375940c6cabbb7d37a3505bfb939e92e67573b892d47b98255453c29dde6b.jpg)
☐ Press [ ] or [ ] until the desired time zone appears in the list.
GMT (Greenwich Mean Time):
The time at the Greenwich Observatory in England. The standard time zones of the world are expressed globally in terms of the difference in hours (up to ±12 hours) from GMT (±0 hours).
☐ Select the time zone in which the machine is located.
□ Press [OK].
☐ Press [DaylightSaving Time Settings].
![[Date & Time Settings] Use the numeric keys. 30/09 2011 17:22 [30/09 2011 17:00] Time Zone Settings DaylightSaving Time Settings Next System Monitor](/content/2026/03/528383/images/8f39849d036adc1c16944a0cd08d923e035dc22d7dcb83fddcebbf50d29abdc6.jpg)
☐ Press [On] → [Start Date].
![Ready to copy. [Daylight Saving Time Settings] ■ Use Daylight Saving Time On Off Start Date End Date Cancel OK System Monitor](/content/2026/03/528383/images/ad7d8ad13a5f99bb47c9f658ff19523a92bc8781a1dcbd0eaa2842c8bb6a8509.jpg)
![[Start Date] Month Day March Final Sunday Cancel OK System Monitor](/content/2026/03/528383/images/7881a66a7a95b55d515b4dcef419b701bbd6e55845b617eb19f50d8e25860622.jpg)
☐ Specify the start date (month, week, and day) of the daylight saving time using the drop-down list boxes → press [OK].
![Ready to copy. [Daylight Saving Time Settings] ■ Use Daylight Saving Time On Off Start Date End Date Cancel OK System Monitor](/content/2026/03/528383/images/05702c4d33223e005c8e328c4b052195a36e0b071ae25ef6b82d3b02a2dd9fee.jpg)
□ Press [End Date].
![[End Date] Month October Day Final Sunday Cancel OK System Monitor](/content/2026/03/528383/images/ecfc318948db99c4dc0d5193d02f4553bb0e2ac8d6d4804c0d9fa8a540e8ec3e.jpg)
☐ Specify the end date (month, week, and day) of the daylight saving time using the drop-down list boxes → press [OK].

NOTE
If the daylight saving time is set, the machine automatically shifts the standard clock forward by one hour.
![[Daylight Saving Time Settings] ■ Use Daylight Saving Time On Off Start Date End Date Cancel OK System Monitor](/content/2026/03/528383/images/69b00f0116d771628f9ac0ee78c5116dd1610b4016f83899d56382b3a40dc604.jpg)
□ Press [OK].
![[Date & Time Settings] Use the numeric keys. 30/09 2011 17:22 [30/09 2011 17:00] Time Zone Settings DaylightSaving Time Settings Next System Monitor](/content/2026/03/528383/images/c4f9157800482a279e1999e865c7cee50a56a84a4646133f21a396c08e570540.jpg)
□ Press [Next].

NOTE
The screens for the fax settings appear only when the optional Super G3 Fax Board-AJ1 is attached to the machine.
![[Unit Telephone #] Use the numeric keys. = 03XXXXXXXX Space + Backspace Back Next System Monitor](/content/2026/03/528383/images/529ca2ed839d551fa24b34de103c33a1160b6013d156b1c9a06d147806bee572.jpg)
☐ Enter the unit telephone number (up to 20 digits) using Ⓔ (numeric keys) → press [Next].
If you want to configure the setting later, leave the box blank and press [Next].
The following keys are also available as necessary.
[Space]: Press to insert a space between the area code and the local fax number.
[+]: Press to insert a country code. Insert a plus sign (+) after the country code, and before the fax number.
[Backspace]: Press to delete the character immediately to the left of the cursor.

NOTE
If you make a mistake when entering numbers, press Ⓒ (Clear) → enter the correct numbers.
![[Unit Name] (Max 24 characters) Canon imageRUNNER Alphabet Backspace Entry Mode Q W E R T Y U I O P \ A S D F G H J K L ~ Z X C V B N M , ; : : Space Shift Back Next System Monitor](/content/2026/03/528383/images/ee96a22f4efd8b5a4357159c5e3e1abba72472355447e279b2531552b7727020.jpg)
![Ready to copy. [Tel Line Type] Pulse Tone Back Next System Monitor](/content/2026/03/528383/images/41086572533a3e422a95e113d5cc980dce6dabb54b7b545e86725decae7e3fc3.jpg)
☐ Enter the unit name (up to 24 characters) using the on-screen keyboard → press [Next].
Press [Entry Mode] to select the desired entry mode ( or ). If you want to configure the setting later, leave the box blank and press [Next].

NOTE
For instructions on how to enter characters, see Chapter 2, "Basic Operations," in the Reference Guide.
☐ Select the type of telephone line → press [Next].
If you do not know the telephone line type, contact your telephone service provider for details.
6
![[IP Address Settings] Use the numeric keys. DHCP IP Address 192.168.000.21 RARP Subnet Mask 255.255.255.0 Gateway Address 192.168.000.1 BOOTP Backspace Back Next System Monitor](/content/2026/03/528383/images/486f0f070b2e7ffd4c660d7b89dfe634c6377a561d5c5aab1ce9d7fcc85450bf.jpg)
Specify the IP address settings → press [Next].
If you want to configure the settings later, leave the boxes blank and press [Next].
● To use a fixed IP address:
☐ Press [IP Address].
☐ Enter the IP address using Ⓤ (numeric keys).
☐ Specify the [Subnet Mask] and [Gateway Address] settings in the same way.
● To automatically assign an IP address using DHCP, RARP or BOOTP:
☐ Press [DHCP], [RAPP], or [BOOTP].
☐ Enter the IP address, subnet mask, and gateway address.
![CANON imageRUNNER 1730i - Specify the IP address settings → press [Next]. - 1](/content/2026/03/528383/images/a853c3f38b06448553791161d038f5dadcf30a15ef4aca1250c35db947cf62ef.jpg)
NOTE
Even if you press [DHCP], [BOOTP], or [RARP], you should enter an IP address, subnet mask, and gateway address. If this information cannot be obtained from the DHCP, BOOTP, or RARP server, the settings entered in this step are used.
7
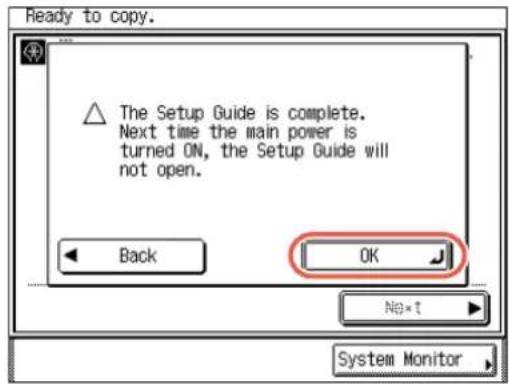
Press [OK] to finish the initial setup.
From the next time the machine's main power is turned ON, the Setup Guide does not appear.
If you want to return to the previous screen, press [Back].
8
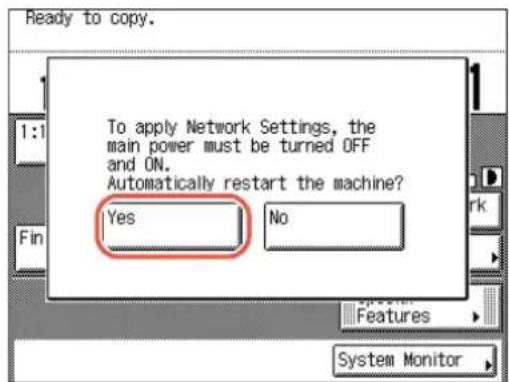
Press [Yes] to restart the machine.
If the IP address settings have been specified, restart the machine to make the settings effective. Press [No] if you want to manually restart the machine later. (See "Restarting the Machine," on p. 5-12.)
![CANON imageRUNNER 1730i - Press [Yes] to restart the machine. - 1](/content/2026/03/528383/images/6ffc445b5a13a301fd398adca9d0521de8aaecc645240f7f3d6606a899c8014a.jpg)
NOTE
After restarting the machine, you might want to check if the IP address is correctly set to the machine. For help, see "Checking the Machine's IP Address," on p. 6-4.
Using the Control Panel Power Switch (Sleep Mode)
To turn the control panel ON or OFF, press the control panel power switch. When the control panel is turned OFF, the machine is in the Sleep mode.

NOTE
- The machine will not enter the Sleep mode when it is in operation.
- The machine can receive, forward, or print documents when it is in the Sleep mode.
| Control Panel Power Switch Machine Status |
| ON Ready | |
| OFF Sleep mode | |
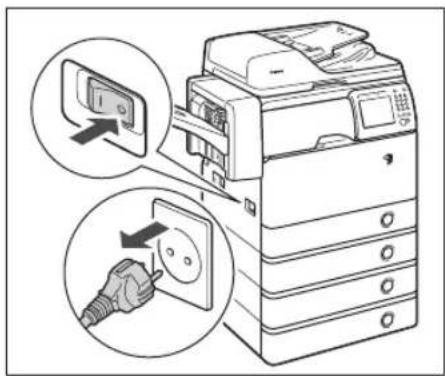
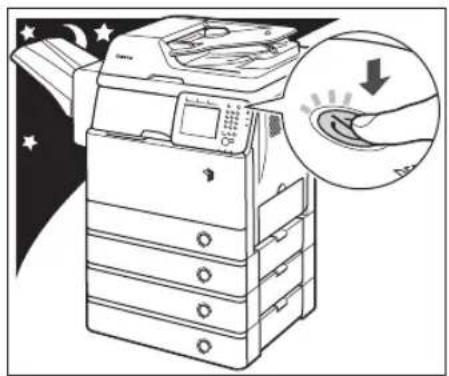
Turning OFF the Main Power
natural_image
Line drawing of a printer with an open button, showing the printer's handle and control panel (no text or symbols present)
To safely turn OFF the machine's main power, press the main power switch (located on the left side of the machine) to the "side.
The main power indicator on the control panel is turned OFF.

WARNING
Do not unplug the power cord before turning OFF the main power. Doing so may result in electrical shock, damage the machine, or destroy the stored data.

IMPORTANT
If you need to turn ON the machine immediately after it is turned OFF (such as when restarting the machine), wait at least 10 seconds before turning it ON again. (See "Restarting the Machine," on p. 5-12.)
Accompanying CD-ROMs
3
CHAPTER
This chapter describes the CD-ROMs that come with the machine.
User Manual CD-ROM 3-2
System Requirements 3-2
Using the CD-ROM Menu....3-3
UFRII LT User Software 3-4
Contents of CD-ROM 3-4
System Requirements 3-5
Installation 3-7
PCL User Software....3-8
Contents of CD-ROM 3-8
System Requirements 3-9
Installation 3-9
PS User Software....3-10
Contents of CD-ROM 3-10
System Requirements 3-11
Installation 3-11
Fax Driver Software (Optional) 3-12
Contents of CD-ROM 3-12
System Requirements 3-13
Installation 3-13
The User Manual CD-ROM is software that enables you to view PDF manuals on your computer desktop. Follow the instructions below to use the User Manual CD-ROM.

NOTE
Depending on the system configuration and product purchased, some manuals may not be needed.
System Requirements
The User Manual CD-ROM can be used in the following system environments.
| Windows Macintosh | |
| OS | Windows 2000 (Service Pack 4 or later)Windows XP (Service Pack 1a or later)Windows Vista (Service Pack 2 or later)Windows 7Windows Server 2003Windows Server 2008 | Mac OS X 10.4.x or later |
| Memory The memory required to run the above operating systems |
| Computer A computer that can run the above operating systems |
| Display A resolution of 1024 pixels × 768 pixels or higher |

IMPORTANT
Depending on the configuration of your computer, some functions may not operate correctly. If the PDF manuals do not open from the CD-ROM Menu, open the PDF files directly from the [ENGLISH] folder on the User Manual CD-ROM.
This section describes how to use the CD-ROM Menu. The CD-ROM Menu appears when you insert the User Manual CD-ROM into the CD-ROM drive. (The sample screen shot shown here is for illustrative purpose only.)

NOTE
- The screen shot shown below may differ from the actual display depending on the operating system used.
- For Macintosh users, double-click the [START] icon to start the CD-ROM Menu.
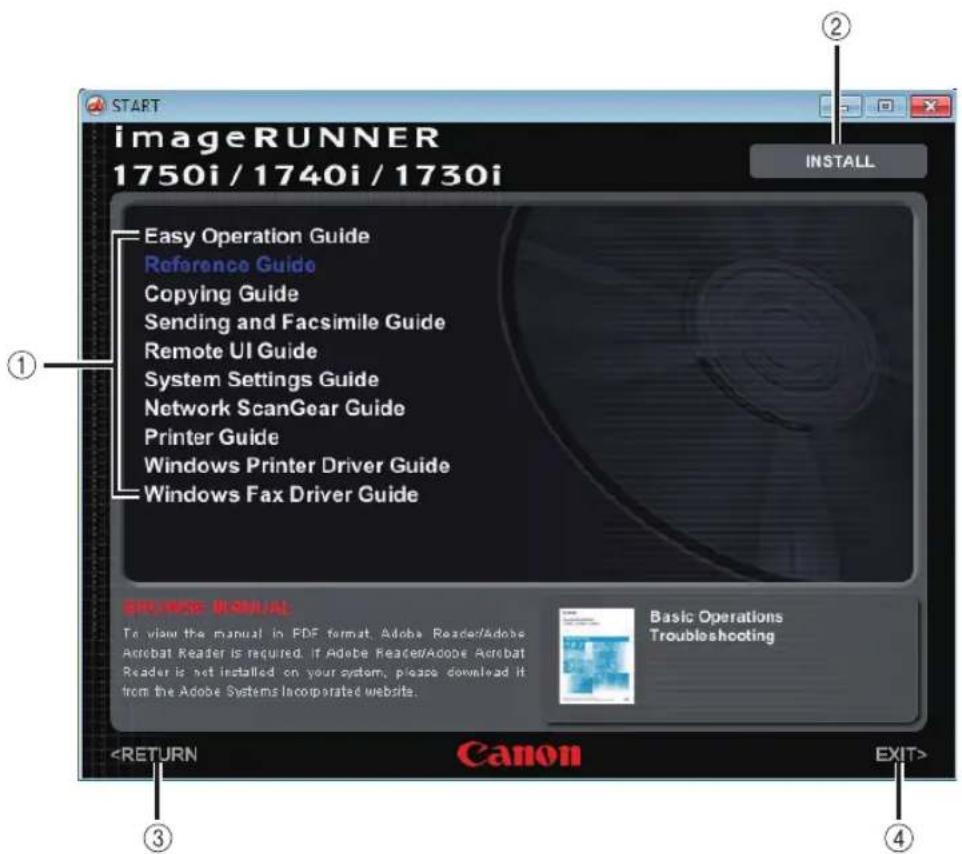
① BROWSE MANUAL
You can read any of the listed guides by clicking on the desired guide. After clicking on the desired guide, Adobe Reader/Adobe Acrobat Reader starts, and the PDF manual is displayed.
② INSTALL
You can install the listed PDF manuals on your computer. After clicking [INSTALL], select the location where you want to save the files.
③ RETURN
Click to return to the Language Selection menu.
④ EXIT
Click to exit the CD-ROM menu.
UFRII LT User Software
The printer driver is software that is required in order to print from applications, such as Microsoft Word/Excel/PowerPoint, etc., on your computer. The printer driver also enables you to configure settings related to printing.
The UFRII LT printer driver and the Color Network ScanGear are installed from the UFRII LT User Software CD-ROM.

Contents of CD-ROM
■ UFRII LT Printer Driver
With the UFRII LT printer driver, the various data processing tasks conventionally executed within the printer are appropriately divided between the host PC and the printer to greatly reduce the overall printing time. The workload can be delegated to match the output data, thus realizing a significant increase in speed through optimization.
■ Color Network ScanGear
With the Color Network ScanGear, originals placed in the feeder/platen glass can be scanned and imported to a computer on the network. The Color Network ScanGear is called from a TWAIN-compliant application on your computer desktop.
Examples of applications that support TWAIN are as follows:
- Adobe Photoshop
- Adobe Acrobat
- Microsoft Word/Excel/PowerPoint etc. in Office 2000 or later
■ Printer Driver Installation Guide
Read this HTML manual before installing the printer driver.
■ Network ScanGear Installation Guide
Read this HTML manual before installing the Color Network ScanGear.

IMPORTANT
The drivers included on the CD-ROMs support 32-bit operating systems. The drivers for 64-bit operating systems can be downloaded from the Canon Web site.
System Requirements
Before installing the software, make sure that your system meets the system requirements outlined below.
UFRII LT Printer Driver
■ Software
- Operating Systems:
- Windows 2000
- Windows XP
- Windows Vista
- Windows 7
- Windows Server 2003
- Windows Server 2008

NOTE
Supported operating systems may vary depending on the version of the printer driver used.
Hardware
- Computer:
- Any computer that runs the above systems
- Memory:
- The amount of memory required to run the above systems correctly
Color Network ScanGear
■ Software
- Operating Systems:
- Windows 2000
- Windows XP
- Windows Vista
- Windows 7
- Windows Server 2003
-
Windows Server 2008
-
Application Software:
- TWAIN-compliant applications (such as Adobe Photoshop, Adobe Acrobat, Microsoft Word/Excel/PowerPoint etc. in Office 2000 or later)
Hardware
- Computer:
- Any computer that runs the above systems
- Hard disk space:
- The amount of disk space required to run the above systems correctly
- Memory:
- The amount of memory required to run the above systems correctly
- A display with a resolution of at least 640 × 480 ( 800 × 600 or more recommended) and capable of displaying at least 256 colors.
- A network host adapter capable of TCP/IP and UDP/IP communication on an Ethernet network.

IMPORTANT
If you want to use the machine as a network scanner, it must be connected to a computer over an IPv4 network.

NOTE
When scanning a large number of images or images containing large amounts of image data, an insufficient memory error or significant loss of scanning speed may occur. If this happens, the following procedures should prove useful:
- Increase the amount of hard disk space by deleting or otherwise appropriately processing unnecessary files on the hard disk, etc.
- Rescan with reduced resolution.
- Increase the amount of RAM.
- Increase the amount of virtual memory to the highest possible.
- Divide originals into several sets and then scan them separately.
Installation
From the menu screen of the CD-ROM, you can begin installing the software or display the HTML manuals to view details about the installation procedure.
■ CD-ROM Menu:

NOTE
View the HTML manuals before you start the installation. You cannot view the HTML manuals while the installation is in progress.
The PCL printer driver is installed from the PCL User Software CD-ROM.

Contents of CD-ROM
■ PCL Printer Driver
The PCL5c, PCL5e, and PCL6 printer drivers can be used with most kinds of business application software. The PCL5c printer driver is for color printers, the PCL5e printer driver is for black-and-white printers, and the PCL6 printer driver is for both color and black-and-white printers. PCL6 is an advanced version of PCL5c and PCL5e, and offers superior printing quality and speed. The PCL5e printer driver is provided as standard with black-and-white printers.
■ Printer Driver Installation Guide
Read this HTML manual before installing the printer driver.
■ Font Manager
Use this software to manage fonts and view them accurately in Windows. Double-click [Canonfm] → the [Setup.exe] icon to install the software. For more information, see the Readme file located in \Canonfm\program files\Canon\Font Manager\English.

IMPORTANT
The drivers included on the CD-ROMs support 32-bit operating systems. The drivers for 64-bit operating systems can be downloaded from the Canon Web site.
System Requirements
Before installing the software, make sure that your system meets the system requirements outlined below.
■ Software
- Operating Systems:
- Windows 2000
- Windows XP
- Windows Vista
- Windows 7
- Windows Server 2003
- Windows Server 2008

NOTE
Supported operating systems may vary depending on the version of the printer driver used.
Hardware
- Computer:
- Any computer that runs the above systems
- Memory:
- The amount of memory required to run the above systems correctly
Installation
From the menu screen of the CD-ROM, you can begin installing the software or display the HTML manual to view details about the installation procedure.


NOTE
View the HTML manuals before you start the installation. You cannot view the HTML manuals while the installation is in progress.
The PS printer driver is installed from the PS User Software CD-ROM.
Contents of CD-ROM
■ PS Printer Driver
The PS printer driver converts print data from applications into data for use with PS printers, and sends it to the printer. As well as converting print data, it can also enable you to configure settings relating to finishing and detailed settings such as halftones, and provides an appropriate print environment for desktop publishing and publishing on demand.
■ Printer Driver Installation Guide
Read this HTML manual before installing the printer driver.

IMPORTANT
The drivers included on the CD-ROMs support 32-bit operating systems. The drivers for 64-bit operating systems can be downloaded from the Canon Web site.
System Requirements
Before installing the software, make sure that your system meets the system requirements outlined below.
■ Software
- Operating Systems:
- Windows 2000
- Windows XP
- Windows Vista
- Windows 7
- Windows Server 2003
- Windows Server 2008
Hardware
- Computer:
- Any computer that runs the above systems
- Memory:
- The amount of memory required to run the above systems correctly
Installation
From the menu screen of the CD-ROM, you can begin installing the software or display the HTML manual to view details about the installation procedure.
■ CD-ROM Menu:

NOTE
View the HTML manuals before you start the installation. You cannot view the HTML manuals while the installation is in progress.
Fax Driver Software (Optional)
The fax driver is software that is required in order to send faxes from applications on your computer desktop. The fax driver is installed from the Fax Driver Software CD-ROM.

IMPORTANT
The Fax Driver Software CD-ROM is included with the optional Super G3 Fax Board-AJ1.
Contents of CD-ROM
Fax Driver
With the fax driver installed on your computer, you can fax documents directly from applications on your computer desktop, instead of scanning originals on the machine.
■ Fax Driver Installation Guide
Read this HTML manual before installing the fax driver.

IMPORTANT
The drivers included on the CD-ROMs support 32-bit operating systems. The drivers for 64-bit operating systems can be downloaded from the Canon Web site.
System Requirements
Before installing the software, make sure that your system meets the system requirements outlined below.
■ Software
- Operating Systems:
- Windows 2000
- Windows XP
- Windows Vista
- Windows 7
- Windows Server 2003
- Windows Server 2008
Hardware
- Computer:
- Any computer that runs the above systems
- Memory:
- The amount of memory required to run the above systems correctly
Installation
From the menu screen of the CD-ROM, you can begin installing the software or display the HTML manual to view details about the installation procedure.
■ CD-ROM Menu:

NOTE
View the HTML manuals before you start the installation. You cannot view the HTML manuals while the installation is in progress.
Routine Maintenance
4
CHAPTER
This chapter describes how to load paper, replace the toner, and clean the machine and introduces some of the consumables such as toner and staple cartridges.
Paper Drawers 4-2
Loading Paper 4-3
Adjusting a Paper Drawer to Hold a Different Paper Size . . . . . . . . . . . . . . . . . . . . . . . . . . . . . . . . . . . . . . . . . . . . . . . . . 4-5
Replacing the Toner 4-8
Routine Cleaning 4-13
Platen Glass and Underside of the Feeder 4-13
Feeder Scanning Area and Rollers 4-14
Consumables 4-18
Paper Stock 4-18
Toner....4-19
Drum Unit 4-19
Staple Cartridge 4-20
Genuine Supplies 4-20
This section describes how to load paper in the paper drawers.
When any of the paper drawers are empty, a message prompting you to load paper may appear on the touch panel display, indicating which paper drawer needs additional paper supply. To clear the message, load paper as described below.

CAUTION
Take care not to cut your hands on the edges of the paper when loading it into the machine.

IMPORTANT
- The paper sizes/types that can be loaded in the paper drawers are as follows: - S i z A4 and A5
- Type: Plain, Recycled, Color, Heavy Paper 1, and 3-hole punch (See "Available Paper Stock," on p. 6-2.)
- With the optional Envelope Cassette-D1, the following envelopes can be loaded in Paper Drawer 2: No.10 (COM10), ISO-B5, Monarch, ISO-C5, and DL. (See Chapter 4, “Optional Equipment,” in the Reference Guide.)
- The number of available paper drawers may vary depending on the machine configuration.

NOTE
- If paper runs out while printing is in progress, the screen on the left appears. The remaining prints are automatically completed as soon as you load the correct paper.
- The screen on the left appears also when the paper drawers are not fully inserted in the machine.
Loading Paper
Load paper in the paper drawers as described below.

IMPORTANT
- Do not load nonstandard-sized paper in the paper drawers.
- Do not load the following types of paper in the paper drawers, as they may cause paper jams:
- Severely curled or wrinkled paper
- Lightweight straw paper (less than approximately 64 g/m²)
- Transparencies
- Labels
- Paper on which color images have been copied (Do not print on the reverse side of such paper.)
- Paper which has been printed on using a thermal transfer printer (Do not print on the reverse side of such paper.)
- Fan the stack of paper well before loading it, and align the edges of the paper stack on a flat surface.
- Never place paper or anything in the empty part of the drawer next to the paper stack. Doing so may cause paper jams.
1
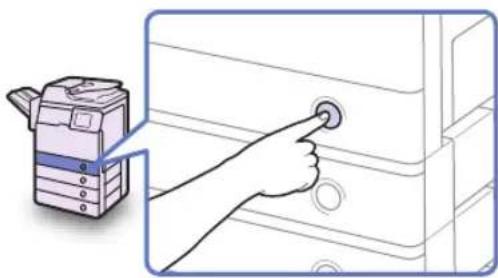
natural_image
Illustration of a hand pressing a button on a computer monitor (no text or symbols present)
Press the button on the paper drawer in which you want to load paper.
2
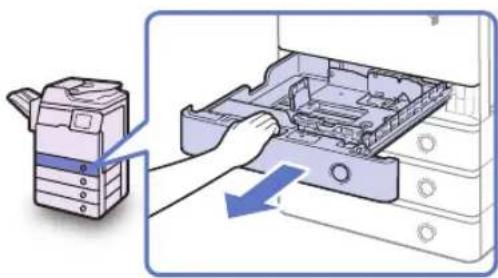
natural_image
Illustration of a printer next to an open storage unit with a hand inserting a component (no text or symbols visible)
Grip the handle and pull out the paper drawer until it stops.
3

natural_image
Line drawing of hands folding a folded garment (no text or symbols)
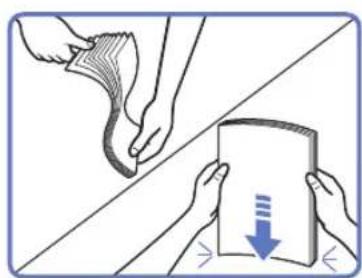
natural_image
Illustration showing two hands holding a document with a downward arrow, no text or symbols present
Open a package of paper and take out the paper stack from the package.

CAUTION
Take care not to cut your hands on the edges of the paper when loading it into the machine.

IMPORTANT
Rewrap any remaining paper in its original package, and store it in a dry place, away from direct sunlight.

NOTE
- For high-quality printouts, use paper recommended by Canon.
- Before loading paper, always fan the sheets several times, and align the edges to facilitate feeding.
4
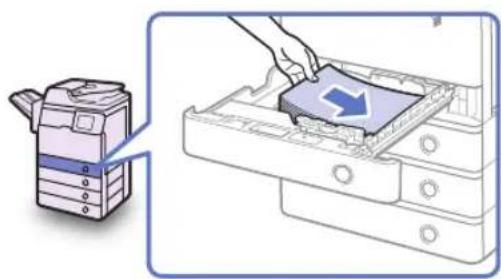
natural_image
Illustration of a printer with a blue arrow pointing to a device inside a machine (no text or symbols)
Load the paper stack into the paper drawer.
Even out the edges of the paper stack, and load the paper stack against the right wall of the paper drawer.

CAUTION
Take care not to cut your hands on the edges of the paper when loading it into the machine.

IMPORTANT
- Rolled or curled paper must be straightened out prior to use.
- Make sure that the height of the paper stack does not exceed the loading limit marks (yboth on the left and back sides of the slide guides.
- Make sure that the paper size setting of the paper drawer matches the size of the paper that is being loaded.

NOTE
• Each paper drawer holds about 550 sheets of paper (80 g/m ^2 ).
- If there are instructions on the package of paper about which side of the paper to load facing up, follow those instructions.
- When printing one-sided documents on paper loaded in the paper drawer, the side facing up is the one printed on.
- If problems occur, such as poor print quality or paper jams, try turning the paper stack over and reloading it.
- For more information on the print direction of preprinted paper (paper which has logos or patterns already printed on it), see Chapter 7, "Appendix," in the Reference Guide.
5
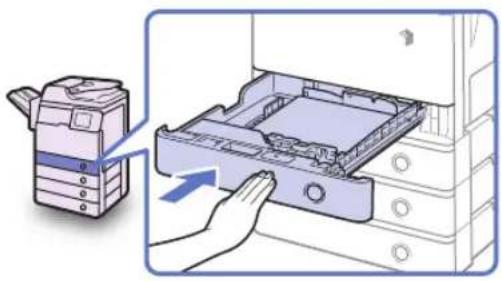
natural_image
Illustration of a printer being inserted into a rack, showing the lid and handle (no text or symbols present)
Gently push the paper drawer back into the machine until it clicks into place.

CAUTION
When returning the paper drawer to its original position, be careful not to get your fingers caught, as this may result in personal injury.

IMPORTANT
Make sure that the paper drawer is fully inserted. You will not be able to make prints if the paper drawer is not completely pushed into the machine.

NOTE
If there are remaining prints to be completed, the machine automatically resumes printing as soon as you load the correct paper.
6
Specify the paper type as required.
For help, see Chapter 3, "Configuring the Machine's Basic Settings," in the Reference Guide.

IMPORTANT
Make sure that the paper type setting of the paper drawer matches the type of the paper that is being loaded.
Adjusting a Paper Drawer to Hold a Different Paper Size
If you want to change the size of paper in the paper drawer, adjust the slide guides for the new paper size as described below.
1
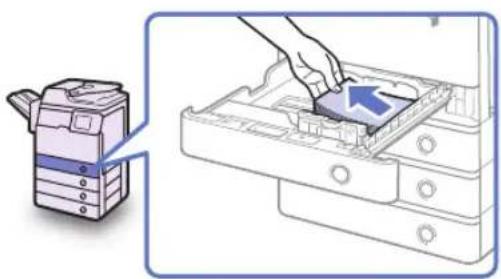
natural_image
Illustration showing a printer with a hand inserting a component into a device (no text or symbols present)
Open the paper drawer and remove all the loaded paper.
For instructions on how to open the paper drawer, see steps 1 and 2 in "Loading Paper," on p. 4-3.
2 Squeeze the lever on the side guide. Without releasing the lever, slide the side guide leftward or rightward to align it with the mark for the desired paper size.
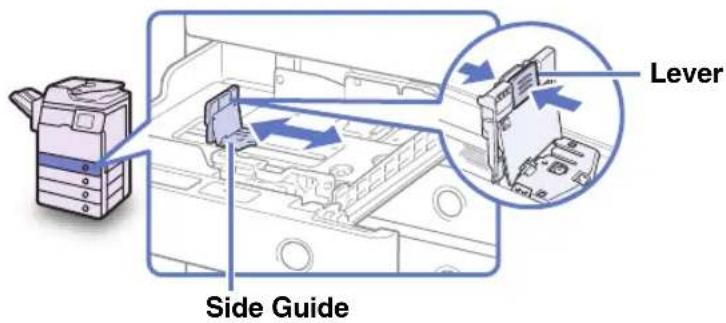
3 Squeeze the lever on the front guide. Without releasing the lever, slide the front guide backward or forward to align it with the mark for the desired paper size.

IMPORTANT
Adjust the guides correctly. Failure to do so may cause paper jams or dirty prints, or make the inside of the machine dirty.
4
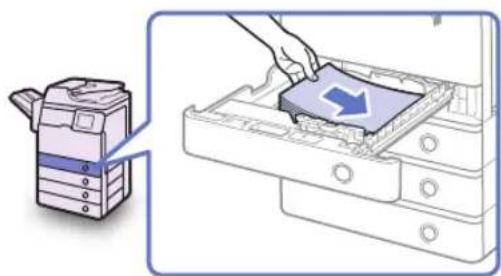
natural_image
Illustration showing a printer next to a printer's internal structure with a blue arrow indicating a component (no text or symbols present)
Load the appropriate size of paper into the paper drawer.

CAUTION
Take care not to cut your hands on the edges of the paper when loading it into the machine.
IMPORTANT
- Rolled or curled paper must be straightened out prior to use.
- Make sure that the height of the paper stack does not exceed the loading limit marks (yboth on the left and back sides of the slide guides.
- Make sure that the paper size setting of the paper drawer matches the size of the paper that is being loaded.
5
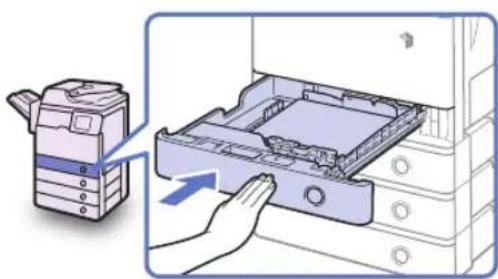
natural_image
Illustration of a printer's internal structure being inserted into a device (no text or symbols visible)
Gently push the paper drawer back into the machine until it clicks into place.

CAUTION
When returning the paper drawer to its original position, be careful not to get your fingers caught, as this may result in personal injury.
6 Place the appropriate paper size label on the paper drawer.
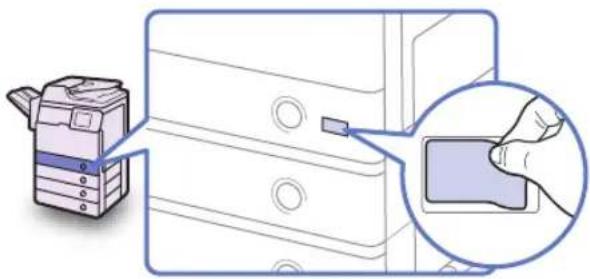
natural_image
Illustration of a printer next to a computer with a magnified view of the printer's clip (no text or symbols present)
IMPORTANT
The paper sizes marked on the labels may include sizes that the machine is unable to use.
7 Specify the paper type as required.
For help, see Chapter 3, "Configuring the Machine's Basic Settings," in the Reference Guide.
IMPORTANT
Make sure that the paper type setting of the paper drawer matches the type of the paper that is being loaded.
Replacing the Toner
When only a small amount of toner is left inside the machine, the message is displayed on the screen. Although you may continue printing, it is highly recommended that you prepare to install a new toner cartridge before the toner completely runs out.
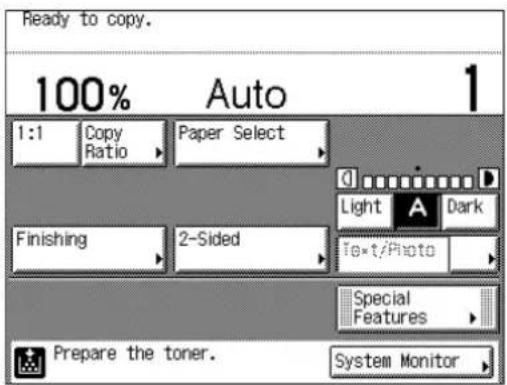
When toner runs out completely and prints can no longer be made, the message appears on the touch panel display. Pressing [Recover Later] enables you to continue operations. However, you have to replace the toner cartridge to make further prints.
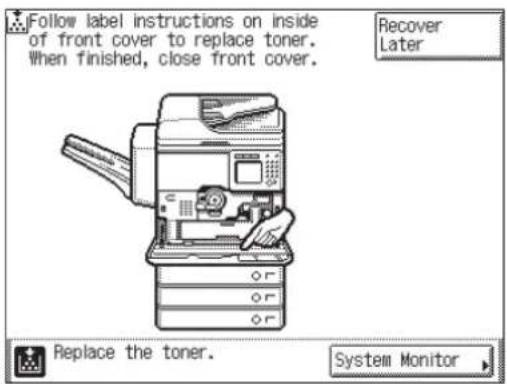
WARNING
- Do not burn or throw used toner cartridges into open flames, as this may cause the toner remaining inside the cartridges to ignite, resulting in burns or a fire.
- Do not store toner cartridges or paper in places exposed to open flames, as this may cause the toner or paper to ignite, resulting in burns or a fire.

CAUTION
- Keep toner out of the reach of small children. If toner is ingested, consult a physician immediately.
• Take care not to allow toner to come into contact with your hands or clothing. If toner gets onto your hands or clothing, wash it off immediately with cold water. Washing with warm water may set the toner permanently, making the stains impossible to remove.
- When discarding used toner cartridges, put the cartridges in a bag to prevent the toner remaining inside the cartridges from scattering, and dispose of them in a location away from open flames.

IMPORTANT
- Use only toner cartridges intended for use with the machine. (See “Consumables,” on p. 4-18.)
- Do not replace toner cartridges until the message prompting you to do so appears.
- Do not attempt to replace the toner cartridge while the machine is printing.

NOTE
If toner runs out during a print job, the remaining prints are completed after you replace the toner cartridge.

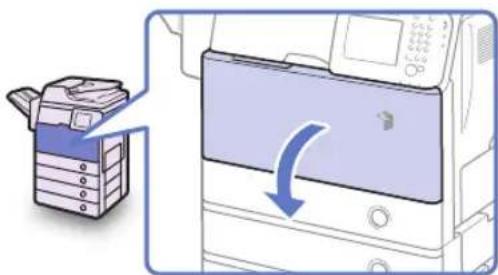
natural_image
Illustration of a printer with a blue cover and arrow indicating compression or disassembly (no text or symbols present)
Open the front cover.

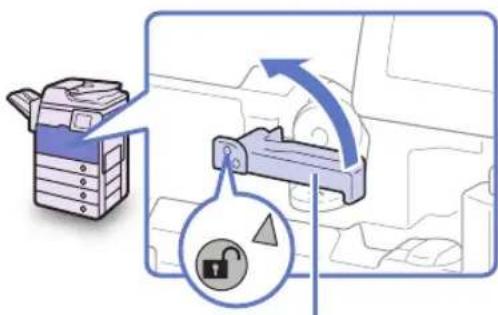
Toner Cartridge Lock Lever
Turn the toner cartridge lock lever counterclockwise so that the arrow marks on the lever and its axis face each other.
3 Pull the toner cartridge out of the toner supply port.
Pull the toner cartridge out halfway with one hand, support it with the other hand from underneath, and then remove it completely while keeping it level.
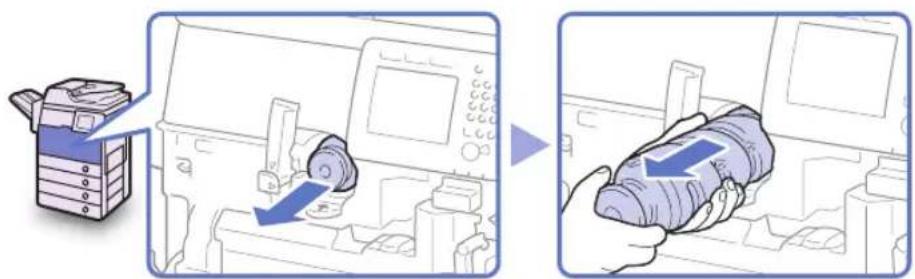
WARNING
Do not burn or throw used toner cartridges into open flames, as this may ignite the toner remaining inside the cartridge, and result in burns or a fire.
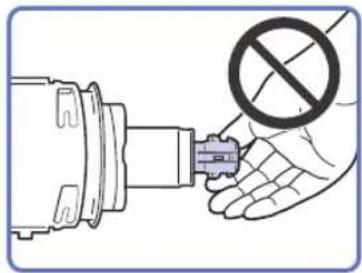
natural_image
Illustration of a hand holding a plug with a prohibition symbol (no text or labels)
IMPORTANT
- If the toner cartridge cannot be pulled out, check that the knob is turned all the way to the appropriate position.
- Do not touch the opening of the toner cartridge or subject it to shock by hitting it. Doing so may cause the toner to leak out of the cartridge.
4 Take the new toner cartridge out of the package and uncap it.
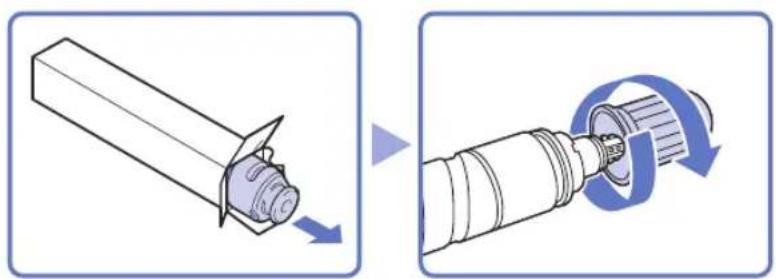
natural_image
Diagram showing a mechanical component before and after assembly, with no visible text or symbols
IMPORTANT
- Use only toner cartridges intended for use with the machine. (See “Consumables,” on p. 4-18.)
- Do not touch the opening of the toner cartridge or subject it to shock by hitting it. Doing so may cause the toner to leak out of the cartridge.
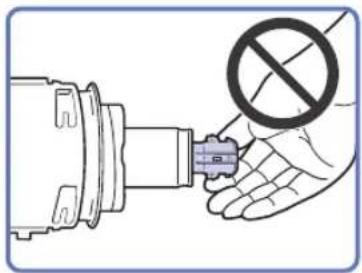
natural_image
Illustration of a hand holding a plug with a no-smoking symbol (no text or labels)
5 Insert the new toner cartridge in the toner supply port as far as it will go.
Support the new toner cartridge with one hand from underneath while pushing it into the machine with the other hand.
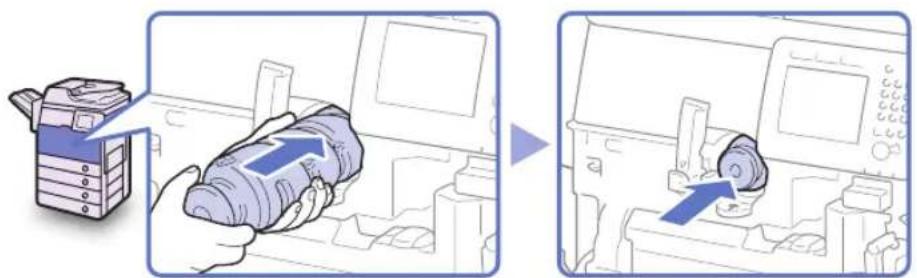
natural_image
Illustration showing a printer being opened into a machine, with no visible text or symbols
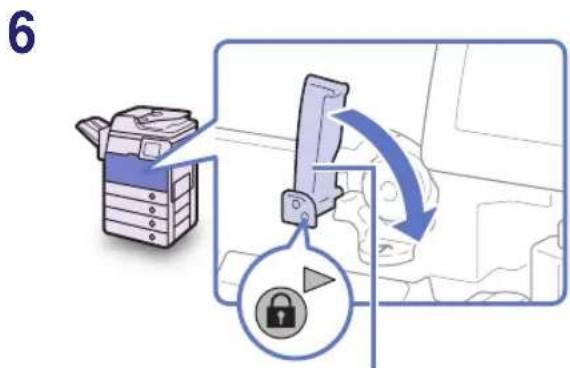
Toner Cartridge Lock Lever
Turn the toner cartridge lock lever clockwise so that the arrow marks on the lever and its axis face each other.
7
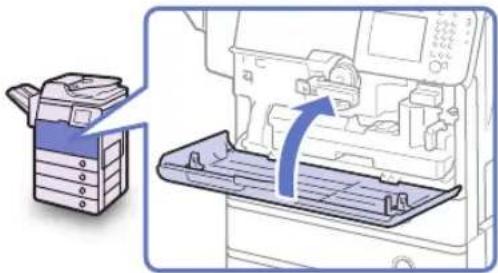
natural_image
Illustration of a printer with a blue arrow indicating a process or operation, showing internal components and a document outline (no text or symbols present)
Close the front cover.

CAUTION
When closing the cover, be careful not to get your fingers caught, as this may result in personal injury.
If the original is not copied clearly, clean the following parts of the machine:
- Platen glass
• Underside of the feeder
- Feeder scanning area and rollers
For high-quality printouts, we recommend that you clean these parts regularly.

WARNING
- When cleaning the machine, first turn OFF the main power switch, then disconnect the power cord. Failure to observe these steps may result in a fire or electrical shock.
- Do not use alcohol, benzene, paint thinner, or other solvents for cleaning. Doing so may damage the plastic parts.
- Disconnect the power cord from the power outlet regularly, and clean the area around the base of the power plug's metal pins and the power outlet with a dry cloth to ensure that all dust and grime is removed. If the power cord is connected for a long period of time in a damp, dusty, or smoky location, dust can build up around the power plug and become damp. This may cause a short circuit and result in a fire.

IMPORTANT
- Do not dampen the cloth too much, as excess water may damage the machine.
- Turning the main power OFF will erase all jobs in the machine's memory.
Platen Glass and Underside of the Feeder
Clean the platen glass and the underside of the feeder as described below.

IMPORTANT
If the platen glass or the underside of the feeder is dirty, the original may not be scanned clearly, or the size of the original may be incorrectly detected.
1 Clean the platen glass and the underside of the feeder with a water-moistened cloth, and then wipe them clean with a soft, dry cloth.
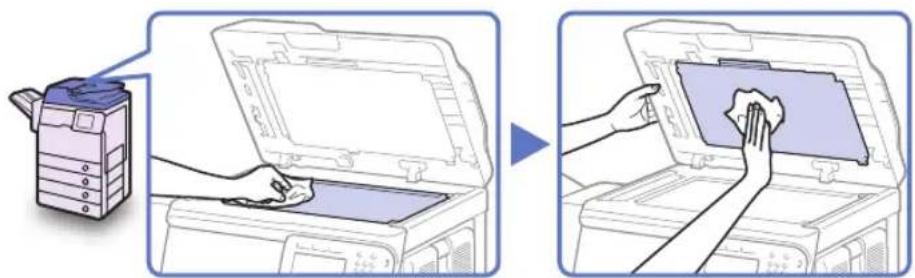
natural_image
Illustration showing a printer being placed on an open file into a printer, with no visible text or symbols.
IMPORTANT
Do not dampen the cloth too much, as excess water may damage the machine.
Feeder Scanning Area and Rollers
Clean the feeder scanning area and rollers regularly as described below.
IMPORTANT
Do not dampen the cloth too much, as excess water may damage the machine.
1 Gently open the feeder cover.
When the feeder cover is completely opened, the inner cover is also opened.
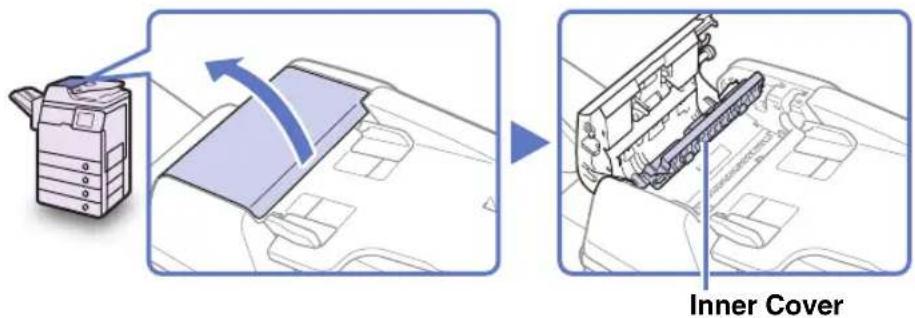
2 Clean the rollers (a total of eight places) inside the feeder cover with a water-moistened cloth. Then, wipe the area with a soft, dry cloth.
Spin the rollers with your hand while cleaning them.
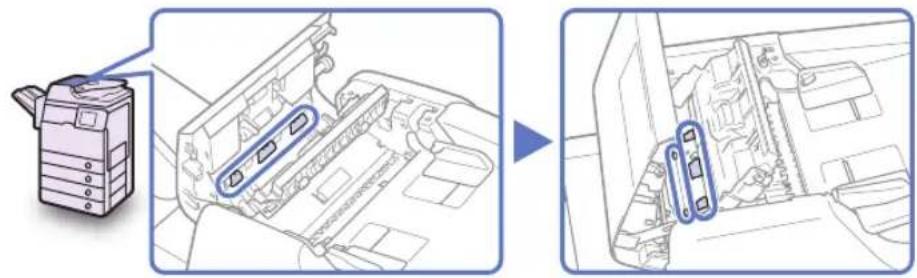
natural_image
Diagram showing a printer's internal structure before and after assembly, with no visible text or symbols.
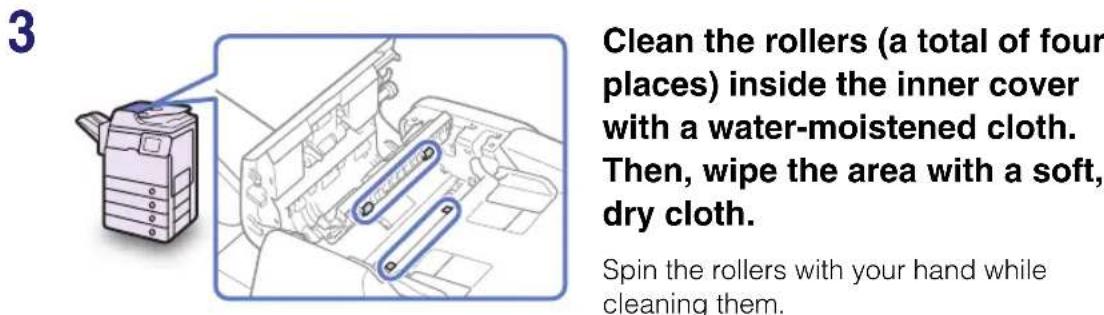
4 Clean the transparent plastic parts of the inner cover and inside it (a total of three places) with a water-moistened cloth. Then, wipe the area with a soft, dry cloth.
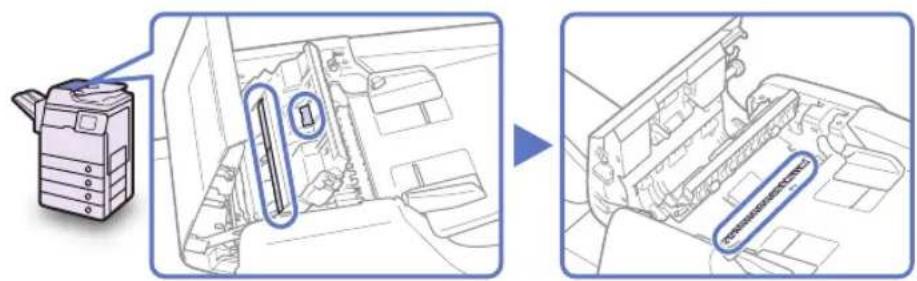
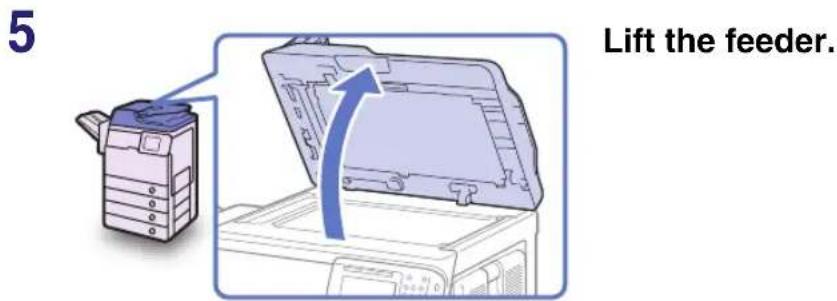
6 Clean the feeder scanning area (the left side of the platen glass) and the white strip of plate under the feeder with a water-moistened cloth. Then, wipe the area with a soft, dry cloth.
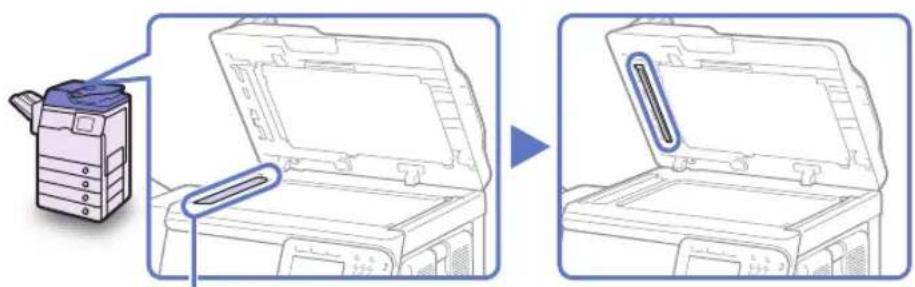
natural_image
Diagram showing a printer's open lid being inserted into a machine, with no visible text or symbols.
Feeder Scanning Area
7 Hold the feeder with one hand, and then open the cover under the feeder with the other.
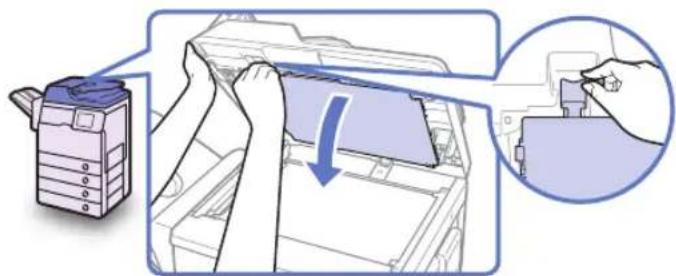
natural_image
Illustration of a printer's internal structure being folded, with a magnified inset showing the process (no text or symbols)
8 Clean the rollers (a total of eight places) inside the cover under the feeder with a water-moistened cloth. Then, wipe the area with a soft, dry cloth.
Spin the rollers with your hand while cleaning them.
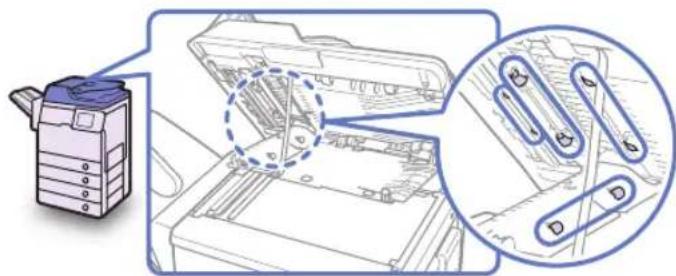
9
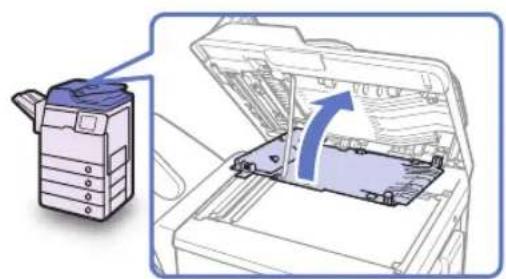
natural_image
Illustration of a printer with an open lid and a blue arrow indicating a motion or transformation (no text or symbols present)
Close the cover under the feeder.
CAUTION
When closing the cover, be careful not to get your fingers caught, as this may result in personal injury.
10
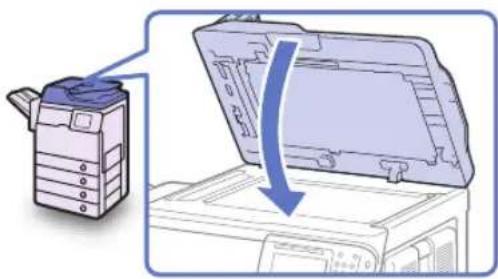
natural_image
Illustration of a printer with an open lid and arrow indicating process (no text or symbols)
Gently lower the feeder.
CAUTION
When lowering the feeder, be careful not to get your fingers caught, as this may result in personal injury.
11
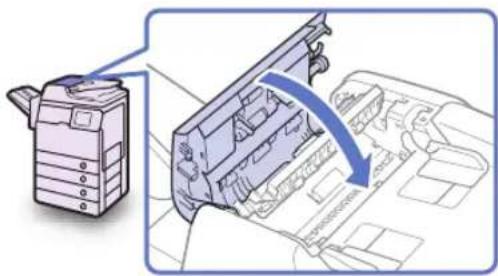
natural_image
Diagram showing a printer device and its internal structure with a blue arrow indicating rotation (no text or symbols present)
Gently close the feeder cover.
CAUTION
When closing the cover, be careful not to get your fingers caught, as this may result in personal injury.
Consumables
The consumables described in this section are available from Canon. For more information, contact your local authorized Canon dealer.
We recommend that you order these consumables from your local authorized Canon dealer before your stock runs out.

CAUTION
Keep toner and other consumables out of the reach of small children. If these items are ingested, consult a physician immediately.
Paper Stock
In addition to plain paper (A4 and A5), recycled paper, color paper, transparencies (recommended for the machine), labels, and other types of paper stock are available. For more information, contact your local authorized Canon dealer.

CAUTION
Do not store paper in places exposed to open flames, as this may cause the paper to ignite, resulting in burns or a fire.

IMPORTANT
To prevent moisture build-up, tightly wrap any remaining paper in its original package for storage.

NOTE
- For high-quality printouts, use paper recommended by Canon.
- Some commercially available paper types are not suitable for this machine. Contact your local authorized Canon dealer when you need to purchase paper.
Toner
If a message prompting you to replace the toner cartridge appears on the touch panel display, replace the toner cartridge with a new one. Use only toner cartridges intended for use with the machine.
■ C-EXV 37 Black Toner
WARNING
- Do not burn or throw used toner cartridges into open flames, as this may cause the toner remaining inside the cartridges to ignite, resulting in burns or a fire.
- Do not store toner cartridges in places exposed to open flames, as this may cause the toner to ignite and result in burns or a fire.
CAUTION
Keep toner and other consumables out of the reach of small children. If these items are ingested, consult a physician immediately.
IMPORTANT
- Store toner cartridges in a cool location, away from direct sunlight. The recommended storage conditions are temperatures below 30^ , and humidity below 80% .
- Do not store toner cartridges in an upright position.
Be careful of counterfeit toners
Please be aware that there are counterfeit Canon toners in the marketplace. Use of counterfeit toner may result in poor print quality or machine performance. Canon is not responsible for any malfunction, accident or damage caused by the use of counterfeit toner.
For more information, see http://www.canon.com/counterfeit
Drum Unit
When you replace the drum unit with a new one, be sure to use only drum units intended for use with the machine.
■ C-EXV 37 Drum Unit
Staple Cartridge
If a message prompting you to load new staples appears on the touch panel display, replace the staple cartridge with a new one. Use only staple cartridges intended for use with the machine.
■ Staple-P1

IMPORTANT
The Staple mode is available only when the optional Staple Finisher-H1 is attached to the machine.
Genuine Supplies
Canon has developed and manufactured Toner, Parts, and Supplies specifically for use in this machine. For optimal print quality and for optimal machine performance and productivity, we recommend that you use Genuine Canon Toner, Parts, and Supplies. Contact your Canon Authorized Dealer or Service Provider for Genuine Canon Supplies.

Troubleshooting
5
CHAPTER
This chapter describes how to solve problems you may face when operating the machine.
Clearing Paper Jams 5-2
Right Side of the Machine 5-3
Paper Drawer 1 5-6
Feeder 5-9
Service Call Message....5-12
Restarting the Machine 5-12
Using the Machine with Limited Functions....5-13
Requesting Repairs from the Control Panel 5-14
Contacting Your Local Authorized Canon Dealer 5-16
Clearing Paper Jams
If paper is jammed inside the machine, a screen such as shown below appears on the touch panel display. Use this screen to immediately locate and clear the paper jam.
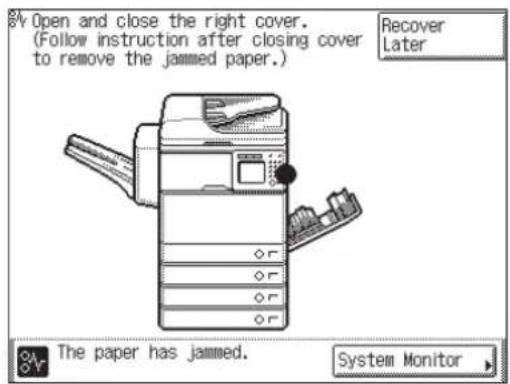
WARNING
There are some areas inside the machine which are subject to high-voltages. When removing jammed paper or when inspecting the inside of the machine, do not allow necklaces, bracelets, or other metal objects to touch the inside of the machine, as this may result in burns or electrical shock.
CAUTION
- When removing jammed originals or paper, take care not to cut your hands on the edges of the original or paper.
- When removing paper which has become jammed inside the machine, take care not to cut your hands or injure yourself on the parts on the inside of the machine. If you cannot remove the paper, please contact your local authorized Canon dealer.
- When removing paper which has become jammed inside the machine, take care not to allow the toner on the jammed paper to come into contact with your hands or clothing, as this will dirty your hands or clothing. If they become dirty, wash immediately with cold water. Washing with warm water may set the toner and make it impossible to remove the toner stains.
-
When removing paper which has become jammed inside the machine, remove the jammed paper gently to prevent the toner on the paper from scattering and getting into your eyes or mouth. If the toner gets into your eyes or mouth, wash immediately with cold water and immediately consult a physician.
-
The fixing unit and its surroundings inside the machine may become hot during use. When removing jammed paper or when inspecting the inside of the machine, do not touch the fixing unit and its surroundings, as this may result in burns or electrical shock.
• After clearing all paper jams, remove your hands from the machine immediately. Even if the machine is not in operation, your hands, hair, or clothing may get caught in the feed rollers, which could result in personal injury or damage if the machine suddenly starts printing.

IMPORTANT
After you have cleared all the paper jams, make sure to return all the covers to their original positions. Once you have removed all of the jammed paper, printing resumes.

NOTE
When all the paper jams are cleared, the machine automatically recalculates the number of copies or prints to make. You do not need to re-enter the number of copies or prints, even if you are printing multiple sets.
Right Side of the Machine
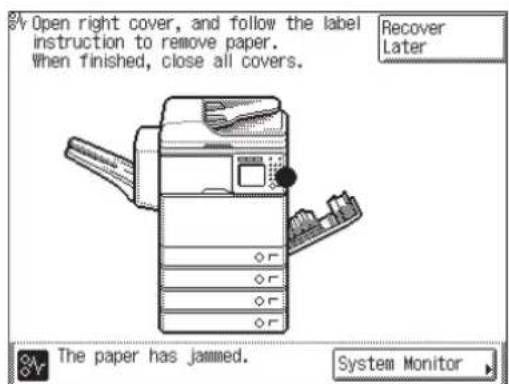
If paper is jammed in the machine's right side, remove the jammed paper as described below.
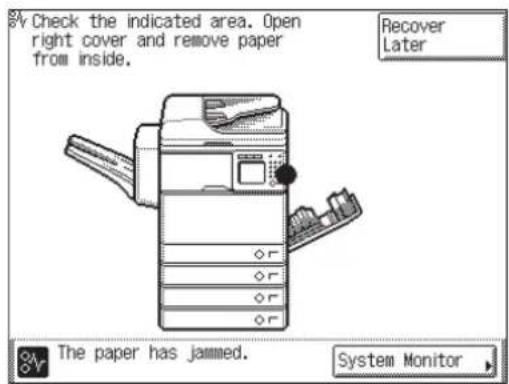
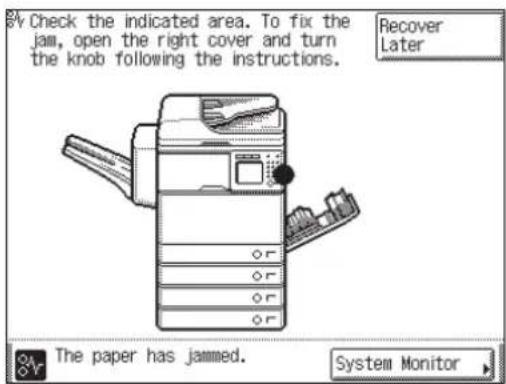

CAUTION
The fixing unit and its surroundings are subject to high temperatures. When removing jammed paper, do not touch anything in this area except the jammed paper or the upper cover.
1 Pull the lever on the right cover of the main unit, and gently open the cover downward until it stops.
If the stack bypass is opened, close it before opening the right cover.
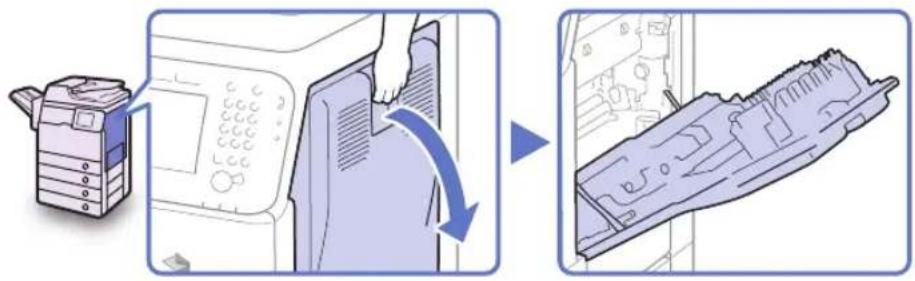
natural_image
Illustration showing a printer presser and its internal structure, with no visible text or symbols.
2 Remove any jammed paper from the paper output unit.
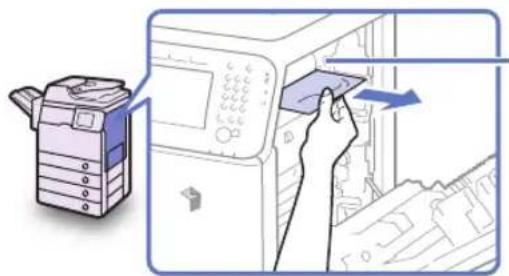
natural_image
Illustration of a printer with a hand inserting a card into a machine (no text or symbols present)
Paper Output Unit
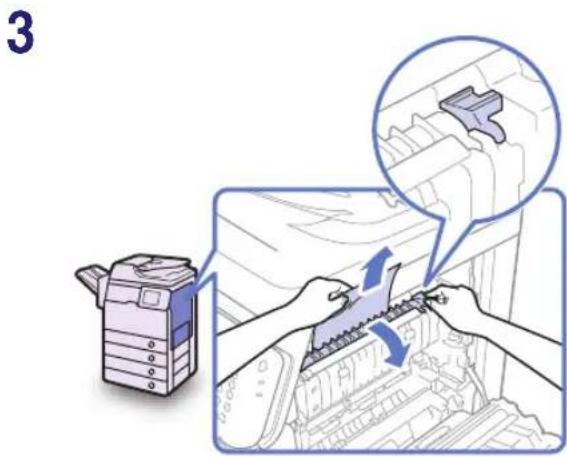
Pull down the upper cover of the fixing unit by the tab, and remove any jammed paper.
CAUTION
The fixing unit and its surroundings are subject to high temperatures. When removing jammed paper, do not touch anything in this area except the jammed paper or the upper cover.
4
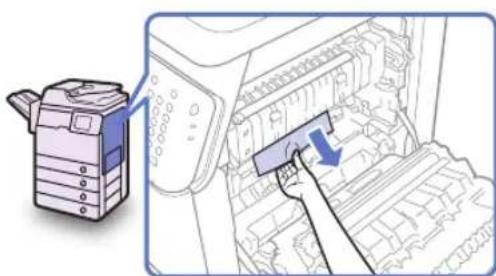
natural_image
Diagram showing a printer with a blue arrow pointing to a component inside a machine (no text or symbols present)
Remove any jammed paper protruding from the lower part of the fixing unit.
If paper is jammed under the roller as shown below, turn the roller and remove the jammed paper.
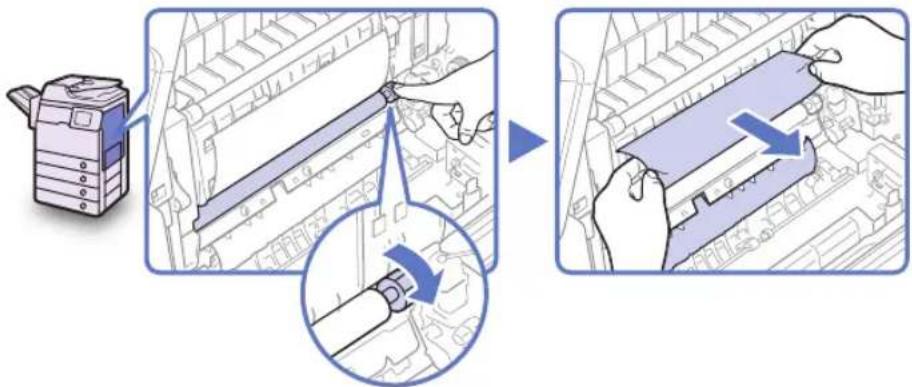
5
Remove any jammed paper from the inside of the right cover.
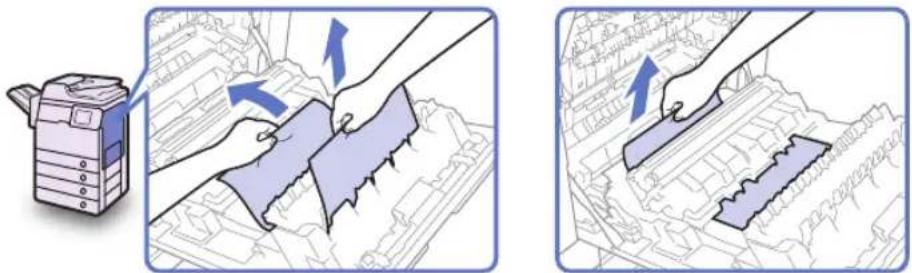
6

natural_image
Illustration of a printer emitting a microwave with a hand inserting a button (no text or symbols present)
Place your hand where the hand symbol (氵) is located on the right cover of the main unit, and then gently close the right cover until it clicks into place.

CAUTION
When closing the cover, be careful not to get your fingers caught, as this may result in personal injury.

IMPORTANT
After you have cleared all the paper jams, make sure to return all the covers to their original positions. Once you have removed all of the jammed paper, printing resumes.
Paper Drawer 1
If paper is jammed inside Paper Drawer 1, remove the jammed paper as described below.
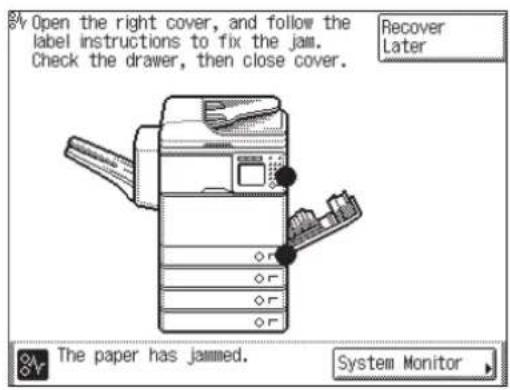

IMPORTANT
The procedure described in this section assumes that the machine is equipped with four paper drawers. The number of available paper drawers may vary depending on the machine configuration.
1 Pull the lever on the right cover of the main unit, and gently open the cover downward until it stops.
If the stack bypass is opened, close it before opening the right cover.
2 Remove any jammed paper.
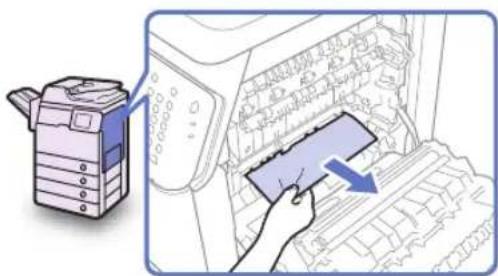
3 Place your hand where the hand symbol () is located on the right cover of the main unit, and then gently close the right cover until it clicks into place. CAUTION
Place your hand where the hand symbol ( ) is located on the right cover of the main unit, and then gently close the right cover until it clicks into place.
CAUTION
When closing the cover, be careful not to get your fingers caught, as this may result in personal injury.
The paper drawer that the paper is fed from may differ from the one that is indicated on the display. If you do not know which drawer the paper is fed from, open each drawer to check for any jammed paper.
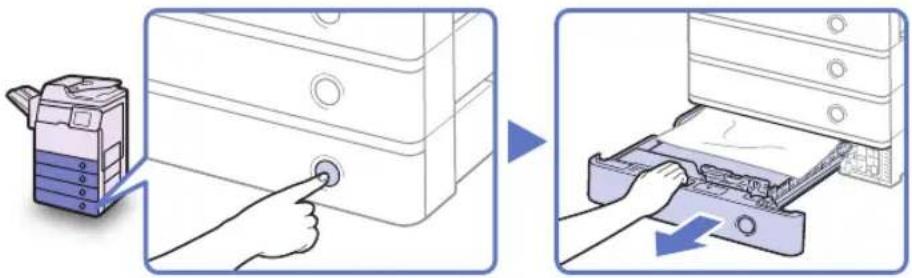

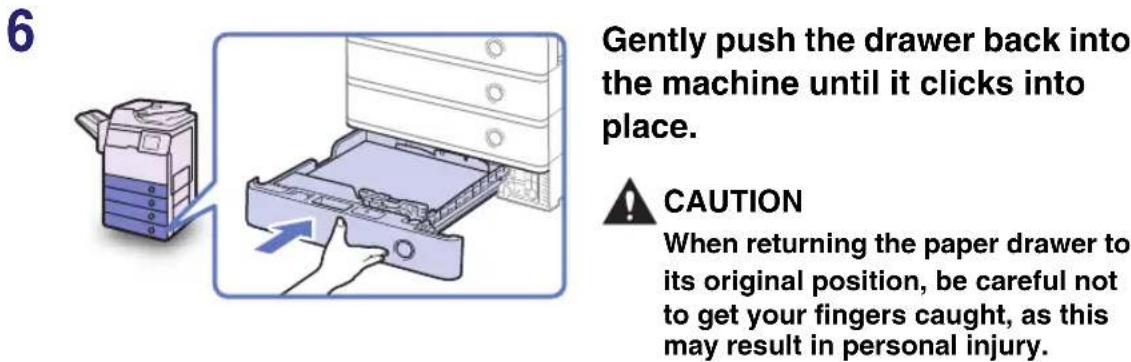
IMPORTANT
After you have cleared all the paper jams, make sure to return all the covers to their original positions. Once you have removed all of the jammed paper, printing resumes.
Feeder
If paper is jammed in the feeder, remove the jammed paper as described below.
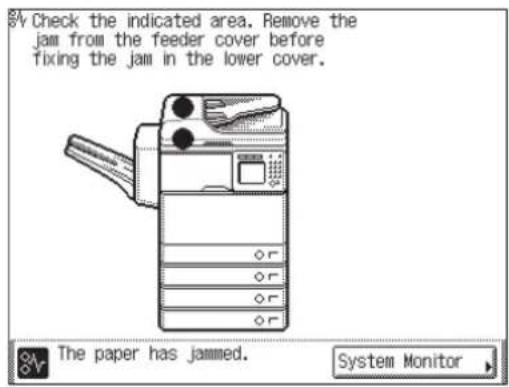
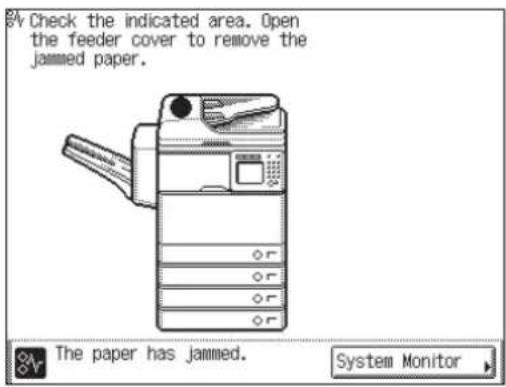
1 Gently open the feeder cover.
When the feeder cover is completely opened, the inner cover is also opened.
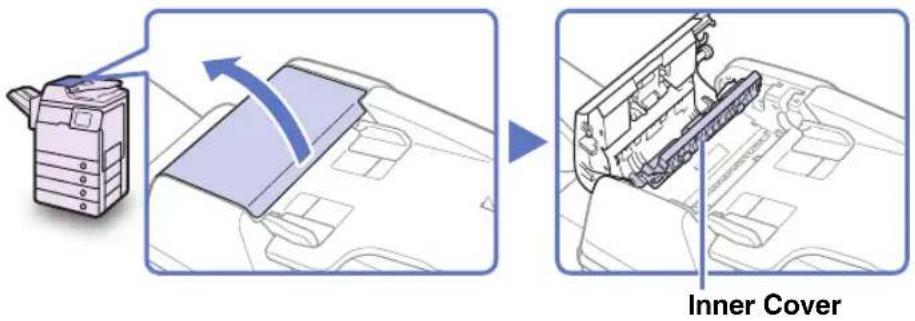
2 Remove any jammed originals.
Do not pull the original forcibly, because it may tear.

natural_image
Diagram showing a printer with an arrow pointing to a component, no text or symbols present
3
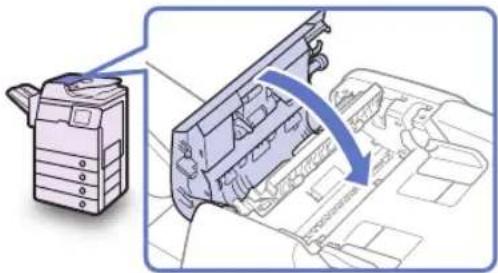
natural_image
Diagram showing a printer device interacting with an internal mechanical component, with a blue arrow indicating rotation or assembly (no text or symbols present)
Gently close the feeder cover.

CAUTION
When closing the cover, be careful not to get your fingers caught, as this may result in personal injury.
4
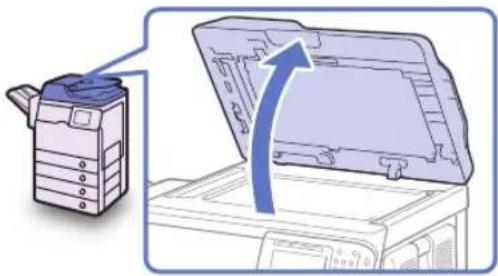
natural_image
Illustration of a printer with an open lid and arrow indicating compression or disassembly (no text or symbols present)
Lift the feeder.
5
Hold the feeder with one hand, and then open the cover under the feeder with the other.
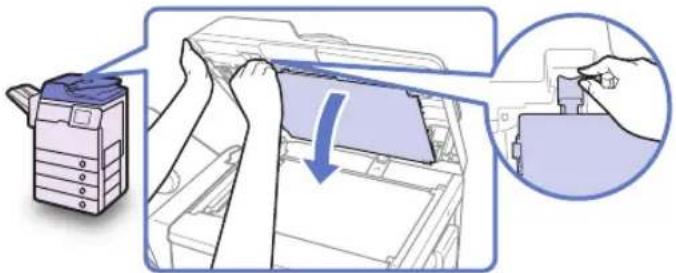
natural_image
Illustration of a printer presser's operation with a hand inserting a component (no text or symbols present)
6
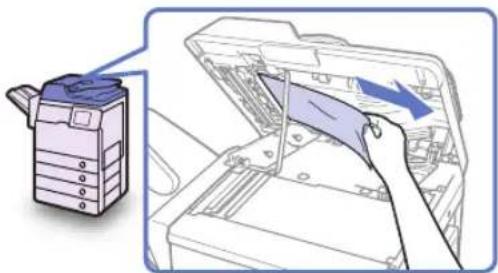
natural_image
Illustration of a printer with a hand inserting a paper into a printer's cover, showing the printer's lid and cover (no text or symbols present)
Remove any jammed originals.
7
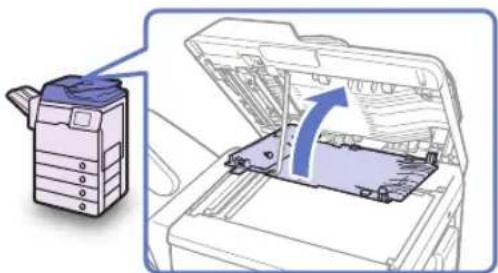
natural_image
Illustration of a printer with an open lid and a blue arrow indicating a process (no text or symbols present)
Close the cover under the feeder.

CAUTION
When closing the cover, be careful not to get your fingers caught, as this may result in personal injury.
8
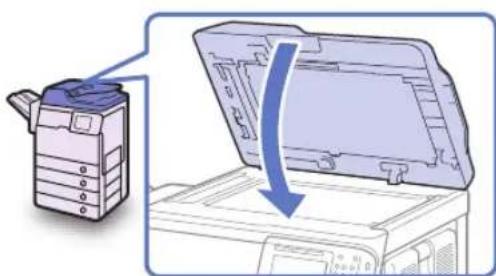
natural_image
Illustration of a printer with a blue arrow indicating the process (no text or symbols present)
Gently lower the feeder.

CAUTION
When lowering the feeder, be careful not to get your fingers caught, as this may result in personal injury.

IMPORTANT
After you have cleared all the paper jams, make sure to return all the covers to their original positions. Once you have removed all of the jammed paper, printing resumes.
Service Call Message
If any critical error occurs that prevents normal operations, a service call message is displayed on the screen. If the screen similar to the one shown below is displayed, follow the procedures described below.
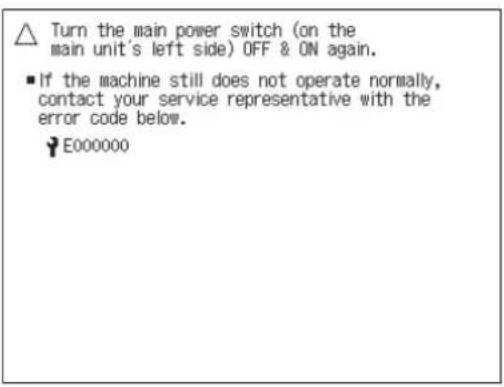
Restarting the Machine
If a service call message is displayed, restart the machine.

IMPORTANT
If the main power is turned OFF, all the jobs in the machine's memory will be erased.
1 Turn OFF the machine's main power.

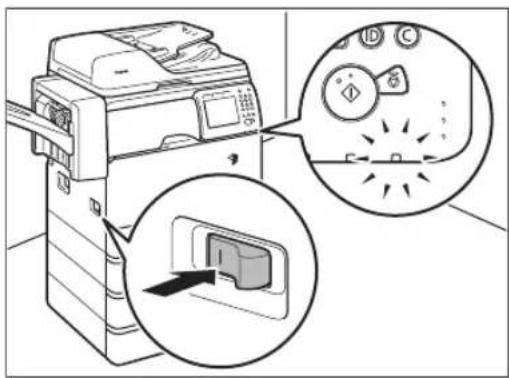
Wait at least 10 seconds and turn the main power back ON.
Using the Machine with Limited Functions
If the Service Call Message screen appears indicating a malfunction of the optional finisher, you can clear the screen by setting the machine to the Limited Functions Mode. In this mode, you can continue operating the machine by disabling the finisher functions.

IMPORTANT
If the main power is turned OFF, all the jobs in the machine's memory will be erased.

NOTE
- Setting the machine to the Limited Functions Mode from the Service Call Message screen enables the Limited Functions Mode in Common Settings. (See Chapter 3, "Configuring the Machine's Basic Settings," in the Reference Guide.)
- The Service Call Message screen may re-appear if the Limited Functions Mode is deactivated without isolating the cause of the malfunction.
1
![Turn the main power switch (on the main unit's left side) OFF & ON again. ■ If the machine still does not operate normally, contact your service representative with the error code below. 123456789012 The finisher output tray cannot move up or down. Make sure that objects are not placed in the range of tray movement. ■ If the device does not function correctly even after the main power switch was turned OFF and then ON again, press [Limited Fnctns Mode] to continue operation using limited functions. Limited Fnctns Mode Shutdown](/content/2026/03/528383/images/7e95b5735f613a31e62ac0f31852c1a8fd62e9c24b440cce31d281b81d58f1af.jpg)
Press [Limited Fnctns Mode].
![CANON imageRUNNER 1730i - Press [Limited Fnctns Mode]. - 1](/content/2026/03/528383/images/099e97cf3641eeb0e18df36cb653940146214b16fae847857dae50d617025ec3.jpg)
NOTE
If you want to turn OFF the machine, press [Shutdown].
2
![Turn the main power switch (on the main unit's left side) OFF & ON again. Is it OK to turn limited functions mode ON? If you press [Yes], functions will be limited. Yes No continue operation using limited functions. Limited Fnctns Mode Shutdown](/content/2026/03/528383/images/4dbc83c66f26f15e1ac7a337cb544810c6cc6b2aede1f5817dafb8e11c2c4240.jpg)
Press [Yes].
To quit, press [No].
3 Restart the machine.
Turn OFF the machine, wait at least 10 seconds, and then turn it ON.
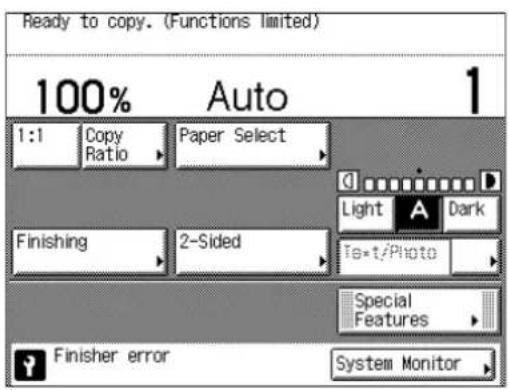
The machine starts up in the Limited Functions Mode.

NOTE
After the problem with the finisher is solved, disable the Limited Functions Mode from the Additional Functions menu. (See Chapter 3, "Configuring the Machine's Basic Settings," in the Reference Guide.)
Requesting Repairs from the Control Panel
If you notice an abnormality with the machine, you can send a repair request from the touch panel display.

WARNING
Do not connect or disconnect the power cord with wet hands, as this may result in electrical shock.

CAUTION
Always grasp the power plug portion when disconnecting the power cord. Pulling on the cord may expose or snap the core wire or otherwise damage the power cord. If the power cord is damaged, this could cause current to leak, resulting in a fire or electrical shock.

IMPORTANT
To make repair requests from the touch panel display, the machine must be configured beforehand. For more information, contact your local authorized Canon dealer.

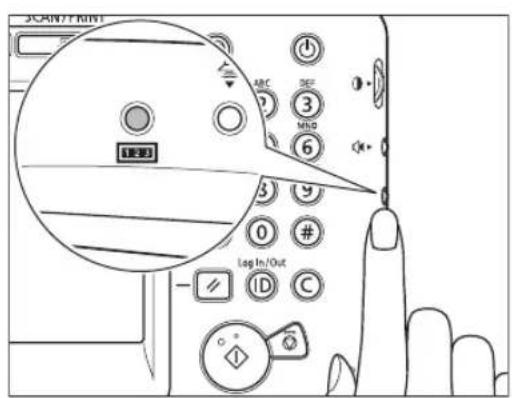
Press Counter Check) on the right side of the control panel.
2
![[Counter Check] 113 : Total (Black/Small) 00012345 501 : Scan (Total 1) 00012345 301 : Print (Total 1) 00012345 : : : Service Call Print List (Serial Number ##00001) Done System Monitor](/content/2026/03/528383/images/8f7e6616f347d82e6c0e2364dea196dea9a8a7248492b2c00896c98fc3c49012.jpg)
Press [Service Call].
3
![[Service Call] Press [Select/Request] to select the type of service call. Request Time: No service calls. Select/ Request Cancel Done System Monitor](/content/2026/03/528383/images/8dfc3f70ea88fd673a611f6a2edb27f6918f0fd6be7ec55ec015aea82a9b9572.jpg)
Press [Select/Request].

NOTE
You can cancel the request by pressing [Cancel] → [Yes].
4
![[Select/Request] Select the request type and press [Request]. Corrupt Image Paper Jams Other Problem Cancel Request Done System Monitor](/content/2026/03/528383/images/736d33483a2a57a22d440aa6072f8c737d96f7ff2eaf315f425811b0bca0f0cd.jpg)
Press [Corrupt Image], [Paper Jams], or [Other Problem] to select the type of the problem you want to fix → press [Request].
![[Service Call] The service call request has been sent. To cancel the request, press [Cancel]. Reqst Time:31/12/2009 12:34:00 Corrupt Image Select/ Request Cancel Done The service call request has been sent. System Monitor](/content/2026/03/528383/images/dd3e1819b9014c936e8cfb80b7127a636098a37394e9da3d03e6c5fe73f0cbf5.jpg)
The screen on the left appears when your request has successfully been sent.

NOTE
You can cancel the request by pressing [Cancel] → [Yes].
![[Service Call] Could not send the service call request. Reqst Time:31/12/2009 12:34:00 No service calls. Select/ Request Cancel Done Could not send the service call request. System Monitor](/content/2026/03/528383/images/556dee732499ce68ec81cfb86b4926296666a384237a99b919032a34f02c2d71.jpg)
The screen on the left appears when the transmission of your request has failed. Try again.

NOTE
If you cannot send repair requests despite several attempts, turn OFF the main power and disconnect the power cord from the wall outlet. Contact your local authorized Canon dealer with the following information:
- Product name
- Problem and status of the machine
- The error code displayed on the screen
If you have any problems or inquiries concerning the machine, contact your local authorized Canon dealer with the following information:
- Product name
- Problem and status of the machine
- The error code displayed on the screen, if any
If the machine does not operate normally even after it is restarted, turn OFF the main power and disconnect the power cord from the wall outlet.

WARNING
Do not connect or disconnect the power cord with wet hands, as this may result in electrical shock.

CAUTION
Always grasp the power plug portion when disconnecting the power cord. Pulling on the cord may expose or snap the core wire or otherwise damage the power cord. If the power cord is damaged, this could cause current to leak, resulting in a fire or electrical shock.

IMPORTANT
Even if a blackout occurs or the machine is turned OFF, a built-in battery retains the documents received in memory for about an hour. However, if the battery is not fully charged, the documents may not be retained. (To fully charge the built-in battery, it takes about two hours after the main power switch is turned ON.)
Appendix
6
CHAPTER
This chapter describes the types of paper that can be used with the machine and includes the index.
Available Paper Stock....6-2
Checking the Machine's IP Address....6-4
Index....6-5
Available Paper Stock
The paper types and sizes that can be used with this machine are shown on the tables below.
√: Available N/A: Not Available
| Paper Type | Paper Source |
| Paper Drawer (64 to 105 g/m2) | Stack Bypass (64 to 128 g/m2) |
| Plain*1 | √ | √ |
| Recycled*1 | √ | √ |
| Color*1 | √ | √ |
| 3-hole punch | √ | √ |
| Bond*2 | N/A | √ |
| Heavy Paper 1*3 | √ | √ |
| Heavy Paper 2*4 | N/A | √ |
| Transparency*5 | N/A | √ |
| Labels N/A | | √ |
*1 From 64 to 90g / m^2 .
*2 From 75 to 90 g/m².
*3 From 91 to 105g / m^2 .
*4 From 106 to 128 g/m².
*5 Use only A4 transparencies made especially for this machine.

NOTE
- For instructions on how to register paper types for the paper drawers, see Chapter 3, "Configuring the Machine's Basic Settings," in the Reference Guide.
- For instructions on how to register paper types for the stack bypass, see Chapter 2, "Basic Operations," and Chapter 3, "Configuring the Machine's Basic Settings," in the Reference Guide.
- Chlorine-free paper can be used with this machine.
√: Available N/A: Not Available
| Paper Size Dimensions | Dimensions | Paper Source |
| Paper Drawers 1/3/4 | Paper Drawer 2 | Stack Bypass |
| A4 210 mm × 297 mm | | √ | √ | √ |
| A5 148 mm × 210 mm | | √ | √ | √ |
| Irregular Size | 99 mm to 216 mm × 140 mm to 356 mm | N/A N/A | | √ |
| Envelope | No.10 (COM10) | 104.7 mm × 241.3 mm N/A | Optional | * | √ |
| ISO-B5 | 176 mm × 250 mm | N/A | Optional* | √ |
| Monarch | 98.4 mm × 190.5 mm | N/A | Optional* | √ |
| ISO-C5 | 162 mm × 229 mm | N/A | Optional* | √ |
| DL | 110 mm × 220 mm | N/A | Optional* | √ |
* Envelopes can be loaded in Paper Drawer 2 only when the optional Envelope Cassette-D1 is attached.

NOTE
- For instructions on how to load paper, see the sections listed below.
| Paper Drawers 1/2/3/4 | Paper See “Loading Paper,” on p. 4-3. |
| Envelope (Drawer 2) | See Chapter 5, “Routine Maintenance,” in the Reference Guide. |
| Stack Bypass | See Chapter 2, “Basic Operations,” in the Reference Guide. |
- Paper Drawers 2, 3, and 4 are optional.
Follow the procedure below to check the machine's IP address.
1
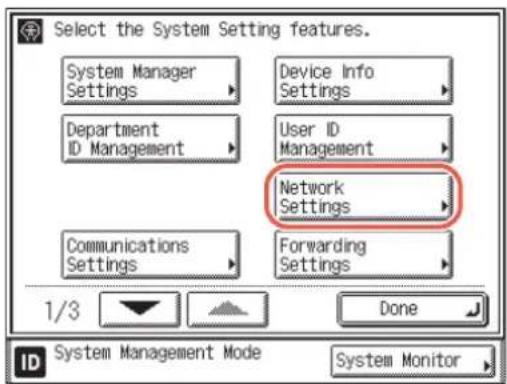
Press (Additional Functions) → [System Settings] → [Network Settings].

NOTE
To access the System Settings, enter the System Management mode by entering the System Manager ID and System Password*. For details, see Chapter 1, "Before You Start," in the System Settings Guide.
* The System Manager ID and System Password are both set to '7654321' at purchase.
2
![[IPv4 Settings] IP Address Settings PING Command IP Address Range Settings ▶ Off 1/2 Done ID System Management Mode System Monitor](/content/2026/03/528383/images/3cba4476024e3c50212da2679cad0e0ea858a6b28c0d7069e355774b118ea4ac.jpg)
Press [TCP/IP Settings] → [IPv4 Settings] → [IP Address Settings].
The IP address settings are displayed.

NOTE
- If the machine's IP address is yet to be set, it is displayed as < 0.0.0.0> .
- For more information on the IP address settings, see Chapter 2, "Connecting the Machine to a TCP/IP Network," in the System Settings Guide.
3 Press (Reset) to return to the top screen.
Index
Numerics
100BASE-TX, 2-10
10BASE-T, 2-10
3-hole punch paper, 6-2
A
Abbreviations used in this manual, ix
Available features, xii
B
Bond paper, 6-2
C
Cable connection
Network, 2-10
Telephone, 2-12
USB, 2-9
Canon dealer, 5-16
Cleaning
Feeder scanning area and rollers, 4-14
Platen glass and underside of the feeder, 4-13
Routine cleaning, 4-13
Color Network ScanGear, 3-4
Color paper, 6-2
Consumables
Drum unit, 4-19
Paper stock, 4-18
Staple cartridge, 4-20
Toner, 4-19
Control panel power switch, 2-22
Copying, 2-2
Copying, Definition of, xi
Country/Region, 2-14
D
Date & Time Settings, 2-14
Displays used in this manual, ix
Drum unit, 4-19
E
Ethernet
100BASE-TX, 2-10
10BASE-T, 2-10
F
Fax Driver, 3-12
Fax Driver Installation Guide, 3-12
Fax Driver Software, 3-12
Fax settings, 2-14
Faxing, 2-3
Feeder scanning area, 4-16
Feeder, Cleaning, 4-14
Font Manager, 3-8
Front guide, 4-6
H
Handling precautions, 1-6
Heavy paper, 6-2
|
Illustrations used in this manual, viii
Installation
Installation space, 1-5
Location and handling, 1-2
Power supply, 1-4
Precautions, 1-2
Safety instructions, xx
IP address settings, 2-14
IP address, checking, 6-4
K
Keys and buttons used in this manual, viii
L
Labels, 6-2
Language, 2-14
Limited Functions Mode, 5-13
Loading limit mark, 4-4, 4-6
Loading paper
Paper drawers, 4-2
M
Main power, 2-13
Moving the machine, 1-5
N
Network connection, 2-10
Network ScanGear Installation Guide, 3-5
Network scanning, 2-3
P
Paper jams, 5-2
Feeder, 5-9
Right Side of the Machine, 5-3
Paper stock, 4-18
Paper size, 6-3
Paper type, 6-2
PCL Printer Driver, 3-8
PCL User Software, 3-8
Plain paper, 6-2
Printer Driver Installation Guide, 3-4, 3-8, 3-10
Printing
from USB memory media, 2-3
PCL, 2-3
PS, 2-3
UFRII LT, 2-3
Printing, Definition of, xi
PS Printer Driver, 3-10
PS User Software, 3-10
R
Recycled paper, 6-2
Remote Scan, 2-3
Remote UI, 2-4
Repair request, 5-14
Restarting, 5-12
Routine cleaning, 4-13
S
Safety instructions
Consumables, xxvii
Handling, xxii
Installation, xx
Maintenance and inspections, xxv
Other warnings, xxvii
Power supply, xxi
Scanning, Definition of, x
Sending
e-mail, 2-2
I-fax, 2-2
to file servers, 2-2
to USB memory media, 2-2
Service call message, 5-12
Setup flow, 2-6
Setup Guide, 2-14
Side guide, 4-6
Sleep mode, 2-22
Staple cartridge, 4-20
Symbols used in this manual, vii
System monitor, 2-4
T
Telephone connection, 2-12
Toner cartridge, 4-8, 4-19
Toner, Mixing, 2-14
Transparency, 6-2
Troubleshooting
Limited functions, 5-13
Service call message, 5-12
TWAIN, 3-4
U
UFRII LT Printer Driver, 3-4
UFRII LT User Software, 3-4
USB connection, 2-9
User Manual CD-ROM, 3-2
Directive R & TTE....xiii
Faisceau laser....xiii
Installation....3-11
Fournitures Canon 4-21
natural_image
Line drawing of a generic electronic device labeled 'Cane' with no visible text or symbols on the device itself.
CLASS 1 LASER PRODUCT
LASER KLASSE 1
APPAREIL Á LASER DE CLASSE 1
APPARECCHIO LASER DI CLASSE 1
PRODUCTO LÁSER DE CLASE 1
APARELHO A LASER DE CLASSE 1
LUOKAN 1 LASER-TUOTE
LASERPRODUKT KLASS 1
ATTENTION
ATTENTION
Module de Finition agrafage-H1
natural_image
Illustration of a printer with a prohibition symbol (no text or labels present)
natural_image
Illustration of a printer with a magnified inset showing a hand pressing down on a curved object (no text or symbols present)
natural_image
Illustration of a padlock with a key inserted, symbolizing security or lock status (no text or symbols present)
Moniteur système
natural_image
Pixelated 3D cube icon with a horizontal bar labeled 'Canon' below, no other text or symbols present.
natural_image
Illustration of a printer with a close-up view showing the printer's control panel (no text or symbols present)
Fournitures Canon 4-21
natural_image
Illustration of a hand pressing a button on a computer monitor (no text or symbols present)
natural_image
Illustration of a printer next to an open storage unit with a hand inserting a component (no text or symbols visible)
natural_image
Line drawing of a hand holding a folded paper or cloth, no text or symbols present
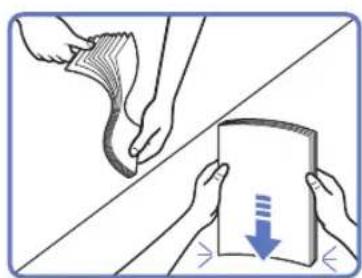
natural_image
Illustration showing two hands holding a device with a downward arrow, no text or symbols present
natural_image
Illustration showing a printer next to a printer's internal structure with a blue arrow indicating direction (no text or symbols present)
natural_image
Illustration of a printer being inserted into a rack, showing the printer's internal structure and the hand inserting a button (no text or symbols present)
natural_image
Illustration showing a printer with a blue arrow pointing to a device inside a machine (no text or symbols present)
natural_image
Illustration of a printer with a blue arrow indicating a process, showing the printer's internal structure and loading (no text or symbols present)
natural_image
Illustration of a printer being inserted into a rack, showing the printer's handle and internal compartments (no text or symbols)
natural_image
Illustration of a printer with a close-up view of its clip, showing no text or symbols on the device itself.

IMPORTANT
AVERTISSEMENT
natural_image
Illustration of a hand holding a plug with a no-smoking symbol (no text or labels)
IMPORTANT
natural_image
Diagram showing a mechanical component before and after assembly, with no visible text or symbols.

IMPORTANT
natural_image
Illustration of a hand holding a plug with a no-smoking symbol (no text or labels)

natural_image
Illustration showing a printer being opened into a machine, with no visible text or symbols

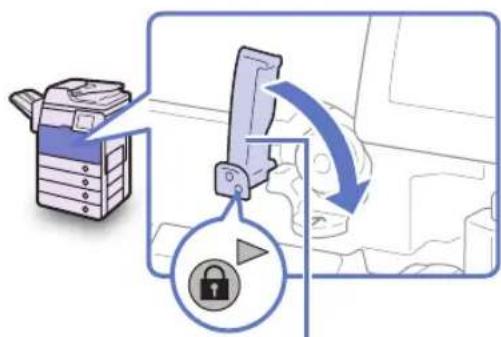
natural_image
Illustration of a printer with an open lid and a blue arrow indicating the process (no text or symbols present)
natural_image
Illustration showing a printer being placed on an open file into a printer, with no visible text or symbols.

IMPORTANT
natural_image
Diagram showing a printer's internal structure before and after assembly, with no visible text or symbols.
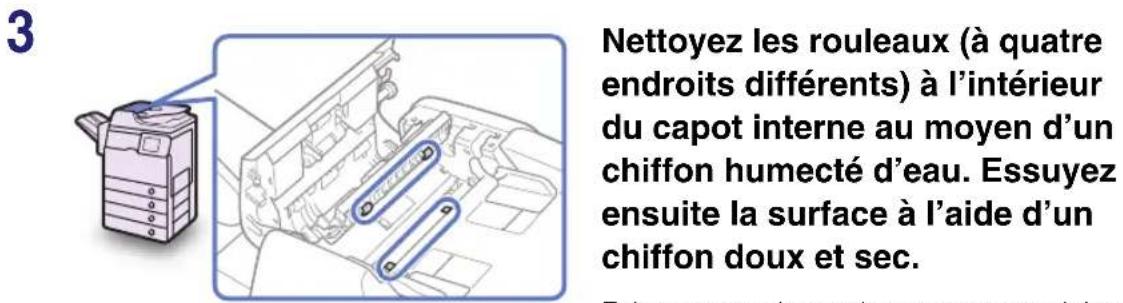
5
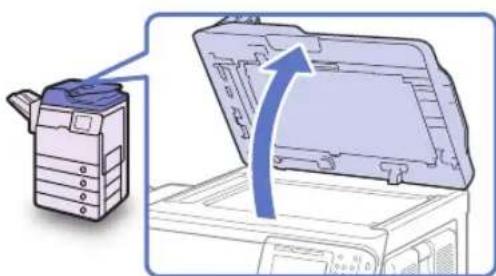
natural_image
Illustration of a printer with a blue arrow indicating the process, showing a closed lid and cover (no text or symbols present)
natural_image
Illustration of a printer presser with a hand inserting a component into the paper (no text or symbols present)
natural_image
Illustration of a printer with a magnified inset showing internal components (no text or symbols)
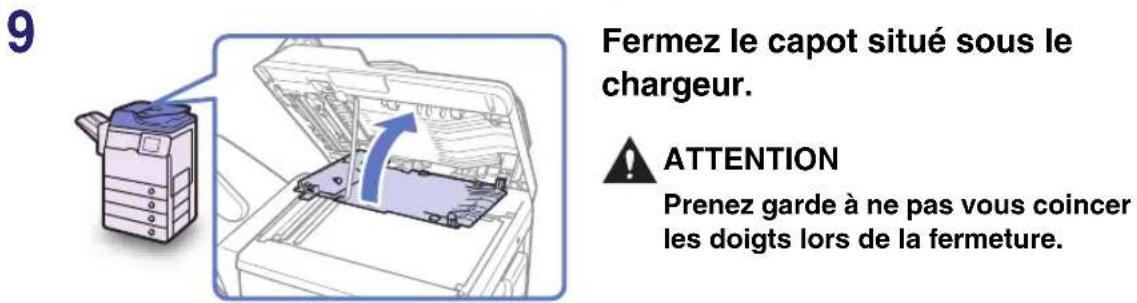
natural_image
Illustration showing a printer device transforming into a mechanical component with a blue arrow indicating the process (no text or symbols present)
natural_image
Illustration of a printer with a hand inserting a card into a machine (no text or symbols visible)
natural_image
Illustration of a printer with a close-up view showing the internal structure and a hand interacting with the next component (no text or symbols present)
5
natural_image
Illustration of a printer with blue arrows indicating process, showing hands interacting with a document (no text or symbols present)
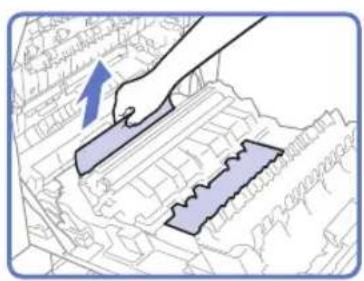
6
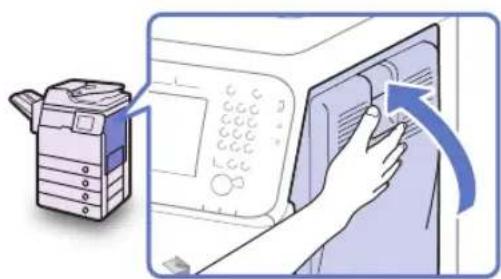
natural_image
Illustration of a printer next to a microwave oven with a hand pressing the button (no text or symbols visible)
natural_image
Illustration showing a printer's internal structure before and after assembly, with no visible text or symbols.
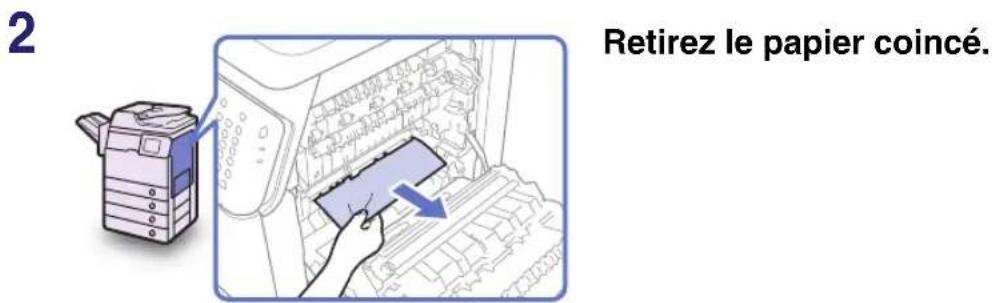
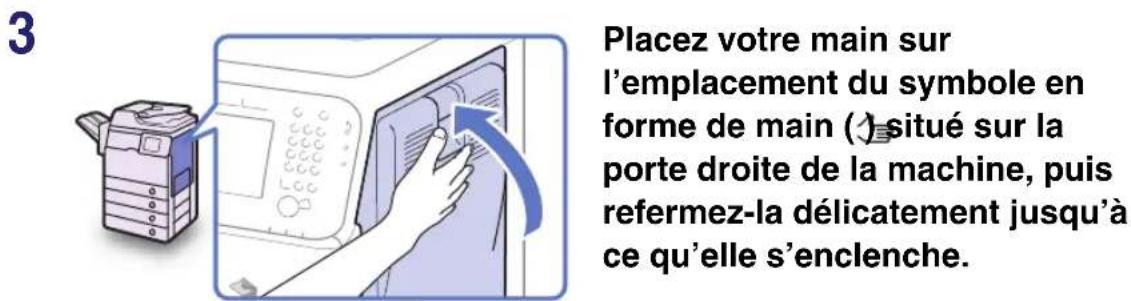
5
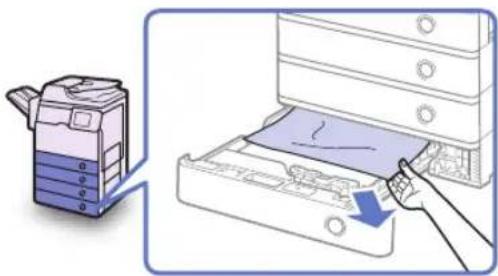
natural_image
Illustration showing a printer and a file drawer with a hand inserting a blue arrow (no text or symbols present)
natural_image
Illustration showing a printer next to a computer drive with a hand inserting a cable (no text or symbols present)
natural_image
Diagram showing a printer with an arrow pointing to a component, no text or symbols present
3
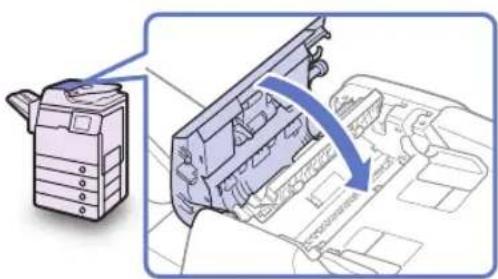
natural_image
Diagram showing a printer device connected to a mechanical component with an arrow indicating direction (no text or symbols present)
natural_image
Illustration of a printer with an open lid and arrow indicating compression or disassembly (no text or symbols present)
natural_image
Illustration of a printer presser's operation with a hand inserting a component (no text or symbols present)
6
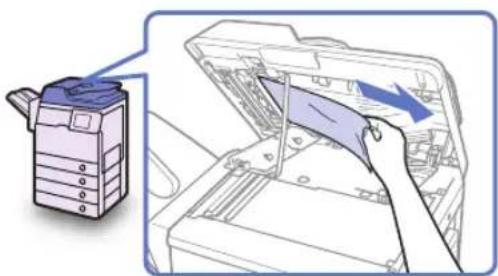
natural_image
Illustration of a printer with a hand inserting a card into a printer's case, showing the process (no text or symbols present)
Retirez les originaux coincés.
7
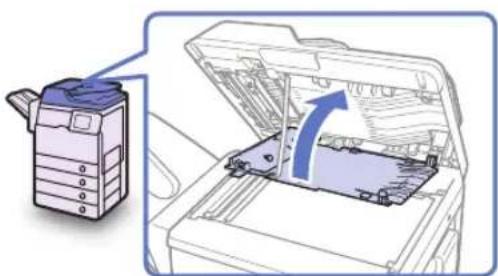
natural_image
Illustration of a printer with an open lid and arrow indicating rotation (no text or symbols)
natural_image
Illustration of a printer with a blue arrow indicating the process (no text or symbols present)
Adresse IP, vérification, 6-4
Papier 3 perforations, 6-2
Papier couleur, 6-2
Papier épais, 6-2
Papier machine, 6-2
Papier ordinaire, 6-2
Papier recyclé, 6-2
Pays/région, 2-14
Pilote d'imprimante PCL, 3-8
Installation....3-11
Faxtreiber-Software (optional) 3-12
natural_image
Line drawing of a CARS machine with multiple stacked units and a central control panel (no text or symbols)
VORSICHT
Finisher H1
natural_image
Illustration of a printer with a prohibition symbol (no text or labels present)
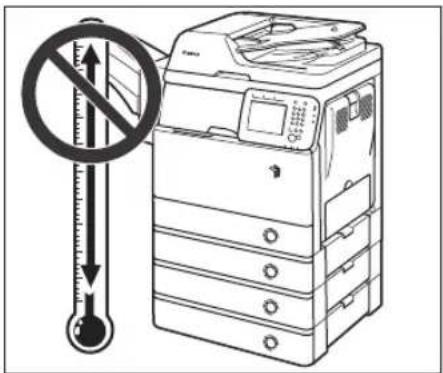
natural_image
Illustration of a printer with a magnified inset showing a hand pressing down on a curved object (no text or symbols present)
flowchart
graph LR
    A["Start"] --> B["Truck Tracking"]
    B --> C["Truck Navigation"]
    C --> D["Truck Control"]
    D --> E["Truck Security"]
    E --> F["Truck Safety"]
    F --> G["Truck Maintenance"]
    G --> H["Truck Security Check"]
    H --> I["Truck Safety Check"]
    I --> J["Truck Security Check Check"]
    J --> K["Truck Safety Check Check"]
    K --> L["Truck Security Check Check"]
    L --> M["Truck Safety Check Check"]
    M --> N["Truck Security Check Check"]
    N --> O["Truck Safety Check Check"]
    O --> P["Truck Security Check Check"]
    P --> Q["Truck Safety Check Check"]
    Q --> R["Truck Security Check Check"]
    R --> S["Truck Safety Check Check"]
    S --> T["Truck Security Check Check"]
    T --> U["Truck Safety Check Check"]
    U --> V["Truck Security Check Check"]
    V --> W["Truck Safety Check Check"]
    W --> X["Truck Security Check Check"]
    X --> Y["Truck Safety Check Check"]
natural_image
Illustration of a padlock with a key inserted, no text or symbols present
Systemmonitor
- Barcode Printing Kit-B1
4
natural_image
Pixelated icon of a 3D cube with a 'Canon' label below, no other text or symbols present.
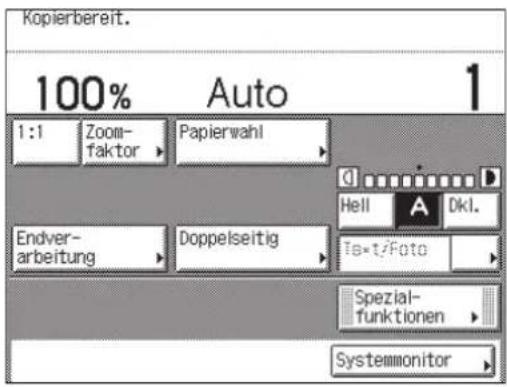
natural_image
Illustration of a printer with a close-up view showing the printer's control panel (no text or symbols present)
natural_image
Illustration of a hand pressing a button on a device panel (no text or symbols visible)
natural_image
Illustration of a printer next to an open storage unit with a hand inserting a component (no text or symbols visible)
natural_image
Line drawing of hands folding a folded garment with a cloth (no text or symbols)
natural_image
Illustration of hands holding a small object and a card with a downward arrow (no text or symbols)
natural_image
Illustration of a printer being placed into a printing machine with a blue arrow indicating the process (no text or symbols present)
natural_image
Illustration of a printer's internal structure being inserted into a rack, with a hand adjusting the part (no text or symbols visible)
natural_image
Illustration showing a printer with a blue arrow pointing to a device inside a machine (no text or symbols present)
natural_image
Illustration of a printer being inserted into a paper holder, showing the printer's internal structure and the printer's base (no text or symbols present)
natural_image
Illustration of a printer's internal structure being inserted into a device (no text or symbols visible)
natural_image
Illustration of a printer next to a door with a close-up of the pad being inserted (no text or symbols)

WICHTIG
natural_image
Illustration of a printer with a paper feeding into a device, showing a blue arrow indicating rotation (no text or symbols present)
WARNING
natural_image
Illustration of a hand holding a plug with a no-smoking symbol (no text or labels present)
WICHTIG
natural_image
Diagram showing a mechanical component before and after assembly, with no visible text or symbols

WICHTIG
natural_image
Illustration of a hand holding a plug with a prohibition symbol (no text or labels)
5
6
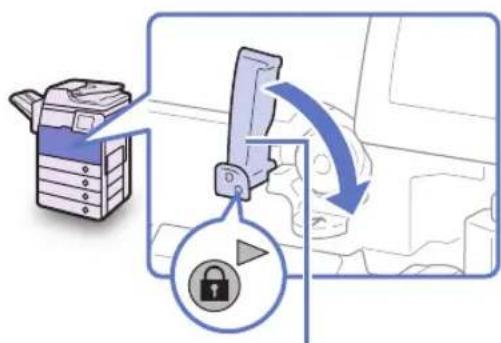
natural_image
Illustration of a printer with a blue arrow indicating the process, showing internal components and a document outline (no text or symbols present)
natural_image
Illustration showing a printer being placed on an open file into a printer, with no visible text or symbols.
WICHTIG
natural_image
Diagram showing a printer device interacting with an internal component, before and after assembly (no text or symbols present)
5
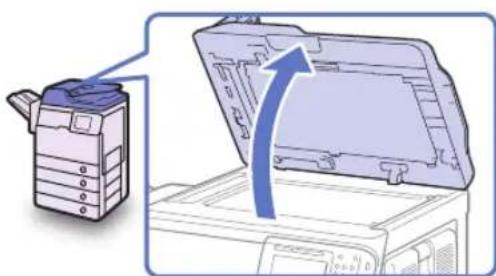
natural_image
Illustration of a printer with a blue arrow indicating the process, showing a closed lid and cover (no text or symbols present)
natural_image
Illustration of a printer presser's operation with a hand inserting a component into the paper (no text or symbols present)
natural_image
Illustration of a printer with a magnified inset showing internal components (no text or symbols)
9
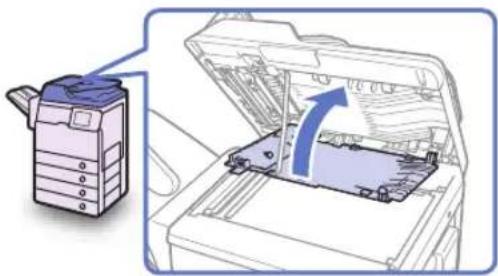
natural_image
Illustration of a printer with an open lid and arrow indicating a process (no text or symbols present)
natural_image
Illustration of a printer with a blue arrow indicating the process (no text or symbols present)
natural_image
Diagram showing a printer device interacting with an internal component, with a blue arrow indicating the process (no text or symbols present)
natural_image
Illustration showing a printer's internal structure being removed, with no visible text or symbols.
natural_image
Illustration of a printer with a blue arrow pointing to a component inside a machine (no text or symbols present)
5
6
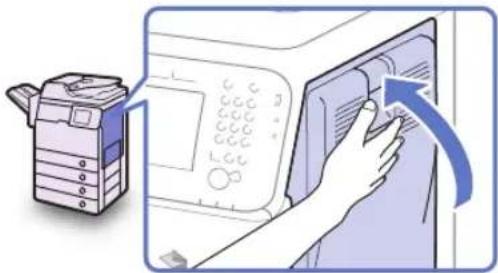
natural_image
Illustration of a printer next to a microwave oven with a hand inserting a button (no text or symbols visible)
natural_image
Illustration showing a printer's internal structure before and after assembly, with no visible text or symbols.
2
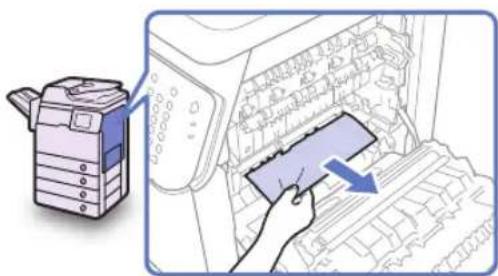
natural_image
Illustration of a printer next to an open circuit board with a hand inserting a paper clip (no text or symbols visible)
natural_image
Illustration of a printer with a hand inserting a device into a microwave (no text or symbols visible)
5
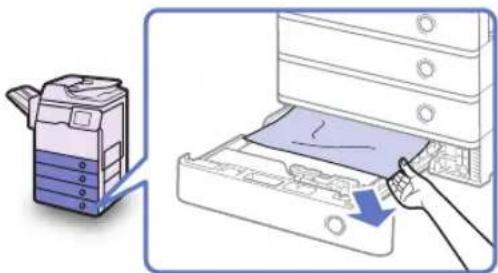
natural_image
Illustration showing a printer and a file drawer with a hand inserting a component (no text or symbols present)
natural_image
Illustration of a printer being inserted into a rack device, showing the printer's internal structure and the printer's base (no text or symbols present)
natural_image
Diagram showing a printer next to a mechanical component with an arrow indicating direction (no text or symbols present)
natural_image
Illustration of a printer with an open lid and arrow indicating compression or disassembly (no text or symbols present)
6
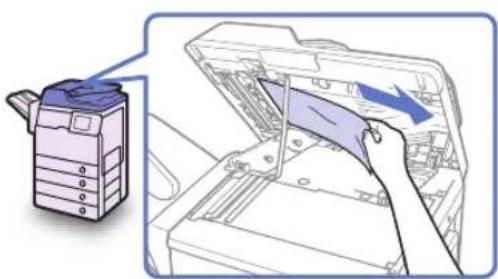
natural_image
Illustration of a printer with a paper feeding into a printer's internal structure, showing the blade being inserted (no text or symbols present)
natural_image
Illustration of a printer with an open lid and a blue arrow indicating a motion or operation (no text or symbols present)
Displaysprache, 2-14
Druck-/Kopiermaterial, 4-19
Papierformat, 6-3
Papiertyp, 6-2
Drucken
PCL, 2-3
PS, 2-3
UFRII LT, 2-3
Tonerpatrone, 4-9, 4-20
Transport des Systems, 1-5
Trommeleinheit, 4-21
TWAIN, 3-4
U
UFRII LT Anwendersoftware, 3-4
natural_image
Line drawing of a Canon electronic device with multiple ports and control panel (no text or symbols)
CLASS 1 LASER PRODUCT
LASER KLASSE 1
APPAREIL Á LASER DE CLASSE 1
APPARECCHIO LASER DI CLASSE 1
PRODUCTO LÁSER DE CLASE 1
APARELHO A LASER DE CLASSE 1
LUOKAN 1 LASER-TUOTE
LASERPRODUKT KLASS 1
ATTENZIONE
ATTENZIONE
Staple Finisher-H1
natural_image
Illustration of a printer with a prohibition symbol (no text or labels present)
natural_image
Illustration of a printer with a magnified inset showing a hand pressing down on a curved object (no text or symbols present)
flowchart
graph TD
    A["Computer"] --> B["Stamping Device"]
    B --> C["Supporto di memoria USB"]
    C --> D["Document with Paper"]
    D --> E["Printed Paper"]
    E --> F["Printed Paper with 📄"]
    F --> G["Printed Paper with 📄"]
    G --> H["Printed Paper with 📄"]
    H --> I["Printed Paper with 📄"]
Scansione di rete
natural_image
Illustration of a padlock with a key inserted, no text or symbols present
Controllo sistema
- Barcode Printing Kit-B1
- Color Send Searchable PDF Kit-E1
- Barcode Printing Kit-B1
4
- Stampa: driver stampante UFRII LT, PCL o PS
- Fax: driver fax
- Scansione remota: Color Network ScanGear
| Copie | Invio Fax | | Stampa | Scansione remota | IU remota |
| E-mail/ I-Fax | a file server | a supporto USB | Stand-alone | da computer |
| | | | | √ | ^* | √ | |
natural_image
Pixelated 3D cube icon with a horizontal bar labeled 'Canon' below, no other text or symbols present.
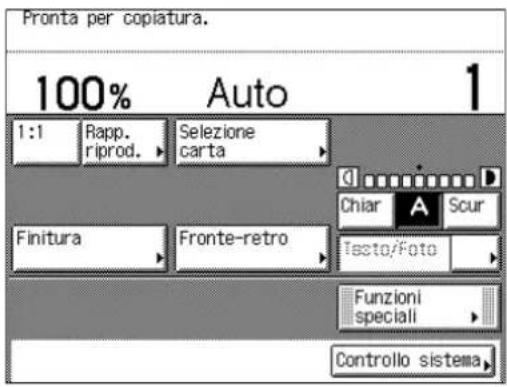
natural_image
Line drawing of a printer with an open button, showing internal components and a magnified view of the button (no text or symbols present)
natural_image
Illustration of a hand pressing a button on a computer monitor (no text or symbols present)
natural_image
Illustration of a printer next to an open storage unit with a hand inserting a component (no text or symbols visible)
natural_image
Line drawing of a hand holding a folded garment with a cloth (no text or symbols)
natural_image
Illustration showing two hands holding a document with a downward arrow, no text or symbols present
natural_image
Illustration showing a printer next to a printer's internal structure with a blue arrow indicating direction (no text or symbols present)
natural_image
Illustration of a printer's internal structure being inserted into a device (no text or symbols visible)
natural_image
Illustration showing a printer next to a computer with an arrow indicating the process (no text or symbols present)
natural_image
Illustration of a printer being inserted into a machine, showing the printer's internal structure and the printer's handle (no text or symbols present)
natural_image
Illustration of a printer being inserted into a device, showing the printer's handle and internal structure (no text or symbols)
natural_image
Illustration of a printer with a close-up of its cable being inserted into a device (no text or symbols present)

IMPORTANTE
natural_image
Illustration of a printer with a blue arrow indicating a download or transfer process (no text or symbols present)
AVVERTENZA
natural_image
Illustration of a hand holding a plug with a no-smoking symbol (no text or labels)
IMPORTANTE
natural_image
Diagram showing a mechanical component before and after assembly, with no visible text or symbols

IMPORTANTE
natural_image
Illustration of a hand holding a connector with a no-smoking symbol (no text or labels present)
5
6
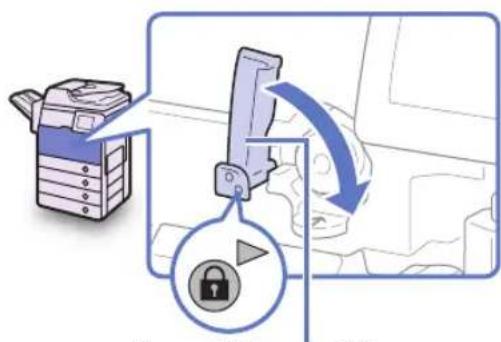
natural_image
Illustration of a printer with an open lid and a blue arrow indicating the process (no text or symbols present)
natural_image
Illustration showing a printer being placed on an open file into a printer, with no visible text or symbols.

IMPORTANTE
natural_image
Diagram showing a printer device interacting with an internal engine compartment, before and after assembly (no text or symbols present)
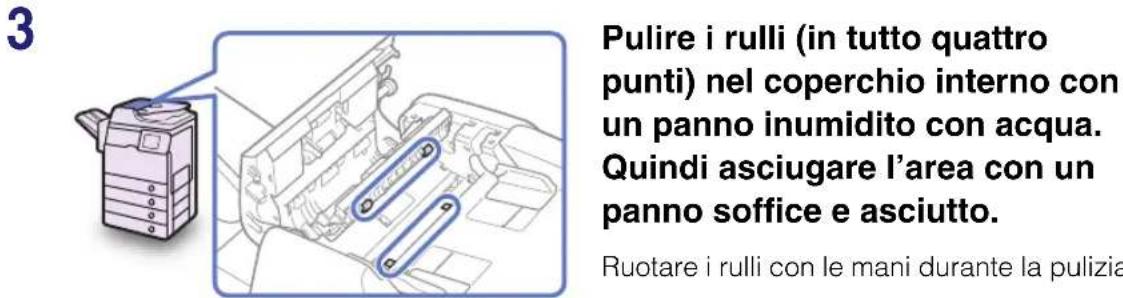
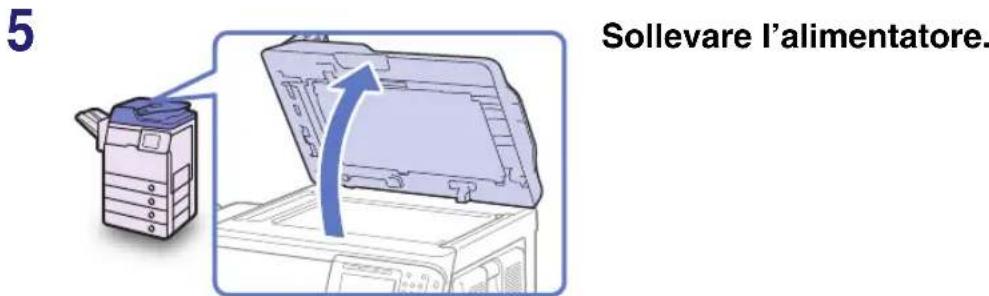
natural_image
Diagram showing a printer's open lid being inserted into a device, with no visible text or symbols.
natural_image
Illustration of a printer being inserted into a paper airplane, showing the process with a magnified inset (no text or symbols)
natural_image
Diagram of a printer with an open lid and a magnified inset showing internal components (no text or symbols)
9
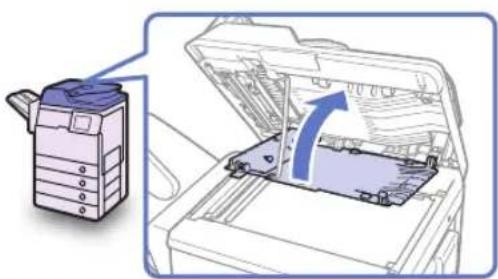
natural_image
Illustration of a printer with an open lid and arrow indicating a loading or movement (no text or symbols present)
natural_image
Illustration of a printer with a blue arrow indicating the process, showing the open lid and base (no text or symbols present)
natural_image
Diagram showing a printer device interacting with an internal mechanical component, with a blue arrow indicating rotation or assembly (no text or symbols present)
natural_image
Illustration of a printer's internal structure showing a printer's front panel and its internal components (no text or symbols)
ATTENZIONE
natural_image
Diagram showing a printer icon and its internal structure with a blue arrow indicating a location or connection (no text or symbols present)
5
natural_image
Illustration showing two steps of fabric cutting process: one with a printer icon, the other with hands holding a blade (no text or symbols)
6
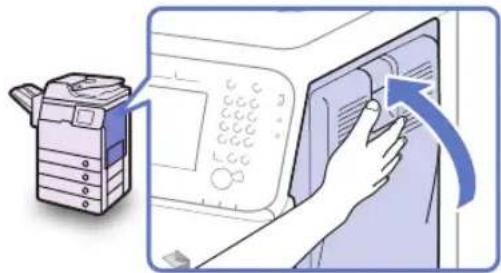
natural_image
Illustration of a printer next to a microwave oven with a hand inserting a button (no text or symbols visible)
natural_image
Illustration showing a printer device transforming into a mechanical component (no text or symbols present)


natural_image
Diagram showing a printer next to a mechanical component with an arrow indicating direction (no text or symbols present)
natural_image
Illustration of a printer with an open lid being inserted, showing the printer's internal structure and the arrow indicating the process (no text or symbols present)
6

natural_image
Illustration of a printer with a paper feeding into a printer's internal structure, showing the blade being inserted (no text or symbols present)
natural_image
Illustration of a printer with an open lid and a blue arrow indicating rotation (no text or symbols present)
Cartuccia toner, 4-9, 4-20
natural_image
Line drawing of a generic electronic device labeled 'Cane' with no visible text or symbols on the device itself.
CLASS 1 LASER PRODUCT
LASER KLASSE 1
APPAREIL Á LASER DE CLASSE 1
APPARECCHIO LASER DI CLASSE 1
PRODUCTO LÁSER DE CLASE 1
APARELHO A LASER DE CLASSE 1
LUOKAN 1 LASER-TUOTE
LASERPRODUKT KLASS 1
ATENCIÓN
ATENCIÓN
natural_image
Illustration of a printer with a prohibition symbol (no text or labels present)
natural_image
Illustration of a printer with a magnified inset showing a hand pressing down on a curved object (no text or symbols present)
flowchart
graph LR
    A["Vehicle Image"] --> B["Navigation Panel"]
    B --> C["Car Tracking System"]
Combinación 2 en 1
Envío
natural_image
Illustration of a padlock with a key inserted, symbolizing security or lock function (no text or symbols present)
Monitor del sistema
natural_image
Pixelated icon of a cube with a gradient background, labeled 'Canon' below (no other text or symbols)
natural_image
Line drawing of a printer with a paper airplane being inserted, showing the printer's handle and control panel (no text or symbols present)
natural_image
Illustration of a hand pressing a button on a computer monitor (no text or symbols present)
natural_image
Illustration of a printer next to an open storage unit with a hand inserting a component (no text or symbols visible)
natural_image
Line drawing of hands folding a folded garment with a cloth (no text or symbols)

natural_image
Illustration showing two hands holding a document with a downward arrow, no text or symbols present
natural_image
Illustration of a printer being placed into a machine, showing the printer's handle and internal components (no text or symbols)
natural_image
Illustration of a printer's internal structure being inserted into a device (no text or symbols visible)
natural_image
Illustration showing a printer next to a device with a hand inserting a component (no text or symbols visible)
natural_image
Illustration showing a printer next to a printer's internal structure with a blue arrow indicating direction (no text or symbols present)
natural_image
Illustration of a printer's internal structure being inserted into a device (no text or symbols visible)
natural_image
Illustration of a printer with a close-up view of its clip, showing no text or symbols on the device itself.

IMPORTANTE
natural_image
Illustration of a printer with a blue folder and arrow indicating a download or transfer process (no text or symbols present)
ADVERTENCIA
natural_image
Illustration of a hand holding a connector with a no-smoking symbol (no text or labels present)
IMPORTANTE
natural_image
Diagram showing a mechanical component before and after rotation, with no visible text or symbols.

IMPORTANTE
natural_image
Illustration of a hand holding a plug with a no-smoking symbol (no text or labels)
5
natural_image
Illustration showing a printer being opened into a machine, with no visible text or symbols
6

natural_image
Illustration of a printer's internal structure with an arrow indicating a process (no text or symbols present)
natural_image
Illustration showing a printer being placed on an open file into a printer, with no visible text or symbols.
IMPORTANTE
natural_image
Diagram showing a printer's internal structure before and after assembly, with no visible text or symbols.

5
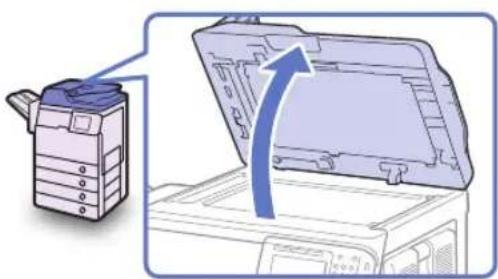
natural_image
Illustration of a printer with an open lid and arrow indicating compression or disassembly (no text or symbols present)
natural_image
Illustration of a printer presser's operation with a hand inserting a component (no text or symbols present)
natural_image
Diagram of a printer with an open lid and a magnified inset showing internal components (no text or symbols)
9
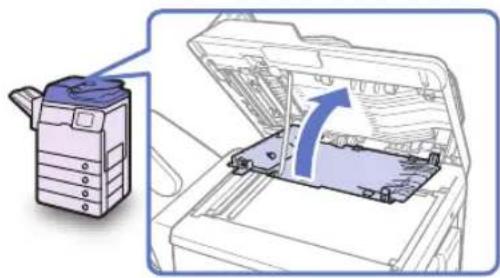
natural_image
Illustration of a printer with an open lid and a blue arrow indicating rotation (no text or symbols present)
natural_image
Diagram showing a printer device interacting with a mechanical component, with a blue arrow indicating the process (no text or symbols present)
natural_image
Illustration showing a printer's front panel being removed from a computer, with a blue arrow indicating the process (no text or symbols present)
natural_image
Illustration of a printer being placed on an electronic device, showing the printer's handle and paper clip (no text or symbols present)
natural_image
Illustration of a printer with a blue arrow pointing to a component inside a machine (no text or symbols visible)
6

natural_image
Illustration of a printer next to a microwave oven with a hand inserting a button (no text or symbols visible)
natural_image
Illustration showing a printer presser and its internal structure, with no visible text or symbols.
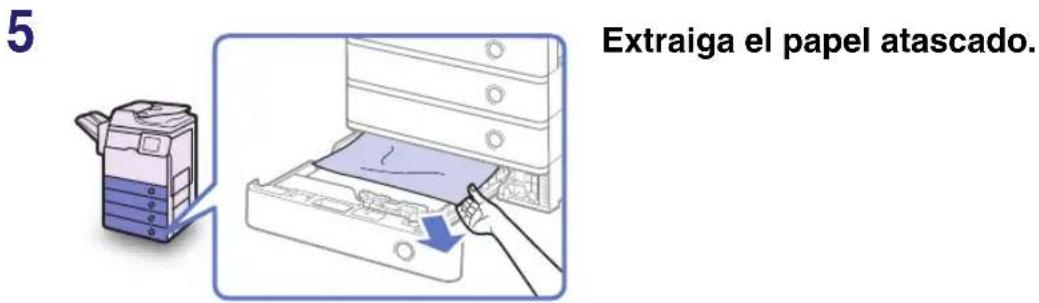
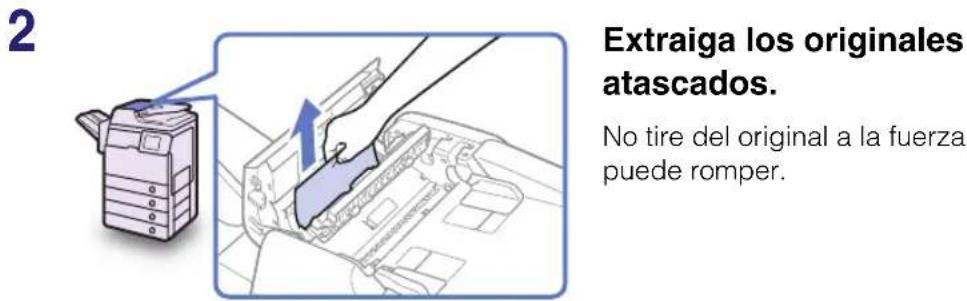
natural_image
Illustration of a printer with an open lid and arrow indicating compression or disassembly (no text or symbols present)
natural_image
Illustration of a printer presser's operation with a hand inserting a component (no text or symbols present)
6
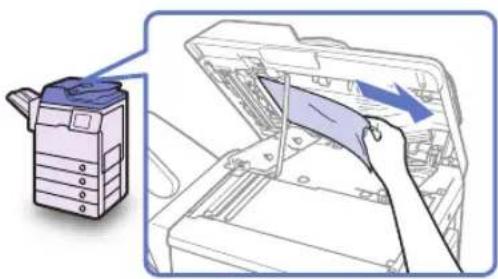
natural_image
Illustration of a printer with a hand inserting a card into an open notebook (no text or symbols visible)
natural_image
Illustration of a printer with an open lid and arrow indicating a process (no text or symbols present)
natural_image
Illustration of a printer with a blue arrow indicating the process (no text or symbols present)
30-2, Shimomaruko 3-chome, Ohta-ku, Tokyo 146-8501, Japan
CANON U.S.A., INC.
One Canon Plaza, Lake Success, NY 11042, U.S.A.
CANON CANADA INC.
6390 Dixie Road Mississauga, Ontario L5T 1P7, Canada
CANON EUROPA N.V.
Bovenkerkerweg 59-61 1185 XB Amstelveen, The Netherlands
(See http://www.canon-europe.com/ for details on your regional dealer)
CANON LATIN AMERICA, INC.
703 Waterford Way Suite 400 Miami, Florida 33126 U.S.A.
CANON AUSTRALIA PTY. LTD
1 Thomas Holt Drive, North Ryde, Sydney, N.S.W. 2113, Australia
CANON CHINA CO., LTD
15F Jinbao Building No.89 Jinbao Street, Dongcheng District, Beijing 100005, China
CANON SINGAPORE PTE. LTD.
1 HarbourFront Avenue #04-01 Keppel Bay Tower, Singapore 098632
CANON HONGKONG CO., LTD
19/F., The Metropolis Tower, 10 Metropolis Drive, Hunghom, Kowloon, Hong Kong