
SBX300 - Pregnant ONKYO - Free user manual and instructions
Find the device manual for free SBX300 ONKYO in PDF.
| Product type | Dock speaker for iPod/iPhone/iPad |
| Brand | Onkyo |
| Model | SBX300 |
| Rated output power | 20 W per channel (FTC, 6 Ω, 2 channels) |
| Power supply | AC 100-240 V, 50/60 Hz (AC adapter) |
| Power consumption | 27 W (operating), 0.3 W (standby) |
| Weight | 3.5 kg |
| Audio input | LINE IN jack (stereo mini-jack) |
| Speaker impedance | 6 Ω |
| Frequency response | 40 Hz - 20 kHz (±3 dB) |
| Main functions | Playback and charging of iPod/iPhone/iPad, Super Bass 1/2, shuffle and repeat modes, auto standby |
| Supplied accessories | Remote control (CR2025 battery included), AC adapter, power cord, cushion pad for iPad |
| Care and cleaning | Dust with a soft dry cloth; for stains, use a slightly damp cloth with mild detergent, then dry immediately |
| Safety | Do not expose to water or moisture; leave at least 15 cm of ventilation space around the unit; use only the supplied adapter |
| Spare parts and repairability | No user-serviceable parts; refer all servicing to qualified personnel; the internal AC fuse is not user-replaceable |
| General information | Compliant with Canadian NMB-003 standard; operating temperature: 5 °C to 35 °C; do not use in case of condensation |
Frequently Asked Questions - SBX300 ONKYO
User questions about SBX300 ONKYO
0 question about this device. Answer the ones you know or ask your own.
Ask a new question about this device
Download the instructions for your Pregnant in PDF format for free! Find your manual SBX300 - ONKYO and take your electronic device back in hand. On this page are published all the documents necessary for the use of your device. SBX300 by ONKYO.
USER MANUAL SBX300 ONKYO
Important Safety Instructions
WARNING:
TO REDUCE THE RISK OF FIRE OR ELECTRIC SHOCK, DO NOT EXPOSE THIS APPARATUS TO RAIN OR MOISTURE.
CAUTION:
TO REDUCE THE RISK OF ELECTRIC SHOCK, DO NOT REMOVE COVER (OR BACK). NO USER-SERVICEABLE PARTS INSIDE. REFER SERVICING TO QUALIFIED SERVICE PERSONNEL.

WARNING
WARNING RISK OF ELECTRIC SHOCK
DO NOT OPEN

AVIS BISQUE DE CHOC ELECTRICUE
NE PAS OUVRIR


The lightning flash with arrowhead symbol, within an equilateral triangle, is intended to alert the user to the presence of uninsulated "dangerous voltage" within the product's enclosure that may be of sufficient magnitude to constitute a risk of electric shock to persons.

The exclamation point within an equilateral triangle is intended to alert the user to the presence of important operating and maintenance (servicing) instructions in the literature accompanying the appliance.
IMPORTANT SAFETY INSTRUCTIONS
- Read these instructions.
- Keep these instructions.
- Heed all warnings.
- Follow all instructions.
- Do not use this apparatus near water.
-
Clean only with dry cloth.
-
Do not block any ventilation openings. Install in accordance with the manufacturer's instructions.
-
Do not install near any heat sources such as radiators, heat registers, stoves, or other apparatus (including amplifiers) that produce heat.
-
Do not defeat the safety purpose of the polarized or grounding-type plug. A polarized plug has two blades with one wider than the other. A grounding type plug has two blades and a third grounding prong. The wide blade or the third prong are provided for your safety. If the provided plug does not fit into your outlet, consult an electrician for replacement of the obsolete outlet.
-
Protect the AC adaptor from being walked on or pinched particularly at plugs, convenience receptacles, and the point where they exit from the apparatus.
En-2
-
Only use attachments/accessories specified by the manufacturer.
-
Use only with the cart, stand, tripod, bracket, or table specified by the manufacturer, or sold with the apparatus. When a cart is used, use caution when moving the cart/apparatus combination to avoid injury from tip-over.
-
Unplug this apparatus during lightning storms or when unused for long periods of time.
-
Refer all servicing to qualified service personnel. S3125A Servicing is required when the apparatus has been damaged in any way, such as power-supply cord or plug is damaged, liquid has been spilled or objects have fallen into the apparatus, the apparatus has been exposed to rain or moisture, does not operate normally, or has been dropped.
-
Damage Requiring Service Unplug the apparatus from the wall outlet and refer servicing to qualified service personnel under the following conditions:
A. When the power-supply cord or plug is damaged,
B. If liquid has been spilled, or objects have fallen into the apparatus, C. If the apparatus has been exposed to rain or water,
D. If the apparatus does not operate normally by following the operating instructions. Adjust only those controls that are covered by the operating instructions as an improper adjustment of other controls may result in damage and will often require extensive work by a qualified technician to restore the apparatus to its normal operation,
E. If the apparatus has been dropped or damaged in any way, and
F. When the apparatus exhibits a distinct change in performance this indicates a need for service.
-
Object and Liquid Entry Never push objects of any kind into the apparatus through openings as they may touch dangerous voltage points or short-out parts that could result in a fire or electric shock. The apparatus shall not be exposed to dripping or splashing and no objects filled with liquids, such as vases shall be placed on the apparatus. Don't put candles or other burning objects on top of this unit.
-
Batteries Always consider the environmental issues and follow local regulations when disposing of batteries.
-
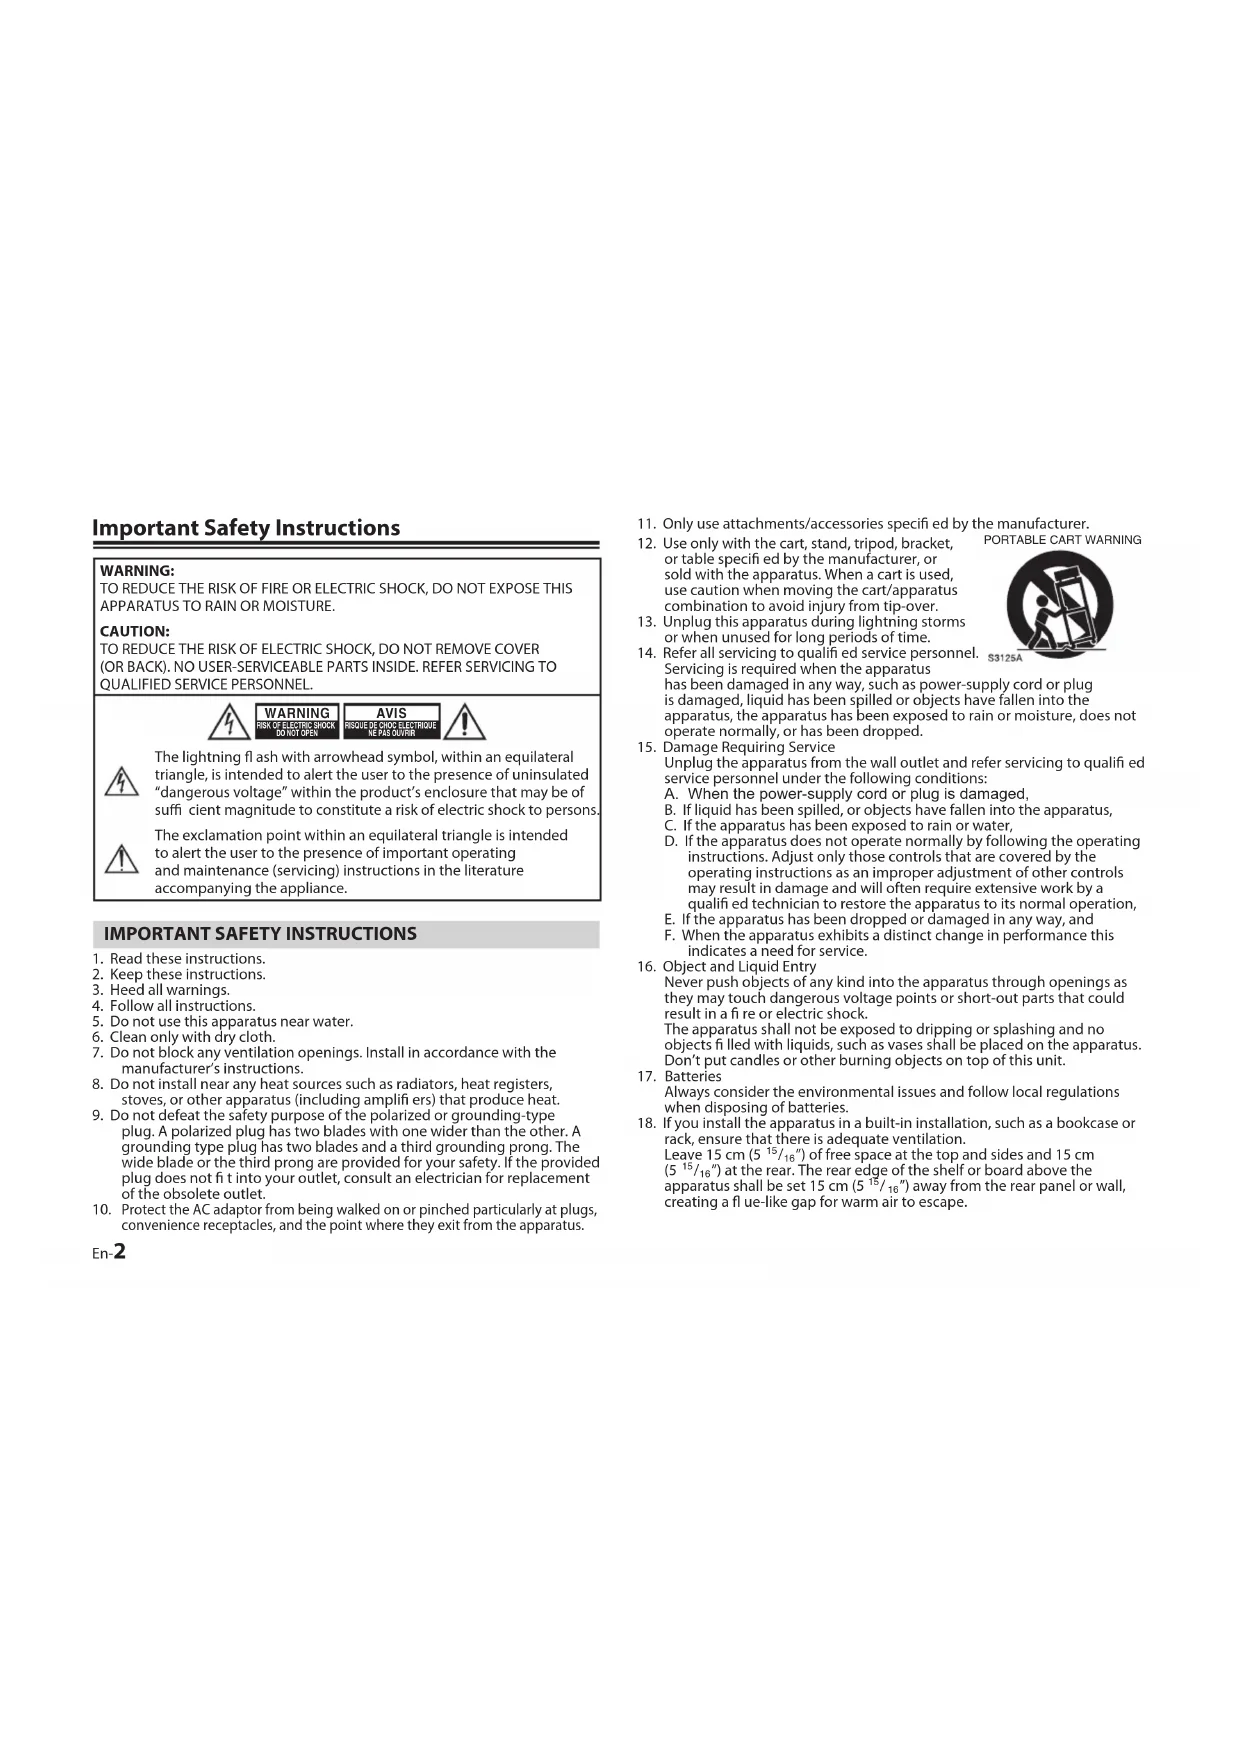
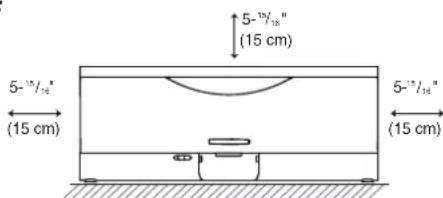
If you install the apparatus in a built-in installation, such as a bookcase or rack, ensure that there is adequate ventilation. Leave 15 cm ( 5^15/16 ) of free space at the top and sides and 15 cm ( 5^15/16 ) at the rear. The rear edge of the shelf or board above the apparatus shall be set 15 cm ( 5^13/_16 ) away from the rear panel or wall, creating a flue-like gap for warm air to escape.
Precautions
- Recording Copyright—Unless it's for personal use only, recording copyrighted material is illegal without the permission of the copyright holder.
- AC Fuse—The AC fuse inside the unit is not user-serviceable. If you cannot turn on the unit, contact your Onkyo dealer.
- Care—Occasionally you should dust the unit all over with a soft cloth. For stubborn stains, use a soft cloth dampened with a weak solution of mild detergent and water. Dry the unit immediately afterwards with a clean cloth. Don't use abrasive cloths, thinners, alcohol, or other chemical solvents, because they may damage the fi nish or remove the panel lettering.
- Power
BEFORE PLUGGING IN THE UNIT FOR THE FIRST TIME, READ THE FOLLOWING SECTION CAREFULLY.
AC outlet voltages vary from country to country. Make sure that the voltage in your area meets the voltage requirements printed on the unit's rear panel (e.g., AC 200-240 V, 50/60 Hz or AC 120 V, 60 Hz). The AC adaptor plug is used to disconnect this unit from the AC power source. Make sure that the plug is readily operable (easily accessible) at all times. Pressing the ON/STANDBY button to select Standby mode does not fully disconnect from the mains. If you do not intend to use the unit for an extended period, remove the AC adaptor from the AC outlet. - Preventing Hearing Loss
Excessive sound pressure from earphones and headphones can cause hearing loss. - Batteries and Heat Exposure
Batteries (battery pack or batteries installed) shall not be exposed to excessive heat as sunshine, fire or the like. - Never Touch this Unit with Wet Hands—Never handle this unit or its AC adaptor while your hands are wet or damp. If water or any other liquid gets inside this unit, have it checked by your Onkyo dealer.
- Handling Notes
- If you need to transport this unit, use the original packaging to pack it how it was when you originally bought it.
- Do not leave rubber or plastic items on this unit for a long time, because they may leave marks on the case.
- This unit's top and rear panels may get warm after prolonged use. This is normal.
WARNING
Caution
Warning
- If you do not use this unit for a long time, it may not work properly the next time you turn it on, so be sure to use it occasionally.
-
When you've finished using this unit, remove all discs and turn off the power.
-
Installing this Unit
• Install this unit in a well-ventilated location.
- Ensure that there's adequate ventilation all around this unit, especially if it's installed in an audio rack. If the ventilation is inadequate, the unit may overheat, leading to malfunction.
- Do not expose this unit to direct sunlight or heat sources, because its internal temperature may rise, shortening the life of the optical pickup.
- Avoid damp and dusty places, and places subject to vibrations from loudspeakers.
- Never put the unit on top of, or directly above a loudspeaker.
- Install this unit horizontally. Never use it on its side or on a sloping surface, because it may cause a malfunction.
- If you install this unit near a TV, radio, or VCR, the picture and sound quality may be affected. If this occurs, move this unit away from the TV, radio, or VCR.
-
To Obtain a Clear Picture—This unit is a hightech, precision device. If the lens on the optical pickup, or the disc drive mechanism becomes dirty or worn, the picture quality may be affected. To maintain the best picture quality, we recommend regular inspection and maintenance (cleaning or worn part replacement) every 1,000 hours of use depending on the operating environment. Contact your Onkyo dealer for details.
-
Moisture Condensation
Moisture condensation may damage this unit.
Read the following carefully:
Moisture may condense on the lens of the optical pickup, one of the most important parts inside this unit.
- Moisture condensation can occur in the following situations: - The unit is moved from a cold place to a warm place.
A heater is turned on, or cold air from an air conditioner is hitting the unit.
- In the summer, when this unit is moved from an air conditioned room to a hot and humid place.
- The unit is used in a humid place.
- Do not use this unit when there's the possibility of moisture condensation occurring. Doing so may damage your discs and certain parts inside this unit.
If condensation does occur, unplug the AC adaptor and leave the unit for two to three hours in the room temperature.
For U.S. models
FCC Information for User
CAUTION:
The user changes or modifications not expressly approved by the party responsible for compliance could void the user's authority to operate the equipment.
NOTE:
This equipment has been tested and found to comply with the limits for a Class B digital device, pursuant to Part 15 of the FCC Rules. These limits are designed to provide reasonable protection against harmful interference in a residential installation. This equipment generates, uses and can radiate radio frequency energy and, if not installed and used in accordance with the instructions, may cause harmful interference to radio communications. However, there is no guarantee that interference will not occur in a particular installation. If this equipment does cause harmful interference to radio or television reception, which can be determined by turning the equipment off and on, the user is encouraged to try to correct the interference by one or more of the following measures:
- Reorient or relocate the receiving antenna.
- Increase the separation between the equipment and receiver.
- Connect the equipment into an outlet on a circuit different from that to which the receiver is connected.
- Consult the dealer or an experienced radio/TV technician for help.
For Canadian Models
NOTE: THIS CLASS B DIGITAL APPARATUS COMPLIES WITH CANADIAN ICES-003.
IC Radiation Exposure Statement:
This equipment complies with IC RSS-102 radiation exposure limits set forth for an uncontrolled environment. This equipment should be installed and operated with minimum distance 20cm between the radiator & your body.
CAUTION
- Proper Installation
• Install the system in a place which is level, dry and neither too hot nor too cold. The appropriate temperature is between 5 °C and 35 °C.
• Install the system in a location with adequate ventilation to prevent internal heat from building up inside the unit.
- Leave sufficient distance between the system and TV.
- Keep the system away from TV to avoid interference with TV.
CAUTION
- Proper Ventilation
To avoid risk of electric shock and fire, and to prevent damage, locate the apparatus as follows:
Front: No obstructions and open spacing.
Sides / Top / Back: No obstructions should be placed in the areas shown by the dimensions below.
Bottom: Place on a flat and stable surface.
Front View:
Side View:
Contents
Getting Started....5
Package Contents ....5
Using the Remote Control ....5
Installing/Replacing the Batteries 6
Connecting the AC Adapter....6
System Overview 7
Front Panel....7
Side Panel....7
Remote Control....8
Playing back from iPod 8
Setting an iPod on the Unit 8
Listening to an iPod....9
Charging an iPod....9
Playing Back from Optional Components 10
Troubleshooting 11
Specification 11
Thank you for purchasing an Onkyo product. Please read this manual carefully before making any connections or using this product. By following these instructions, you'll get the best audio performance and the most listening pleasure from your Onkyo product. Keep this manual for future reference.
* In this user manual, "iPod" is used as a general reference to functions on an iPod, iPhone or iPad, unless otherwise specified by the text or illustrations.
* In catalogs and on packaging, the letter at the end of the product name indicates the color. Specifications and operations are the same regardless of color.
Getting Started
Package Contents
Examine whether the following package contents are all included:

Main Unit Remote

Control

AC Adapter Power Cord Cushion

for iPad
• A Lithium Coin Battery CR2025 is loaded on the remote control at the factory.
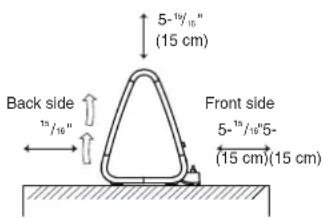
Using the Remote Control
Remove the battery-protect sheet before use.
Aim the remote control at the Remote control sensor on the front lens within an approximate distance of 23 feet (7m) away.
CAUTION
To avoid possible failure, read the following instructions and handle the remote control properly.
- Do not drop or cause impact to the remote control.
- Do not spill water or any liquid on the remote control.
- Do not place the remote control on a wet object.
- Do not place the remote control under the direct sunlight or near sources of excessive heat.
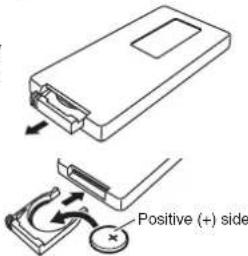
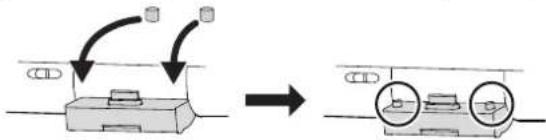
Installing/Replacing the Batteries
CAUTION
Danger of explosion if battery is incorrectly replaced. Replace only with the same or equivalent type.
- Squeeze and pull to release the battery cover latch. You can remove the battery door with your fingernails by using the spaces set back in wall.
- Match the polarity on the Lithium Cell with a plus sign (+) on the battery tray.
- Slide the tray with new battery into the battery compartment until you hear a click sound.
WARNING
- When Using the Battery
- Store the battery in a place where children cannot reach. If a child accidentally swallows the battery, consult a doctor immediately.
- Do not recharge, short circuit, disassemble, heat the battery, or dispose the battery in fi re. Doing any of these things may cause the battery to give off heat, crack, or start a fire. Do not leave the battery with other metallic materials. Doing this may cause the battery to give off heat, crack, or start a fi re.
- When throwing away or saving the battery, wrap it in tape and insulate; otherwise, the battery may start to give off heat, crack, or start a fire.
- Do not poke the battery with tweezers or similar tools. Doing this may cause the battery to give off heat, crack, or start a fire.
- This product contains a CR Coin Cell Lithium Battery that contains Perchlorate Material, so that special handling may apply.
NOTE
- If you are not going to use the remote control for a long time, remove the battery to avoid any damage that may be caused by leakage and corrosion.
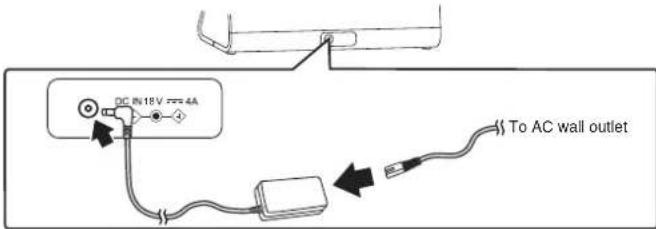
Connecting the AC Adapter
WARNING
Only use the AC adapter provided with the unit.
- Ensure that power supply outlet matches with the unit AC's input 100-240V, 50/60Hz before connection.
1 Insert the AC Adapter into DC IN jack of the unit.
2 Insert one end of the Power Cord into the end of the AC Adapter and the other end into an electrical outlet only after all other connections are completed.
System Overview
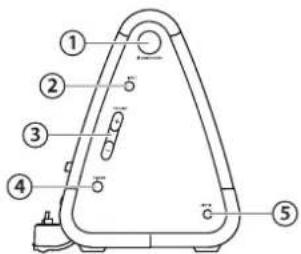
Front Panel
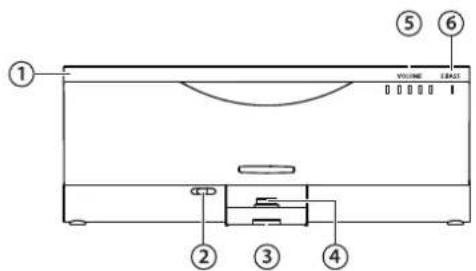
-
Handle
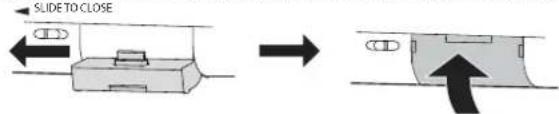
-
Docking tray switch (SLIDE TO CLOSE)
Slide the switch to close the docking tray.
- Source indicator
Lights when one of the sources is selected.
White: iPod mode
Green: LINE IN mode
-
iPod connector
-
VOLUME indicators
Five level bars will be lighted up/went out one by one when you increase/decrease the volume. Light flashes when the sound is muting.
- S.BASS indicator
Lights when the super bass is activated.
None: OFF
Green: Super bass 1
Orange: Super bass 2
Side Panel
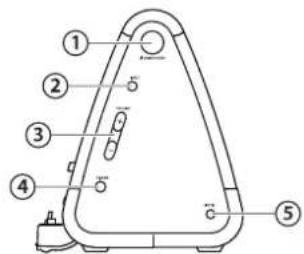
-
ON/STANDBY button
-
INPUT button
Switch between iPod and LINE IN modes.
- VOLUME buttons
Hold to increase or decrease the volume.
- S.BASS button
Activate super bass 1 or super bass 2 sound effect.
- LINE IN jack
For connecting an external audio device with using a stereo mini (not supplied).
Remote Control
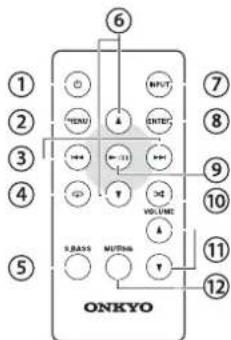
- S.BASS button
Activate the super bass 1 or super bass 2 sound effect.
- ▲ (Up)/ (Down) button
Move the cursor to up or down in iPod mode.
- INPUT button
Switch between the iPod and LINE IN modes.
- ENTER button
Confirm a selection in iPod mode.
- ▶/II (Play/Pause) button
Play/pause a track when listening to a track.
- ✕ (Shuffle) button
Select shuffle mode during iPod is playing back.
- VOLUME +/- button
Press to increase (+) or decrease (-) the volume level.
- MUTING button
Turn off the sound. Press again to restore the sound output.
The VOLUME indicators flash when the sound is muting.
Playing back from iPod
NOTE
When you use the iPad, attach the cushion for iPad (included).
Store the cushion in a place where children cannot reach. If a child accidentally swallows the cushion, consult a doctor immediately.
Setting an iPod on the Unit
• Compatible iPod/iPhone/iPad models:
Made for:
iPod touch (1st, 2nd, 3rd and 4th generation)
iPod classic,
iPod nano (2nd, 3rd, 4th, 5th and 6th generation)
iPhone 4, iPhone 3GS, iPhone 3G, iPhone
iPad 2, iPad
1 Press PUSH TO OPEN on the docking tray at the front of this unit to open.

2 Set your iPod on the tray. Make sure the connector plug of unit is firmly inserted into the connector port of iPod.
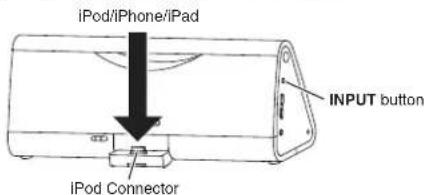
NOTE
- If the space is left between Docking Tray and setting surface, the damage may be caused due to the excessive force. Open the Docking Tray completely until it stays fl at along the setting surface.
- Remove the case or cover from your iPod before setting it in the tray to ensure a stable connection.
CAUTION
- Do not lean the unit forward when the docking tray is open.
When the docking tray is not used, you had better close the tray to avoid the damage.
Switch SLIDE TO CLOSE to the direction of arrow and close the tray.
NOTE
- When placing or removing the iPod, hold the iPod at the same angle as that of the connector on this unit, and do not twist or bend the iPod as connector damage may result.
- Do not carry the unit with an iPod set on the docking tray. Doing so may cause a malfunction.
- When placing or removing the iPod, hold the docking tray securely.
• Before disconnecting the iPod, pause playback. - If the battery of your iPod is extremely low, charge it for a while before operation.
- An iPod will not work unless it is turned on. Be sure to turn on the power of iPod before operation.
Listening to an iPod
1 Press the "button to turn on the unit.
2 Press the INPUT button on the unit or remote control to switch to the iPod mode if the unit is not in the iPod mode.
• The source indicator turns to white.
3 The track starts playing back automatically.
Charging an iPod
The iPod can be charged through the unit while it is connected to a wall outlet.
- Charging begins when the iPod is set on the docking tray.
• The charging status appears in the display on iPod.
• Make sure the AC adapter is connected to the unit. - The iPod is charged regardless of the sound source selected on the unit.
• See the iPod instruction manual about the details of iPod charging.
NOTE
for Caring Your iPod
- Do not touch or hit the iPod terminal pins or the connector pins directly. It might cause damages to the connector part.
- If the iPod does not play correctly, please update your iPod software to the latest version. - For details about updating your iPod, check on the Apple web site http://www.apple.com.
- You may not be able to charge iPod using this unit depending on the type or generations of the iPod.
In such case, turn the unit ON for the proper charging of iPod.
- iPod is a trademark of Apple Inc., registered in the U.S. and other countries.
• iPhone is a trademark of Apple Inc.
- iPad is a trademark of Apple Inc.
• We are not responsible for any loss of or damage to iPod that might result from the use of this product.
- Sound distortion may occur when playing back audio sources with high recording levels. When distortion occurs, it is recommended to turn off the equalizer of the iPod. For information on operating the iPod, see the iPod instruction manual.
iPad, iPhone, iPod, iPod classic, iPod nano, iPod shuffle, and iPod touch are trademarks of Apple Inc., registered in the U.S. and other countries.
"Made for iPod", "Made for iPhone" and "Made for iPad" mean that an electronic accessory has been designed to connect specifically to iPod, iPhone, or iPad, respectively, and has been certified by the developer to meet Apple performance standards. Apple is not responsible for the operation of this device or its compliance with safety and regulatory standards.
Please note that the use of this accessory with iPod, iPhone or iPad may affect wireless performance
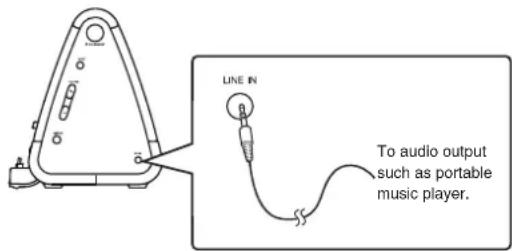
Playing Back from Optional Components
You can enjoy the sound from an optional component such as a portable music player through the speakers of this unit. Be sure to turn off the power of each component before making any connections. For details, refer to the instruction manual of the component to be connected.
1 Connect the LINE IN jack on the side of the unit to the line output jack of an external component using an audio connecting cable (not supplied).
2 Turn the connected component on.
3 Press button to turn on the unit.
4 Press INPUT button repeatedly to switch LINE IN mode. The sound from the connected component is output from the speakers of this unit.
• The source indicator turns to Green.
Troubleshooting
The unit does not work.
- Press Reset button which is placed inside the Reset engraved thin hole on the bottom of this unit using such as a slender rod.
- Unplug the Power Cord from the wall outlet, wait 10 seconds or more, then plug it in again.
- Press the INPUT button repeatedly to Bottom of unit switch LINE IN mode (the source indicator lit Green), and press and hold the (Repeat) button on the remote control during the power is ON.
The unit is suddenly powered off.
- The unit has an energy saving function. The unit automatically enters the standby mode in the following situations.
- No sound output and without any operation for more than 10 minutes in the iPod mode.
- No signal input for more than 10 minutes in the LINE IN mode. In such cases, turn ON the unit again and play back the audio.
The power does not come on.
- Make sure the Power Cord is connected to the wall outlet firmly. (P.6)
The buttons on the unit do not function.
- Remove and reconnect the AC adapter and turn on the unit again. (P.6)
There is no sound output.
- Check if the volume of the iPod/external device connected to the unit is set to the minimum.
• Make sure the sound is not muted. (P.8) - Adjust the VOLUME +/- buttons on the remote control or unit. (P.7, 8)
There is no audio from iPod.
• Make sure the iPod is connected firmly. (P.8, 9)
iPod operation is not performed.
• Make sure the iPod is connected firmly. (P.8, 9)
- Restart the iPod.
The iPod cannot be charged.
• Make sure the iPod is connected firmly. (P.8, 9)
- Make sure the Power Cord is connected to the wall outlet firmly. (P.6)
The Docking Tray cannot be closed.
- Switch the SLIDE TO CLOSE to direction of arrow. (P.9)
The remote control does not function.
• Make sure the battery is inserted correctly. (P.6)
- Replace the battery in the remote control with a new one if it is weak. (P.6)
- Move closer to the unit when using the remote control. (P.5)
Specification
General
Rated output Power(FTC): (L,R) 20 watts minimum continuous power per channel, 6 ohm loads, 2 channels driven at 1 kHz with a maximum total harmonic distortion of 1 %
Power Supply: AC 100 – 240 V, 50/60 Hz
Power Consumption: 27 W
No-sound Power
Consumption: 4.8 W
Stand-by Power
Consumption: 0.3 W
Dimensions (Approx.): 17^11/16''(W) × 6^15/16''(H) × 5^3/_16''(D) (450 mm (W) × 176 mm (H) × 131 mm (D))
Weight: 7.7 lbs. (3.5 Kg)
Analog Input: LINE
Amplifi er
Total Harmonic
Distortion+N: 0.5 % (1 kHz 1 W)
Damping Factor: 15 (Front, 1 kHz, 8 Ω)
Input Sensitivity/
Impedance: 1000 mV / 47 kΩ (LINE)
Frequency Response: 40 Hz to 20 kHz/+3 dB, -3 dB
Tone Control Characteristics: +4 dB, 80 Hz (S. BASS 1)
$$ + 8 \mathrm{dB}, 8 0 \mathrm{Hz} (\text { S . B A S S } 2) $$
Signal to Noise Ratio: 76 dB (LINE, IHF-A)
Speakers
Speaker Impedance: 6 Ω
Speaker Outputs: Internal speaker 2 ch
Type: Full-range Bass-Reflex
Unit: 4^1/8 " (10.5 cm) cone
Design and specifications are subject to change without notice.
m = 311
RISQUE DE CHOC ELECTRICUE


1. Poignée
Orange: Super bass 2
Panneau latéral
1. Bouton ON/STANDBY
2. Bouton INPUT
Bascule entre les modes iPod et LINE IN.
3. Boutons VOLUME
Dimensions (approximatives): 450 mm (L) × 176 mm (H) × 131 mm (P)
$$ (1 7 ^ {1 1} / _ {1 6} ^ {\prime \prime} (L) \times 6 ^ {1 5} / _ {1 6} ^ {\prime \prime} (H) \times 5 ^ {3} / _ {1 6} ^ {\prime \prime} (P)) $$
Type : Bass reflex full range
PRECAUCIÓN
1. Manilla
1. Botón ON/STANDBY
2. Botón INPUT
1. Botón (On/Standby)
| +8 dB, 80 Hz (S. BASS 2) |
18 Park Way, Upper Saddle River, N.J. 07458, U.S.A.
Tel: 800-229-1687, 201-785-2600 Fax: 201-785-2650
http://www.us.onkyo.com/
ONKYO EUROPE ELECTRONICS GmbH
Liegnitzerstrasse 6,82194 Groebenzell,GERMANY
Tel: +49-8142-4401-0 Fax: +49-8142-4401-555
http://www.eu.onkyo.com/
ONKYO EUROPE ELECTRONICS GmbH (UK BRANCH)
The Coach House 81A High Street, Marlow, Buckinghamshire, SL7 1AB, UK
Tel: +44-(0)1628-473-350 Fax: +44-(0)1628-401-700
ONKYO CHINA LIMITED
Unit 1 & 12, 9/F, Ever Gain Plaza Tower 1, 88, Container Port Road, Kwai Chung,
N.T., Hong Kong. Tel: 852-2429-3118 Fax: 852-2428-9039
http://www.onkyochina.com/
ONKYO CHINA PRC
1301, 555 Tower, No.555 West NanJin Road, Jin an, Shanghai,
China 200041, Tel: 86-21-52131366 Fax: 86-21-52130396
SN 29400962B
(C) Copyright 2011 ONKYO SOUND & VISION CORPORATION Japan.
All rights reserved.
D1110-3
