DuraVision FDX1003T - Monitor EIZO - Free user manual and instructions
Find the device manual for free DuraVision FDX1003T EIZO in PDF.
User questions about DuraVision FDX1003T EIZO
0 question about this device. Answer the ones you know or ask your own.
Ask a new question about this device
Download the instructions for your Monitor in PDF format for free! Find your manual DuraVision FDX1003T - EIZO and take your electronic device back in hand. On this page are published all the documents necessary for the use of your device. DuraVision FDX1003T by EIZO.
USER MANUAL DuraVision FDX1003T EIZO
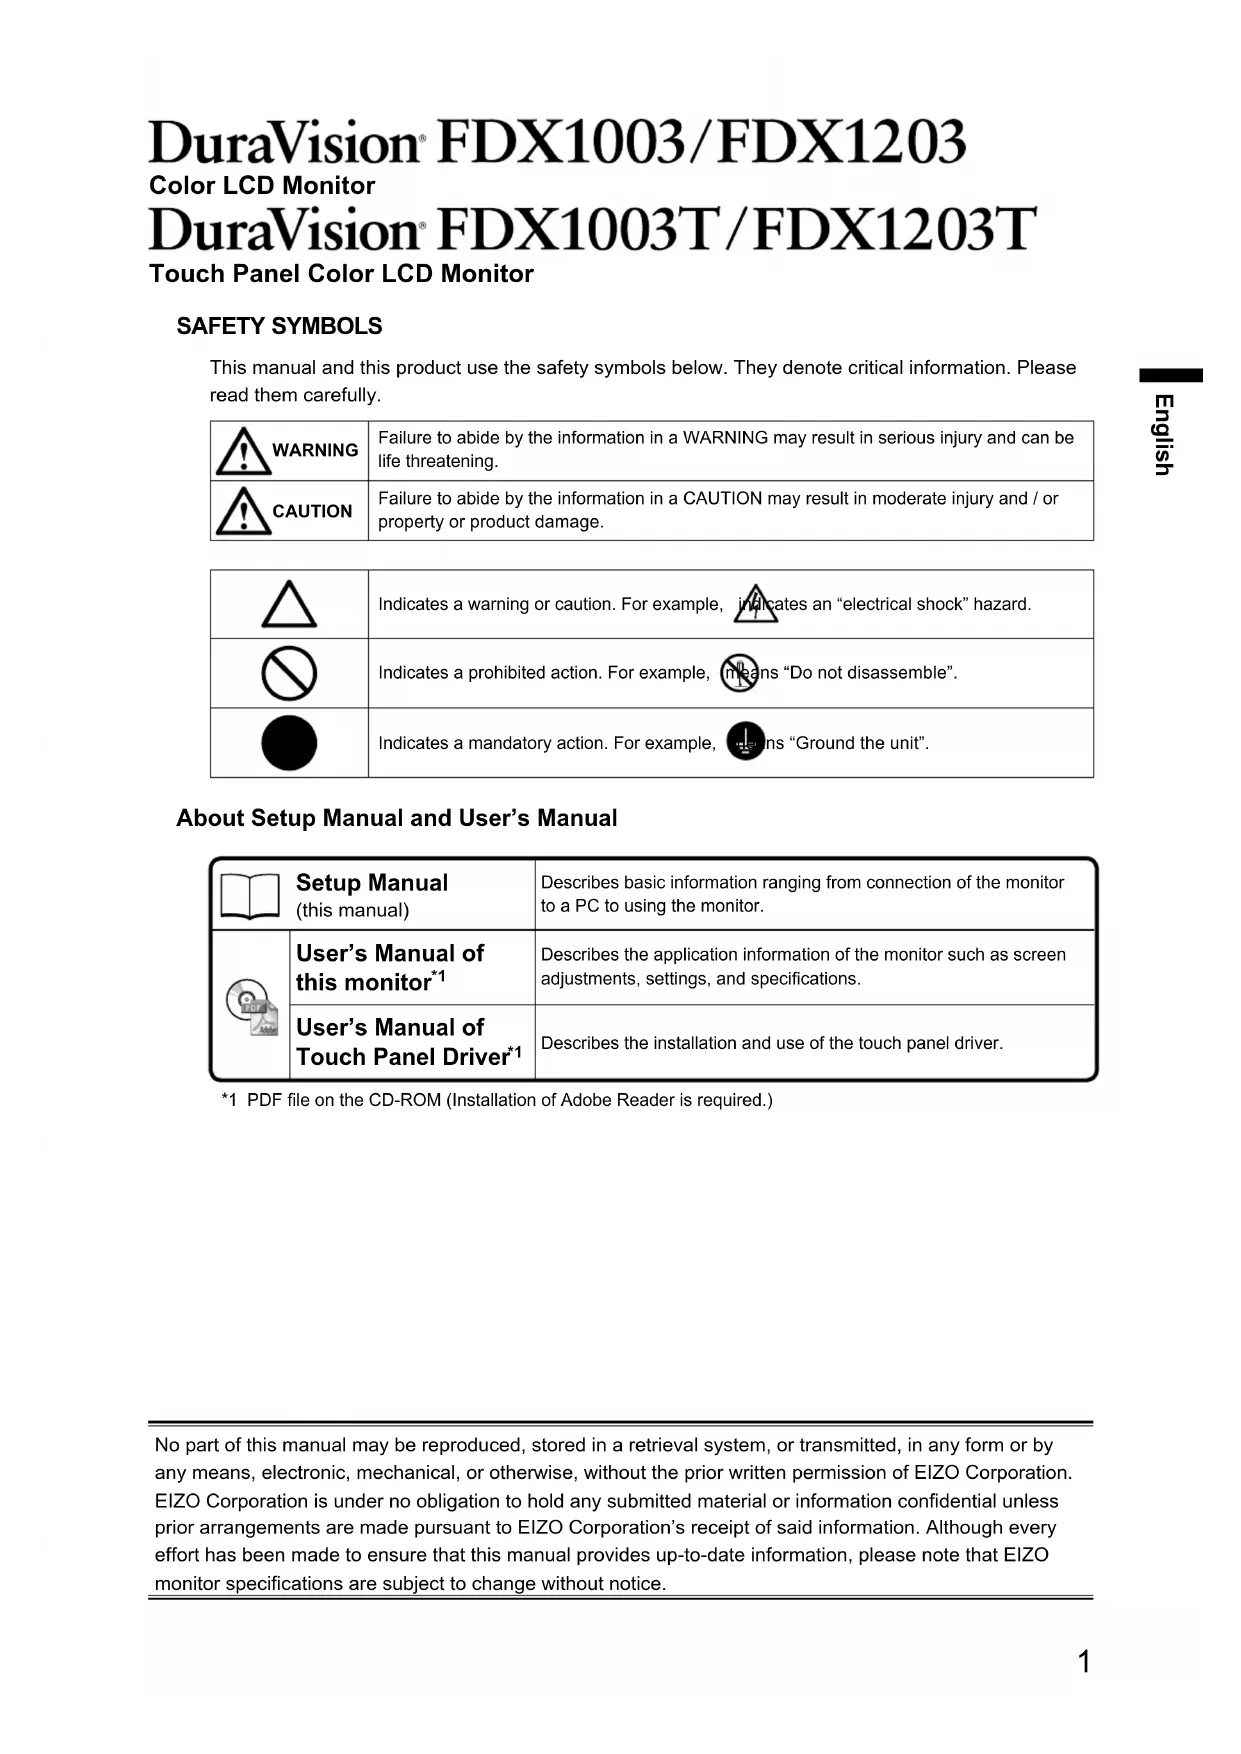
DuraVision® FDX1003 FDX1203
Color LCD Monitor
FDX1003T FDX1203T
Touch Panel Color LCD Monitor
七卜艾·卡 二乃
重要:使用前必此之的七口卡卡卡卡卡卡卡卡卡卡卡卡卡卡卡卡卡卡卡卡卡卡卡卡卡卡卡卡卡卡卡卡卡卡卡卡卡卡卡卡卡卡卡卡卡卡卡卡卡卡卡卡卡卡卡卡卡卡卡卡卡卡卡卡卡卡卡卡卡卡卡卡卡卡卡卡卡
Setup Manual
Important: Please read this Setup Manual and the User's Manual stored (on the CD-ROM) carefully to familiarize yourself with safe and effective usage. Please retain this manual for future reference.
Installationshandbuch
Compatible Resolutions
The monitor supports the following resolutions.
This is the product of two parts.
落とたるけがや故障の原因なります。


風通の悪い、狹いところに置:NO
Touch Panel Color LCD Monitor
SAFETY SYMBOLS
This manual and this product use the safety symbols below. They denote critical information. Please read them carefully.
| WARNING | Failure to abide by the information in a WARNING may result in serious injury and can be life threatening. |
| CAUTION | Failure to abide by the information in a CAUTION may result in moderate injury and / or property or product damage. |
| △ | Indicates a warning or caution. For example, indicates an "electrical shock" hazard. |
| ⊗ | Indicates a prohibited action. For example, means "Do not disassemble". |
| ● | Indicates a mandatory action. For example, ns "Ground the unit". |
About Setup Manual and User's Manual
| Setup Manual (this manual) | Describes basic information ranging from connection of the monitor to a PC to using the monitor. | |
| User's Manual of this monitor*1 | Describes the application information of the monitor such as screen adjustments, settings, and specifications. | |
| User's Manual of Touch Panel Driver*1 | Describes the installation and use of the touch panel driver. | |
*1 PDF file on the CD-ROM (Installation of Adobe Reader is required.)
No part of this manual may be reproduced, stored in a retrieval system, or transmitted, in any form or by any means, electronic, mechanical, or otherwise, without the prior written permission of EIZO Corporation. EIZO Corporation is under no obligation to hold any submitted material or information confidential unless prior arrangements are made pursuant to EIZO Corporation's receipt of said information. Although every effort has been made to ensure that this manual provides up-to-date information, please note that EIZO monitor specifications are subject to change without notice.
IMPORTANT
- To ensure personal safety and proper maintenance, please read carefully this section and the caution statements on the monitor.
Location of the Caution Statements
FDX1003/FDX1003T

FDX1203/FDX1203T
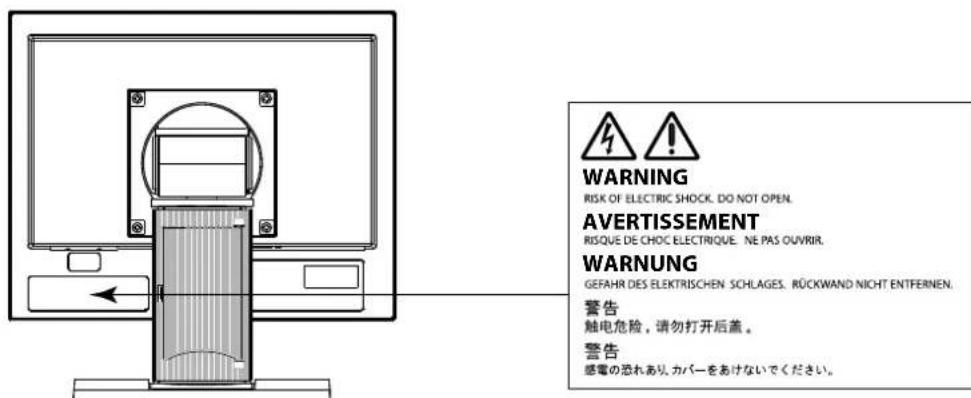

WARNING
If the unit begins to emit smoke, smells like something is burning, or makes strange noises, disconnect all power connections immediately and contact your local EIZO representative for advice.
Attempting to use a malfunctioning unit may result in fire, electric shock, or equipment damage.
Do not open the cabinet or modify the unit.
Opening the cabinet or modifying the unit may result in fire, electric shock, or burn.

Refer all servicing to qualified service personnel.
Do not attempt to service this product yourself as opening or removing covers may result in fire, electric shock, or equipment damage.
Keep small objects or liquids away from the unit.
Small objects accidentally falling through the ventilation slots into the cabinet or spillage into the cabinet may result in fire, electric shock, or equipment damage. If an object or liquid falls/ spills into the cabinet, unplug the unit immediately. Have the unit checked by a qualified service engineer before using it again.

Place the unit at the strong and stable place.
A unit placed on an inadequate surface may fall and result in injury or equipment damage. If the unit falls, disconnect the power immediately and ask your local EIZO representative for advice.
Do not continue using a damaged unit. Using a damaged unit may result in fire or electric shock.
Use the unit in an appropriate location.
Not doing so may result in fire, electric shock, or equipment damage.
- Do not place outdoors.
- Do not place in a transportation system (ship, aircraft, train, automobile, etc.) where it may be affected by strong vibration or shock.
- Do not place in a dusty or humid environment.
- Do not place in a location where water is splashed on the screen (bathroom, kitchen, etc.).
- Do not place in a location where the steam comes directly on the screen.
- Do not place near heat generating devices or a humidifier
- Do not place in a location where the product is subject to direct sunlight.
- Do not place in an inflammable gas environment.
- Do not place in environments with corrosive gases (such as sulfur dioxide, hydrogen sulfide, nitrogen dioxide, chlorine, ammonia, and ozone).
- Do not place in environments with dust, components that accelerate corrosion in the atmosphere (such as sodium chloride and sulfur), conductive metals, and so on.
To avoid danger of suffocation, keep the plastic packing bags away from babies and children.
Use the enclose AC adapter.
The enclosed AC adapter is for use with this product only. Do not use the AC adapter with other equipment. Connecting to power sources that do not match the power ratings of the AC adapter may result in fire or electric shock.
If using the AC power connector, make sure the power cord meets the following requirements.
This product does not include a power cord. Please prepare separately a power cord which meets the requirements.
- The power cord must be compliance with the mandatory standards of the country and region in which this product is to be used.
Example
For Europe : The power cord set has rated value of at least AC 250V~ 10A and has cord type H05VV-F, GTCE-3, 0.75mm^2
For USA : The power cord set has rated value of at least AC 125V~ 10A and has cord type SVT, 3/18AWG (0.75mm²).
For China : The power cord set has rated value of at least AC 250V~10A and has cord type “配60227 IEC53 3× 1 平方毫米”
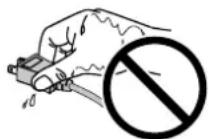
To disconnect the power cord, grasp the plug firmly and pull.
Tugging on the cord may damage and result in fire or electric shock.

The equipment must be connected to a grounded main outlet.
Failure to do so may result in fire or electric shock.

Use the correct voltage.
- The unit is designed for use with a specific voltage only. Connection to another voltage than specified in this User's Manual may cause fire, electric shock, or equipment damage.
- Do not overload your power circuit, as this may result in fire or electric shock.
Handle the power cord and AC adapter with care.
Handle the power cord and AC adapter with care.
Do not place heavy objects on, pull or tie the power cord or the AC adapter. Using a damaged cord or AC adapter may result in fire or electric shock.
Never touch the plug, AC adapter or power cord during a thunderstorm.
Touching them may result in electric shock.


When attaching an arm stand, please refer to the user's manual of the arm stand and install the unit securely.
Not doing so may cause the unit to become unattached, which may result in injury or equipment damage. When the unit is dropped, please ask your local EIZO representative for advice. Do not continue using a damaged unit. Using a damaged unit may result in fire or electric shock. When reattaching the tilt stand, please use the same screws and tighten them securely.
Do not touch a damaged LCD panel directly with bare hands.
The liquid crystal that may leak from the panel is poisonous if it enters the eyes or mouth. If any part of the skin or body comes in direct contact with the panel, please wash thoroughly. If some physical symptoms result, please consult your doctor.

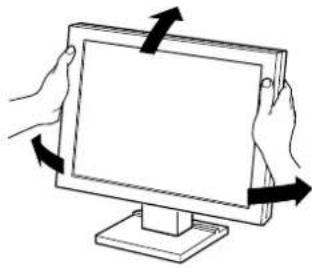
Handle with care when carrying the unit.
Disconnect the power cord and cables when moving the unit. Moving the unit with the cord attached is dangerous. It may result in injury.
When carrying the unit, grasp and hold it firmly by the bottom as shown in the illustration on the right.
Dropping the unit may result in injury or equipment damage.

OK
Do not install the unit in a closed space.
If the inerior becomes hot, it may result in fire, electric shock or damage.

Do not touch the plug or AC adapter with wet hands.
Doing so may result in electrical shock.
Use an easily accessible power outlet.
This will ensure that you can disconnect the power quickly in case of a problem.
Mind that the AC adapter becomes hot during use.
- Do not cover or place anything on top of the AC adapter. Do not place the AC adapter on top of things that trap heat such as carpets, blankets, etc. Keep the AC adapter away from direct sunlight and heat sources such as heaters. Not doing so may result in fire.
- Do not touch with bare hands. Doing so may result in burns.
- Before moving the monitor, be sure to turn off the power switch, disconnect the power plug from the power outlet, and wait until it has cooled completely.
Do not suspend the AC adapter in midair.
Using it while suspended in midair may result in fire or electric shock.

Periodically clean the area around the plug.
Dust, water, or oil on the plug may result in fire.
Unplug the unit before cleaning it.
Cleaning the unit while it is plugged into a power outlet may result in electric shock.
If you plan to leave the unit unused for an extended period, disconnect the power cord from the wall socket after turning off the power for safety and power conservation.
Notice for this monitor
| Aside from displaying microscope images, this product is also suited to the dedicated usages such as operation of terminal equipment. |
| This product has been adjusted specifically for use in the region to which it was originally shipped. If the product is used outside the region, it may not operate as specified in the specifications. |
| This product may not be covered by warranty for uses other than those described in this manual. |
| The specifications noted in this manual are only applicable when the following are used:· Signal cables specified by us |
| Only use optional products manufactured or specified by us with this product. |
| If you place this product on a lacquer-coated desk, the color may adhere to the bottom of the stand due to the composition of the rubber. Check the desk surface before use. |
| It takes about 30 minutes for the performance of electrical parts to stabilize. Please wait 30 minutes or more after the monitor power has been turned on, and then adjust the monitor. |
| Monitors should be set to a lower brightness to reduce changes in luminosity caused by long-term use and maintain a stable display. |
| When the screen image is changed after displaying the same image for extended periods of time, an afterimage may appear. Use the screen saver or power save function to avoid displaying the same image for extended periods of time. |
| Periodic cleaning is recommended to keep the monitor looking new and to prolong its operation lifetime (refer to "Cleaning" (page 7)). |
| The LCD panel is manufactured using high-precision technology. Although, missing pixels or lit pixels may appear on the LCD panel, this is not a malfunction. Percentage of effective dots: 99.9994% or higher. |
| The backlight of the LCD panel has a fixed lifetime. When the screen becomes dark or begins to flicker, please contact your local EIZO representative. |
| Do not scratch or press on the panel with any sharp objects, as this may result in damage to the panel. Do not attempt to brush with tissues as this may scratch the panel. |
| When the monitor is cold and brought into a room or the room temperature goes up quickly, dew condensation may occur on the interior and exterior surfaces of the monitor. In that case, do not turn the monitor on. Instead wait until the dew condensation disappears, otherwise it may cause some damage to the monitor. |
| (Cautions for the Use of the Touch Panel)· During touch operationBe careful of the following points. Otherwise, damage may occur to the monitor.- Do not strongly press, scratch, or poke the panel.- Do not touch the panel with hard objects such as ballpoint pens or metals. |
Attention
Chemicals such as alcohol and antiseptic solution may cause gloss variation, tarnishing, and fading of the cabinet or panel, and also quality deterioration of the image.
- Never use any thinner, benzene, wax, and abrasive cleaner, which may damage the cabinet or panel.
- Do not allow liquid to enter the clearance between the panel and the panel frame.
Note
- The optional ScreenCleaner is recommended for cleaning the cabinet and panel surface.
The stains on the cabinet and panel surface can be removed by moistening part of a soft cloth with water.
To use the monitor comfortably
- An excessively dark or bright screen may affect your eyes. Adjust the brightness of the monitor according to the environmental conditions.
- Staring at the monitor for a long time tires your eyes. Take a 10-minute rest every hour.
Package Contents
Check that all the following items are included in the packaging box. If any items are missing or damaged, contact your local EIZO representative.
Note
- Please keep the packaging box and materials for future movement or transport of the monitor.
Monitor
- AC adapter : FSP050-DIBAN2
- Analog signal cable: MD-C87

- USB cable: MD-C93 (for FDX1003T / FDX1203T only)

- Cable Tie (for FDX1003/FDX1003T only)
- EIZO LCD Utility Disk (CD-ROM)
- Setup Manual (this manual)
Attention
- This product does not include a power cord. Please provide separately a power cord which meets the usage requirements. For more information, please contact your local EIZO representative.
Controls and Functions
Example : FDX1003T
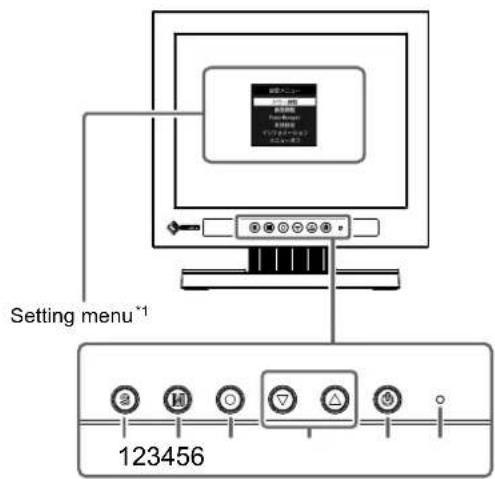
| 1. Button Switches input signals for display. | |
| 2. M button Changes Color Mode. | |
| 3. ● button Displays the Setting men | determines an item on the menu screen, and saves adjusted values. |
| 4. ↑▲ button | Provides the menu selection as well as the adjustment and setting of a function. Displays the Brightness menu. |
| 5. ⑥ button Turns the power on or off. | |
| 6. Power indicator | Indicates the monitor's operation status. Blue: Operating Orange: Power saving mode OFF: Power off |
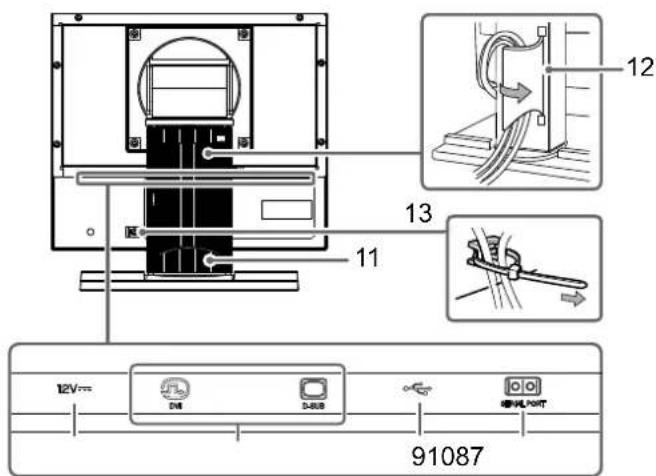
| 7. Power Jack (DC-IN) | Connects to the AC adapter. |
| 8. Input signal connector | Left: DVI-D connector / Right: D-Sub mini 15-pin connector |
| 9. USB upstream port (for FDX1003T / FDX1203T only)*2 | Connects a PC and monitor via a USB cable when this product is used as a touch panel monitor. |
| 10. RS-232C port (for FDX1003T / FDX1203T only)*2 | Connects a PC and monitor via a RS-232C cable when this product is used as a touch panel monitor. |
| 11. Stand | Used to adjust the angle of the monitor screen. |
| 12. Cable holder | Covers the monitor cables. |
| 13. Cable Tie (for FDX1003 / FDX1003T only) | Clinches the cables. |
1 For instructions for use, refer to the User's Manual on the CD-ROM.
2 These ports cannot be used at the same time. When cables are connected to both ports, the USB port is prioritized.
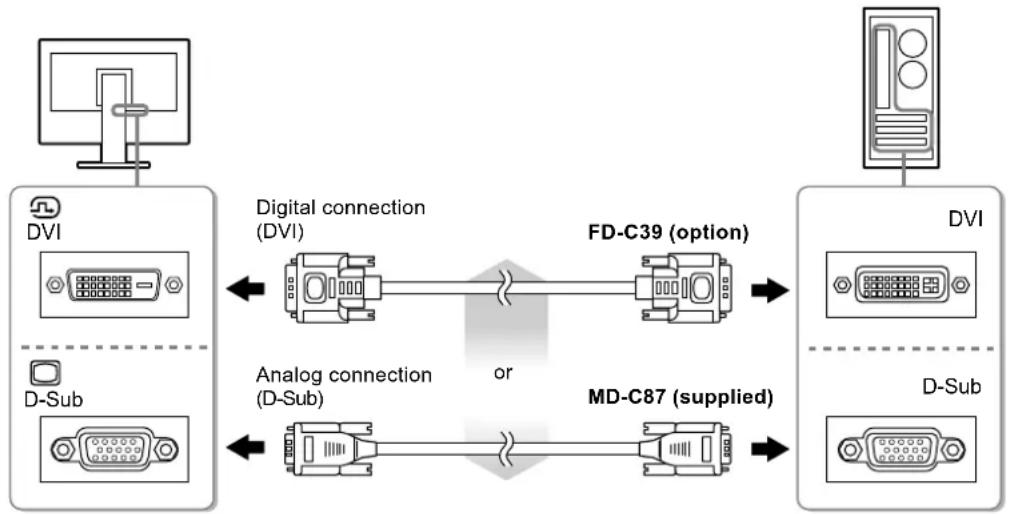
Connecting Cables
Attention
- Check that the monitor and the PC are powered off.
- When replacing the current monitor with this monitor, be sure to change the PC settings for resolution and vertical scan frequency to those that are available for this monitor. Refer to the compatible resolution table before connecting the PC.
Note
- When connecting multiple PCs to the monitor, refer to the User's Manual on the CD-ROM.
1. Connect the signal cables to the input signal connectors and PC.
Check the shape of the connectors, and connect the cables.
After connecting the signal cable, tighten the screws of the connectors to secure the coupling.
2. Connect the power cord to the AC adapter.
3. Connect the AC adapter to the Power jack of the monitor, and after that, connect the power plug to a power outlet.
4. Press to turn on the monitor.
The monitor's power indicator lights up blue.
5. Turn on the PC.
The screen image appears.
If an image does not appear, refer to "No picture" (page 12) for additional advice.
If using the FDX1003T / FDX1203T proceed with installation and calibration of the touch panel driver.
Attention
- For the maximum power saving, it is recommended that the Power button be turned off. Unplugging the power cord completely shuts off power supply to the monitor.
Adjusting the Screen Angle
Hold the left and right edges of the monitor with both hands, and adjust the tilt and swivel of the screen to the optimum position for working.
Attention
- Be sure that the cables are correctly connected.
Attaching the Optional Arm
An optional arm (or an optional stand) can be attached by removing the stand section. Please refer to our web site for the corresponding optional arm (or optional stand). http://www.eizoglobal.com
Attention
- When attaching an arm or stand, follow the instructions of their User's Manual.
-
When using another manufacturer's arm or stand, confirm the following in advance and select one conforming to the VESA standard. Use the screws securing the unit and the stand.
-
Clearance between the screw holes: 100mm× 100mm or 75mm× 75mm (for FDX1203 / FDX1203T only)
- Thickness of plate : 2.6mm
-
Strong enough to support weight of the monitor unit (except the stand) and attachments such as cables.
-
Connect the cables after attaching an arm or stand.
- The monitor and arm or stand are heavy. Dropping them may result in injury or equipment damage.
Periodically check the tightening of screws. - If screws are loose, the monitor may detach and cause injury or equipment damage.
Procedure
- Lay the LCD monitor on a soft cloth spread over on a stable surface with the panel surface facing down.
- Remove the stand.
Prepare a screwdriver. Loosen the screws (four) securing the unit and the stand with the screwdriver.
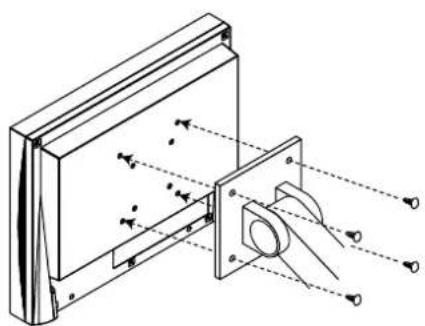
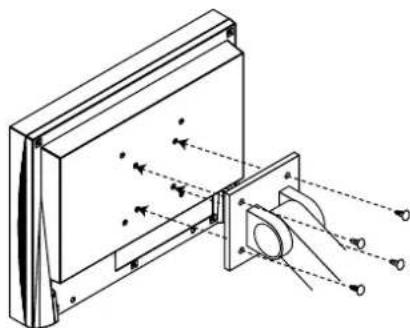
- Attach the arm or stand to the monitor.
Secure the monitor to the arm or stand using the screws specified in the User's Manual of the arm or stand.
-
Clearance between the screw holes when attach an arm or stand: In case of 100mm × 100mm
-
Clearance between the screw holes when attach an arm or stand: In case of 75mm × 75mm (for FDX1203 / FDX1203T only)
Installing the Touch Panel Driver (FDX1003T / FDX1203T)
Attention
- The user account to be used for installing the touch panel driver must have the "Administrators" privilege.
-
When reinstalling the touch panel driver to update the driver, etc., restart the PC after uninstalling the driver and then install it.
-
Uninstall the other touch panel driver, if it is installed.
- Install the touch panel driver according to the instructions included in the CD-ROM.
For how to install the touch panel driver, see the Touch Panel Driver User's Manual (on the CD-ROM).
- Use the USB cable or RS-232C cable to connect the monitor and the PC.
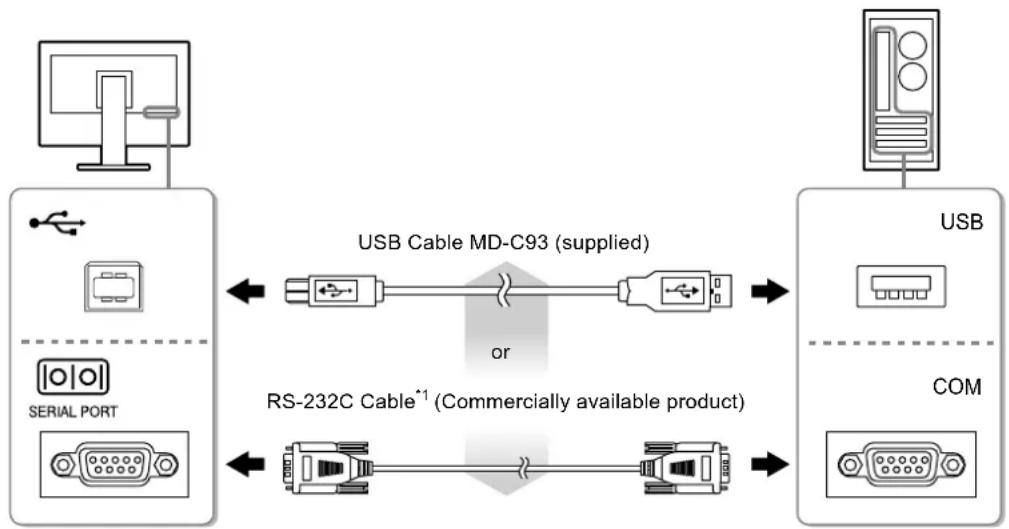
*1 crossover type
- Restart the PC.
Attention
- When using the RS-232C cable with Windows 7 / Windows Vista / Windows XP, set up the device using the following procedure after the restart. For details, refer to the Touch Panel Driver User's Manual (on the CD-ROM).
- Click "Start" - "All Program" - "DMC" - "DMC Touch Panel Configuration" to display "Properties" window.
- Click "Add a serial device", and register a new serial device.
- Click "Device", and specify the COM port number used for the "COM port".
- Click "Apply".
- Click "Close".
Calibrating the Monitor (FDX1003T / FDX1203T)
Calibrate the monitor according to the Touch Panel Driver User's Manual (on the CD-ROM).
Note
- If its installation location has changed, please perform calibration.
Troubleshooting
No picture
If a problem still remains after applying the suggested remedies, contact your local EIZO representative.
| Problem Possible cause and remedy | |
| 1. No picture • Power indicator does not light. | • Check whether the power cord is connected properly. • Press◎. • If the problem persists, turn off the power, and then turn it on again a few minutes later. |
| • Power indicator is lighting blue. | • Increase “Brightness” and / or “Gain” in the Setting menu. |
| • Power indicator is lighting orange. • Switch the input signal with◎ • Move the mouse or press any key on the keyboard. • Check whether the PC is turned on. • Depending on the PC and graphics board, the input signal is not detected and the monitor does not recover from the power saving mode. If the screen is not displayed even after moving the mouse or pressing any key on the keyboard, turn the monitor off and on using its power button. When the screen is displayed, execute the following procedure. The problem may be improved. 1. Press◎ to turn off the monitor. 2. Hold down◎ while pressing◎ turn on the monitor. “x” is displayed on the menu title of “Information” of the Setting menu. 3. Reboot the PC. To return to the previous setting, perform steps 1 to 3 again. | |
| 2. The message below appears. | This message appears when the signal is not input correctly even when the monitor functions properly. |
| • The message shows that the input signal is out of the specified frequency range. Example: DVI Signal Error | • Check whether the PC is configured to meet the resolution and vertical scan frequency requirements of the monitor (see “Compatible Resolutions”). • Reboot the PC. • Select an appropriate setting using the graphics board's utility. Refer to the User's Manual of the graphics board for details. |
Note
- If there is a problem with the image displayed or with the touch panel, refer to the Monitor User's Manual (on the CD-ROM).
Specifications
| FDX1003 FDX1003T | LCD Panel | |
| Type TN | ||
| Backlight LED | ||
| Size 26 cm (10.4 inch) (26.3 cm diagonal) | ||
| Native Resolution 1024 dots × 768 lines | ||
| Display Size (H x V) 210.4 mm × 157.8 mm | ||
| Pixel Pitch 0.2055 mm | ||
| Display Colors 8 bit colors : 16.77 million colors | ||
| Viewing Angles (H / V, typical) | 160° / 130° | |
| Contrast ratio (typical) 700 : 1 | ||
| Response Time (typical) | 16 ms (Black - white - black) | |
| Power | ||
| Input AC adapter (AC) : AC 100 V - 240 V ± 10%, 50 / 60 Hz 0.3 A | ||
| Main unit (DC) : DC 12 V ± 10%, 0.7 A | ||
| Maximum Power AC adapter (AC) : 10.0 W or less | ||
| Consumption Main unit (DC) : 9.0 W or less | ||
| Standby Mode AC adapter (AC) : 1.0 W or less | ||
| Main unit (DC) : 0.5 W or less | ||
| Physical Specifications | ||
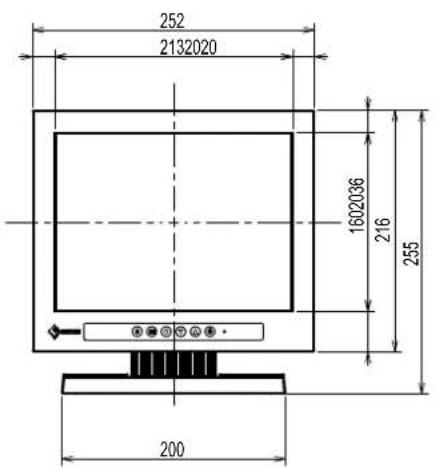
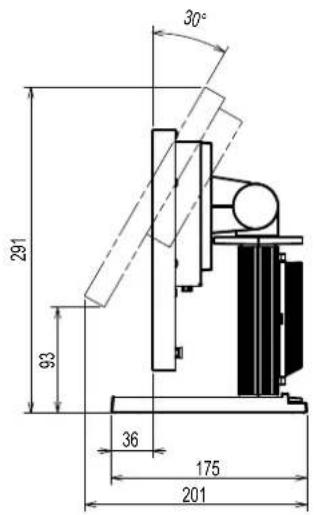
| Dimensions (Width) × (Height) × (Depth) | 252 mm × 291 mm × 201 mm (Tilt: 30°) | |
| 252 mm × 255 mm × 175 mm (Tilt: 0°) | ||
| Dimensions (Without Stand) | 252 mm × 216 mm × 45 mm | |
| (Width) × (Height) × (Depth) | ||
| Net Weight | FDX1003 : Approx. 3.5 kg | |
| FDX1003T : Approx. 3.7 kg | ||
| Net Weight | FDX1003 : Approx. 1.8 kg | |
| (Without Stand) | FDX1003T : Approx. 2.0 kg | |
| Tilt | Up 30°, down 0° | |
| Swivel | Right 35°, left35° | |
| FDX1203 FDX1203T | LCD Panel | |
| Type TN | ||
| Backlight LED | ||
| Size 31 cm (12.1 inch) (30.7 cm diagonal) | ||
| Native Resolution 1024 dots × 768 lines | ||
| Display Size (H x V) 245.7 mm × 184.3 mm | ||
| Pixel Pitch 0.240 mm | ||
| Display Colors 8 bit colors : 16.77 million colors | ||
| Viewing Angles (H / V, typical) | 160° / 140° | |
| Contrast ratio (typical) 60:0 : 1 | ||
| Response Time (typical) | 25ms (Black - white - black) | |
| Power | ||
| Input AC adapter (AC) : AC 100 V - 240 V ± 10%, 50 / 60 Hz 0.4 A Main unit (DC) : DC 12 V ± 10%, 1.2 A | ||
| Maximum Power Consumption | AC adapter (AC) : 16.0 W or less Main unit (DC) : 15.0 W or less | |
| Standby Mode | AC adapter (AC) : 1.0 W or less Main unit (DC) : 0.5 W or less | |
| Physical Specifications | ||
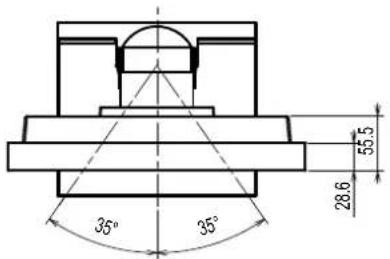
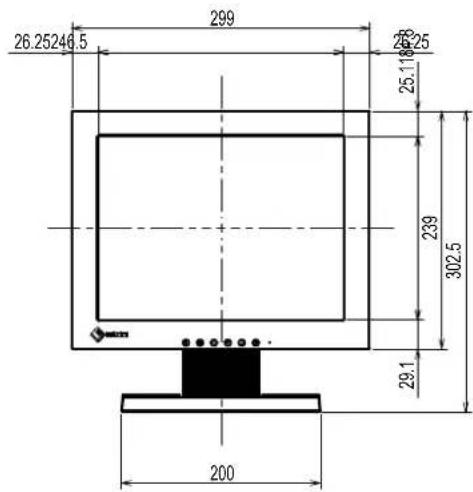
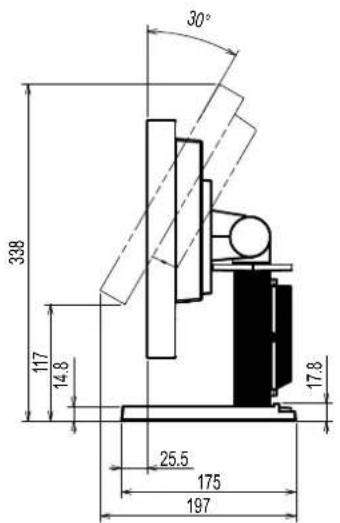
| Dimensions (Width) × (Height) × (Depth) | 299 mm × 338 mm × 197 mm (Tilt: 30°) 299 mm × 302.5 mm × 175 mm (Tilt: 0°) | |
| Dimensions (Without Stand) (Width) × (Height) × (Depth) | 299 mm × 239 mm × 55.5 mm | |
| Net Weight | FDX1203 : Approx. 3.7 kg FDX1203T : Approx. 3.9 kg | |
| Net Weight (Without Stand) | FDX1203 : Approx. 2.0 kg FDX1203T : Approx. 2.2 kg | |
| Tilt | Up 30°, down 0° | |
| Swivel | 35°Right, 35°Left | |
| FDX1003T FDX1203T | Touch Panel | |
| Method | Analog resistive technology | |
| Communication method | USB, RS-232C (* Cannot be used at the same time.) | |
| Surface treatment | Anti-reflection | |
| Surface hardness 2H | ||
| OS | Microsoft Windows 10 (32 bit / 64 bit) Microsoft Windows 8.1 (32 bit / 64 bit) Microsoft Windows 7 Service Pack 1 (32 bit / 64 bit) Microsoft Windows Vista Service Pack 2 (32 bit) Microsoft Windows XP Service Pack 3 (32 bit) (Not compatible with Mac OS) | |
| FDX1003 FDX1203 FDX1003T FDX1203T | Video Signals | |
| Input Terminals DVI-D connector × 1, D-Sub mini 15-pin × 1 | ||
| Digital Scanning Frequency (H / V) | 31 kHz - 49 kHz / 59 Hz - 61 Hz (720 × 400 : 69 Hz - 71 Hz) | |
| Analog scan frequency Frequency (H / V) | 24 kHz - 61 kHz / 55 Hz - 76 Hz | |
| Dot Clock Digital 65 MHz | Analog 80 MHz | |
| Synchronous signal Separate, TTL, positive / negative | ||
| Communication | ||
| Input Terminals RS-232C : D-Sub 9-pin (male) | ||
| USB | ||
| Port Upstream port × 1 | ||
| Standard USB Specification on Rev.2.0 | ||
| Operating Environmental Requirements | ||
| Temperature AC adapter (AC) : 0 °C to 40 °C (32 °F to 104 °F) Main unit (DC) : 0 °C to 50 °C (32 °F to 122 °F) | ||
| Humidity | 20 % to 90 % R.H.(no condensation) | |
| Air pressure | AC adapter (AC) : 540 hPa to 1060 hPa Main unit (DC) : 540 hPa to 1060 hPa | |
| Transportation / Storage Environmental Requirements | ||
| Temperature -20 °C to 60 °C (-4 °F to 140 °F) | ||
| Humidity | 10 % to 90 % R.H (no condensation) | |
| Air pressure | 200 hPa to 1060 hPa | |
- Main default settings
| Color Mode | User1 |
| Smoothing | 3 |
| Power Save | On |
| Eco Timer | Off |
| Language | English |
| Touch Panel | Auto |
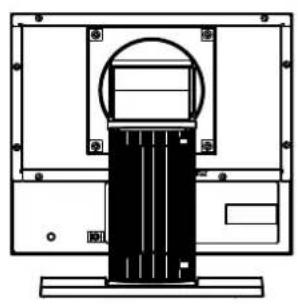
Outside Dimensions
FDX1003/FDX1003T
Unit: mm

FDX1203 / FDX1203T
Unit: mm
DuraVision® FDX1003/FDX1203
LCD-Farbmonitor
DuraVision FDAx1003T/FDX1203T
| For U.S.A., Canada, etc. (rated 100-120 Vac) Only |
| FCC Declaration of Conformity |
| We, the Responsible Party EIZO Inc. |
| 5710 Warland Drive, Cypress, CA 90630 |
| Phone: (562) 431-5011 |
| declare that the product Trade name: EIZO |
| Model: DuraVision FXD1003/FDX1003T/FDX1203/FDX1203T |
| is in conformity with Part 15 of the FCC Rules. Operation of this product is subject to the following two conditions: (1) this device may not cause harmful interference, and (2) this device must accept any interference received, including interference that may cause undesired operation. |
| This equipment has been tested and found to comply with the limits for a Class B digital device, pursuant to Part 15 of the FCC Rules. These limits are designed to provide reasonable protection against harmful interference in a residential installation. This equipment generates, uses, and can radiate radio frequency energy and, if not installed and used in accordance with the instructions, may cause harmful interference to radio communications. However, there is no guarantee that interference will not occur in a particular installation. If this equipment does cause harmful interference to radio or television reception, which can be determined by turning the equipment off and on, the user is encouraged to try to correct the interference by one or more of the following measures. |
| * Reorient or relocate the receiving antenna. |
| * Increase the separation between the equipment and receiver. |
| * Connect the equipment into an outlet on a circuit different from that to which the receiver is connected. |
| * Consult the dealer or an experienced radio/TV technician for help. |
| Changes or modifi cations not expressly approved by the party responsible for compliance could void the user's authority to operate the equipment. |
| Note |
| Use the attached specifi ed cable below or EIZO signal cable with this monitor so as to keep interference within the limits of a Class B digital device. |
| - Shielded Signal Cable (enclosed) |
| Canadian Notice |
| This Class B digital apparatus complies with Canadian ICES-003. |
| Cet appeareil numérique de le classe B est conforme à la norme NMB-003 du Canada. |
关于电子信息产品污染控制标识

(For Japanese Market Only.)
This warranty is valid only in Japan.
Copyright © 2014-2016 EIZO Corporation All rights reserved.
EIZO Europe GmbH
Helmut-Grashoff-Strasse 18, 41179 Monchengladbach, Germany
Phone: +49 2161 8210210 Fax: +49 2161 8210150