
sWalk Fold - Treadmills Sportstech - Free user manual and instructions
Find the device manual for free sWalk Fold Sportstech in PDF.
| Product type | Folding treadmill |
| Brand | Sportstech |
| Model | sWalk Fold |
| Dimensions (open) | 125 × 53 × 12.5 cm |
| Net weight | 23.8 kg |
| Max user weight | 120 kg |
| Speed | 1 – 6 km/h |
| Power supply | 220–240 V AC, 50–60 Hz |
| Power consumption | 735 W (max) |
| Current (fuse) | 3.5 A |
| Connectivity | Bluetooth 4.2, Sportstech LIVE app |
| Training programs | 4 presets (P01–P04) |
| Display | Time, distance, speed, calories/heart rate |
| LED lights | Yes (on/off) |
| Remote control | Yes (CR2032 battery included) |
| Lubrication | Every 50 hours of use (after the first 25) |
| Belt adjustment | Tension and centering via Allen screws |
| Storage | Foldable, transport wheels |
| Replacement parts | Exploded view and list available online |
| Warranty | See declaration of conformity at the end of the manual |
Frequently Asked Questions - sWalk Fold Sportstech
User questions about sWalk Fold Sportstech
0 question about this device. Answer the ones you know or ask your own.
Ask a new question about this device
Download the instructions for your Treadmills in PDF format for free! Find your manual sWalk Fold - Sportstech and take your electronic device back in hand. On this page are published all the documents necessary for the use of your device. sWalk Fold by Sportstech.
USER MANUAL sWalk Fold Sportstech
Risk of injuries from moving belt!
- Keep children and animals away from the treadmill.
- Do not move fingers, feet or other limbs
or objects under the moving belt.
Always wear suitable footwear for training.
Make sure the belt is always properly
tensed and centered. - Reduce speed to full stop before descending.
Risk of electrical shock!
- Do not open the motor cover.
- Use the device only on a properly grounded socket.

Quetschgefahr!
Caution! Risk of crushing!
AWARNUNG!
We are pleased you chose a device from the SPORTSTECH product range. SPORTSTECH sports equipment offers you high quality and new technology.
In order to fully use the potential of your device and be able to enjoy it for many years, please read this manual carefully before starting up and beginning of training, and use the device according to the instructions. The operational safety and function of the device can only be guaranteed if the safety instructions in this user manual are observed.
We shall not assume any liability for damages resulting from improper use or incorrect operation.

WARNING! Danger from improper use!
- Make sure that ALL persons using the device have read and understood this user manual. Keep this manual in a safe place close to the device.
- Adhere to ALL Safety Advices in this manual.
- NEVER overexert yourself or others when using the device.
Table of contents
Scope of delivery 18
Technical data. 18
Exploded drawing/spare parts list. 18
Conformity 18
1. Important Safety Notes 19
2. Setting up, Storing 21
3. Control 22
4. Training 24
5. Troubleshooting 26
6. Cleaning and maintenance 26
7.Disposal 27
EU Declaration of Conformity 65
Scope of delivery
1 Motor-driven treadmill with variable speed
2 Remote control 3 Power cable
4 Pads for storing 5 Operating manual
6 Duo-tool (Hex and cross-head wrench) for pads and for tensioning
Technical data
| Product dimensions (LxWxH) when set up 125 × 53 × 12.5 cm cm | |
| Net weight of the device 23,8 kg | |
| Maximum permitted user weight 120 kg | |
| Minimum/Maximum speed 1 km/h / 6 km/h | |
| Mains voltage and frequency for power connection | 220..240 V AC; 50..60 Hz |
| Electrical power consumption | 735 W |
| Current (fuse) | 3.5 A |
| Radio protocol for pulse signal transmission | Bluetooth |
| Connection with smart devices | Bluetooth 4.2 |
| Maximum radiated transmitting power | 0 dBm |
Exploded drawing/spare parts list

- With the drawing and list, identify the required spare part and note the number.
- Contact our customer service and give the number of the spare part. You find the contact details on the back of the manual or on our website.
- Clarify all further steps with our staff.
Under the following link you will find the exploded view and the spare parts list: https://sportstech.link/swalk_fold_spareparts
Conformity
You find the declaration of conformity on the second-last page of this manual.
1. Important Safety Notes

WARNING! Danger from improper use!
- Read all instructions and safety notes before using the device. Follow them carefully.
- Danger of health damage or even death due to improper or excessive training!
The device is not suitable for medical purposes and high accuracy applications. - Also apply common sense to prevent risks.

PERSONAL REQUIREMENTS
GENERAL PHYSICAL CONDITIONS
WARNING! Danger of health damage or even death due to improper or excessive training! Using the device is strenuous for the circulation and the musculoskeletal system.
- The intensity of use (speed) may never exceed the current fitness of the user.
- Always pay attention to physical signals. The pulse measurement may be inaccurate.
- Stop the training immediately in case of discomfort, weakness, body aches, chest pain, nausea, shortness of breath or similar.
- If necessary, seek medical advice before training; especially if you are older, have medical problems or have little experience with physical training.
- People with limited abilities may only use the device with a suitable supervisor and at low speed.
Weight and age requirements
- Only adult persons are allowed to use the device.
- The maximum permissible user weight is 120 kg .
- Children under 14 years of age may never use the device or perform any cleaning or maintenance tasks on the device.

GENERAL CONDITIONS OF USE
- Do not use the device commercially, but only for home use. Do not use the device for therapeutic purposes.
- Children and animals must be kept at a safe distance of at least 3m (10 ft) from the device. The moving running belt is particularly dangerous.

UNPACKING AND SETTING-UP
DANGER! Risk of suffocation! Keep plastic bags and the like away from children and pets.
- Keep the packaging material during the return period to facilitate a possible return of the goods. Dispos of the packaging material later in accordance with local regulations (e.g. recycling).
- Only set up the device on a firm, level surface in dry indoor areas. Protect sensitive surfaces with a heat-resistant mat: The engine compartment can get hot.
- Set up the device with sufficient clearance in all directions; in particular, maintain a clearance of at least 2m (6.6 ft) behind the device (see section "Setting up the device").
- Ensure that all ventilation openings of the engine compartment are free and clean. If there is a carpet under the device, it may not touch the underside of the device.

-
Perform visual inspection before each use; especially check and correct the following:
-
Is the device standing safely and stable?
-
Is the running belt sufficiently lubricated, aligned centrally and sufficiently tensioned?
- Are all connections tight? (screws, nuts, etc.)
- Is the cable intact?
-
Is the area around the device free from accident hazards such as sharp-edged objects?
-
In the event of any defect in the device or the cable, do not use the device, but secure it against any use and arrange for repair.
- Only use the device with correct electrical values and original cables with protective earthing. Do not use a distribution socket. Protect cables from heat and mechanical damage.
- Only use the device with non-slip sports shoes. Never use heels or spikes. Do not use it barefoot or on socks.
- If using shoelaces, ensure that they are tied short and tight.
- Do not use the device with loose clothing, long shoelaces or towels that could get caught.
- Do not use the device with jewellery or loose objects.
- Do not use the device under the influence of alcohol, medication or drugs.

DURING USE
- The device may only be used by one person at a time.
-
Entering and starting the device:
-
Only enter the device when the running belt is at a standstill.
-
Start the device at the lowest speed.
-
When using the device:
-
Increase speed only when the user is walking or running safely. Change speed only slowly.
-
Never overexert yourself.
- Only walk or run forwards; never sideways or backwards.
-
Do not stop walking or running while the belt is still moving.
-
Stopping and leaving the device:
-
For stopping, slowly reduce speed to a standstill (Speed +/- buttons).
-
Only leave the device when the running belt is at standstill. Step off the device to the side.
-
Do not eat or drink on the device.
- Keep liquids and dirt away from the device.
- Do not use sprays on or near the device

IMMEDIATELY AFTER USE
- Turn off the switch next to the cable socket. Carefully disconnect the power cable from the device.
- Perform a visual inspection again: Is the device clean and intact?

CLEANING, MAINTENANCE, ADJUSTING, STORING
- Perform maintenance tasks and adjustments regularly, but only according to the instructions.
- Never switch on the device in storage position.
- Store the device and power cord out of the reach of children and animals.
- Store the device in a dry, clean place protected from frost, heat and sunlight.

SAFETY STICKERS
The safety stickers must be at the positions shown in the following figure.
- Make sure they are always intact and fully readable.
2. Setting up, Storing
2.1 SETTING-UP
Find a location for the device that meets the following requirements:
Dry interior
Device does not cover any ventilation openings.
- Heat-resistant robust base; use floor protection mat if necessary
- Clearance of at least 2m (6.6 ft) behind the device.
- Clearance of at least 1m (3.3 ft) on both sides of the device.
- Clearance of at least 30~cm (1.0 ft) in front of the device.
2.2 TOOL KIT
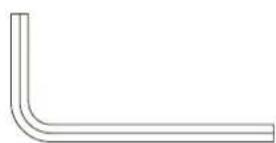
Remote Control x1 Allen Key x1
2.3 OPERATION
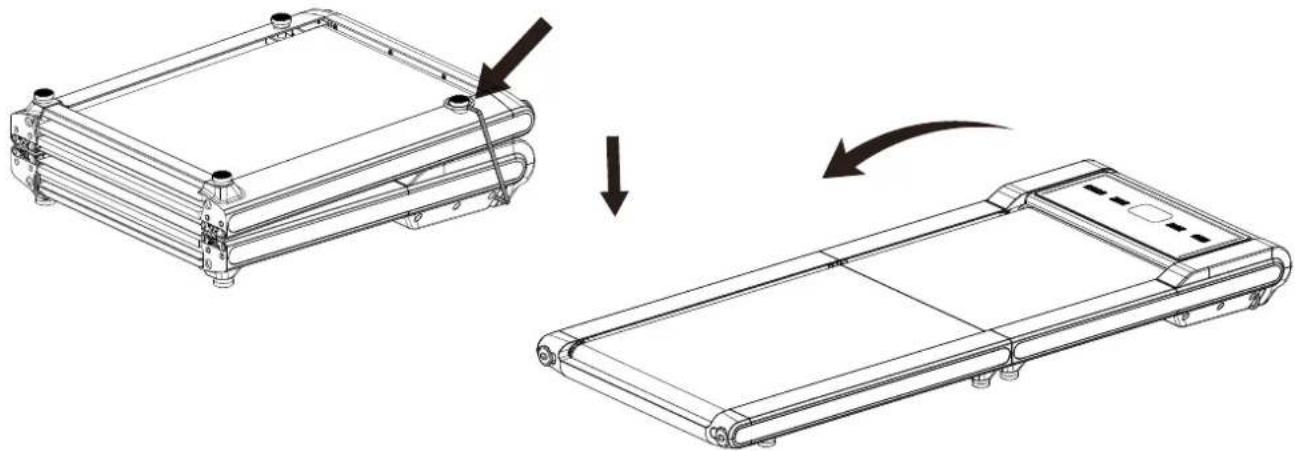
- Carefully remove the treadmill from the carton and place it on a level, flat surface. Since the treadmill is heavy, assistance from a second person is recommended.
- Loosen the rope buckle on the foot pad, then unfold the treadmill.
Risk of injuries from moving belt!
- Keep children and animals away from the treadmill.
- Do not move fingers, feet or other limbs
or objects under the moving belt.
Always wear suitable footwear for training.
Make sure the belt is always properly
tensed and centered. - Reduce speed to full stop before descending.
Risk of electrical shock!
- Do not open the motor cover.
- Use the device only on a properly grounded socket.

AWARNUNG!
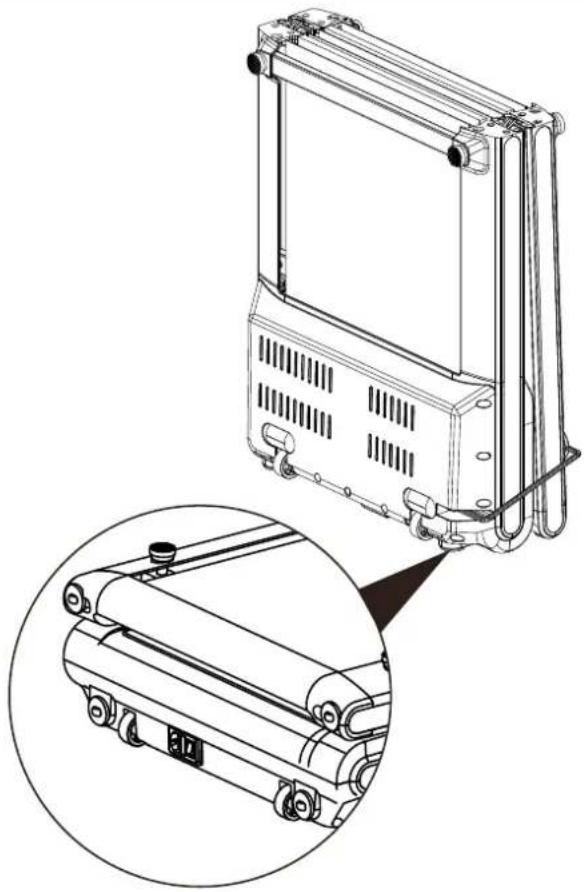
- The unit can be carefully straight onto its Transport Wheels for easy moving and storage.
- Fold the treadmill and buckle the rope back, stand it up to move freely on the Transport Wheels.

CAUTION: Do not attempt to move the treadmill unless the rope buckled.
3. Control
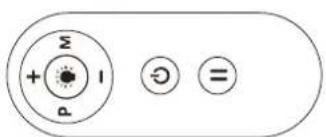
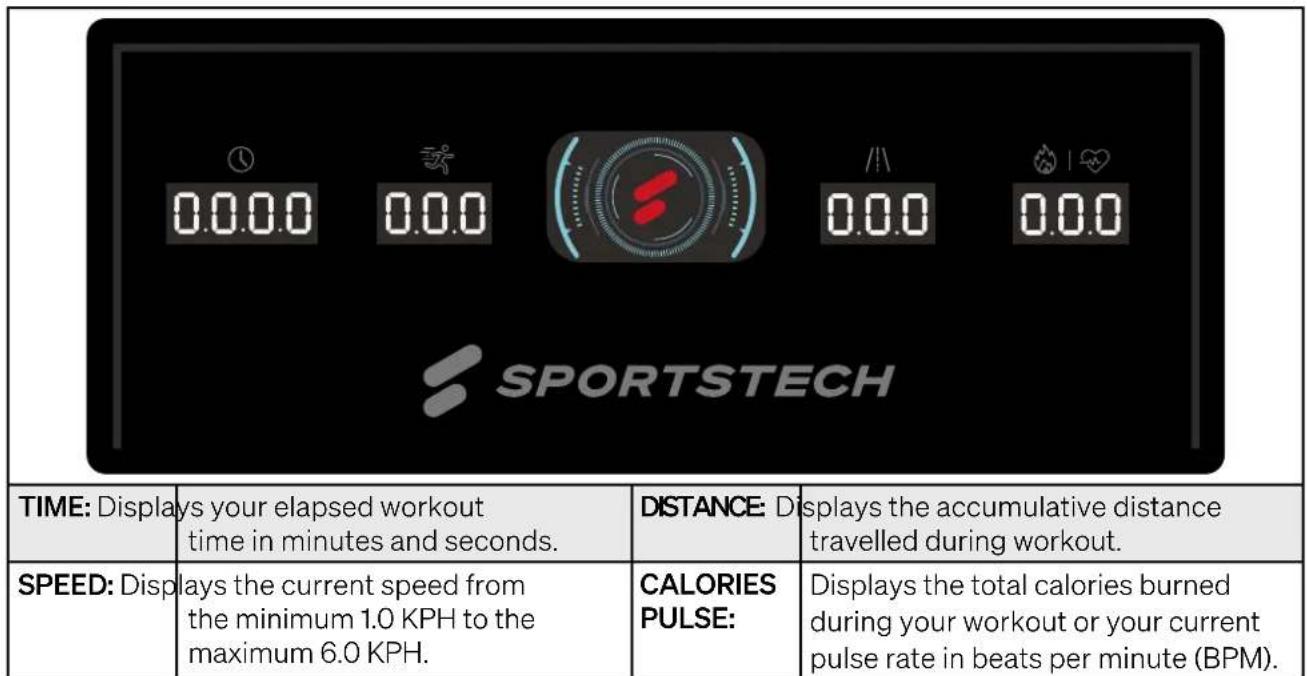
3.1 DISPLAY FUNCTIONS
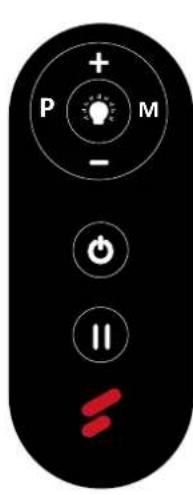
Press the button to start/stop training on different training mode immediately.
Press the button to select the pre-set training program (P01-P04) mode before training.
Press the MODE button to switch your Speed, Time, Distance and Calorie count.
Press the PAUSE button to resume/end your workout. In the running mode, press the Pause key to enter the pause mode. The current parameters remain unchanged and the speed flashes.
To control the ON/OFF of the LED lights.
+ Increase speed.
Decrease speed.
3.3 SPORTSTECH LIVE APP
The Sportstech LIVE App offers you, among other things:
- Individual workouts with professional trainers
- Landscape and outdoor videos
Determining training priorities - Training data in real time
- Training history and metrics

- Compete with others in Competition Mode - collect trophies in Ranking
- Equipment-independent workouts e.g. for yoga
Delicious and varied cooking recipes ...and much more!
Information here: https://sportstech.link/app-download

4. Training
4.1 STRETCHING FOR WARMING UP AND COOLING DOWN
- To begin your training session, do some stretching. Never overstretch your muscles.
- We recommend to perform each of the following exercises 10 times and to repeat the complete cycle up to five times. Then make your training according to your personal fitness level.
- After training, also do stretching exercises to properly cool down.
1

HEAD ROLL
Rotate your head to the right for one count, feeling the stretch up the left side of your neck, then rotate your head back for one count, stretching your chin to the ceiling and letting your mouth open. Rotate your head to the left for one count, then drop your head to your chest for one count.
2

SHOULDER LIFTS
Lift your right shoulder toward your ear for one count. Then lift your left shoulder up for one count as you lower your right shoulder.
3
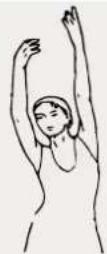
SIDE STRETCHES
Open your arms to the side and lift them until they are over your head. Reach your right arm as far toward the ceiling as you can for one count. Repeat this action with your left arm.
4
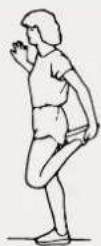
QUADRICEPS STRETCH
With one hand against a wall for balance, reach behind you and pull your right foot up. Bring your heel as close to your buttocks as possible. Hold for 15 counts and repeat with left foot.
5
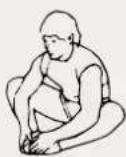
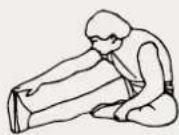
INNER THIGH STRETCH
Sit with the soles of your feet together and your knees pointing outward. Pull your feet as close to your groin as possible. Gently push your knees toward the floor. Hold for 15 counts.
6
INNER THIGH STRETCH
Sit with the soles of your feet together and your knees pointing outward. Pull your feet as close to your groin as possible. Gently push your knees toward the floor. Hold for 15 counts.
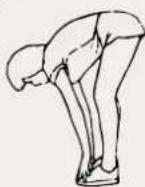
7
HAMSTRING STRETCHES
Extend your right leg. Rest the sole of your left foot against your right inner thigh. Stretch toward your toe as far as possible. Hold for 15 counts. Relax and then repeat with left leg.
8
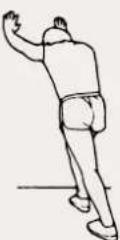
CALF / ACHILLES STRETCH
Lean against a wall with your left leg in front of the right and your arms forward. Keep your right leg straight and the left foot on the floor; then bend the left leg and lean forward by moving your hips toward the wall. Hold, then repeat on the other side for 15 counts.
4.2 FREE TRAINING
- When you are ready, press the Start button on the remote control. The treadmill starts moving.
- Set your feet on the treadmill in quick succession and start walking.
- If desired, change the speed and/or incline of the treadmill with the corresponding buttons on the control panel. Never overexert yourself!
- If you want to stop the training, press the 'Stop' button on the remote control.
- If a target value is set, the computer stops automatically when it is reached.
4.3 TRAINING IN PROGRAM MODE (PO1-PO4)
The computer offers 4 programs (P01-P04). The speed progress in each program is shown below.
- Press the button on the remote control until the number of the desired program is shown.
- Press the START/STOP button on the remote control to begin the training.
- If desired, adapt the speed with the + / - buttons on the remote control.
- If desired, interrupt the training with the START/STOP button on the remote control.
| MINUTE | 1 | 2 | 3 | 4 | 5 | 6 | 7 | 8 | 9 | 10 | 11 | 12 | 13 | 14 | 15 | 16 | 17 | 18 | 19 | 20 | ||
| PROGRAM | P01(km/h) | 2 | 2 | 2 | 2 | 2,5 | 2,5 | 2,5 | 2,5 | 2 | 2 | 2 | 2 | 2,5 | 2,5 | 2,5 | 2,5 | 2 | 2 | 2 | 2 | |
| P02(km/h) | 2 | 2 | 2 | 2 | 2,5 | 2,5 | 2,5 | 2,5 | 3 | 3 | 3 | 3 | 3 | 2,5 | 2,5 | 2,5 | 2,5 | 2 | 2 | 2 | 2 | |
| P03(km/h) | 2,5 | 2,5 | 2,5 | 2,5 | 3 | 3 | 3 | 3 | 3 | 3 | 3 | 3 | 3 | 2,5 | 2,5 | 2,5 | 2,5 | 2 | 2 | 2 | 2 | |
| P04(km/h) | 3.3 | 3.4 | 4.4 | 5.5 | 6.6 | 5.5 | 4.4 | 4.4 | 3.3 | 3 | ||||||||||||
5. Troubleshooting
5.1 TROUBLESHOOTING GUIDE
| Problem Possible reason Possible solution | ||
| No working | Treadmill not plugged in. Plug the power cord into a wall outlet. | |
| Power cord damaged | Wait 5 minutes and then try to restart the treadmill. | |
| Running belt slips | Running belt not tightened enough | Tension the running belt |
| Remote control does not work | Incorrect use of default | Replace new battery cells. Replace new remote control |
| Battery power shortage | ||
| Remote control maulfunction | ||
Friction noise Walking belt off center Adjust walking belt tension with the tool.
In all cases of doubt, contact our customer service. You find the contact details on the last page.
6. Cleaning and maintenance
6.1 CLEANING
After each use, wipe sweat from the device with a slightly wetted cloth.
- Never allow moisture or humidity to reach the computer or other electrical or electronic components.
- Do not use abrasives or solvents.
6.2 MAINTENANCE
- Before and after each training session, check that the device is in perfect condition. Also check that all fastening parts and protective covers are in place and intact. Tighten bolts and nuts if necessary.
6.3 LUBRICATING
Lubricating under the running belt will ensure superior performance and extend its life expectancy. After the first 25 hours of use (or 2-3 months) apply some lubricant, and repeat for every following 50 hours of use (or 5-8 months).
6.3.1 How to check running belt for proper lubrication
- Lift one side of the running belt and feel the top surface of the running deck.
- If the surface is slick to the touch, then no further lubrication is required.
- If the surface is dry to the touch, apply some lubricant.
Run on the treadmill at a slow speed for 3 to 5 minutes to evenly distribute lubricant.
NOTE: DO NOT over lubricate running deck. Any excess lubricant that comes out should be wiped off.


Lubricant
6.4 ADJUSTING THE RUNNING BELT
The running belt is tensioned at the factory. However, due to stretching, it may be necessary to re-tension and readjust the running belt after some time. This is done via screws in the end caps of the running belt
frame, which can be turned with the Allen key supplied.
6.4.1 Checking the tension of the running belt
If the running belt slips when stepping on, when changing speed or already when switching on, it is probably too weakly tensioned. However, the running belt may neither be too tight, as this increases the wear of the ball bearings, among other things.
- Ensure that no children or animals approach the treadmill.
- Switch on the device and run the belt at 4 to 6km / h and observe the run.
6.4.2 Uniform retightening of the running belt
- Turn the screws alternately on both sides evenly and carefully about a quarter turn clockwise to increase the tension. Do not stretch too much.
- Check that the running belt is centred and adequately tensioned.
6.4.3 Relaxing the running belt
In rare cases, the running belt may be too tight. Then:
- Carefully turn the screw(s) about a quarter turn anticlockwise to reduce the tension.
- Check that the running belt is centred and adequately tensioned.
6.4.4 Adjusting the running belt centrally
- If the belt does not run centrally, the tension must be increased on the side to which it is drifting. (drifting to the right => tighten slightly on the right or relax slightly on the left; drifting to the left => tighten slightly on the left or relax slightly on the right)
- Retighten by a maximum of a quarter turn, then check the central running again.

7. Disposal
7.1 INFORMATION ABOUT INCLUDED BATTERIES
Dear customers,
As an end user, you are legally obligated to dispose of electrical appliances and batteries separately from household waste. We aim to make this as easy as possible for you. Please refer to the instructions on this page for more information.
Information according to 4 Paragraph 4 Electrical and Electronic Equipment Act
| Battery type: CR2032 | |
| Chemical system: Li Mn Lithium Manganese Dioxide | |
| Battery manufacturer: Yiwu Huadao Battery Factory |
Information on the safe removal of batteries or accumulators
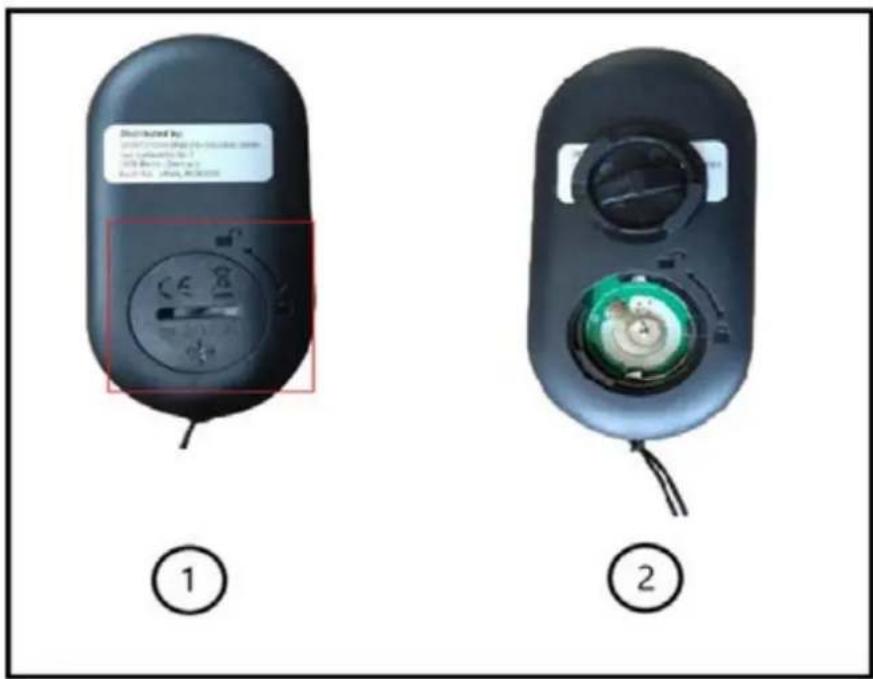
- Open the battery cover at the back of the device. To do this, for example, turn the battery cover a bit to the left using a coin.
- Remove the battery from the device.
- Battery/accumulator and, if necessary, the device can now be disposed of separately at the respective suitable official collection point. Please also observe the locally applicable regulations.
7.2 DEAR CUSTOMERS
As an end user, you are legally obliged to collect waste electrical and electronic equipment and batteries as well as accumulators separately from municipal waste. We want to make this as easy as possible for you. Please note the information on this page and on the back.

Notes on EU directive 2012/19/EU - in Germany implemented in ElektroG (Law about electric and electronic devices); elsewhere implementation may differ)
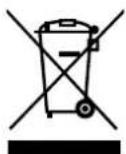
We advise owners of electric and electronic equipment that waste electrical and electronic equipment must be collected separately from municipal waste in accordance with the applicable legal regulations. The symbol of a crossed-out garbage can, which is shown on waste electrical and electronic equipment, also indicates the obligation to collect this waste separately.

Notes on disposal and symbols for an electrical appliance based on EU Directive 2006/66/EU (in Germany in accordance with the Battery Act (BattG); elsewhere, implementation may differ)
Old batteries and accumulators must not be disposed of with household waste. As an end user, you are legally obliged to return used batteries. The symbol with the crossed-out garbage can means that you are not allowed to dispose of old batteries in the household waste.
Use the official collection points for this, such as the collection points of public waste disposal carriers. You can also return used batteries to retail outlets, provided they sell batteries. If the symbol Cd, Hg, or Pb is displayed under the symbol of the crossed-out garbage can, this is an indication that the battery contains either cadmium, mercury or lead. These are toxic heavy metals that not only pose significant risks to the environment but also to human health.
Recycling loop

Packaging material can be conveyed back to the raw material cycle. Dispos of packaging material in accordance with legal provisions. Information can be retrieved from the return or collections systems of your community.
Manual de Usuario
Querido cliente,
Risk of injuries from moving belt!
-
Keep children and animals away from the treadmill.
-
Do not move fingers, feet or other limbs
or objects under the moving belt.
Always wear suitable footwear for training.
Make sure the belt is always properly
tensed and centered.
- Reduce speed to full stop before descending.
Risk of electrical shock!
-
Do not open the motor cover.
-
Use the device only on a properly grounded socket.

WARNING!
Risk of injuries from moving belt!
- Keep children and animals away from the treadmill.
- Do not move fingers, feet or other limbs or objects under the moving belt.
Always wear suitable footwear for training. - Make sure the belt is always properly tensed and centered.
- Reduce speed to full stop before descending
Risk of electrical shock!
- Do not open the motor cover.
- Use the device only on a properly grounded socket.

WARNING!
In all cases of doubt, contact our customer service. You find the contact details on the last page.
https://sportstech.link/swalk_fold_spareparts
Conformità
Risk of injuries from moving belt!
- Keep children and animals away from the treadmill.
- Do not move fingers, feet or other limbs
or objects under the moving belt
Always wear suitable footwear for training.
Make sure the belt is always properly
tensed and centered. - Reduce speed to full stop before descending.
Risk of electrical shock!
- Do not open the motor cover.
- Use the device only on a properly grounded socket.

WARNING!
STRETCHING DEI QUADRICIPITI
STRETCHING INTERNO COSCIA
STRETCHING DEI TENDINI
EU Declaration of Conformity /
This declaration applies only to the product referred to below in the condition in which it was placed on the market; parts subsequently fitted and/or interventions by the end user are not taken into account.
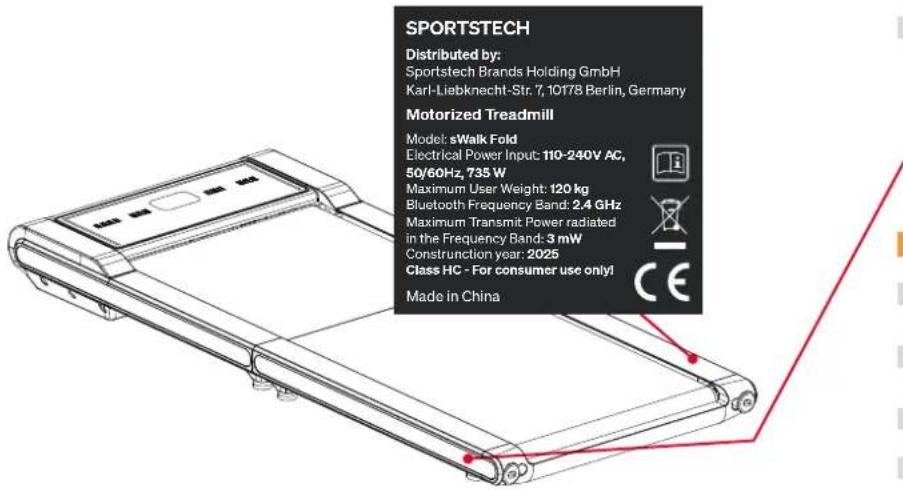
10178 Berlin, Germany

www.sportstech.de

SERVICE:

03088626446

service@sportstech.care

www.sportstech.care

- AWARNUNG!
- WARNING! Danger from improper use!
- Table of contents
- Scope of delivery
- Technical data
- Exploded drawing/spare parts list
- Conformity
- Important Safety Notes
- PERSONAL REQUIREMENTS
- GENERAL PHYSICAL CONDITIONS
- Weight and age requirements
- GENERAL CONDITIONS OF USE
- UNPACKING AND SETTING-UP
- DURING USE
- IMMEDIATELY AFTER USE
- CLEANING, MAINTENANCE, ADJUSTING, STORING
- SAFETY STICKERS
- Setting up, Storing
- SETTING-UP
- TOOL KIT
- OPERATION
- Risk of injuries from moving belt!
- Risk of electrical shock!
- Control
- DISPLAY FUNCTIONS
- SPORTSTECH LIVE APP
- The Sportstech LIVE App offers you, among other things:
- Training
- STRETCHING FOR WARMING UP AND COOLING DOWN
- HEAD ROLL
- SHOULDER LIFTS
- SIDE STRETCHES
- QUADRICEPS STRETCH
- INNER THIGH STRETCH
- HAMSTRING STRETCHES
- CALF / ACHILLES STRETCH
- FREE TRAINING
- TRAINING IN PROGRAM MODE (PO1-PO4)
- Troubleshooting
- TROUBLESHOOTING GUIDE
- Cleaning and maintenance
- CLEANING
- MAINTENANCE
- LUBRICATING
- How to check running belt for proper lubrication
- ADJUSTING THE RUNNING BELT
- Checking the tension of the running belt
- Uniform retightening of the running belt
- Relaxing the running belt
- Adjusting the running belt centrally
- Disposal
- INFORMATION ABOUT INCLUDED BATTERIES
- Dear customers,
- Information on the safe removal of batteries or accumulators
- DEAR CUSTOMERS
- Recycling loop
- Manual de Usuario
- Querido cliente,
- WARNING!
- Conformità
- STRETCHING DEI QUADRICIPITI
- STRETCHING INTERNO COSCIA
- STRETCHING DEI TENDINI
- EU Declaration of Conformity /
Brand : Sportstech
Model : sWalk Fold
Category : Treadmills