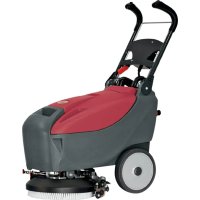
E14 - Floor cleaner Minuteman - Free user manual and instructions
Find the device manual for free E14 Minuteman in PDF.


User questions about E14 Minuteman
0 question about this device. Answer the ones you know or ask your own.
Ask a new question about this device
Download the instructions for your Floor cleaner in PDF format for free! Find your manual E14 - Minuteman and take your electronic device back in hand. On this page are published all the documents necessary for the use of your device. E14 by Minuteman.
USER MANUAL E14 Minuteman
| Manufacturer | MINUTEMAN INTERNATIONAL INC. |
| Machine Type | SCRUBBER DRYER MACHINE |
| Model | E14B – E14220 – E14115 |
| Serial Number | YY WW 0000 |
| Gross Weight / Net Weight | Battery version 75,5 kg - 166 lb (including battery) / 49 kg - 108 lbCable version 49 kg - 108 lb / 40 kg - 88 lb |
| Tension | 12 V DC (B)220 V DC (E)115 V DC (E) |
| Maximum Power | 490 W (B)500 W (E) |
| Maximum Gradient of Operation | 2 % |
| Gradient of Protection | IP 22 (B)IP 23 (E) |
The descriptions contained in this publication are not binding. Minuteman International Inc. therefore, reserves the right to apply changes at any time to bodies, details, supply of accessories, which may be considered convenient for improvement or for any manufacturing or commercial aspect.
Partial reproduction of text and drawings in this catalog is prohibited under the law.
Minuteman International Inc. reserves the right to make technical changes and/or equipment.
The images are intended for reference only and not binding in terms of design and features.
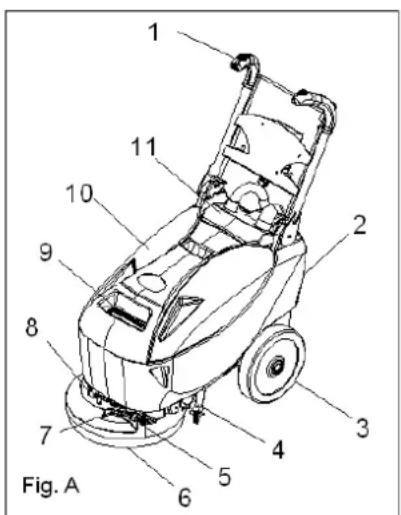
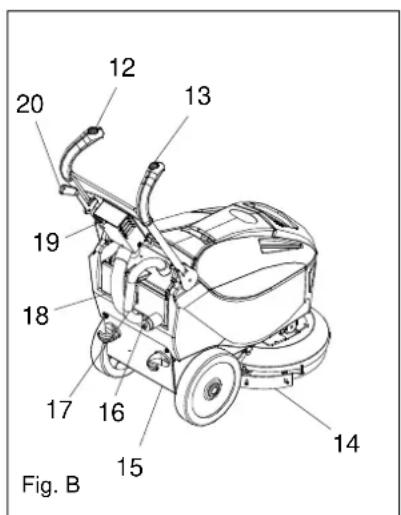
MACCHINE COMPONENTS
1 Handle
2 Solution tank
3 Wheel
4 Squeegee
5 Brush cover
6 Brush
7 Cock
8 Solenoid
9 Water inlet filter
10 Recovery tank
11 Cover
12 Start vacuum motor switch
13 Start brush motor switch
14 Back rubber blade
15 Chassis
16 Descharging cap
17 Squeegee hose
18 Vacuum hose
19 Battery charger
20 Squegee lifting lever
1 FOREWORD
This is a floor scrubbing machine that is able to clean a wide variety of types of flooring and types of dirt by using the mechanical action of one disk brush and the chemical action of a water-detergent solution. As it moves forward it also gathers up the dirt removed from the floor and the detergent solution that has not been absorbed by the floor.
The machine must only be used for this function.
Even the best machines will only operate efficiently and work with profit if they are used properly and kept in perfect operating order.
Read this instruction booklet carefully and consult it every time problems arise with machine operation.
Any improper use of the machine is forbidden. Any kind of claim against the producer or his representative for damages due to an use not conformed to machine destination is excluded.
Put the manual at operator's disposal so that he can consult it for all eventualities.
Remember that, if necessary, our service organization, in collaboration with our agents, is always available for helpful hints or direct intervention.
2 RECEIVING THE MACHINE
Immediately check, when receiving the machine, that all the materials indicated on delivery documents have been received and also that the machine has not been damaged in transit. If it has been damaged, this damage must be immediately reported to the shipper and also to our customer service department. Only acting promptly in this manner will make it possible to receive missing material and to be reimbursed for damage.
3 TECHNICAL DESCRIPTION
| E14B | E14220 | E14115 | ||
| Coverage performance | m²/h - ft²/h | 1050 - 11302,11 | 1050 - 11302,11 | 1050 - 11302,11 |
| Working speed | m/min - ft/h | 0/60 - 0/196 | 0/60 - 0/196 | 0/60 - 0/196 |
| Scrubbing path | mm - in | 350 - 13,78 | 350 - 13,78 | 350 - 13,78 |
| Brush size | mm - in | 1 x 350 - 1 x 13,78 | 1 x 350 - 1 x 13,78 | 1 x 350 - 1 x 13,78 |
| Brush pressure | kg - lb | 28 - 61,73 | 28 - 61,73 | 28 - 61,73 |
| Brush pressure control | // | // | // | |
| Squeezegee width/Dry path | mm - in | 420 - 16,54 | 420 - 16,54 | 420 - 16,54 |
| Squeezegee lifting mechanism | Mechanical | Mechanical | Mechanical | |
| Solution tank | I - gal | 16 - 4,23 | 16 - 4,23 | 16 - 4,23 |
| Recovery tank | I - gal | 18 - 4,76 | 18 - 4,76 | 18 - 4,76 |
| Tank manufacturing | Polyethylene | Polyethylene | Polyethylene | |
| Voltage | V | 12 | 220 | 115 |
| Battery capacity (STANDARD DIN) | Ah₅ | 65 (GEL/AGM) | // | // |
| Batteries compartment LxWxH | mm - in | 290x190x23511,42x7,48x9,25 | // | // |
| Brush motor (nominal power) | W | 1 x 250 | 1 x 250 | 1 x 250 |
| Traction motor (nominal power) | W | // | // | // |
| Vacuum motor (nominal power) | W | 2 stages perip. 200 | 2 stages perip. 200 | 2 stages perip. 200 |
| Water lift | mm - in H2O | 540 - 21,26 | 710 - 27,95 | 710 - 27,95 |
| Dimensions LxWxH | mm - in | 720x490x64528,35x19,29x25,39 | 720x490x64528,35x19,29x25,39 | 720x490x64528,35x19,29x25,39 |
| Weight without batteries | kg - lb | 37,5 - 82,67 | 37,5 - 82,67 | 37,5 - 82,67 |
4 SYMBOLS USED ON THE MACHINE

Brush symbol.
Used to indicate the brush motor control switch, for both disk or cylindrical brushes

Vacuum motor symbol.
Used to indicate the vacuum motor switch

Open book symbol.
Tells the worker to read the manual before operating the machine
5 SYMBOLS USED IN THE MANUAL

Warning symbol
Read carefully the sections preceded by this symbol: they concern the safety of the operator, of the machine and of the environment.

Indicates danger of gas exhalations and emission of corrosive liquids

Indicates fire danger
Do not approach with free flames

Indicates the need for protection gloves
6 PREPARING THE MACHINE
6.1 Moving the packaged machine
The machine is contained in specific packing (box + two-way pallet to be lift up only on the longer side) with a platform so that it can be moved by a fork-lift.
Total weight is 72.4kg (48,9 kg without batteries). Packing dimensions are (Fig. 2):
A (Width): 520 mm
B (Length): 790 mm
C (Height): 770 mm

The fork lift or the transpallet have to pick up the pallet at the center, the item has to be moved very carefully without crash and paying attention to lift it up over the reasonable height. Packing crates cannot be stacked.
6.2 How to unpack the machine
- Cut the plastic band with suitable nippers, paying attention to its spring back
- Open the upper borders of the package and extract the brush and the squeezegee. (Fig. 3)
- Take out the machine from the package, pulling the box upwards.
- Lift the front of the machine and remove the carton box.
- Lift the handle (see 6.7, Handle regulation) and, keeping raised the front of the machine, push forward till the complete step over of the wheel.
- Using an inclined plane, make the machine going down from the platform.
- Keep the box and the platform since it may be necessary to transport the machine again.
6.3 Putting the battery
The machine is equipped with an incorporated battery charger and an ermetic gel battery. In the case of using a different battery form the one supplied, use only AGM or Gel batteries 12V 65A.
The batteries must be housed in the battery compartment below the recovery tank.
The dimensions of the battery compartment are: 290 × 190 × 235 (H) mm.

Strictly comply with the instructions given by the battery manufacturer or retailer regarding battery maintenance and daily recharging. All installation and maintenance procedures must be carried out by specialists. Before switching on the machine check that the battery is connected respecting the correct polarity.


When you manipulate batteries always wear safety cloth according to the currently laws. In particular, before manipulating batteries, take off all metallic objects such as rings, necklace and watches from hands, wrists and neck. Do not lean metallic objects on the batteries.
When putting the battery:
- Take off the hoses from the cover.
- Take off the recovery tank.
- Introduce the battery in the compartment with the pole in the direction of the back of the machine. Be careful not to knock into the surrounding walls in order to avoid damages to the machine or to the battery.
6.4 Extracting the battery
When extracting the battery:
- Take off the hoses from the cover.
- Take off the recovery tank.
- Disconnect the battery
- Extract the battery upward. Be careful not to knock into the surrounding walls in order to avoid damages to the machine or to the battery.
6.5 Recharge of the batteries
Connect the machine to a 220 V socket using the cable it is equipped of. During the charging process on the battery charger the red warning light is on (Fig. 4). At the end of the charging process the green warning light will be on (Fig. 4). In order not to cause the risk of permanent damage to the battery, avoid at all costs its complete discharge and effect recharging within a few minutes after that the signal of discharged batteries appears.

Never leave the batteries completely discharged, even if the machine is not being used.

Make sure that the battery charger fits the installed batteries both for capacity as for type (lead/acid or GEL and equivalents). Never charge a GEL battery with an unsuitable battery charger. Carefully follow the instructions given by the manufacturer of batteries and battery charger.


Danger of gas exhalations and emission of corrosive liquids
Fire danger: do not approach with free flames
6.6 Battery charge level gauge
The battery charge level gauge is composed by 3 led that indicate approximately the battery charge level (Fig. 4).
Gren = battery charged
Yellow = battery partially exhausted
Red = battery exhausted, the brush motor and the vacuum motor turn off automatically

The brush motor and the apiration motor automatically turn off a few seconds after the red led turns on. In order to bring the machine to the recharging point, lift up the front of the machine and move leaning on the wheels.
Using the specific cable, connect the battery charger to a 220V socket.
During the charging process it is not possible to use the machine.
6.7 Handle regulation
The handle, bended for packing reasons, must be put in the working position:
- Insert the hose with the major diameter in the left cover connector (Fig. 5A)
- Insert the hose with the smaller diameter in the right cover connector (Fig. 5B)
- Lift up the handle pulling the lever indicated (Fig. 6A)
- Move the handle and put it in the working position (Fig. 6B)
6.8 Installing the disk brushes
- Lift up the squeegee if it is in the working position. (Fig. 8-3)
- Lift up the machine pressing on the handle.
- Lean the machine on the brush being sure that this last is in the center of the brush cover.
- Activate with pulses the start button (Fig. 8-2)
The brush locks automatically.

To avoid damages to the floors, choose with attention the types of brushes more suitable for the surface to treat.
Make sure there are no objects or people close to the machine.
6.9 Recuperation tank
Check that the discharge plug is screwed and that the cover leans completely on the blade.
6.10 Detergent solution
Fill the solution tank with clean water at a temperature that does not exceed 50^ (Fig. 7) and add the liquid detergent in the amounts and using the procedures recommended by the detergent manufacturer. Use only a minimal percentage of detergent to prevent formation of an excess quantity of foam since too much foam may damage the vacuum motor.

Always use low foam detergent. Introduce a small amount of anti-foam detergent in the recuperation tank before starting to work to be sure to prevent foam from being generated. Never use pure acids. Put the refill opening cover back in place after filling the tank.
7 GENERAL SAFETY REGULATIONS
- Follow these regulations carefully to avoid harm to the operator and damage to the machine.
- The machine must be used exclusively by authorized and trained personnel
- Read the labels on the machine with attention. Never cover them for any reason and always immediately replace them if they are damaged
- Before using the machine check all the controls, the indicators and any instruments in order to employ it properly.
-
Before you use the machine make sure that all doors and covers are positioned as shown in this operating and maintenance manual
-
Make sure the surface you clean can afford the machine weight
- When operating the machine be careful of other persons and of children in particular
- Never mix different types of detergents: this could generate noxious gases
- Machine storage temperature must be between -25^ and +55^
- Operating conditions: room temperature between 0^ and 40^ with relative humidity between 30 and 95%
- Never set containers of liquid on the machine
- Never use the machine to transport goods
- Never use acid solutions which could damage the machine and/or persons
- Avoid running the brushes with the machine stopped: this could damage the floor
- Never aspirate flammable, deflagrate, explosive, corrosive, toxic liquids or powders.
- Never use the machine in an explosive environment
- Use a powder fire extinguisher in case of fire. Do not use water
- Do not use the machine in the rain
- Do not open covers and protections while the machine is working
- Do not hit against shelving or scaffolding
- Do not use the appliance on surfaces with a slope higher than the one indicated on the name-plate.
- The machine must perform washing and drying operations simultaneously. Any other operations must be done in zones where the presence of unauthorized persons is prohibited. Signal wet floors with suitable signs
- Whenever the machine has operating troubles, check to make sure these are not due to insufficient ordinary maintenance. If this is not the case then enquire with your nearest MINUTEMAN INTERNATIONAL INC. service center
- When replacing machine parts always ask for ORIGINAL spare parts from your Authorized MINUTEMAN INTERNATIONAL INC. Agent and/or Retailer
- Use only original MINUTEMAN INTERNATIONAL INC. brushes.
- Avoid clogging the solution tank filter: do not fill with detergent solution a long time before starting to use the machine
- Always cut out the electric power supply to the machine whenever maintenance is performed
- Restore all electrical connections after terminating any maintenance procedures
- Never remove guards that require tools for removal
- Never wash the machine with direct or pressurized jets of water or with corrosive substances
- Have your nearest MINUTEMAN INTERNATIONAL INC. service center check the machine every 200 operating hours
- Check the connector wear and tear; if the connector is damaged, replace it before using the machine; the replacement must be done by authorized personal only.
- Dispose of consumables in accordance with currently applicable laws and codes
- In the case of demolition, it is important to divide all the materials and give them to qualified and authorized operators, in accordance with currently applicable laws and codes.
- Batteries contain hazardous and dangerous materials that must be disposed in accordance to currently laws concerning hazardous and noxious substances and given to qualified operators.
- Do not leave the working machine unmanned. Make sure that children or not qualified staff do not use it.
- Do not use the machine in dangerous areas.
- Do not use too loose garments or accessories that may get entangled in the moving parts.
- During the floor cleaning the operator must stand behind the machine and drive it using the handle. Only one operator at a time can use the machine
- Apart from the safety instructions included in the present manual, respect and observe the general safety rules for the sector and the currently regulations concerning the environment protection
- If the operator do not have the necessary skills to use the machine or he is in a psychophysical condition altered by chemical substances (ex. alcohol, drugs, medicines) must be suitably stopped
8 OPERATION
8.1 Preparing to work
-
Prepare the machine for operation making sure that the black plastic hoses are correctly connected to the cover (Fig. 5). To have further clarifications about the correct hoses connection see chapter 6.7, points 1 and 2.
-
Make sure that the rate regulation valve is open (Fig. 9-2).
- Press the vacuum motor switch (Fig. 8-1)
- Lower the squeegee by turning down its lever (Fig. 8 - 3)
- Press the brush motor switch (Fig. 8-2)
Now the machine will start to work in perfect efficiency until the detergent solution is finished.

Before using the machine check all the controls to employ it properly.

The red led (Fig. 4) appears on the charger when the battery charge level is getting too low. The brush motor and the vacuum motor automatically turn off. Batteries must be recharged as soon as possible. In order to bring the machine to the recharging point, lift up the front of the machine and move leaning on the wheels.
8.2 Overflow device
The machine has a filter that stops the vacuum motor whenever the recuperation tank is full.
In this case you must empty the tank.
8.3 Traction
This machine traction is obtained by the brush, that working slightly inclined, move the machine ahead.

Moving in reverse lift up the squeezegee.
9 AFTER WORK IS TERMINATED
At the end of the work, before performing any type of maintenance, proceed as follows:
- Turn off brush motor switch (Fig. 8-2).
- Turn off vacuum motor switch (Fig. 8-1).
- Move the machine to the dirty water drain site.
- Empty the recovery tank


Always wear gloves when doing this to protect yourself from contact with hazardous solutions.
- Clean the squeegee with a jet of clean water. The squeegee must be lifted when the machine is not in use to prevent permanent deformations to the rubber strips.
- Remove the brush and clean it with a jet of water.
10.1 Cleaning the recovery tank


Always wear gloves when doing this to protect yourself from Q contact with hazardous solutions.
- Remove the protection cover after taking off the the black plastic hoses.
- Remove and carefully rinse the filter and the float (Fig. 11)
- Lift the recovery tank, rotate it anti-clockwise and take it off (Fig. 12)
- Rinse the recovery tank (Fig. 13), carefully rinse it and clean the drain plug.
- Replace everything by carrying out these procedures in reverse order.

For the discharge of the liquids used for the floor cleaning, follow the indication written on the soap label and apply the currently laws and codes.
10.2 Cleaning the squeegee
Clean the squeegee with a jet of water. Check the condition of the rubbers and reverse or replace them as necessary. Careful cleaning of the entire aspiration unit ensures a longer working life for the vacuum motor.
Clean the wiper tube and make sure it is not clogged (Fig. 10 - 2).
10.3 Cleaning the solution tank filter
- Remove and clean the filter (Fig. 7 - 1).
- Replace the filter.
10.4 Removing the disk brushes
- Lift up squeegee moving upward its lever (Fig. 8-3)
- Lift up the machine levering with the handle
- Activate with pulses the start button (Fig. 8-2)
The brush lock out automatically.

Make sure there are no objects or people close to the machine.
11 WEEKLY MAINTENANCE
11.1 Replacing the rear squeezegee rubber
Proceed as follows to change the drying edge of the rear squeezegee rubber if it is worn and does not dry properly:
- Remove the black plastic aspiration hose from the squeegee..
- Unscrew the lock handwheels and remove the squeegee.
- Unscrew the handwheels and remove the rear blade hook.
- Turn the rubber over or replace it as necessary, making sure it is correctly aligned to the floor.
- Reassemble by performing these procedures in reverse order

If the vertical alignment of the rubber is not correct, the machine does not dry perfectly.
11.2 Replacing the front squeezegee rubber
If the front squeezegee rubber is worn the aspiration is poor and the machine will not dry perfectly. Proceed as follows to replace it:
- Remove the black plastic aspiration hose from the squeezegee..
- Unscrew the lock handwheels and remove the squeegee.
- Unscrew the locking systems and remove the front blade hook. (Fig. 10-1)
- Turn the rubber over or replace it as necessary, making sure it is correctly aligned to the floor.
- Reassemble by performing these procedures in reverse order

If the vertical alignment of the rubber is not correct, the machine does not dry perfectly.
11.3 Cleaning the aspiration hose
If aspiration is insufficient check that the aspiration tube is not clogged. Clean as necessary with a jet of water, spraying from the part where it is inserted into the tank. Proceed as follows to do this:
- Detach the aspiration tube from the seat on the recuperation tank
- Clean it with a jet of water, spraying from the part where it is inserted into the tank
- Reassemble everything by repeating these procedures in reverse order


Wear gloves when doing this to protect yourself from any contact with hazardous materials and solutions and make sure there are no objects or people close to the machine.
11.4 Cleaning the recovery tank
- Empty the recuperation tank through the hose, unscrewing the knob a few turns and then pulling out the plug.
- Rinse out the tank and clean the opening
- Put the opening and plug on the drain cover back in position.


Wear gloves when doing this to protect yourself from any contact with hazardous materials and solutions and make sure there are no objects or people close to the machine.
12 TROUBLE SHOOTING
12.1 Insufficient water to the brushes
- Check that the rate regulation valve is sufficiently open (Fig. 9 - 2).
- Check that there is water in the solution tank
- Clean the electrovalve (Fig. 9 - 1) unscrewing the magnet and put in on after cleaning (Fig. 14).
12.2 Squeegee does not dry perfectly
- Check that the squeegee is clean
- Check that the vacuum motor is correctly positioned
- Clean the entire aspiration unit (see "WEEKLY MAINTENANCE")
- Replace worn rubbers.
- Check the correct alignment of the rubbers
- Clean or replace the squeegee wheels
12.3 Machine does not clean well
- Check the condition of the brush and replace if necessary. Brush must be replaced when bristles are about 15mm high. Refer to "REMOVING THE BRUSH" and "INSTALLING THE BRUSH" to replace it. Working with a brush that is too worn may cause damage to the floor.
- Use another type of brush rather than the standard brush. To clean floors with exceptionally tough dirt, we recommend the use of special brushes that are supplied on request and according to your specific needs.
12.4 Too much foam is generated
Check that a low-foam detergent has been used. Add if necessary a small quantity of anti-foam liquid to the recuperation tank. Remember that more foam is generated when the floor to be cleaned is not very dirty. In this case use a more diluted detergent solution.
12.5 Vacuum motor does not operate
- Check that motor signal lamp is on. If it is not, reset the protection
- Check that the battery is properly connected.
- Reset the related protection
- If the problem persists, contact the dealer or the assistance.
12.6 Brush motor does not operate
- Check that motor signal lamp is on. If it is not, reset the protection
- Check that the battery is properly connected.
- Reset the related protection
- If the problem persists, contact the dealer or the assistance.
12.7 Machine does not start
- Check if the battery is properly connected.
- Check if the battery is charged
- Check the protection is not operating
- If the problem persists, contact the dealer or the assistance.
12.8 Electrical protections
The machine is equipped with the following electrical protection systems:
- Low-current protections installed outside to protect (Fig. 15):
BATTERY VERSION
- brush motor (30A)
- electrical controls (12A)
vacuum motor (30A)
CABLE VERSION
- brush motor (3A)
- vacuum motor and electrical controls (8A)
12.9 The brush motor works but the brush does not turn
- The belt could be wet. Check it there is any leakage and, if it is not, wait until the belt becomes dry.
- The belt could be worn or broken. Replace it.
INFORMATION
14N845 U.S. Route 20
Pingree Grove, Illinois 60140
www.minutemanintl.com
INFORMACIONES