
DO748K - Coffee machine DOMO - Free user manual and instructions
Find the device manual for free DO748K DOMO in PDF.

| Product type | 4-in-1 coffee machine (coffee maker) |
| Brand | DOMO |
| Model | DO748K |
| Voltage | 220-240 V~, 50-60 Hz |
| Power | 1215-1545 W |
| Standby consumption | 0.27 W (after 15 min) |
| Compatibility | Nespresso and Dolce Gusto capsules, ground coffee, ESE pods |
| Main functions | Coffee preparation with 3 interchangeable holders, custom cup size adjustment, auto shut-off |
| Auto shut-off | After 15 minutes of inactivity |
| Descaling | Every 500 cycles, with light warning |
| Included accessories | 3 filter holders (Nespresso, Dolce Gusto, powder/ESE), measuring scoop with tamper, storage tray, drip tray |
| Removable parts dishwasher safe | Drip tray, grid, 3 filter holders |
| Safety | Locking lever, burn protection (steam), electrical instructions |
| Warranty | 2 years |
| Cup size adjustment | Customizable for Single, Double, Lungo (defined ranges) |
Frequently Asked Questions - DO748K DOMO
User questions about DO748K DOMO
0 question about this device. Answer the ones you know or ask your own.
Ask a new question about this device
Download the instructions for your Coffee machine in PDF format for free! Find your manual DO748K - DOMO and take your electronic device back in hand. On this page are published all the documents necessary for the use of your device. DO748K by DOMO.
USER MANUAL DO748K DOMO
natural_image
Black and white POMO coffee maker with glass cup, coffee cups, and coffee beans nearby (no text or symbols visible)EN Instruction booklet Coffee maker 4-in-1
Read all instructions carefully.
Save this instruction manual for future reference.
⚠PRODUCTSPECIFIEKE WAARSCHUWINGEN
BEDIENINGSPANEEEL
NESPRESSO
natural_image
Close-up of two black electronic devices with ventilation grilles and a red arrow indicating motion (no text or symbols visible)natural_image
Symbol of a trash bin with crossed lines indicating no waste or discharge (no text or numbers present)natural_image
Recycling symbol with three chasing arrows forming a triangle (no text or labels)⚠AVERTISSEMENTS SPÉCIFIQUES AU PRODUIT
PANNEAU DE COMMANDE
NESPRESSO
natural_image
Close-up of a black electronic device with two square plates and a red upward arrow indicating motion (no text or symbols visible)natural_image
Symbol of a trash bin crossed with no text or numbers, representing waste sorting or restriction (no text present)BEDIENFELD
natural_image
Close-up of a black electronic device with two rectangular plates and a red arrow indicating motion (no text or symbols visible)natural_image
Symbol of a trash bin crossed with two crossed lines and a solid black rectangle below (no text or labels)Thank you very much for placing your trust in DOMO. We hope you enjoy your new purchase.
All our products undergo strict quality control before reaching you. If you still experience any problems with your device, we sincerely regret that. We have collected the most frequently asked questions about our devices on our webshop. Scan the QR code and have a look!

If you cannot find a solution to your problem there, do not hesitate to contact our customer service via info@linea2000.be. Our staff will do everything they can to assist you!
This device has a warranty period of 2 years from the date of purchase. During this warranty period, the distributor will assume responsibility for any defects that can be shown to be the result of material, construction or manufacturing errors. Such defects will be remedied by repair or replacement of the device. The 2-year warranty period will be suspended during the repair period and will continue after the repair has taken place for the remaining duration of the warranty period. The warranty will be honoured if proof of purchase clearly showing the date of purchase is provided. If your device becomes defective within the 2-year warranty period, please return it with your proof of purchase to the store you purchased it from or follow the procedure of the relevant webshop if you bought it online.
The warranty does not cover damage to the device, accessories or parts caused by:
• normal wear and tear from use;
• non-compliance with the instructions for use, maintenance and cleaning in the manual;
- incorrect connection, e.g. electrical voltage too high;
- incorrect, heavy-handed or abnormal use;
• repairs or alterations carried out by the consumer or unauthorised third parties;
- use of parts or accessories not recommended nor supplied by the distributor.
SAFETY INSTRUCTIONS
When using electrical appliances, basic safety precautions should always be taken, including the following. Any injury or damage caused by failure to comply with these rules are at your own risk. Neither the manufacturer, importer, or the supplier may be held liable.
- Read all instructions carefully.
- Make sure all packaging materials and promotional stickers have been removed before using the appliance for the first time. Make sure children cannot play with the packaging materials.
-
This appliance is only suitable for use in domestic and similar environments, such as:
-
staff kitchen areas in shops, offices and other working environments;
- farm houses;
- by clients in hotels, motels and other residential type environments;
• bed and breakfast type environments.
• Children should be supervised to ensure that they do not play with the appliance.
- This appliance can be used by children aged from 16 years and above and persons with reduced physical, sensory or mental capabilities or lack of experience and knowledge if they have been given supervision or instruction concerning use of the appliance in a safe way and understand the hazards involved.
• Children shall not play with the appliance.
- Cleaning and user maintenance shall not be made by children unless they are older than 16 or supervised.
- Keep the appliance and its cord out of reach of children younger than 16 years.
- All repairs should be carried out by the manufacturer or its aftersales service.
▲ELECTRICAL WARNINGS
- In order to avoid a hazard this appliance must not be supplied through an external switching device, such as a timer or a
separate remote control, or connected to a circuit that is regularly switched on and off by the utility.
- The appliance must be disconnected from its power source when not in use, during service and when replacing parts. If present, first turn all the buttons to the 'off' position, then pull the plug out of the socket by grasping the plug itself. Never pull the cord or appliance to remove the plug from the socket.
- Before use, check carefully that the electric tension and frequency of the power net at your home match the indications on the rating label of the appliance.
- The appliance must be plugged into an appropriate outlet that is installed and grounded in accordance with local installation regulations.
- Do not let the power supply cord hang over the edge of a counter, or touch hot surfaces.
- Keep the power cord away from hot parts and don't cover the appliance.
- Unwrap the cord completely to prevent overheating of the cord. Do not allow the power cord supply to run underneath or around the unit.
- For safety reasons, never use the appliance if the cord, plug, or appliance itself is damaged, or after a malfunction of the appliance. Return the appliance to the DOMO Service Department or its service agent for examination, repair, or electrical or mechanical adjustment. Do not try to repair the appliance yourself.
⚠️INSTALLATION
- Do not place near flammable materials, gases or explosives.
- Do not use or store this appliance outdoors.
• Always use the appliance on a steady, dry and level surface.
- Never place this appliance near a gas stove or electrical stove or in a place where it may come into contact with a warm appliance.
⚠ USE
- Do not use this appliance for other than intended use.
- Never leave the appliance unattended while it is functioning.
- Do not operate the appliance with wet hands.
- The use of accessories that are not recommended or sold by the manufacturer can cause fire, electrical shock or injuries. Only use the utensils delivered with the appliance.
⚠ CLEANING AND MAINTENANCE
- To protect against electrical shock or burns, do not immerse unit, cord, or plug in water or other liquid.
- Failure to maintain this appliance in a clean condition could adversely affect the life of the appliance and possibly result in a hazardous situation.
⚠PRODUCTSPECIFIC WARNINGS
- During the brewing process, the water in the pod holder or filter holder will be very hot and may release hot steam. Do not lift the lever whilst the coffee is brewing and keep hands away from the appliance when it is in operation.
- Never remove capsule or filter holder and water tank while making coffee.
- Do not overfill the kettle. Never add water above the maximum level marked on the appliance.
- Do not spill any liquid on the connector.
- Do not move the appliance while in use or when still hot. Allow to cool before moving the appliance.
- Never use the appliance without water.
- Be careful when opening the pod holder. Do not touch the puncture needles in the pod lid to avoid injury. Do not remove the pod holder, filter holder or water tank while making coffee.
SAVE THESE INSTRUCTIONS FOR FUTURE REFERENCE
All images and descriptions in this manual are purely indicative and may differ slightly from the actual device.
PARTS
- Control panel
- Locking lever
- 3 holders:
a. for Nespresso pods
b. for Dolce Gusto pods
c. for small or large filter
- Drip tray grid
- Drip tray
- Storage tray
- Water tank lid
- Water tank
- Small filter for ground coffee or ESE pods
- Large filter for ground coffee
- Measuring scoop with tamper

CONTROL PANEL
- Indicator lights for functions
- Cup size indicator lights
- Dulce Gusto level lights
- Function button
- Start/stop button
- Cup button

BEFORE THE FIRST USE
- Remove all packaging materials and any promotional stickers.
- Check if all accessories are included and if the appliance is not damaged.
- Place the appliance on a flat, stable surface. Provide adequate space around the appliance for ventilation.
- Assemble all loose accessories
- Remove and clean the water tank. Fill it with clean water, place it in the appliance and place the lid on the tank. Never exceed the MAX indicator on the water tank.
- Plug the plug into an electrical socket. You will hear a beeping sound. The device is in sleep mode. Press the start/stop button to switch on the appliance. The appliance will start heating up and the start/stop button indicator light will flash.
- Once the start/stop button indicator light remains on, the appliance is at temperature and in standby mode. It is now ready to make coffee.
- Rinse before first use. Insert the filter holder into the appliance without filter or coffee, place a large cup under the spout and make a lungo (see 'Use').
USE
Press the start/stop button to switch on the appliance. The appliance will start heating up and the start/stop button indicator light will flash.
Once the start/stop button indicator light remains on, the appliance is at temperature and ready to brew coffee.
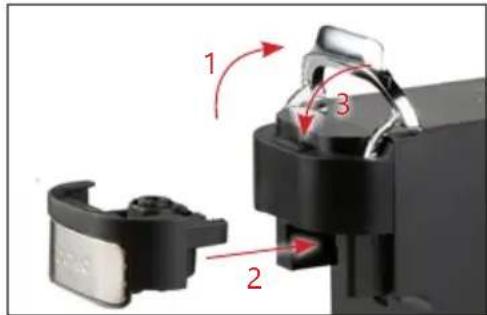
PLACING THE HOLDER
- Raise the locking lever.
- Place the desired coffee holder in the machine.
- Push the locking lever down again.
NESPRESSO
- Take the Nespresso holder and open it by pressing down the release button and lifting the lid.
- Place a Nespresso pod in the holder, close it (make sure the lid clicks into place) and insert it into the appliance.
- Press the function button until the Nespresso indicator light lights up.
- Press the cup button until the desired cup size lights up.
- Place the correct size cup under the coffee spout.
- Press the start/stop button.
- The coffee will automatically stop flowing when the set volume is reached.
DOLCE GUSTO
- Take the Dolce Gusto holder and open it by pressing down the release button and lifting the lid.
- Place a Dolce Gusto pod in the holder, close it (make sure the lid clicks into place) and insert it into the appliance.
- Press the function button until the Dolce Gusto indicator light lights up.
- Press the cup button until the desired level lights up.
- Place the correct size cup under the coffee spout.
- Press the start/stop button.
- The coffee will automatically stop flowing when the set volume is reached.
POWDER/ESE POD
- Take the filter holder and open it by pushing down the release button and lifting the lid.
- Place the desired filter in the filter holder:
- Use the small filter for a small cup. Fill with the desired amount of ground coffee and press with the tamper, or place an ESE pod in the filter.
- Use the large filter for a double cup or lungo. Fill with the desired amount of ground coffee and press with the tamper.
Close the filter holder (make sure the lid clicks into place) and insert it into the appliance.
- Press the function button until the Powder/ESE indicator light lights up.
- Press the cup button until the desired cup size lights up.
- Place the correct size cup under the coffee spout.
- Press the start/stop button.
- The coffee will automatically stop flowing when the set volume is reached.
CUP SIZES
By default, the cup sizes for Nespresso and ground coffee/ESE pods are set as follows:
| Single Double Lungo | |||
| Nespresso 30 ml | 60 ml 110 ml | ||
| Powder/ESE pod 30 ml | 60 ml 110 ml | ||
The cup sizes for each setting can be adjusted to your preference:
-
Select the cup size you wish to adjust.
-
Press the cup button for 2 seconds.
-
The machine will start up and the cup button will flash. Wait for the desired amount of coffee to flow out, then press the cup key again to stop the coffee flow.
-
The appliance will automatically store the set capacity.
The setting range for a small cup (single) is 20-50 ml, for a large cup (double) it is 50-80 ml and for a lungo it is 80-130 ml. If the set volume exceeds the adjustable range, the maximum is automatically recorded. If the set quantity is lower than the adjustable range, the minimum is automatically recorded.
The cup size settings for the Dolce Gusto function cannot be adjusted. The level indicator corresponds to Dolce Gusto's recommended levels.
| - | = | = | = | = | = | = | |
 Dolce Gusto Dolce Gusto | 30 ml 40 ml | 70 ml 110 ml | 160 ml 170 ml | 220 ml |
⚠️Place the drip tray in a higher position for small cups, to avoid coffee splashing. To move the drip tray, remove it from the lower slot of the storage tray and place it in the upper slot.

natural_image
Close-up of a black electronic device with two slats and a red arrow indicating motion (no text or symbols visible)SLEEP MODE
If no button is pressed for 15 minutes, the device goes from standby mode to sleep mode. The start/stop button indicator light will go out and the appliance will cool down.
Press the start/stop button to return the device to standby mode. The appliance will start heating up and the start/stop button indicator light will flash. Once the start/stop button indicator light remains on, the appliance is at temperature and once again in standby mode.
STORAGE TRAY
The storage tray can be used to store coffee pods.
Pull out the storage tray using the drip tray. Store the pods inside and slide the tray back into the machine.
RESTORING FACTORY SETTINGS
When the device is in sleep mode (no lights are on), you can restore factory settings. To do this, press and hold the function key and the cup key simultaneously for 5 seconds. A long beep will sound and the buttons will flash 3x to confirm that the factory settings have been restored.
LEANING AND MAINTENANCE
- Trek de stekker uit het stopcontact en laat het toestel afkoelen alvorens het te reinigen.
- Before cleaning the unit, pull the plug out of the power socket and let the unit cool down.
- Clean all removable parts (filters, holders, measuring scoop with tamper, water tank and lid, drip tray and grille) with clean warm water after use. The drip tray, grid and 3 holders are dishwasher-safe.
- Dry off the parts before putting them back.
- Wipe the unit housing clean with a soft, damp cloth to remove stains.
- Flush the unit regularly by brewing without putting ground coffee in the filter.
Do not immerse unit, cord, or plug in water or other liquid.
⚠️ Never use aggressive or abrasive cleaning agents.
DESCALING
The appliance should be descaled after every 500 cycles. The appliance will give an alert: the function button and cup button will flash alternately. The appliance will continue to operate normally, but the warning will not disappear until the full descaling process has been completed:
- Press the function button and cup button simultaneously for 5 seconds. Both buttons will flash rapidly.
- Fill the water tank with water and coffee machine descaler up to the maximum level. Follow the instructions on the packaging of the descaling product.
- Insert the filter holder without filter or coffee.
- Place a container (minimum 1500 ml) under the coffee spout.
- Press the start/stop button to start the descaling process.
- When the appliance stops running (after about 2 minutes), the descaling process is complete. Clean the water tank and filter holder and rinse by making a lungo with pure water WITHOUT descaler and WITHOUT coffee.
PROBLEMS AND SOLUTIONS
| PROBLEMS SOLUTIONS | |
| All lights on the control panel will flash. | The lever is not locked. Make sure the desired holder is correctly positioned and push the lever down to lock. |
| During coffee brewing, the function key and cup key flash simultaneously and the appliance stops working. | The water reservoir is empty. Fill it with clean water and reinsert the tank. Never exceed the MAX indicator on the water tank.The spout is too slow because the pod holder or filter holder is clogged. Clean the holder and reinstall it. Wait 2 minutes before making coffee again.The spout is too slow because the wrong capsule or coffee pod was used. Only Nespresso and Dolce Gusto compatible capsules or ESE pods can be used in this appliance.. |
| Water leaks underneath the appliance. | This happens when you add too much water to the reservoir. Make sure you don’t overfill past the MAX indicator.The drip tray is full of water. Empty the tray. |
SPECIFICATIONS
| Model DO748K | |
| Voltage 220-240 V~, 50-60 Hz | |
| Power 1215-1545 W | |
| Energy consumption in off-mode after 15 minutes 0.27 W |
GUIDELINES
natural_image
Symbol of a trash bin with crossed lines indicating no waste or discharge (no text or numbers present)This symbol on the product or on its packaging indicates that this product may not be treated as household waste. Instead it must be brought to the applicable collection point for recycling of electrical and electronic equipment. By ensuring this product is disposed of correctly, you will help prevent potential negative consequences for the environment and human health, which could otherwise be caused by inappropriate waste handling of this product. For more detailed information about recycling of this product, please contact your local city office, your household waste disposal service or the shop where you purchased the product.
The packaging is recyclable. Please treat the packaging ecologically.

This appliance conforms to all European requirements in the areas of safety, health, and environmental protection.
The EU declaration concerning this appliance can be requested at any time from info@linea2000.be
GARANTIA
Estimado cliente,
PANEL DE CONTROL
NESPRESSO
natural_image
Close-up of two black rectangular devices with ventilation grilles and a red arrow indicating motion (no text or symbols visible)natural_image
Symbol of a trash bin crossed with two crossed lines, no text or numbers presentPANNELLO DI CONTROLLO
natural_image
Close-up of a black electronic device with two square plates and a red upward arrow indicating motion (no text or symbols visible)MODALITÀ DI SOSPENSIONE
natural_image
Symbol of a trash bin crossed with no text or numbers, representing waste sorting or disposal (no text present)OVLÁDACÍ PANEL
NESPRESSO
natural_image
Close-up of two black rectangular devices with ventilation grilles and a red arrow indicating motion (no text or symbols visible)REŽIM SPÁNKU
natural_image
Symbol of a trash bin with crossed lines indicating no waste or discharge (no text or labels)OVLÁDACÍ PANEL
NESPRESSO
natural_image
Close-up of two black electronic devices with ventilation grilles and a red arrow indicating motion (no text or symbols)REŽIM SPÁNKU
Ak sa 15 minút nestlačí žiadne tlačidlo, spotrebič prejde z pohotovostného režimu do režimu spánku. Kontrolka tlačidla štart/stop zhasne a spotrebič sa ochladí.
natural_image
Symbol of a trash bin crossed with two crossed lines, no text or numbers presentLooking for extra accessories or you have a broken piece?
ORDER the original DOMO accessories and parts on our webshop.
Webshop


natural_image
Stack of sheets of paper with a circular inset showing a small object, no visible text or symbols
natural_image
Two white plastic electrical connectors with mounting holes (no text or symbols visible)
natural_image
White cylindrical container with black interior, no visible text or symbols
natural_image
Clear glass coffee maker with black handle and lid (no text or symbols visible)


- ⚠PRODUCTSPECIFIEKE WAARSCHUWINGEN
- BEDIENINGSPANEEEL
- NESPRESSO
- ⚠AVERTISSEMENTS SPÉCIFIQUES AU PRODUIT
- PANNEAU DE COMMANDE
- BEDIENFELD
- SAFETY INSTRUCTIONS
- ▲ELECTRICAL WARNINGS
- ⚠️INSTALLATION
- ⚠ USE
- ⚠ CLEANING AND MAINTENANCE
- ⚠PRODUCTSPECIFIC WARNINGS
- SAVE THESE INSTRUCTIONS FOR FUTURE REFERENCE
- PARTS
- CONTROL PANEL
- BEFORE THE FIRST USE
- USE
- PLACING THE HOLDER
- DOLCE GUSTO
- POWDER/ESE POD
- CUP SIZES
- SLEEP MODE
- STORAGE TRAY
- RESTORING FACTORY SETTINGS
- LEANING AND MAINTENANCE
- DESCALING
- GUIDELINES
- GARANTIA
- PANEL DE CONTROL
- PANNELLO DI CONTROLLO
- MODALITÀ DI SOSPENSIONE
- OVLÁDACÍ PANEL
- REŽIM SPÁNKU
Brand : DOMO
Model : DO748K
Category : Coffee machine