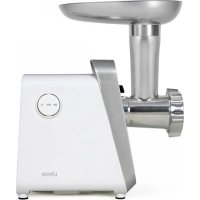
DOP257 - Mincer LIVOO - Free user manual and instructions
Find the device manual for free DOP257 LIVOO in PDF.



User questions about DOP257 LIVOO
0 question about this device. Answer the ones you know or ask your own.
Ask a new question about this device
Download the instructions for your Mincer in PDF format for free! Find your manual DOP257 - LIVOO and take your electronic device back in hand. On this page are published all the documents necessary for the use of your device. DOP257 by LIVOO.
USER MANUAL DOP257 LIVOO
natural_image
WhiteLivoo stainless steel kitchen grater with a circular control knob (no text or symbols on the device body)Livoo
Version : v.1.0
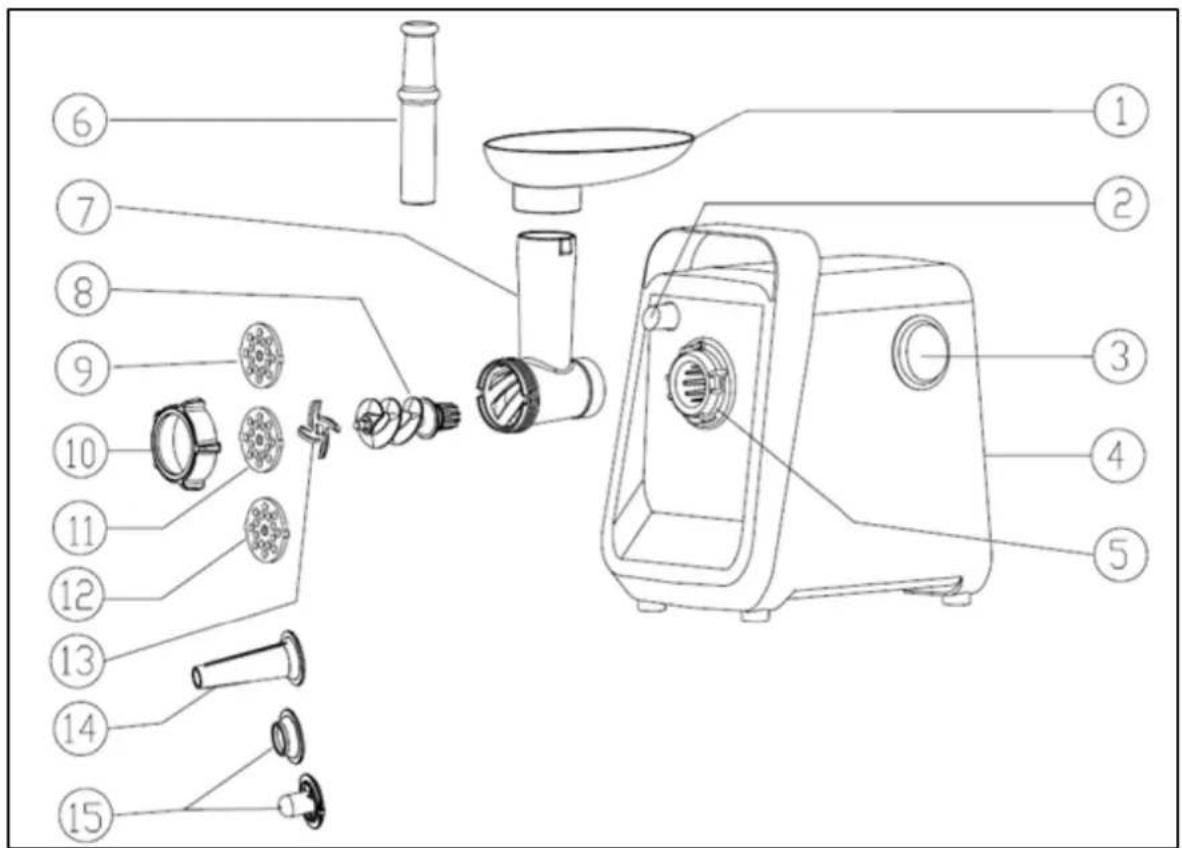
text_image
Exploded view diagram of a kitchen appliance with numbered parts for identificationFigure 1
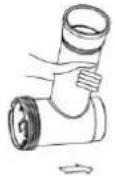 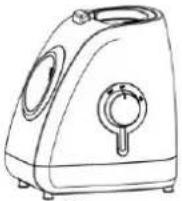 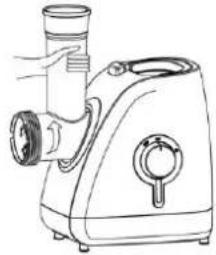 12 12 | 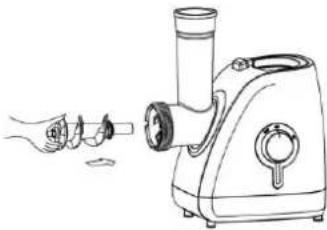 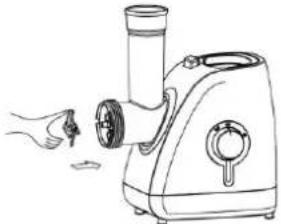 34 34 |
  56 56 | 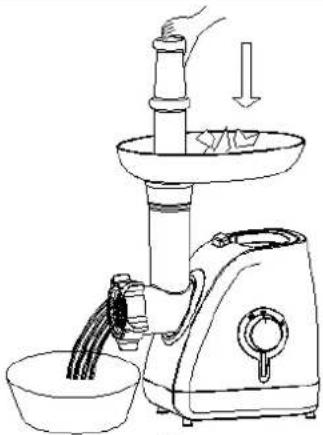 7 7 |
 8 8 | 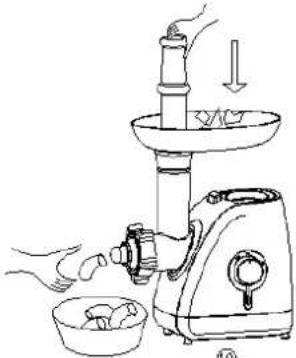 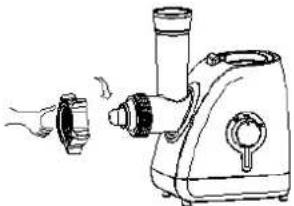 9 9 |
text_image
11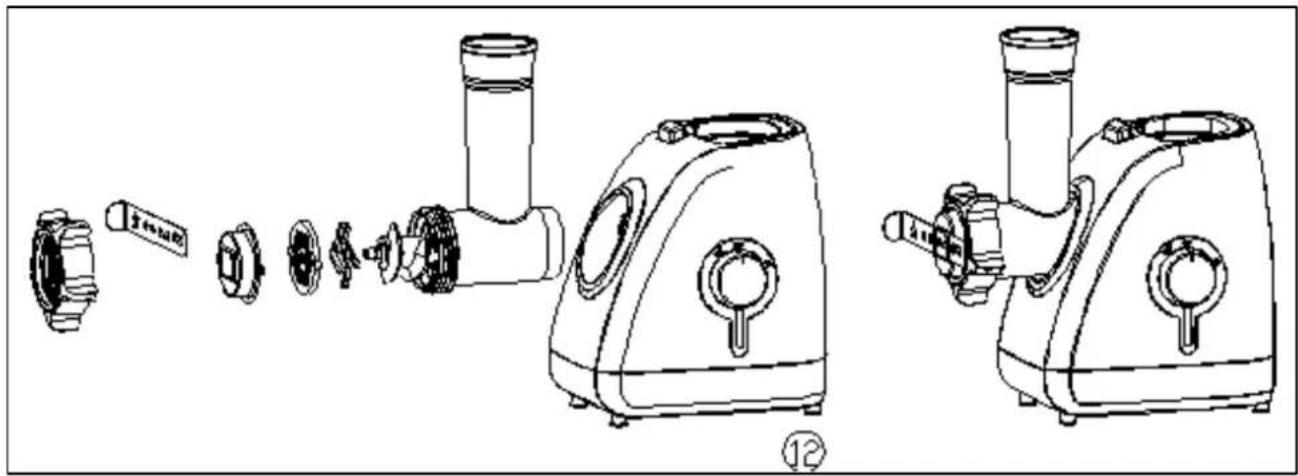
natural_image
Technical line drawing of a manual kitchen brush with exploded view and assembled views (no text or labels)natural_image
Symbol of a trash bin crossed with no text or labels, accompanied by a black rectangular block below (no readable text or symbols)Thank you for choosing a Livoo product!
EN
Your blender, your barbecue, and your headphones are not just objects, they are extensions of yourself, allowing you to get closer to your friends and family, to bring them together, to laugh and to share experiences. Livoo's aim is to help you live your life to the fullest, whatever wishes you have throughout the year. Winter raclette, summer barbecue. Or the other way around. It's up to you. Take advantage of this freedom for feel good moments every day.
That's why we're constantly innovating and creating clever products full of zest, but most of all, accessible. Find our entire collection on our website www.livoo.en.
Livoo, your daily companion till social networks

@Livoo

@livoo_officiel

@Livoo
Safety Instructions
Please, take time to read well the instruction sheet before the first use and keep them for a future use.
A misuse of the appliance can damage it or hurt the user. Assure that you use the appliance for the use for which it is designed. We refuse any responsibilities as for the damages by an incorrect use or a bad manipulation.
-
Make sure your mains voltage corresponds to that specified on the appliance before plugging in. The appliance must be connected to an earthed mains safety socket.
-
To protect against electrical hazards, do not immerse the cord, plug, or appliance itself in water or other liquids.
-
Never let the machine operate unattended. Keep out of reach of children or incompetent persons.
-
The appliance is not intended to be operated by means of an external timer or separate remote control system.
-
If the supply cord is damaged, it must be replaced by the manufacturer, its service agent or similarly qualified persons in order to avoid a hazard. (*)
-
Do not use the device:
-
if the grip or the power cable is damaged
- in case of malfunction
- if the device was damaged in any way
- if it fell in the water
-
if you dropped it.
-
Never use the appliance near hot surfaces. Never move the appliance by pulling the cord. Do not wind the cord around the appliance or twist it.
- Stand the appliance on a stable, flat surface.
- Never use accessories which are not recommended by the producer. They could constitute a danger to the user and risk to damage the appliance.
- Be careful when handling the sharp cutting blades, and during cleaning
- There is potential injury from misuse.
-
It is absolutely necessary to keep this appliance clean at all times as it comes into direct contact with food.
-
Regarding the instructions for cleaning surfaces in contact with food or oil, thanks to refer to the below paragraph "cleaning" in manual.
- Regarding the instructions for the use of accessories, operation times and speed settings, thanks to refer to the below paragraphs.
- Always disconnect the appliance from the supply if it is left unattended and before assembling, disassembling or cleaning.
- This appliance shall not be used by children. Keep the appliance and its cord out of reach of children
- This appliance can be used by persons with reduced physical, sensory or mental capabilities or lack of experience and knowledge if they have been given supervision or instruction concerning use of the appliance in a safe way and if they understand the hazards involved.
- Children shall not play with the appliance.
- Switch off the appliance and disconnect from supply before changing accessories or approaching parts that move in use
-
Accessories, other than those supplied with the appliance, shall include instructions for their safety use
-
This appliance is intended to be used in household and similar applications such as:
-
staff kitchen areas in shops, offices and other working environments
- farm houses
- by clients in hotels, motels and other residential type environments
- bed and breakfast type environments
(*) Competent qualified electrician: after sales department of the producer or importer or any person who is qualified, approved and competent to perform this kind of repairs in order to avoid all danger. In any case you should return the appliance to this electrician.
Technical Specifications
Voltage : 230V \~50-60Hz Power : 350W
Power consumption: 0W
Drawing of the device: picture 1
| 1. | Tray |
| 2. | Lock button |
| 3. | On-off button |
| 4 | Body of the device |
| 5 | Ring head |
| 6 | Pusher |
| 7 | Main funnel |
| 8 | Feed screw |
| 9 | 5mm hole discs |
| 10 | Fixing ring |
| 11 | Discs with 7 mm holes |
| 12 | Cutting Disc |
| 13 | Blade |
| 14 | Sausage funnel |
| 15 | Kebbe attachment |
Use of the device
Check that the voltage on the rating label matches the mains voltage in your home. Wash all parts (except the body of the appliance) in warm, soapy water before first use. Before plugging in the device, the ON/OFF button should be in the "OFF" position.
Hold the main funnel with one hand and insert it into its housing by pressing the release button at the same time and then turn it to the left to lock taking care to match the notches, let go of the release button (fig. 2/1-2).
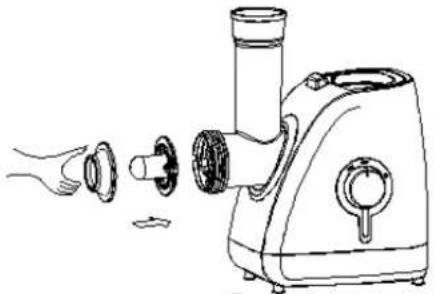
Place the feed screw in its housing, turning it slightly until it is secured in the engine block. Place the blade on the tip of the feed screw, putting the cutting part backwards (fig.2/3-4).
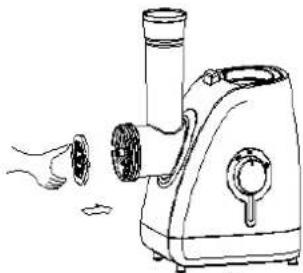
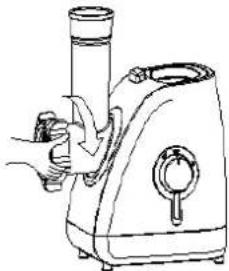
Add the desired cutting disc, fix it correctly with the notches on the sides (fig.2/5-6). Press the center of the disc with one finger and then screw in the fixing ring with the other hand. Do not tighten too tightly.
Attach the filling tray to the main funnel. Be sure to allow air to circulate around the engine when the unit is running.
Chop the meat
Cut the meat into large cubes so that the pieces can easily engage in the funnel
Plug in and turn the switch to "ON". To engage the pieces in the funnel, use only the pusher (fig.2/7). After use, turn off the device and unplug.
Reverse function
In case of blocking, turn the device off by turning the switch to "OFF". Wait at least 1 minute until the chopper is completely stopped. Turn the switch to "REV", the knife will turn in the opposite direction and release the piece that was stuck. If it still doesn't work, turn off the unit and disassemble it for cleaning.
Making kebbe: (fig.2/8-9-10)
Set up the elements for Kebbe. Press down on the center of the disc with one finger and then screw in the fixing ring with the other hand Do not screw too hard. Form Kebbes and fry them in hot oil.
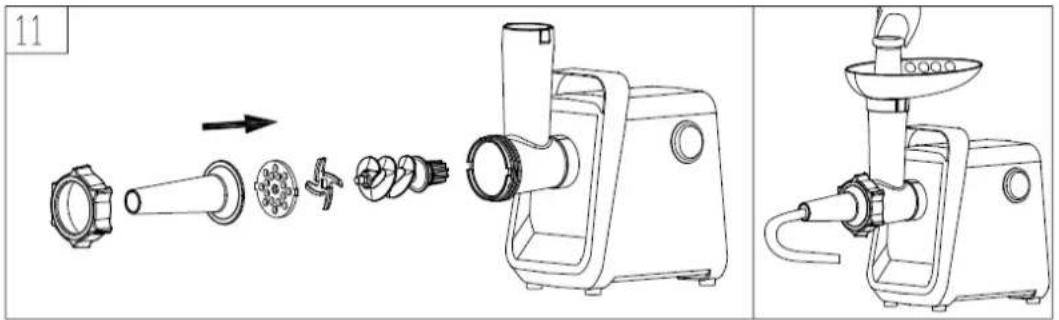
Making sausages: (fig.2/11)
Do not prepare sausages that are too thick to avoid saturating the casing.
Note: soak the hose for about 10-15 minutes in warm water to make it elastic
Plug in the unit, turn the power off knob to the ON position. Place the food in the filling tray and gently remove the hose from the socket as it fills. Twist the casing to form the sausages.
Making biscuits: (fig.2/12)
Choose the desired cookie shape and place the mixture in the funnel. Plug in the unit, turn the power off knob to the ON position. If necessary, press the mixture further with the pusher. Hold the dough at the outlet, holding it slightly, then cut to the desired length and place your cookie on a baking sheet.
Cleaning and maintenance
Turn off the device. Unplug the outlet. Unscrew the mounting ring. To remove the blade easily, place a screwdriver between the disc and the head and gently lift it. Remove food residue. Disassemble the different parts you used. Wash each piece in warm soapy water. Do not immerse the motor base in water, wipe the outside of the unit with a damp cloth. Do not place the parts in the dishwasher.
Clean and wipe all parts with a soft cloth. From time to time, you can wipe the metal parts with a cloth lightly coated with oil to prevent them from rusting.
natural_image
Symbol of a trash bin with crossed-out lines and a solid rectangle below (no text or labels)Correct disposal of the unit (Electrical and Electronic Equipment).
(Applicable in the European Union and the rest of Europe that have adopted separate collection systems countries). The European Directive 2012/19/EU on Waste Electrical and Electronic Equipment (WEEE), requires that old household electrical appliances must not be disposed of in the normal household waste stream. Old appliances must be collected separately in order to optimize the recovery and recycling of the materials they contain and reduce the impact on human health and the environment. The symbol of the crossed out dustbin is marked on all products to remind the obligations of separate collection. Consumers should contact their local authority or retailer for information concerning the correct disposal of their product.
• Non contractual illustration
- Product information is subject to change without prior notice.
natural_image
Symbol of a trash bin crossed with no text or labels, accompanied by a black rectangular block below (no readable text or symbols)natural_image
Symbol of a trash bin crossed out by two crossed lines (no text or labels)
natural_image
Symbol of a trash bin crossed with no text or labels, accompanied by a black rectangular block below (no readable text or symbols)natural_image
Symbol of a trash bin with crossed lines indicating no waste, and a solid black rectangle below (no text or labels)text_image
CE FR © ©LIVOO
BP 61071
67452 Mundolsheim - FRANCE