BBFHM2410H - Monitor BlueBuilt - Free user manual and instructions
Find the device manual for free BBFHM2410H BlueBuilt in PDF.
| Product type | Monitor |
| Brand | BlueBuilt |
| Model | BBFHM2410H |
| Screen size (diagonal) | 24 inches |
| Native resolution | 1920 × 1080 (Full HD) |
| Panel type | IPS |
| Typical brightness | 300 cd/m² |
| Typical contrast ratio | 1000:1 |
| Response time (typical) | 14 ms |
| Viewing angle | 178° horizontal / 178° vertical |
| Connectors | 1× VGA, 1× HDMI, 1× DisplayPort 1.4, 1× headphone output |
| Power supply | 12 V ⎓ 3 A (external power adapter) |
| Power consumption (max) | 36 W |
| Standby power consumption | ≤ 0.5 W |
| Dimensions without stand (W × D × H) | 539.8 × 46.2 × 319.1 mm |
| Dimensions with stand (lowest position) | 539.8 × 200.0 × 361.9 mm |
| Net weight | 4.5 kg |
| VESA mounting | 100 × 100 mm (4× M4) |
| Main features | FreeSync, HDR, Low Blue Light, brightness/contrast adjustments, rotation/tilt, overdrive |
| Maintenance and cleaning | Use a dry microfiber cloth; water and ammonia-free, acetone-free cleaner for stubborn stains |
| Safety | Do not use in humid environment; unplug if malfunction; do not repair yourself |
| Spare parts and repairability | Contact Coolblue customer service for repairs (5-year warranty) |
| General information | Manual available in PDF on notice-facile.com; Coolblue B.V., Weena 664, 3012 CN Rotterdam |
Frequently Asked Questions - BBFHM2410H BlueBuilt
User questions about BBFHM2410H BlueBuilt
0 question about this device. Answer the ones you know or ask your own.
Ask a new question about this device
Download the instructions for your Monitor in PDF format for free! Find your manual BBFHM2410H - BlueBuilt and take your electronic device back in hand. On this page are published all the documents necessary for the use of your device. BBFHM2410H by BlueBuilt.
USER MANUAL BBFHM2410H BlueBuilt
1. SAFETY INSTRUCTIONS 7
1.1. Safety instructions: electrical safety 7
1.2 Safety instructions: installation 8
1.3 Safety instructions: use. 8
1.4 Safety instructions: cleaning. 9
2. PREPARATION 10
2.1 Unpacking the monitor. 10
2.2 Main components 10
2.3 Choose mounting arrangement. 11
2.4 Attach the stand to the monitor 12
2.5 Attach the monitor arm or wall bracket. 13
3. CONNECTIONS 14
4. SETTING 15
4.1 Rotate or tilt the monitor 15
4.2 The control panel 16
4.3 Settings menu. 17
5. MAINTENANCE AND CLEANING 19
6. TROUBLESHOOTING 19
7. SPECIFICATIONS 20
8. TECHNICAL DATA 21
9. WARRANTY 21
10. TAKING OUT OF SERVICE 22
11. SAFE DISPOSAL 22
FOREWORD
ABOUT THIS DOCUMENT
- This manual contains all information for the correct, efficient and safe use of the monitor.
- Fully read and understand the instructions in this manual before installing or using your monitor.
- Keep this document for future use as long as you use and/or own the monitor. Pass on the instructions to the next user of the monitor.
- Coolblue B.V. cannot in any way be held liable for immaterial damage to you or to others, or material damage to the device, your property or property of others caused by not following or not correctly following the instructions in this manual.
- Only use the monitor for its intended purpose; as a monitor that you connect to a computer or laptop to display the image.
- The latest version of this manual can be found at www.coolblue.nl/en if you search by the article number (see cover page).
ORIGINAL INSTRUCTIONS
This manual was originally written in Dutch. All other languages are translated documents. In the case of translation errors, the Dutch version takes precedence.
SYMBOLS USED
| Symbol Meaning | |
| WARNING | Indicates a dangerous situation which, if not avoided, may result in serious immaterial damage to you or others. |
| CAUTION! | Indicates a dangerous situation which, if not avoided, can result in slight immaterial damage to you or others. |
| ATTENTION! | Indicates a situation related to material damage. |
COPYRIGHT
The data depicted in this manual, including texts, photographs, graphic drawings, trademarks, (trade) names and logos, are the property of Coolblue B.V. and are protected by copyright, trademark law and/or any other intellectual property right, unless these data belong to a third party. You are never allowed to reproduce, transfer, distribute, store or make the contents of the manual available to third parties, in whole or in part, without the prior written consent of Coolblue B.V. and/or the third party to whom the data belong.
CONTACT DETAILS
BlueBuilt is a registered brand of Coolblue B.V.
You can reach customer service at: www.coolblue.nl/en/customer-service
Coolblue B.V.
Weena 664
3012 CN Rotterdam
Netherlands
www.coolblue.nl
1. SAFETY INSTRUCTIONS
1.1 SAFETY INSTRUCTIONS: ELECTRICAL SAFETY

WARNING!
- Do not use the monitor in a humid or wet environment.
- Do not touch the monitor or power cable with wet hands.
- Use only the original power cable supplied with the monitor.
- Do not use the monitor if the power cable or the monitor is damaged. Replace a damaged or defective device or power cable immediately.
- Do not make any repairs to the monitor or power cable that are not described in this manual. The monitor may only be repaired by an authorised service technician.

CAUTION!
- Do not twist or kink the power cable or roll the cable up. Do not clamp the power cable between the surface and the monitor. This can damage the cable's insulation.
- Keep the power cable free of dust and dirt.

ATTENTION!
- Do not unplug the power cable when the monitor is in use.
- Do not pull the power cable to unplug it. Always pull the plug.
- Do not drop the monitor and avoid impacts. Dropping or bumping the monitor may damage the monitor and affect its correct operation. Do not use the monitor if it has been dropped.
1.2 SAFETY INSTRUCTIONS: INSTALLATION

WARNING!
- Do not place the monitor near heat sources.
- Never let children play with the packaging material. Keep the packaging material out of reach of children.

ATTENTION!
- Avoid discolouration of the housing and do not expose the monitor to direct sunlight.
- Always place the monitor on a flat and stable surface or mount it on a sturdy monitor arm or wall bracket.
1.3 SAFETY INSTRUCTIONS: USE

WARNING!
- Unplug the device if you hear strange noises, smell an odour or see smoke.

CAUTION!
- Move the parts of the monitor to be adjusted with due caution to avoid entrapment of hands and/or fingers.

ATTENTION!
- Always disconnect all cables from the monitor before moving the monitor.
- Never pull the power cable to carry or move the device or to disconnect the plug from the socket.
- Do not climb, sit or stand on the monitor.
1.4 SAFETY INSTRUCTIONS: CLEANING

WARNING!
- Never insert objects into the air vents.

ATTENTION!
- Do not press the monitor screen with your hands or other objects.
- Never spray detergent directly on the screen.
2. PREPARATION
2.1 UNPACKING THE MONITOR
-
Remove all packaging material and any transport attachments present (e.g. tape, tie-wraps, cable ties and protective film).
-
Check that all parts are present and that there is no damage to the device or accessories.
2.2 MAIN COMPONENTS
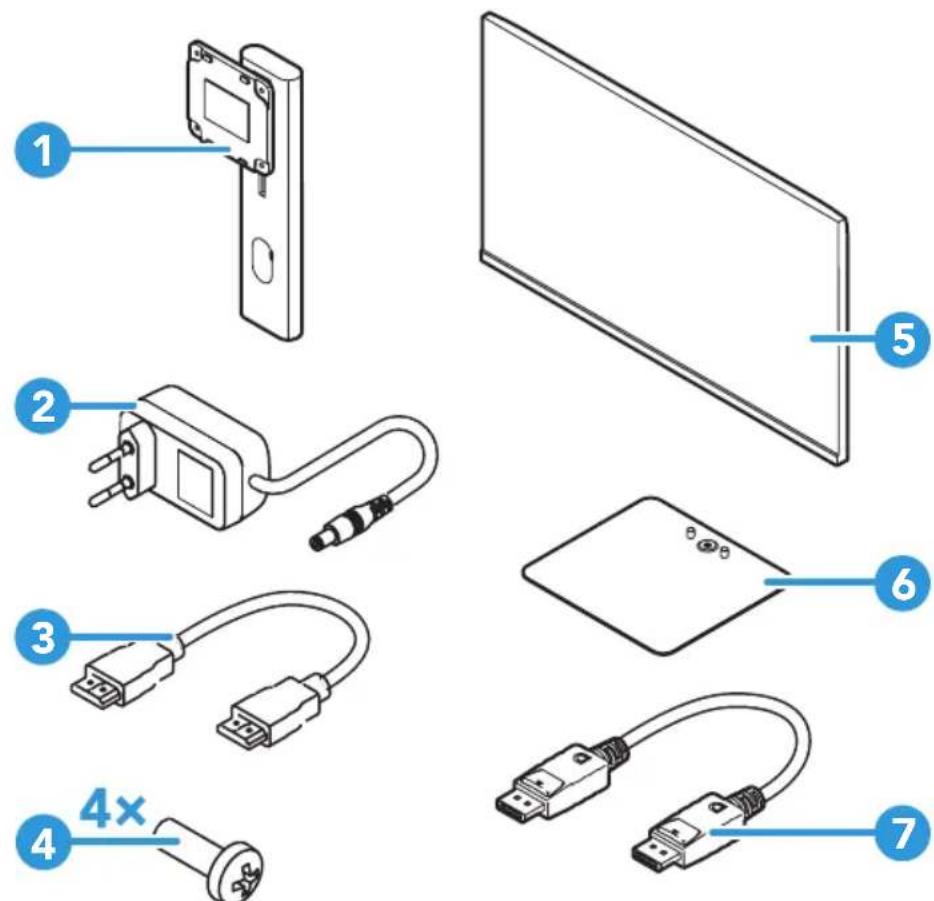
- Stand
- Power adapter
- HDMI cable (1.5 metres)
-
Bolts 4 × 12 millimetres
-
Display
- Base
- DisplayPort cable (1.5 metres)
2.3 CHOOSE MOUNTING ARRANGEMENT
Mount the monitor on the stand supplied or choose another mounting method; mounting on a monitor arm or wall bracket. These are not supplied as standard and you purchase them yourself.
Choose the desired mounting method based on your preference and the available space around the monitor.
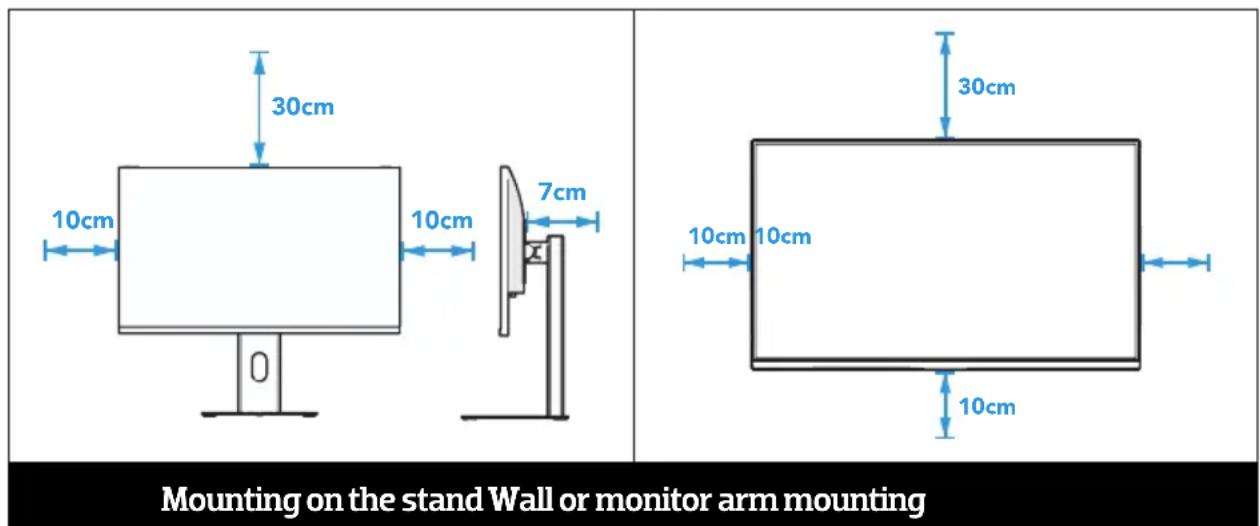
(i) The monitor can't swivel left or right that well when you mount it to the wall or a monitor arm.

2.4 ATTACH THE STAND TO THE MONITOR

- Lay a soft cloth on a flat surface.
- Carefully place the monitor face down on the soft cloth.
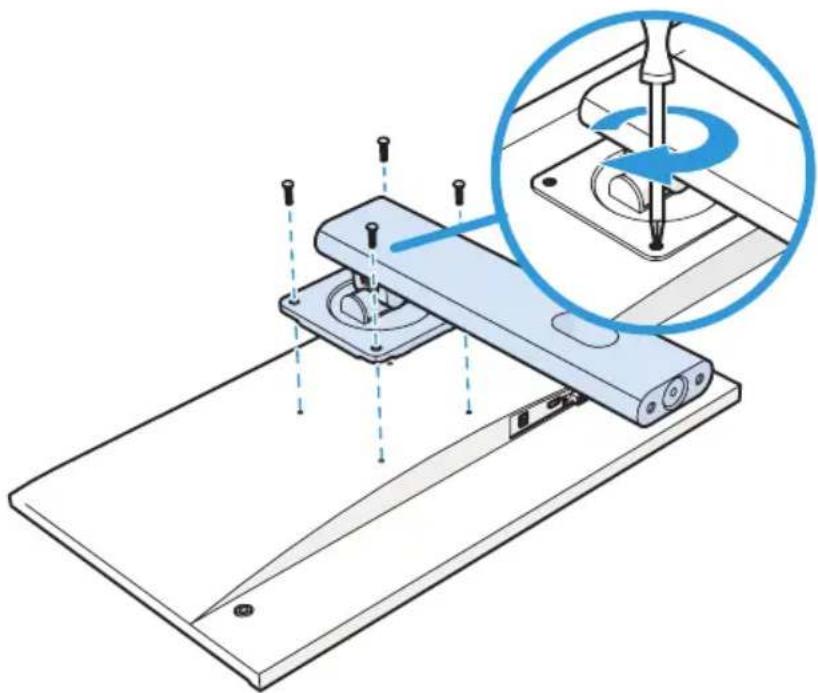
- Align the holes on the stand with the holes on the back of the monitor.
- Attach the stand to the monitor with the four bolts and a screwdriver.
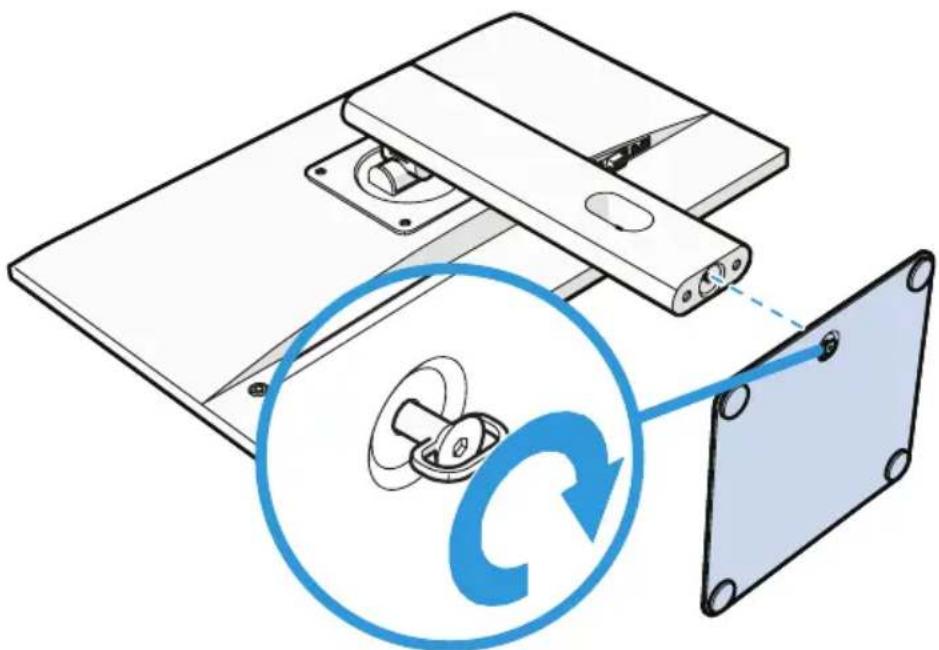
- Align the stand with the swivel at the bottom of the base.
- Attach the base to the stand and screw it on.
- Carefully place the monitor upright on a flat and stable surface.
2.5 ATTACH THE MONITOR ARM OR WALL BRACKET
Check the manual of the product (monitor arm or wall bracket) you bought for proper installation.
3. CONNECTIONS
The monitor has the following connections (from left to right):

| Connection Description | |
| DC | Connect the monitor to a power source via the power cable. |
| DisplayPort | Connect the monitor to a source via a DP cable. |
| HDMI | Connect the monitor to a source via the HDMI cable. |
| VGA | Connect the monitor to a source via a VGA cable. |
| Earphones | Connect an audio output device to the monitor. |
4. SETTING
4.1 ROTATE OR TILT THE MONITOR
Rotate or tilt the monitor in three ways.
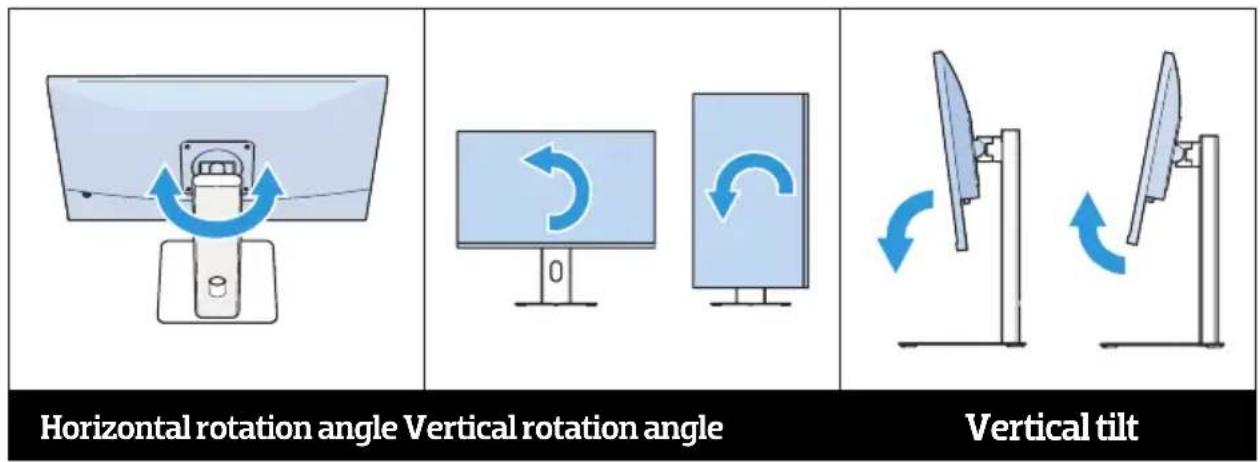
① The monitor can't swivel left or right that well when you mount it to the wall or a monitor arm.
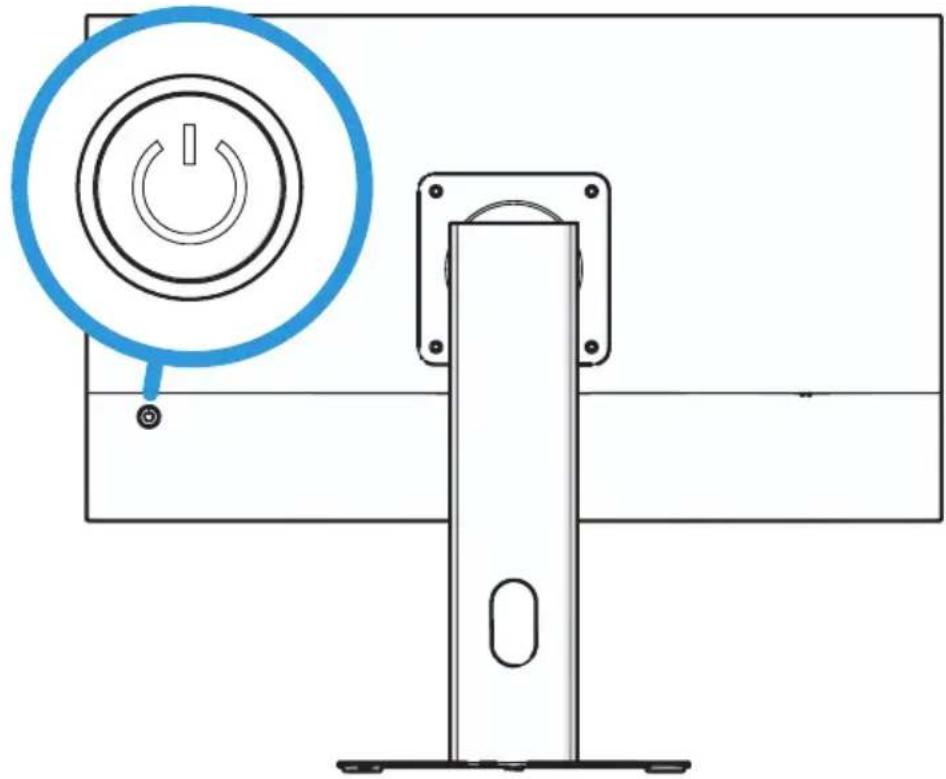
4.2 THE CONTROL PANEL
Set the monitor using the button on the back of the monitor.
- Press the button and open the Settings menu.
- Press the down or up button and select a category in the menu.
- Press the right button and select a setting in the chosen category.
- Press the down or up button and select a setting in the menu.
- Press the right button and select the setting.
- Press the left or right button and adjust the setting.
- Press the down button and confirm your choice.
- Press the left button and leave the menu.
4.3 SETTINGS MENU
| Category Setting Description | ||
| Luminance | Brightness | Adjust the light intensity of the display. |
| Contrast | Adjust the difference between the light and dark parts of the screen. | |
| ECO mode | Switch to matching profiles for various scenes. | |
| DCR | Automatically optimise dynamic contrast for better image quality. | |
| Overdrive | Adjust pixel response time for smooth moving images. | |
| HDR | Enable HDR mode for expanded colours and contrasts. | |
| Image Setup. | H.Position | Set the horizontal position of the image. |
| V.Position | Set the vertical position of the image. | |
| Clock | Adjust the timing of the signal on the receiving device to reduce problems such as flickering or instability in the displayed image. | |
| Phase | Adjust signal alignment to improve the overall image quality. | |
| ImageRatio. | Set the width-to-height ratio of the screen. | |
| Color Setup | Color Temp. | Adjust the colour temperature of the image. |
| Red | Adjust the intensity of the base colours. | |
| Green | ||
| Blue | ||
| Low Blue Light | Switch off the blue light for calmer viewing. | |
| OSD Setup | Language | Adjust the language of the on-screen menu. |
| H.Position | Set the horizontal position of the on-screen menu. | |
| V.Position | Set the vertical position of the on-screen menu. | |
| Timeout | Set the time before the on-screen menu closes automatically. | |
| Transparency | Adjust the transparency of the on-screen menu. | |
| Reset | Auto.Config | Automatically apply optimal configuration. |
| AutoColor | Optimise colour settings automatically. | |
| Reset | Reset all settings to their default values. | |
| Extra | Input Select. | Select the input source when using multiple inputs. |
| Mute | This monitor doesn't have speakers. | |
| Volume | This monitor doesn't have speakers. | |
| FreeSync | Enable FreeSync technology for smooth gaming playback. | |
5. MAINTENANCE AND CLEANING
Clean the monitor often.
- Press the button on the back of the monitor and switch off the monitor.
- Wipe visible dust off the monitor with a dry microfibre cloth.
- dampen the microfibre cloth with water and a cleaning agent without ammonia or acetone. Preferably use a special screen cleaner to remove stubborn stains.
(i) Do not apply the cleaning agent directly to the screen, but to the microfibre cloth.
- Dry the monitor with a dry microfibre cloth.
- Press the button on the back of the monitor and turn the monitor on.
6. TROUBLESHOOTING
| Problem Possible cause Possible solution | ||
| The indicator LED is switched off. | The power cable is not connected. | Connect the power cable to the DC port and a power source. |
| Standby mode is enabled. The PC to which the monitor is connected is switched off. | Switch on the PC to which the monitor is connected. The monitor automatically exits standby mode. | |
| The monitor is switched off. The indicator LED flashes. | Power-saving mode is enabled. | Press any key on the keyboard or move the mouse to turn on the monitor. |
| The display keeps switching on and off. | The DP/VGA/HDMI cable is not properly connected to the monitor and/or to the PC. | Check the DP/VGA/HDMI cable connection between the monitor and the PC. Make sure the connectors make full contact. |
| The screen is too dark. | Brightness and contrast are set incorrectly. | Adjust the brightness and contrast in the on-screen "Luminance" menu. |
| The screen is too bright. | ||
| The screen colour is inconsistent. | The colours are set incorrectly. | Adjust the colours red, green and blue in the on-screen menu "Color Setup". |
7. SPECIFICATIONS
| Screen diagonal | 24" |
| Backlight | E-LED |
| Resolution | 1920×1080 (pixels) Full HD (1080p) |
| Aspect ratio | Standard (16:9) |
| Panel type | IPS |
| Brightness | 300cd/m2 (typ.) 250cd/m2 (min.) |
| Contrast ratio | 1000:1 (typ.) |
| Response time | 14ms (typ.) 5.9ms with overdrive |
| Pixel spacing | 0.2745mm(H)×0.2745mm(V) |
| Viewing angle | 178°(H)/178°(V) |
| Lifetime | 30.000 hours (min.) |
| Colour range (X% NTSC) | 72% (typ.) |
| Viewing area (mm) | 527.04(H)×296.46(V)mm |
| Colour rendering | 16.7M colours (6bit+FRC) |
| Chipset | MT9700FCL |
| Power | 12V=3A |
| Energy consumption | ≤36W |
| Standby power consumption | ≤0.5W |
| VGA | ×1(1920×1080@75Hz) |
| HDMI IN | ×1(1920×1080@100Hz) |
| DisplayPort 1.4 | ×1(1920×1080@100Hz) |
| Headphone | Level: 110 ± 40 mVrms Interface: Φ3,5 mm mini-interface |
| Dimensions (w × d × h) | 539,80mm × 46,20mm × 319,10mm (without stand) 539,80mm × 200mm × 361,9mm (with stand) (down) 539,8 × 200 × 491,9 mm (with stand) (up) |
| Packaging dimensions (w × d × h) | 630 × 175 × 490 mm |
| Weight | Net weight: 4.5 kg; gross weight: 6.5 kg |
| VESA | 4-M4 100mm × 100mm |
| Ambient temperature | Storage humidity: 10% ~ 90% RH, non-condensing Operating humidity: 20% ~ 85% RH, non-condensing Storage temperature: -10°C ~ +60°C Operating temperature: 0 ~ +40°C Operating altitude: ≤5000m Longest service time: 18 hours × 7 days |
名
8. TECHNICAL DATA
The technical data is indicated on the type plate on the inside of the appliance and on the energy label (both also printed on page 2). The QR code on the energy label provided with the appliance provides a web link to the information related to the appliance performance in the EU EPREL database. Keep the energy label for reference together with the user manual and any other documents provided with this appliance. It is also possible to find the same information in EPREL via the link https://eprel.ec.europa.eu and the model name and product number that can be found on the type plate of the appliance. See link www.theenergylabel.eu for detailed information on the energy label.
9. WARRANTY
This device comes with a warranty period of five years after purchase. To make a warranty claim, you need the purchase receipt with purchase and/or delivery date. For more information on warranty conditions, please visit www.coolblue.nl/en/customer-service.
10. TAKING OUT OF SERVICE
- Clean the device. Follow the instructions on page 19 Maintenance and cleaning
- Remove the power cable from the (earthed) socket.
- Carefully remove the device from its place.
- Store the device in its original packaging in a dry and ventilated space.
11. SAFE DISPOSAL

This symbol indicates that the device must not be disposed of with other household waste within the EU. By properly disposing of the device, you help prevent potential hazards to the environment and public health. Recycling materials contributes to the conservation of our natural resources. Therefore, do not dispose of waste electronic
appliances along with household waste. When disposing of the device, follow national and local regulations regarding the environmentally friendly disposal of electronic devices. You can also contact Coolblue B.V. if you no longer want to use the device or you can return it to a Coolblue store of your choice.
Z

INHOUDSOPGAVE
VOORWOORD
26