Multicom 2 - Radio transmitter ALBRECHT - Free user manual and instructions
Find the device manual for free Multicom 2 ALBRECHT in PDF.

| Product type | Full-duplex radio transmitter for simultaneous two-way communication |
| Model | Multicom 2 |
| Brand | ALBRECHT |
| Transmission frequency | 2.4 GHz |
| Transmission power | < 20 dBm (typ. 16 dBm) |
| Battery | Li-Ion 3.7 V / 1800 mAh / 6.66 Wh |
| Typical battery life | 12 h (main), 40 h (secondary), 60 h (receiver) |
| Charging type | USB-C, PD 5 V compatible |
| Headphone impedance | 32 Ohms |
| Dimensions (L x H x D) | 112 x 56 x 34 mm |
| Net weight | Approximately 104 g |
| Range | Approximately 200 m (may vary depending on obstacles) |
| Maximum number of participants | 5 transmitters (1 main + 4 secondary) + 94 receivers |
| Main functions | Full-duplex, centralized channel synchronization, microphone mute, key lock, volume/microphone sensitivity adjustment, external audio input |
| Package contents | Multicom 2 radios, headsets/earpieces, power supply with 4-way charging cable, softshell bag, manual |
| Maintenance and cleaning | Clean only with a dry cloth |
| Safety | Do not expose to moisture or excessive heat, do not short-circuit the battery, use only the supplied accessories |
| Warranty | 2 years from date of purchase (excluding wear and external damage) |
| Repairability | Contact the retailer or after-sales service for repair/replacement |
| General information | Compliant with directive 2014/53/EU, recycling via WEEE collection points |
Frequently Asked Questions - Multicom 2 ALBRECHT
User questions about Multicom 2 ALBRECHT
0 question about this device. Answer the ones you know or ask your own.
Ask a new question about this device
Download the instructions for your Radio transmitter in PDF format for free! Find your manual Multicom 2 - ALBRECHT and take your electronic device back in hand. On this page are published all the documents necessary for the use of your device. Multicom 2 by ALBRECHT.
USER MANUAL Multicom 2 ALBRECHT
text_image
Vice Transm 6 CH 00 Vice Transmitter 6 CH 00 Main Transmitter 6 CH 00 Transmitter Vice Transm Vice Transmitter 6 CH 00 Vice Transmitter Vice Transmitter Vice Transmitter Vice Transmitter Vice Transmitter Vice Transmitter Vice Transmitter Vice Transmitter Vice Transmitter Vice Transmitter Vice Transmitter Vice Transmitter Vice Transmitter Vice Transmitter Vice Transmitter Vice Transmitter Vice Transmitter Vice Transmitter Vice Transmitter Vice Transmitter Vice Trans明白 Vice Trans明白 Vice Trans明白 Vice Trans明白 Vice Trans明白 Vice Trans明白 Vice Trans明白 Vice Trans明白 Vice Trans明白 Vice Trans明白 Vice Trans明白 Vice Trans明白 Vice Trans明白 Vice Trans明白 Vice Trans明白 Vice Trans明白 Vice Trans明白 Vice Trans明白 Vice Trans明白 Vice Trans明白 Vice Transwhite Vice Transwhite Vice Transwhite Vice Transwhite Vice Transwhite Vice Transwhite Vice Transwhite Vice Transwhite Vice Transwhite Vice Transwhite Vice Transwhite Vice Transwhite Vice Transwhite Vice Transwhite Vice Transwhite Vice Transwhite Vice Transwhite Vice Transwhite Vice Transwhite Vice Transwhite Vice Trans white Vice Trans white Vice Trans white Vice Trans white Vice Trans white Vice Trans white Vice Trans white Vice Trans white Vice Trans white Vice Trans white Vice Trans white Vice Trans white Vice Trans white Vice Trans white Vice Trans white Vice Trans white Vice Trans white Vice Trans white Vice Trans white Vice Trans white Vice Trans blacktext_image
Diagram of a smartwatch with labeled parts including control panel, display screen, and ear devicetext_image
3.5 mm Line-In6. Spezifikationen
natural_image
Simple line drawing of a trash bin with crossed diagonal lines indicating no waste or restriction (no text or symbols)
12. Serviceadresse
Multicom 2 Real-time communication system
text_image
600 CHDAC VOL+ M- CH+ VOL- CH-Manual
English
Table of content
- Scope of delivery....13
- Overview and getting started....13
- Operating elements and connections....14
- Operation....15
4.1. Switch on/off 15
4.2. Volume and microphone sensitivity 15
4.3. Set channel.... 15
4.4.Key lock 15
4.5. Central channel synchronization.... 16
4.6. Mute microphone....16
- External audio players....16
- Specifications ..... 17
- Safety instructions ....17
- Troubleshooting....18
- CE Declaration of Conformity .....19
- WEEE and recycling....19
- Service address ......20
1. Scope of delivery
- Multicom 2 radios
- Headsets / earphones
- Power supply unit incl. 4-way charging cable
- Softshell bag
- Manual
2. Overview and getting started
The Multicom 2 system enables simultaneous two-way communication (full-duplex) between up to 5 participants and 94 other listeners. There are three different device types:
- Main device (Main): The central coordinator for communication. One main device is always required for each group.
- Transmitting devices (Vice): Enable sending and receiving of audio. Up to 4 devices per group possible.
- Receiver: Reception and playback of audio, but no talkback possible.
Fully charge all devices with the supplied charger before using them.
Connect the supplied headsets (earphones for receiver) with the socket on the top of the devices.
Switch on the devices to start communication. All devices in a group must be set to the same channel (see chapter 4.5 „Central channel synchronization“ auf Seite 16). Make sure that all devices are within range of the main device. The range is approximately 200 m and can be restricted by obstacles between the devices.
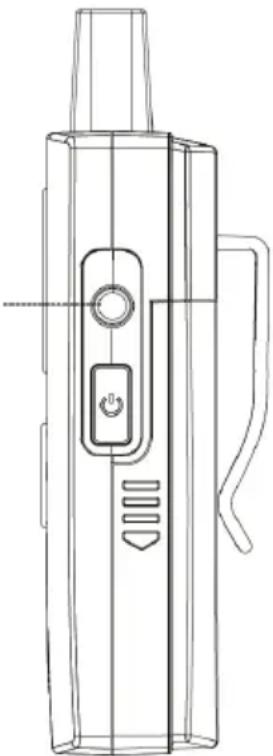
3. Operating elements and connections
text_image
Technical diagram of a mechanical component with numbered parts labeled 13 and 14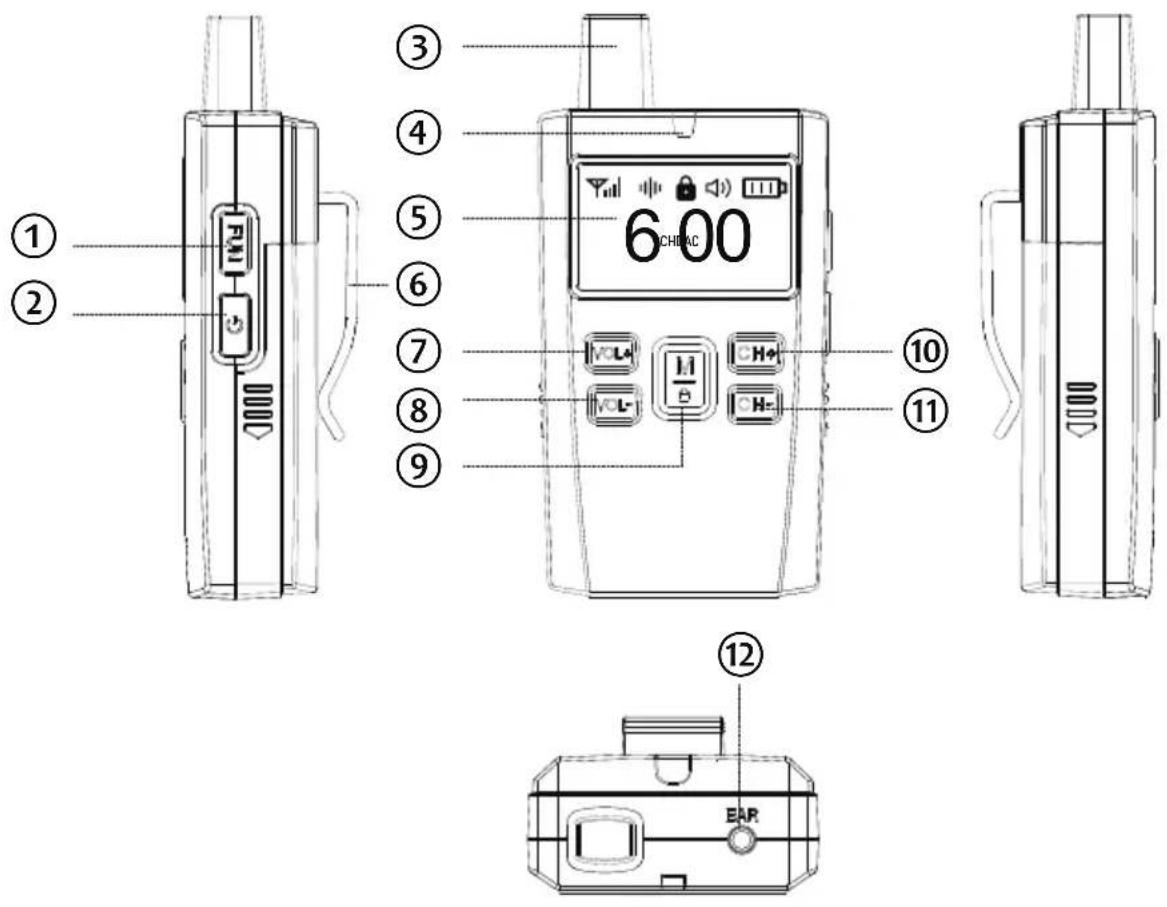
text_image
Diagram of a smartwatch with labeled parts including control panel, display screen, and ear device| Labeling Function | ||
| 1 FUN / Line-In | Muting the microphone (Vice)3.5mm audio input for external players(main) | |
| 2 Switch on/off | ||
| 3 Antenna | Keep the antenna as free and upright as possible | |
| 4 Status LED Displays the operating / charging status | ||
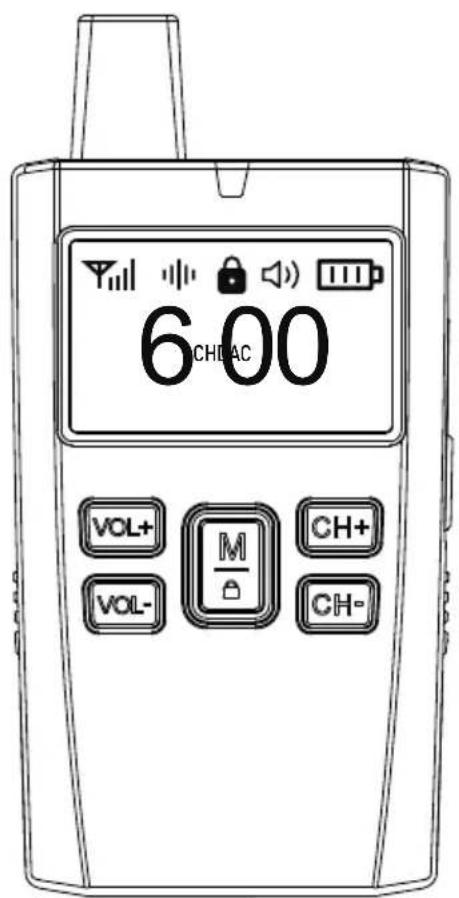
| 5 Display | Displays the operating status, channel and volume | |
| 6 Clip Belt clip | ||
| 7 VOL+ Increases the volume | ||
| 8 VOL- Reduces the volume | ||
| 9 | M / [ABDA] | Configuration / key lock |
| 10 CH+ Increases the channel | ||
| 11 CH- Reduces the channel | ||
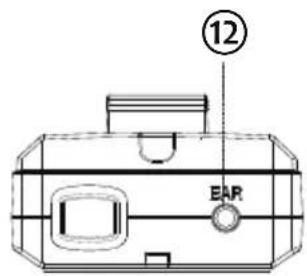
| 12 Headset Connection for the headset | ||
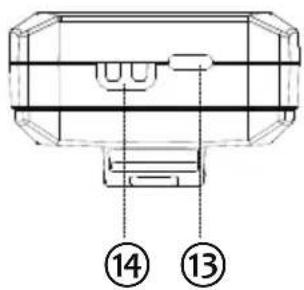
| 13 USB-C USB-C charging socket | ||
| 14 | Charging contacts | for external stand charger |
4. Operation
4.1. Switch on/off
Press and hold the button to switch the device on or off.
4.2. Volume and microphone sensitivity
The display shows the current volume (DAC) or microphone sensitivity (MIC). Use the VOL+/- buttons to change the displayed value.
To switch between DAC and MIC, release the button lock and briefly press the ⏻ button (Main) / long press the M button (Vice).
4.3. Set channel
Release the button lock and set the channel using the CH+/- buttons. The current channel is shown on the display.
4.4. Key lock
Briefly press the 🔒 button to switch the key lock on and off. When the key lock is active, the 🔒 symbol is shown on the display. The volume / microphone sensitivity can still be adjusted when the key lock is active.
4.5. Central channel synchronization
You can make the channel setting centrally on the main device for all group members and synchronize all devices in a group.
To do this, select a desired free channel on the main unit. Then press and hold the M button for about 5 seconds.
All switched-on transmitters and receivers that are not currently in an active group are configured to the selected channel. Devices that are already assigned to a group are not affected.
4.6. Mute microphone
Main Transmitter:
To mute or unmute your own microphone, press and hold the VOL+ button. Pressing the ⏻ button twice will mute the microphones of all Vice Transmitters.
Vice Transmitter:
Press and hold the FUN button to mute the microphone.
The loudspeaker symbol in the display shows the current status of the mute function.
5. External audio players
An external audio player can be connected to the main unit. To do this, connect the audio output of the external audio player to the input socket on the right-hand side of the main unit using a 3.5 mm jack cable. If you now play an audio file, it will be transmitted to all devices in the group.
3.5 mm Line-In
natural_image
Line drawing of a handheld device with handle, control panel, and buttons (no text or symbols)6. Specifications
| 1 | Model: Multicom 2 |
| 2 | transmission frequency: 2.4 GHz |
| 3 | Transmission power: < 20 dBm / typ. 16 dBm |
| 4 | Battery: 3.7 V / 1800 mAh / 6.66 Wh Li-Ion |
| 5 | Type. Operating time: 12 h (Main) / 40 h (Vice) / 60 h (Recv.) |
| 6 | Charging connection: USB-C 5 V, PD-compatible |
| 7 | Headphone impedance: 32 Ohm |
| 8 | Dimensions (WxHxD): 112 x 56 x 34 mm |
| 9 | Net weight: approx. 104g |
7. Safety instructions
- Only clean the appliance with a dry cloth.
- Only use the accessories supplied by the manufacturer.
- Do not expose this device to rain or moisture.
- Do not expose the appliance to excessive heat.
- Only charge the battery in the device.
- Do not short-circuit the battery contacts.
- Damage to the battery or extreme temperatures can cause the battery to ignite or explode.
- If you notice any damage to the battery, stop using the device and contact the manufacturer.
8. Troubleshooting
The device cannot be switched on.
- Make sure that the battery is inserted correctly
- Charge the device completely
- Contact your dealer
I can't hear my conversation partners.
- Make sure that all headsets are connected correctly.
- Make sure that the microphone mute function is switched off.
- Make sure that the volume and microphone sensitivity are set sufficiently high.
- Make sure that all devices are on the same channel.
- Make sure that all devices are within range of the main device. Use the signal strength indicator on the display.
- Make sure that there is no more than one main device on this channel.
I hear my own voice in the earpiece.
This is called the sidetone function and is well known in the professional audio sector. Sidetone refers to the playback of the spoken word in the headset's own loudspeaker. This allows you to better regulate the volume of your own voice (especially important with circumaural headsets). If you cannot hear yourself, you know that no one else has heard you either.
7. Warranty and recycling information
We are required by law to include disposal and warranty information with each device, as well as an EU Declaration of Conformity with instructions for use in various countries. This information can be found on the following pages.
2-year warranty from date of purchase
The manufacturer/retailer provides a two-year warranty for this
product from the date of purchase. This warranty covers all failures due to defective components or faulty functions within this period, with the exception of wear and tear such as scratches on the display, defective housing, defective antenna and defects due to external influences such as corrosion, overvoltage due to improper external power supply or the use of unsuitable accessories. Defects caused by improper use are also excluded from the warranty.
In the event of a warranty claim, please contact your dealer. The dealer will repair or replace the device or forward it to an authorized service center.
You can also contact our service partner directly. Please enclose your proof of purchase with the device and describe the malfunction as precisely as possible.
9. CE Declaration of Conformity
Standards and guidelines
CE
Hereby, Alan Electronics GmbH declares that the radio equipment model Multicom 2 is in compliance with Regulation 2014/53/EU. The full text of the EU Declaration of Conformity can be found at the following internet address:
http://service.alan-electronics.de/CE-Papiere/
10. WEEE and recycling

natural_image
Symbol of a trash bin crossed with no text or labels, representing environmental protection (no text present)European legislation prohibits the disposal of old or defective electrical or electronic appliances with household waste. To dispose of the device, take it to a collection point in your municipality for recycling. This system is financed by the industry and ensures environmentally friendly disposal and the recycling of valuable raw materials.
11. Service address
Technical hotline (for devices sold in Germany)
Please call our service hotline on +49 (0) 6103/9481 - 66 (normal German landline rate) or send us an e-mail:
service@albrecht-midland.de
Before returning a device, please read chapter 12 "Troubleshooting".
You will find some tips and tests there. Alternatively, you can contact our hotline.
Subject to printing errors.
The information in these operating instructions is subject to change without prior notice.
© 2025 Alan Electronics GmbH
text_image
Technical diagram of a smartwatch with labeled parts including control panel, display screen, and ear devicetext_image
3.5 mm Line-In6. Spécifications
natural_image
Symbol of a trash bin crossed with no text or labels, representing waste sorting or disposal (no text present)text_image
Technical diagram of a mechanical component with numbered parts labeled 13 and 14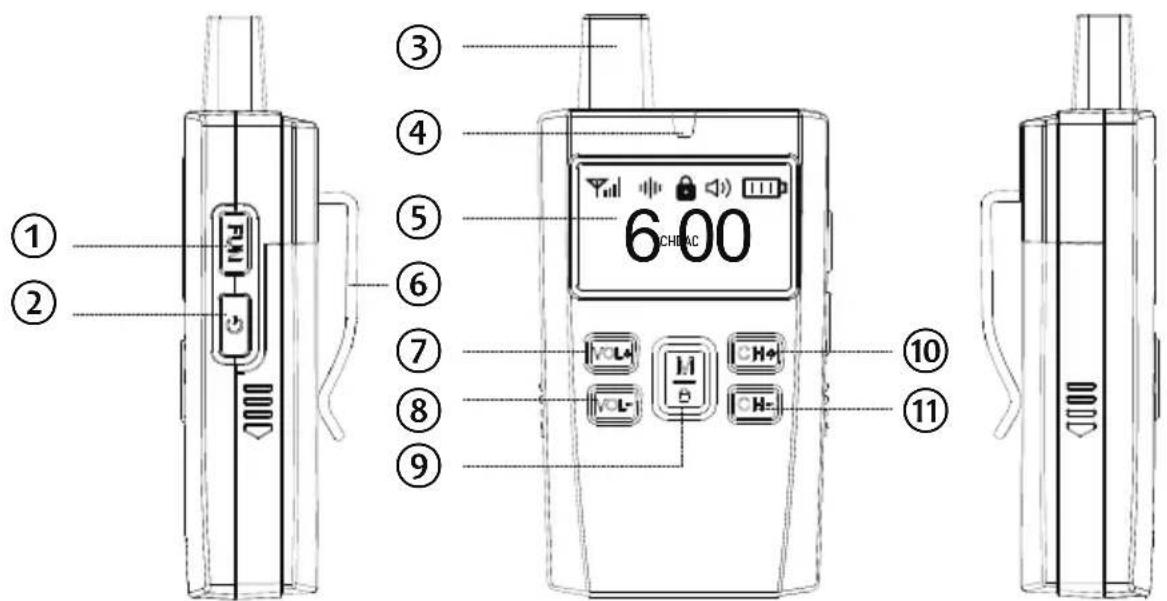
text_image
① ② ③ ④ ⑤ ⑥ ⑦ ⑧ ⑨ 6 CHIAC ⑩ ⑪