Realiview APF1700 WiFi - Digital photo frame AGFAPHOTO - Free user manual and instructions
Find the device manual for free Realiview APF1700 WiFi AGFAPHOTO in PDF.
| Product type | WiFi Digital Photo Frame |
| Brand | AgfaPhoto |
| Model | Realiview APF1700 WiFi |
| Connectivity | Integrated Wi-Fi |
| Mobile app | Frameo (iOS and Android) to send photos |
| Internal storage | Capacity not specified, expandable via MicroSD card |
| Supported image formats | Common formats (not specified) |
| Main functions | Slideshow, caption display, brightness adjustment, display order, hiding/deleting photos |
| Friend management | Adding and managing via shared connection code |
| Care and cleaning | Use a soft, non-abrasive cloth; avoid alcohol, gasoline, solvents |
| Safety precautions | Do not expose to moisture or dust, do not open the casing, unplug if unused for long periods |
| Repairability | No user-serviceable parts; repairs only by qualified personnel |
| Power supply | Provided mains adapter (identical specifications required for replacement) |
| Operating temperature | Indoor only |
| Backup and restore | Via MicroSD card |
| General information | Embedded Android version, Pair ID, Frameo version |
| Support | support.frameo.net |
| Recycling | Device, accessories, and cables recyclable; dispose of at a store or recycling center |
| Manufacturer | GT COMPANY, 5 rue de la Galmy, 77700 Chessy, France |
Frequently Asked Questions - Realiview APF1700 WiFi AGFAPHOTO
User questions about Realiview APF1700 WiFi AGFAPHOTO
0 question about this device. Answer the ones you know or ask your own.
Ask a new question about this device
Download the instructions for your Digital photo frame in PDF format for free! Find your manual Realiview APF1700 WiFi - AGFAPHOTO and take your electronic device back in hand. On this page are published all the documents necessary for the use of your device. Realiview APF1700 WiFi by AGFAPHOTO.
USER MANUAL Realiview APF1700 WiFi AGFAPHOTO
Realiview APF1700 Wi-Fi Digital photo frame
User Manual Manuel d'utilisation Benutzerhandbuch Manual de usuario Manuale d'uso

natural_image
Abstract logo design with red and white curved shapes (no text or symbols)frameo
Download the full user manual on :
https://www.support.agfaphoto-gtc.com/

User Manual
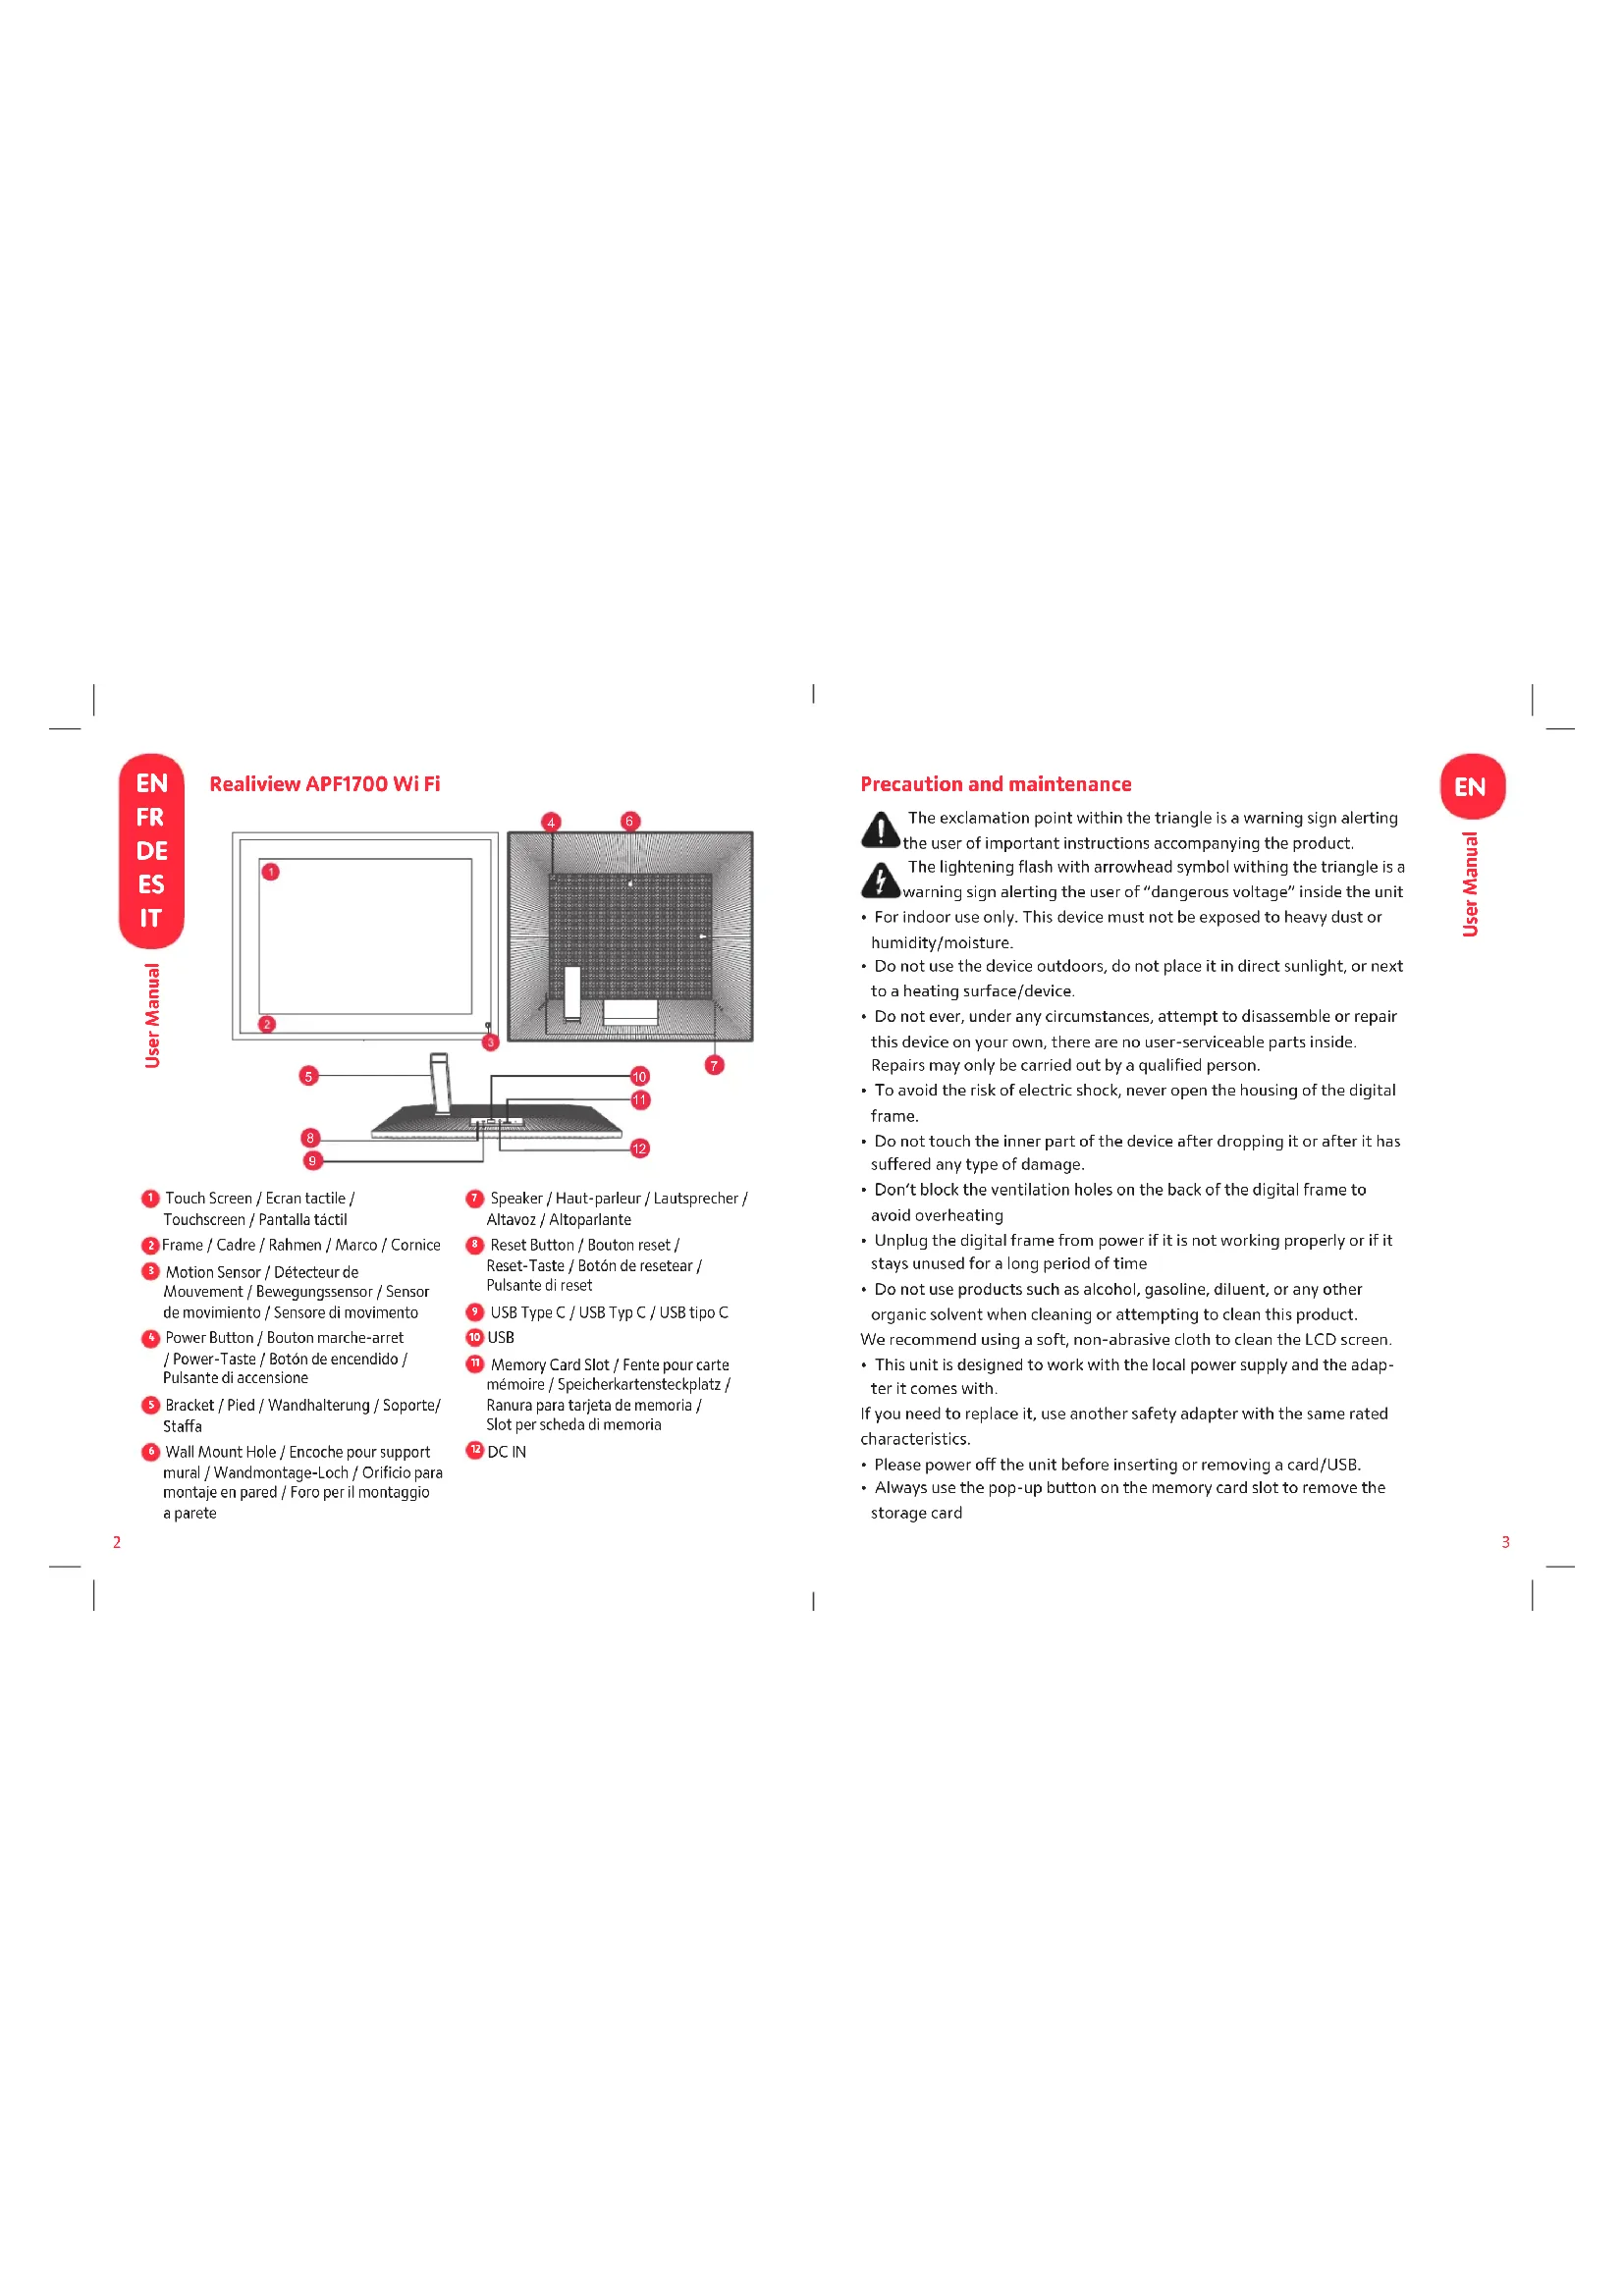
Realiview APF1700 Wi Fi

1 Touch Screen / Ecran tactile / Touchscreen / Pantalla táctil
2 Frame / Cadre / Rahmen / Marco / Cornice
3 Motion Sensor / Détecteur de Mouvement / Bewegungssensor / Sensor de movimento / Sensore di movimento
4 Power Button / Bouton marche-arret / Power-Taste / Botón de encendido / Pulsante di accensione
5 Bracket / Pied / Wandhalterung / Soporte/ Staffa
6 Wall Mount Hole / Encoche pour support mural / Wandmontage-Loch / Orificio para montaje en pared / Foro per il montaggio a parete
7 Speaker / Haut-parleur / Lautsprecher / Altavoz / Altoparlante
8 Reset Button / Bouton reset / Reset-Taste / Botón de resetear / Pulsante di reset
9 USB Type C / USB Typ C / USB tipo C
10 USB
11 Memory Card Slot / Fente pour carte mémoire / Speicherkartensteckplatz / Ranura para tarjeta de memoria / Slot per scheda di memoria
12 DC IN
Precaution and maintenance
The exclamation point within the triangle is a warning sign alerting the user of important instructions accompanying the product.
The lightening flash with arrowhead symbol within the triangle is a warning sign alerting the user of "dangerous voltage" inside the unit
- For indoor use only. This device must not be exposed to heavy dust or humidity/moisture.
- Do not use the device outdoors, do not place it in direct sunlight, or next to a heating surface/device.
- Do not ever, under any circumstances, attempt to disassemble or repair this device on your own, there are no user-serviceable parts inside. Repairs may only be carried out by a qualified person.
- To avoid the risk of electric shock, never open the housing of the digital frame.
- Do not touch the inner part of the device after dropping it or after it has suffered any type of damage.
- Don't block the ventilation holes on the back of the digital frame to avoid overheating
- Unplug the digital frame from power if it is not working properly or if it stays unused for a long period of time
- Do not use products such as alcohol, gasoline, diluent, or any other organic solvent when cleaning or attempting to clean this product.
We recommend using a soft, non-abrasive cloth to clean the LCD screen.
- This unit is designed to work with the local power supply and the adapter it comes with.
If you need to replace it, use another safety adapter with the same rated characteristics.
- Please power off the unit before inserting or removing a card/USB.
- Always use the pop-up button on the memory card slot to remove the storage card

User Manual
Contents
Getting started
Congratulations on your brand new Frameo photo frame! If you are new to using Frameo then start by following the Frameo quick setup or follow the on-screen guide when powering it on for the first time. Once you have set up your Frameo frame, you can start connecting it to your friends and family.
Frameo app
To send photos to your frame, use the Frameo app for iOS or Android.


Scan code to find the app
Frameo quick setup
When starting your frame for the first time, you will need to set up the frame.
- Select a language. This will be the language used on the Frameo.
- Connect your frame to the internet by connecting it to Wi-Fi.
- Verify or correct the date and time.
- Frameo may ask you to update to the latest version. It is recommended to up date your frame before continuing if asked to.
- Enter your name, and the location where you have placed your frame e.g. "John Doe" and "Living room", "Kitchen" or "Office". Finally set the timezone if not already correct.
Start using Frameo
Next step is to connect Frameo with your friends and family by providing them with a code from your frame. If you want to be able to send photos to the frame yourself, start by downloading the app for iOS or Android on App Store or Google Play. Then use the code to connect your frame and app as described below.
Connecting a new friend
Make sure that your friend has downloaded and installed the Frameo app. Click the add friend icon on your frame. A dialog will appear showing a connection code, which is valid for 12 hours. Now share this code in whatever fashion you prefer e.g. SMS, E-Mail, IM, phone call, to your friend. Once your friends have added the code in their Frameo app, they will automatically appear on your frame and be able to send you photos. Read chapter Change options for a friend to allow connected friends, to retrieve and share the connection code via the smartphone app.

Navigating your Frameo
Swipe left or right to go through your photos. To access the menu, simply tap once on the screen.

In the menu you will find the most used features.

+ Add friend
This will generate a code that you can share with your friends and family so they can connect and send photos to your frame.
Settings
Power menu
React
NB. The React menu can also be accessed by double-tapping on the screen.
Hide photo
Hides the current photo. This means that the photo will no longer be shown in the slideshow. If needed the photo can be shown again through the settings menu.
Gallery
Opens a gallery which allows for easy and fast navigation through your photos.
Fit to frame/Fill frame
This toggles how the photo is shown.
The Fill frame option is the default. The photo is scaled so that it fills the whole screen. It will be centered around what is selected as the most important part. See the first picture below.
Adjust photo
Allows you to adjust the position of the photo in the frame for an even better fit. Here you can also use ⚙️ to rotate your photo, and you can use 📄 edit the caption on imported photos. For received photos, please ask the sender to edit the caption in the Frameo app.
Interacting with videos
When a video is shown two additional controls are shown. One for play/pause of the video and one to control the volume level for video sounds.
Power menu
Tap the power icon ⏻ to access the power menu. Here you can power off using ⏻ restart your frame using oenter sleep mode using .

NB. Make sure to always use the power off button on the device or in the power menu to turn Frameo off. Never disconnect power when Frameo is running.
External storage menu
When inserting an external storage (e.g. a microSD card) a menu will automatically appear with three options: Press to play photos directly from the external storage, press to import photos to the internal memory of your frame or press to make a backup of your frame.

Settings
Through the settings, you can personalize your frame to your needs.
My frame
Frame name
Changes the name of your frame. This is also the name that connected friends and family will see in their list of connected frames in the smartphone app.
Frame location
Changes the location of your frame. This is the location displayed on your friends' and family's list of connected frames which can help to distinguish frames from each other.


Set language
Sets the language used on the frame.
Date
Sets the date used on the frame.
Time
Sets the time used on the frame. Frameo will automatically try to set the correct date and time when connected to the internet.
Time zone
Sets the time zone used on the frame.
Enable/Disable 24-hour format
Enables, and disables, 24-hour time format.
Manage photos
In the manage photos menu you can see how many photos are on your frame and the storage they use. You can also see the amount of storage left available on your device for storing new photos.
Show/hide photos
Select which photos to hide by tapping them. Hidden photos will NOT be deleted from your frame and you can always select them to be shown again. Use to hide or show all photos.
Delete photos
Select photos that you want to permanently delete from your frame by tapping the photo. Use ☐ to select or deselect all and ☐ to permanently delete the selected photos.
Import photos
Allows you to import photos from an external storage (e.g. microSD card). Before you try to import photos, make sure you have an external storage (e.g. microSD card) inserted into your frame with the photos you wish to import. Start by selecting the photos that you want to import onto your frame. Once selected tap the import button ↓ to start the import process. Use ☐ to select or deselect all photos on the external storage (e.g. microSD card). Use = to set the sort order of photos before import and ↑ to order by ascending/descending.
Export photos
Allows you to export photos from the frame to external storage (e.g. microSD card). The export function will export all photos on the frame as well as profile pictures.
Play from external storage
Enables / disables playback of photos and videos directly from an external storage (e.g. microSD card) without taking up space on the frame.
My Friends
This list contains all the connected friends that are allowed to send photos to your frame.
Change options for a friend
Click the options icon to open the friend options menu. From here you can allow / disallow if a friend may share the code to the frame. If this is enabled the friend can retrieve and share the code to the frame from his/her app. From the options menu you can also delete a friend, by pressing the DELETE FRIEND button. This will remove the friend from the list and thereby remove their permission to send photos to the frame. You will then be asked to confirm the removal and if you would like to remove all photos previously received from this friend.
Add person
To allow a new person to send you photos, simply tap the add friend button + and share the presented code in whatever way you prefer.
Display
Brightness level
Adjust the brightness level of the screen.
Slideshow
Timer
Set the duration that a photo should be displayed before showing the next photo.

Show caption
Set whether or not to display the captions that your friends have sent with the photo. Check to display captions. Uncheck to hide captions.
Fill frame
Set the default frame photo setting. Check to set default to fill which makes the photos fit the device screen according to the most important part of the photo. Uncheck to make the photo fit inside the screen of the device, adding background bars on the sides or top/bottom.
Frame background
Choose between several different frame background options to be shown as bars if the photo does not fill the screen.
Photo display order
Sets the order in which your photos are displayed on the frame.
- By date taken: Photos are shown in order of when it was taken.
- By date received: Photos are shown in order of when it was received.
- Shuffle: Photos are shuffled and shown in a random order.
Reverse photo display order
Sets if photos are displayed newest to oldest or oldest to newest.
Autoplay
Enables/disables autoplay of videos in the slideshow. Videos can always be manually started regardless of this setting.
Video playback
Determines how videos should be played when autoplay is enabled.
- Loop videos: The video will loop until the slideshow timer is up.
- Play once: The video will play once and show its thumbnail until the timer is up.
- Play once and continue: The video will play once and continue to the next photo, or video, once it completes.
Auto mute
Enable to automatically mute the video volume after a short period of time of not interacting with the frame.
Video volume
Adjust the volume level for video sounds on the frames.
Wi-Fi
Set which Wi-Fi the frame connects to. If you are connecting to a network with a captive portal Connection status will say that Wi-Fi login is required and show up this to open a login screen where you can enter credentials to access the network.
Wi-Fi details
Use ⓘ to show details about the current connected Wi-Fi.
Reset Wi-Fi
Use i to delete all Wi-Fi information and restart your frame.
Notifications
Show notifications
Enables/disables whether notifications are shown in the slideshow (e.g. when a new photo is received).
Backup and Restore
Backup frame to external storage (e.g. microSD card)
Tap to make a backup of your photos, friends and settings. The time of the latest successful backup is also displayed here. Any existing backup on the external storage will be overridden!
Automatic backup
If checked, your frame will automatically take a backup within 30 hours of receiving new photos or making changes to your frame.
Restore from backup
Before you attempt to restore your frame, start by confirming that your backup is up-to-date. This is done by confirming the date under "Backup frame to external storage (e.g. microSD card)". If e.g. the last backup is too old or if no backup is made, then press the "Backup frame to external storage (e.g. microSD card)" button to make a new backup. NB: To keep both the old and the new frame operational at the same time after restoring from backup, please make sure that both frames are updated to the latest version beforehand. If you wish to restore a backup on a frame that has already been setup, then you must first reset the frame. This is done by pressing the "Reset frame" button. This will delete all data on the Frameo and reset the Frameo to its setup screen. On the setup screen you can select the "Restore from backup" button which will restore your frame according to the backup. If the "Restore from backup" button isn't visible, then confirm that the external storage (e.g. microSD card) is correctly mounted.
Reset frame
Removes all data from your frame. This will permanently remove all your photos, friends/connections and settings.
Help
Open source libraries
Opens a list of open source libraries used in the app and their licenses.
Guide
Opens the quick start guide, that was shown when you first started the frame.
About
Android version
See what version of Android that is installed on the frame.
Peer ID
This is a unique ID for your photo frame. When contacting our support, please provide this ID with your message.
Frameo version
Shows what version of the Frameo software is currently installed on your frame.
Check for update
Check if an update is available for your frame.
Privacy
For more information regarding privacy, please visit http://privacy.frameo.net
Support
Please visit https://support.frameo.net/hc for FAQ, support and to provide feedback.
Librairies open source
Notice of compliance for the European Union
CE Products bearing the CE mark comply with the applicable European directives and associated harmonised European standards.
Disposal of waste equipment by users in the European Union
This symbol means that according to local laws and regulations, it is prohibited to dispose of this product with household waste. Instead, it is your responsibility to protect the environment and human health by handing over your used device to a designated collection point for the recycling of waste electrical and electronic equipment. For more information about where you can drop off your waste equipment for recycling, please contact your local city office, your household waste disposal service or the shop where you purchased the product.


Product manufactured for and distributed by :
AgfaPhoto is used under license of Agfa-Gevaert NV. For this product a sub-license has been granted by AgfaPhoto Holding GmbH (www.agfaphoto.com). Neither Agfa-Gevaert NV nor AgfaPhoto Holding GmbH manufacture this product or provide any product warranty or support. For service, support and warranty information, contact the distributor or manufacturer.

natural_image
Abstract logo with red circular background and white hand-like shapes (no text or symbols)Frameo App Instantly Share Photos & Videos


Scan code to find the Frameo app Scannez le code pour trouver l'application Frameo Scannen Sie den Code, um die Frameo-App zu finden Escanea el código para encontrar la aplicación Frameo Scansiona il codice per trovare l'app Frameo Escaneie o código para encontrar o aplicativo Frameo Scan de code om de Frameo-app te vinden
Zeskanuj kod, aby znaleźć aplikację Frameo Olvassa be a kódot a Frameo alkalmazás megtalálásához Naskenujte kód a najděte aplikaci Frameo

AGFAPHOTO
www.agfaphoto-gtc.com