
appLS23 - Barcode scanner Approx - Free user manual and instructions
Find the device manual for free appLS23 Approx in PDF.
| Product type | High-performance wireless barcode scanner |
| Brand | Approx |
| Model | appLS23 |
| Supported symbologies | 1D and 2D barcodes, including QR codes (paper and screen) |
| Wireless connectivity | Bluetooth (HID, BLE, SPP) and 2.4 GHz (dongle) |
| Bluetooth connection modes | HID, BLE, SPP |
| Scanning mode | Manual and automatic |
| Light indicator (LED) | Red (charging), blue (connection), green (2.4G), green+blue flashing (HID) |
| Audible signal (buzzer) | Long/short beeps for power on, scan, error, etc. |
| Power supply | Internal rechargeable battery via interface |
| Factory reset function | Yes (configuration code) |
| Battery level display | Yes (configuration code) |
| Firmware update | Possible (version configuration code) |
| Safety | Never open the device; avoid contact with water, liquids, metal objects |
| Cleaning | Clean the window with a soft cloth; no solvents |
| Recycling | Complies with European directive 2002/96/EC; battery must be removed and recycled separately |
Frequently Asked Questions - appLS23 Approx
User questions about appLS23 Approx
0 question about this device. Answer the ones you know or ask your own.
Ask a new question about this device
Download the instructions for your Barcode scanner in PDF format for free! Find your manual appLS23 - Approx and take your electronic device back in hand. On this page are published all the documents necessary for the use of your device. appLS23 by Approx.
USER MANUAL appLS23 Approx
Please carefully read all the contents of the manual before using the products described in this manual to ensure that the product is safely and effectively preserved for future use. Do not disassemble the terminal or tear off the seal on the terminal. Otherwise, we will not be responsible for the warranty or replacement of the terminal.
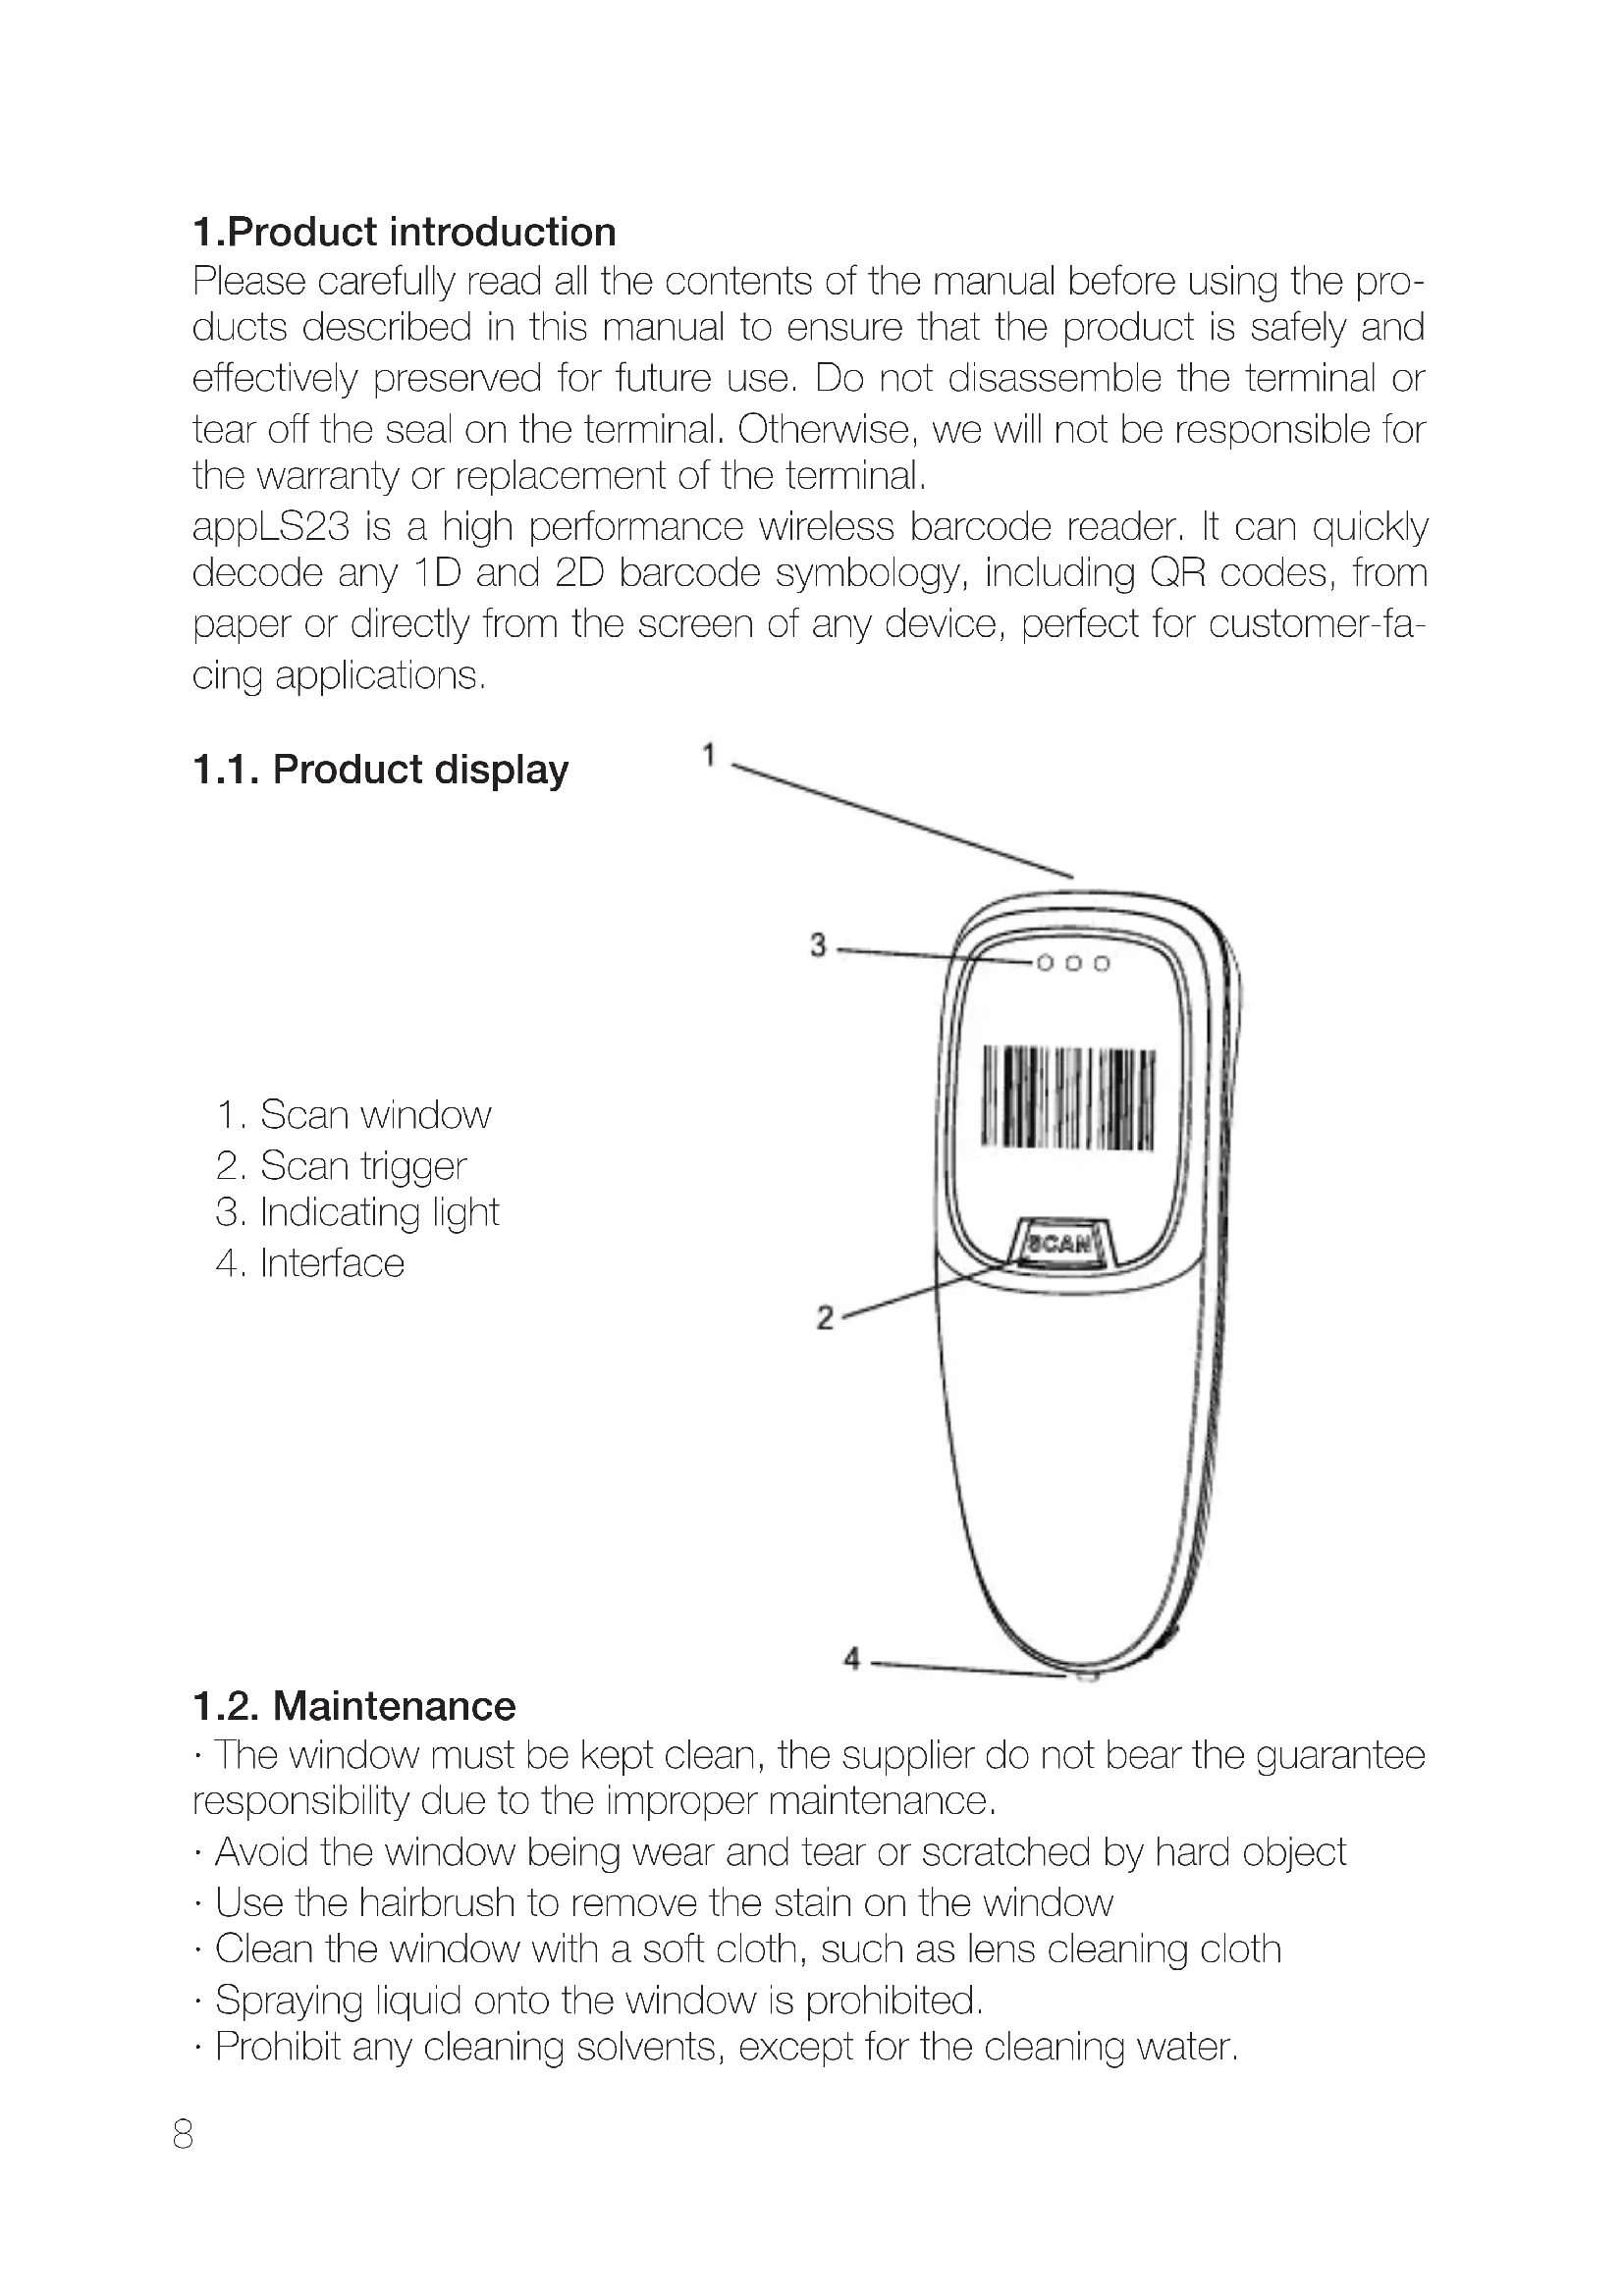
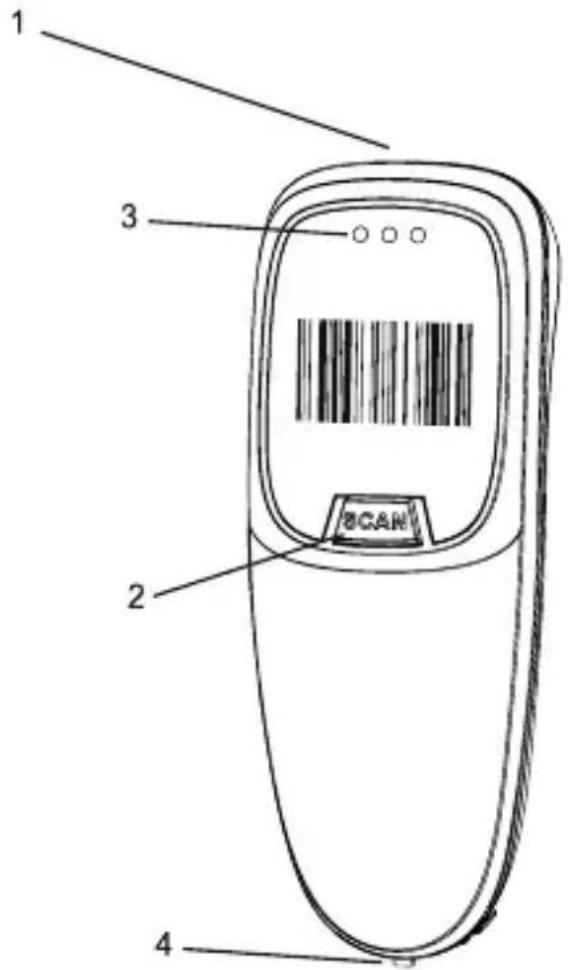
appLS23 is a high performance wireless barcode reader. It can quickly decode any 1D and 2D barcode symbology, including QR codes, from paper or directly from the screen of any device, perfect for customer-facing applications.
1.1. Product display
- Scan window
- Scan trigger
- Indicating light
- Interface
1.2. Maintenance
- The window must be kept clean, the supplier do not bear the guarantee responsibility due to the improper maintenance.
· Avoid the window being wear and tear or scratched by hard object
· Use the hairbrush to remove the stain on the window
· Clean the window with a soft cloth, such as lens cleaning cloth - Spraying liquid onto the window is prohibited.
- Prohibit any cleaning solvents, except for the cleaning water.
1.3. LED indicator
- Red light is always on when charging, it turns off when the battery is full or the charging line is not connected. If the red light flashes, the battery may be not applied or not applied appropriately.
- Regular blue light indicates that all connections are in good condition.
- Green light flashes when under 2.4G connection.
- Green & blue lights flash synchronously when under HID connection.
1.4. Buzzer description
| Sound type | Description | |
| 1 time long beep (low first, high after) | Scanner on | |
| 1 time long beep (high first, low after) | Scanner off | |
| 1 time short beep (low) | Scan code or | pair receiver or wireless connected |
| 1 time short beep (low first, high after) | Save scanning data in storage | |
| 1 time short beep (high first, low after) | Scan setting code | |
| 3 times short beep (low) | 2.4G send data fail or cache is full | |
| 5 times short beep (low) | Power off | |
| and stop scanning | ||
| 2 times short beep(low) | 2.4G disconnect | |
| 2 times short beep(high) | Scan the Setting code which does not w | |
2. Restore factory defaults

Factory default
3. Version info

Version info
4. Battery capacity

Battery capacity
5. Bluetooth
5.1. Bluetooth HID protocol
- First scan "Bluetooth HID", then scan "Pairing Setting" to enter Bluetooth searching (Blue&green light will flash once the searching is begun); 2. Turn on Bluetooth in your device, search, select and pair "Barcode Scanner HID", if the pairing is successful, you will hear a "beep" sound and green&flash light is always on. (The whole pairing process takes about 1min, if timeout and the pairing failed, it will automatically exit the pairing mode).

Bluetooth HID
Pairing setting

5.2. Bluetooth BLE protocol
- Scan "Bluetooth BLE" to enter Bluetooth searching (Blue&green light will flash alternately once the searching has begun).
- Turn on Bluetooth in your device, search, select and pair "Barcode Scanner BLE", if the pairing is successful, you will hear a "beep" sound and green&flash light is always on.

Bluetooth BLE
5.3. Bluetooth SPP protocol
- Scan "Bluetooth SPP" to enter Bluetooth searching (blue light will flash once the searching has begun).
- Turn on the Bluetooth in the customized software, search and select "Barcode Scanner SPP", you will hear a "beep" sound if the pairing is successful, and the blue light is always on.

Bluetooth SPP
6.2.4G (dongle)
6.1.2.4G receiver mode
- To enter the pairing status, first scan "2.4G Receiver Mode", then scan "Pairing Setting" (the green light will flash).
- Plug the USB dongle into the device, when hearing a "beep" sound, it means the pairing is successful and the blue&green light is always on. (The whole pairing process takes about 1min, if timeout and the pairing failed, it will automatically exit the pairing mode);

2.4G receiver mode
Pairing setting
6.2. Virtual serial port mode
Under the circumstances when application software requires ports, scan "USB Virtual COM" and recognize as USB Virtual COM. (Be advised: An installed driver is require. The default settings of port is: 9600 baud rate, 8 data bits; no check bit; 1 stop bit).

USB virtual com
7. Scan mode

Manual

Automatic
8. Immediate mode
In immediate mode, data scanned will be directly transmitted to the receiver, there will be one short sound if the transmission is successful, meanwhile the green indicator light will flash once. If the transmission failed, there will be three short sounds and the green light will flash for three times. The data will be lost under immediate mode if the transmission failed.

Immediate mode
9. Inventory mode
Offline inventory mode
In offline inventory mode, scanning the barcode then its data will be automatically saved in the memory chip inside the scanner, later there will be one short sound. If the memory is full, there will be three short sounds as warning sign and the green light will flash three times.

Offline inventory
Mixed mode (just for 2.4G)
Mixed mode is the combination of immediate mode and data inventory. When the scanner is within the range of transmission, the data scanned will be immediately sent to the receiver; when the scanner is out of the range of real time transmission, the data scanned will be automatically saved in the memory chip inside the scanner.

Mixed mode
Inventory setting
Show total amount of barcode scanned in storage:

Upload statistics
Upload all data in memory chip:

Upload data
Delete all data in memory chip (Warning: All data deleted cannot be restored, make sure you have uploaded all data and made a backup).

Delete all data
10. Sleep time setting

30s

1
min

2

5
mins

10

30
mins

Turn off sleep mode

Iniciate sleep mode immediately
11. Keyboard language settings

America

Germany

France

Spain

Italy

Japan

Belgian

Portugal

The

Turkey

Turkey

Sweden

Thai

Russian

International universal keyboard
12. Case conversion

Upper case
Lowe case


Upper&lower case conversion
Upper&lower case conversion OFF
13. Voice settings

*High volume
Medium volume


LOW
volume
Mute
14. Terminator settings

Enter

Line
feed

Enter+LF

TAB

No terminator
15. Data edit
15.1. Disable / Enable invisible character output

Enable

Disable
15.2. Add prefix/suffix
How to add prefix/suffix: First scan "Set prefix" or "Set suffix", then scan the corresponding barcode (see character table below), you may add up to 32 bytes.
| Dec | ASCII | Character Set 0 | Character Set 1 | Character Set 2 | Char. Set 3 | Charact. Set 4 | Programming Barcode |
| 1 | SOH | NULL | Home | Ctrl+A | Alt+001 | Enter nume-ric keypad | |
| 2 | STX | Ctrl+B | End | Ctrl+B | Alt+002 | Cap Lock | |
| 3 | ETX | Ctrl+C | Up Arrow | Ctrl+C | Alt+003 | Right Arrow | |
| 4 | EOT | NULL | Down Arrow | Ctrl+D | Alt+004 | Up Arrow | |
| 5 | ENQ | NULL | Left Arrow | Ctrl+E | Alt+005 | NULL | |
| 6 | ACK | NULL | Right Arrow | Ctrl+F | Alt+006 | NULL | |
| 7 | BEL | NULL | Shift+Tab | Ctrl+G | Alt+007 | Enter | |
| 8 | BS | Back Space | Back Space | Back Space | Alt+008 | Left Arrow | |
| 9 | HT | Tab | Tab | Tab | Alt+009 | Tab | |
| 10 | LF | Enter | Enter | Ctrl+P | Alt+010 | Down Arrow | |
| 11 | VT | NULL | NULL | Ctrl+Q | Alt+011 | Tab | |
| 12 | FF | NULL | NULL | Ctrl+R | Alt+012 | delete | |
| 13 | CR | Enter | Enter | Enter | Alt+013 | Enter | |
| 14 | S0 | F1 | Page Up | Ctrl+N | Alt+014 | Insert | |
| 15 | S1 | F2 | Page Down | Ctrl+O | Alt+015 | Esc | |
| 16 | DLE | F3 | F11 | Ctrl+P | Alt+016 | F11 | |
| 17 | DC1 | F4 | NULL | Ctrl+Q | Alt+017 | Home | |
| 18 | DC2 | F5 | NULL | Ctrl+R | Alt+018 | Print Screen | |
| 19 | DC3 | F6 | NULL | Ctrl+S | Alt+019 | Back Space | |
| 20 | DC4 | F7 | NULL | Ctrl+T | Alt+020 | Shift tab | |
| 21 | NAK | F8 | F12 | Ctrl+U | Alt+021 | F12 | |
| 22 | SYN | F9 | F1 | Ctrl+V | Alt+022 | F1 | |
| 23 | TB | F10 | F2 | Ctrl+W | Alt+023 | F2 | |
| 24 | CAN | F11 | F3 | Ctrl+X | Alt+024 | F3 | |
| 25 | EM | F12 | F4 | Ctrl+Y | Alt+025 | F4 | |
| 26 | SUB | NULL | F5 | Ctrl+Z | Alt+026 | F5 | |
| 27 | Esc | Esc | F6 | Ctrl+[ | Alt+027 | F6 | |
| 28 | FS | ALT+028 | F7 | Ctrl\ | Alt+028 | F7 | |
| 29 | GS | ALT+029 | F8 | Ctrl+] | Alt+029 | F8 | |
| 30 | RS | NULL | F9 | Ctrl^ | Alt+030 | F9 | |
| 31 | US | NULL | F10 | Ctrl+_ | Alt+031 | F10 |
- Displayable character table
| Decimal Data | ASCII | Programming Barcode |
| 32 | Space | |
| 33 | ! | |
| 34 | " | |
| 35 | # | |
| 36 | $ | |
| 37 | % | |
| 38 | & | |
| 39 | ' | |
| 40 | ( | |
| 41 | ) | |
| 42 | * | |
| 43 | + | |
| 44 | , | |
| 45 | - | |
| 46 | . |
| Decimal Data | ASCII | Programming Barcode |
| 47 | / | |
| 48 | 0 | |
| 49 | 1 | |
| 50 | 2 | |
| 51 | 3 | |
| 52 | 4 | |
| 53 | 5 | |
| 54 | 6 | |
| 55 | 7 | |
| 56 | 8 | |
| 57 | 9 | |
| 58 | : | |
| 59 | ; | |
| 60 | < | |
| 61 | = | |
| 62 | > | |
| 63 | ? | |
| 64 | @ | |
| 65 | A | |
| 66 | B | |
| 67 | C | |
| 68 | D | |
| 69 | E | |
| 70 | F | |
| 71 | G | |
| 72 | H | |
| 73 | I | |
| 74 | J | |
| 75 | K | |
| 76 | L |
| Decimal Data | ASCII | Programming Barcode |
| 77 | M | |
| 78 | N | |
| 79 | O | |
| 80 | P | |
| 81 | Q | |
| 82 | R | |
| 83 | S | |
| 84 | T | |
| 85 | U | |
| 86 | V | |
| 87 | W | |
| 88 | X | |
| 89 | Y | |
| 90 | Z | |
| 91 | [ | |
| 92 | \ | |
| 93 | ] | |
| 94 | ^ | |
| 95 | - | |
| 96 | 、 | |
| 97 | a | |
| 98 | b | |
| 99 | c | |
| 100 | d | |
| 101 | e | |
| 102 | f | |
| 103 | g | |
| 104 | h | |
| 105 | i | |
| 106 | j |
| Decimal Data | ASCII | Programming Barcode |
| 107 | k | |
| 108 | I | |
| 109 | m | |
| 110 | n | |
| 111 | o | |
| 112 | p | |
| 113 | q | |
| 114 | r | |
| 115 | s | |
| 116 | t | |
| 117 | u | |
| 118 | v | |
| 119 | w | |
| 120 | x | |
| 121 | y | |
| 122 | Z | |
| 123 | { | |
| 124 | | | |
| 125 | } | |
| 126 | ~ | |
| 127 | DEL | |
| 164 | a | |
| 199 | C | |
| 231 | G |
18. Safety, maintenance and recycling instructions
- Caution: Never open the device, the internal parts are danger, electrical shock.
- Do not install this unit near water, for example, in a wet basement, in an unprotected outdoor installation or in any area classified as a wet.
- Do not insert objects of any kind into this unit through openings as they may touch voltage points and short out parts that could result in fire or electric shock.
- Do not spill any liquid on the unit. Danger of explosion!
- Do not crush power cables, danger of short circuit!
- Always connect to the manufacturer's recommended tension.
- Clean the product with a soft and dry cloth.
- Follow local regulations for disposing of the product.
19. Recycled
AEEREI-RAE 558 - In this manual, the container (bien) symbol indicates that the product is subject to the European directive 2002/96/EC, electrical and electronic products, batteries, and other accessories must necessarily be subject to a selective collection.
At the end of the life of the devise, make use of the recycling bins.
This gesture will help reduce the health risks and preserve the environment. Municipalities and distributor, will provide essential details on recycling your old device. If this device carries an internal battery, it must be removed and deposited separately for proper management.
1. Introdução
The content of this guide is subject to typographical errors
www.approxtpv.es


- Product display
- Maintenance
- LED indicator
- Buzzer description
- Restore factory defaults
- Version info
- Battery capacity
- Bluetooth
- Bluetooth HID protocol
- Bluetooth BLE protocol
- Bluetooth SPP protocol
- 6.2.4G (dongle)
- 6.1.2.4G receiver mode
- Virtual serial port mode
- Scan mode
- Immediate mode
- Inventory mode
- Offline inventory mode
- Mixed mode (just for 2.4G)
- Inventory setting
- Sleep time setting
- Keyboard language settings
- Case conversion
- Voice settings
- Terminator settings
- Data edit
- Add prefix/suffix
- Safety, maintenance and recycling instructions
- Recycled
- Introdução
Brand : Approx
Model : appLS23
Category : Barcode scanner