
Digimonitor Easy 89506 - Surveillance Camera Miniland - Free user manual and instructions
Find the device manual for free Digimonitor Easy 89506 Miniland in PDF.
| Product type | Wireless surveillance camera (video baby monitor) |
| Brand and model | Miniland Digimonitor Easy 89506 |
| Monitor screen | 3.5 inch color LCD |
| Number of supported cameras | Up to 2 cameras |
| Transmission frequency | 2.4 GHz FHSS |
| Outdoor range (line of sight) | Up to 240 meters |
| Camera orientation | Pan 355° horizontal, tilt 53° vertical (manual) |
| Night vision | Automatic infrared (black and white, up to 2 m) |
| Temperature sensor | Yes, built into camera |
| VOX mode (sound detection) | Yes, can be enabled/disabled |
| Scan mode | Cyclic display of cameras every 12 seconds |
| Talk to baby function | Yes, via monitor microphone and speaker |
| Camera power supply | 5V / 1A mains adapter (USB-C) |
| Monitor power supply | 5V / 1A mains adapter (USB-C), built-in rechargeable battery |
| LED indicators | Power, charge, volume, signal level, temperature, VOX, night vision, zoom |
| Cleaning and maintenance | Soft, slightly damp cloth; do not use solvents |
| Safety instructions | Do not replace adult supervision; keep out of reach of children; minimum distance of 1 m from the crib |
| Repairability | Do not attempt to repair yourself; contact Miniland authorized service |
| Box contents | 1 camera, 1 AC/DC adapter, 1 user manual, 1 warranty |
Frequently Asked Questions - Digimonitor Easy 89506 Miniland
User questions about Digimonitor Easy 89506 Miniland
0 question about this device. Answer the ones you know or ask your own.
Ask a new question about this device
Download the instructions for your Surveillance Camera in PDF format for free! Find your manual Digimonitor Easy 89506 - Miniland and take your electronic device back in hand. On this page are published all the documents necessary for the use of your device. Digimonitor Easy 89506 by Miniland.
USER MANUAL Digimonitor Easy 89506 Miniland
digital camera 3.5" easy
Espanol 5
Portugues 15
Deutsch 25
English 10
Francais 20
Italiano 30
We congratulate you for having acquired the camera accessory for the digital baby monitor digimonitor 3.5" easy, with a wireless colour monitor featuring the most advanced technology. We are certain you will be fully satisfied with the quality and features of this product, however we recommend you read these instructions carefully in order to guarantee the best results from your purchase.
This equipment allows for 2 cameras to be attached to the same monitor, enabling you to choose the camera image you wish at any given time.
One of the main features of this baby monitor is that it allows the image from each camera to be viewed for a few seconds alternately.
Note: The characteristics described in this user manual are subject to modifications without prior notice.
2. CONTENTS
1 camera (baby unit)
1 AC / CC adaptor
1User Manual
1 Guarantee Card
If any of the aforementioned elements is missing, get in touch with your distributor.
3. SAFETY INSTRUCTIONS
Read this instruction manual carefully before using your baby monitor for the first time and keep it for reference use in the future.
3.1. GENERAL SAFETY INSTRUCTIONS:
When using electrical equipment it is necessary to take certain basic safety precautions at all times:
- It is necessary to exercise caution when any product is used by or in the vicinity of children or elderly persons. Keep the appliance out of reach of children.
- This product should not be used as the sole means of surveillance, not being under any circumstances a substitute for responsible supervision of children, elderly persons or property by adults.
-
This unit should only be used with the AC power adapters included in this package (rated 5.0V, 1A).
-
This product contains small parts. Exercise care when unpacking and assembling the product.
- DO NOT allow children to play with the packaging materials such as plastic bags. Exercise care when unpacking and assembling the product.
- DO NOT use the appliance if the cord or plug is damaged. If your baby monitor is not operating properly or has suffered any damage, contact the authorized Miniland service center to request inspection and repair of the appliance in order to avoid any possible risk.
- DO NOT attempt to repair or adjust any of the electrical or mechanical functions of the unit since, if you do, the guarantee will be made void.
- Check the voltage of your home in order to ensure that it matches the voltage indicated in the specifications of the appliance.
- If you are not going to use the baby monitor for a long period of time, always unplug the power adapter.
To disconnect the appliance from the mains, hold the transformer and remove the plug from the socket. Never pull on the cord itself.
- This product is designed for indoor use only. The unit should not be exposed to rain, moisture, dripping or splashing. No objects filled with liquid should be placed on top of, or beside the product, such as a glass or vase. This item should not be used near water.
- Before using your additional camera for the first time, remove all the protective plastic wrapping from both the monitor and the camera.
CAUTION
- This baby monitor is designed to give parents peace of mind when they are unable to be in the same room as their baby. This product is not a substitute for supervision by adults. It is necessary for one parent to stay near the monitor when in use. The baby monitor is not a medical device and you should not entrust the welfare of your baby to it. It is important that you regularly visit the baby's room in person to ensure that everything is in order.
- Never use this baby monitor in cases in which the life or health of the baby or other people, or the integrity of a building, depend on its operation. The manufacturer accepts no liability or claim for death, personal injury or property damage resulting from the malfunction or misuse of the product.
- Misuse of this Wireless Baby Monitor could result in legal action.
- Use this product responsibly.
IMPORTANT: Please note that any change or modification to the equipment not performed by the Miniland technical service will not be covered by the product guarantee.
3.2. TIPS FOR RADIO INTERFERENCE
This equipment has been tested and meets the requirements of Directive RED 2014/53/UE. These
requirements are designed to offer reasonable protection against harmful interference in a residential installation. If the unit is not installed and used according to the instructions, it could cause harmful interferences to radio communications.
Note, however, that there is no guarantee that interference will not occur in a particular installation. If the baby monitor causes interference to the radio or television, which can be determined by switching it on and off, you are recommended to try and correct the interference as follows:
- Reorient or change the position of the receiver.
- Increase the distance between the equipment in question and the baby monitor.
- Connect the equipment to a different socket from the one used for the receiver.
- Check with the Customer Service Department. To ensure compliance with Directive RED 2014/53/ UE, this equipment has special shielded cables.
Operation with non-approved equipment or with unshielded cables will probably cause interference to radio and television reception.
3.3. CHOOSING A SUITABLE LOCATION
- Place the electronic device out of the reach of children in order to avoid accidents.
Children can become entangled in cords. The baby unit should be placed at a distance of at least 1 to 1.5 meters from the baby's cot. Never place the baby unit inside the cot, bed or playpen, or attach the tripod to them. Make sure the unit, cables and adapter are out of reach of the baby and other young children. - Place the baby monitor in a place where the air can circulate freely. Do not place on soft quilts or blankets, or in the corners of cupboards, shelves, etc.
- Place the baby monitor away from heat sources such as radiators, chimneys, cookers and direct sunlight.
- Place the camera away from TV sets, repeaters and radios. The intense radio signals generated by these elements could cause noise or even sounds and images to appear on the monitor. If this occurs, move the camera to another location.
4.PRODUCT FEATURES
4.1. MONITOR FUNCTIONS AND CONTROLS
4.1.1.MONITOR (FIGURE 1)
- On/ Off button
- Power LED
- Volume LEDs
- LCD Screen
- Menu
- Up navigation button / increase volume
- Right navigation button / increase brightness
- Down navigation button / decrease volume
9.Left navigation button / decrease brightness - OK/ zoom button
- VOX mode on/off button
12.Talk to the baby key
13. Microphone
14. USB-C power connector
15. Antenna
16. Reset button
17. Collapsible rack
18. Speaker
4.1.2. DISPLAY (FIGURE 3)
A. Signal level
B. Camera selected
C. Scan mode
D. Night vision
E. Monitor volume
F.Vox Mode
G. Temperature
H. Battery level / monitor charge indicator
I. Talk to the baby activated indicator
J.Zoom
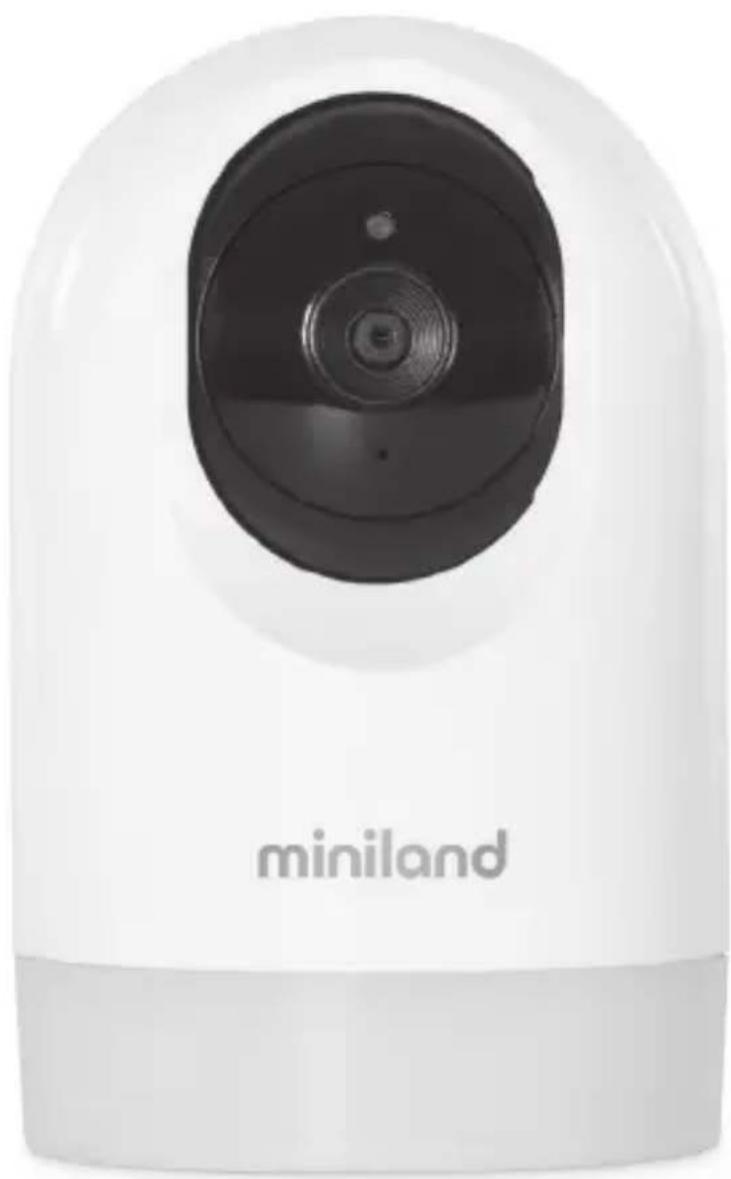
4.2. CAMERA FUNCTIONS AND CONTROLS (FIGURE 2)
- On / off button
II. Photo sensor
III. Camera lens
IV. Infra-red vision LEDs
V. Microphone
VI. Speaker
VII. Temperature sensor
VIII. Pairing button
IX. Charging LED
X. USB-C power connector
5. INSTRUCTIONS FOR USE
5.1. BEFORE USE
5.1.1.BABY UNIT POWER SUPPLY
The camera, or baby unit, of this baby monitor is designed to be used with the AC / CC adaptor supplied.
- Connect the adaptor cable to the USB-C socket on the camera (X). Use only the adaptor supplied.
- Connect the adaptor to the mains.
Warning: Choking hazard - Keep the cord out of the baby's reach. NEVER place a camera with cables less than 1 meter from the cot. Never use extension cords with AC adapters. Use only the AC adapters supplied.
5.2.OPERATION
5.2.1.TURNING THE CAMERA ON/OFF
To turn the camera on or off, keep the power button (I) pressed in for two seconds.
The on / off LED (IX) will come on for two seconds when the unit is switched on and flash twice when the unit is switched off.
When you have installed the camera and turned it
on, you can see the images and listen to the sounds captured in your baby's room via the monitor.
5.2.2. SETTING THE CAMERA ANGLE
The camera on the 3.5" baby monitor can be angled manually. To do this, turn the camera to the left or to the right, and / or move the lens up or down until you get the position you want. The camera has 355^ vision, but it does not rotate on its own axis, so do not force it. When you turn the camera sideways and it reaches its limit at around 180^ , do not try to make it turn further. The camera has a 53^ vertical angle of view, so do not force it when it reaches its limit.
Note: For a clearer view, clean the camera lens with a slightly damp cloth.
5.2.3. INFRARED NIGHT VISION (AUTOMATIC)
The infrared night vision function allows the camera to pick up images in dark or low light conditions. In this mode, only black and white images will be displayed on the monitor and only objects located less than 2 meters away can be seen.
The camera automatically changes to infrared mode when there is insufficient light for normal vision.
When the camera is in this mode, the night vision icon (D) will be displayed on screen.
Note: The light sensor (II) is located at the top of the camera. Take care not to cover the sensor with any object to prevent the camera from entering night mode when there is light in the room.
5.2.4. ADD CAMERA AND PAIRING
The device is designed to allow different areas to be observed with up to two cameras. To pair the camera follow the steps described below:
- Press the menu button (5) to display the menu and show the highlighted camera icon.
- Press the down (8) navigation button until the add / remove icon is displayed and press the OK / zoom button (10) to go into the sub-menu.
- Press the up (6) or down (8) navigation button to select the camera you want to add.
- Press the OK / zoom button (10) to search for a camera unit.
- Press the pairing button on the camera (X) for 5 seconds.
- Once paired the image of the camera will show immediately on the monitor unit screen.
For various reasons you may lose the connection between the monitor and a camera which is already connected. Should this be the case, repeat the process explained above to connect the camera with the monitor again.
Note 1: Before starting the pairing procedure, make
sure the camera and the monitor are close to one another and that the camera is correctly plugged in and is switched on.
Note 2: Each camera can be linked just with one monitor at a time.
Note 3: If the monitor and the camera, for some reason, have left the factory without being paired, you will have to do it manually adding the camera to channel 2. You won't be able to pair the camera again with channel 1 until you have paired it in another channel and remove the channel 1 camera.
5.2.5. DELETE CAMERA
To delete one of the cameras connected, follow the next steps:
- Press the menu button (5) to display the menu and show the highlighted camera icon.
- Press the up (6) or down (8) navigation button until the add / remove icon is displayed and then press the OK / zoom button (10) to go into the sub-menu.
- Press the up (6) or down (8) navigation button to select the camera you want to remove and then press the OK / zoom button (10) again.
Note: A channel needs to be deleted before pairing to a new camera unit.
5.2.6. CHOOSING THE CAMERA
The device is designed to allow different areas to be monitored with up to two cameras.
To select the camera you want to view, follow the steps described below:
- Press the menu button (5) to display the menu and show the highlighted camera icon.
- Press the OK / zoom button (10) to go into the sub-menu.
- Press the up (6) or down (8) navigation button to select the camera you want to see (camera 1, camera 2).
- Press the OK / zoom button (10) to go to the selected camera.
Note: The additional baby monitor reference compatible with this additional camera is 89505 digimonitor 3.5" easy.
5.2.7. SCAN MODE
This function automatically cycles through your paired camera channels to display each camera for 12 seconds.
This function can be used only when you have more than 1 camera unit paired. To enter in this mode:
- Press the menu button (5) to display the menu and show the highlighted camera icon.
- Press the OK / zoom button (10) to go into the sub-menu.
-
Press the up (6) or down (8) navigation button until the scan mode icon is highlighted.
-
Press the OK zoom button (10).
- The scan mode icon (C) will be displayed at the top of the screen to indicate that it is activated.
Note 1: If one of the cameras is out of range, has no battery or is not switched on, the monitor will warn you and the main screen will be displayed during that period of time.
Note 2: To cancel scan mode, follow the same steps described above and select from the options available: see camera 1, see camera 2.
6. MAINTENANCE
- Clean the surfaces of the camera and monitor with a soft, lint-free cloth.
- If the units become dirty, use a lightly dampened cloth to wipe surfaces, taking care to not allow water into any openings.
-
Never use cleaning agents or solvents.
-
TROUBLESHOOTING
| PROBLEM POSSIBLE CAUSE SOLUTION | ||
| No reception on the monitor. | Camera not turned on. | Press the on / off button (I) and keep pressing for at least 2 seconds. |
| Monitor not turned on. | Press the on / off button (1) and keep pressing for 4 seconds. | |
| Camera: not plugged in to the power adapter. | Plug in the power adapter. | |
| Monitor: The power adapter is not plugged. | Plug in the power adapter. | |
| Monitor out of range. | Pull out the monitor aerial and if it is still out of range, bring the monitor closer to the camera. | |
| Connection lost between the monitor and a camera already linked. | Extend the antenna (15) of the monitor, and in case it is still out of range move the monitor closer to the camera. Check section: 5.2.4. | |
| A wrong camera has been selected. | Change the camera number you are watching. See 5.2.6. | |
| Unable to charge the battery to the parent unit. | AC/DC adapter is not plugged in. Plug in the power adapter. | |
| Only black and white images are displayed. | Check whether the camera is in night vision/infrared mode. | In order to view the images in colour, increase the level of light in the room the camera is in or check there is nothing covering the camera's light sensor (II). |
| The camera is not transmitting. | The camera has not been turned on. | Press the on / off button on the camera (I) and keep pressing for 2 seconds. |
| Camera: power adapter not plugged in. | Plug in the power adapter. | |
| VOX mode or standby mode is activated. | To view the monitored area continuously, switch off the VOX mode or power saving mode on the monitor. | |
| Interference or unsatisfactory reception. | Other electronic devices may be interfering with the signal. | Move them away from the device. |
| The camera and monitor may be too far apart. | Extend the antenna (15) of the monitor, and in case it is still out of range move the monitor closer to the camera. | |
| The battery charge level may be too low. | Plug in the power adapter. | |
| The camera or monitor may be too close to many metal objects. | Move them away from the device. | |
| If the baby unit has lost connection with the parental unit. | The camera and monitor may be too far apart. | Extend the monitor antenna (15), and in case it is still out of range move the monitor closer to the camera. |
| Connection between the two units is momentarily lost. | Restore the units by disconnecting them from the power supply.Wait about 15 seconds before reconnecting them.Allow one minute for the baby unit and the parent unit to synchronize. | |
| The connection between the two units is lost. | Pair the camera and monitor again.See section 5.2.4. | |
8. TECHNICAL SPECIFICATIONS
| Frequency 2.4GHz FHSS | |
| Operating Range 240m (straight line and open space) | |
| N° of configurable channels 2 | |
| Power (baby unit) Output: 100-240 V CA - 50/60 Hz | |
| Power (baby unit) Input: 5 V - 1A |
9.PRODUCT DISPOSAL INFORMATION
- Remember to dispose of the product responsibly.
- Do not mix products bearing the crossed -out bin symbol with your general household waste.
- For the correct collection and treatment of these products take them to the collection points designated by your local authority. Alternatively contact the retailer who sold you the product.
Hereby, Miniland S. A. declares that this "89506 digital camera 3.5" easy is in compliance with the essential requirements and other relevant provisions of Directive 2014/53/UE.

INDICE
4.1.2. ECRA (FIGURA 3)
A.Nível de sinal
B. Camara seleccionada
C. Modo scan
D. Visao nocturna
E. Volume do monitor
F. Modo Voz
G. Temperatura
H. Indicador de nivel de bateria/carga do monitor
I. Indicador de Falar com bebe ativado
J.Zoom
4.2. FUNCOES E COMANDOS DA CAMARA (FIGURA 2)
I. Botão de ligar/desligar
II. Sensor Foto
III. Lente da-camera
IV. LED de visão por infravermelhos
V. Microfone
VI. Altifalante
VII. Sensor de temperatura
VIII. Botao de emparelhamento
IX. LED de energia
X. Conector de alimentacao USB C
5. INSTRUÇOÉS DE UTILIZACHO
4. CARACTERISTIQUES DU PRODUIT
4.1. FONCTIONS ET CONTROLES DU MONITEUR
9. INFORMATIONS D'ÉLIMINATION DU PRODUIT
4.1.2.DISPLAY (FIGURA 3)
DECLARATION OF CONFORMITY
Miniland S. A. P.Ind. La Marjal C/ La Patronal, 10. 03430 ONIL (Alicante) SPAIN Technical support: +34 966 557 775 · www.minilandgroup.com · teayudamos@miniland.es
We declare under our own responsibility that the product:
digital camera 3.5" easy · Miniland · 89506 · Miniland, S. A.
to which this declaration refers conforms with the relevant standards or other standardising documents:
- Directive 2014/53/EU of the European Parliament and of the Council of 16 April 2014 on the harmonisation of the laws of the Member States relating to the making available on the market of radio equipment.
-EN 62479:2010 Assessment of the compliance of low power electronic and electrical equipment with the basic restrictions related to human exposure to electromagnetic fields (10 MHz to 300 GHz). - EN 50663:2017 Generic standard for assessment of low power electronic and electrical equipment related to human exposure restrictions for electromagnetic fields (10 MHz - 300 GHz).
- EN IEC 62368-1:2020+A11.2020 Audio/video, information and communication technology equipment - Part 1: Safety requirements.
- ETSI EN 301489-1 V2.2.3 (2019-11) ElectroMagnetic Compatibility (EMC) standard for radio equipment and services; Part 1: Common technical requirements; Harmonised Standard for ElectroMagnetic Compatibility.
- ETSI EN 301489-3 V2.1.1. (2019-03) ElectroMagnetic Compatibility (EMC) standard for radio equipment and services; Part 3: Specific conditions for Short-Range Devices (SRD) operating on frequencies between 9kHz and 246GHz ; Harmonised Standard covering the essential requirements of article 3.1(b) of Directive 2014/53/EU.
ETSI EN 300 440 V2.2.1 (2018-07) Short Range Devices (SRD); Radio equipment to be used in the 1 GHz to 40 GHz frequency range; Harmonised Standard for access to radio spectrum. - Directive 2006/66/EU on Batteries and Accumulators and Waste Batteries and Accumulators.
- Directive 2009/125/EC Ecodesign requirements for energy-related products.
- Commission Regulation (EC) NO 1275/2008, implementing Directive 2005/32/EC with regard to ecodesign requirements for standby and off mode electric power consumption of electrical and electronic household and office equipment.
- Restriction of Hazardous Substances (RoHS) Directive 2011/65/EU and its amendment Directive (EU) 2015/863.
REACH (Registration, Evaluation, Authorization and Restriction of Chemical substances) Regulation (EC) No 1907/2006. - Waste Electrical and Electronic Equipment (WEEE) Directive 2012/19/EU.
Miniland, S. A.
Chief Executive Officer
Rafael Rivas González
Onil, Alicante, Spain.
17th March 2023

miniland
minilandgroup.com
miniland
Miniland S. A. P. Ind. La Marjal I C/ La Patronal, 10
03430 ONIL (Alicante) SPAIN
Technical support: +34 966 557 775
Fax: +34 965 565 454
www.minilandgroup.com·teayudamos@miniland.es
Miniland, S. A. 2023
Made in China. Keep this information.
- CONTENTS
- SAFETY INSTRUCTIONS
- GENERAL SAFETY INSTRUCTIONS:
- CAUTION
- TIPS FOR RADIO INTERFERENCE
- CHOOSING A SUITABLE LOCATION
- 4.PRODUCT FEATURES
- MONITOR FUNCTIONS AND CONTROLS
- 4.1.1.MONITOR (FIGURE 1)
- DISPLAY (FIGURE 3)
- CAMERA FUNCTIONS AND CONTROLS (FIGURE 2)
- INSTRUCTIONS FOR USE
- BEFORE USE
- 5.1.1.BABY UNIT POWER SUPPLY
- 5.2.OPERATION
- 5.2.1.TURNING THE CAMERA ON/OFF
- SETTING THE CAMERA ANGLE
- INFRARED NIGHT VISION (AUTOMATIC)
- ADD CAMERA AND PAIRING
- DELETE CAMERA
- CHOOSING THE CAMERA
- SCAN MODE
- MAINTENANCE
- TECHNICAL SPECIFICATIONS
- 9.PRODUCT DISPOSAL INFORMATION
- INDICE
- ECRA (FIGURA 3)
- FUNCOES E COMANDOS DA CAMARA (FIGURA 2)
- INSTRUÇOÉS DE UTILIZACHO
- CARACTERISTIQUES DU PRODUIT
- FONCTIONS ET CONTROLES DU MONITEUR
- INFORMATIONS D'ÉLIMINATION DU PRODUIT
- 4.1.2.DISPLAY (FIGURA 3)
- DECLARATION OF CONFORMITY
- We declare under our own responsibility that the product:
- to which this declaration refers conforms with the relevant standards or other standardising documents:
- miniland
Brand : Miniland
Model : Digimonitor Easy 89506
Category : Surveillance Camera