
Edge 34C2KPDSGR - Monitor Alogic - Free user manual and instructions
Find the device manual for free Edge 34C2KPDSGR Alogic in PDF.

| Product type | Ultra-wide curved monitor |
| Brand | Alogic |
| Model | Edge 34C2KPDSGR |
| Screen size | 34 inches (86.4 cm) |
| Dimensions with stand | 815 × 642 × 245 mm |
| Dimensions without stand | 815 × 367 × 41 mm |
| Weight with stand | 10.13 kg |
| Weight without stand | 5.98 kg |
| Power supply | 180 W power adapter (24 V / 7.5 A) |
| Resolution | 3440 × 1440 pixels (UWQHD) |
| Refresh rate | 100 Hz |
| Panel type | IPS |
| Aspect ratio | 21:9 |
| Brightness | 400 nits (typical) |
| Contrast ratio | 1000:1 (typical) |
| Response time | 14 ms (8 ms with Overdrive) |
| Color gamut | sRGB 95%, Adobe RGB 94%, DCI-P3 97% |
| Built-in speakers | 2 × 3 W (stereo) |
| Video connectivity | 1 × HDMI 2.0, 1 × DisplayPort 1.4, 1 × USB-C (DP Alt Mode) |
| USB ports | 1 × USB-C 3.0 Gen1 (upstream), 2 × USB-C 2.0 (downstream) |
| Other ports | 1 × Gigabit Ethernet, 1 × 3.5 mm audio (output) |
| USB-C charging | Up to 90 W for laptops |
| Image features | PIP/PBP, Overdrive, HDR, Adaptive Sync, Blue light shift |
| VESA mounting | 100 × 100 mm (M4 × 10 mm screws recommended) |
| Security | Kensington lock (slot) |
| Maintenance and cleaning | Clean with a soft, dry cloth. Do not use abrasive products. |
| Spare parts and repairability | Contact ALOGIC support for any spare parts or repairs. |
| General information | Indoor use only. Keep out of reach of children. |
Frequently Asked Questions - Edge 34C2KPDSGR Alogic
User questions about Edge 34C2KPDSGR Alogic
0 question about this device. Answer the ones you know or ask your own.
Ask a new question about this device
Download the instructions for your Monitor in PDF format for free! Find your manual Edge 34C2KPDSGR - Alogic and take your electronic device back in hand. On this page are published all the documents necessary for the use of your device. Edge 34C2KPDSGR by Alogic.
USER MANUAL Edge 34C2KPDSGR Alogic
34"/40" Ultrawide QHD Monitor
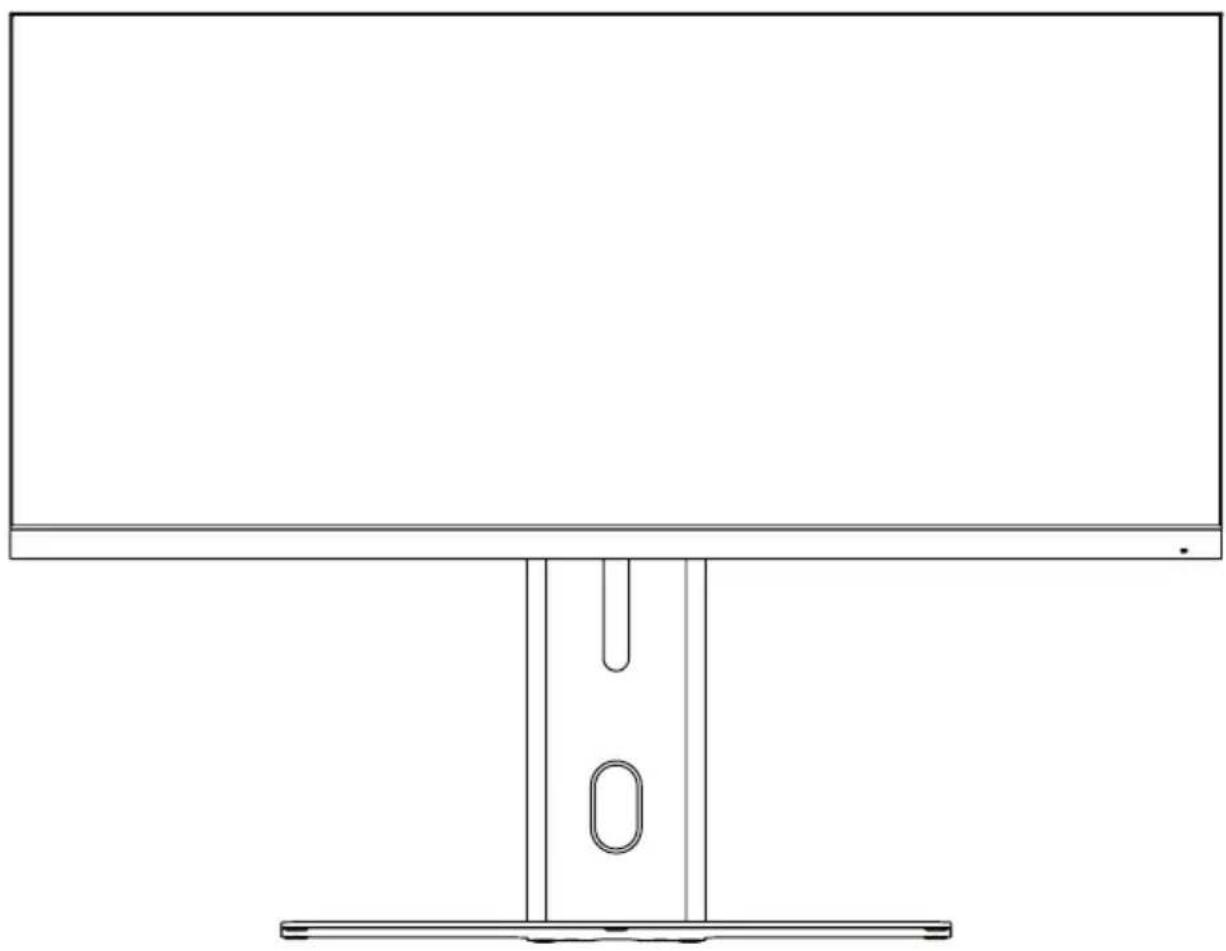
Quick Start Guide
| Brightness | 34° - 400 mils (Typical) 40° - 350 mils (Typical) |
| Response Time (Grey to Grey) | 34°: 14ms (6ms with Overdrive) 40°: 8ms (4ms with Overdrive) |
| Contrast Ratio | 34°: 1,000:1 40°: 1,200:1 |
| Panel Depth: 8 Bit | |
| Colour Accuracy | 34° 99% sRGB 94% Adobe RGB 97% DCI-P3 40° 95% sRGB 92% Adobe RGB 90% DCI-P3 |
| PIP/PBP Supported | |
| Overdrive Supported | |
| Speakers 3Wx2, 8Ω | |
| Ethernet Port Gigabit | |
| USB-C Laptop Charging | Up to 90W power |
| HDMI Version 2.0 | |
| DisplayPort Version 1.4 | |
| USB-C Ports | 3.0 Gen(Display Port) 2.0 (Accessory Ports) |


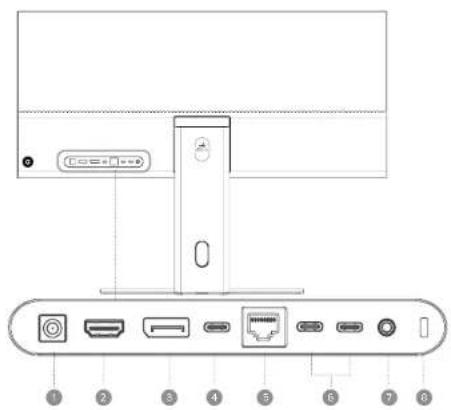
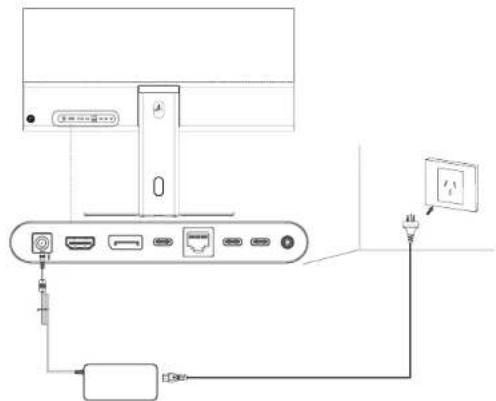
Monitor Ports
| Power Input Connect this to a wall outlet using the power supply included with Edge. | |
| HDMI Connects Edge to video. | |
| DisplayPort Connects Edge to video. | |
| USB-C (Display + PD) The best way to connect Edge to your computer's video, and your computer to both 90W charging and accessories connected to Edge. | |
| Ethernet (RJ45) Can provide USB-C connected computers access to high-speed and secure, wired networking. | |
| USB-C Ports for connecting USB-C accessories to your computer, such as a mouse and keyboard. Requires your computer to be connected by USB-C. | |
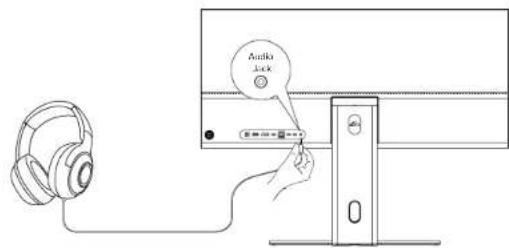
| 3.5mm Audio Connect to headphones or externally powered speakers. Does not support input from microphones. | |
| Kensington Security Slot Allows you to physically secure your monitor with any compatible Kensington Lock. |
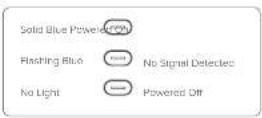
Indicator Light

Assembling the Monitor
Attach the Stand Stem to the Stand Base.
Firmly attach the stem with the thumb screw on the bottom of the Stand Base.
Carefully insert the stand into the back of the monitor, taking care to align the stand's tips with the notches in the monitor's mount. The stand will click into place when correct inserted.
If you're setting the monitor up for the first time, lift its travel bag to expose the mounting area, while leaving it in the protective foam. Otherwise, gently place the monitor screen-down on a flat surface.
WARNING
This monitor has a heavy glass back. Remove with care to avoid damaging the monitor. We recommend removing the monitor from the packaging with the aid of another person

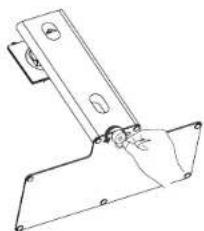
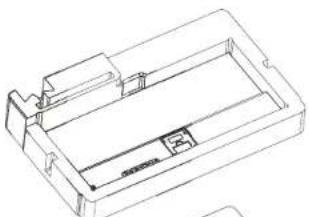
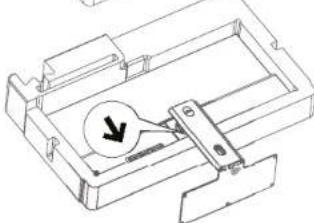
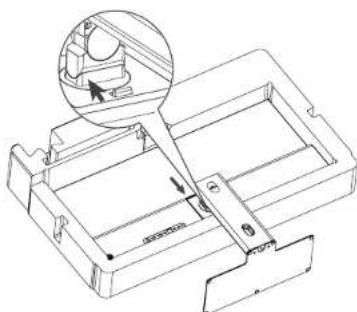
Removing the Monitor from the Stand
Lay the monitor onto a flat surface, screen-down.
Lift the release lever on the stend's head.
Gently angle the stand upwards and pull backwards to remove.
图

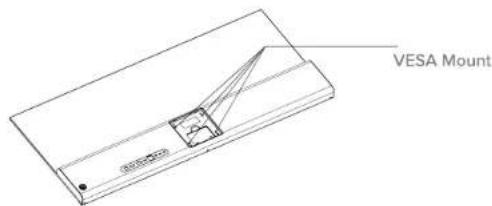
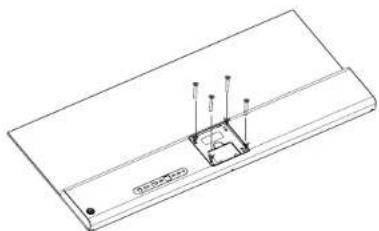
Attaching the Monitor to a VESA Mount
Edge has holes for four mounting screws in the rear mounting section, where its stand attaches.
Edge is compatible with 100x100mm VESA mounts which can support its weight, although care should be taken as it is both unusually heavy and unusually wide for a monitor of its size, and may not work with all mounts that advertise as compatible with 34/40^ monitors.
When connecting Edge to a third party mount, we recommend using 10mm M4 mounting screws. Using shorter screws may result in an insecure connection, while longer ones may damage Edge.
图
With the monitor disconnected from its stand, lay it screen-down on a flat surface.
图
Follow the instructions of your 100x100mm compatible VESA mount, taking care not to over-tighten any mounting screws, which may damage your monitor:
EN

Connecting Your Monitor Connecting to Accessories
First, connect Edge to a wall socket using the included power adapter and cable.
Then press and hold in the joystick on the back of Edge to turn the monitor on or off.
We recommend connecting to Edge with the included USB-C cable if your computer has a USB-C port compatible with DisplayPort (DP) Act Mode, as this will allow your computer to receive up to 90W charging as well as connect to Edge's Ethernet and USB-C Accessory Ports.
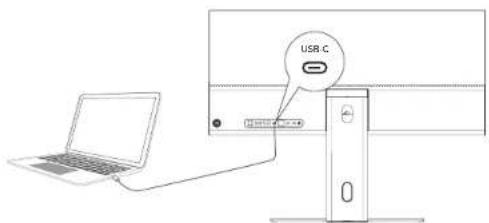
It can be difficult to tell if your computer has a DP Alt Mode compatible USB-C port. The most reliable way to figure out which USB-C ports are DP Alt Mode compatible is to check your computer's manual, or the manufacturer's webpage. They are sometimes marked with a screen or DisplayPort icon.
All Thunderbolt 3 and Thunderbolt 4 ports are compatible with DP Alt Mode and USB-C Power Delivery. All USB-C ports on modern MacBooks are either Thunderbolt 3 or 4.
If your computer or device does not have a USB-C DP Alt Mode compatible port, we recommend connecting with the included HDMI cable, although DisplayPort offers the same visual quality if you have your own cable.

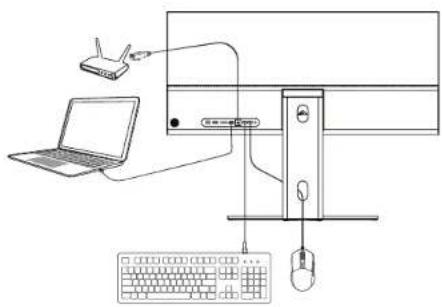
When connected to Edge's USB-C 3.0 Gen 1(Display) port, your computer will automatically recognise any USB-C accessories connected to Edge's USB 2.0 (Accessory) ports.
We recommend using these ports for connecting peripherals like mice and keyboards, or data devices like external hard drives.
Audio and Edge
Edge has stereo speakers which can be used when it's connected to a video source via HDMI, DisplayPort or USB-C (DP Alt Mode). To do so, simply select 34C2KPD/40C2KPD from your device's Settings > Sound menu.
Additionally, Edge can send audio to a pair of headphones or (externally-powered) speakers connected to its 3.5mm Audio port. When an external audio device is connected, Edge's speakers will be disabled.
This 3.5mm Audio port cannot be used for audio in, like microphones.
Charging your Computer with Edge
Edge can charge USB-C connected computers at up to 90W. To do so, simply connect a Power Delivery (PD) compatible USB-C port to Edge's USB-C 3.0 Gen1 (Display) port via the included cable.
Not all USB-C ports are PD compatible. To check if yours is, look for a plug, battery or lightning icon. Many ports don't have icons, so we recommend checking the product manual or manufacturer's website to be sure. All Thunderbolt 3 and 4 ports are PD compatible.
The 90W power Edge supplies may not be enough to power some performance or gaming laptops when under high load.
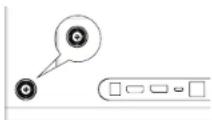
Securing your Monitor
You can physically secure Edge by connecting its Kensington Security Slot to any standard Kensington Lock.
Follow the instructions included with your lock to attach it.


Setting the Correct Resolution for Edge
If you're unsure, follow the steps below to ensure your computer is sending Edge the correct video feed.
Windows
- Open "Settings" from the Windows Start Menu.
- Navigate to "System" then "Display".
- In the bottom left corner of the window showing the displays, ensure it's set to "Extend these Displays" and not "Duplicate these Displays".
a. Duplicating a non-ultrawide display onto Edge can result in visual glitches or distortions. - Ensure the resolution is set to "3456x1440" or "3440x1440", whichever appears in your options list.
Mac
- Open your computer's "System Settings" menu (click on the Apple Icon in the top left corner) and navigate to "Displays".
- Click on your Edge monitor.
- Make sure "Use as" is set to either "Main Display" or "Extended Display", not "Mirror".
a. Duplicating a non-ultrawide display onto Edge can result in visual glitches or distortions. - In the list of available resolutions, ensure Edge is set to either "3456x1440" or "3440x1440", whichever appears in the list.
If this does not resolve your display issue, please contact ALOGIC support (support@alogic.co).
How to Arrange Apps on Edge for Multitasking
On the latest versions of Windows, macOS and most versions of Linux, arranging two windows side by side is as easy as selecting and dragging an app or window to the edge of the screen, waiting until a translucent outline appears over half the screen, and releasing.
For more information on these features and advanced tips, consult Microsoft and Apple's official help pages.
Apple's App Tiling Guide Microsoft's Windows Snapping Guide


More complicated layouts can be set up and easily switched between using additional utilities, such as Microsoft's "Power Toys FancyZones" for Windows, or the "Rectangle" application on macOS, which are available via Google or other search engines.

Understanding Edge's Controls
- Press the joystick button to enter Edge's menu.
- Move the joystick to select the menu option you wish to adjust and click the joystick start adjusting, moving the joystick left and right to change the setting.
- Press the joyslick in to save your changed value.
- Move the joystick left to exit the menu.
- Press the joystick in and hold to turn the monitor on or off.
Shortcuts
When no menu is open, you can move the joystick in the following direction to access commonly used settings.

Change
Backlight

Change
Volume

Change
Preset

Change
Video Source
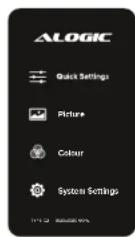
Configuring Edge's Settings
Clarity's menu is divided into four sections for easy navigation.
- Quck Settings: All of the monitor's most commonly adjusted features.
- Picture: Adjust non-colour settings that impact how your display looks.
Color: Adjust the colour balance of your monitor. - System: Adjust other monitor settings, such as Overdrive. Language and Sleep Mode.

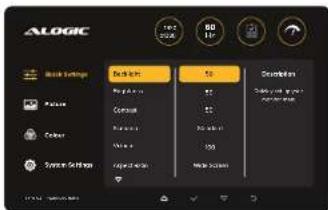
Quick Settings
- Move the joystick to scroll through functions.
- Press the joystick to adjust the selected function, and save your changes.
| Menu Description | |||
| Backlight Adjusts the lum | posity of the monitor's backlight. Increase for a brighter picture. | ||
| Brightness Adjusts the details in the brighter parts of the image. | |||
| Contrast Adjusts the visual | detail in the darker areas of your picture. Setting the contrast too high can result in distorted colours in your monitor's brighter areas and reduced detail in the mid-tones. | ||
| Preset Lets you select between preconfigured picture profiles. | |||
| Standard Mode | Movie Mode | Eco Mode | User Mode |
| "Standard" is designed for general computer use, with a slightly warm colour balance and average contrast and brightness. "Movie" increases the colour vibrancy and contrast to make pictures more impressive, but less accurate. "ECO" reduces the brightness and other settings to save power. "User" sets everything to neutral, so that you can adjust everything yourself. | |||
| Volume Adjusts how loud your monitor's speakers are. Higher volumes may result in reduced audio quality. | |||
| Aspect Ratio Allows you to specify your monitor's main input to display the video signal in. This can be useful if it's not correctly detecting the video signal and is stretching the image. | |||
| Input Allows you to specify whether you want the monitor's main input to display the signal from the HDMI DisplayPort or USB-C port, or simply autodetect. This can be useful if the monitor isn't correct detecting your video source, or when using Picture in Picture modes. | |||
| Blue Light Shift Allows you to reduce the blue light your monitor is outputting. This can reduce eye strain, especially in darker in environments, but results in an warmer image. | |||
| Adaptive Sync Enables or Disables Adaptive Sync. While playing video games, this can be useful to prevent screen tearing and synchronisation related stuttering. | |||

Picture Settings
- Move the joystick to scroll through functions.
- Press the joystick to adjust the selected function, and save your changes.
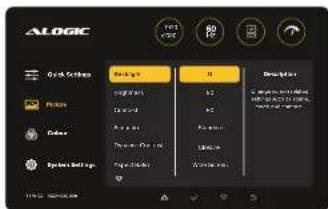
| Menu Description | |
| Backlight See Quick Settings. | |
| Brightness | See Quick Settings. |
| Contrast | See Quick Settings. |
| Preset | See Quick Settings. |
| DCR | This setting enables or disables the display's Dynamic Contrast, which changes brightness, and contrast values depending on what's on screen to produce a more visually impactful image, at the cost of visual accuracy. Note that while Dynamic Contrast is on, the preset settings are overridden. |
| Aspect Ratio | See Quick Settings. |
| Sharpness | Changes the way pixels render next to each other. Raising this setting can help make text and lines clearer, but can also introduce visual errors. |
| Multi-Window | This allows you to enable Picture by Picture (PBP) mode, where the monitor displays two video inputs (HDMI, DisplatPort or USB-C) side by side, or Picture in Picture mode (PIP) where a secondary video signal is shown on top of the main signal. |
| Secondary Input | With this option, you specify which other video input you'd like to use for PBP or PIP. |
| Multi Window Swap | Switches the main and sub window in multi-window mode. |
Color Settings
- Move the joystick to scroll through functions.
- Press the joystick to adjust the selected function, and save your changes.


Troubleshooting
| Menu Description | |
| Color Temp | These settings let you adjust the color temperature of your monitor, increasing or decreasing any of the colours to achieve different balances. |
| Warm Emphasises red | and yellow colours for a cozier feeling that can reduce eye strain. |
| Cool Emphasios blue | hues for colder, nighttime look, May increase eye strain. |
| Neutral (7500) | Balances colours to present a more true-to-life image. |
| User | Lets you manually adjust the monitor's balance of Red, Green and Blue (RGB) and Cyan, Magenta and Yellow (CMY). |
| Gamma | Changes how smoothly the monitor's blacks transition into white. |
| Tint | Adjusts the monitor's colours. |
| Saturation | Adjusts the intensity of your monitor's colours. |
| Blue Light Shift | See Quick Settings. |
System Settings
- Move the joystick to scroll through functions.
- Press the joyslick to adjust the selected function, and save your changes.
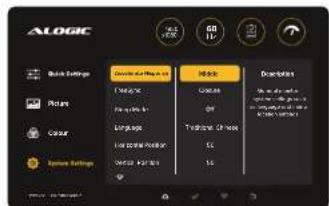
| Menu Description | |
| Overdrive | Increases the response time of the monitor by sending additional voltage to the pixels. Can make playing games feel more responsive, but can introduce visual glitches such as ghosting. |
| Adaptive Sync See Quick Settings. | |
| HDR Enables High Dynamice | Range, a mode which can produce richer colours and contrasts when playing HDR enabled content. Must be enabled on your computer as well. |
| Sleep Mode Change how long the monitor must be inactive for before it enters sleep mode. | |
| Language Change the language of the monitor's software. | |
| OSD H Position Change the horizontal position of the monitor's OSD menu. | |
| OSD V Position Change the vertical position of the monitor's OSD menu. | |
| OSD Timer Change the time it takes the OSD menu to disappear after inactivity. | |
| OSD Transparency Change the opacity of the OSD menu. | |
| Volume See Quick Settings. | |
| Mute Silences all audio output from the monitor. | |
| Reset | Restores the monitor to ALOGIC's default settings. |
| Symptom | Solution |
| Edge does not turn on after power button pressed for six seconds. | ·Verify that the mains power cord is securely attached to the power adapter, is connected to a power outlet and the power outlet is switched on. ·Verify that the power adapter is securely connected to the rear of the monitor. |
| Monitor does not show HDMI or DisplayPort video from the computer | ·Check that an appropriate video cable is connected between the computer and display and the correct input is selected on the monitor. ·Check your computer's settings to verify that it is detecting the monitor and is outputting video to it. |
| Monitor does not show USB-C video from the computer | ·Verify that you are using the USB-C cable that came with the monitor. ·Check your computer's settings to verify that it is detecting the monitor and is outputting video to it. ·Check that the USB-C port on your computer that the monitor is connected to supports video output using DisplayPort Alternate Mode (DP Alt Mode). |
| Laptop computer does not charge when connected to the monitor using USB-C | ·Verify that the USB-C port on your computer supports charging using the USB Power Delivery (USB-PD) standard. ·Some laptops require more than 90W of power to charge. These tend to be high end graphics and gaming focused computers. ·If necessary, connect the power adapter that came with the computer to your laptop in addition to the USB-C cable that is connected to the monitor. |
Warnings
- Do not place the power cord next to a heat source.
The power cord should be connected to a grounded wall socket. - Use only the supplied power cord with this monitor.
This monitor is designed for indoor use only. - Keep packaging and components out of the reach of children, who may suffocate or choke on certain pieces.
- Do not use the monitor in areas prone to heat, smoke, dust or moisture.
- Set monitor down gently to avoid damaging glass.
- Only place the monitor on flat surfaces that can support its weight.
- Do not place in the monitor in a way that leaves any part overhanging the surface it's resting on to minimise the risk of fall.
- If the monitor makes unusual sound or you can smell burning, immediately disconnect the power cord and contact ALOGIC Support.

①

(4)
O
。
②
3
Packungsinhalt
FCC Compliance Statement
This device complies with Part 15 of the FCC Rules. Operation is subject to the following two conditions:
(1) this device may not cause harmful interference, and
(2) this device must accept any interference received, including interference that may cause undesired operation.
NOTE: Changes or modifications not expressly approved by the party responsible for compliance could void the user's authority to operate the equipment.
Responsible Party - U.S. Contact Information
ALOGIC USA LLC
3730 Parish Ave
Fremont CA 94536 USA
EU Declaration of Conformity
Hereby, ALOGIC Corporation declares that this product is in compliance with Directive 2014/53/EU. The full text of the EU declaration of conformity is available at the following internet address by clicking on the Compliance Documentation link: www.alogic.co
HOMI
The terms HDMI and HDMI High-Definition Multimedia Interface, and the HDMI Logo are trademarks or registered trademarks of HDMI Licensing Administrator, Inc. in the United States and other countries.


- Assembling the Monitor
- Removing the Monitor from the Stand
- Attaching the Monitor to a VESA Mount
- Connecting Your Monitor Connecting to Accessories
- Audio and Edge
- Charging your Computer with Edge
- Securing your Monitor
- Setting the Correct Resolution for Edge
- Windows
- Mac
- How to Arrange Apps on Edge for Multitasking
- Apple's App Tiling Guide Microsoft's Windows Snapping Guide
- Understanding Edge's Controls
- Shortcuts
- Configuring Edge's Settings
- Quick Settings
- Picture Settings
- Color Settings
- Troubleshooting
- System Settings
- Warnings
- FCC Compliance Statement
- EU Declaration of Conformity
- HOMI
Brand : Alogic
Model : Edge 34C2KPDSGR
Category : Monitor