Monitor XT12 - Subwoofer DENON - Free user manual and instructions
Find the device manual for free Monitor XT12 DENON in PDF.
| Product Type | Subwoofer |
| Brand | Denon |
| Model | Monitor XT12 |
| Dimensions (W x H x D) | 406.4 mm x 417.5 mm x 455.8 mm |
| Weight | 17.7 kg |
| Power Supply | AC mains (power cord, fuse T 2AL 250V) |
| Continuous Power (RMS) | 50 W |
| Peak Power | 100 W |
| Amplifier Type | Class A/B |
| Frequency Response | 24 Hz to 160 Hz |
| Phase Adjustment | 0° / 180° |
| Low-Pass Filter | 80 Hz to 160 Hz / LFE |
| Inputs | Line (RCA), LFE (single RCA), Speaker level (5-way binding posts) |
| Controls | Volume, Low-Pass Filter, Power Auto On/Off |
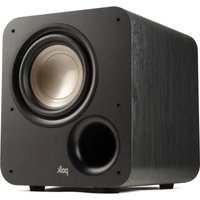
| Removable Grille | Yes |
| Finish | Black vinyl PICA |
| Warranty (electronics/amplifier) | 3 years limited (USA and Canada) |
| Warranty (cabinet and enclosure) | 5 years limited (USA and Canada) |
| Maintenance | Dust regularly; do not use abrasive or solvent cleaners |
| Safety | Do not open (risk of electric shock); do not expose to water or moisture |
| User-Replaceable Parts | Fuse (T 2AL 250V) replaceable |
Frequently Asked Questions - Monitor XT12 DENON
User questions about Monitor XT12 DENON
0 question about this device. Answer the ones you know or ask your own.
Ask a new question about this device
Download the instructions for your Subwoofer in PDF format for free! Find your manual Monitor XT12 - DENON and take your electronic device back in hand. On this page are published all the documents necessary for the use of your device. Monitor XT12 by DENON.
USER MANUAL Monitor XT12 DENON
Thank you for choosing the Polk Monitor XT12TM Subwoofer. The Polk Monitor XTTM speaker line is bold, stylish and quality built for performance. Pure and simple, the Polk Monitor XT speakers are the true definition of "Expect Great Sound".
Having built our reputation as The Speaker Specialists® for more than 45 years, we take pride in our superior sound and build quality, which features many patented and award-winning audio innovations. For the people of Polk, building audio products is not just a job—it's a passion. And if you're going to remember one thing, remember this: We live by the truest principle of what audio should deliver—great sound at an affordable price for everyone!
Technical Assistance or Service
If your product was damaged during shipping, please contact the authorized Polk Audio retailer where you purchased your product. For technical support, FAQs, and repair information, visit http://support.polkaudio.com. Support email addresses and phone numbers vary based on the region where you purchased your product.
WARNING! Listen Carefully
Polk Audio loudspeakers are capable of playing at extremely high volume levels, which could cause serious or permanent hearing damage. Polk Audio accepts no liability for hearing loss, bodily injury, or property damage resulting from the misuse of its products. Keep these guidelines in mind and always use good judgment when controlling volume:
- Limit prolonged exposure to volume levels that exceed 85 decibels (dB). For more information about safe volume levels, please review the Occupational Health and Safety Administration (OSHA) guidelines at http://www.osha.gov/
Product Disposal
Certain international, national and/or local laws and/ or regulations may apply regarding the disposal of this product. For more information, please contact the retailer where you purchased this product or the Polk importer/distributor in your country. More information is also available at www.polkaudio.com or by contacting Polk Audio at 5541 Fermi Court, Carlsbad, California, 92008, USA. Phone: 1-800-377-7655.
This symbol on our electrical products or their packaging indicates that it is prohibited in Europe to discard this product(s) as domestic waste. To ensure that you dispose of the product(s) correctly, please dispose of the product(s) according to local laws and regulations on the disposal of electrical and electronic equipment In doing so, you are contributing to the retention of natural resources and to the promotion of environ protection by the treatment and disposal of elect waste.
Care and Cleaning
The only thing you should ever need to do to your speakers is dust them occasionally. Never apply any abrasive or solvent-based cleaner or any harsh detergent. You can clean the grilles with the brush attachment of a vacuum cleaner.
Safety Precautions


CAUTION
TO REDUCE THE RISK OF ELECTRIC SHOCK, DO NOT REMOVE COVER (OR BACK). NO USER-SERVICEABLE PARTS INSIDE. REFER SERVICING TO QUALIFIED SERVICE PERSONNEL.

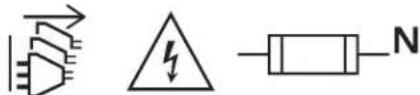
The lightning flash with arrowhead symbol, within an equilateral triangle, is intended to alert the user to the presence of uninsulated "dangerous voltage" within
the product's enclosure that may be of sufficient magnitude to constitute a risk of electric shock to persons.

The exclamation point within an equilateral triangle is intended to alert the user to the presence of important operating and maintenance (servicing)
instructions in the literature accompanying the appliance.
- Correct disposal of this product. This marking indicates that this product should not be disposed with other household wastes throughout the EU. To prevent possible harm to the environment or human health from uncontrolled waste disposal, recycle it responsibly to promote the sustainable reuse of material resources. To return your used device, please use the return and collection systems or contact the retailer where the product was purchased. They can take this product for environmental safe recycling.
- CAUTION! To reduce the risk of fire or electric shock, do not expose this apparatus to rain or moisture. The apparatus shall not be exposed to dripping or splashing and that objects filled with liquids, such as vases, shall not be placed on apparatus.
- Read these instructions.
- Keep these instructions.
- Heed all warnings.
- Follow all instructions.
- Do not use this apparatus near water.
- Clean only with a dry cloth.
- Do not block any ventilation openings. Install in accordance with the manufacturer's instructions.
- Do not install near any heat sources such as radiators, heat registers, stoves, or other apparatus (including amplifiers) that produce heat.
- No naked flame sources, such as lighted candles, should be placed on the apparatus.
- Place the subwoofer close to your AC power socket for easy plugging and unplugging.
- Protect the power cord from being walked on or pinched particularly at the plugs, convenience receptacles, and at the point where they exit from the apparatus.

- Use only attachments/accessories specified by the manufacturer.
- Use only with the cart, stand, tripod, bracket, or table specified by the manufacturer, or sold with the apparatus. When a cart or rack is used, use caution when moving the cart/apparatus combination to avoid injury from tip-over. The subwoofer may tip over, causing serious person or death.
- Unplug the apparatus during lightning storms or when unused for long periods of time.
- Refer all servicing to qualified personnel. Servicing is required when the apparatus has been damaged in any way, such as when power supply cord or plug is damaged, when liquid has been spilled or objects have fallen into the apparatus, when the apparatus has been exposed to rain or moisture, does not operate normally, or has been dropped.
- WARNING! The mains plug/appliance coupler is used as the disconnect device. The disconnect device shall remain readily operable.
- CAUTION! To completely disconnect this product from the mains, disconnect the plug from the wall socket outlet. The mains plug is used to completely interrupt the power supply to the unit and must be within easy access by the user.
- The equipment can be used at a maximum ambient temperature of 95^ (35^)
- The product is designed for altitudes up to and including 2000m above sea level.
- CAUTION! To completely disconnect this product from the mains, disconnect the plug from the wall socket outlet. The mains plug is used to completely interrupt the power supply to the unit and must be within easy access by the user.
- CAUTIONS ON INSTALLATION! For proper heat dispersal, do not install this unit in a confined space such as a bookcase or similar enclosure.
- Amplifier: 0.3 m or more
- Other units: 0.1 m or more
- CAUTION! Neutral fusing. After fuse is blown, there is still a risk of electrical shock. Disconnect power cord before service. When replacing, use a fuse with the same current rating (T 2AL 250V).
IC Information (For Canadian Customers)
CANICES-3(B)/NMB-3(B)
FCC Information (For US Customers)
1. Compliance Information
This product complies with Part 15 of the FCC Rules. Operation is subject to the following two conditions: (1) this product may not cause harmful interference, and (2) this product must accept any interference received, including interference that may cause undesired operation.
2. Important Notice: Do Not Modify This Product.
This product, when installed as indicated in the instructions contained in this manual, meets FCC requirements. Modification not expressly approved by Sound United may void your authority, granted by the FCC, to use the product.
- NOTE: This product has been tested and found to comply with the limits for a Class B digital device, pursuant to Part 15 of the FFC Rules. These limits are designed to provide reasonable protection against harmful interference in a residential installation.
This product generates, uses, and can radiate radio frequency energy and, if not installed and used in accordance with the instructions, may cause harmful interference to radio communications. However, there is no guarantee that interference will not occur in a particular installation. If this product does cause harmful interference to radio or television reception, which can be determined by turning the product OFF and ON, the user is encouraged to try to correct the interference by one or more of the following measures:
- Reorient or relocate the receiving antenna.
- Increase the separation between the equipment and receiver.
- Connect the product into an outlet on a circuit different from that to which the receiver is connected.
- Consult the local retailer authorized to distribute this type of product or an experienced radio/TV technician for help.
Notes on Use
- Avoid high temperatures.
- Allow for sufficient heat dispersion when installed in a rack.
- Handle the power cord carefully.
- WARNING! Hold the plug when unplugging the cord.
- Keep the unit free from moisture, water, and dust.
- Unplug the power cord when not using the unit for long periods of time.
- Do not obstruct the ventilation holes.
- Do not let foreign objects into the unit.
- Do not let insecticides, benzene, and thinner come in contact with the unit.
- WARNING! Never disassemble or modify the unit in any way.
- Ventilation should not be impeded by covering the ventilation openings with items such as newspapers, tablecloths or curtains.
- CAUTION (for amplifier)! HOT SURFACE. DO NOT TOUCH.
- Naked flame sources such as lit candles should not be placed on the unit.
- Do not expose the unit to dripping or splashing fluids.
- Do not place objects filled with liquids, such as vases, on the unit.
WARNING! Do not handle the mains cord with wet hands. - WARNING! When the switch is in the OFF (STANDBY) position, the equipment is not completely switched off from MAINS.
- The equipment shall be installed near the power supply so that the power supply is easily accessible.
- Do not bend forcibly the plug on the equipment for the connection between the connector and micro USB/USB cable.
The rear metal panel over the internal heat sink may become hot when operating this product continuously. Do not touch hot areas, especially around the "Hot surface" mark and the rear metal panel.

Positioning Your Subwoofer
To maximize the sound quality of your speaker system, correct placement is everything. Your Monitor XT12 subwoofer is compatible with 2.1, 3.1, 5.1, 7.1 and 9.1 setups. Placing your subwooers in the optimal location provides a more dramatic effect on the performance of the bass output.
Listening with One Subwoofer
For a single-subwoofer setup, Polk recommends positioning the subwoofer on either side of and along the same wall as the front speakers. Placing the subwoofer in the middle of the listening area will not provide the most optimal sound and may decrease the amount of bass output you experience. For the best sound and minimal distortion, the subwoofer should be positioned approximately 6 inches from the wall.
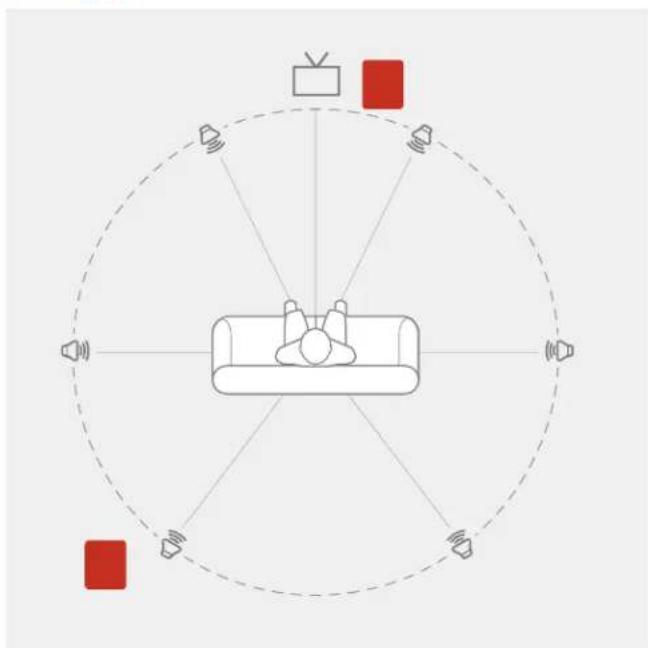
Listening with Multiple Subwoofer
When placing multiple subwoofer, choose a location in either corner of the same wall as your front speakers and position the second or multiple subwoofer in an opposite diagonal position as the first subwoofer. Ensure each subwoofer is at least 6 inches from the wall. This will ensure the best listening experience.
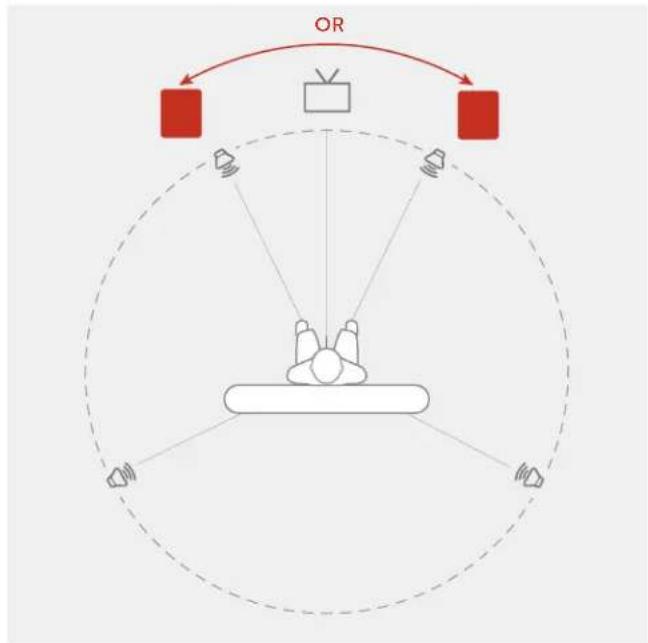
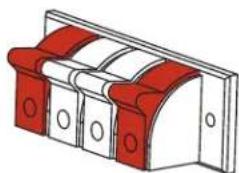
Single Subwoofer Setup
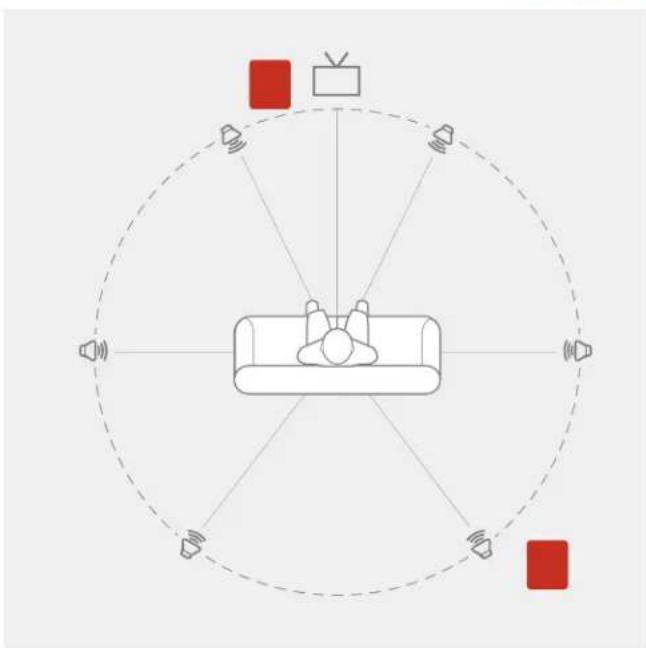
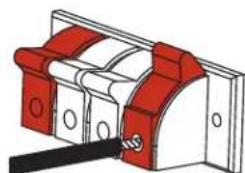
Multiple Subwoofer Setup
OR
Subwoofer Back Panel Controls
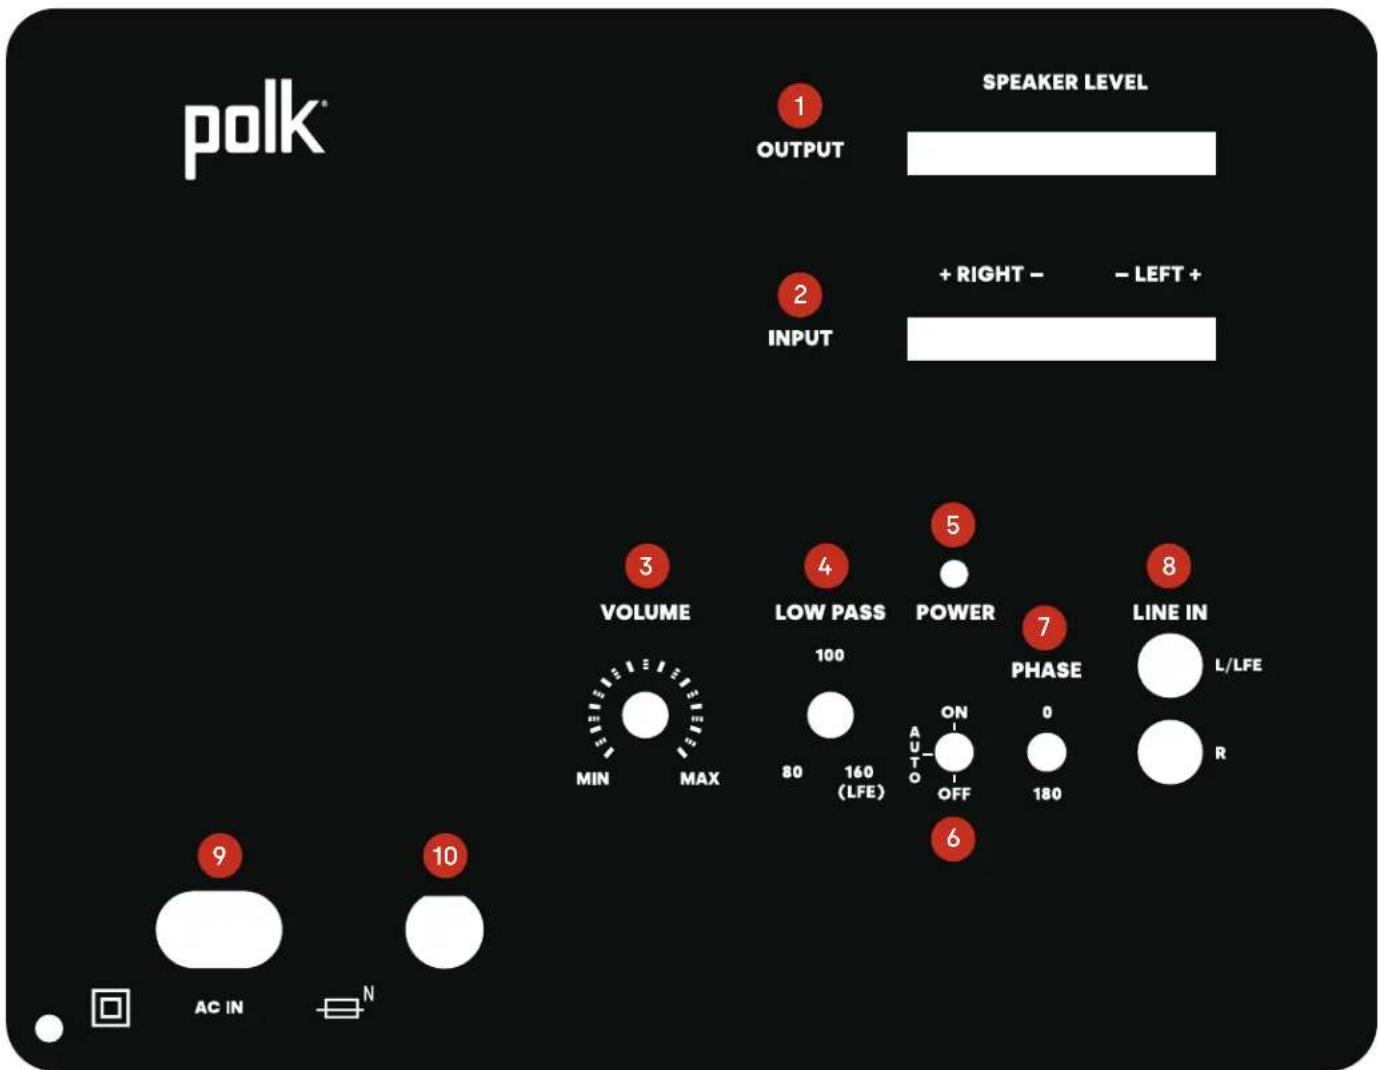
| 1 SPEAKER LEVEL OUTPUT |
| 2 SPEAKER LEVEL INPUT |
| 3 VOLUME CONTROL |
| 4 LOW PASS FILTER |
| 5 LED POWER INDICATOR |
| 6 POWER AUTO/ON AND OFF |
| 7 PHASE CONTROL |
| 8 LINE IN (LFE = WHITE RCA) |
| 9 AC POWER INLET |
| 10 FUSE (T 2AL 250V) |
Subwoofer Connection Options
There are three options for connecting an input to your subwoofer: LINE IN, SPEAKER LEVEL IN, and LFE.
1 LINE IN SETUP
LINE IN


This method is recommended for systems with no LFE/ subwoofer output jack, such as 2-channel systems.
- Power-off the amplifier/receiver and disconnect the subwoofer from the AC socket.
- Connect standard RCA cables from the front left and right pre-out jacks of the receiver.
- Connect the subwoofer to an AC power source and turn it on.
- Set the default volume to the 12 o'clock position.
- Set the low-pass filter on the subwoofer to the appropriate frequency.
2 SPEAKER LEVEL IN SETUP
This method is recommended for amplifiers/receivers that do not have LFE/subwoofer or pre-out jacks.
- Power-off the amplifier/receiver and disconnect the subwoofer from the AC socket.
- Connect standard speaker cables from the speaker output terminals of the amplifier/receiver. Most amplifiers and receiver speaker terminals allow two sets of wires to be connected to one terminal set (one for the main speaker and one for the subwoofer).
IMPORTANT NOTE: One terminal on each channel input is marked with a red band (+) and the other is marked with a black band (-) . Make certain that you connect the wire from the red (+) terminal of your amplifier/receiver to the red (+) terminal of the subwoofer and the wire from the black (-) terminal of your amplifier/receiver to the black (-) terminal of the subwoofer. It is essential to connect all speakers in the system to the amplifier in the same way (to the correct polarity.) If you experience poor bass, one or more of the channels may be connected to the incorrect polarity and may need to be rewired. Pay close attention and connect positive to positive and negative to negative on all channels.
- Connect the subwoofer to an AC power source and turn it on.
- Set the default volume to the 12 o'clock position.
3 LFE SETUP
Follow the steps in the appropriate section below depending on whether or not you have a Y adapter.
With a Y adapter
- Power off the amplifier/receiver and disconnect the subwoofer from the AC socket.
- Connect a Y adapter to the RCA input on the amplifier and connect the LFE cable from your receiver to the Y adapter.
- Turn the low-pass filter knob on the subwoofer to 160 Hz.
- Set the default volume to the 12 o'clock position.
- Connect the subwoofer to AC power and turn it on.
Without a Y adapter
- Power off the amplifier/receiver and disconnect the subwoofer from the AC socket.
- Connect the LFE cable from your receiver to the left white RCA line input.
- Turn the low-pass filter knob on the subwoofer to 160Hz
- Set the default volume to the 12 o'clock position.
- Connect the subwoofer to AC power and turn it on.
| Monitor XT12 Subwoofer Specifications* | |
| Speaker type Subwoofer | |
| Base type Bass reflex (ported) | |
| Overall frequency response 24 Hz-160 Hz | |
| Continuous (RMS) 50 W | |
| Peak power 100 W | |
| Amplifier type Class A/B | |
| Phase adjustment 0/180 | |
| Europe (<.5W compliance) Yes | |
| Low-pass crossover frequency 80 Hz-160 Hz / LFE | |
| Dimensions and Weight Attributes | |
| Product dimensions (W x H x D) 16.0" x 16.4" x 17.9" (406.4 mm x 417.5 mm x 455.8 mm) | |
| Product weight (each) 39 lbs (17.7 kg) | |
| Cabinetry | |
| Available finishes Black vinyl pica | |
| Feet Permanently installed feet (no levelling) | |
| Removable grille Included | |
| Inputs | |
| Line level | Yes |
| LFE | Single RCA |
| Speaker | Left/Right 5-way binding posts |
| Controls | |
| Main power | Auto on/off |
| Volume control | Potentiometer with center detent |
| Low-pass control | Potentiometer with center detent |
*Subject to change without notice.
U.S. and Canada Limited 3-Year Warranty for Electronics and Amplifier/ Limited 5-Year Warranty for the Subwoofer and Cabinet
Polk Audio, LLC (hereinafter "Polk" or "Polk Audio") provides this limited warranty to the original retail purchaser only. This warranty will terminate automatically prior to its stated expiration if the original retail purchaser sells or transfers the Product to any other party.
Polk Audio warrants to the original retail purchaser only, that the subwoofer and cabinet ("Product") will be free from defects in material and workmanship for a period of five (5) years, and the electronics and amplifier for a period of three (3) years from the date of original retail purchase from an authorized Polk Audio Dealer.
To allow Polk to offer the best possible warranty service, please register your new Product online. To register, please visit support.polkaudio.com and click Register a Product, or call Polk Customer Service at 1-800-377-7655 in the USA and Canada within ten (10) days of the date of original purchase.
Defective Products must be shipped as designated by Polk, together with proof of purchase, prepaid and insured to either the Polk Authorized Dealer from whom you purchased the Product, or to a location designated by Polk. When returning products for warranty repair, you will be required to provide an original receipt or bill of sale, identifying you as the original purchaser and identifying the purchase was made through a Polk Authorized Dealer. Products must be shipped in the original shipping container or its equivalent; in any case, the risk of loss or damage in transit is to be borne by you. If upon examination by Polk or Polk Authorized Dealer it is determined that the unit was defective in materials or workmanship at any time during this limited warranty period, Polk or the Polk Authorized Dealer will, at its option, repair or replace this Product at no additional charge, except as set forth below. All replaced parts and Products become the property of Polk. Products replaced or repaired under this warranty will be returned to you, within a reasonable time, freight prepaid. If you have questions about warranty coverage or the warranty return process, please visit support.polkaudio.com and click Warranty. To contact Polk Customer Service from the United States or Canada, call 1-800-377-7655.
This warranty does not include service or parts to repair damage caused by accident, disaster, misuse, abuse, negligence, inadequate packing or shipping procedures.
commercial use, voltage inputs in excess of the rated maximum of the unit, cosmetic appearance of cabinetry not directly attributable to defect in materials or workmanship, or service, repair, or modification of the Product which has not been authorized or approved by Polk. This warranty shall terminate if purchased from an unauthorized dealer or if any of the serial number on the Product has been removed, tampered with or defaced.
This warranty is applicable to all of the U.S. and Canada, except Quebec, and is in lieu of all other expressed or implied warranties. If this Product is defective in materials or workmanship as warranted above, your sole remedy shall be repair or replacement as provided above. In no event will Polk Audio be liable to you for any incidental or consequential damages arising out of the use or inability to use the Product, even if Polk Audio or a Polk Authorized Dealer have been advised of the possibility of such damages, or for any claim by any other party. Except as provided in this limited warranty, and to the maximum extent permitted by law, Polk is not responsible for direct, indirect, special, incidental or consequential damages resulting from breach of warranty or condition or under other legal theory, including but not limited to, loss of revenue, profits, business, opportunity, goodwill, reputation, compromise or corruption of data, or any indirect or consequential loss of damage. Some states or provinces do not allow the exclusion or limitation of incidental or consequential damages, so the above limitation and exclusion may not apply to you.
All implied warranties on this Product are limited to the duration of this expressed warranty. Some states or provinces do not allow limitations on how long an implied warranty (or condition) lasts, so the above limitations may not apply to you. This warranty gives you specific legal rights, and you also may have other rights which vary from state to state or province to province, as applicable. Residents of Quebec are governed by that province's consumer protection legislation.
This warranty applies only to Products purchased in Canada, the United States of America, its possessions and U.S. and NATO armed forces exchanges. Please see the warranty guide specific to Polk Products purchased in countries or territories not referenced herein.
a Division of D&M Europe B.V.