ROLLON 3300R - Generator MILWAUKEE - Free user manual and instructions
Find the device manual for free ROLLON 3300R MILWAUKEE in PDF.
| Brand | Milwaukee |
| Product type | Portable lithium-ion battery generator |
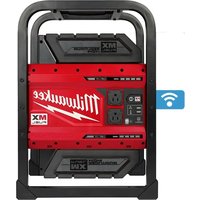
| Model | ROLLON 3300R |
| Peak power | 7,200 W (5 seconds) |
| Rated power | 3,600 W @ 65% duty cycle |
| AC output voltage | 120 VAC, 60 Hz |
| AC outlet(s) | 2 GFCI outlets |
| USB ports | USB-A (5 V, 2.4 A) and USB-C (20 V, 3 A, up to 60 W) |
| Input voltage (charge) | 120 VAC |
| Rated input current | 9.3 A |
| Operating temperature | -20°C to 40°C |
| Charging temperature | 5°C to 40°C |
| Weight | 47.2 kg (104 lb) |
| Connectivity | ONE-KEY™ (wireless) |
| Protection rating | Waterproof (temporary indoor/outdoor use) |
| Battery type | Integrated lithium-ion |
| Grounding | 3-prong plug, M4 x 0.7 ISO bonding terminal |
| Safety pictograms | Electric shock risk, GFCI protection, do not burn |
| Included accessories | Power cord (part no. 22-64-0026) |
| Warranty | 3 years (power tool) |
Frequently Asked Questions - ROLLON 3300R MILWAUKEE
User questions about ROLLON 3300R MILWAUKEE
0 question about this device. Answer the ones you know or ask your own.
Ask a new question about this device
Download the instructions for your Generator in PDF format for free! Find your manual ROLLON 3300R - MILWAUKEE and take your electronic device back in hand. On this page are published all the documents necessary for the use of your device. ROLLON 3300R by MILWAUKEE.
USER MANUAL ROLLON 3300R MILWAUKEE
natural_image
Line drawing of a Milwaukee electric vehicle chassis with visible battery pack, wheels, and control panel (no text or symbols)The power supply must be charged before first use.
WARNING To reduce the risk of injury, user must read and understand operator's manual.
IMPORTANT SAFETY INSTRUCTIONS
AWARNING READ ALL SAFETY WARNINGS, INSTRUCTIONS, ILLUSTRATIONS AND SPECIFICATIONS PROVIDED WITH THIS POWER SUPPLY. FAILURE TO FOLLOW ALL INSTRUCTIONS LISTED BELOW MAY RESULT IN ELECTRIC SHOCK, FIRE AND/OR SERIOUS INJURY. SAVE ALL WARNINGS AND INSTRUCTIONS FOR FUTURE REFERENCE.
WORK AREA SAFETY
- This power supply contains energy higher than 1 kWh. Do not use in a sleeping room or any habitable space of a dwelling unit.
- Rainproof. For indoor use or temporary outdoor use. Exercise reasonable care when using in wet conditions. Do not charge outdoors. Keep storage door closed.
- Avoid dangerous environments. Do not charge power supply in rain, snow, damp or wet locations. Do not use or charge power supply in the presence of explosive atmospheres (gaseous fumes, dust or flammable materials) because sparks may be generated when plugging in the power supply, possibly causing fire.
- Keep work area clean and well lit. Cluttered or dark areas invite accidents.
- Close supervision is necessary when a power supply is used near children.
- Never leave the power supply unattended while in use.
- Do not stack power supplies.
- Arrange power cords carefully to avoid hazardous environments. Tripping or snagging on power cords can cause injury and power supply damage. Keep power cords dry and off the ground. Do not allow power cords to run through puddles or across wet ground.
ELECTRICAL SAFETY
- Charge power supply only with the provided power cord. Do not use if the power cord is damaged in any way. If damaged or missing, replace with identical replacement parts.
- Power cord plugs must match the outlet. Never modify the plug in any way. Do not use any adapter plugs with earthed (grounded) equipment.
- Do not abuse the power cord. Never use the power cord for carrying, pulling or unplugging the power supply. Keep power cord away from heat, oil, sharp edges or moving parts. Do not unplug by pulling on the power cord. To unplug, grasp the plug, not the power cord.
- Unplug the power cord from outlet when not in use and before servicing or cleaning.
- Avoid using an extension cord for AC input. When unavoidable, use a properly wired 14 gauge or larger extension cord with pins that are the same number, size and shape as the pins on the AC input. Make sure that the extension cord is in good electrical condition.
-
Do not exceed the load rating of the extension cord. Exceeding the load capacity of the extension cord could result in overheating, fire, electrical shock, or injury.
-
The power supply output is disconnected (isolated) from the AC receptacle ground pin and frame; electrical equipment that requires this connection may not operate unless properly connected to the ground pin.
- Avoid body contact with earthed or grounded surfaces, such as pipes, radiators, ranges and refrigerators. There is an increased risk of electric shock if your body is earthed or grounded.
- Connect only to a properly grounded outlet. Ground to local codes.
- Connect to a GFCI protected circuit when charging.
• Test GFCI monthly. - Do not connect the power supply output to a building's electrical system.
- Do not permanently install in a vehicle.
- Do not overload the power supply's capacity. Exceeding the power supply's wattage/amperage capacity may damage the power supply and/or electrical devices connected to it.
- Corded equipment may require more power consumption than this power supply is capable of providing. Check the equipment's manual to avoid damage to the power supply or risk of personal injury.
- Do not short circuit AC outputs. A short-circuited power supply may cause fire, personal injury, and power supply damage. A power supply will short circuit if a metal object makes a connection between the line and neutral terminals of the AC outputs. Do not place a power supply near anything that may cause a short circuit.
- Do not allow fluids to flow into power supply. Corrosive or conductive fluids, such as seawater, certain industrial chemicals, and bleach or bleach containing products, etc., can cause a short circuit.
- Do not use if power supply has been immersed in a flooded area. Do not place or store power supply where it can fall or be pulled into water or liquid.
- Do not use a power supply or corded equipment that has been damaged or modified. Damaged or modified products may exhibit unpredictable behavior resulting in fire, explosion or risk of injury.
- Do not expose a power supply or corded equipment to fire or excessive temperature. Do not use an external device to heat the power supply. Do not burn or incinerate the power supply even if it is damaged, dead or completely discharged. Exposure to fire or temperature above 265^ (130°C) may cause explosion. Toxic fumes and materials are created when burned.
- Do not use a power supply that is smoking/ showing signs of melting/making unusual noises/heating up. Move power supply away from structures or combustible materials. If a fire starts, call fire department.
PERSONAL SAFETY
• Always use common sense and be cautious when using this power supply. It is not possible to anticipate every situation that could result in a dangerous outcome. Do not use this power supply if you do not understand these operating instructions or you feel the work is beyond your capability; contact Milwaukee Tool or a trained professional for additional information or training.
- Do not sit or step on the power supply.
- Only charge in a well ventilated area. Do not block vents; keep free of dust, lint, hair, and anything else that may reduce air flow. Only use power supply in
an upright position. Do not put fingers, hands, or other objects into openings.
- Do not smoke, strike a match, or cause a spark in the vicinity of a charging power supply. Vented gases may explode.
USE AND CARE
- Know your power supply. Read operator's manual carefully. Learn its applications and limitations, as well as the specific potential hazards related to this power supply. Do not alter or modify the power supply from the original design or function. Misuse and improper handling can cause injury.
- Use corded equipment according to the equipment manufacturer's instructions and in locations specified by the manufacturer. Equipment may not be suitable for outdoor/rain use.
- Do not plug corded equipment into the power supply when the accessory cover is installed.
- Suitable for use in a repair facility. This equipment has arcing or sparking parts which should not be exposed to flammable vapors; locate equipment at least 18" (457 mm) above the floor when used in a repair facility.
- Operating this power supply less than 3' (1 m) from building or other obstruction can cause overheating and damage to the power supply. For proper cooling, allow at least 3' (1 m) of empty space around the power supply.
- Always assume the AC outlets are live. The auto start ONE-KEY™ feature can result in unexpected starting of corded equipment.
- This power supply is not intended for use with emergency medical equipment or life support devices.
- Do not use the power supply as a workbench where cutting, drilling, or other activities could cause damage to the power supply.
- Do not place more than 150 lbs on power supply when stationary. Do not load higher than the extended handle position.
- Follow all charging instructions and do not charge a power supply outside the temperature range specified in the instructions. Charging improperly or at temperatures outside the specified range may damage the integrated battery and increase the risk of fire.
- Do not crush, drop, damage or disassemble power supply. Do not use a power supply that has received a sharp blow, been dropped, run over, or damaged in any way (e.g., pierced with a nail, hit with a hammer, stepped on, in a vehicle accident). If it is damaged, contact an authorized MILWAUKEE service facility.
- Under abusive conditions, liquid may be ejected from the integrated battery; avoid contact. If contact accidentally occurs, flush with water. If liquid contacts eyes, additionally seek medical help. Liquid ejected from the integrated battery may cause irritation or burns.
SERVICE
- Inspect power supply and power cord regularly. Have the power supply serviced by a qualified repair person using only identical replacement parts. This will ensure that the safety of the power supply is maintained. Do not disassemble power supply. Contact a MILWAUKEE service facility for ALL repairs.
- Maintain labels and nameplates. These carry important information. If unreadable or missing, contact a MILWAUKEE service facility for a free replacement.
ACCESSORIES
- Use only recommended attachments. Use of an attachment not recommended or sold by the power supply manufacturer may result in a risk of fire, electric shock or personal injury.
• Always follow all manufacturer's safety rules of the attachments.
TRANSPORTING
Do not place more than 60 lbs on power supply when transporting. Do not load higher than 11".
- To reduce the risk of injury, fire, or explosion due to damaged battery packs, remove side mounted chargers before transporting.
• Secure the power supply before transporting to prevent tipping, rolling, slipping, and falling.
- When moving power supply, do not overreach. Keep proper footing and balance at all times. Clear the area of obstructions. This enables better control in unexpected situations.
- Use multiple people whenever it is necessary to lift or carry the power supply. The power supply is heavy. Lift with legs, not back.
- Only lift the power supply by the roll cage, do not lift by the handle.
- Do not transport power supply with corded equipment plugged into the outlets.
STORAGE
- To prevent the risk of fire or shock; store your power supply upright in a cool, dry place. Do not store where temperatures may exceed 122^ (50°C) such as in direct sunlight, a vehicle, or metal building during the summer. Do not store outside.
Do not hang/hoist the power supply for storage (eg., from a crane hook).
SPECIFICATIONS
Cat. No....3300R
Charger Rating ^* 1000 W
Rated Input Voltage......Universal 120 VAC
Rated Input Amps....9.3 A
Total Rated Output (Both Receptacles)
Peak Watts 7200 W for 5s
Rated Watts....3600 W@ 65% Duty Cycle
Voltage.... 120 VAC
Rated Frequency 60 Hz
Rated Output Voltage
(USB-A) 5 VDC @ 2.4 A (12 W)
Rated Output Voltage
(USB-C)....20 VDC @ 3 A (Up to 60 W)
Cord Cat. No....22-64-0026
UL Listed, Type SJOW, 3-conductor,
No. 14 AWG min, rated 105°C min,
300 V/15 A min, 6 ft (1.8 m) min length
Bonding Terminal Stud ....M4 x 0.7 ISO
Weight** (Tool Only)....104 lb (47.2 kg)
Recommended Ambient
Operating Temperature ...... -4°F to 104°F
(-20°C to 40°C)
Recommended Ambient
Charging Temperature.... 41°F to 104°F
(5°C to 40°C)
* The charger power can be adjusted using the ONE-KEY™ app.
** Add additional PACKOUT™ weight and contents attached to power supply.
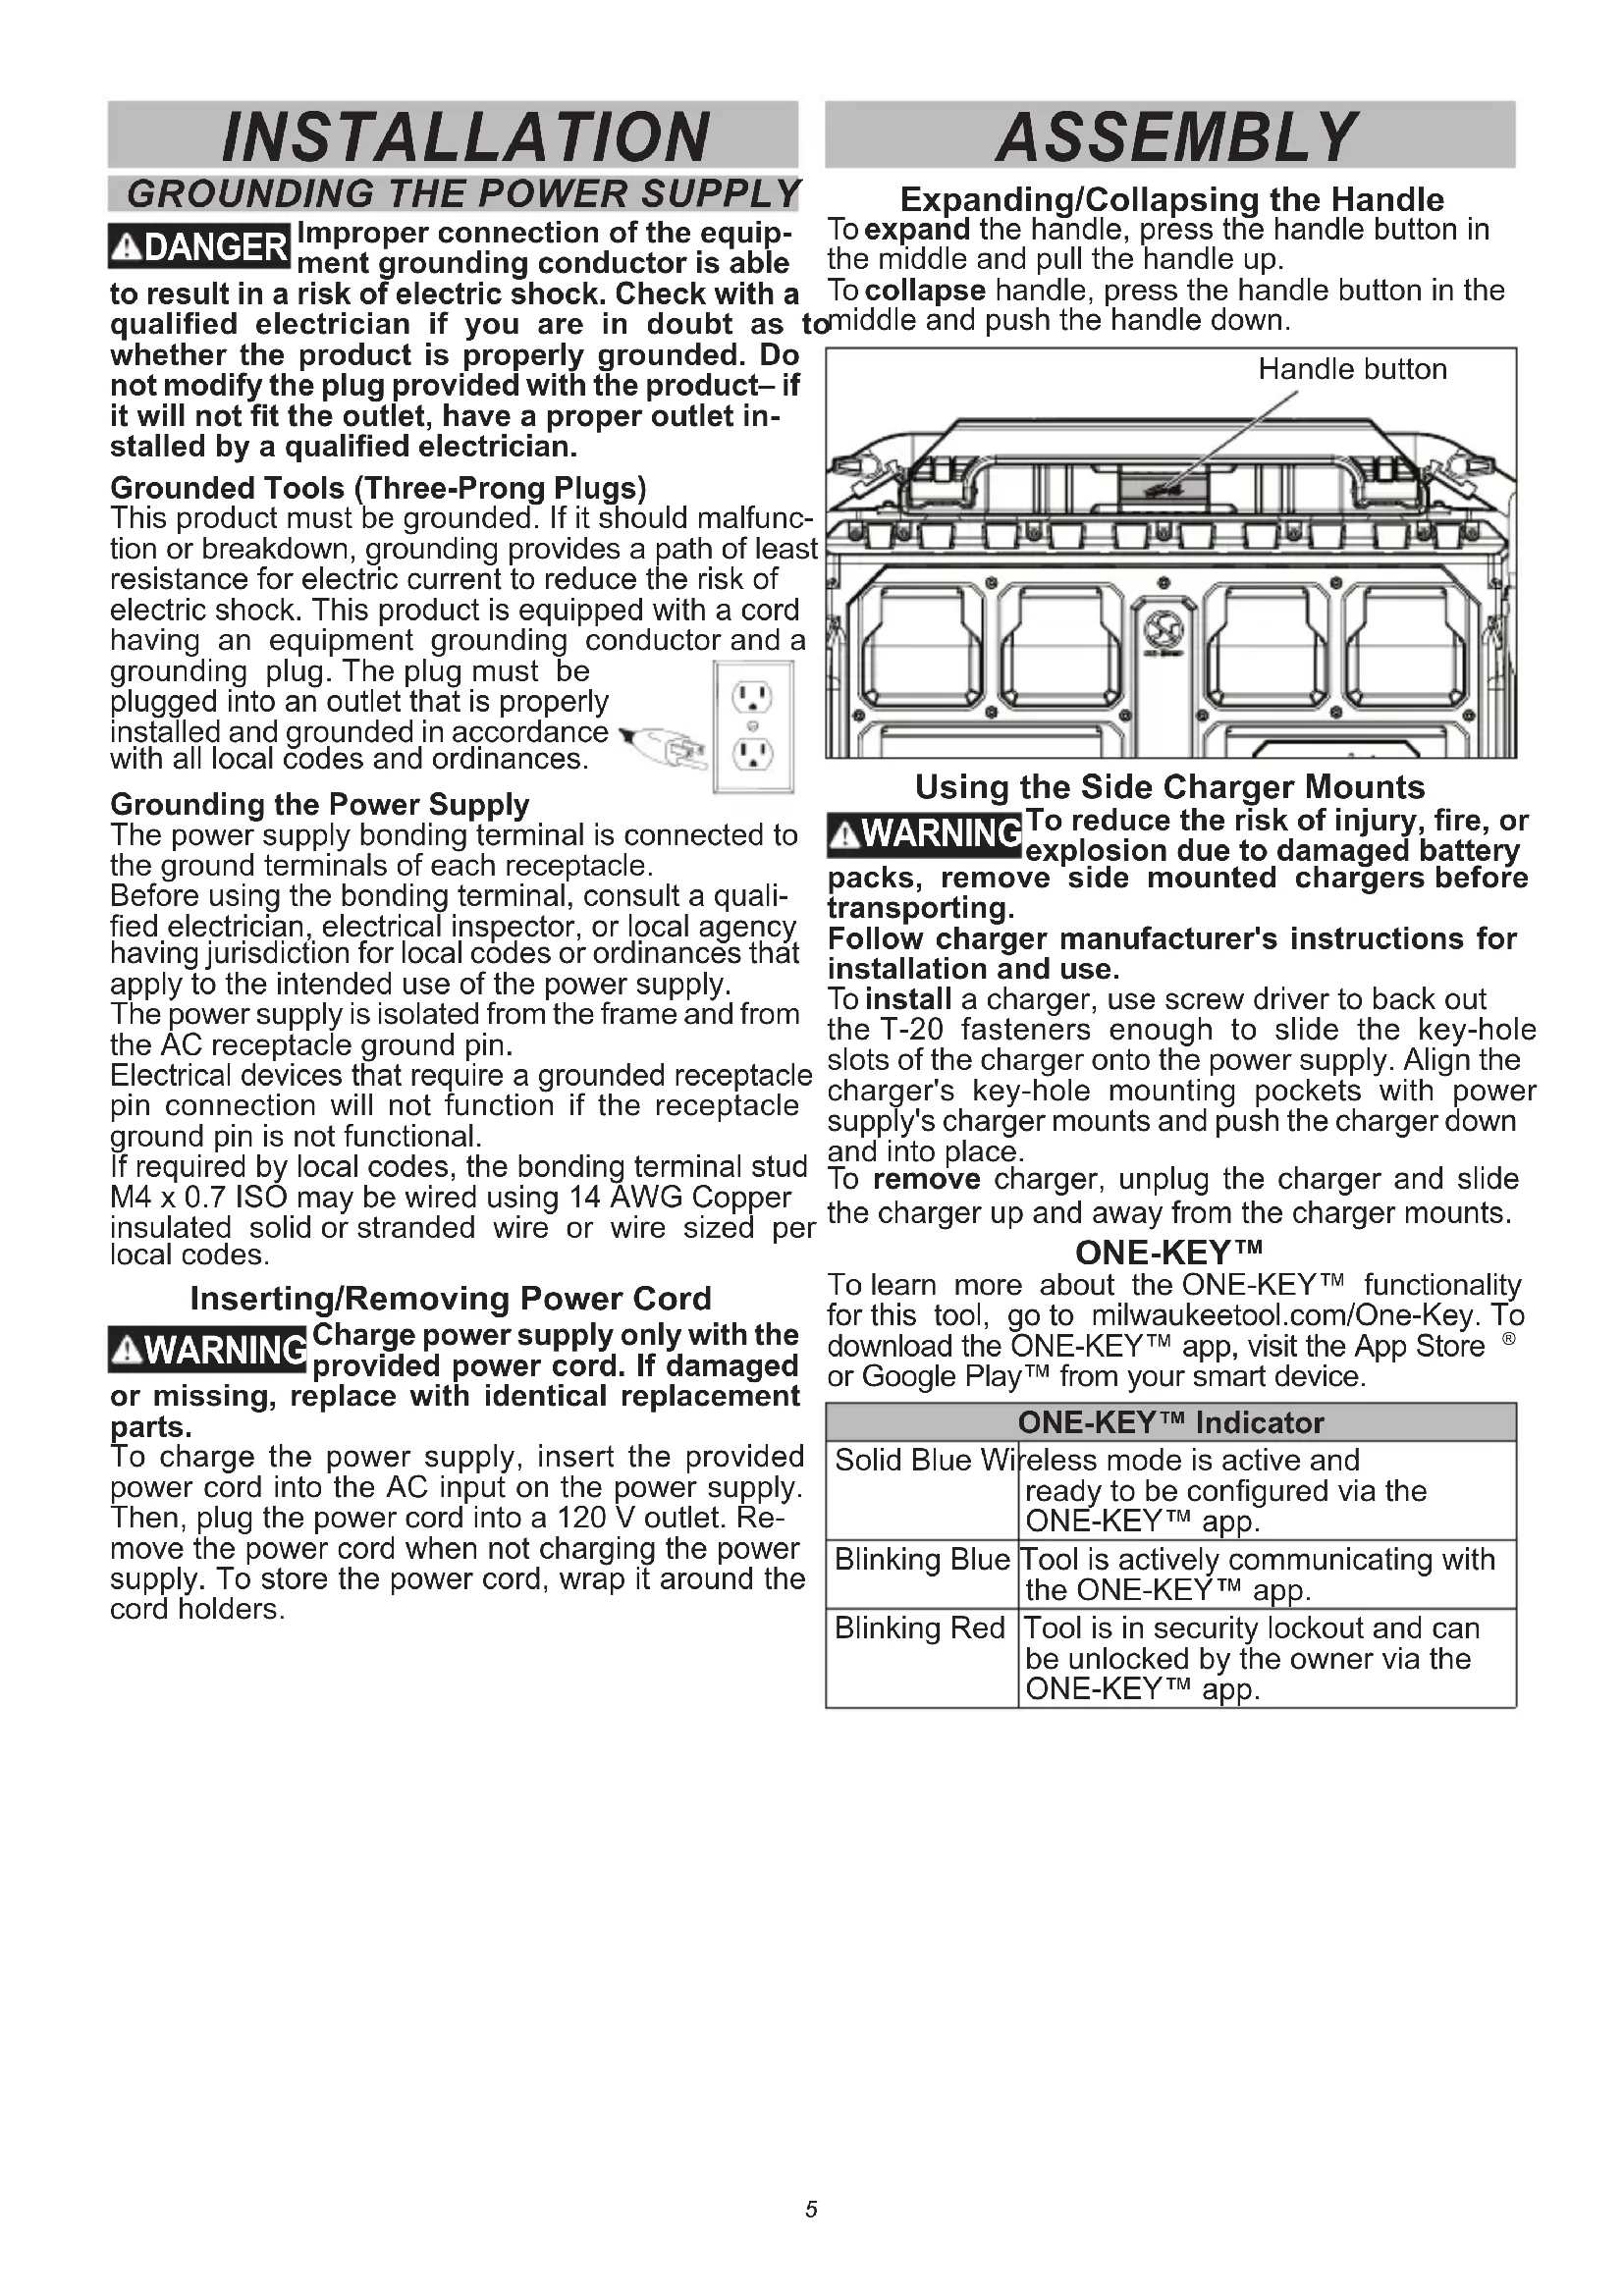
FUNCTIONAL DESCRIPTION
text_image
Technical diagram of a Milwaukee offshore platform with numbered components and exploded view- Roll cage
- Cord holders
- Handle
- Vents
- Charger mounts
- AC input
- Feet
- Charger cord holder
- Display
- ONE-KEY™ indicator
- Power button
12.AC power button - GFCI duplex outlets
- Bonding terminal stud M4 x 0.7 ISO
- Storage
16.USB-C
17.USB-A - USB power button
- Circuit breaker reset buttons
SYMBOLOGY
Volts
Direct Current
\~Alternating Current
Amps
Hz
Flow button

WARNING
Risk of Electric Shock
Universal Serial Bus (USB)
Universal Serial Bus Type-C (USB-C)
Additional person lift
Do not use power supply that has been immersed
Do not step
Class II equipment with functional grounding
BFP Backfeed Protected
NOM Approval Mark for Mexico
U. Listing for Canada and U.S.
INSTALLATION
GROUNDING THE POWER SUPPLY
DANGER
Improper connection of the equipment grounding conductor is able to result in a risk of electric shock. Check with a qualified electrician if you are in doubt as whether the product is properly grounded. Do not modify the plug provided with the product—if it will not fit the outlet, have a proper outlet installed by a qualified electrician.
Grounded Tools (Three-Prong Plugs)
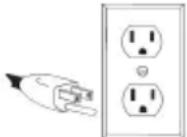
This product must be grounded. If it should malfunction or breakdown, grounding provides a path of least resistance for electric current to reduce the risk of electric shock. This product is equipped with a cord having an equipment grounding conductor and a
grounding plug. The plug must be plugged into an outlet that is properly installed and grounded in accordance with all local codes and ordinances.
Grounding the Power Supply
The power supply bonding terminal is connected to the ground terminals of each receptacle.
Before using the bonding terminal, consult a qualified electrician, electrical inspector, or local agency having jurisdiction for local codes or ordinances that apply to the intended use of the power supply.
The power supply is isolated from the frame and from the AC receptacle ground pin.
Electrical devices that require a grounded receptacle pin connection will not function if the receptacle ground pin is not functional.
If required by local codes, the bonding terminal stud M4 x 0.7 ISO may be wired using 14 AWG Copper insulated solid or stranded wire or wire sized per local codes.
Inserting/Removing Power Cord
WARNING
Charge power supply only with the provided power cord. If damaged or missing, replace with identical replacement parts.
To charge the power supply, insert the provided power cord into the AC input on the power supply. Then, plug the power cord into a 120 V outlet. Remove the power cord when not charging the power supply. To store the power cord, wrap it around the cord holders.
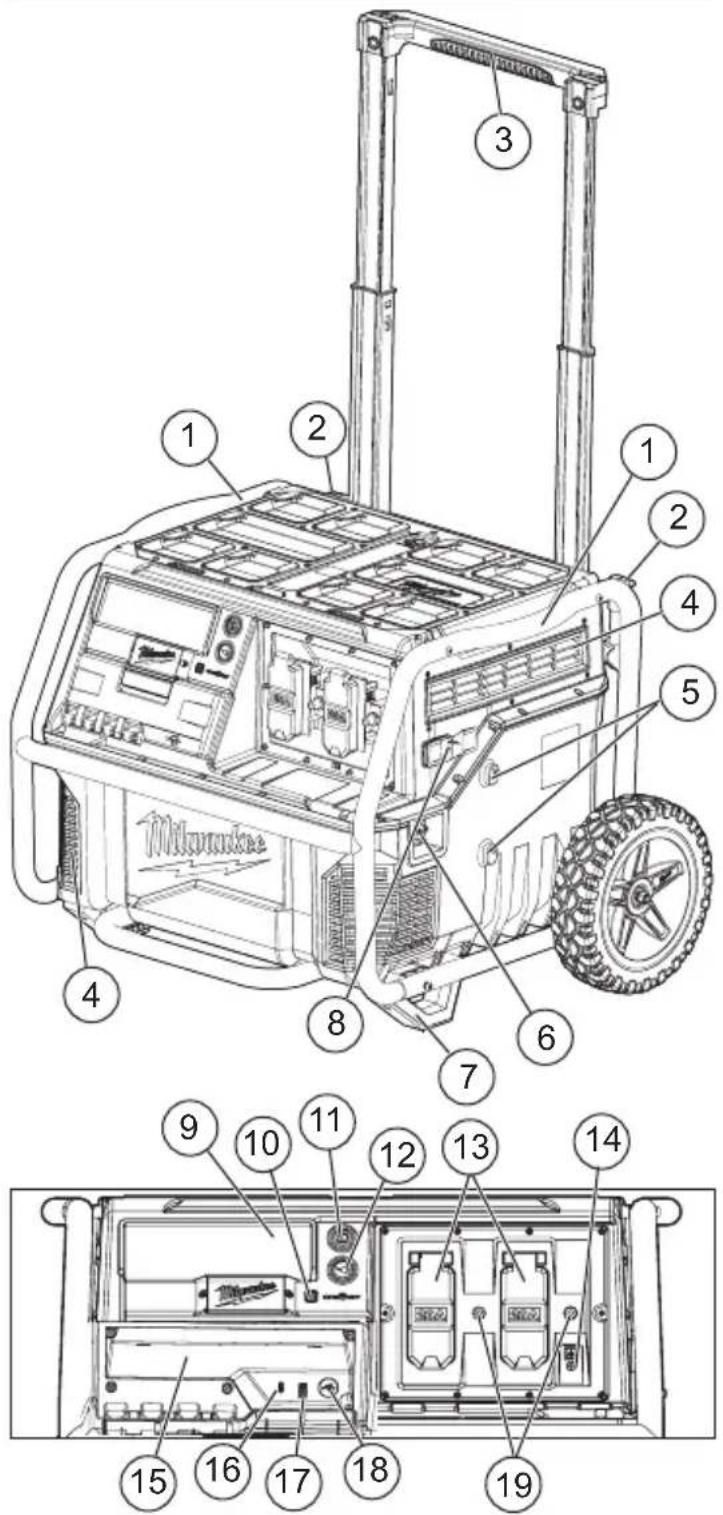
ASSEMBLY
Expanding/Collapsing the Handle
To expand the handle, press the handle button in the middle and pull the handle up.
To collapse handle, press the handle button in the to middle and push the handle down.
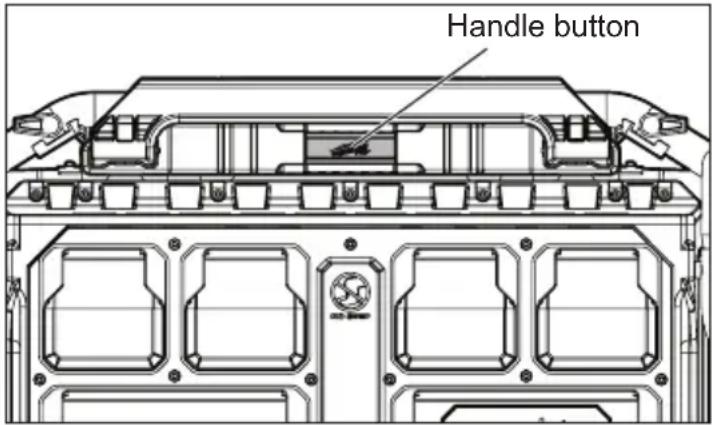
text_image
Handle buttonUsing the Side Charger Mounts
WARNING
To reduce the risk of injury, fire, or explosion due to damaged battery packs, remove side mounted chargers before transporting.
Follow charger manufacturer's instructions for installation and use.
To install a charger, use screw driver to back out the T-20 fasteners enough to slide the key-hole slots of the charger onto the power supply. Align the charger's key-hole mounting pockets with power supply's charger mounts and push the charger down and into place.
To remove charger, unplug the charger and slide the charger up and away from the charger mounts.
ONE-KEY™
To learn more about the ONE-KEY™ functionality for this tool, go to milwaukeetool.com/One-Key. To download the ONE-KEY™ app, visit the App Store ® or Google Play™ from your smart device.
| ONE-KEYTM Indicator | |
| Solid Blue Wi | reless mode is active and ready to be configured via the ONE-KEYTM app. |
| Blinking Blue | Tool is actively communicating with the ONE-KEYTM app. |
| Blinking Red | Tool is in security lockout and can be unlocked by the owner via the ONE-KEYTM app. |
TRANSPORTATION
OPERATION
WARNING
Use multiple people whenever it is necessary to lift or
carry the power supply. The power supply is heavy. Lift with legs, not back.

To reduce the risk of injury, fire, or explosion due battery damage:
- Remove side mounted chargers before transporting.
- Do not place more than 60 lbs on power supply when transporting. Do not load higher than 11".
- Do not hang/hoist the power supply for storage (eg., from a crane hook).
- Only lift the power supply by the roll cage, do not lift by the handle.
- Do not transport power supply with corded equipment plugged into the outlets.
- When moving power supply, do not overreach. Keep proper footing and balance at all times. Clear the area of obstructions. This enables better control in unexpected situations.
- Secure the power supply before transporting to prevent tipping, rolling, slipping and falling.
Lifting by the Roll Cage
Always maintain firm footing and use multiple people to lift when not using a lift device. To lift, have at least two people grasp the roll cage from around the power supply.
Transporting in a Vehicle
Using suitably rated tie downs, secure the power supply roll cage to a solid attachment point in the vehicle.
Transporting on a Jobsite
To roll power supply, extend the handle and tilt the power supply back onto the tires. Push the power supply on smooth surfaces and pull on uneven surfaces.
NOTICE The power supply may tip unexpectedly on highly uneven or sloped ground.
Transporting up a Step
When the rise distance is no higher than the power supply's wheel height, the wheels can be used to go up or down between surfaces.
- Roll the power supply up to steps, curb, low vehicle, etc.
- Grasp the handle evenly with both hands.
- Slowly roll the power supply up or down.
WARNING
To reduce the risk of shock, inspect the power supply before each use.
Do not use a power supply or corded equipment that has been damaged or modified. Damaged or modified products may exhibit unpredictable behavior.
Power Supply Capacity
Ensure the power supply's rated and peak watts capacity is greater than the total of the corded equipment. Rated watts is the amount of power the power supply must produce to keep the equipment running. Peak watts is the short burst of power needed to start electric motor-driven tools, such as a circular saw.
- Find the rated and peak watts for the corded equipment (from the equipment labels, literature, or estimated values below).
-
Use the peak watts from the highest rated item, and the rated watts from the rest of the items. Because not all motors start at the same time, total peak watts can be estimated by including only the item with the highest peak watts.
-
Example: Highest Peak W (Circular Saw).....2300 Peak W
Radio 50 Rated W
Portable Fan....40 Rated W
Electric Drill 600 Rated W
Total...... 2990 W
Total Corded Equipment < Power Supply
2990W < 3600W
| Application/Equipment | Estimated Rated Watts* | Estimated Peak Watts* |
| Job Site | ||
| Electric Drill - 3/8" 600 | 1000 | |
| Work Light | 1000 | 1000 |
| Reciprocating Saw | 960 1920 | |
| Circular Saw - 7-1/4" | 1400 | 2300 |
| Miter Saw - 10" | 1800 | 2800 |
| Air Compressor 1/4 HP | 970 1600 | |
| Airless Sprayer 1/3 HP | 600 1200 | |
| Radio | 50 | 50 |
| M18TM/M12TM Standard Charger (48-59-1812) | 60 | 60 |
| M18TM/M12TM Rapid Charger (48-59-1808) | 75 (M12TM) 120 (M18TM) | 75 (M12TM) 120 (M18TM) |
| Lifestyle | ||
| Microwave | 1000 | 1000 |
| TV | 50-200 | 50-200 |
| Satellite Receiver | 250 | 250 |
| Portable Fan | 40 | 120 |
| Heater | 1300 | 1300 |
| String Lights | 50-150 | 50-150 |
| Laptop | 50-150 | 50-150 |
| Tablet | 15 | 15 |
| Cellphone | 5 | 5 |
| *Wattages listed are approximate. Check tool or appliance for actual wattage. | ||
Runtime/Time to Charge
When the charge indicator is displayed, the remaining time to charge and status of charge percent is shown. When charge indicator is not displayed the remaining runtime is shown.
Using the Power Supply
WARNING
Use corded equipment according to the equipment manufacturer's
instructions and in locations specified by the manufacturer. Equipment may not be suitable for outdoor/rain use.
During transport, follow charger instructions on use in unattended situations. Injury, damage, fire, etc., could occur from unanticipated situations.
This equipment has arcing or sparking parts which should not be exposed to flammable vapors; locate equipment at least 18" (457 mm) above the floor when used in a repair facility.
Do not use the power supply as a workbench where cutting, drilling, or other activities could cause damage to the power supply.
Always assume the AC outlets are live. The auto start ONE-KEY ^™ feature can result in unexpected starting of corded equipment.
This power supply converts DC electricity to 120 VAC household power and/or USB charging power. Protect the power supply from rain or moisture during use. The power supply must be charged before first use.
- Only use the product in upright condition.
• To prolong the life of the product and attached devices, add devices one at a time. - Always assume the AC outlets are live. Use caution when using auto start ONE-KEY™ feature.
• Test GFCI monthly. - The correct and safe way to manage the power of the product is to add the loads sequentially.
- Press the power button to turn the power supply on. The power button LED will light white.
- Press the AC power button or USB power button to provide power to their outlets. The AC or USB power button LED will light white.
- Inspect corded equipment. Ensure there is no damage to the corded equipment.
- Plug in and turn on the first load, preferably the largest load to avoid overload. To prolong the life of the power supply and corded equipment, plug in equipment one at a time.
- Plug in and turn on the next load.
When finished, press the power button to turn off the power supply and unplug the corded equipment.
USB Outlets
Press the USB power button to turn power on and off to the USB outlets. Plug in a USB device, place the device into the storage compartment, and close the storage door completely.
Passthrough Power
The power supply can charge and provide output power through its outlets at the same time. If the power draw is greater than the charging speed, the power supply's overall charge status will decrease until it powers off. Allow the power supply to continue to charge. Once sufficiently re-charged, restart the AC outlets (see "Using the Power Supply").
| Display Indicators | |
 | Power Button - Current status:White solid - OnWhite pulsing - ChargingWhite flashing - Low Charge (<10%)Green solid - Fully ChargedRed solid - Overload or Over-TemperatureRed flashing - No Charge (<1%) orOverload/Over-Temperature clearedRed/Green flashing - Fault orCharging FaultAmber solid - Integrated Battery Fault |
| [OBHA] | Charging IndicatorPower supply is charging |
| [O7B] | Status of Charge GaugeIncreases when charging, decreases during AC output use |
 | Status of Charge PercentIncreases when charging, decreases during AC output use |
 | Runtime/Time To ChargeRemaining run time during AC or USB outputTime until full charge during charging |
 | Power GaugeThe total kW draw during AC output use |
 | AC OnAC outlets have been turned on |
| [XX60] | USB OnUSB outlet has been turned on |
| [STW] | LockRefer to the ONE-KEYTM app for information regarding this feature |
| [CKX4] | Auto RestartRefer to the ONE-KEYTM app for information regarding this feature |
| [Z0V2] | Slow ChargeRefer to the ONE-KEYTM app for information regarding this feature |
 | OverloadThe AC output exceeds the power supply's capacity - See "Overload" |
 | Over-TemperatureThe power supply's temperature is above the acceptable range - See "Over-Temperature" |
| [UN] | Under-TemperatureThe power supply's temperature is below the acceptable range - See "Under-Temperature and Cold Weather Operation" |
| [UN] | fault - See "Fault Situations"AC Output (discharging)Power Button flashing Red/GreenAC Input (charging)Charging Fault icon also displaysPower Button flashing Red/GreenIntegrated BatteryPower Button solid Amber |
| [UN] | Charging Fault - See "Fault Situations"There is a problem with the AC Input (charging) |
Slow Charge/Adjustable Charge Rate
Multiple power supplies can be charged on a single breaker by adjusting the charge rate via the ONE-KEY™ app.
Overload
An overload is indicated by a long tone and an overload indicator on the display. The power button LED will light red.
Once the overload is cleared, the power button LED will flash red and the overload indicator will still be displayed. To reset, push the power button. The power button LED will return to white. If it continues to light red, the overload has not been fully cleared. After five consecutive overloads, the power supply will need to be plugged in to reset the integrated battery.
Over-Temperature
An over-temperature condition is indicated by the over-temperature indicator on the display and the power button LED will light red. The AC and USB outlets are turned off
Allow the power supply to cool before continuing use. Once the power supply has cooled to within the acceptable range, the power button LED will flash red and the over-temperature indicator will still be displayed. To reset, push the power button. The power button LED will return to white. If it continues to light red, the over-temperature has not been fully cleared.
Under-Temperature and Cold Weather Operation
AWARNING To reduce the risk of explosion, do not use an external device to heat the power supply.
Charging:
If the Under-Temperature icon is displayed, the power supply won't charge. If the power supply charge is too low, move the power supply to a warm area to raise the temperature.
Discharging:
This power supply is designed to operate in temperatures below freezing. When the integrated battery is too cold, it may need to warm up before normal use. Use the power supply in a light application (up to 1000 W) to warm the integrated battery. If the application load is too heavy, the power supply will overload (see "Overload").
CHARGING
WARNING To reduce the risk of shock, charge power supply only with the provided power cord. Do not use if the power cord is damaged in any way. If damaged or missing, replace with identical replacement parts.
When to Charge the Power Supply
- It is not necessary to run down the integrated battery before charging the power supply.
- Use the status of charge gauge, runtime, and power gauge on the display to determine when to charge the power supply.
- Nearing end of discharge is indicated by repeated short tones, the gauges flashing.
•Full discharge is indicated by a long tone and the power supply shutting down.
Charging the Power Supply
- Move the power supply indoors before charging.
- Plug the power cord into an AC outlet. The power supply will begin charging.
• The power button LED will pulse white.
• The charging indicator will display.
• The time to charge will display.
• The status of charge percent will display. - When charging is complete, the power button LED will light green.
- If the power supply is too hot or cold, refer to "Over-Temperature" or "Cold Weather Operation". Once the integrated battery is within the acceptable range, normal charging will take place.
- If the power supply is left plugged in during use with corded equipment, it will continue to charge (see "Passthrough Power").
Fault Situations
Multiple fault situations may be displayed. The power button LED is used with the fault indicator to identify the type of issue.
To clear a fault or charging fault:
- Turn off the power supply.
- Unplug all corded equipment.
- Unplug the power cord.
- Wait at least 60 seconds.
- Plug in the power cord.
- Turn on the power supply.
If the fault icons are not displayed, the fault has cleared. Restart use of the power supply.
If the fault icons reappear, or if the power button LED is solid amber, contact MILWAUKEE at 1-800-SAWDUST for instructions on returning the power supply to a service facility.
To reset the outlets:
Push the respective circuit breaker reset button.
To reset the power supply:
Press and hold the power button for 30 seconds.
EXTENSION CORDS
Grounded tools require a three wire extension cord. Double insulated tools can use either a two or three wire extension cord. As the distance from the supply outlet increases, you must use a heavier gauge extension cord. Using extension cords with inadequately sized wire causes a serious drop in voltage, resulting in loss of power and possible tool damage. Refer to the table shown to determine the required minimum wire size.
The smaller the gauge number of the wire, the greater the capacity of the cord. For example, a 14 gauge cord can carry a higher current than a 16 gauge cord. When using more than one extension cord to make up the total length, be sure each cord contains at least the minimum wire size required. If you are using one extension cord for more than one tool, add the nameplate amperes and use the sum to determine the required minimum wire size.
Guidelines for Using Extension Cords
- Do not exceed the load rating of the extension cord. Be mindful of the individual and accumulative electrical load for all attachments. Exceeding the load capacity of the extension cord could result in overheating, fire, electrical shock, or injury.
- If you are using an extension cord outdoors, be sure it is marked with the suffix "W" to indicate that it is acceptable for outdoor use.
- Be sure your extension cord is properly wired and in good electrical condition. Always replace a damaged extension cord or have it repaired by a qualified person before using it.
- Protect your extension cords from sharp objects, excessive heat and damp or wet areas.
| Recommended Minimum Wire Gauge For Extension Cords* | |||||
| Nameplate Amps | Extension Cord Length | ||||
| 25' 50' 75' 100' 150' | |||||
| 0 - 2.0 | 18 | 18 | 18 | 18 | 16 |
| 2.1 - 3.4 | 18 | 18 | 18 | 16 | 14 |
| 3.5 - 5.0 | 18 | 18 | 16 | 14 | 12 |
| 5.1 - 7.0 | 18 | 16 | 14 | 12 | 12 |
| 7.1 - 12.0 | 16 | 14 | 12 | 10 | -- |
| 12.1 - 16.0 | 14 | 12 | 10 | -- | -- |
| 16.1 - 20.0 | 12 | 10 | -- | -- | -- |
*Based on limiting the line voltage drop to five volts at 150% of the rated amperes.
MAINTENANCE AND STORAGE
WARNING To reduce the risk of injury, unplug the power cord from outlet when not in use and before servicing or cleaning. Do not disassemble power supply. Contact MILWAUKEE for ALL repairs.
To reduce the risk of fire, personal injury, and power supply damage, do not allow fluids to flow into power supply. Corrosive or conductive fluids, such as seawater, certain industrial chemicals, and bleach or bleach containing products, etc., can cause a short circuit.
Maintain Power Supply
Keep the power supply in good repair by adopting a regular maintenance program. If the power supply does not work properly, contact MILWAUKEE at 1-800-SAWDUST for instructions on returning the power supply to a service facility.
Cleaning
Clean dust and debris from any vents. Keep power supply clean, dry and free of oil or grease. Use only mild soap and a damp cloth to clean, since certain cleaning agents and solvents are harmful to plastics and other insulated parts. Some of these include gasoline, turpentine, lacquer thinner, paint thinner, chlorinated cleaning solvents, ammonia and household detergents containing ammonia. Never use flammable or combustible solvents around tools.
Maintenance and Storage
Do not use oil or solvents to clean or lubricate the power supply. The plastic casing will become brittle and crack, causing a risk of injury. Store at room temperature away from moisture. Do not store in damp locations where corrosion of AC input may occur. Permanent capacity loss can result if the power supply is stored for long periods of time at high temperatures (over 120^ F). Do not store in a vehicle.
Charge the power supply before storing long term. After about a year of storage, charge the power supply as normal.
⚠ WARNING To reduce the risk of injury or explosion, do not burn or incinerate the power supply even if it is damaged, dead or completely discharged. Toxic fumes and materials are created when burned.
Disposing
Always dispose of the power supply according to federal, state and local regulations. Contact MILWAUKEE at 1-800-SAWDUST for instructions on returning the power supply to a service facility for proper disposal.
Repairs
This power supply contains an integrated Li-Ion battery core. It is not removable and is only serviceable by MILWAUKEE. For repairs, contact MILWAUKEE at 1-800-SAWDUST for instructions on returning the power supply to a service facility.
ACCESSORIES
AWARNING Use only recommended accessories. Others may be hazardous.
For a complete listing of accessories, go online to www.milwaukeeetool.com or contact a distributor.
WIRELESS COMMUNICATION
For products provided with wireless communication features, including ONE-KEY™:
Pursuant to part 15.21 of the FCC Rules, do not modify this product. Modification could void your authority to operate the product. This device complies with part 15 of the FCC Rules and ISED-Canada's license exempt RSS standards. Operation is subject to the following two conditions: 1) This device may not cause harmful interference, and 2) This device must accept any interference received, including interference that may cause undesired operation.
Interference
Electrical interference from other equipment may cause unexpected results from the power supply. If the power supply shuts off or shows inaccurate information on the display:
- Move the power supply away from the interference.
- Turn off the power supply, wait 60 seconds, and restart.
- Unplug the power supply, wait 60 seconds, and restart.
SERVICE - UNITED STATES
1-800-SAWDUST (1.800.729.3878)
Monday-Friday, 7:00 AM - 6:30 PM CST
or visit www.milwaukeetool.com
Contact Corporate After Sales Service Technical Support with technical, service/repair, or warranty questions.
Email: metproductsupport@milwaukeeetool.com
Become a Heavy Duty Club Member at www.milwaukeeetool.com to receive important notifications regarding your tool purchases.
SERVICE - CANADA
Milwaukee Tool (Canada) Ltd
1.877.948.2360
Monday-Friday, 7:00 AM - 4:30 PM CST
or visit www.milwaukeetool.ca
LIMITED WARRANTY USA & CANADA
This MILWAUKEE power tool* is warranted to the original purchaser from an authorized MILWAUKEE distributor only to be free from defects in material and workmanship. Subject to certain exceptions, MILWAUKEE will repair or replace any part on this power tool which, after examination, is determined by MILWAUKEE to be defective in material or workmanship for a period of three (3) years after the date of purchase unless otherwise noted. Return of the power tool to a MILWAUKEE factory Service Center location or MILWAUKEE Authorized Service Station, freight prepaid and insured, is required. A copy of the proof of purchase should be included with the return product. This warranty does not apply to damage that MILWAUKEE determines to be from repairs made or attempted by anyone other than MILWAUKEE authorized personnel, misuse, alterations, abuse, normal wear and tear, lack of maintenance, or accidents.
Normal Wear: Many power tools need periodic parts replacement and service to achieve best performance. This warranty does not cover repair when normal use has exhausted the life of a part including, but not limited to, chucks, brushes, cords, saw shoes, blade clamps, o-rings, seals, bumpers, driver blades, pistons, strikers, lifters, and bumper cover washers.
*This warranty does not cover battery packs or all power tools. Refer to the separate and distinct warranties available for those products. The warranty period for the LED in the LED Work Light (49-24-0171) and the LED Upgrade Bulb (49-81-0090) is the lifetime of the product subject to the limitations above. If during normal use the LED or LED Upgrade Bulb fails, the part will be replaced free of charge.
Warranty Registration is not necessary to obtain the applicable warranty on a MILWAUKEE power tool product. The manufacturing date of the product will be used to determine the warranty period if no proof of purchase is provided at the time warranty service is requested. ACCEPTANCE OF THE EXCLUSIVE REPAIR AND REPLACEMENT REMEDIES DESCRIBED HEREIN IS A CONDITION OF THE CONTRACT FOR THE PURCHASE OF EVERY MILWAUKEE PRODUCT. IF YOU DO NOT AGREE TO THIS CONDITION, YOU SHOULD NOT PURCHASE THE PRODUCT. IN NO EVENT SHALL MILWAUKEE BE LIABLE FOR ANY INCIDENTAL, SPECIAL, CONSEQUENTIAL, OR PUNITIVE DAMAGES, OR FOR ANY COSTS, ATTORNEY FEES, EXPENSES, LOSSES OR DELAYS ALLEGED TO BE AS A CONSEQUENCE OF ANY DAMAGE TO, FAILURE OF, OR DEFECT IN ANY PRODUCT INCLUDING, BUT NOT LIMITED TO, ANY CLAIMS FOR LOSS OF PROFITS. SOME STATES DO NOT ALLOW THE EXCLUSION OR LIMITATION OF INCIDENTAL OR CONSEQUENTIAL DAMAGES, SO THE ABOVE LIMITATION OR EXCLUSION MAY NOT APPLY TO YOU. THIS WARRANTY IS EXCLUSIVE AND IN LIEU OF ALL OTHER EXPRESS WARRANTIES, WRITTEN OR ORAL. TO THE EXTENT PERMITTED BY LAW, MILWAUKEE DISCLAIMS ANY IMPLIED WARRANTIES, INCLUDING WITHOUT LIMITATION ANY IMPLIED WARRANTY OF MERCHANTABILITY OR FITNESS FOR A PARTICULAR USE OR PURPOSE; TO THE EXTENT SUCH DISCLAIMER IS NOT PERMITTED BY LAW, SUCH IMPLIED WARRANTIES ARE LIMITED TO THE DURATION OF THE APPLICABLE EXPRESS WARRANTY AS DESCRIBED ABOVE. SOME STATES DO NOT ALLOW LIMITATIONS ON HOW LONG AN IMPLIED WARRANTY LASTS, SO THE ABOVE LIMITATION MAY NOT APPLY TO YOU, THIS WARRANTY GIVES YOU SPECIFIC LEGAL RIGHTS, AND YOU MAY ALSO HAVE OTHER RIGHTS WHICH VARY FROM STATE TO STATE.
This warranty applies to product sold in the U.S.A. and Canada only. Please consult the 'Service Center Search' in the Parts & Service section of MILWAUKEE's website www.milwaukeeetool.com or call 1.800.SAWDUST (1.800.729.3878) to locate your nearest service facility for warranty and non-warranty service on a MILWAUKEE power tool.
INSTRUCTIONS
IMPORTANTES
CONCERNANT LA
SÉCURITÉ
⚠ AVERTISSEMENT VEUILLEZ LIRE TOUS LES AVERTISSEMENTS DE
SÉCURITÉ ET TOUTES LES INSTRUCTIONS, TOUTES LES ILLUSTRATIONS ET TOUTES LES PRÉCISIONS FOURNIES AVEC CETTE SOURCE D'ALIMENTATION. NE PAS SUIVRE L'ENSEMBLE DES INSTRUCTIONS DÉCRITES CI-DESSOUS PEUT CAUSER UNE DÉCHARGE ÉLECTRIQUE, UN INCENDIE OU DES BLESSURES GRAVES. CONSERVER TOUS LES AVERTISSEMENTS ET TOUTES LES INSTRUCTIONS POUR LES CONSULTER ULTÉRIEUREMENT.
SÉCURITÉ DU LIEU DE TRAVAIL
Charger Rating ^* 1 000 W
text_image
Technical diagram of a device rear panel with numbered components for identificationMilwaukee Tool (Canada) Ltd 1.877.948.2360
Monday-Friday, 7:00 AM - 4:30 PM CST www.milwaukeetool.ca
GARANTIE LIMITÉE- AUX ÉTATS-UNIS ET AU CANADA
(USB-C)....20 V CD a 3 A (Hasta 60 W)
Cat. No. de cable....22-64-0026
Lunes a Viernes (9am a 6pm)