
EPLMB23 - Printer EPSON - Free user manual and instructions
Find the device manual for free EPLMB23 EPSON in PDF.
| Product Type | Ceiling mount kit for projector |
| Brand | EPSON |
| Model | EPLMB23 |
| Dimensions (L × D × H) | 270 × 139 × 150 mm |
| Weight | 3.4 kg |
| Horizontal rotation | 360° |
| Vertical and lateral tilt | ±18° |
| Horizontal lens shift | 100 mm |
| Material | Steel |
| Package contents | Ceiling mount kit, hex key, hex wrench, M4×12 mounting screws with washers, user guide |
| Installation | Reserved for a specialist |
| Compatibility | Small EPSON projectors |
| Maximum load capacity | Up to 20 kg (projector + kit) |
| Height adjustment | Possible with optional extension tube (ELPFP13 or ELPFP14) |
| Safety | Check ceiling sturdiness, use a safety cable |
| Maintenance | Check screw tightness periodically |
Frequently Asked Questions - EPLMB23 EPSON
User questions about EPLMB23 EPSON
0 question about this device. Answer the ones you know or ask your own.
Ask a new question about this device
Download the instructions for your Printer in PDF format for free! Find your manual EPLMB23 - EPSON and take your electronic device back in hand. On this page are published all the documents necessary for the use of your device. EPLMB23 by EPSON.
USER MANUAL EPLMB23 EPSON
- This product is for mounting an Epson Multi-Media Projector on the ceiling.
- ELPMB22 is for medium-size projectors and ELPMB23 is for small projectors. See our website or product catalog to find out which model can be used to mount your projector.
- To adjust the height of where the projector is installed, purchase a separate extension pipe with height adjustment function.
For details, see "4 Extension Pipe" on page 11.
- To ensure the safe use of this product, read this instruction manual carefully and keep it for future reference.
Epson accepts no responsibility for any damage or injury caused by incorrect mounting, assembly or handling.
- The assembly and mounting illustrations show ELPMB22. The design of the actual product may differ from that shown in the illustrations.
- Specifications are subject to change without notice.
Safety Precautions
The warning mark shown below is used throughout this instruction manual to ensure correct use and to prevent personal injury or property damage. Make sure you understand these warnings when reading this instruction manual.
Warning
Incorrect handling resulting from ignoring a warning mark could result in serious injury or even death.
Features
- Ball joint structure enables angle adjustment
Adjust the angles of horizontal rotation, vertical tilt and sideways tilt.
- Easy mount/detach action simplifies access to the projector
Mount and detach the projector from the ceiling mount easily.
- Scale sticker makes lens center alignment easy
Move the lens center horizontally in relation to the screen using the scale sticker as a guide.
Weight
ELPMB22:3.5 kg
ELPMB23: 3.4 kg
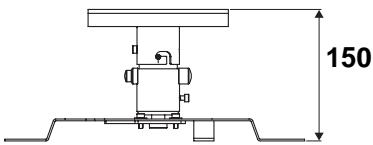
Dimensions
ELPMB22: W 342 × D 210 × H 150 ~mm
ELPMB23: W 270 × D 139 × H 150 mm
1 Before Assembly and Installation
1-1 Safety Precautions
Warning
- This product is sold on the assumption that the installation work will be performed by a specialist with the required technical know-how and ability. It should not be installed by anyone else.
- Assemble the various parts using the appropriate methods to ensure sufficient strength.
- Tighten the screws firmly.
- Incomplete assembly could cause the projector and ceiling mount to fall and cause injury.
Warning
When a projector is attached to the ceiling mount, their combined weight may be as much as 10 to 20 kilograms. Before starting the installation, carefully check the construction, material, and strength of the ceiling and use the most appropriate methods to prevent the projector from falling.
1-2 Checking the Package Contents
Open the box and check that nothing is missing.

ELPMB22 ceiling mount
ELPMB23 ceiling mount
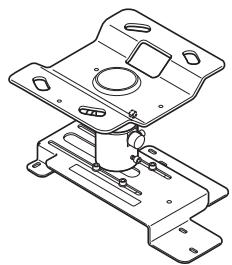
Offset wrench
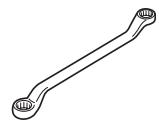
Hexagon wrench

Projector mounting screws: 4 pcs. (M4 × 12)/ lock washers: 4 pcs./ plain washers: 4 pcs.
Instruction manual (this manual)
- Only use the projector mounting screws provided to install the projector plate onto the projector.
- Prepare the necessary tools before starting.
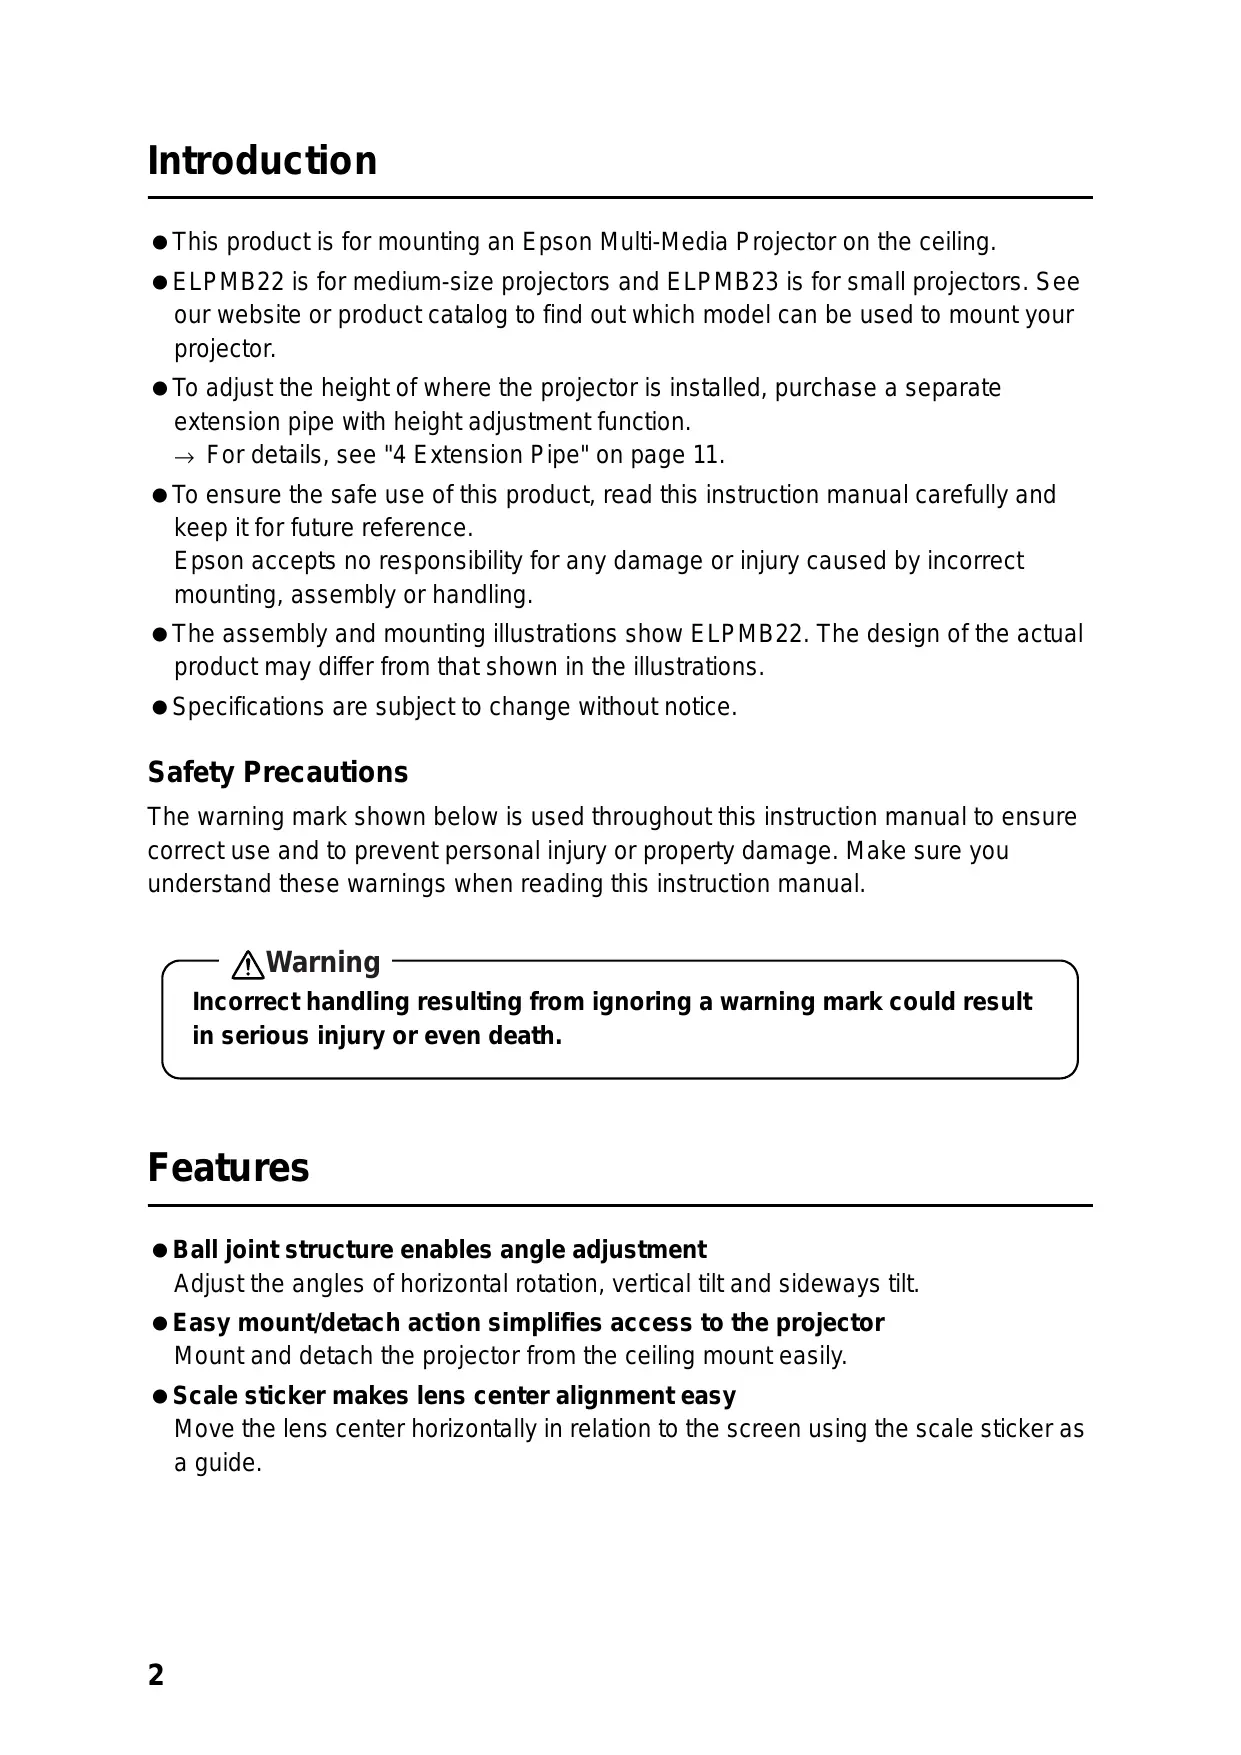
1-3 Names of Parts
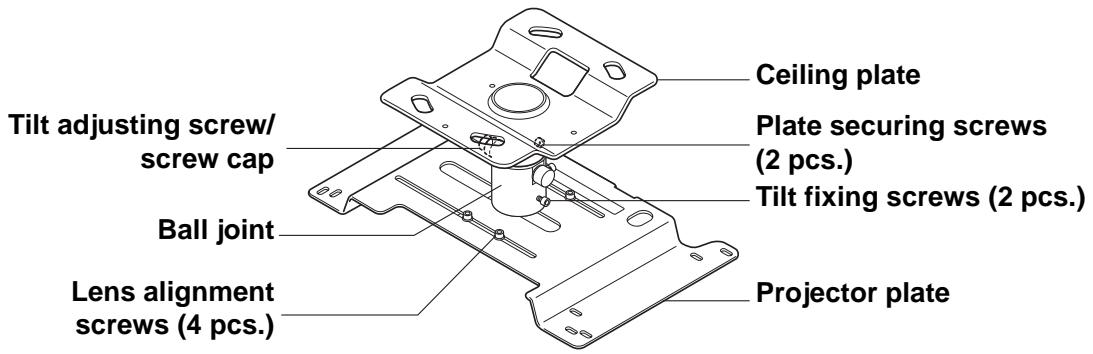
ELPMB22

ELPMB23
1-4 Installing the Projector
- Install the projector away from fluorescent lighting, air conditioners and other electrical items. Failure to do so can cause the remote control to malfunction.
- To limit the effect of external noise, we recommend that you position the projector so that the cable connecting it to a computer or other device is no longer than 20 meters.
- The projector should be installed in a location that is free of dust and moisture to prevent the lens and internal optical parts from becoming dirty.
- Do not install the projector in a location beyond its operating temperature range. Doing so can cause it to malfunction.
Closing the curtains in a bright room makes the projected image easier to see.
2 Assembly and Installation
2-1 Removing the Ceiling Plate from the Projector Plate
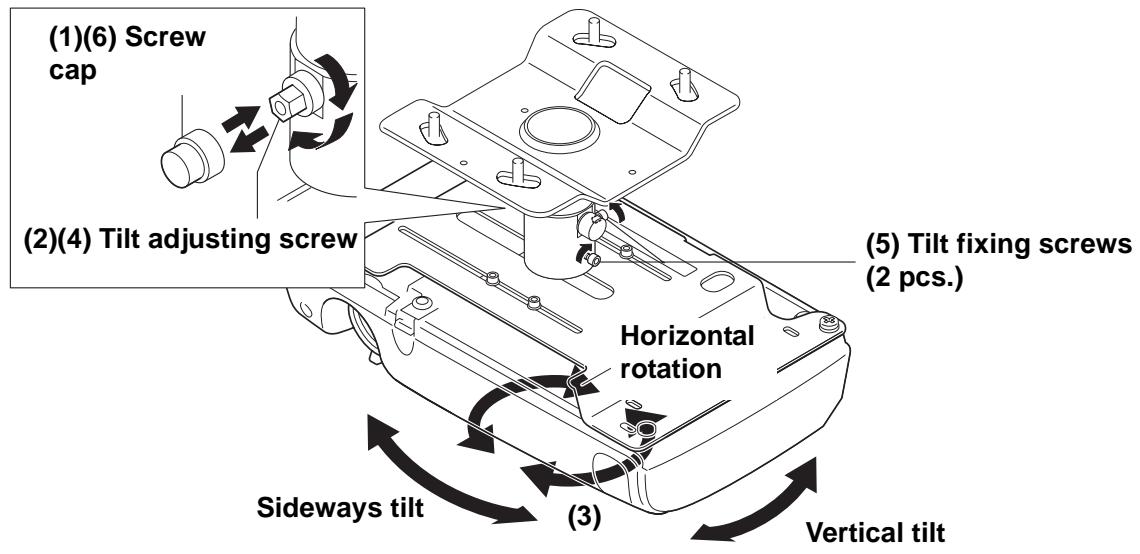
(1) When you open the package, make sure the ball joint can be moved.
(The tilt adjusting screw and tilt fixing screws are loose when the product leaves the factory.)
If the ball joint cannot be moved, perform the following steps.
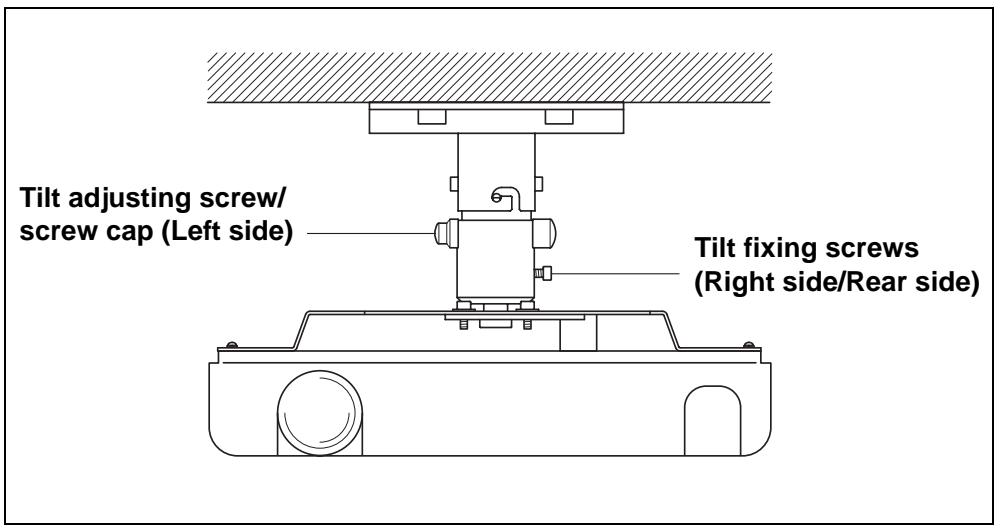
① Remove the screw cap (protruding type) from the tilt adjusting screw.
② Use the offset wrench provided to loosen the tilt adjusting screw.
- The tilt adjusting screw is designed to tighten again when turned more than 180 degrees.
- There is no need to loosen the screw on the opposite side of the tilt adjusting screw.
(3) Use the hexagon wrench to loosen the two tilt fixing screws.
(2) Remove the two plate securing screws with the hexagon wrench and remove the ceiling plate from the projector plate.
Rotate the ceiling plate about 30 degrees to the right and lift it.
2-2 Fitting the Ceiling Plate to the Ceiling
(1) Secure the ceiling plate to the ceiling by putting screws or nuts through the four oblong holes.
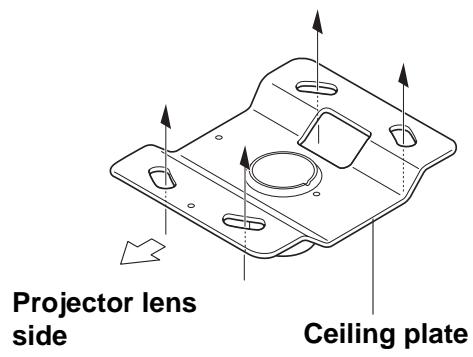
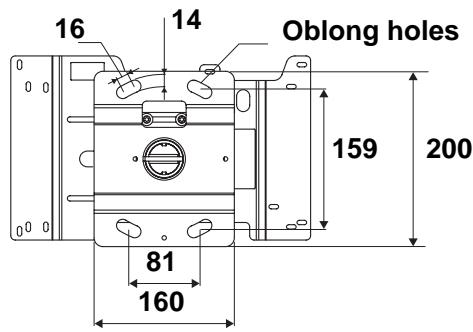
Ceiling contact area dimensions (mm)
-
The illustration shows ELPMB22. ELPMB23 has the same dimensions.
-
When installing the ceiling mount on a concrete ceiling, use anchors and bolts. For details, see "3 Installing on a Concrete Ceiling" on page 10.
- To adjust the height of where the projector is installed, purchase a separate extension pipe with height adjustment function.
For details, see "4 Extension Pipe" on page 11.
2-3 Fitting the Projector Plate to the Projector
(1) Turn over the projector so that the operating panel faces downwards.
(2) Use the four projector mounting screws provided to attach the projector plate to the projector.
There are several oblong holes in the projector plate. Place the screws through the holes that align with your projector and tighten them.
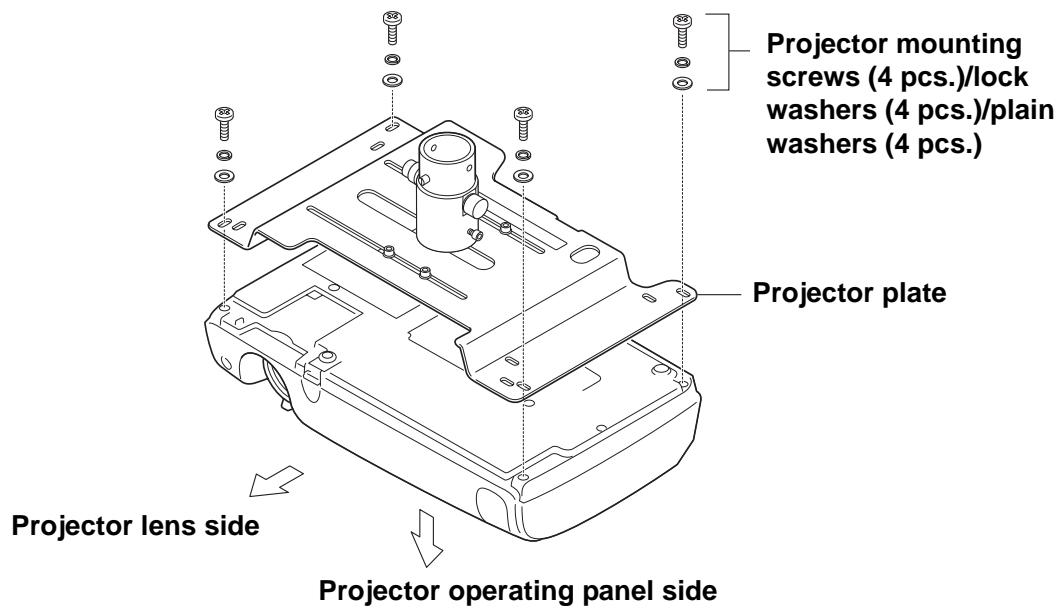
- The illustration may differ depending on the kind of projector.
Warning
- Always use the screws provided to secure the projector.
- After tightening the screws check carefully that they are tight.
- Firmly fix the projector to the ceiling mount with a sufficiently strong safety wire or belt to prevent it from falling. (Read the instruction manual of the projector to confirm which part of the projector can be to attach a safety wire or belt.)
- Applying a screw-locking adhesive or lubricant, oil and so on to the projector where it is fixed to the ceiling mount can make the case crack and the projector fall, leading to damage or injury. Do not use any sort of adhesive, lubricant, or oil when installing or adjusting the ceiling mount.
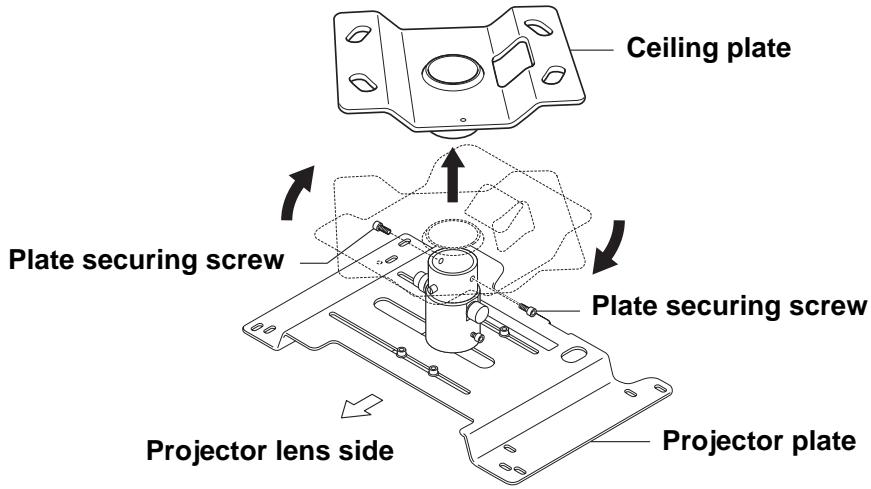
2-4 Fitting the Projector Plate to the Ceiling Plate
(1) Insert the ball joint of the projector plate into the ceiling plate.
Put the two protrusions on the ball joint into the grooves of the ceiling plate. Fit the plates together so that the ball joint is in the direction illustrated (Front view).
(2) Tighten the two plate securing screws firmly with the hexagon wrench provided.
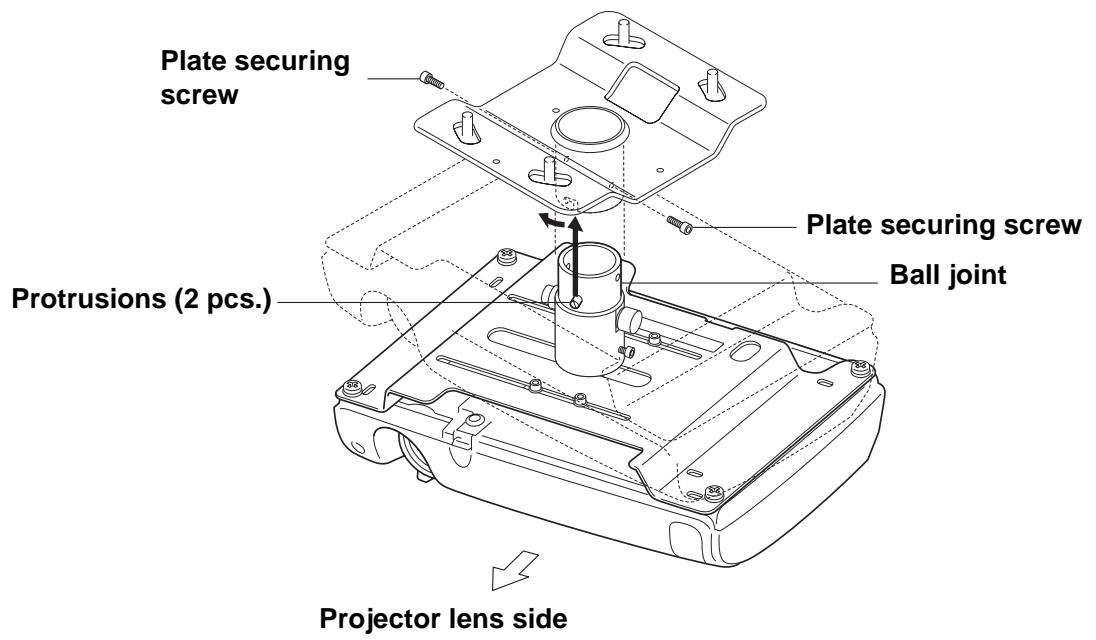
Front view
2-5 Aligning the Projector Lens Center
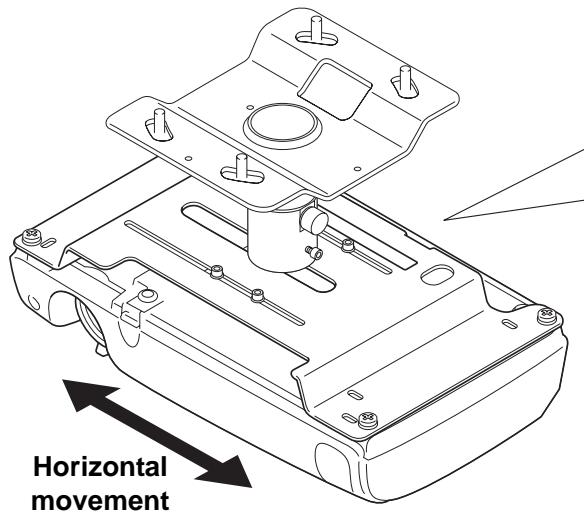
Moving the projector plate horizontally enables you to align the center of the ceiling mount (the ball joint) and the center of the projector lens.
- Horizontal adjustment range: 130 ~mm (ELPMB22)/ 100 ~mm (ELPMB23)
Warning
- Hold the projector carefully from below during adjustment.
- Retighten all screws after adjustment. If they are not sufficiently tight the projector may fall.
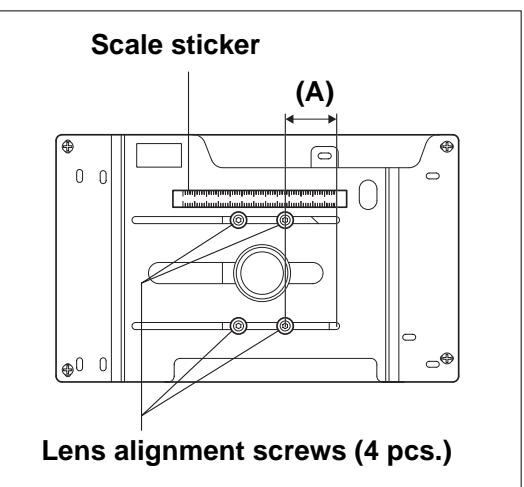
(1) Loosen the four lens alignment screws using the hexagon wrench provided.
(2) Adjust the lens position by moving the projector plate horizontally until the measurement on the scale sticker (measurement (A) in the illustration) equals the measurement for your projector shown on our website.
(3) Fully tighten the four lens alignment screws using the hexagon wrench provided.
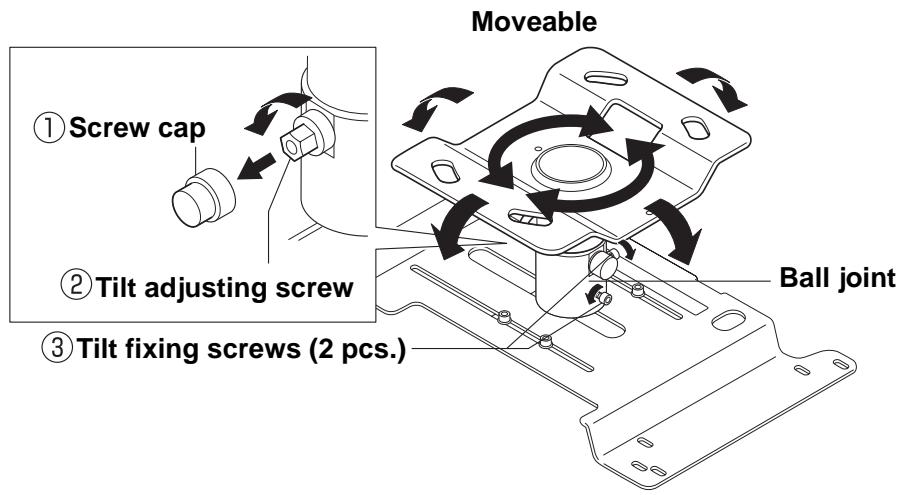
2-6 Adjusting the Angle
The ball joint structure makes it simple to fix the projector in any position within the installation angle range.
- Horizontal rotation adjustment range: 360 degrees in any direction
Vertical tilt and sideways tilt adjustment range: ±18 degrees
Warning
- Hold the projector carefully from below during adjustment.
- Retighten all screws after adjustment. If they are not sufficiently tight the projector may fall.
Adjust by carrying out the following steps.
(1) Remove the screw cap (protruding type) from the tilt adjusting screw.
(2) Partly tighten the tilt adjusting screw using the offset wrench provided.
(3) Adjust the projection position of the projector.
(4) Fully tighten the tilt adjusting screw using the offset wrench provided.
(5) Tighten the two tilt fixing screws using the hexagon wrench provided.
(6) Fit the screw cap (protruding type) onto the tilt adjusting screw.
3 Installing on a Concrete Ceiling
(1) Fit a commercially available anchors and bolts to the concrete ceiling.
(2) Fit the ceiling plate with a commercially available nuts.
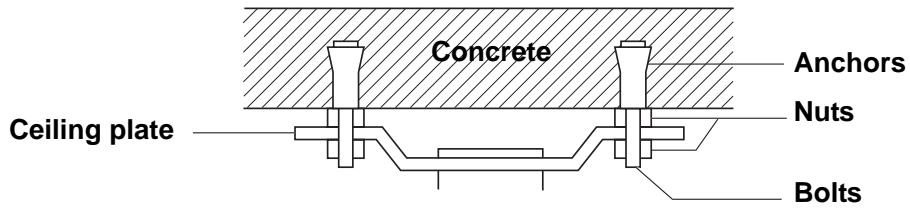
- If there is a hanging ceiling or something else that interferes with installation on the ceiling, purchase and fit a separate extension pipe.
For details, see "4 Extension Pipe" on page 11.
Warning
- When installing the ceiling plate on the ceiling, install all parts so that they can fully withstand the combined weight and lateral movement of the projector body and ceiling mount. Use nuts and bolts that are M12 or higher. Failure to do so could cause the projector to fall.
- Epson accepts no responsibility for the projector falling due to inadequate installation.
To adjust the height of where the projector is installed, you need to purchase a separate extension pipe. There are two extension pipe model numbers, ELPFP13 and ELPFP14. The illustration below shows the range of distances between ceiling plate and projector to which each model can be adjusted.
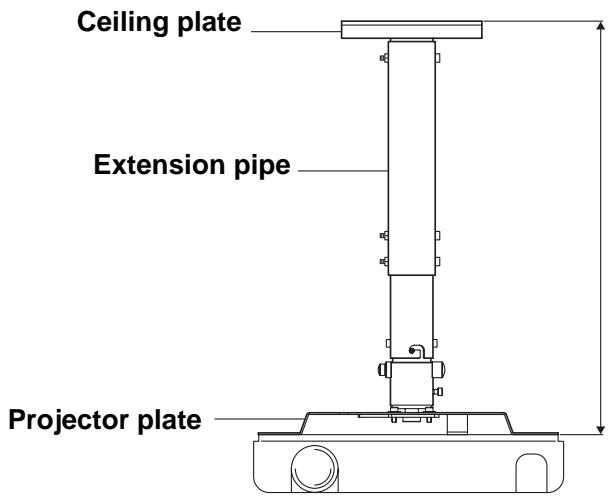
ELPFP13: 668 mm to 918 mm (50 mm pitch)
ELPFP14: 918 mm to 1168 mm (50 mm pitch)
5 For Safe Use
- Only a specialist should remove or install the projector, including for maintenance and repairs.
See the instruction manual of the projector for information about maintenance and repairs.
Warning
- Never loosen any bolts, screws or nuts after installation. Also check periodically that no screws have come loose. If you find a loose screw, retighten it firmly.
- Do not swing from the ceiling mount. Doing so could cause the projector and ceiling mount to fall and injure someone.
6 Inquiries
- Safety Precautions
- Warning
- Features
- Before Assembly and Installation
- 1-1 Safety Precautions
- 1-2 Checking the Package Contents
- 1-3 Names of Parts
- 1-4 Installing the Projector
- Assembly and Installation
- 2-1 Removing the Ceiling Plate from the Projector Plate
- When you open the package, make sure the ball joint can be moved.
- 2-2 Fitting the Ceiling Plate to the Ceiling
- 2-3 Fitting the Projector Plate to the Projector
- 2-4 Fitting the Projector Plate to the Ceiling Plate
- 2-5 Aligning the Projector Lens Center
- 2-6 Adjusting the Angle
- Installing on a Concrete Ceiling
- For Safe Use
- Inquiries
Brand : EPSON
Model : EPLMB23
Category : Printer