1664136 - Screwdriver BASETECH - Free user manual and instructions
Find the device manual for free 1664136 BASETECH in PDF.
| Brand | BaseTech |
| Model | 1664136 |
| Product type | Cordless electric screwdriver (impact wrench) |
| Input voltage | 10.8 V |
| Max torque | 100 Nm |
| No-load speed | 0 – 2300 min⁻¹ |
| Chuck size | 6.3 mm (1/4 inches) |
| Dimensions (L × W × H, without battery) | 180 × 57 × 165 mm |
| Weight (without battery) | 0.774 kg |
| Operating/storage conditions | 0 to +45 °C, 20 – 85 % RH |
| Sound level (L_PA) | 70.76 ± 3 dB(A) |
| Vibration level | 1.71 ± 1.5 m/s² |
| Power supply | Rechargeable battery (battery pack not included) |
| Compatible battery pack | Conrad no. 1493004 |
| Compatible charger | Conrad no. 1761445 |
| Recommended bits | 6.3 mm chuck, special impact screwdriver bits (not included) |
| Intended use | Screwing and unscrewing screws, bolts, nuts |
| Impact mechanism | Yes |
| Work light | Integrated LED |
| Rotation direction | Reversible (tightening/loosening) |
| Variable speed | Yes (by pressing the switch) |
| Cleaning | Lint-free damp cloth, soft brush for ventilation slots |
| Safety | Mandatory PPE (safety glasses, gloves, ear protection); disconnect battery before maintenance |
| Repairability | Repair by qualified professional; identical spare parts |
| Package contents | Main unit, instruction manual (without battery or accessories) |
Frequently Asked Questions - 1664136 BASETECH
User questions about 1664136 BASETECH
0 question about this device. Answer the ones you know or ask your own.
Ask a new question about this device
Download the instructions for your Screwdriver in PDF format for free! Find your manual 1664136 - BASETECH and take your electronic device back in hand. On this page are published all the documents necessary for the use of your device. 1664136 by BASETECH.
USER MANUAL 1664136 BASETECH
GB Original Instructions
Rechargeable impact driver
Item No. 1664136 Page 15 - 26
F Notice originale
natural_image
Diagram showing a folded document with a black arrow indicating rotation or change (no text or symbols present)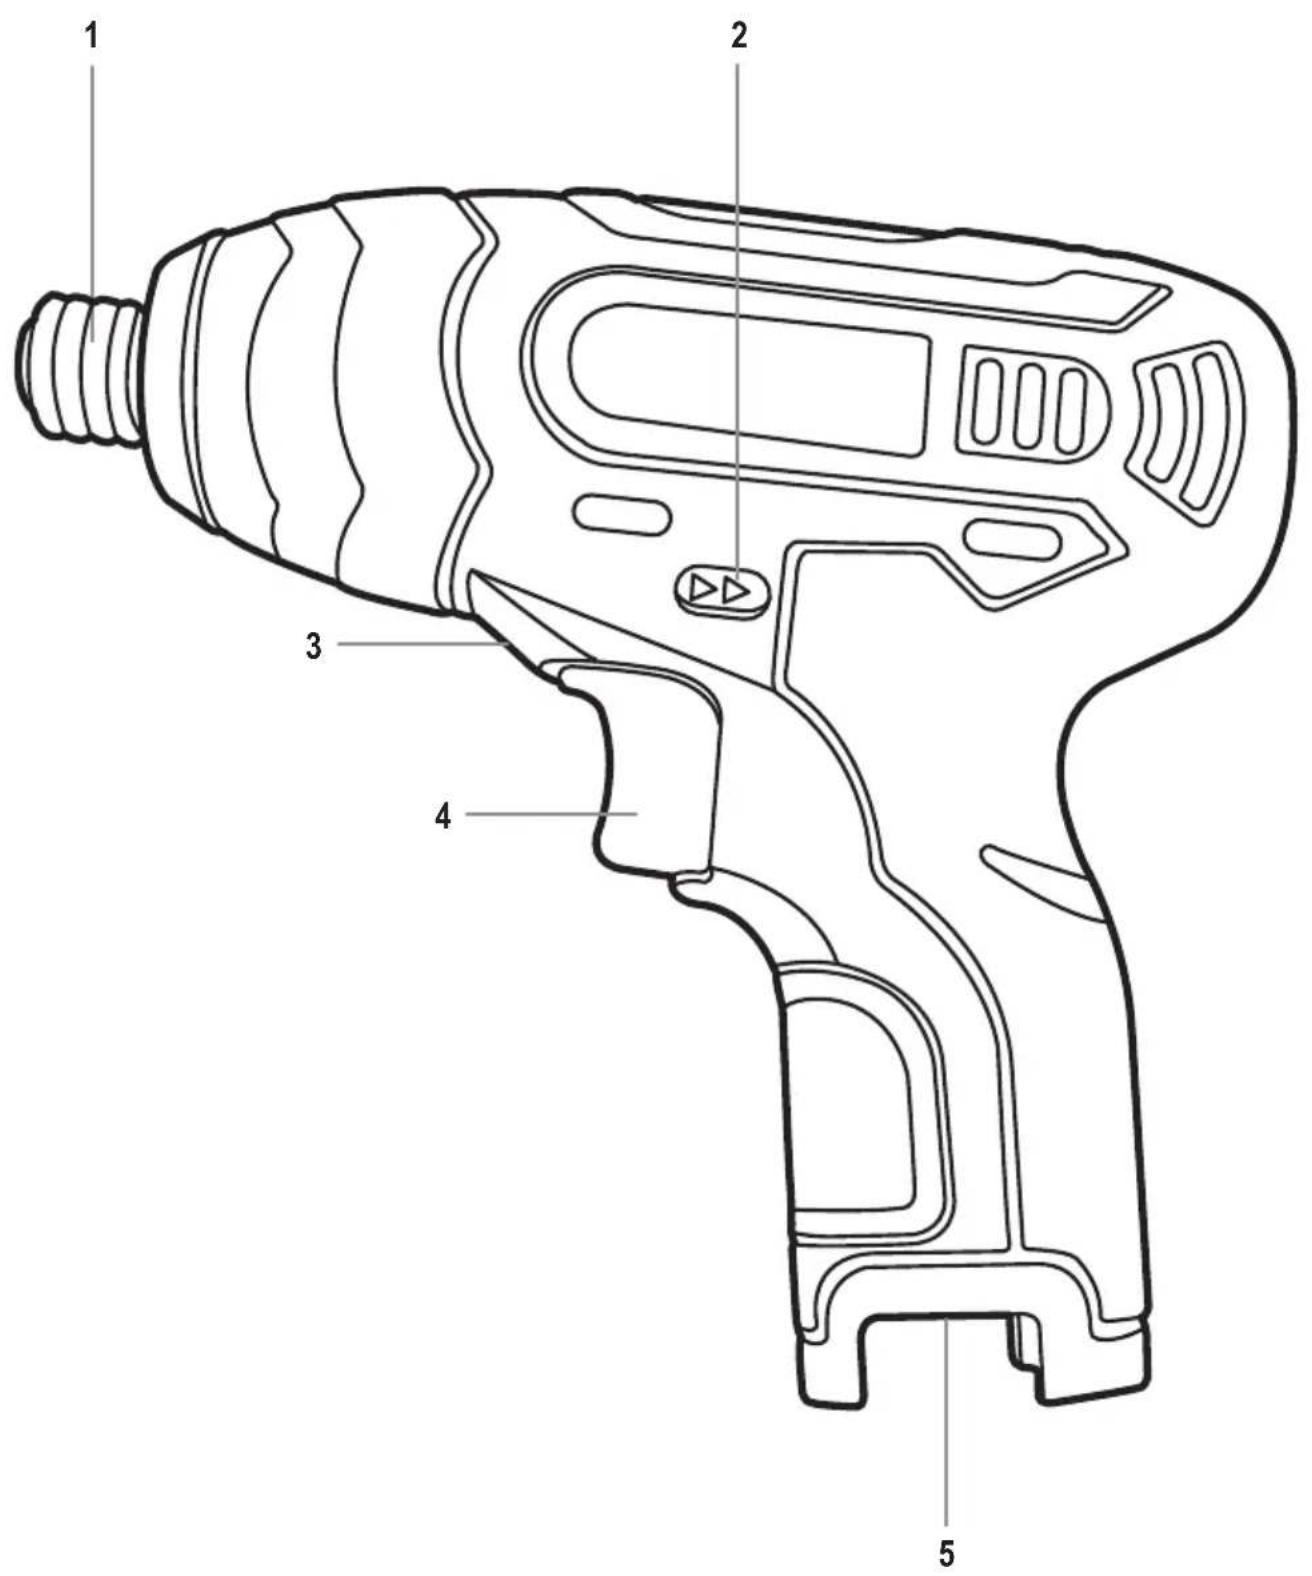
text_image
Technical diagram of a handheld electric drill with numbered parts labeled 1 to 5Seite
www.business.conrad.at
natural_image
Technical line drawing of a mechanical component with threaded end and arrow indicator (no text or symbols)Abb. 2

text_image
Diagram showing a screwdriver with labeled parts and directional arrows indicating assembly or process flow.natural_image
Line drawing of a handheld electric drill (no text or symbols)- Introduction......16
- Explanation of symbols....16
- Intended use....17
- Delivery content....17
- General power tool safety warnings 18
a) Work area safety 18
b) Electrical safety 18
c) Personal safety....18
d) Power tools use and care 19
e) Battery tool use and care....19
f) Residual risks 20
g) Service....20
h) Drill safety warnings 20
-
Operating elements ......21
-
Setup and preparation....21
a) Installing bits....21
b) Assembling/changing the battery 22
- Operation....22
a) Setting the rotation direction....22
b) To do/check before each use....23
c) Operation tips....23
d) Switching the product on/off 24
-
Cleaning and maintenance....24
-
Storage and transportation 25
- Disposal 25
- Technical data....25
a) General....25
b) Sound and vibration information....26
c) Suitable battery pack and charger....26
- Declaration of Conformity (DOC)......26
1. Introduction
Dear customer,
Thank you for purchasing this product.
This product complies with statutory national and European regulations.
For safety reasons, always follow the instructions in this manual.

These operating instructions are part of this product. They contain important information on setting up and using the product. Also consider this if you pass on the product to any third party. Therefore, retain these operating instructions for reference!
If there are any technical questions, please contact:
International: www.conrad.com/contact
United Kingdom: www.conrad-electronic.co.uk/contact
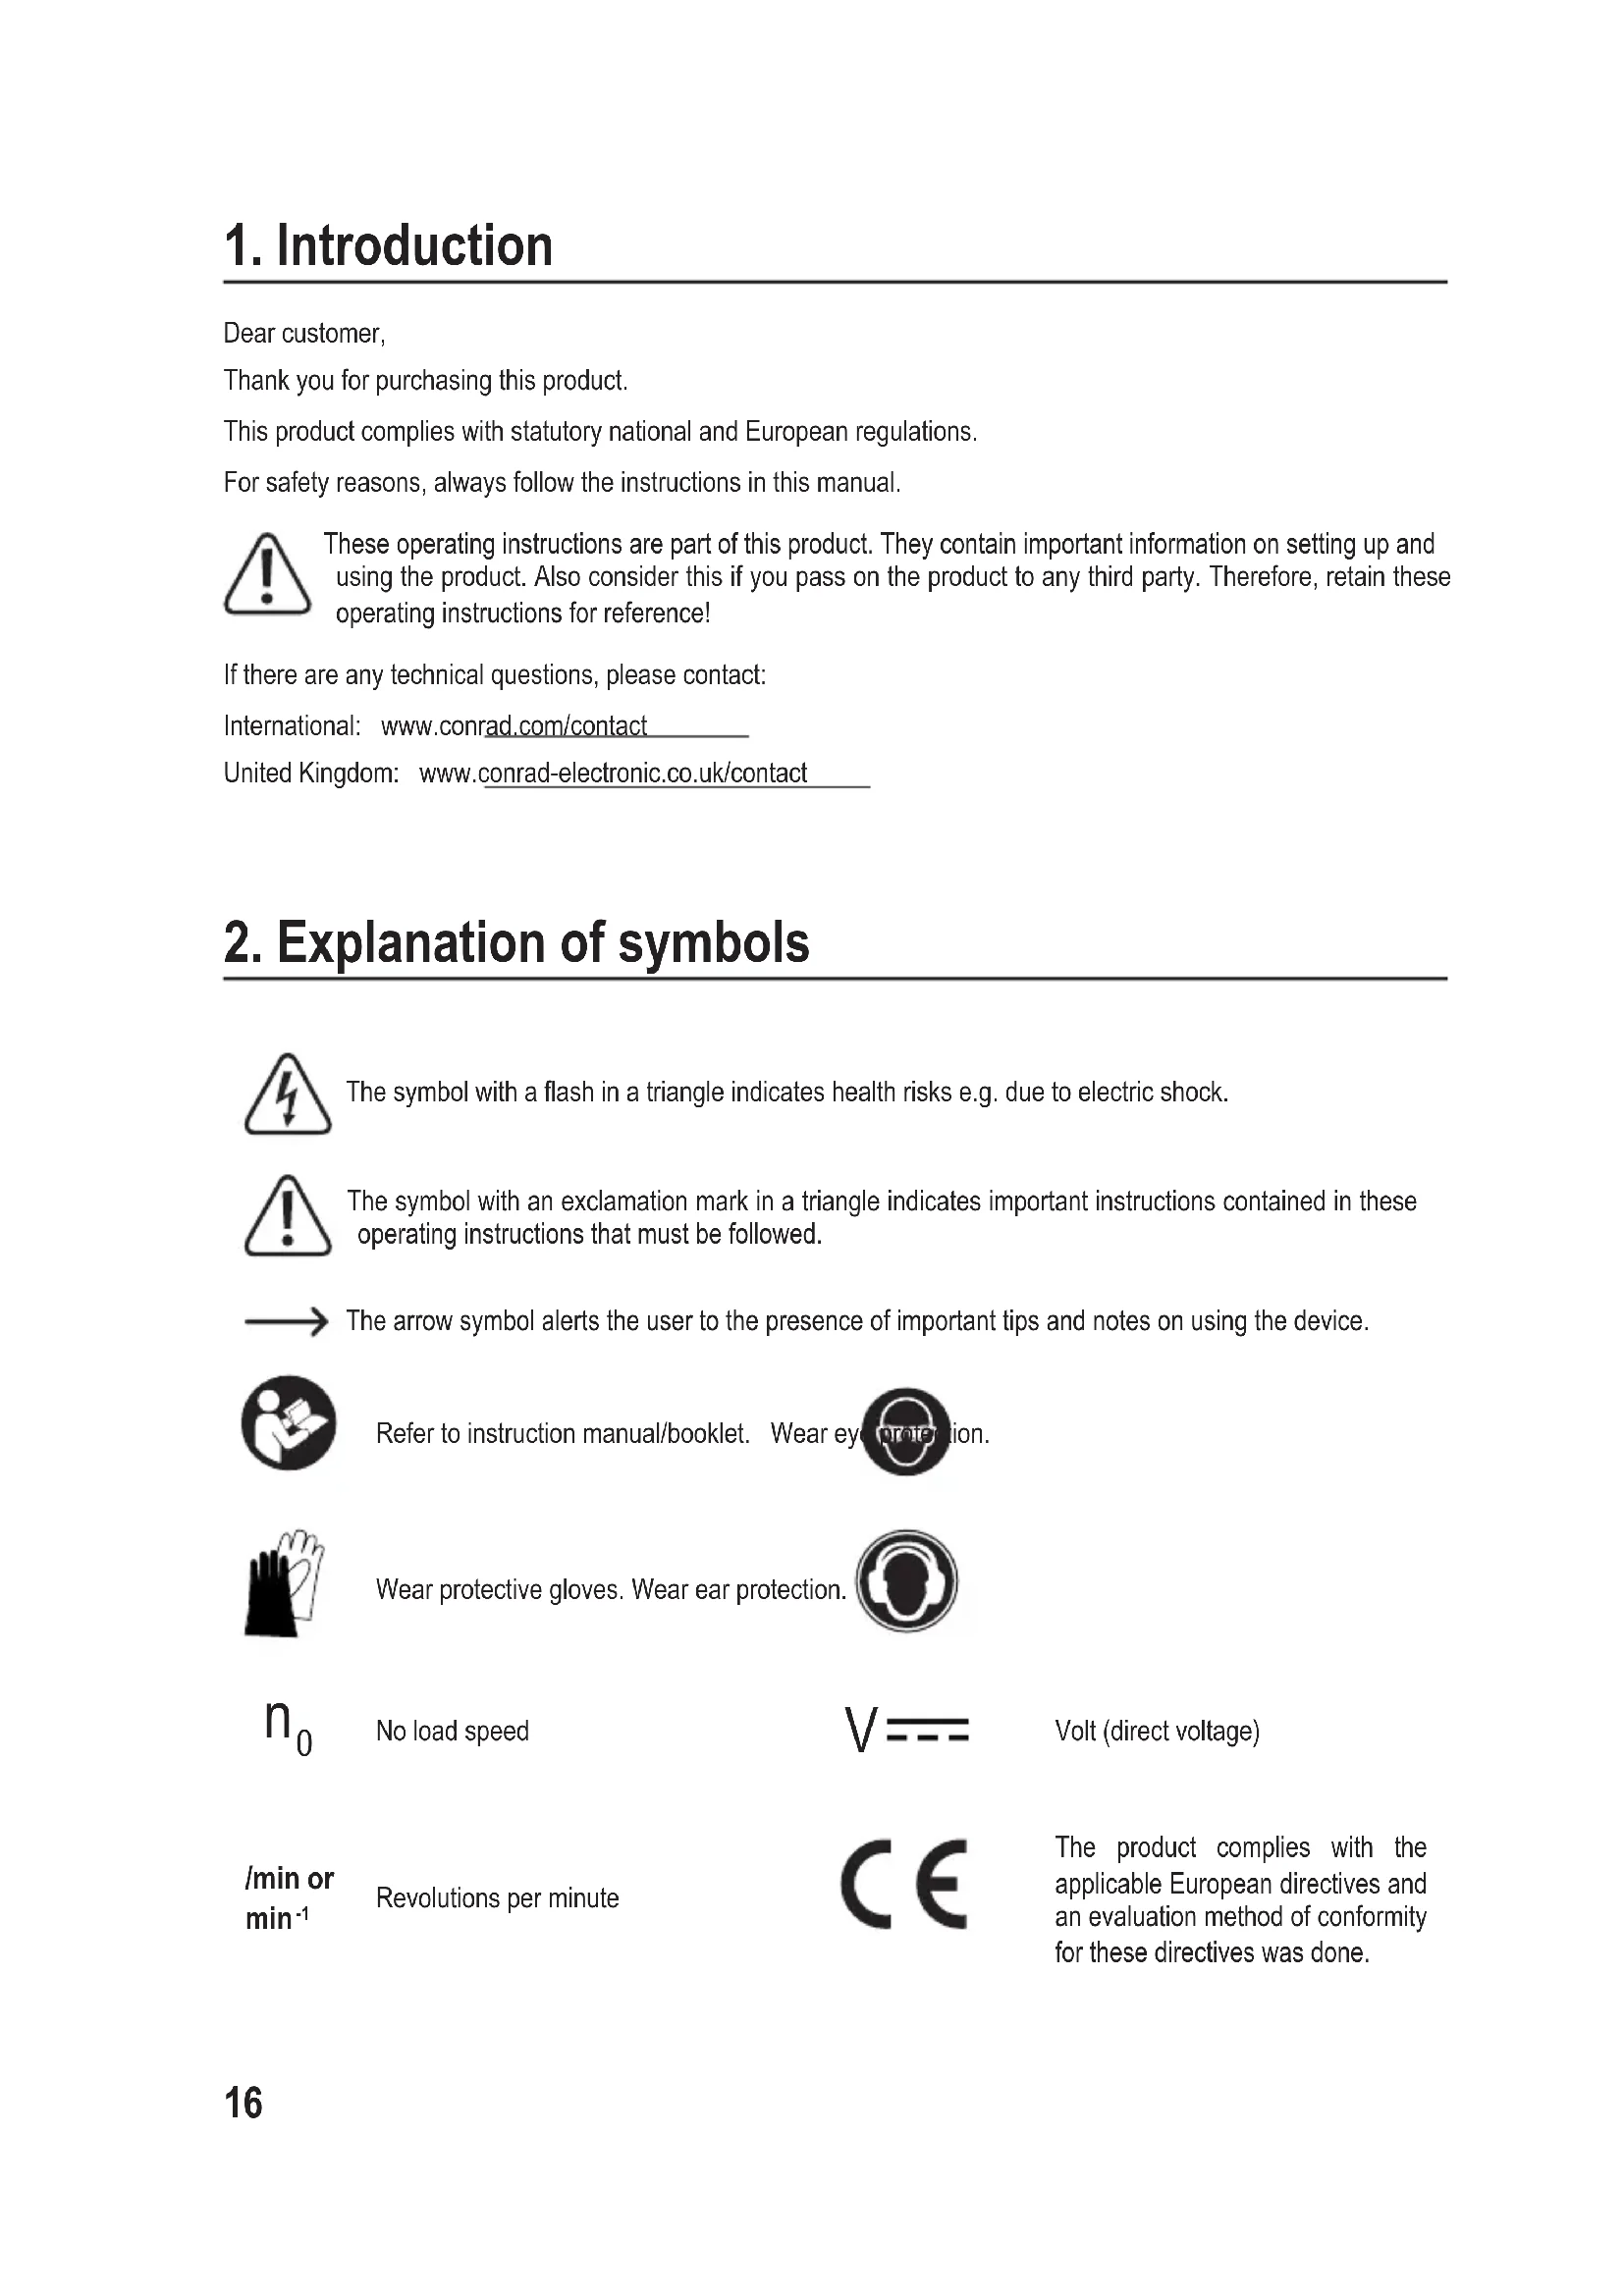
2. Explanation of symbols

The symbol with a flash in a triangle indicates health risks e.g. due to electric shock.

The symbol with an exclamation mark in a triangle indicates important instructions contained in these operating instructions that must be followed.

The arrow symbol alerts the user to the presence of important tips and notes on using the device.

Refer to instruction manual/booklet. Wear eye protection.


Wear protective gloves. Wear ear protection.


No load speed

Volt (direct voltage)
/min or min ^-1
Revolutions per minute

The product complies with the applicable European directives and an evaluation method of conformity for these directives was done.
3. Intended use
The product is intended for screwing in and out screws/bolts and nuts with left and right-handed thread, by using a variety of bits (not included). The product features impact mechanism which provides much higher torque than a typical cordless screwdriver.
For safety and approval purposes, you must not rebuild and/or modify this product. Using the product for purposes other than those described above may damage the components. In addition, improper use can cause hazards such as short circuits, fire and electric shocks. Read the instructions carefully and store them in a safe place. Make this product available to third parties only together with its operating instructions.
All company and product names are trademarks of their respective owners. All rights reserved.
4. Delivery content
- 1 x Main unit
- Operating instructions
Up-to-date operating instructions
Download the latest operating instructions at www.conrad.com/downloads or scan the QR code on this page. Follow the instructions on the website.

This product is shipped without a battery pack and without accessories. User needs to purchase a suitable battery pack/charger and accessories:
• Battery pack: Conrad Item No. 1493004
• Battery charger: Conrad Item No. 1761445
- Bit set 147-piece: Conrad Item No. 814489
5. General power tool safety warnings
WARNING! Read all safety warnings and all instructions. Failure to follow the warnings and instructions may result in electric shock, fire and/or serious injury.
Save all warnings and instructions for future reference.
The term “power tool” in the warnings refers to your mains-operated (corded) power tool or battery-operated (cordless) power tool.
a) Work area safety
- Keep work area clean and well lit. Cluttered or dark areas invite accidents.
- Do not operate power tools in explosive atmospheres, such as in the presence of flammable liquids, gases or dust. Power tools create sparks which may ignite the dust or fumes.
- Keep children and bystanders away while operating a power tool. Distractions can cause you to lose control.
b) Electrical safety
- Power tool plugs must match the outlet. Never modify the plug in any way. Do not use any adapter plugs with earthed (grounded) power tools. Unmodified plugs and matching outlets will reduce risk of electric shock.
- Avoid body contact with earthed or grounded surfaces, such as pipes, radiators, ranges and refrigerators. There is an increased risk of electric shock if your body is earthed or grounded.
- Do not expose power tools to rain or wet conditions. Water entering a power tool will increase the risk of electric shock.
- Do not abuse the cord. Never use the cord for carrying, pulling or unplugging the power tool. Keep cord away from heat, oil, sharp edges or moving parts. Damaged or entangled cords increase the risk of electric shock.
- When operating a power tool outdoors, use an extension cord suitable for outdoor use. Use of a cord suitable for outdoor use reduces the risk of electric shock.
- If operating a power tool in a damp location is unavoidable, use a residual current device (RCD) protected supply. Use of an RCD reduces the risk of electric shock.
c) Personal safety
- Stay alert, watch what you are doing and use common sense when operating a power tool. Do not use a power tool while you are tired or under the influence of drugs, alcohol or medication. A moment of inattention while operating power tools may result in serious personal injury.
-
Use personal protective equipment. Always wear eye protection. Protective equipment such as dust mask, non-skid safety shoes, hard hat, or hearing protection used for appropriate conditions will reduce personal injuries.
-
Prevent unintentional starting. Ensure the switch is in the off-position before connecting to power source and/or battery pack, picking up or carrying the tool. Carrying power tools with your finger on the switch or energising power tools that have the switch on invites accidents.
- Remove any adjusting key or wrench before turning the power tool on. A wrench or a key left attached to a rotating part of the power tool may result in personal injury.
- Do not overreach. Keep proper footing and balance at all times. This enables better control of the power tool in unexpected situations.
- Dress properly. Do not wear loose clothing or jewellery. Keep your hair, clothing and gloves away from moving parts. Loose clothes, jewellery or long hair can be caught in moving parts.
- If devices are provided for the connection of dust extraction and collection facilities, ensure these are connected and properly used. Use of dust collection can reduce dust-related hazards.
d) Power tools use and care
- Do not force the power tool. Use the correct power tool for your application. The correct power tool will do the job better and safer at the rate for which it was designed.
- Do not use the power tool if the switch does not turn it on and off. Any power tool that cannot be controlled with the switch is dangerous and must be repaired.
- Disconnect the plug from the power source and/or the battery pack from the power tool before making any adjustments, changing accessories, or storing power tools. Such preventive safety measures reduce the risk of starting the power tool accidentally.
- Store idle power tools out of the reach of children and do not allow persons unfamiliar with the power tool or these instructions to operate the power tool. Power tools are dangerous in the hands of untrained users.
- Maintain power tools. Check for misalignment or binding of moving parts, breakage of parts and any other condition that may affect the power tool's operation. If damaged, have the power tool repaired before use. Many accidents are caused by poorly maintained power tools.
- Keep cutting tools sharp and clean. Properly maintained cutting tools with sharp cutting edges are less likely to bind and are easier to control.
- Use the power tool, accessories and tool bits etc. in accordance with these instructions, taking into account the working conditions and the work to be performed. Use of the power tool for operations different from those intended could result in a hazardous situation.
- Keep handles and grasping surfaces dry, clean and free from oil and grease. Slippery handles and grasping surfaces do not allow for safe handling and control of the tool in unexpected situations.
e) Battery tool use and care
- Recharge only with the charger specified by the manufacturer. A charger that is suitable for one type of battery pack may create a risk of fire when used with another battery pack.
- Use power tools only with specifically designated battery packs. Use of any other battery packs may create a risk of injury and fire.
-
When battery pack is not in use, keep it away from other metal objects, like paper clips, coins, keys, nails, screws or other small metal objects that can make a connection from one terminal to another. Shorting the battery terminals together may cause burns or a fire.
-
Under abusive conditions, liquid may be ejected from the battery; avoid contact. If contact accidentally occurs, flush with water. If liquid contacts eyes, additionally seek medical help. Liquid ejected from the battery may cause irritation or burns.
- Do not use a battery pack or tool that is damaged or modified. Damaged or modified batteries may exhibit unpredictable behaviour resulting in fire, explosion or risk of injury.
- Do not expose a battery pack or tool to fire or excessive temperature. Exposure to fire or temperature above 130 °C may cause explosion.
- Follow all charging instructions and do not charge the battery pack or tool outside the temperature range specified in the instructions. Charging improperly or at temperatures outside the specified range may damage the battery and increase the risk of fire.
f) Residual risks
Even if you are operating this product in accordance with all the safety requirements, potential risks of injury and damage remain. The following dangers can arise in connection with the structure and design of this product:
- Health defects resulting from vibration emission if the product is being used over long periods of time or not adequately managed and properly maintained.
- Injuries and damage to property due to broken application tools or the sudden impact of hidden objects during use.
- Danger of injury and property damage caused by flying objects.
g) Service
- Have your power tool serviced by a qualified repair person using only identical replacement parts. This will ensure that the safety of the power tool is maintained.
- Never service damaged battery packs. Service of battery packs should only be performed by the manufacturer or authorized service providers.
h) Drill safety warnings
- Wear ear protectors when impact drilling. Exposure to noise can cause hearing loss.
- Use auxiliary handle(s), if supplied with the tool. Loss of control can cause personal injury.
- Hold the power tool by insulated gripping surfaces, when performing an operation where the cutting accessory or fasteners may contact hidden wiring. Cutting accessory contacting a "live" wire may make exposed metal parts of the power tool "live" and could give the operator an electric shock.
- Use clamps or another practical way to secure and support the workpiece to a stable platform. Holding the work by hand or against your body leaves it unstable and may lead to loss of control and potential injuries.
- To reduce the risk of explosion, electric shock and property damage, always check the work area for hidden gas pipes, electrical wires or water pipes.
- Hold the power tool securely. When tightening and loosening the screws/bolts be prepared for temporarily high torque reactions.
6. Operating elements
(→ Fold-out page)
1 Tool holder
2 Tighten/loosen rotation control switch
3 Work light
4 On/off switch with variable speed
5 Battery compartment
7. Setup and preparation

Switch the product off and remove battery pack before assembly, cleaning, adjustments, maintenance, storage and transportation.
Always wear gloves when handling the product.
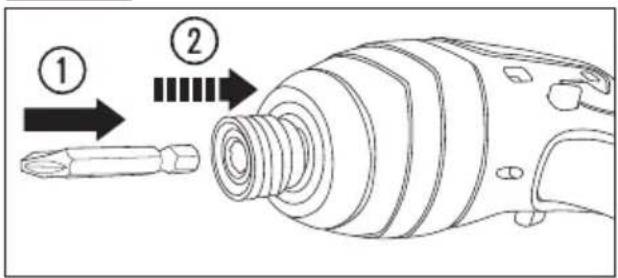
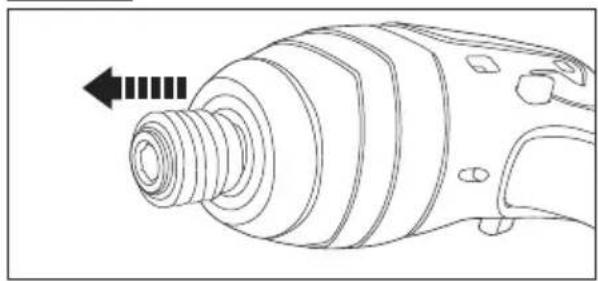
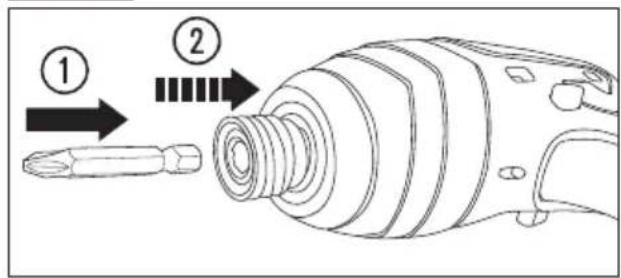
a) Installing bits

Due to the impact mechanism you should use only bits, which are designed for operation with impact screwdrivers of greater or equal torque than the torque of the product.
Installation must be carried out when the battery is removed from the product to prevent injury.
The product cannot be used with standard drill bits.
The bits are not supplied with the product. Use bits with the chuck size of 6.3 mm (1/4 in).
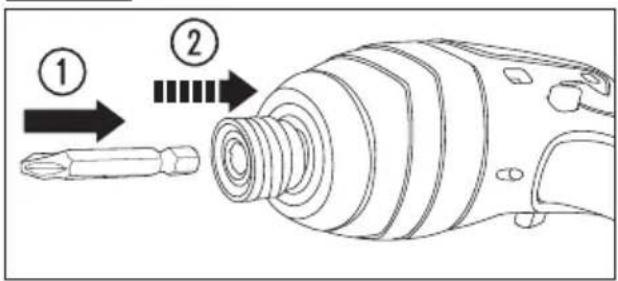
- Pull the locking sleeve of the tool holder (1) ( Fig. 1).
- Insert the bit into the tool holder (1). Release the locking sleeve ( Fig. 2).
Fig. 1
natural_image
Technical line drawing of a mechanical component with threaded end and arrow indicating direction (no text or symbols)Fig. 2
text_image
Diagram showing a screwdriver and its internal components with numbered annotationsb) Assembling/changing the battery
The battery pack fits only one way. Do not force it into the battery compartment (5).
-
Slide the battery pack into the battery compartment until it "clicks" in place.
-
To remove the battery, push the locks on the side of the battery and pull it out.
8. Operation
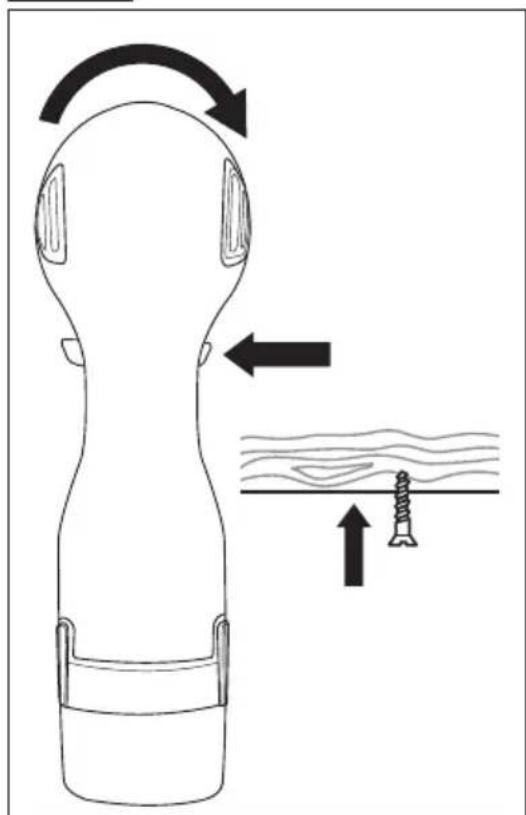
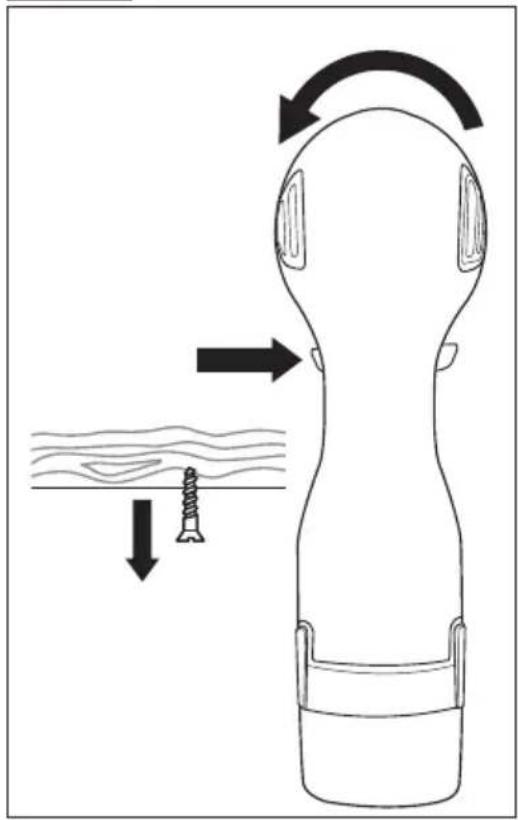
a) Setting the rotation direction
-
To set the tighten rotation direction, press the tighten/loosen rotation control switch (2) through to the left stop ( Fig. 3).
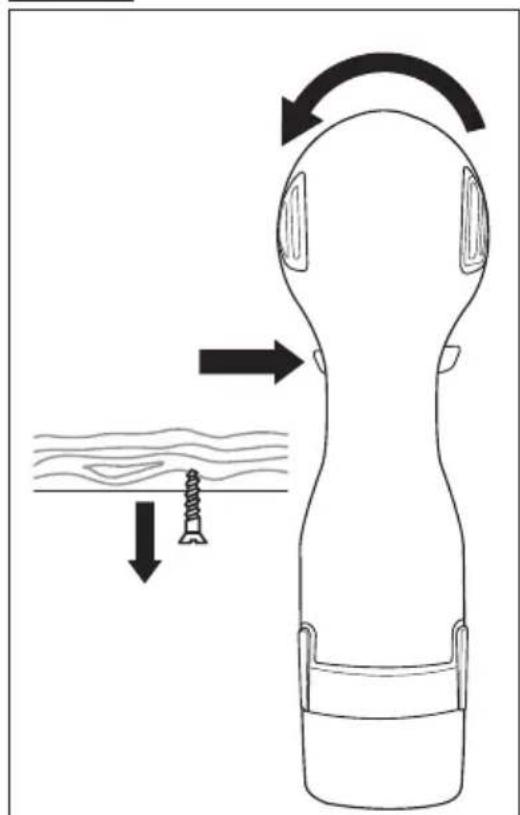
-
To set the loosen rotation direction, press the tighten/loosen rotation control switch (2) through to the right stop ( Fig. 4).
Fig. 3
natural_image
Diagram of a human head with earphones and a foot, showing motion arrows and a textured surface (no text or symbols)Fig. 4
natural_image
Diagram of a person's head with earphones and a screw, showing mechanical deformation (no text or symbols)b) To do/check before each use
- Wear safety glasses and protective gloves. Further hearing and dust protection is recommended. Adequate protective clothing will reduce personal injury by flying debris or accidental contact with raw surfaces.
- Do not use any attachments or accessories not recommended by the manufacturer. It may result in serious personal injury.
- Check if the accessory is fixed correctly ( Installing bits).
c) Operation tips

The working procedure is divided into two steps: Screwing in and tightening (impact mechanism in action). The impact mechanism is activated as soon as the screwed connection is tight and therefore load is put on the motor (the power of the motor to transferred to steady rotary impacts).
- Only apply the power tool to the screw/bolt or nut when the tool is switched off. Rotating bits can slip off and damage the thread.
- During operation you should begin with a slow rotation speed and increase it in the course of work if needed. The rotation speed can be controlled by pressing the on/off switch (4) to varying extents.
- It is recommended to perform the first few turns manually by hand, key or a screwdriver to ensure the correct screwing in of a component.
- In case of working with threaded components, do not exert too much pressure on the product. This can lead to the damage of the thread.
- Before screwing larger/longer screws it is advisable to predrill a pilot hole (using a different drill) with the core diameter of the thread to approx. 2/3 of a given screw length.
- Always hold the product perpendicularly to the point to be screwed. Holding it at an angle may cause slipping or jamming of the screw/bolt.
d) Switching the product on/off

After tightening the screw/nut, the product's impact mechanism starts to "bump". The maximum impact duration should not exceed 1-2 seconds.

The product is equipped with the work light (3) to illuminate the work area. The work light turns on when the product is in operation, and turns off automatically when the product is off.
- To switch on the product, press the on/off switch (4) (→ Fig. 5).

natural_image
Line drawing of a handheld electric drill (no text or symbols)- To switch off the product, release the on/off switch (4).

The speed of the power tool can be adjusted by pressing the on/off switch (4) to varying extents. A light pressure on the on/off switch results in a low rotational speed. Increased pressure on the switch causes an increase in speed.
9. Cleaning and maintenance

Switch the product off and remove battery pack before assembly, cleaning, adjustments, maintenance, storage and transportation. Also disconnect the charger from the mains.
- Regularly check for obvious defects such as loose fixings, and worn or damaged components.
- Check that parts and correctly fitted. Carry out necessary maintenance or repairs before each use.

Under no circumstances use aggressive cleaning agents, cleaning alcohol or other chemical solutions to clean the housing of the product.
- Do not emerge the product into water or any liquids.
- Use a damp, lint-free cloth to clean the housing of the product.
- Clean the ventilation slots at the side cover of the product with a soft brush. Clogged ventilation slots might cause the engine to overheat.
- Wipe the surface with a dry cloth afterwards.
10. Storage and transportation
- Switch the product off and remove the battery pack.
- Clean the product as described above.
- Store the product indoors, in a dry place inaccessible to children.
- We recommend using the original package for storage or covering the product with a suitable cloth or enclosure to protect it against dust.
- Protect the product from any heavy impact or strong vibrations which may occur during transportation. Secure the product to prevent it from slipping or falling over.
11. Disposal
Electronic devices are recyclable waste and must not be disposed of in the household waste. At the end of its service life, dispose of the product in accordance with applicable regulatory guidelines.
You thus fulfil your statutory obligations and contribute to the protection of the environment.
12. Technical data
a) General
Input voltage....10.8 V
Maximum torque....100 Nm
No load speed n_0 0-2300 min ^-1
Chuck size....6.3 mm (1/4 in)
Operating / storage conditions....0 to +45°C, 20 – 85 % RH
Dimensions (W x D x H) 180 x 57 x 165 mm (without battery)
Weight 0.774 kg (without battery)
b) Sound and vibration information
Noise emission value L_PA 70,76 ± 3,0 dB(A)
Noise emission value L_WA .....81,76 ± 3,0 dB(A)
Vibration level....1,71 ± 1,5 m/s ^2
Uncertainty K....1,50 m/s ^2
The vibration emission level given has been measured in accordance with a standardised test given in EN 60745 and may be used to compare one tool with another. The declared vibration value may also be used in a preliminary assessment of exposure.

Warning! The vibration emission during actual use of the power tool can differ from the declared total value depending on the ways in which the tool is used.
Identify additional safety measures to protect the operator that are based on an estimation of exposure in the actual conditions of use (taking account of all parts of the operating cycle such as the times when the tool is switched off and when it is running idle in addition to the trigger time).
c) Suitable battery pack and charger
Battery pack.....Conrad Item No. 1493004
Battery charger......Conrad Item No. 1761445
13. Declaration of Conformity (DOC)
Conrad Electronic SE, Klaus-Conrad-Straße 1, D-92240 Hirschau hereby declares that this product conforms to the
Electromagnetic Compatibility Directive 2014/30/EU
EN 55014-1:2006 + A1:2009 + A2:2011
EN 55014-2:2015
Machinery Directive 2006/42/EU
EN 60745-1:2009 + A11:2010
EN 60745-2-2:2010
Restriction of Hazardous Substances Directive 2011/65/EU

Click on the following link to read the full text of the EU declaration of conformity:
www.conrad.com/downloads
Select a language by clicking on a flag symbol, and then enter the product order number in the search box.
The EU Declaration of Conformity is available for download in PDF format.
Page
France (email): technique@conrad-france.fr
Suisse: www.conrad.ch www.biz-conrad.ch
2. Explication des symboles

natural_image
Technical line drawing of a mechanical component with threaded end and arrow indicator (no text or symbols)III.2
text_image
Technical diagram showing a screwdriver with labeled parts and directional arrows indicating assembly or process flow.text_image
Diagram illustrating head-to-head joint movement with directional arrows and a screw on a surfaceIII.4
natural_image
Diagram of a person's head with earphones and a screw, showing mechanical deformation (no text or symbols)natural_image
Line drawing of a handheld electric drill (no text or symbols)Directive 2006/42/CE relative aux machines
EN 60745-1:2009 + A11:2010
EN 60745-2-2:2010
www.conrad.com/downloads
natural_image
Technical line drawing of a mechanical component with threaded end and arrow indicating direction (no text or symbols)Afb. 2