
AX 6000 - Exercise bike Christopeit - Free user manual and instructions
Find the device manual for free AX 6000 Christopeit in PDF.
User questions about AX 6000 Christopeit
0 question about this device. Answer the ones you know or ask your own.
Ask a new question about this device
Download the instructions for your Exercise bike in PDF format for free! Find your manual AX 6000 - Christopeit and take your electronic device back in hand. On this page are published all the documents necessary for the use of your device. AX 6000 by Christopeit.
USER MANUAL AX 6000 Christopeit
Assembly and exercise instructions
Order No.: 2008AX 6000
GB
Page 13-23
- Contents 13
- Important Recommendations and Safety Instructions 13
- Assembly Instructions 14-16
- Mount, Use & Dismount 17
- Computer manual 18
- Cleaning, Checks and Storage/ Troubleshooting 19
- Training instructions 20
- Parts List - Spare Parts List 21-23
9.Exploded view 59
Dear customer,
we congratulate you on your purchase of this home training sports unit and hope that we will have a great deal of pleasure with it. Please take heed of the enclosed notes and instructions and follow them closely concerning assembly and use.
Please do not hesitate to contact us at any time if you should have any questions.
IMPORTANT RECOMMENDATIONS AND SAFETY INSTRUCTIONS
Our products are all tested and therefore represent the highest current safety standards. However, this fact does not make it unnecessary to observe the following principles strictly.
- Assembly the machine exactly as described in the installation instructions and use only the enclosed, specific parts of the machine. Before assembling, verify the completeness of the delivery against the delivery notice and the completeness of the carton against the assembly steps in the installation and operating instructions.
- Check the firm seating off all screws, nuts and other connections before using the machine for the first time and at regular intervals to ensure that the trainer is in a safe condition.
- Set up the machine in a dry, level place and protect it from moisture and water. Uneven parts of the floor must be compensated by suitable measures and by the provided adjustable parts of the machine if such are installed. Ensure that no contact occurs with moisture or water.
- Place a suitable base (e.g. rubber mat, wooden board etc.) beneath the machine if the area of the machine must be specially protected against indentations, dirt etc.
- Before beginning training, remove all objects within a radius of 2 metres from the machine.
- Do not use aggressive cleaning agents to clean the machine and employ only the supplied tools or suitable tools of your own to assemble the machine and for any necessary repairs. Remove drops of sweat from the machine immediately after finishing training.
- WARNING! Systems of the heart frequency supervision can be inexact. Excessive training can lead to serious health damage or to the death. Consulta doctor before beginning a planned training programme. He can define the maximum exertion (pulse, Watts, duration of training etc.) to which you may expose yourself and can give you precise information on the correct posture during training, the targets of your training and your diet. Never train after eating large meals. This item is not suitable for therapeutically purposes!
- Only train on the machine when it is in correct working order. Use original spare parts only for any necessary repairs. WARNING: Replace the wormparts immediately and keep this equipment out of use until repaired.
- When setting the adjustable parts, observe the correct position and the marked, maximum setting positions and ensure that the newly adjusted position is correctly secured.
- Unless otherwise described in the instructions, the machine must only be used for training by one person at a time. The exercise time should not overtake 60 min/daily.
- Wear training clothes and shoes which are suitable for fitness training with the machine. Your clothes must be such that they cannot catch during training due to their shape (e.g. length). Your training shoes should be appropriate for the trainer, must support your feet firmly and must have non-slip soles.
-
WARNING! If you notice a feeling of dizziness, sickness, chest pain or other abnormal symptoms, stop training and consult a doctor.
-
Never forget that sports machines are not toys. This appliance can be used by children aged from 8 years and above and persons with reduced physical, sensory or mental capabilities or lack of experience and knowledge if they have been given supervision or instruction concerning use of the appliance in a safe way and understand the hazards involved. Children shall not play with the appliance. Cleaning and user maintenance shall not make by children without supervision. Take suitable measures to ensure that children never use the machine without supervision.
- The appliance use only to be used with the power supply unit provided with the appliance.
- Ensure that the person conducting training and other people never move or hold any parts of their body into the vicinity of moving parts.
- At the end of its life span this product is not allowed to dispose over the normal household waste, but it must be given to an assembly point for the recycling of electric and electronic components. You may find the symbol on the product, on the instructions or on the packing. The materials are reusable in accordance with their marking. With the re-use, the material utilization or the protection of our environment. Please ask the local administration for the responsible disposal place.
- To protect the environment, do not dispose of the packaging materials, used batteries or parts of the machine as household waste. Put these in the appropriate collection bins or bring them to a suitable collection point.
- This machine is a speed-dependant machine, i.e. the power increases with increasing speed, and the reverse.
- The machine is equipped with 10-speed resistance adjustment. This makes it possible to reduce or increase the braking resistance and thereby the training exertion. Turning the adjusting knob for the resistance setting towards stage 1 reduces the braking resistance and thereby the training exertion. Turning the adjusting knob for the resistance setting towards stage 10 increases the braking resistance and thereby the training exertion.
- The maximum permissible load (=body weight) is specified as 150 kg. This machine has been tested and certified in compliance with EN ISO20957-1 / 2014 und EN ISO 20957-9:2016 "H/C". This item's computer corresponds to the basic demands of the EMV Directive of 2014/30/EU.
- The assembly and operating instructions is part of the product. If selling or passing to another person the documentation must be provided with the product.
Remove all the separate parts from the packaging, lay them on the floor and check roughly that all are there on the base of the assembly steps. Please note that a number of parts are connected directly to the main frame preassembled. In addition, there are several other individual parts that have been attached to separate units. This will makes assembly easier and quicker for you. Assembly time: 50 min.
STEP1:
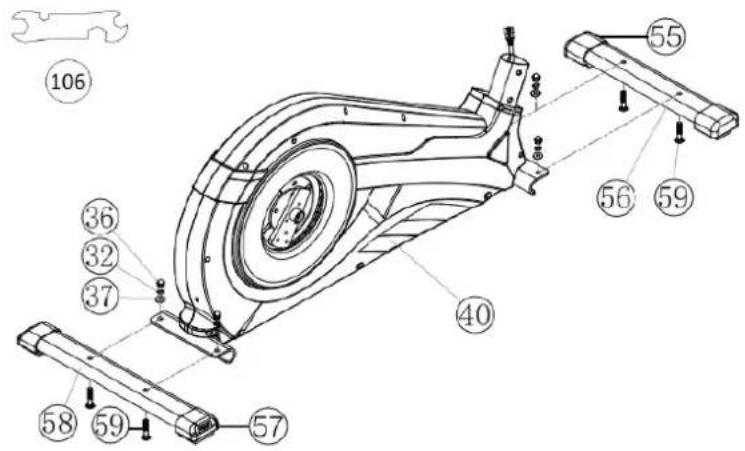
Attach the stabilizer (56+58).
- Attach the front stabilizer (56) assembled with front caps with transportation roller (55) to main frame (40) by using bolts M8x45 (59), washers (37), spring washers (32) and cap nuts (36).
- Attach the rear stabilizer (58) assembled with height adjustable caps (57) to main frame (40) by using bolts (59), washers (37), spring washers (32) and cap nuts (36). (For uneven floor, you can adjust the height at rear caps (57) and secure for stable position.)
STEP 2:
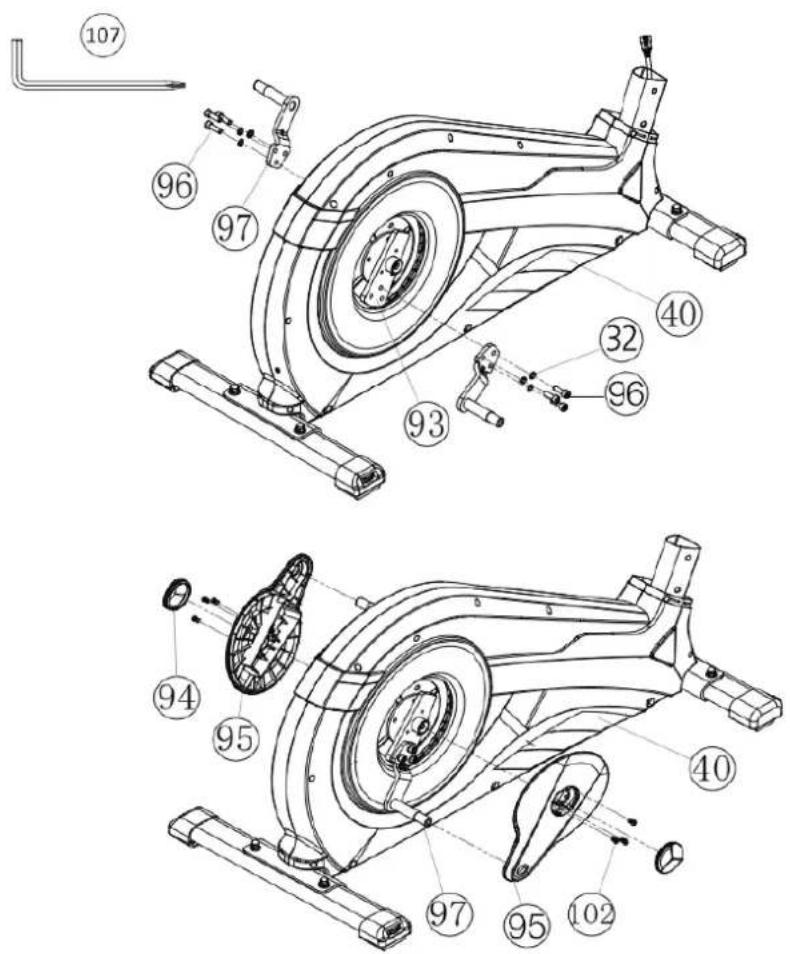
Assembly of pedal cranks (97) and crank covers (95).
-
Put the pedal crank (97) at pedal crank holder (93) so that the holes align and screw it tightly by using screw M8x20 (96) and spring washers (32).
-
Put the crank cover (95) onto the pedal crank (97) and attach it by using screws M5x15 (102).
- Attach the crank plug (94) at crank cover (95).

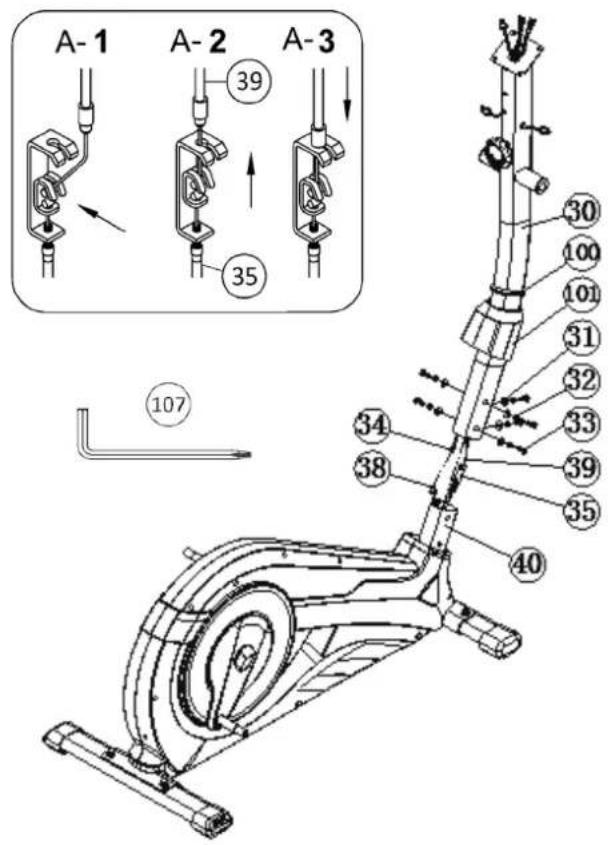
STEP 3: Assembling of the connection cable (34) to the sensor cable (38) and installation of support (30) at the main frame (40).
- Place screws M8x20 (33), curved washers (31) and spring washers (32) accessibly beside the front part of the main frame (40).
- Place the lower end of the support (30) against the main frame (40) and push the rubber ring (100) and support cover (101) onto the support (30).
- Plug the ends of the two computer cables (34-38) projecting from (30 + 40) together. (Note: The connection cable (34) projecting from the support (30) must not slide into the tube, as it is required for later steps of installation.) When joining the tubes, ensure that the cable connection will not trapped.
- Connect the middle section tension cable (39) to the bracket of lower section cable tension (35) (See figure A1-A3). Before this step of the installation, it is advisable to adjust the resistance setting to the lowest stage 1, at which the cable extends furthest from the sheath. Put the lowest part of cable (39) into the small hook (figure A1). Pull it until the small hook get in higher position (A2) and then insert the cable (39) onto the bracket (35) (figure A3).
- Put one spring washer (32) and one curved washer (31) on each screw (33). Push the screws (33) through the holes in the support (30), screw into the threaded holes of the main frame (40) and tighten lightly.
- Push the plastic cover (101) and rubber ring (100) into the right position to cover the connection point.
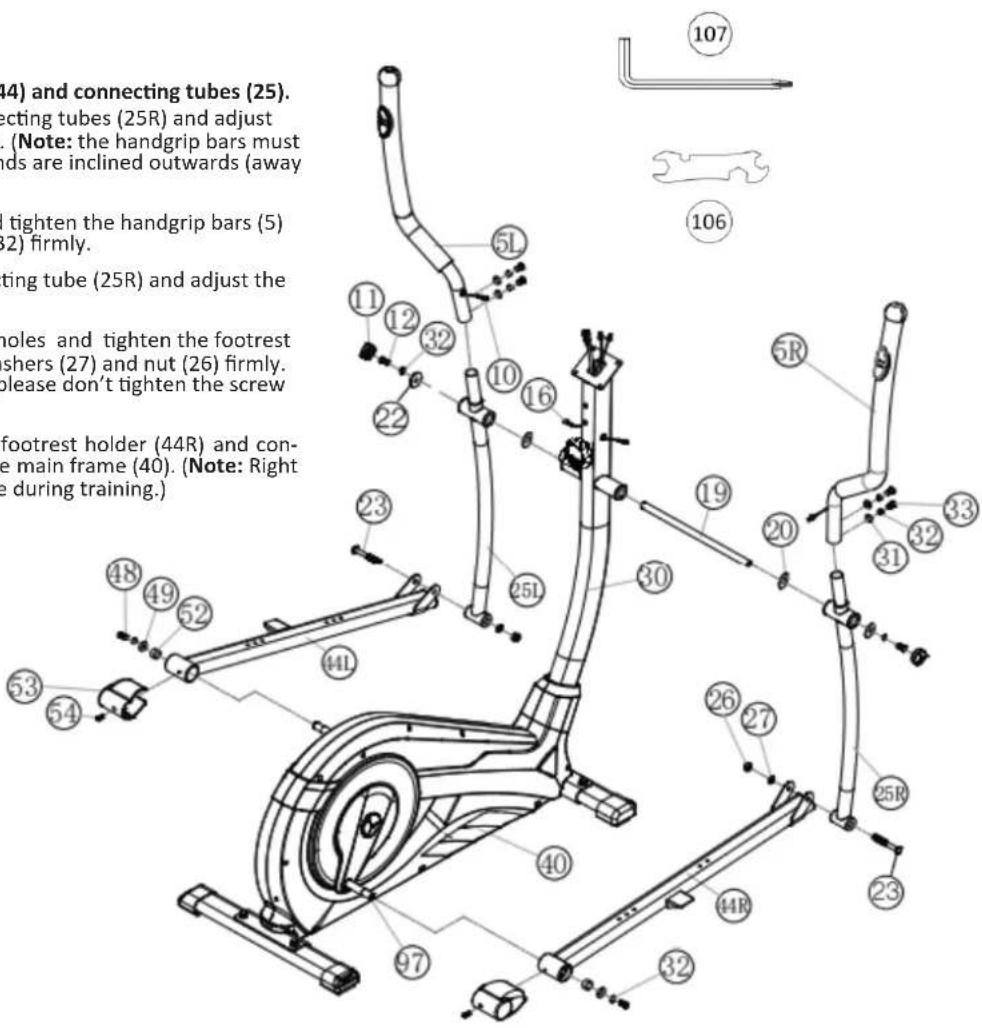
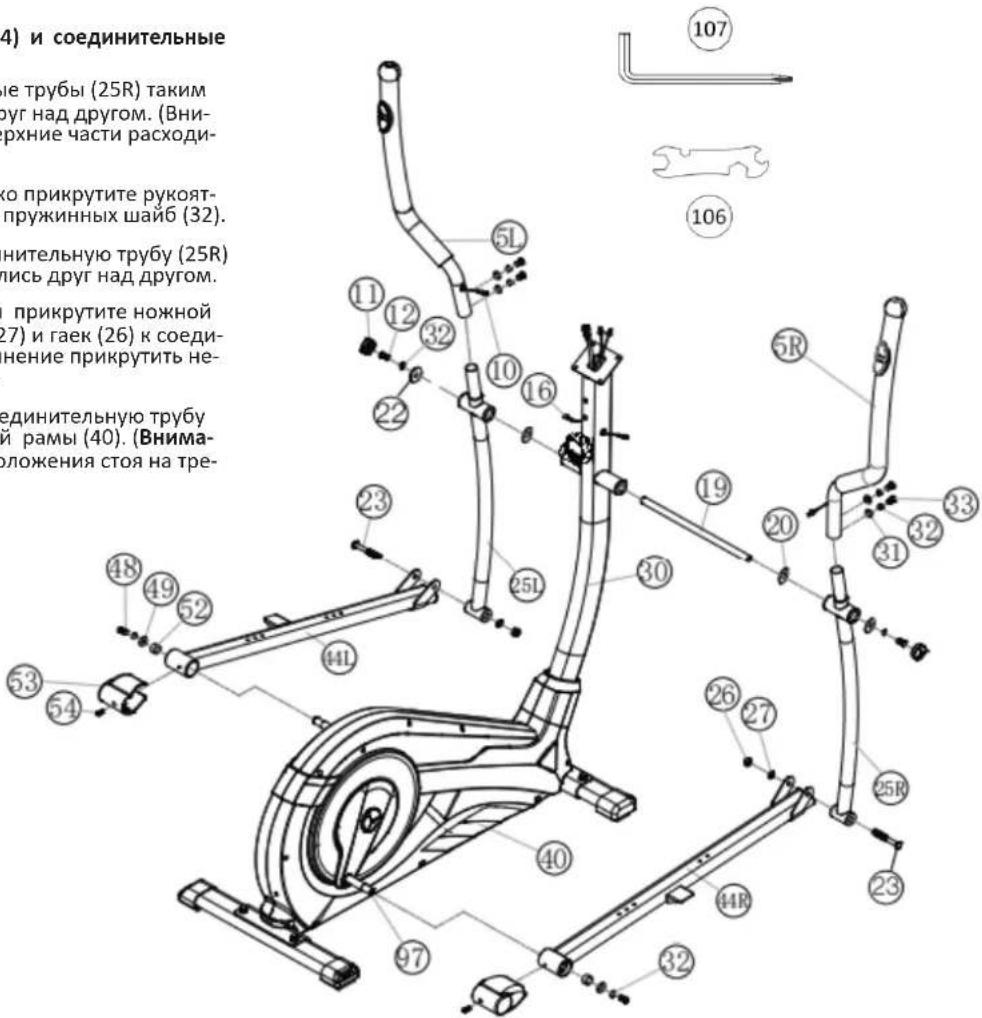
STEP 4: Installation of handgrips (5), footrest holder (44) and connecting tubes (25).
- Push the handgrip bars (5R) onto the connecting tubes (25R) and adjust the holes in the tubes so that they are aligned. (Note: the handgrip bars must be aligned after assembly so that the upper ends are inclined outwards (away from the support (30)).
- Push the screws (33) through the holes and tighten the handgrip bars (5) with curved washers (31) and spring washer (32) firmly.
- Put the footrest holder (44R) at the connecting tube (25R) and adjust the holes in the tubes so that they are aligned.
- Push the screw M8x78 (23) through the holes and tighten the footrest holder (44R) at connection tube (25R) with washers (27) and nut (26) firmly. (This connection point has to move easily. So please don't tighten the screw too much.)
- Place the preassembled unit of the right footrest holder (44R) and connecting tube (25R) at the right hand side of the main frame (40). (Note: Right is specified as viewed standing on the machine during training.)
- Push the grip axle (19) into the middle position at handlebar support (30) and put one wave washer (20) and the connecting tube (25R) onto the axles' end (19). Put on the hex screw M8x20 (12) a spring washer (32) and a washer 8//32 (22) and tighten it firmly.
- Put the foot pedal holder (44R) at the pedal crank (97) and tighten them with steel tube (52), washer 8//20 (49), spring washer (32) and screw M8x20 (48) firmly.
- Install the left footrest holder (44L) incl. all additionally required parts on the left hand side of the machine as described in 1. -7.
- Put the plugs of pulse cables (10) into the plugs from pulse connection cables (16) and attach the screw caps (11) onto screws (12).
STEP5:
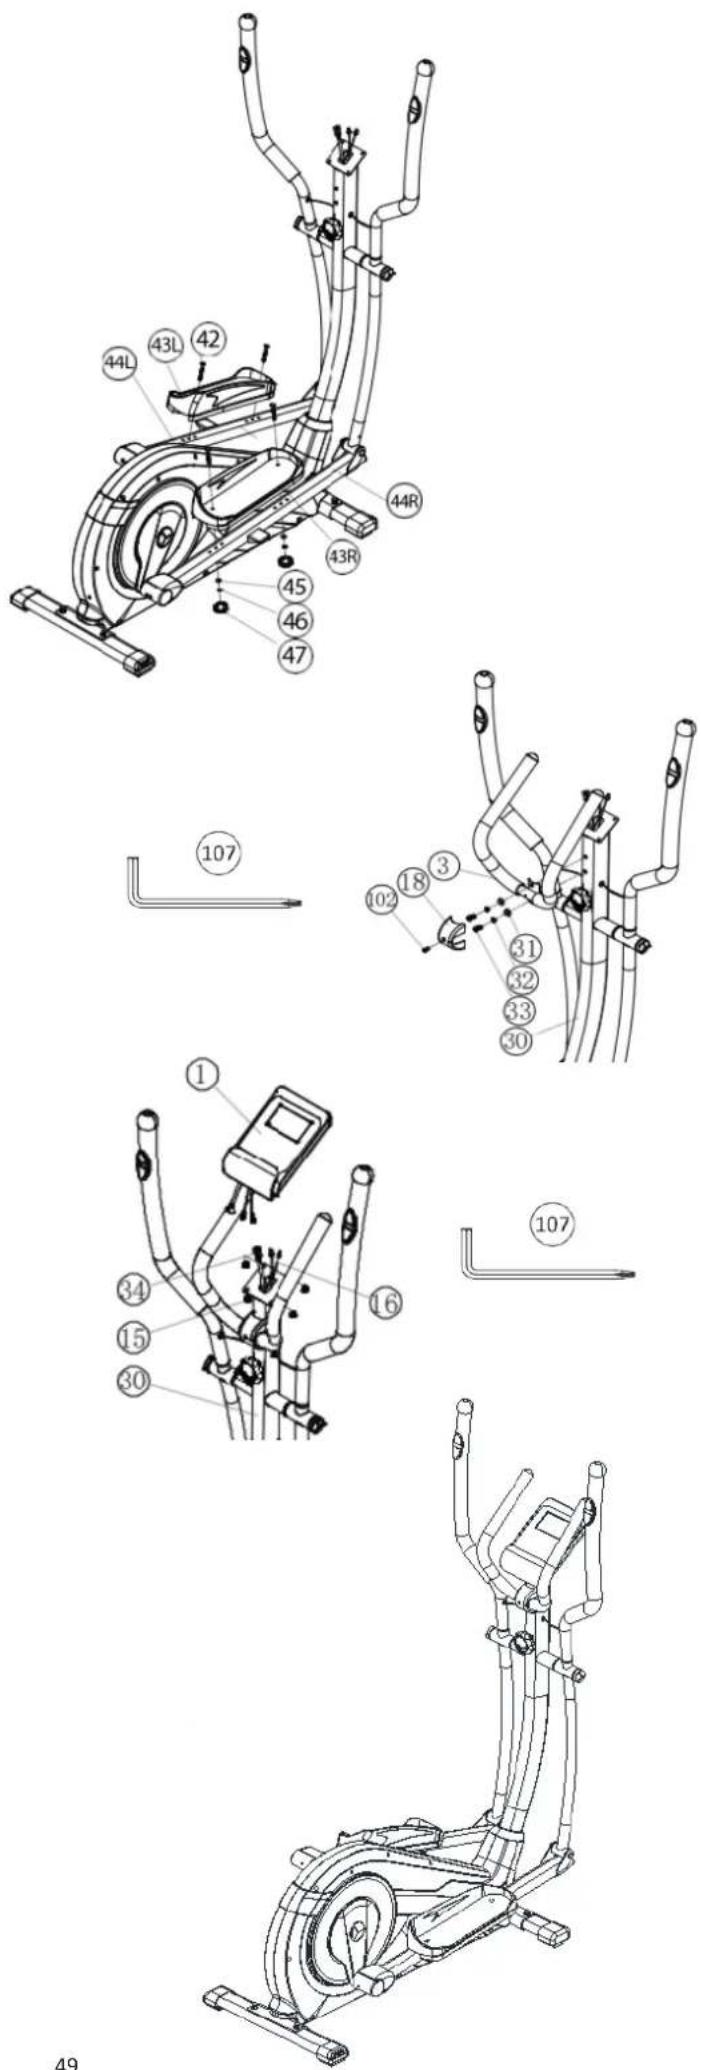
Installation of the footrests (43) at footrest holder (44).
- Push the right footrest (43R) onto the footrest holder (44R). Adjust the holes in the parts so that they are aligned.
- Push the screws M6x50 (42) from above through the holes. Push from the opposite side on a washer (45) and spring washer (46), screw on a handgrip nut (47) and tighten firmly.
- Install the left footrest (43L) on the left footrest holder (44L) as described in 1. -2. (Note: The position adjusted in this way should always be equal at both sides. The right and left footrests can be discerned by the edges of the longitudinal sides of the footrests. The high edges of the footrests (43) must point inwards (towards the main frame.) The positions can change as desired at all times by removing the carriage bolts (42) and sliding the footrests on the footrest brackets to get a comfortable exercise position close to the hand grip.)
STEP 6:
Attach the handle grip (3) at support (30).
- Push a spring washer (32) and a washer (31) onto each screw M8x20 (33).
- Place the handle grip (3) against the holder at support (30) and tighten the handle grip (3) at handlebar support (30) firmly.
- Attach the grip cover (18) at handle grip (3) and secure with screw M5x15 (102).
STEP7:
Attach the computer (1) at support (30).
- Put the plug of connection cable (34) into the plug from computer (1) backside.
- Insert the plug of pulse connection cables (16) to the jack of the computer (1) and attach the computer (1) to top monitor bracket of front post (30) with screws M5x10 (15). (Attention: Ensure that the cable loom are not crunched or pinched during installation.)
STEP 9:
Checks
- Check the correct installation and function of all screwed and plug connections. Installation is thereby complete.
- When everything is in order, familiarize yourself with the machine at a low resistance setting and make your individual adjustments.
Note:
Please keep the tool set and the instructions in a safe place as these may be required for repairs or spare parts orders becoming necessary later.

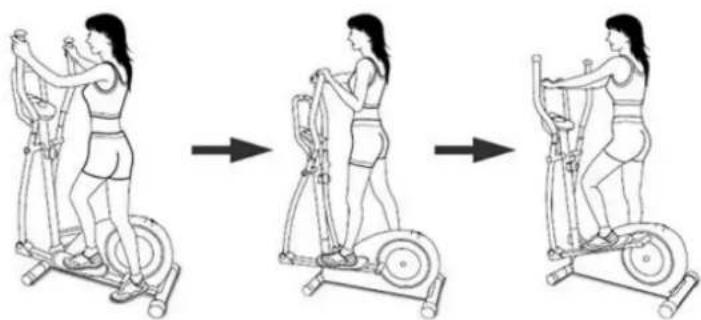
MOUNT, USE & DISMOUNT
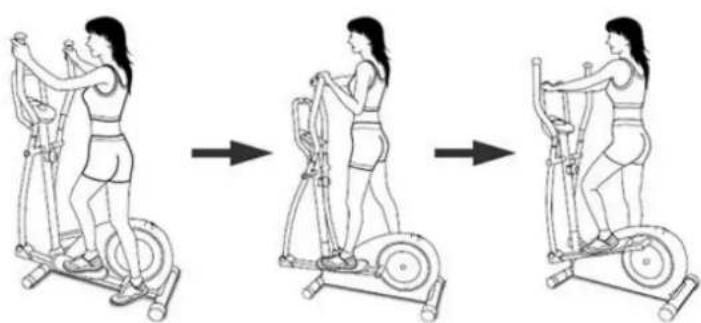
Mount:
a. Stand beside the item, put the nearest footrest into deepest position and hold the fixed handlebar tightly.
b. Put your foot onto the footrest, try to put whole body weight on your foot and simultaneously cross over with your another foot on the other side footrest and place there on the footrest too.
c. Now you are in the position to start your training.
Use:
a. Keep your hands in desired position on the fixed handlebar.
b. Pedal your exercise item by step your feet on footrests and balance the body weight to left and right side of footrest
c. If you like to exercise the upper body too, you can place the hands from fixed handle bar to the left and right handle grips.
d. Then you can increase the pedaling speed gradually and adjust braking resistance levels to increase the exercise intention.
e. Keep always your hands on fixed handle bar or hand grips left and right.
Dismount:
a. Slow down the pedaling speed until it comes to rest.
b. Keep the hands grabbing the fixed handlebar tightly, put one foot cross over the equipment and land on the floor, then land the other one.
This training equipment is a stationary exercise machine used to simulate a combination of biking, stepping and walking without causing excessive pressure to the joints, hence decreasing the risk of impact injuries.
Exercise this item offer a non-impact cardiovascular workout that can vary from light to high intensity based on the resistance preference set by the user. It will strengthen your muscles of upper and lower body and increase cardio capacity and maintain fitness of your body also.
Transportation of Equipment:
There are two rollers equipped on the front foot. For moving, you can lift up the rear foot and drive it to where you would like to locate or store it.
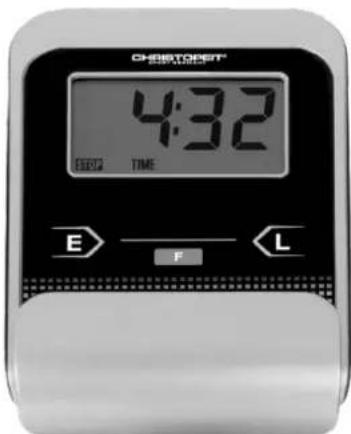
The supplied computer allows the most convenient training. Every value relevant to training is displayed in a corresponding window. From the beginning of the training session, the required time, the current speed, the approximate calorie consumption, the travelled distance ad the current pulse rate are displayed. All values are counted from zero upwards. If you wish to see one value displayed constantly during training, select this with the F key. If you wish to see these values in constant alternation, select the SCAN function. The display then changes from one function to the next at intervals of approx. 6 seconds.
The computer is switched on by briefly pressing the F- key or simply by beginning training. The computer begins to register and display all values. To stop the computer, just stop training. The computer stops all measurements and retains the last attained values. The last attained values in the functions TIME, CALORIES and KM are stored and training can continue with these values when training is resumed. The computer switches of automatically approx. 4 minutes after training is stopped. All values attained until that time are stored and are displayed again when training is resumed. It is then possible to continue training from these values or to reset all functions to zero using the L- key.
DISPLAYS:
1. ^n SPEED" (KM/H) display:
The current speed is displayed in kilometres per hour. It is not possible to specify a particular value using the E key. The values last attained by this function are not stored. (Limit of the display: 999.9 km/h.)
The currently required time is displayed in minutes and seconds. It is possible to specify a particular value using the "E" key. If a particular time has been specified, the remaining time is displayed. When the specified value is attained, this is indicated by an acoustic signal. The values last attained by this function are stored. (Limit of the display: 99 minutes.)
3. DIST (KM) display:
The current status of the travelled distance is displayed. It is possible to specify a particular value using the , key. If a particular distance has been specified, the remaining distance is displayed. When the specified value is attained, this is indicated by an acoustic signal. The values last attained by this function are stored. (Limit of the display: 999,9 km.)
4. CALORY (CAL) display:
The current status of the consumed calories is displayed. It is possible to specify a particular value using the E key. If a particular consumption has been specified, the remaining number of calories to be consumed is displayed. When the specified value is attained, this is indicated by anacoustic signal. The values last attained by this function are stored. (Limitof the display: 999,0 calories.)
5. ^n PULSE ^n display:
The current pulse rate is displayed in beats per minute. It is possible to specify a particular value using the E'' key.
The values last attained by this function are not stored. (Limit of both displays:40 - 240 pulse beats per minute.)
Note:
For pulse measurement, the two contact surfaces of the pulse measuring handle unit must be gripped simultaneously. The contact surfaces should be located centrally in the palms of the hands.
6. '' function:
If this function is selected, the current values of all functions are displayed successively in a constant sequence approx. every 5 seconds.
7. STOP display:
Display of Stopmode. Presets can be set.
KEYS:
1. F^ key (Fuction):
Pressing this key once briefly makes it possible to change from one function to another, i.e. the respective functions can be selected for which entries can be made using the "E" key. The currently selected function is indicated in the window.
2. E'' key (Enter):
By pressing this key once, it is possible to specify values step by step in the respective functions. For this, the desired function must firstly be selected using the F key. Holding the key pressed activates faster running. When training begins, the specified values are then counted down to zero.
3. _n^nL^ -key = (Delete):
When this key is pressed briefly, the values chosen with the F key are reset to zero. If the key is held longer (approx. 3 seconds), all last attained values are deleted.
Replacing the batteries:
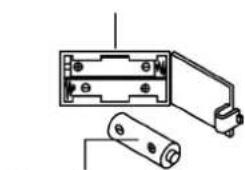
- Open the battery compartment cover and then remove the used Batteries.(If the batteries should leak remove them under increased considering that the battery acid is not into contact with skin come and clean the battery compartment thoroughly.)
- Insert the new batteries (type AAA) 1.5V in the correct order and taking into account the polarity in the battery compartment and close the batterycover so that it clicks into place.
- If the computer does not pick up immediately, the function should batteries are removed for 10 seconds and re-inserted.
- The empty batteries properly in accordance with the disposal regulations disposed of and do not give residual waste.
Battery compartment
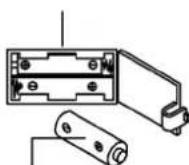
AAA batteries
1. Cleaning
Use only a less wet cloth for cleaning. Caution: Never use benzene, thinner or other aggressive cleaning agents for surface cleaning as this damage caused. The device is only for private home use and for use suitable indoors. Keep the unit clean and moisture from the device.
2. Storage
Remove the batteries from the computer while intending the unit for more than 4 weeks not to use. Choose a dry storage in-house and put some spray oil at front & rear foot tube connection point and hand grip axle. Also to the thread of the mounting screws for handle and seat tube. Cover the bike to protect it from being discolor by any sunlight and dirty through dust.
3. Checks
We recommend every 50 hours to review the screw connections for tightness, which were prepared in the assembly. Every 100 operating hours, you should put some spray oil at front & rear foot tube connection point and hand grip axle.
TROUBLESHOOTING
If you cannot solve the problem with the following information, please contact the authorized service center.
| Problem Possible Cause Solution | ||
| Computer has no value at Dis-play if you press any key. | No power adapter is well plugged or wall power is without power. | Check that the power adapter is properly plugged in, possibly with another electric device check if the wall power is fine. |
| Computer is not counting data and do not switch on after start cycling. | Sensor impulse missing base on not well plugged connection. | Check the plug connections at computer and inside of handle-bar support. |
| Computer is not counting data and do not switch on after start cycling. | Sensor impulse missing base on not correct position of sensor. | Take off the cover and check the distance between magnet and Sensor. The magnet at turning belt wheel should have only less than < 5mm distance against the sensor position. |
| No pulse value. | Pulse cable is not plugged in. | Check the separately pulse cable is well connected with computer. Check the connections of the pulse cable. |
| No pulse value. | Pulse sensors not well connected. | Screw out the screw for pulse measurement and check if plugs are well connected and no damage at pulse cable. |
| Resistance don't change Connection of resistance not well Check the resistance connection inside of handlebar support as manual mention. | ||
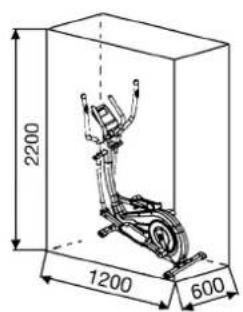
Training area in mm (for home trainer and user)
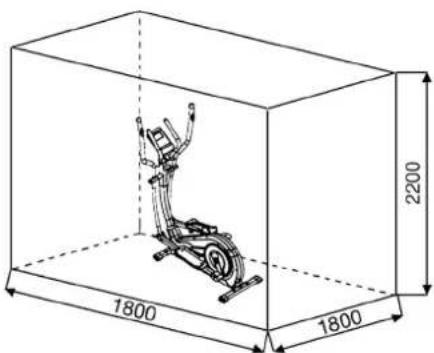
Free area in mm (Training area and security area (rotating 60cm))
You must consider the following factors in determining the amount of training effort required in order to attain tangible physical and health benefits:
1.Intensity:
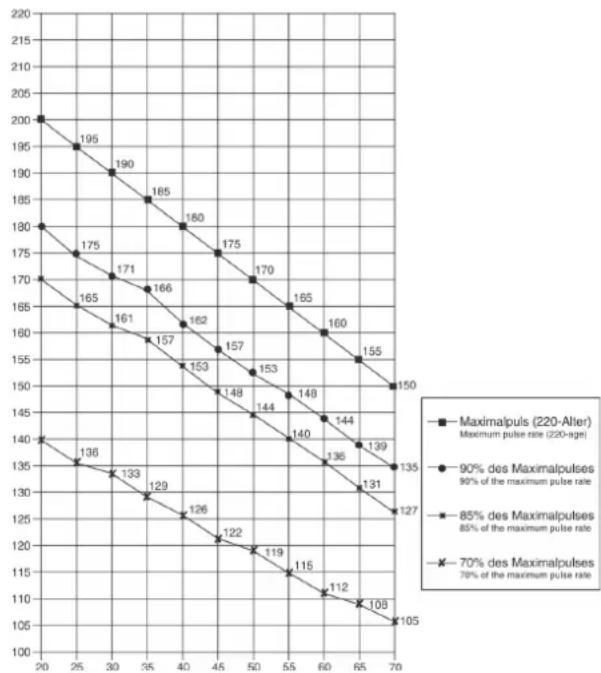
The level of physical exertion in training must exceed the level of normal exertion without reaching the point of breathlessness and/or exhaustion. A suitable guideline for effective training can be taken from the pulse rate. During training this should rise to the region of between 70% to 85% of the maximum pulse rate (see the table and formular for determination and calculation of this).
During the first weeks, the pulse rate should remain at the lower end of this region, at around 70% of the maximum pulse rate. In the course of the following weeks and months, the pulse rate should be slowly raised to the upper limit of 85% of the maximum pulse rate. The better the physical condition of the person doing the exercise, the more the level of training should be increased to remain in the region of between 70% to 85% of the maximum pulse rate. This should be done by lengthening the time for the training and/or encreasing the level of difficulty. If the pulse rate is not shown on the computer display or if for safety reasons you wish to check your pulse rate, which could have been displayed wrongly due to error in use, etc., you can do the following:
a. Pulse rate measurement in the conventional way (feeling the pulse at the wrist, for example, and counting the number of beats in one minute).
b. Pulse rate measurement with a suitable specialised device (available from dealers specialising in health-related equipment).
2. Frequency
Most experts recommend a combination of health-conscious nutrition, which must be determined on the basis of your training goal, and physical training three times a week. A normal adult must train twice a week to maintain his current level of condition. At least three training sessions a week are required to improve one's condition and reduce one's weight. Of course the ideal frequency of training is five sessions a week.
3.Planning the training
Each training session should consist of three phases: the warm-up phase, the training phase, and the cool-down phase. The body temperature and oxygen intake should be raised slowly in the warm-up phase. This can be done with gymnastic exercises lasting five to ten minutes. Then the actual training (training phase) should begin. The training exortionshould be relatively low for the first few minutes and then raised over a period of 15 to 30 minutes such that the pulse rate reaches the region of between 70% to 85% of the maximum pulse rate. In order to support the circulation after the training phase and to preventching or strained muscles later, it is necessary to follow the training phase with a cool-down phase. This should be consist of stretching exercises and/ or light gymnastic exercises for a period of five to ten minutes.
4.Motivation
The key to a successful program is regular training. You should set a fixed time and place for each day of training and prepare yourself mentally for the training. Only train when you are in the mood for it and always have your goalin view. With continuous training you will be able to see how you are progressing day by day and are approaching your personal training goal bit by bit.
Calculation formula:
Maximum pulse rate = 220 - age (220 minus your age)
90% of the maximum pulse rate = (220 - age) × 0.9 85% of the maximum pulse rate = (220 - age) × 0.85 70% of the maximum pulse rate = (220 - age) × 0.7
WARM UP EXERCISES (WARM UP)
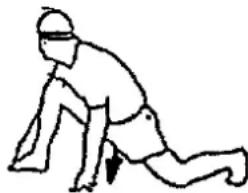
Start your warm up by walking on the spot for at least 3 minutes and then perform the following gymnastic exercises to the body for the training phase to prepare accordingly. The exercises do not overdo it and only as far run until a slight drag felt. This position will hold a while.


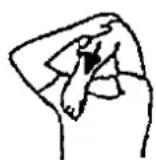
Reach with your left hand behind your head to the right shoulder and pull with the right hand slightly to the left elbow. After 20sec. switch arm.
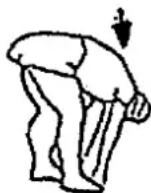
Bend forward as far forward as possible and let your legs almost stretched. Show it with your fingers in the direction of toe. 2 x 20sec.
Sit down with one leg stretched out on the floor and bend forward and try to reach the foot with your hands. 2 × 20 sec.
Kneel in a wide lunge forward and support yourself with your hands on the floor. Press the pelvis down. Change after 20 sec leg.
After the warm-up exercises by some arms and legs shake loose. We recommend the warm-up exercises at the end of the training be conducted and to end your workout with shaking of the extremities. (Cool down)
PARTS LIST - SPARE PARTS LIST AX 6000
Art.-Nr.:
2008
Technical data: Issue
17.06.2021
Magnetic brake system
- approx. 8 KG flywheel
10-manually adjustable load steps
- Hand Pulse measurement;
- Pedals three times adjustable
- Wheels for easier transportation
Computer, showing: Speed, time, distance, approx. calories and heart rate.
- Input of limits for time, distance, approx. calories and pulse.
Announcement of higher limits.
Max. body weight 150 KG
This product is created only for private Home sports activity and not allowed to us in a commercial or professional area. Home Sport use class H/C
Please contact us if any components are defective or missing, or if you need any spare parts or replacements in future:
Space requirement approx. [cm]: L 120 x B 60 x H 165
Items weight [kg]: 45
Exercise space approx. [^2 ] 3,5
05 10 15 2025 30 40 50 60 708090100
| Illustration No. | Designation | Dimension mm | Quantity | Attached to Illustration No | ET-Number |
| 1 | Computer | 1 | 30 | 36-2008-03-BT | |
| 2 | Fixed handle foam | 2 | 3 | 36-1508-04-BT | |
| 3 | Fixed handle | 1 | 30 | 33-1908-03-SW | |
| 4 | End cap | 2 | 3 | 39-9847 | |
| 5L | Hand grip left | 1 | 25L | 33-1508-11-SI | |
| 5R | Hand grip right | 1 | 25R | 33-1508-12-SI | |
| 6 | End cap | 2 | 5 | 36-9825315-BT | |
| 7 | Hand grip foam | 2 | 5 | 36-1123-11-BT | |
| 8 | Hand pulse sensor | 2 | 5 | 36-1123-23-BT | |
| 9 | Self-tapping screw | M4x25 | 2 | 8 | 36-9111-38-BT |
| 10 | Hand pulse cable | 2 | 8+16 | 36-1123-12-BT | |
| 11 | Screw head cover | 2 | 12 | 36-1908-06-BT | |
| 12 | Outer hexagon bolt | M8x20 | 2 | 19 | 39-9823 |
| 13 | Axle nut | 2 | 91+93 | 39-9820-SW | |
| 14 | Cable save | 4 | 5+30 | 36-9134-22-BT | |
| 15 | Screw | M5x10 | 4 | 1 | 39-9903 |
| 16 | Pulse connection cable | 2 | 1+10 | 36-1123-24-BT | |
| 17 | Nylon bushing | 19x38 | 2 | 30 | 36-1508-09-BT |
| 18 | Grip cover | 1 | 3 | 36-1908-07-BT | |
| 19 | Hand grip axle | 1 | 25+30 | 33-9925462-SI | |
| 20 | Washer | 19//38 | 2 | 19 | 36-9925114-BT |
| 21 | Nylon bushing | 18.5x38 | 4 | 25 | 36-9825328-BT |
| 22 | Washer | 8//32 | 2 | 12 | 39-10166 |
| 23 | Allen bolt | M10x78 | 2 | 25+44 | 39-10055-SW |
| 24 | Oval plug | 30x60 | 2 | 44 | 36-1123-26-BT |
| 25L | Connection tube left | 1 | 5L+44L | 33-1508-08-SI | |
| 25R | Connection tube right | 1 | 5R+44R | 33-1508-09-SI | |
| 26 | Nylon nut | M10 | 2 | 23 | 39-9981-VC |
| 27 | Washer | 10//19 | 2 | 23 | 39-9989-CR |
| 28 | Steel tube | 14x10x59.3 | 2 | 29 | 36-9925515-BT |
| Illustration No. | Designation Dimension mm Quantity Attached to | Illustration No ET-Number | ||
| 29 Bushing 14x8 | B2 4 25 36-9925516-BT | |||
| 30 Handlebar post 1 40 33-2008-02-SW | ||||
| 31 Curved washer 8//19 12 | 33 36-9966-CR | |||
| 32 | Spring washer | for M8 | 26 | 12,33,48+59 |
| 33 | Allen bolt | M8x20 | 12 | 3,5+30 |
| 34 | Connection cable | 1 | 1+35 | |
| 35 Tension wire | 1 39+80 | 36-2008-06-BT | ||
| 36 Cap nut | M8 | 4 59 39-9900-SW | ||
| 37 Washer | 8//16 4 59 39-9962 | |||
| 38 Sensor cable | 1 35+40 | 36-2008-07-BT | ||
| 39 Tension control 1 30+35 | 36-2008-04-BT | |||
| 40 Main frame | 1 30 33-1908-01-SW | |||
| 41 | Screw | M5x40 | 1 | 30+39 |
| 42 | Carriage bolt | M6x50 | 4 | 43+44 |
| 43L | Pedal left | 1 | 44R | |
| 43R | Pedal right | 1 | 44L | |
| 44L | Foot tube left | 1 | 25L+97 | |
| 44R | Foot tube right | 1 | 25R+97 | |
| 45 Washer | 6//14 4 42 39-9863 | |||
| 46 Spring washer | for M6 | 4 42 39-9865-SW | ||
| 47 Hand grip nut | M6 | 4 42 36-9825318-BT | ||
| 48 Allen bolt | M8x20 | 2 97 39-10095-SW | ||
| 49 | Washer | 8//24 | 2 | 48 |
| 50 | C-clip | C40 | 2 | 44 |
| 51 | Bearing | 2203-2RS | 2 | 44 |
| 52 | Steel tube | 17.5x22x12 | 2 | 97 |
| 53 Plastic cover | 2 44 36-1908-11-BT | |||
| 54 Screw | M5x8 2 53 39-9903 | |||
| 55L | Front stabilizer cap left | 1 | 56 | |
| 55R | Front stabilizer cap right | 1 | 56 | |
| 56 Front stabilizer 1 40 33-1908-04-SW | ||||
| 57 Rear stabilizer cap | 2 58 36-1908-10-BT | |||
| 58 Rear stabilizer | 1 40 33-1908-05-SW | |||
| 59 | Carriage bolt | M8x45 | 4 | 40,56+58 |
| 60 | Drill screw | M5x20 | 10 | 38,55,57+63 |
| 61 | Axis protection piece | 2 | 66 | |
| 62 | Axle nut | M10x1.25 | 2 | 64 |
| 63 Curved washer 5//14 | 1 41 36-10406 | |||
| 64 Flywheel | 1 40 33-1908-11-SI | |||
| 65 | Eye bolt | M6x40 | 2 | 64 |
| 66 U-piece | 2 65 36-9713-55-BT | |||
| 67 | C-clip | C8 | 1 | 71 |
| 68 | Washer | 10//15 | 1 | 71 |
| 69 | Wave washer | 10x15x0.5 | 1 | 71 |
| 70 Idler wheel | 1 71 36-9214-28-BT | |||
| 71 | Axle idler wheel | 1 | 40+70 | |
| 72 Nylon nut | M10 1 71 39-9981-VC | |||
| 73 | Nut | M6 | 4 | 65+74 |
| 74 | Double-thread screw | 1 | 40+80 | |
| 75 Silicone washer | 8//16 1 74 39-9917-CR | |||
| 76 Nylon nut | M6 | 5 74 39-9816-VC | ||
| 77 Spring | 1 80 36-9806217-BT | |||
| 78 | Allen bolt | M6x15 | 6 | 81+91 |
| 79 | Washer | 6//14 | 3 | 78 |
| 80 Magnet bracket | 1 81 33-1611-14-SI | |||
| 81 Axle magnet bracket | 1 80 36-9225-11-BT | |||
| 82 | Spring washer | für M6 | 6 | 78+92 |
| 83 Magnet | 1 89 36-9825506-BT | |||
| 84 | C-clip | C20 | 1 | 91 |
| 85 | Washer | 20.5x25x2 | 1 | 91 |
| 86 | Bearing | 6004-2RS | 2 | 40 |
| 87 | Washer | 20.5x25x1 | 1 | 91 |
| 88 | Wave washer | 20x25x0.5 | 1 | 91 |
| 89 Belt wheel | 1 91 36-1908-14-BT | |||
| 90 | Belt | 520J6 | 1 | 64+89 |
| Illustration No. 91 Pedal axle 1 89+93 33-1908-10-SI | Illustration No ET-Number | ||||
| 92 Axle nut 2 91 +93 39-9820-SW | |||||
| 93 Crossing welding 2 91 33-1908-08-SI | |||||
| 94 Crank plug 2 95 36-1908-15-BT | |||||
| 95 Circle cover 2 97 36-1908-04-BT | |||||
| 96 Screw | M8x20 | 6 93+97 39-9886-CR | |||
| 97 Crank | 2 93 33-1908-09-SI | ||||
| 98L | Chain cover left | 1 | 40+98R | 36-2008-01-BT | |
| 98R | Chain cover right | 1 | 40+98L | 36-2008-02-BT | |
| 99 Connection shaft | 1 98 36-1508-10-BT | ||||
| 100 | Rubber plug 1 101 36-1908-12-BT | ||||
| 101 | Plastic cover | 1 30 36-1908-05-BT | |||
| 102 | Screw | M5x15 | 7 | 18,93+95 | 39-10190 |
| 103 | Drill screw | M5x15 | 7 | 98 | 39-9851 |
| 104 | Self-tapping screw | M4.5x25 | 7 | 98 | 39-9825338-BT |
| 105 | Screw | 3x10 | 2 | 38 | 39-10127-SW |
| 106 | Multi wrench | 2 | 36-9107-28-BT | ||
| 107 | Allen wrench | 6 | 1 | 36-9107-27-BT | |
| 108 | Assembly and exercise instructions | 1 | 36-2008-08-BT | ||
NOTES
SOMMAIRE
Chere cliente, cher client,
3. Planning van de training
PepedncnoIb3ObaHHnEM
PpOHTaTe HcTpyKuHIO
no ekcnnyataaun!


13.CneIyET npHnHnHnAIBHO yueCTb, YTO cnpTnBhBie ChapdBi-He IrpWkN. 3TO yUcpoTcBO MOeT b6Itb NcNoJIb3OBAHO DeTeB B O3PacTe OT 8 let nIuC oOrpaHNeHbIMn Fm3NKeCKMn, CeHCOPHbIMn HINYMCTBeHHbIMn CNOOC6HOCTMn HInHexBaTKo ONbTaIaN 3HaHN, ECNN OHNI pRIODHBn HA3Op NII NOpDObHE INCHpyKUnn NO 6e3O-NachOMY nCNOJIb3OBAHnIO np6Oa, a TaKae, BO3MOKHO, BOCNTAHmOnaCHOte, CBsAHHbX C NoHMAJAcB, DTeN He MOrY Irt PpaTB C DOMa CnpTbHoro 06OpdyOBaHnO. OunctKa nTexHnueckoe 06ClyKuBaHne He DOJIHKo BnIOJNAHTbcJeTeE 6e3 npNCMOtpa. NcKlIOuHTb BO3MOKHOCTb NcIOJIb3OBAHnTrepeHaepeDeTbMn 6e3 Ha3Opa, pInHAB COOTBeTCTByIOUe MePbl.
14.3TO yCTPOINCTBO MOXET pa6OtaTb TOIbKO C BKNIOUeHHbIM 6NOKOM NITAHIA.
15.CneiNbTaTeM,HTo6bI TpeHpyOoiueceN dpyrNe Iua HIKoRda He nonaIaII KAKIMM-NIOO ChAeTmC BcOeroB cBOero TEaB 3OHy eIe DnKyU XNCx DeTaeJI NIN TO6bO OHn HE HaxoDInncb TaM.
16. B KOHc Cpoka CnyKbI 3OT npOyKT He DOJKeH 6blb yTNn3NPOBAH B DOMaunHne OTXoDbI, a DOJKeH 6blb OTdHa N c6OpHbI nyHKT yTNlN3aUIN nCNOlb3OBAHHbIX 3JeKtpuecknx N 3JeKtPOHHbIX np6OBpOB. Ha 3To yKa3BaIBaET CmBON b H npOyKeT, H nHCTpyKUnn no 3KnLyaTaUNn nn H yNaKOBke. BCE MATEPnaJI bMOYr 6blb ChOBa nCNOlb3OBAHbI cOrnacHO MapKnPOBKe. PnIOBTOPHOM nCNOlb3OBAHN, BTOPuHoi Nepepa60Ke Hnn dpyTHx FOpmAX BTOPuHORO nCNOlb3OBAHN cTApBx pNpOPOB Bb BHOCNTe CBQ BKNlaD B 3aUHTy OKpyauKe CpeBb. PoxanyIctA, y3HaIte B KOMMHyALbHM OynpAbLeHHn aDpc 6bn3NekaUero c6OpHOrO nyHKTa yTNlN3aUNn.
17.YuHTbIaB Tpe6oBaHnna 3KOJIoHN, He ydaJIaTb ynaKOBouHbMaTePnA,I3pAcXoOBOAHHbIe 6aTaapeNn N Detanl TpeHaKepe BMeCTc C bITobBIMn OTxOdAMn, a KNaCTb IN B npeyCMOTpeHHbIe dIra 3TOr0 KOHTHeBpeb- c6OpHKn nn CdaBaTb IN B COOTBeTcBYUOme NyHKtBc6opa yTNlbCbIpB.
18.3TOT TpeHaHexpeDCTabIeT c6obcnopTNBbHc Chapd,deN CTByUoN 3BaNCUMOCTN OCKOCTN, t.e.ero MOnHOCTb BoaPactaETNO Mepe YBeInuHnueHnAocToTb BpaueHn HnAo6Opot.
19.DaHHbI npn6Op RAJIeTc3aBNCmMbIM OT CKOpOCTN, t.e. C yBeHInNeHEmuNcIa 6OBpOTOB MOUHOCbYBEHNuBaETcN HAO6OpOT.Pnp6Op Cha6KeHΦHKpyEmoB V 10-MN NOLOKeHnxpeYlnPobKOi COpOTNBHeH,NOTOPAIO3BOJReTCHN3ITNbO NOBICITb TOPMO3HOE CONpOTNBHeHne N, TEMcABIM, TpeHINPOBOHyO Harpy3K.NPi 3OTM BpaSeHne pykN peYlnPobKbcnCONpOTNBHeH N B HApRaBHeH N CTyeH N 1 BeTe K CHNKeHNoTOPMO3HOroCONpOTNBHeH N, TEM cMbIM, TpeHINPOBOuHn Harpy3K.BpaSeHnepykN peYlnPobKcn CONpOTNB He H NaPabLeH N CTyeH N 10 BeTe KNOBbIeHNo TOPMO3HOro CONpOTNBHeH N, TEM cMbIM, TpeHINPOBuHOHaRpy3K.
20.Дунгимая Мakсимальнаг Harpy3ka (= Bec TeNa) yctaHOBNeHa B150 kr. Komnblotep npoewen nCbItahna u cepTnФикauHIO corlaCHO Hopme EN ISO 20957-1/2014 und EN ISO 20957-9:2016 „H/C" u EMC Directive 2014/30/EU.
21.Инстукции по сборе и Эхларуатци дожьп расматваця кадостыnpolyktа.Tд Камentаць Дожьп р dedoc tabлъс рп рдаоже ппrelдаче npolykta.
IpoKanyuCTa, BbHbTe BCE OTdEhbHbIe qACTn I3 KOpO6Kn npOBepBte IN HA KOMPiEeTHoCTb B COOTBeTCTBn CO cneuNkauaeNe. PpIMnTE Bo BHMaHne, YTO HeKOTOpBie qACTn PpeBaPHTeNbHO CMOHTnpObaHbI. BpeM yCTaHOBKn 50mHn.
WAR1:
MOnTaX IpepeDHeN 3aDHeN HoKeK (56+58).
- YctahOBHTe nepeHIOHOHXKY (56), cMOHTPOBAHHYIO CKONNAQKAMN TpaHCNOPTPOBOHyBIM 6LOKOM (55) HA OCHOBHYOPAMY (40) KPNKO pNkpyTNEe c nOmoIbIO KpenexhBx6oTobM8x45 (59), npyKHNbIX wai6 (32) noKnadhix wai6 (37) NKONaKOBblie raIKN (36).
2.YCTAHOBNTe 3aHIOHOKKy (58),cMOHTPOBAHHy c KOJIaayKAMM(57),Ha OCHBOHY pamy (40) n KpENKO npKNpyTnte ee cnoMoUbKOpeNekHBix 6oTob (59),npYKHNbIX Wai6 (32) NOkKnAdhIX Wai6 (37) n KOJIaayKOBblie rAIkn (36). (PiocLe TOrO, KaK Bblc MOHTPOBAJI NecB TepeHaepe, npAIBNbHObblCTaBtEKeOMNeHCATOpBI (57) HEPOBHOCn NOna.3TNMI BblpeDyPepNIte Hen peHAMEpeHHbIe DInBeHeHHa TpeHaepe BO BpeMHTpeHNPovBkn.)

UAR2:
MOnTaX WaTyH neJaH (97) n o6WnBka WaTyH neJaH (95).
- YctahOBInTe 7aTuH neDAnI (97) Ha 7aTuH 3aNnCb neDAnI (93) KpEnIO npKpyTne ee c NomOuBIO Kpe nexhhbix 6oTob M8x20 (9), npyKHHbIX uai6 (32).
- UctahOBHTe 6oWbKa WATyH neaJIn (95) Ha waTHy 3aIINcB neaJIn (97) KpEnK npnKpyTne ee c noMooub KopeNkhhix 6oTob M5x15 (102).
- Hadehhe Ta 06wnBka WAtyH neaHn (95) no oHn 3arnyuKn (94).
UAR3: CoeHHeHHe KOMbIOTepHOrO Ka6JIa (34) c ceHCOpHbIM Ka6JIeM (38) m oHTax onOpHoi Tpy6bl (30) Ha ochOBHyo paMy (40).
1.ПложнгБбЛТБМ8x20(33),noДКlaДньIeшaIb6I(31)И npyKINHHIe shaIb6I(32)pAdomcpepeHneuactbIOOCHOBHOpaMbI(40).
2. BCTaBbTe HnKHHIO qACTb ONOpHoi Tpy6bl (30) B OCHOBHyO pamy (40),HaedeHbTe pe3nHOBoe KObIoo (100) n 06wnBka ONOpHoi Tpy6bl (101).
3. CoeHNHTe KOHbI obONX KOMNbOTepHBIX Ka6eJe (34-38), BbIXOJaIe n3 (30-40). (BHMaHHe! BbIXoJauN i3 onOpHOr Tpy6bl (30) KOHeKoCMnBtOePHTORO Ka6eJIa (34) He JOnJIeH 3aJaIaTb B Tpy6y,T.K. OH Bam eue noHaDoBntc npn nocNeIyUoeM MoNTaKe).Takke o6paTne BHMaHHe Ha To, YTObI npn CoeINHeHHITpy6 KOMNbOTepHBie Ka6eJIH He bbln 3aKaTaBl.
4. PpOBeHnTe KOHbI peryNIpOBKn conpoTnBHeHn (39) KKe-NeHnTOPOBOB TARs (35) n CoeHNHTe IN dpyr C dpYROM, KaKNPpeCTABLeHO Ha pcyHKax A1-3. PeryNIOBky BcoPOTNBHeHcyTAHO BnTe TaK, YtObI TARa C rONOBKO BbIXoJHn KaKMOXHO DaJIbue N3 O6uINBKn. Iocne yero 3aCenITE rONOBKYHa KOHc TE TANr peYInpOBKn cPoiPTNBHeHn (39) HA KpUoyK, HxOJaunCnHa KpENNEHn TPOCOBOB TARn (35) (Pnc.1).IOTaHnTE BcO ONOpHy TpybC nPnIeJHnHO rONOBKoTHyBEBPx TAK, YtObI KpUoyKn B KpENNEHn NEPEMeCTnNCbHaBepx (Pnc.2) n O6uINBkA KpENNEHn 3actOnopnAcB (Pnc.3).
5. HadehbeHa KaKdbi 6oT (33) no OJHO npyKnHHO WaiBe (32) n OJHO NpKlaHNO WaiBe (31) n BCTaBte ONOPHy Tpy6y (30) B OCHOBHyO pamy (40). BCTaBte 6oTbI (33) B OTBepCTnN 3aTAHnte.
6.BCTABTe 06WnBky onOpHou Tpy6b1 (101) cpe3nHOBBIM KOJbUOM (100)Ha npEynCMOTpeHHoe MeTO B NOLOKeHN.

UAR4: MoHTaXpyKoTOK(5),HOxHbIXpbHuArOB(44)NcoeHNHTeBHeIe Tpy6bl (25).
- BctabTe pykoAtKn (5R) Ha coeHNHtBHeI Ty6bl (25R) TaKIM 06pa3OM, YTO6bl OTbepCTn paCOnaRaIncb Dpyr HAd Dpyrom. (BHHMaHne! PyKOAtKN MOHTpOyOTcTak, YTO6bl BepXHne YaCTn paCXoDInCb OT onOpHTo Tpy6bl (30).
2.BCTABBe 6oNTbI (33) B OTBepCTnN KpEnKO npnKpyTne pyKoRTKn (5R) C nOMOsbIO NOkLaAdhbx Wa6 (31) N pnyKHHbIX Wai6 (32). - PpIIOKHTe HOXHOH pbUar (44R) Ha coeINHtEnbHyIO Tpy6y (25R) TaKIM O6pa3OM, YTO6bI OTBepCTn paCNOlarAInCb Dpyr HAD dpYROM.
4.BctabBe 60ntbM8x78 (23)BOTBepCTnH npHKpyNTHe HOHNb bHaar (44R) c nOmoUbIO NOKJIaDHbIX Ma6 (27) n Raek (26) K coeMHNEbHOH Tpy6 (25R). (3To 60TBoE coeINHeHne npHKpyNTb HeKPENKO, TOIbKO yTO6bl OHOJeKBOBraNocB). - Правьй HOхноу рыuar (44R) И павую coeMHHTeBHyTOpy6y (25R) NOLOKHTe Ha npabvYIO CTOPOHy OCHOBHoi pAmbl (40). (BHMnHe!правь стора НОДРаЗУМeBaEТСИ NОLOXKeHЯ CTOR Ha TpeHaxKepe npri TpeHnpOBe.)
- BCTaBte 0cb (19) nocepeDnHe B onopHyTO Tpy6y (30), HaJeHbTe NODKlaDHyO Wai6y (20) nNoce 3ToTc OoeDHHInTe bHyIO Tpy6y (25R) Ha 0cb (19). HaJeHbTe Ha 6oJI M8x20 (12) npYkHHyO wai6y (32) n oD- KlaDHyO wai6y 8//32 (22) BkpyTne 0cb (19) ONOpHOI Tpy6bln KpeNko npNKpyTne.
- HadehTe npabBHOxHOb pBuAr (44R) Ha npabB uATyN neaNN (97) n npKpyTte C NOMOsbK PKeIeHne KaHaTHoRo 6loKaNoKnlaHOn Ma6b8 I//20 (49), npXHHoH Ma6b3 (32), KpennHe N KaHaTHoro 6loKa (52) n 6oNTOB (48).
8.CMOHTnpyTeJeBbHHOxHoIpbUar (44L) npn NOMOuCBeX Heo5xoDmBix YaCTeK N BoBc TcPOHe TpeHaKepeKa Kc ONCaHO BbIe BnyHKTx 1.-7.
9.CBxKTeKa6eIyNbCa(10+16)Ha-DeHbTe 3aRnyuKy (11)Ha6oT(12).
LJAR5:
MOnTaK npaBoro fHKcatopa (43) Ha HOxHoN pbUar (44).
- PnncTaBBTe npabBbФmKcTOp cTOnbI (43R)Ha npabBb HOxHOBpHbAar (44R) TaKm OpbzOM, TcO6bl OTBePCTBa pACoNOraJIINCbDpy HAD dPyROM.
2.BctabBe60ntbM6x50(42)cbepxyBOTbepcTna. Hadehbe Co6paTho CTOpBo OHy NpKaAaHyo Waiy (45),OHy npKunHHuWaiy (46),BkpyTnTe rpi6koByraKy (47) u Kpenko3aKpyTne.
3.CMOHTpyuTe JeBbI ΦHKcTOp CTOnbl (43L) HaJeBbI HOKHOpBuHaR (44L), KaK OINcaHO Bblwe BNYHKrAa 1-2. (BHMaHHe! IaIpaJNHyI npABORIO NLeBOrO FHKcTOp aCTOnbl (43R+43L) 6opATne BHNMaHHe Ha BaICOTy KaHTa. BbICOKn KaHTdoJIKeH 6bltC BHYtpEHHeNCTopoHbI, t.e. 6lnke K OCHOBHOpaMe.)
LAR6:
MOnTakn npuyne (3) Ha onopHyo Tpy6y (30).
- HaedeHbTe Ha 60JIbM8x20 (33) no oDHoHryToi noKlaHOnuaiBe (31) n npyKnHHUo uai6y(32).
- Hadehhe Ta Ha 60ntb1 (33) n KpeKIO cMOHTnpyTe npuyehb (3) Ha onopHyTO ty6y (30).
- YctahOBInTe 06uINbKa pyIa (18) Ha npoyueHb (3) KpENK pNkpyTne ee c NOMOuBIO KpENeKhhbx 6oIToB M5x15 (102).
L7:
MOHTAX KOMnbIOTepa (1) Ha onophyo Tpy6y (30).
- Bo3bMMte KOMlbIOTeP (1) n BCTaBtBe CoeINHmTeNbHn Ka6eBn (34) cO6paTHoN CTOpOnbH KOMMbTOpeA (1).
2.BCTaBbTe Ka6eBnynbca (16) B COOTBeCTByIOUe THe3do HAKOMNbIbTepe (1), nPnIOXnTE KOMNbIbTepe (1) Ha KpEnJIeHNeKOMNbIbTepe, HaxOJaueCeC CBepxHa onOpHn Tpy6e (30), mnpKnpeIteero C nomooubo 6oNTOB M5x10 (15). (O6paTMe BHNMaHHe HA To, YTO6bI Ka6eB He 6bl 3aKaat.)
LWAr 9:
KoHTpoJIb
- PpOBepBte Bce CoeDHeHnHa NpaBnIbHoCTb C6OpKn I npOBeNtte PnpOBepKyfHKUHOHaNbHoCTM. PnTOM MOHTak CHNTAETC3aKOHHeHbIM.
- EcnB BCE B npaJKe, npoBeDnTe npo6HyIO TpeHNPBOK pnpMaJIeHbKO HApy3Ke, INHdNBUyAaBHO HAcTpOte TpeHaeKep.
3ameyahne:
PokanyIcTa, coxpaHnIte Ha6Op INHCTpyMHTOB IJN NOcNeIyOuX BO3MOKhBxpeMOHTOB INHCTpyKUIO NO MOHTaKy
NCIOJIb3OBAHNE TPEHAJKEPA
CauTbcn Ha TpeHaxKep:
BCTaHbTe pIaOM c TpeHaKepeom N Bo3bMntecb 3a npOyHH. UcTaHObIne 6bnKaIuyo neAalb B HnKHeIO No3HnIO N NOCTabTe Ha Hee CTynHIO TaK, YTObI OHa HaxOuNacb B HAdEeKHom NIOJooHeHH Ha neJaII. IpeKeINbTe dpRyIO Hory Ha npOTnbONIOxHyIO CTOpOHy HOCtABTe CTynHIO ha neAalb. KpenKO depXnTecb npn ATOM DBym pykAmn 3a npOyHH.
NoB3OBAHHe:
DepxntcB DBym pykamn Chayana 3a CkOby B ydo6Hom dIa Bac MeCTe n WaarTne PpN ONDOBpeMeHHOM nepeHOce Beca C OHOH NeaHn ApyrTyOtaKIM bpOAm, YTObbl ToJbKO pRtKa HEMHO npINOpHMmaLacb OT neAIn N OcyueCTBIAIOCb paBHOMepHoe DBHXKeHne. IyOn ONDOBpeMeHHo TpeHnpOBKn BepXHe qactn Tea daepxntcB3a DnBHyuieNCPnyHn cnpBaN C yBeJIuHeneH mIyMeHbSeHHN CKoPCtN tTopMO3HOrO cOpPOTNBHeHn MOxHO perYIpOBaBt hTEHCNBHOCTb TpeHnpOBKn. NoctOHHo DepxntcB 3a CkOby nI npoyHn BO BPEm TpeHnpOBKn.
Cnyckatbca c TpehaXkepa:
PpekpaTne TpeHnPOBky, KpENKO DePKAcb 3a HEnoDBNHHle NOpyHN. Chmnte Chauana OHy CTynHIO C neDAnI N NoCTaBBte ee HaDeKHom nOLOXeHN Ha NOI. Chmnte NOTOM DpyrYIO CTynHIO C neDAnI N NoCTaBBte ee HA NOI cOaNITE M TpeHaxpe. 3OT TpeHaxkep - HEnoDBNHHbI DomAwhNI TpeHaxep, IMNTnpYIOuN CuohTaHne E3dBi HA BEnOCUNPe, 6eRa N 3aHrTHI HA CTennpe. I3-3a TpeHnPOBKn pni IIO60I NorOde, 6e3 BHeUHX BO3dEiCTBNI, a TaKKe 6e3 DaBHeNn npn E3e B rpynn YeMehBwaetcBepoAHTocb NaDeHn n NepeyTomLeHn.
H3-3a BO3MOXHOCTN 3MeHeHHa COnpoTnBHeHHa, CoeTaHne e3dHa BEnocnpe, Gera n 3aHrTn Ha CTennpe npdeOCTabHETBO3MOXHOCTb TpeHPOBKn cepDeuHO-COCyDnCToCnCTEmb63Uepe3MepHO rHanpRKeHHa. PnT 3OM BO3MOxHa BoOEe HmEHe HHTcHCBHAA TpeHPOBKA. PnT 3OM TpeHpyTOc BepXHe HnKHXHe KOHeHcTOH, YKpePnAeTc cepDeuHO-COCyDnCTa CHCTema NcNoCo6CTByTeC NODepeKHaHe XopoWe cnOpTNBHOf OOpMbI.
TpaHcnpTnPOBka:
Ha nepeHHe HoxKHe HaxOaTcB DbTa TpaHcNopTpOpBOuHbIX pONka.
Toro, UTo6bI nepeBHyb TpeHaepe Ha dpyroe MeCTo IIN
NOMeCTNb Ha MeCtO XpaHEnH, BO3bMNTecb 3a PybI HAKIOHnTe
TpeHaepe Ha nepeHIOHO HOKky TaK, UTo6bI TpeHaepe MOxHO 6blIO
nerko nepeBHyb C NOMoUbHO TpaHCNopTpOpBOuHbIX pONkOB Ha
hyHXoe MeCtO. (BHmAHme: Ecn TpeHaepe He OcaUeH pyIem,
ocTopoXHO nepeBnraite TpeHaeep 3a npuyHN.)

BxOJnB KOMnIeKt ObOpyIOBaHnChapraKa KOMnbOTep oBeCneYnBAM MaKcHMajbHbIK KOMΦoPT BO BpEma TpeHnpOBKn. Ih6oB BaxHBn DnTpeHnpOBoHOrO nPoUeCa NOKa3TeNb OTPaKaTeCnHa dncnnee.
C Hauanom TpeHnpOBKn Ha DnCnlee BbcBueHbAIOCTc Heo6xoDnMOe BpeM, KaTtueckaCKOpOCTb, npImepHbI paXoJ KAnOpN, npoi DeHHoe pacCToRHe N PyIbC TpeHpyUoeroCA B MmOeHT ChATNa NOkazAH. OTCeT Bcex 3HaueHn HaunhaeTc OT C yCTaHOBKO ceta Bnepe.
KOMnbIOTep BkIOHuaeTc npOCTbIM HaJxATHeM KHONKn "F" nIN npOCTc C HAJAMOp TpeHNPoBKN. KOMNbIOTep HauHnAeT OTCyET BCEx NOKa3AHn I OTObpaKaTaN Hx HnCnIe. YTo6blOCTaOHOBtB KMNbIOTep, Heo6XODIMO npOCTO 3aBePpBt TpeHNPoBky. KOMNbIOTep octaHaBnBAe BCE n3MepeHn I dEmOHCTpnpyET KOHeUhie pe3yIbTaTb.Cambl NoCneHnpe3yIbTaTb FynKuIN BPEM, KAIOPN IN KNLOMETPAK 3aHOCTBa NAmrTb, n pRn BO3o6HOBLeHN TpeHNPoBKn Bbi MoKeTe HauTa C 3THnx NOk3aTeJIe. KOMNbIOTep ABOMaTHueCKN OKIOUaetc PnIMPeHNOpe34 MNHyTb Nocle OKOHuaHn TpeHNPoBKn. Bce DoCTNHytBdo 3TOR NOk3aTeJI.
DHCNIEN:
1.LncnneJ,ZEIT"(Bpema):
Ioka3bIaerФakTnueckn 3aTpaueHHoe BpeMn MmHytax n cekyHdax.C NOMOuBko KHOONK "MOKHO pneDbapntelbo 3aadtb onpepehen HbienoKa3aTeEN. EcnB Bbl 3aJANOn ppeJeNHeB OpeMn To yka3bIaE tCBAPEM, octBaWeecn Do 3aAHHOR npeDena. KaK TOLbKO YkazAHn PpeEnDoCTNRHT, TyT He pa3DaETc AkyCTnuEckn CnHAn. Ipon3BOIDTC 3aNNCb B nAMrTaNoCNEHn Pe3yNbTAToB BTOYfHKnn. (MaKcImMaBHa rpaHnca nok3aTeJIg 99 MNHT.)
2.Lncnnei"KM/H"(KM B yac):
Noka3bIbaeTcA qaKTnueckN DOCTnHHTaR cKOpocTb B KNIOMeTpax BAc. HeB03MOxHO npEdBapntbHo 3aDtB C NOMOuBo KHONK, E"ONpeDeHeHHo NOKa3aTeNb. 3aNNcB B NaMaTb NocJeHnx pe3yNbTaTOB B3- Tof yHKnn H ne npOn3BOdntc. (MaKcMmAbhA rpaHnua Noka3aTeJI 999,9 km/4ac)
3.Incnnei, KALORIEN" (Kanopn):
Yka3bIaETcKaKTNueCKeO KJIuYeCTBO I3pACXODoBAHbIX KAOpN. MoKHO npEaBapHTeJbHO 3aTb OnpeJeHHb NOKa3aTeB B 3ToI- OyHKU C NOKKn "E". Ecn Bbl 3aAaN ONpeJeHHbNOKa3aTeB,TO Yka3bIaBcTc KOJIueCTBO OCTaBUnxCR Do 3aDaHHOTnpEJa KaOpN. KaT ToIbKO Yka3aHbN I pPeDen OocTHHyT,TO TYtKe Pa3DaTc AkyCTUeCKn CnHaN. 3AnCb B NaMBy NocDeHNxpe3yNbTaTOB B 3ToI OyHKU IN POn3BODnTC. (MaKcMaJIbHaR rpaHnua NOKa3aTeA 999,0 KaOpN)
4.Lncnnei, KM" (Knlometpa):
Ko3aBaeTcKoJIHcTeBO npOeHHbIX KINOMeTPOB. MoXHOppeBapIneBHO 3aDtB ONpeJeHnBIO K0a3aTeB B 3ToI ΦyHKuIN CmOMOB KOHNK +" +." EcnB Bb 3aDaniOnpeJeHbN IOKa3aTeB,TO yKa3bBaEeCTKO KOIeCHeBO OCTABuNNcR DO 3aDaHHORo ppeJenaknOMeTPOB. KaT ToIbKO yKa3aHHBI ppeJEN DOCTURHT, TO TY Jkepa3aTeC AkyCTMecKNI CHrHaI. PpOu3BOIMTC3AnMCB B NaMaTbNoCleHnpe3yNbTaTOB B 3ToI ΦyHKuIN. (MaKcImaJIbHra rpaHnua NOKa3aTeA 999,9 KM)
5.LncnnePULS"(NYlbC):
EmohctpnpyetcpaKtnechoe coCToHnne npbca B ydpax B MNHyTy. C NOMOuBKO KHOKN "E"MOKHO ppeBaPHTeNbHO 3aDAtb ONpeDe-HeHbienoka3aTeN. 3aNcB namrB nocLeHNx pe3yIbTaTOB B aToi OyHKUNHe Ipon3BOJNTc.(MaKcMuaHBaR rpaHua nokaTeJIa OT 40 do 22 ydapOB MHNyTy)
BHMaHne:
IIN3MepenHyIbCa Heo6xOdmo OAnHOBpeMeHHo B3rTbc 0eHNMy pKaMn 3a 06e KOHTAKTHIe NOBEPXHOCTn HA KOMNbIOTepe. PpN 3OTOM KOHTAKTHE IOBEPHXOCTn DOJIKHb I HAXOITbc NO cepeHHe BHTpeHHe CTOPOHb IaNoHei.
6.FyHKnua,SCAN"(DemohctpaunBcex nokazann no oupeen): EcnBbBupaetc 3a FyHKnua,TO B INTEpBaJe npImepHo 6 cekynD,NOCToHHO CMeHApry Dpyra,DMOHCTpPyIOTC NO oupeen Do CTNHTbienOKaTeEN BCEx FyHKnua.
7.Jncnnei,STOP(CTON):
Hdkaunr cTOn MOyca.Bo3MOxHeBBOD daHHbIX
KHONK:
1.Khonka,F"(Функця):
KOPOTKIM ODHOKPATHBIM HAKATHEM KNABUNI MOHNO NEPEXOHTB OT OHDHOYUNI K DpyrO,TO ECTb BbHpaETC COBTBcTByUoAa YHNUKNY, BKOToPYU C NOMOJbIO KHONIK, E" BBOATcX JEAeMaBie
2.Khonka,E"(BbOd daHHbx):
OJHKoPbTHbIM HAKxATnEM KONKIN PPON3BODITc BBOd 3HauEHNI TOHN NIOH FyHKUIN. JI TTOR C NOMOuBIO KONKIN "Heo6xoDMOpneBapntelbHO BbIbpat bKeJaemyo FyHKUIN.
Bonee IInTeIbHbIM HaxaTneM HnHcunpyetc CKopocTHoH peXIM BBOda,OCTaHOBNTb KOTOpbMIoKHO NOBTOPbIM HaKaTneM.
3.Khonka,L"(ydaeneHne daHHbIX):
KOPOTKM HAKATNEM 30T KHONK MOKHNO YCTAHOBNTB BBIOPAHHBI NCMOOMUH BO KHONK "NOKA3aTeNb HA HOJI. COOTBETCTBYUOJN NOKA3aTeNBbICBEHNAEETCAH DMCIIIE.
3aMeHa 6aTapei:
- OtkpoTe KpbIbKy 6aTapeHoro OTeKaN ydaJIte NcNoJIb3ObaHHbI BatapeHKn.(EcIn 6aTapeN pa3raDnncB, ydaJIte nx nOd yBeINuHnacb, yTuTBaR, yKeCNToHra 6aTapeHe HaxoNDTCB KOHTAKTE KOKe npXoJrN tUaTeNbHO OHCTNE 6aTapeHHbI OTcEK.)
2.BctabBe HOBbIe 6aTapeKn (TN (AAA) 1.5V AA B npabHbHom noPpKne INpHIMMa BO BHIMaHne NOJIrpHOCTB B AKKyMylrTOPHOM OTcKeEN NOkIIIOUeHne KpbIka 6aTapeHOrO OTeKa TAK, YTObI OHa3aΦHKCPOBaNacb Co UeNJKom.
3.Ecnn KOMmbOTep He 06 3ToI yHKunn CneDyET BaTApEn ydaJIaHTCnB TeueHHe 10ceKHyN n CHOba BCTabJraTeTc.
4.YTNIN3Npyte pa3pRjEHHbIe 6aTApEN B COOTBETCTBUN C npPeDnCaHNAMNDOJIKNHbIM O6pa3OM N He daHOT OCTaTOUHbIE OTXOdbI.
BatapeHbIOTcK
6aTapeiKn AAA
1.ЧИстка
IyHCTKINNCIOJIb3yIeCPTYIOBIAKHyIOCaIpETKY.BHNMAHHe: HIKoTaHE NcNOJb3yIe TdN AYCTKIN 6EH3nH,pa3GABNTEn bIn DpyrHne arpeCCNBIe HICHTAIRE CpeDCTBA,KOTOpBEIO NOBpeDITb NOBepXHOCTb.TpeHaKepe PpeHa3HAueH ToIbKO IdoMaHero NCIOJIb3OBAHH B nomeuHenn. IpeDOxpaHnRE Tpe-HaKeP OT cbIOCTN nblnn.
2. XpaHeneHte TpeHaXepea
BbHbTe 6aTapeHKn, eNn npnbop He nCOnb3yTc B TceHne 6oOee Yem 4 HeDn. IocTabte TpeHaKeB C cyXoe nMeueHne n pacblnte HEMORo MaKn Odoctyn Kcn o WapnHpb. TaKke K pe3b6 KepeKHeBx BNTOB npykN nTy6Kn cndeHb. HakpoIte TpeHaKeP, tOsbI 3aunTb erO to cJlHeuHbI Lyueh Nbln n 3TM npedobpaTb n3MeHeHne OKpacki.
3. Texnueckoe obcnyuBaHne
Mb peKomeHyem nocne kakdbix 50 cAcob noIb3oBaHn npo- BeprB 6OToBbie coeHHeHn nocne kaKdbix 100 cAcob noIb- 3oBaHn cMa3bIBaT bocn u wapHnpbl MaCnOM n3 paCnblntela.
INCPABLHEHENOJAOK
Ecn np6leMa He MoKeT 6bIb peWeHa c nOmoBIO HNKeCToUx YkaaHn, noKaanyIcTa, o6paTInTeC b UeHTp, rde Bbl Kynnn TpeHaKeep.
90% OT MaKc. YacToTbI Nylbca = (220 - Bo3pact) x 0.9
85% OT MaKc. yAcToTbI nylbca = (220 - Bo3pact) x 0.85
70%OTMAKc.yactobIyIbca=(220-Bo3pact)x0.7

YUNPAXKHEHNAJRAPA3MHNKNIPEEDTPEHNPOBKOJ
HaHHTe pa3MHky C xOdbbHa MeTe B TeueHe 3 MHyT. NocIe 3TORo BbINHnTE CLeDyUoJe ynpaXHeHn, KOtOpBle nomOryT Bam ONTHMaIbHO NOIroTOBnBC K TpeHnPOBe. Bo BpemBaBIOJIHeHn ynpaXHeHn Bbl He DOnJXbI NCbITbIBaT b60nb. BblONHnTe ynpaXHeHne DoNoRBAHnTRHYuero UYBCTa B MbIwue.


BctaHbTe poBHO n 3aBeDnTe OndHy pyKu 3a roNoBy. BToPlyo pyKu noLoXnTe CbePxy, Bo3bMntEc b3 aNoKoTb N NoTnHnTe D0 oUyueHHN pactJKeHHN Tpuenca. OctaHbTeB b3OM noLoXeHHN Ha 20 ceKyHd, nobTopnTe dpyroynpkoi.
Haknohntecb BnepeI He cIb6aHor n NonbitaTne TocTaNblaBcAmpykdo nona.BbnOnnHnre ynpaxHeHne 2 p3a no 20 cekyHd.
CaybTe Ha non N BbITAHHTe Ody Hory. HakoHNTecb Bnepei n no npObyte DoCTaTb CTynHIO. BblnHnIe YnpaXHeHne 2 p3a no 20 ckyHd.
BNoIoxKeHHn 1HpOKOro Bbina- aOboOnPiTe cyKaMn B noN n ToHnTeMbUeHbHor. Ype3 20 CeKHyD nomeHre HOr.
Iocne pa3mnHKn noTpncnte Horamn npKaAM, yTo6bl paccna6ntb Mblu. He npekpaanTe TpeHnpOBky Bhe3aHNo. ChaJa yMeHbWnte Temn TpeHnpOBKn, yTo6bl nybc onyctnncra do obbyHoro noka3aTeJr. Mbl peKoMeHdyem B KOHe TpeHnpOBKn CHOBA BbINOHNtB KOMJIeKC ynpaxHeHn dJa pa3mnHKn. (Cool down)
CNEUΦUKAUN - CNICOK 3APACHbIX YACTEAX 6000
№ 3aka3a: 2008 TexHnueckne xapaKTepeNCTNKu: 17.06.2021
MarHHaCnCTemaHarpyKeHn
- INHHePcUHOHHaMaCCa 8Kr
10 ypOBHeHarpy3Kn
3 cTeeneHn perylnpOBKn neaJe
-Измеренипльба датунами На руковский.
- TpaHcnpTIpOBOUHbIe poliKn BnepeDn
KOMNbIOTep cHnDnKaUnei CLeyDIOuINx napameTpoB:BpeM,ckOpOCTb,IcStaHcUa,piu6I.pacXoJkAloPnIyIbc nSCAN
Bo3MOxHocTb 3aDaBaTb Co6CTBeHHbIe npaMeTpbl: BpeMa, DnctaHcIa, npu6JI. pacXoJ kALOpN mAKC. nylbc.
- N3BeueHHe O npEeBbIeHn 3aDaHHbIX npaMeTpO8
MaKcImaJIbHbI Bec noJIb3ObaTeJr:150Kr
3TOT KOHBeHep KToIbKO dIy qactHO nOcbactn cnopta Doma KaKetc Hne Iy npomblIeHHORIO nnKOMpeueckoro NcNoB3oBaHmN noXoJdAun. HcNoB3oBaHne cnopta Doma KlaCC H/C
CnB ynaKOBky, npOBepbTe no cnNcKy, BCE nI deTaN Ha MeCe. EcnB BCE B nopAKe, To MoXHO hauHnHaTb c6OpKy. Ecn KaKoH-NbYdb arperat He B nopAKe NnOTCyTCTByET, ObaaainTeCb K Ham:
© by Top-Sports Gilles GmbH D-42551 Velbert (Germany)
