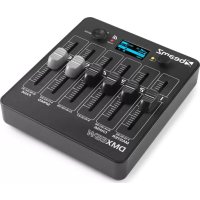
DMX65W - Controller BeamZ - Free user manual and instructions
Find the device manual for free DMX65W BeamZ in PDF.


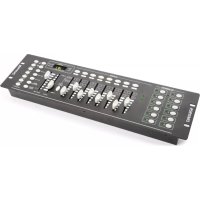
| Product type | DMX controller |
| Brand | BeamZ |
| Model | DMX65W |
| Power supply | USB 5V/1A or built-in rechargeable battery |
| Number of DMX channels | Up to 30 channels |
| Wireless DMX transmission | Yes, 2.4 GHz (transmitter) |
| Wired DMX connectivity | USB and RJ45 (Ethernet) outputs with included XLR cable |
| Screen | OLED with display of channels and DMX values |
| Faders | 6 channel faders (1-6), master fader, chase fader, speed fader, transition fader |
| Joystick | Yes, for navigation |
| Chase creation | Up to 8 chases of 15 steps each |
| Timer function | Automatic on/off programming per chase |
| Password protection | Yes |
| Screen saver | Yes, with delay setting (3-255 seconds) |
| Operating ambient temperature | -5°C to +45°C |
| Usage | Indoor only |
| Cleaning | Non-linting dry cloth |
| Approximate dimensions | 200 x 150 x 50 mm |
| Approximate weight | 0.5 kg |
Frequently Asked Questions - DMX65W BeamZ
User questions about DMX65W BeamZ
0 question about this device. Answer the ones you know or ask your own.
Ask a new question about this device
Download the instructions for your Controller in PDF format for free! Find your manual DMX65W - BeamZ and take your electronic device back in hand. On this page are published all the documents necessary for the use of your device. DMX65W by BeamZ.
USER MANUAL DMX65W BeamZ
WARNING! Before carrying out any operations with the unit, carefully read this instruction manual and keep it with care for future reference. It contains important information about the installation, usage and maintenance of the unit.
Unpack and check carefully that there is no transportation damage before using the unit
Please read these instructions carefully and follow the instructions.
Observe all safety warnings. Never remove safety warnings or other information from the equipment.
- Be sure that no ventilation slots are blocked; otherwise the unit will overheated.
WARNING! Before connecting the equipment to the power outlet, first verify that the mains voltage and frequency match the values specified on the equipment. If the equipment has a voltage selection switch, connect the equipment to the power outlet only if the equipment values and the mains power values match. If the included power cord or power adapter does not fit in your wall outlet, contact your electrician.
After connecting the unit, check all cables in order to prevent damage or accidents, e.g., due to tripping hazards.
Make sure that the power cord is never crimped or damaged. Check the unit and the power cord from time to time.
Always disconnect power from the mains, when unit is not used or before cleaning! Only handle the power cord by the plug. Never pull out the plug by tugging the power cord.
Unplug the power cord and power adapter from the power outlet if there is a risk of a lightning strike or before extended periods of disuse.
- Do not switch the unit on and off in short intervals.
- Do not connect the unit to a dimmerpack.
Install the unit in a well ventilated place.
Always allow free air space of at least 50 cm around the unit for ventilation.
Make sure that the area below the installation place is blocked when rigging, derigging or servicing the unit.
This unit is not designed for permanent operation. Consistent operation breaks will ensure that the unit will serve you for a long time without defects.

WARNING! If the power cord of the unit is equipped with an earthing contact, then it must be connected to an outlet with a protective ground. Never deactivate the protective ground of a power cord.
Make sure that the unit is not exposed to extreme heat, moisture or dust.
- Clean the unit using a dry cloth.
This unit is designed exclusively for indoor use, do not use this equipment in the immediate vicinity of fluid (does not apply to special outdoor equipment - in this case, observe the special instructions noted below). Do not expose this unit to flammable materials, fluids or gases.
If the unit has been exposed to drastic temperature fluctuation (e.g. after transportation), do not switch it on immediately. The arising condensation water might damage your unit. Leave the unit switched off until it has reached room temperature.
- Never attempt to bypass the thermostatic switch or fuses.
- Do not dismantle or modify the unit.
- For replacement use battery of same type and rating only.
- Repairs, servicing and electric connection must be carried out by a qualified technician.
The ambient temperature must always be between -5^ and +45^ .
If this unit is operated in any other way, than the one described in this manual, the product may suffer damages and the warranty becomes void.
- Plastic bags must be kept out of reach of children.
Unit must be installed out of the reach of children. Never leave the unit running unattended.

This symbol on the product or on its packaging indicates that this product shall not be treated as household waste. Instead it shall be handed over to the applicable collection point for the recycling of electrical and electronic equipment.
By ensuring this product is disposed of correctly, you will help prevent potential negative consequences for the environment and human health, which could otherwise be caused by inappropriate waste handling of this product. The recycling of materials will help to conserve natural resources. For more detailed information about recycling of this product, please contact your local Civic Office, your household waste disposal service or the shop where you purchased the product.
UNPACKING INSTRUCTION

CAUTION! Immediately upon receiving the product, carefully unpack the carton, check the contents to ensure that all parts are present, and
have been received in good condition. Notify the shipper immediately and retain packing material for inspection if any parts appear damage from
Shipping or the package itself shows signs of mishandling. Save the package and all packing materials. In the event that the product must be returned to the factory, it is important that the product be returned in the original factory box and packing.
If the unit has been exposed to drastic temperature fluctuation (e.g. after transportation), do not switch it on immediately. The arising condensation water might damage your unit. Leave the unit switched off until it has reached room temperature.
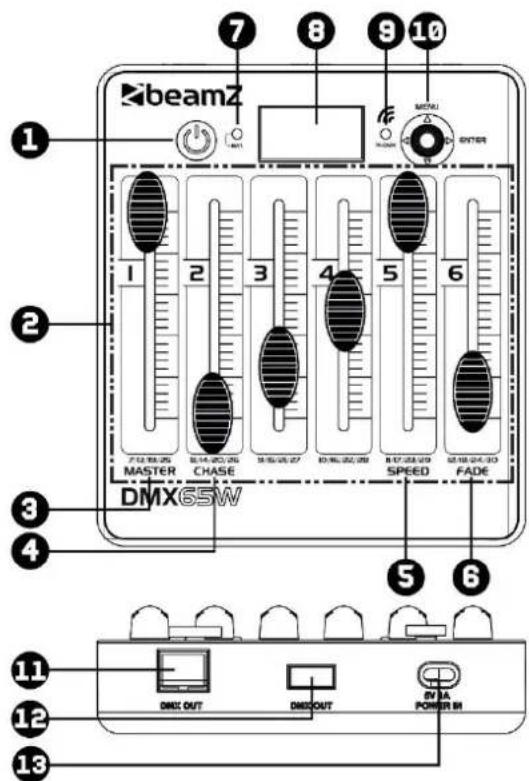
OVERVIEW
- Power On/Off
- Fader channel1-6
- Master fader
- Chase fader
- Speed fader
- Fade fader
- LED indicator battery
- OLED Display
- LED indicator Wireless DMX
- Joystick
- DMX Output RJ45 Ethernet
- DMX Output USB
- Power input 5Volt/1A
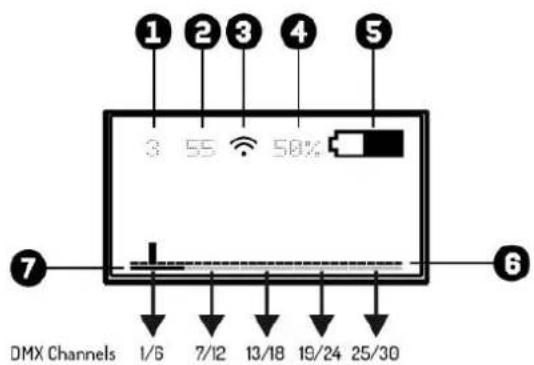
DISPLAY
- DMX Channel
- DMX Value
- Wireless DMX Indicator
- Battery capacity in percentage
- Battery capacity indicator
- Overview of DMX Channels 1-30
- Select DMX channel group (per 6 channels)
WIRED DMX
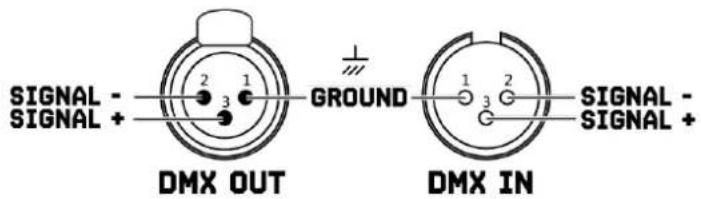
For a higher level of operational reliability, it is advisable to carry out your lighting installation wired. Use the XLR-RJ45 cable (included) or an XLR-USB cable (not included) and connect the DMX line to the first DMX device. The DMX line is always transmitted as a serial data stream from one connected to the following device via the "DMX IN" and "DMX OUT" connectors (XLR connectors) which can be found on every DMX device.
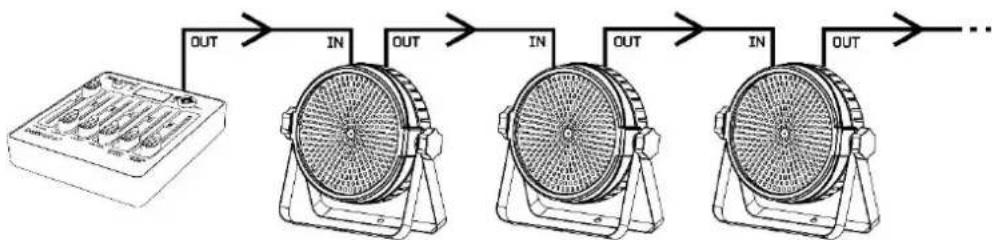

CAUTION! At the last unit, you must close the DMX line with a terminating resistor. Take an XLR connector and solder a 120 Ohm resistor between signal (-) and signal (+) and connect it to the DMX output of the last unit in the line.

WIRELESS DMX
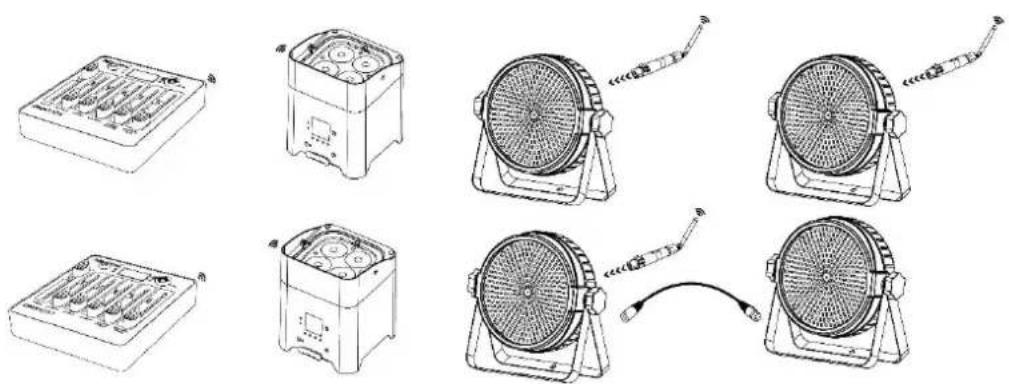
This controller has a wireless DMX transmission on board which operates on 2.4Ghz frequency band. The controller acts as a transmitter and needs a receiver (item 154.077 BPP Wireless DMX Transmitter/Receiver) or Beamz fixture with built-in 2.4Ghz DMX transmission.
To activate wireless DMX:
Press
Note: Keeps DMX address standard at value "1", in complex installation you can change start address
Select
and confirm with button. Select
and press <▶> button to switch between "ON" and "OFF".
Ready? Go back to the "main" menu with <▶> button.
To select DMX universe:
Press
and select DMX Universe colour you want to use.
| DMX UNIVERSE | COLOUR | DMX CHANNELS |
| 1 | Red | 1 - 512 |
| 2 | Green | 1 - 512 |
| 3 | Yellow | 1 - 512 |
| 4 | Blue | 1 - 512 |
| 5 | Magenta | 1 - 512 |
| 6 | Cyan | 1 - 512 |
| 7 | White | 1 - 512 |
Note: If you want to turn off the LED indicator near the display, you can easily do this by going to
Operation examples:
CREATE A CHASE
With this controller you are able to create 8 different chases with 15steps each, play chase with adjustable speed and fade time.
Create your own chase:
Press
Before we go further you need to know each function in OLED display:
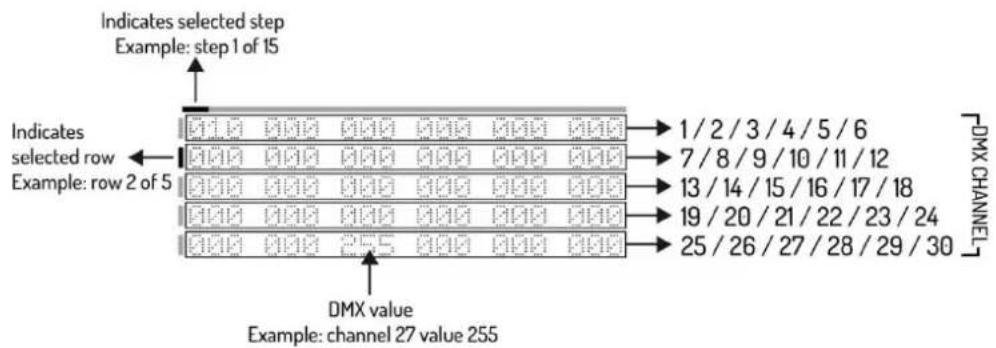
Select DMX channel with < > button and select DMX value with the fader corresponding to the DMX channel.
Select step with <> button and repeat the above step up to a maximum of 15 steps.
Note: Last step must be confirmed with
Ready? Go back to the "effects" menu with <> button.
PLAY CHASE
Play your own chase:
Method 1:
Press
Method 2:
Press
Ready? Go back to the "effects" menu with <▶ button.
DELETE CHASE
Delete your own chase:
Press
Note: This step cannot be undone!!
TIMER FUNCTION
This controller is able to activate and deactivate a chase (ID number) at a specific time.

CAUTION! When using the timer function, do not switch off the controller!
Set your timer function:
Press
Note: number 8 means manually
Select
Enter the actual time by "TIME"
Enter start time by "POWER ON"Enter end time by "POwER OFF"
Note: For long-term and optimal battery life, we recommend setting "POwer Off BAT" at a minimum of 10% . Controller will automatically switched off as soon as set percentage is reached.
Ready? Go back to the "main" menu with <▶ button.
DISPLAY ENERGY SAVING
For longer operation and to save battery energy, you can automatically switch off OLED display after no operation has taken place for a certain period of time.
Set your display battery saver:
Press
Ready? Go back to the "main" menu with <▶ button.
Password
When used in public spaces, unauthorized persons can consciously or unconsciously change the lighting settings. This is usually undesirable and you can therefore set a password.
Set your password:
Press
Ready? Go back to the "main" menu with <▶ button.
DMX CABLES
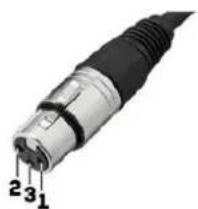
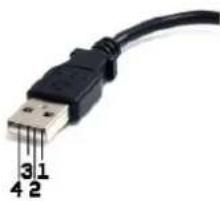
CONNECTION DIAGRAM XLR TO USB
| FUNCTION | XLR | USB | |
| Ground | Pin1 | connect with | Pin 4 |
| Signal - | Pin 2 | connect with | Pin 2 |
| Signal + | Pin 3 | connect with | Pin 3 |
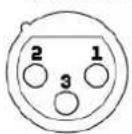
DMX OUT XLR FEMALE
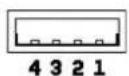
DMX IN USB-A
CONNECTION DIAGRAM XLR TO RJ45
| FUNCTION | XLR | RJ45 | |
| Ground | Pin 1 | connect with | 7 & 8 |
| Signal - | Pin 2 | connect with | 2,4 & 6 |
| Signal + | Pin 3 | connect with | 1,3, & 5 |
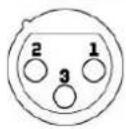
DMX OUT XLR FEMALE
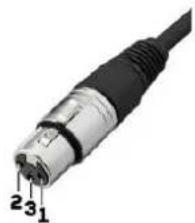
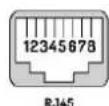
DMX IN USB-A
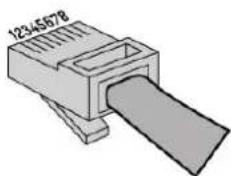
When fabricating your own cables, always observe the illustrations on this page. Never connect the shielding of the cable to the ground contact of the plug and always make certain that the shielding does not come into contact with the aluminium or metal housing of the plug. If the shielding is connected to the ground, this can lead to short-circuiting and system malfunctions.
CLEANING AND MAINTENACE
The product is maintenance-free, except for incidental cleaning. For cleaning you can use a lint-free, damp cloth. Refer repairs to an authorised Beamz specialist.
VEILIGHEIDSINSTRUCTIES

ELIMINAR UN PROGRAMA
Set your timer function:
DIAGRAMA DE CONEXION XLR A USB
| FUNCION | XLR | USB | |
| Ground | Pin 1 | conecta en | Pin 4 |
| Signal - | Pin 2 | conecta en | Pin 2 |
| Signal + | Pin 3 | conecta en | Pin 3 |
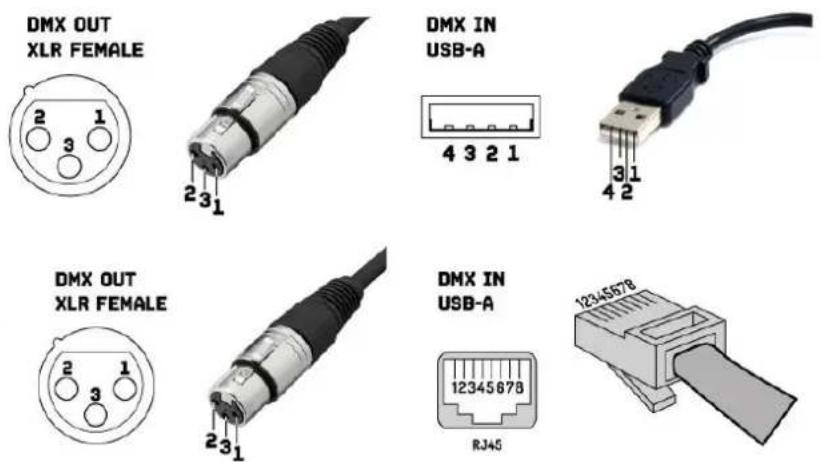
DIAGRAMA DE CONEXION XLR A RJ45
| FUNCIón | XLR | RJ45 | |
| Ground | Pin 1 | conecta en | 7 & 8 |
| Signal - | Pin 2 | conecta en | 2, 4 & 6 |
| Signal + | Pin 3 | conecta en | 1, 3, & 5 |
When used in public spaces, unauthorized persons can consciously or unconsciously change the lighting settings. This is usually undesirable and you can therefore set a password.
Ustaw swoje haslo:
CONNECTION DIAGRAM XLR TO RJ45
| Level 1 | Level 2 | Level 3 | Level 4 | DESCRIPTION |
| Effects | ID | 0-7 | Select chase ID number | |
| Play chase | Play chase | |||
| Edit chase | Edit chase | |||
| Delete chase | Delete chase | |||
| SETTINGS | DMX Address | Set DMX start adress for the controller | ||
| Wireless | Wireless EN | ON / OFF | Enable or disable wireless DMX | |
| Wireless LED | ON / OFF | Enable or disable wireless DMX indicator | ||
| Power-up | 0-7 | Select ID by start up controller. NR 8 means Manual | ||
| Display | Screen mode | Logo / On / Off | Select screen mode, when controller not used | |
| Screen time | 3-255 | Select time (in seconds) to turn on screen mode | ||
| Password | Password | On / Off | Enable or disable controller with password protection | |
| Set password | Create password with up, down, left, right buttons | |||
| Time | Time | Enter the actual time | ||
| Power On | Enter start time show | |||
| Power Off | Enter end time show | |||
| Power off Batt. | 0% | Reserve power for timer function in battery use | ||
| Calibration | Function available for Beamz service or authorized dealer | |||
| Load factory | Restore factory settings | |||
| Status | BAT Voltage | Shows current battery voltage | ||
| Version | Shows software version |
TECHNICAL SPECIFICATIONS
Rated voltage : via USB 5Volt
Battery : type 18650 2600mAh
Wireless DMX : operating frequency 2.4GHz
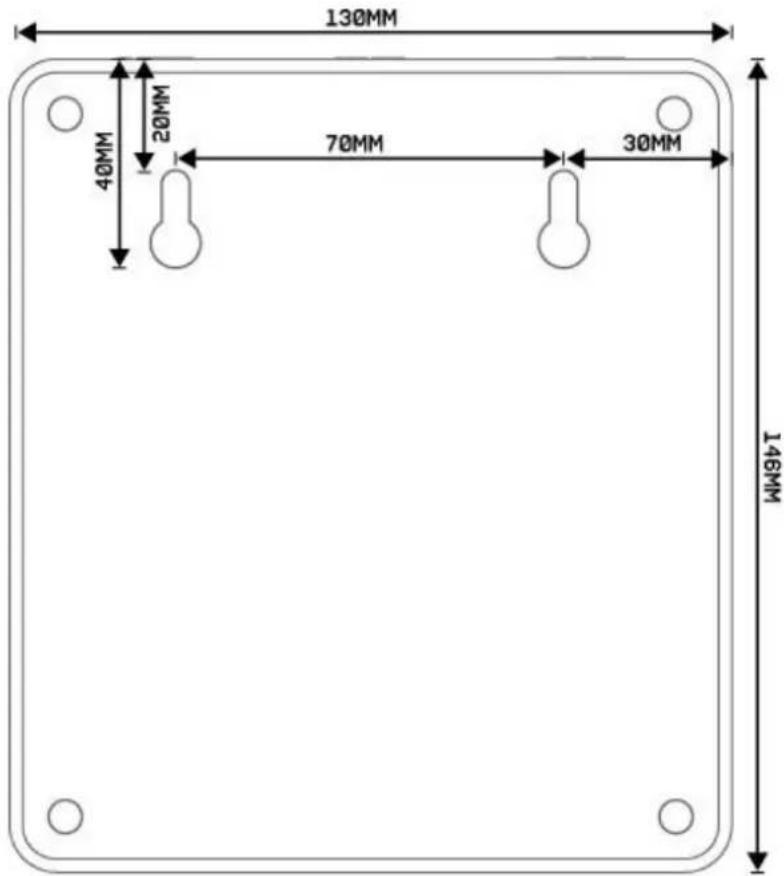
Dimensions per unit :130x150x40mm
Weight (per unit) : 0.4 kg
Design and product specifications are subject to change without prior notice.
European Union
Trionios B.V.
7602KR Almelo, The Netherlands
2014/35/EU
2014/30/EU
2011/65/EC

United Kingdom
Tronios Ltd.,
130 Harley Street,
London W1G 7JU, United Kingdom
S1.2016:1101
S.I.2016:1091
S.I. 2012:3032




- UNPACKING INSTRUCTION
- OVERVIEW
- DISPLAY
- WIRED DMX
- WIRELESS DMX
- CREATE A CHASE
- PLAY CHASE
- DELETE CHASE
- TIMER FUNCTION
- DISPLAY ENERGY SAVING
- Password
- DMX CABLES
- CONNECTION DIAGRAM XLR TO USB
- CONNECTION DIAGRAM XLR TO RJ45
- CLEANING AND MAINTENACE
- VEILIGHEIDSINSTRUCTIES
- ELIMINAR UN PROGRAMA
- TECHNICAL SPECIFICATIONS
Brand : BeamZ
Model : DMX65W
Category : Controller