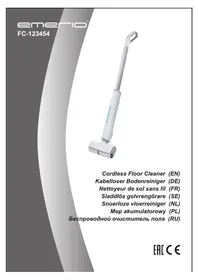
FC123454 - Saucepan Emerio - Free user manual and instructions
Find the device manual for free FC123454 Emerio in PDF.


| Product type | Cordless floor cleaner |
| Brand | Emerio |
| Model | FC123454 |
| Power supply | Battery 11.1 V DC, adapter: input 100-240 V ~ 50/60 Hz, 0.4 A max, output 12.6 V = 1 A, 12.6 W |
| Rated power | 50 W |
| Clean water tank capacity | 400 ml |
| Dirty water tank capacity | 250 ml |
| Compatible floor type | Hard floors: tile, marble, parquet, granite, terrazzo, bamboo, etc. |
| Main functions | Hard floor cleaning with moistened rollers, suction of dirty water, self-cleaning of rollers |
| Charge indicators | Three LED bars: 65-100% (3 bars), 30-60% (2 bars), less than 30% (1 bar), flashing = immediate recharge |
| Runtime | Not specified, but rechargeable with mains adapter |
| Battery type | Integrated lithium-ion battery not user-replaceable |
| Roller maintenance | Self-cleaning after use (add 100-150 ml of water to the base), machine washable at <=45°C |
| Tank cleaning | Empty and rinse the dirty water tank after each use; empty the clean water tank if not used for a long time |
| Safety | Do not immerse, use only the supplied adapter, do not use near heat sources, unplug before cleaning |
| Warranty | 2 years from date of purchase, subject to following instructions |
| After-sales service | Emerio B.V., Zomervaart 1A, 2033 DA Haarlem, Netherlands; email: info@emerio.eu |
| Recycling | Compliant with European directive 2012/19/EU, do not dispose of with household waste |
Frequently Asked Questions - FC123454 Emerio
User questions about FC123454 Emerio
0 question about this device. Answer the ones you know or ask your own.
Ask a new question about this device
Download the instructions for your Saucepan in PDF format for free! Find your manual FC123454 - Emerio and take your electronic device back in hand. On this page are published all the documents necessary for the use of your device. FC123454 by Emerio.
USER MANUAL FC123454 Emerio
natural_image
White and gray cleaning brush with handle and roller, isolated on white background (no text or symbols)Cordless Floor Cleaner (EN)
Kabelloser Bodenreiniger (DE)
Instruction manual – English ...... - 2 -
Before use make sure to read all of the below instructions in order to avoid injury or damage, and to get the best results from the appliance. Make sure to keep this manual in a safe place. If you give or transfer this appliance to someone else make sure to also include this manual.
In case of damage caused by user failing to follow the instructions in this manual the warranty will be void. The manufacturer/importer accepts no liability for damages caused by failure to follow the manual, a negligent use or use not in accordance with the requirements of this manual.
- Read operator's manual.
-
This appliance can be used by children aged from 8 years and above and persons with reduced physical, sensory or mental capabilities or lack of experience and knowledge if they have been given supervision or instruction concerning use of the appliance in a safe way and understand the hazards involved.
-
Children shall not play with the appliance.
-
Cleaning and user maintenance shall not be made by children without supervision.
-
The appliance is only to be used with the power supply unit provided with the appliance.
-
The plug of adaptor must be removed from the socket-outlet before cleaning or maintaining the appliance.
-
Detachable supply unit< CZH013126100EUWP> WARNING: For the purposes of recharging the battery, only use the detachable supply unit provided with this appliance.
-
This appliance contains batteries that are only replaceable by skilled persons.
-
A hazard may occur if the appliance runs over the supply cord.
-
Add the clean water into the clean water tank. During use, the dirty water will be collected into dirty water tank. The capacity of clean water tank is 400ml; the capacity of dirty water tank is 250ml.
-
Before inserting the plug into the mains socket, please check that the voltage and frequency comply with the specifications on the rating label.
-
Before operation, cleaning or maintenance, disconnect the mains plug from the socket.
-
Ensure that the mains cable is not hung over sharp edges and keep it away from hot objects and open flames.
-
Do not immerse the appliance or the mains plug in water or other liquids. There is danger to life due to electric shock!
-
To remove the plug from the plug socket, pull the plug. Do not pull the power cord.
-
Do not plug or unplug the appliance from the electrical outlet with a wet hand.
-
Never attempt to open the housing of the appliance, or to repair the appliance yourself. This could cause electric shock.
-
Never leave the appliance unattended during use.
-
This appliance is not designed for commercial use. Indoor use only.
-
Do not use the appliance for other than intended use.
-
Do not wind the cord around the appliance and do not bend it.
-
The use of accessory attachment not recommended by the appliance manufacturer may cause injuries.
-
The appliance is assumed to be used on hard floor, including rubber floor, marble floor, granite floor, terrazzo floor, solid wood floor, composite floor, bamboo floor, and all kinds of mirror surface tile, porcelain tile, etc. which has a flat surface.
-
Do not use the appliance near to the heater, or stove which are too hot in case of the plastic deformation.
-
When using this appliance, if there is situation like too much heat, or strange noise, or bad smell come out, please stop to use the appliance immediately.
- When you finish using the machine, make sure to clean the dirty water tank to reduce the risk of dirt block.
- When cleaning the stairs, please make sure you hold the appliance and the banister well to avoid falling down.
PARTS AND ACCESSORIES
- On/off switch
- Handle
- Power indicators (three bars)
- Charging port
- Clean water tank
- Dirty water tank
- Rollers
- Base
- Adaptor
INSTALLATION
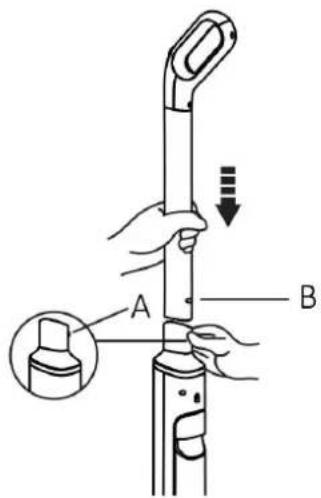
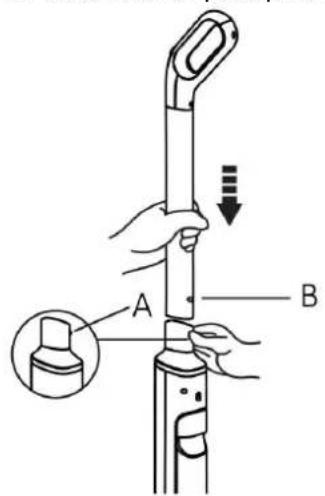
- Upright the main body; attach the handle part to the main body, press the tube lock (A) at the same time. The tube lock (A) will pop out through the small hole (B) in the tube. Make sure the handle part is firmly assembled to the main body.
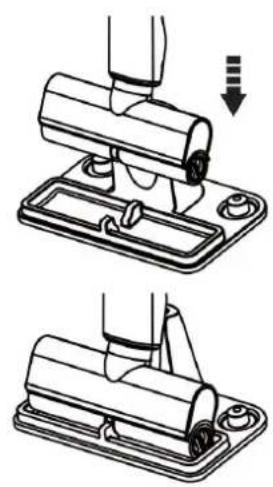
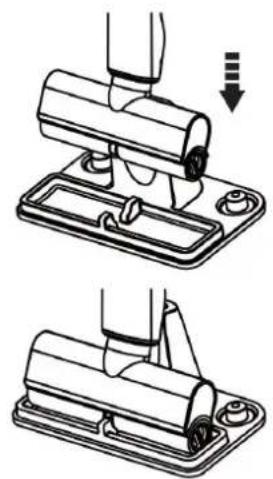
- Rest the appliance steadily on the base.
natural_image
Two-step diagram showing a mechanical assembly with a tool and a base, no text or symbols present.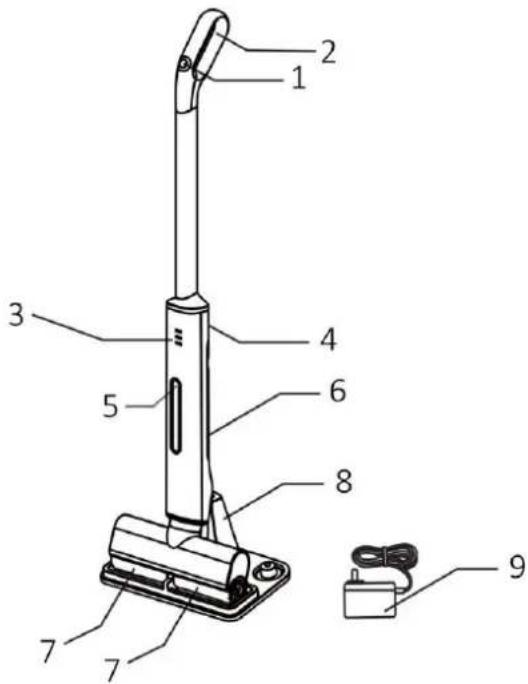
HOW TO CHARGE
When cleaning is finished, turn off the appliance; use the adaptor to charge the appliance. The appliance can not be used during charging.
1) Plug one end of the adaptor into the charging port of the main unit.
2) Plug the other end of the adaptor into the power outlet.
3) During charging, the power indicator will flash.
4) When fully charged, the power indicators (three bars) will stay lit.
Note:
Electric quantity for three bars: 65% \~ 100%;
Electric quantity for two bars: 30% \~ 60%;
Electric quantity for one bar: less than 30%.
If three bars are flashing: nearly no power and need to charge immediately.
BEFORE USE
-
Please make sure that the appliance has been installed well and check whether the battery power is enough.
-
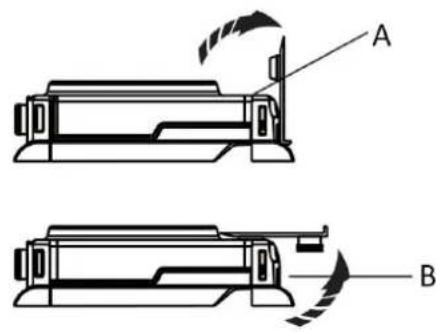
Add the clean water into the clean water tank.
A: clean water tank; B: dirty water tank
OPERATION
-
Presse the on/off buttons for 1\~2 seconds to let the appliance work, which shall wetten the rollers.
-
Hold the handle and move the appliance on the hard floor and do the mopping.
-
Press the on/off button again to turn off the machine.
Note: if you want to add some cleaning agent in the clean water tank, please use just a little low-foaming or non-foaming cleaning agent, and mop the floor dry later.
CLEANING AND MAINTAINANCE
-
Use only a soft moist cloth to clean the outside of the unit. Do not allow any kind of liquid to enter the unit.
-
Do not use aggressive chemicals or abrasives.
Roller cleaning:
-
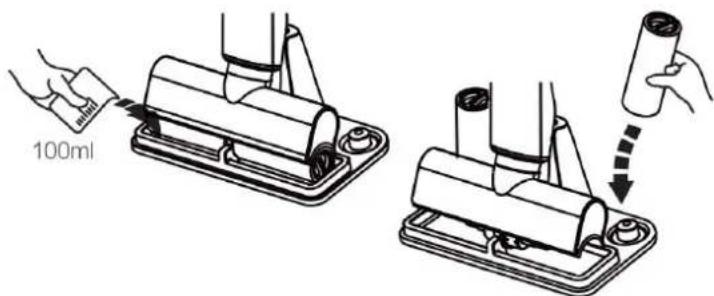
When the clean is finished, empty the dirty water tank, and add 100ml\~150ml water in the base and then rest the appliance on the base to work another 3 minutes to do the self cleaning of the rollers.
-
Take off the rollers and dry them on the base.
-
Rollers can also be cleaned in a washing machine, but with the water temperature lower than 45°C.
-
We suggest to clean the rollers every time after use.
How to detach and install the rollers:
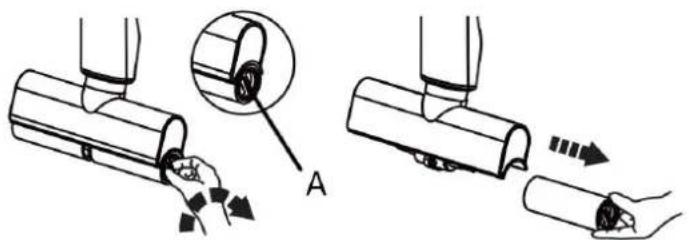
Detach: hold the roller handle (A) at the side and then rotate to take it out, please refer to below picture:
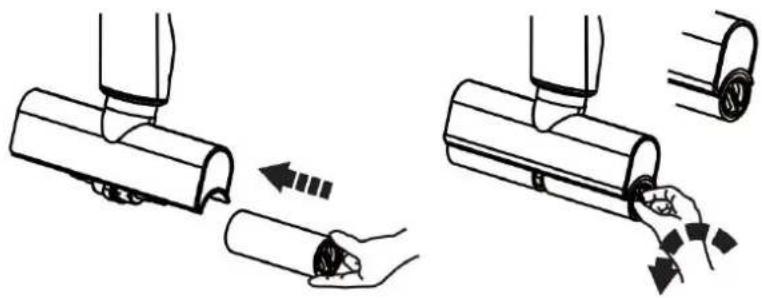
Install: insert the roller and rotate a little, please pay attention to the colour of the roller, it should match the colour on the appliance.
natural_image
Illustration of two mechanical devices with arrows indicating process steps (no text or symbols)Water tank cleaning
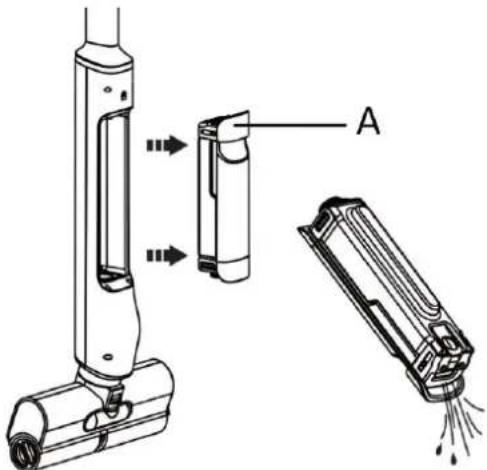
- Grasp the water tank handle (A), and pull the water tank out.
- Open the dirty water tank cover to pour out the dirty water and then clean it. We suggest to clean the dirty water tank every time after use.
- After cleaning, assemble the water tank back correctly.
Note: please empty the clean water tank if not using the appliance for a long time.
natural_image
Technical line drawing of a handheld device with labeled component A, showing internal components and exhaust flow (no text or symbols)Cleaning the cover of the dirty water transfer part
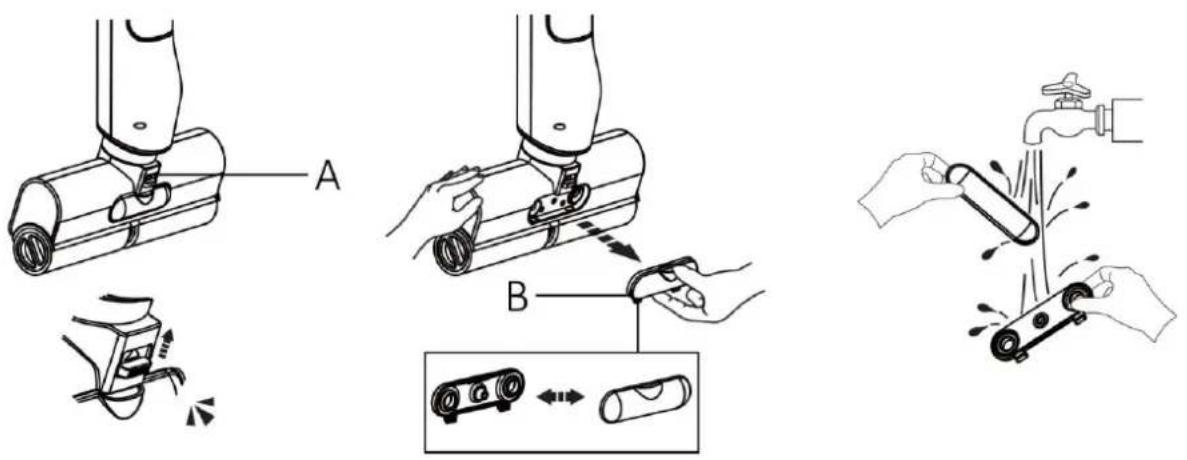
Lift the unlock button (A) upwards, you will hear a "Click" sound. The cover (B) will be unlocked. Take them out, and then clean them with water. Install them correctly after cleaning.
Note: when installing, match the direction of both sides and press inside, a click sound will be heard. The cover will be installed.
COMMON FAULTS
| Common faults: | Possible reason | Solution |
| Appliance does not work: | 1. No power or shorted powered | Please charge the machine |
| 2. Dirty water tank is full | Take out the water tank and clean it | |
| 3. Roller is blocked by the hair things | Clean the roller | |
| Appliance is weak in cleaning or water leakage | 1. Water tank is installed in the wrong position | Install the water tank correct |
| 2. Roller is blocked by hair things. | Clean the roller | |
| 3. Lower battery | Please charge the appliance | |
| Appliance shakes terribly: | Roller is not installed well. | Install the roller correct |
| Appliance could not be charged: | The adaptor is not collected well. | Please check the adaptor |
| Clean water does not come out: | 1. No clean water in the clean water tank | Add clean water |
| 2. The water tank is not installed well. | Re-install the water tank correct |
TECHNICAL DATA
Voltage: 11.1V DC
Power: 50W
Adaptor input: 100-240V\~ 50/60Hz, 0.4A MAX
Adaptor Output: 12.6V=1A=12.6W
GUARANTEE AND CUSTOMER SERVICE
Before delivery our devices are subjected to rigorous quality control. If, despite all care, damage has occurred during production or transportation, please return the device to your dealer. In addition to statutory legal rights, the purchaser has an option to claim under the terms of the following guarantee:
For the purchased device we provide 2 years guarantee, commencing from the day of sale. If you have a defective product, you can directly go back to the point of purchase.
Defects which arise due to improper handling of the device and malfunctions due to interventions and repairs by third parties or the fitting of non-original parts are not covered by this guarantee. Always keep your receipt, without the receipt you can't claim any form of warranty. Damage caused by not following the instruction manual, will lead to a void of warranty, if this results in consequential damages then we will not be liable.
Neither can we hold responsible for material damage or personal injury caused by improper use if the
instruction manual is not properly executed. Damage to accessories does not mean free replacement of the whole appliance. In such case please contact our service department. Broken glass or breakage of plastic parts is always subject to a charge. Defects to consumables or parts subjected to wearing, as well as cleaning, maintenance or the replacement of said parts are not covered by the warranty and are to be paid.
ENVIRONMENT FRIENDLY DISPOSAL
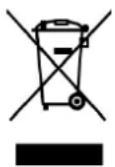
Recycling – European Directive 2012/19/EU
This marking indicates that this product should not be disposed with other household wastes. To prevent possible harm to the environment or human health from uncontrolled waste disposal, recycle it responsibly to promote the sustainable reuse of material resources. To return your used device, please use the return and collection systems or contact the retailer where the product was
purchased. They can take this product for environmental safe recycling.
Emerio B.V. Customer service: Kundeninformation: Klantenservice:
Zomervaart 1A T: +31 (0) 23 3034369 T: +49 (0) 3222 1097 600 T: +31 (0) 23 3034369
2033 DA Haarlem E: info@emerio.eu E: info.de@emerio.eu E: info.nl@emerio.eu
The Netherlands
SICHERHEITSHINWEISE
MONTAGE
AUFLADEN
BETRIEB
natural_image
Illustration of two mechanical devices with arrows indicating process steps (no text or symbols)Wassertankreinigung
natural_image
Technical line drawing of a handheld device with labeled component A, showing internal components and exhaust flow (no text or symbols)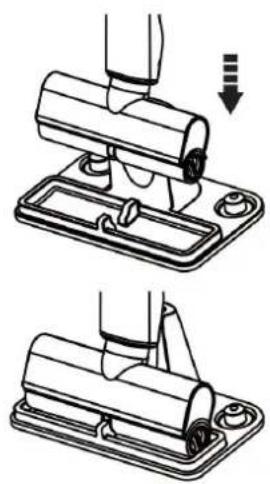
natural_image
Two-step diagram showing a mechanical assembly with a tool and a base, no text or symbols present.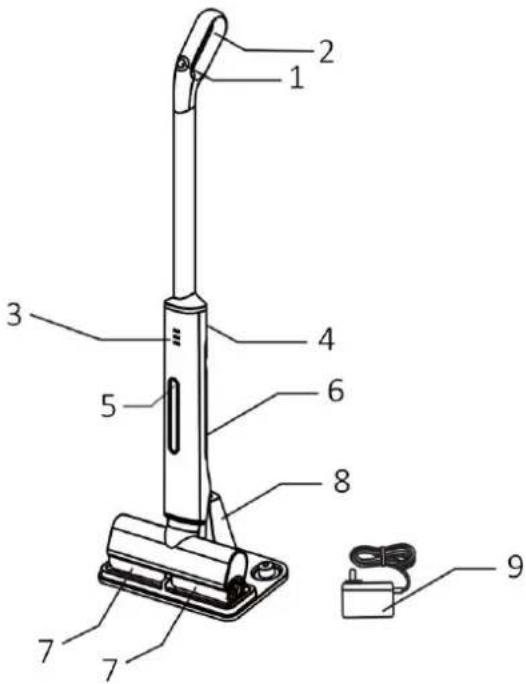
COMMENT CHARGER LE PRODUIT ?
FONCTIONNEMENT
natural_image
Illustration of two mechanical devices with arrows indicating process steps (no text or symbols)natural_image
Technical line drawing of a handheld device with labeled component A, showing internal components and exhaust flow (no text or symbols)natural_image
Two-step diagram showing a mechanical assembly with a tool inserted into a bracket, no text or symbols present.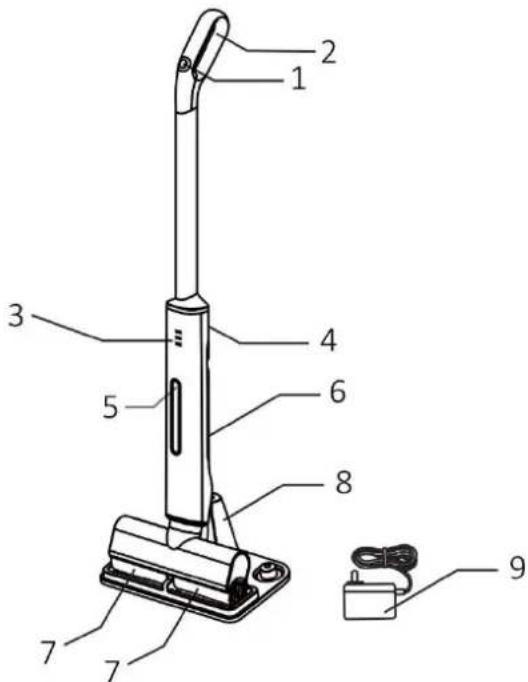
LADDNING
ANVÄNDNING
natural_image
Illustration of two mechanical devices with arrows indicating process steps (no text or symbols)natural_image
Technical line drawing of a handheld device with labeled component A, showing internal components and exhaust flow (no text or symbols)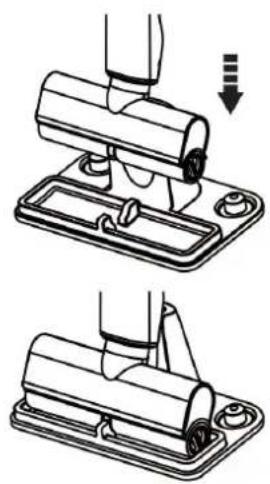
natural_image
Two-step diagram showing a mechanical assembly with a tool and a base, no text or symbols present.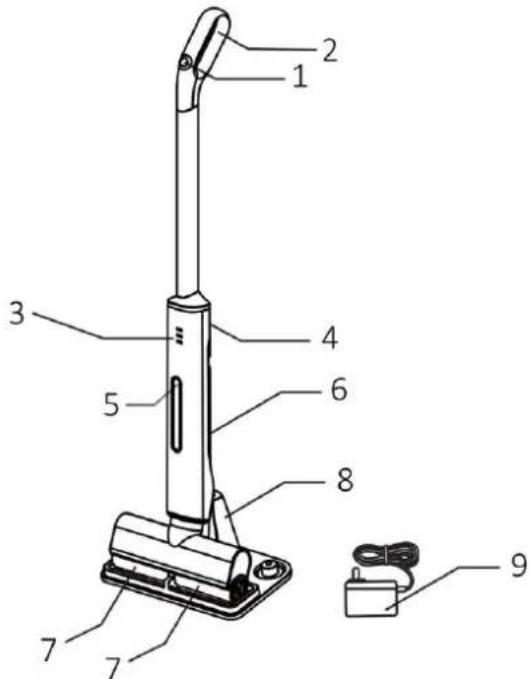
OPLADEN
WERKING
natural_image
Illustration of two mechanical devices with hands operating a cylindrical component, showing motion and assembly (no text or symbols)natural_image
Technical line drawing of a handheld device with labeled component A, showing internal components and exhaust flow (no text or symbols)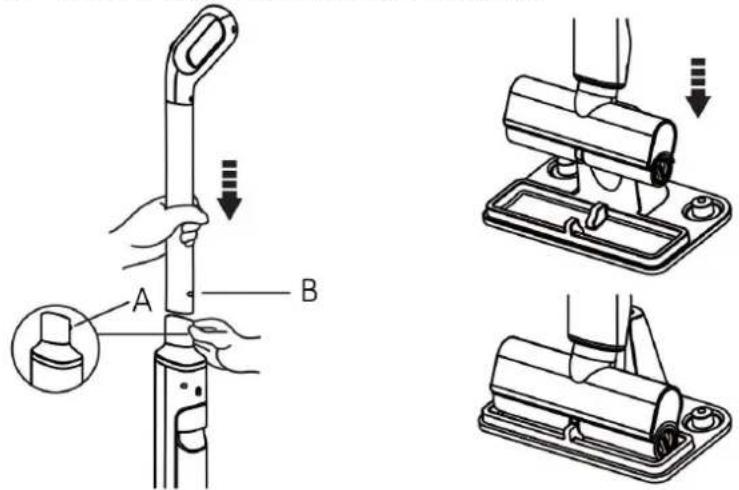
SPOSÓB LADOWANIA
UŻYTKOWANIE
natural_image
Illustration of two mechanical devices with hands operating a tool, showing motion and assembly (no text or symbols)TYPOWE USTERKI
natural_image
Two-step diagram showing a mechanical assembly with a tool and a base, no text or symbols present.ЗАРЯДКА ПРИБОРА
УПРАВЛЕНИЕ
natural_image
Illustration of a hand using a tool to lift a cylindrical object, showing step-by-step assembly (no text or symbols)ОШИБКИ
- PARTS AND ACCESSORIES
- INSTALLATION
- HOW TO CHARGE
- BEFORE USE
- OPERATION
- CLEANING AND MAINTAINANCE
- Roller cleaning:
- How to detach and install the rollers:
- Water tank cleaning
- Cleaning the cover of the dirty water transfer part
- TECHNICAL DATA
- GUARANTEE AND CUSTOMER SERVICE
- ENVIRONMENT FRIENDLY DISPOSAL
- SICHERHEITSHINWEISE
- MONTAGE
- AUFLADEN
- BETRIEB
- Wassertankreinigung
- COMMENT CHARGER LE PRODUIT ?
- FONCTIONNEMENT
- LADDNING
- ANVÄNDNING
- OPLADEN
- WERKING
- SPOSÓB LADOWANIA
- UŻYTKOWANIE
- ЗАРЯДКА ПРИБОРА
- УПРАВЛЕНИЕ
Brand : Emerio
Model : FC123454
Category : Saucepan