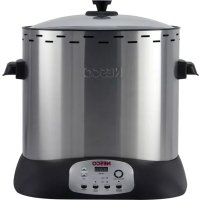
ITR01 - Multi-cooker Nesco - Free user manual and instructions
Find the device manual for free ITR01 Nesco in PDF.


User questions about ITR01 Nesco
0 question about this device. Answer the ones you know or ask your own.
Ask a new question about this device
Download the instructions for your Multi-cooker in PDF format for free! Find your manual ITR01 - Nesco and take your electronic device back in hand. On this page are published all the documents necessary for the use of your device. ITR01 by Nesco.
USER MANUAL ITR01 Nesco
natural_image
Illustration of a simple cooking pot with a black and white body, featuring a digital display labeled 'NESCO' (no text or symbols on the main image)User Manual
Upright Turkey Roaster (Model: ITR-01)
NESCO®
TABLE OF CONTENTS
Important Safeguards 1-2
Intro & Overview ....3
Components List ....4
Control Panel Functions ....5
Parts Assembly 6-7
Before First Use 7
Preparation Instructions 8
Operating Instructions 9-10
Estimated Cooking Settings 11
Cleaning and Maintenance 12
Important Guidelines ....13
Troubleshooting 14-15
One Year Limited Warranty 17
Please visit YouTube channel: NESCO Upright Turkey Roaster
“NESCO®” is a registered trademark of The Metal Ware Corporation.
The Metal Ware Corporation
1700 Monroe St., P.O. Box 237
Two Rivers, WI 54241-0237
Phone: 1-(800) 288-4545

natural_image
Simple line drawing of a desktop computer with monitor, keyboard, and mouse (no text or symbols)For accessories and additional products, go to
www.nesco.com
IMPORTANT SAFEGUARDS
- This instruction manual contains important information necessary for the proper use of this appliance.
- Read and follow all warnings and instructions before assembling and using this appliance.
• This appliance is designed for household use only.
READ ALL INSTRUCTIONS
When using any electrical appliance basic safety precautions should always be observed including the following:

The inner heating elements become VERY HOT during use.
NEVER touch the inner heating elements while the appliance is in operation.
ALWAYS allow the appliance to cool down completely before cleaning.
- Do not touch hot surfaces. Use handles or knobs.
- To protect against electrical shock, do not immerse cord, plug, or appliance in water or other liquid.
- This appliance is not a toy. Close supervision is necessary when any appliance is used by or near children. Store this appliance in a safe place, out of the reach of children.
- Unplug from outlet when not in use and before cleaning. Allow to cool before putting on or taking off parts.
- Do not operate any appliance with a damaged cord or plug or after the appliance malfunctions or has been damaged or appears to be damaged in any manner. Return appliance to the NESCO® Factory Service Department for examination, repair, or adjustment.
- Do not attempt to repair the appliance.
- Do not use any accessory attachments not recommended by the appliance manufacturer as they may cause injuries and void the warranty.
- Always place the appliance on a firm and stable surface. Make sure the surface is clean and dry.
- Do not use this appliance on wet or hot surfaces or near any heat sources.
- Do not place on or near a hot gas or electric burner, or in a heated oven.
- Do not use outdoors.
- To disconnect the appliance, turn any control to 'OFF', then remove plug from wall outlet.
- Do not use appliance for other than intended use.
IMPORTANT SAFEGUARDS
- Do not operate unattended.
- Do not clean with metal scouring pads. Pieces can break off the pad and touch electrical parts, creating a risk of electric shock.
- Oversize foods, metal foil packages, or utensils must not be inserted in the roaster as they may involve a risk of fire or electric shock.
- This appliance is not intended for use by persons (including children) with reduced physical, sensory or mental capabilities, or lack of experience and knowledge, unless they have been given supervision or instruction concerning use of the appliance by a person responsible for their safety.
- Do not let cord hang over edge of table or counter, touch hot surfaces and never pull on the cord.
- Before plugging the appliance in or operating, make sure your hands are dry and safe to do the actions. Do not operate the appliance if the cord or plug is wet.
- A fire may occur if the roaster is covered or touching flammable material, including curtains, draperies, walls, and the like, when in operation.
- When disconnecting, to avoid any injury, please unplug by grasping the plug, not the cord.
- Extreme caution must be used when moving an appliance containing hot liquids.
- Polarized Plug: This appliance has a polarized plug (one blade is wider than the other). To reduce risk of electric shock, plug is intended to fit into polarized outlet only one way. If the plug does not fit fully into the outlet, reverse the plug. If it still does not fit, contact a qualified electrician. Do not try to modify the plug in any way.
- Short Cord Instructions: A short power supply cord is provided to reduce the risk resulting from becoming entangled in or tripping over a longer cord. Extension cords may be used if care is exercised in their use. If an extension cord is used, the marked electrical rating of the cord should be at least as great as the electrical rating of the appliance. The longer cord should be arranged so that it will not drape over the tabletop where it can be pulled on by children or tripped over unintentionally.
Follow all warnings and instructions.
Save this instruction manual for future use.
This appliance is designed for household use only.
INTRO & OVERVIEW
Thank you for selecting the NESCO® Upright Turkey Roaster.
Welcome to the exciting world of convenient, oil-free vertical roasting. The NESCO® Upright Turkey Roaster is the ideal appliance for saving time in the kitchen and offers the user a ‘second’ oven allowing for additional cooking options. This upright roaster is perfect to have around during the holidays or any time of year as it can cook more than just a turkey.
The innovative Roast-Ryte™ Technology uses vertical heating elements to cook a turkey inside and out, maintaining the moisture on the inside while searing the skin on the outside. The outer heating elements rotate heat around the turkey, while the center heating element cooks from the inside out. These special features provides perfect, even cooking throughout while enabling the poultry to be cooked faster than in a conventional oven.
With enough space for your cooking demands, this oil-free, easy to use vertical roaster can cook up to an 18-lb. bird in two hours. The easy-to-read control panel has an adjustable digital timer as well as a built in 120-minute auto turkey program. The pre-set high/low heat selection function takes the guesswork out of finding the optimal cooking temperature. Illuminated lights indicate when the heating elements are on and cycling.
Removable and dish washer safe, the cooking stand drip tray collects all unwanted turkey drippings and the interior surface is non-stick making clean-up quick and minimal. This upright roaster is lightweight, includes side handles for safe handling and has a glass cover for convenient viewing during use. The color and stainless steel finish is a classic combination which will accent any kitchen counter perfectly and the compact design offers the room needed to prepare delicious meals.
With just a touch of a button, the NESCO® Upright Turkey Roaster provides the most convenient and mess-free way to cook poultry and meat, allowing you to cook comfortably and enjoy more time with your family outside of the kitchen.
This instruction manual will help ensure maximum performance and product life while you enjoy using your new upright roaster. Please read the entire manual before using your product for the first time. Keep this manual as a reference and save for future use.
COMPONENTS LIST
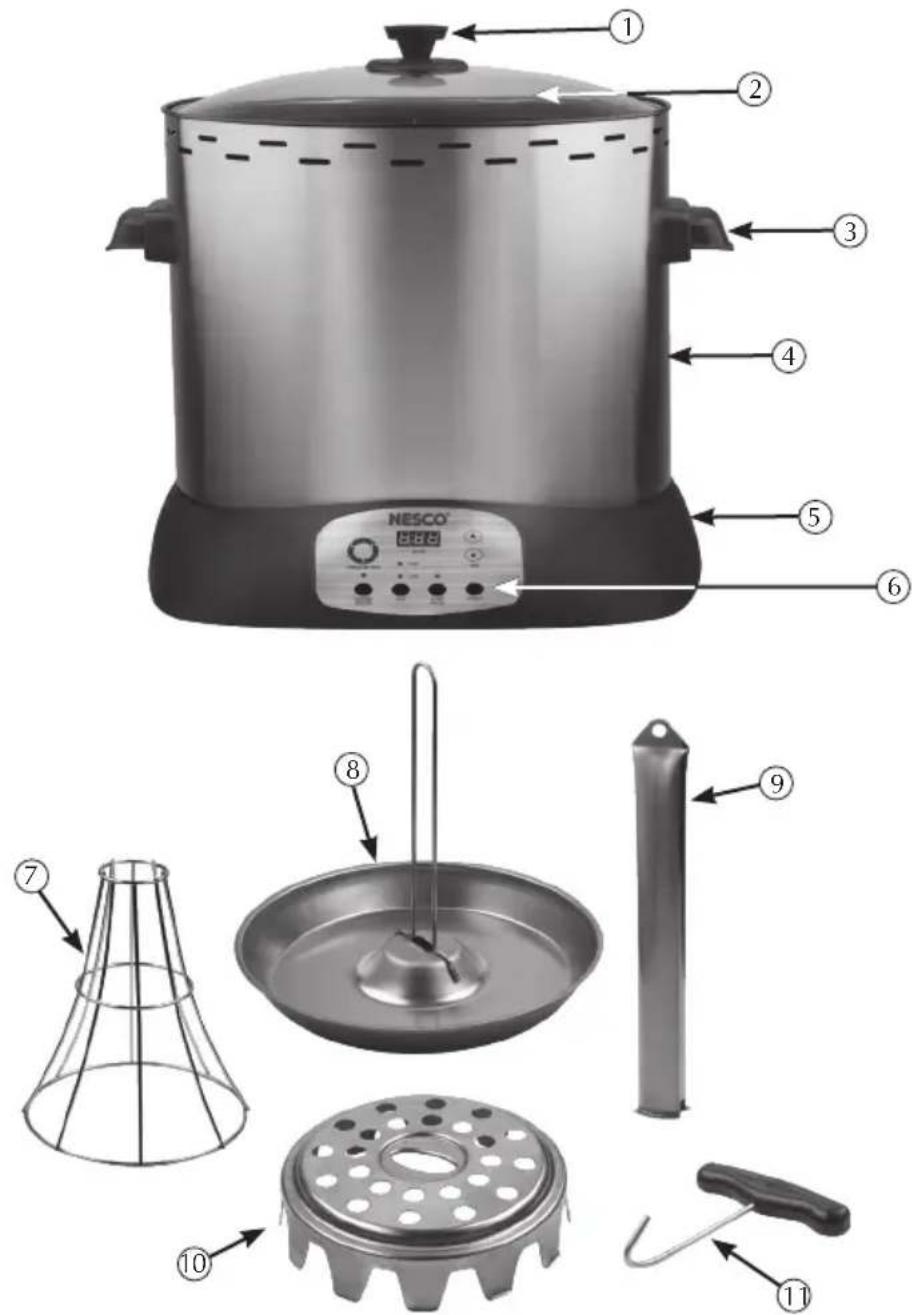
- Cover Handle
- Glass Viewing Cover
- Side Handles
- Main Body
-
Base
-
Control Panel
- Top Rack
- Drip Tray
- Heating Element Cover
- Bottom Rack
- Rack Remover
CONTROL PANEL FUNCTIONS
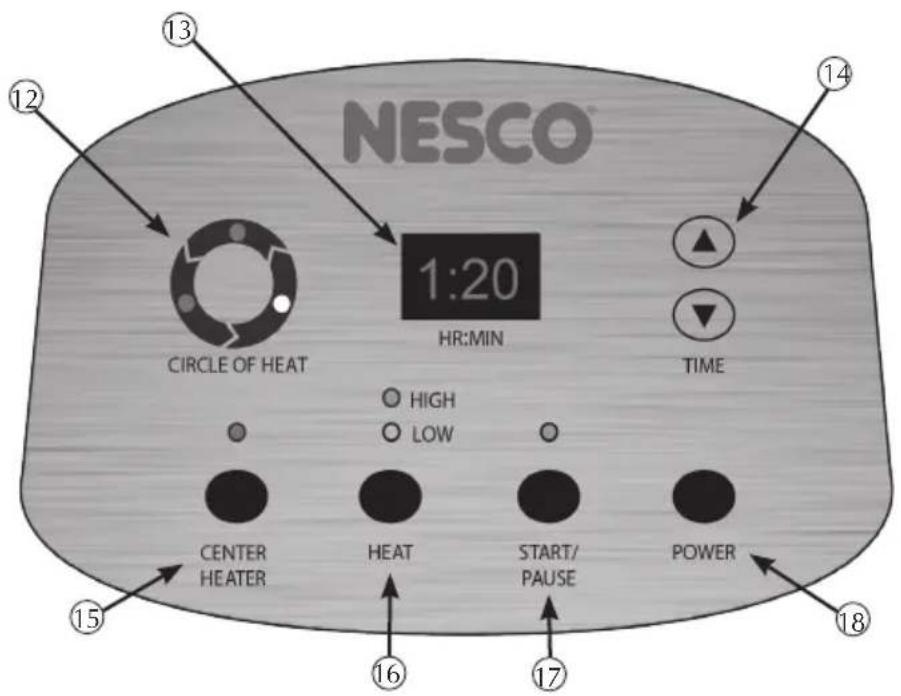
text_image
NESCO 1:20 HR:MIN CIRCLE OF HEAT HIGH LOW TIME CENTER HEATER HEAT START/ PAUSE POWER 15 16 17 18 14- Outer Heat Elements Cycle Indicator - Indicates which elements are working.
- Digital Display (HR:MIN) - Displays remaining cooking time in hours and minutes.
- Time Adjustment - Timer range: 0 to 4:00 hours Max.
- Center Heat Element Selection Button - Turns center element on and off.
- Heat Selection Button - Default Low Heat: 300°F / Default High Heat: 500°F
- Cooking Cycle Start/Pause Button - Starts and pauses the cooking cycle.
- Power Button - Turns the appliance on and off.
Roaster Features:
natural_image
Top-down technical illustration of a circular heating element with internal blades and control panel (no text or symbols)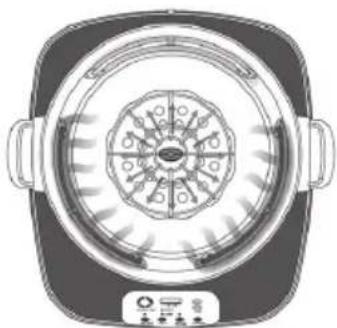
natural_image
Top-down technical illustration of a circular heating element with internal blades and control buttons (no text or symbols)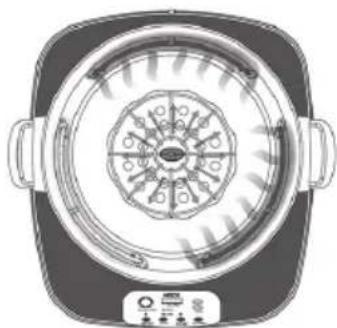
natural_image
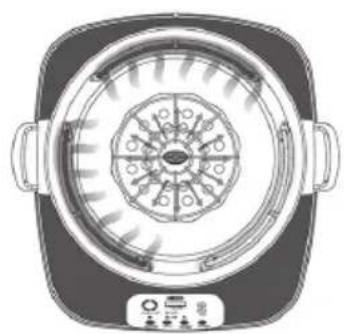
Top-down schematic of a mechanical or electrical device with circular components and control buttons (no text or symbols)• The Upright Turkey Roaster features vertical heating elements designed to cook food inside and out.
- This roaster has been programmed with two heat settings. On the HIGH setting, two of the outer elements are on at all times. On the LOW setting, one outer element is on at all times.
• The center heating element can be turned on and off depending on food type and cooking cycle time.
• The ‘Circle of Heat’ symbol indicates which heating elements are active and rotating around the food.
Roaster Features: (Continued)
- 120 minute default turkey cooking program for a 16-18 lb. bird.
- Default settings: High Heat, Center Element ON, Time: 2 hours
- Thaw temperature of food may vary cooking cycle times.
- When the default cooking cycle expires, the Digital Display will beep twice, return to the default cooking cycle time and display "02:00". The heating elements will turn off automatically. Power will remain on.
• Maximum cooking time is 04:00 hours.
- Time on the Digital Display increases and decreases in “minute” increments.
- Removable parts are dishwasher safe (except Main Body).
PARTS ASSEMBLY
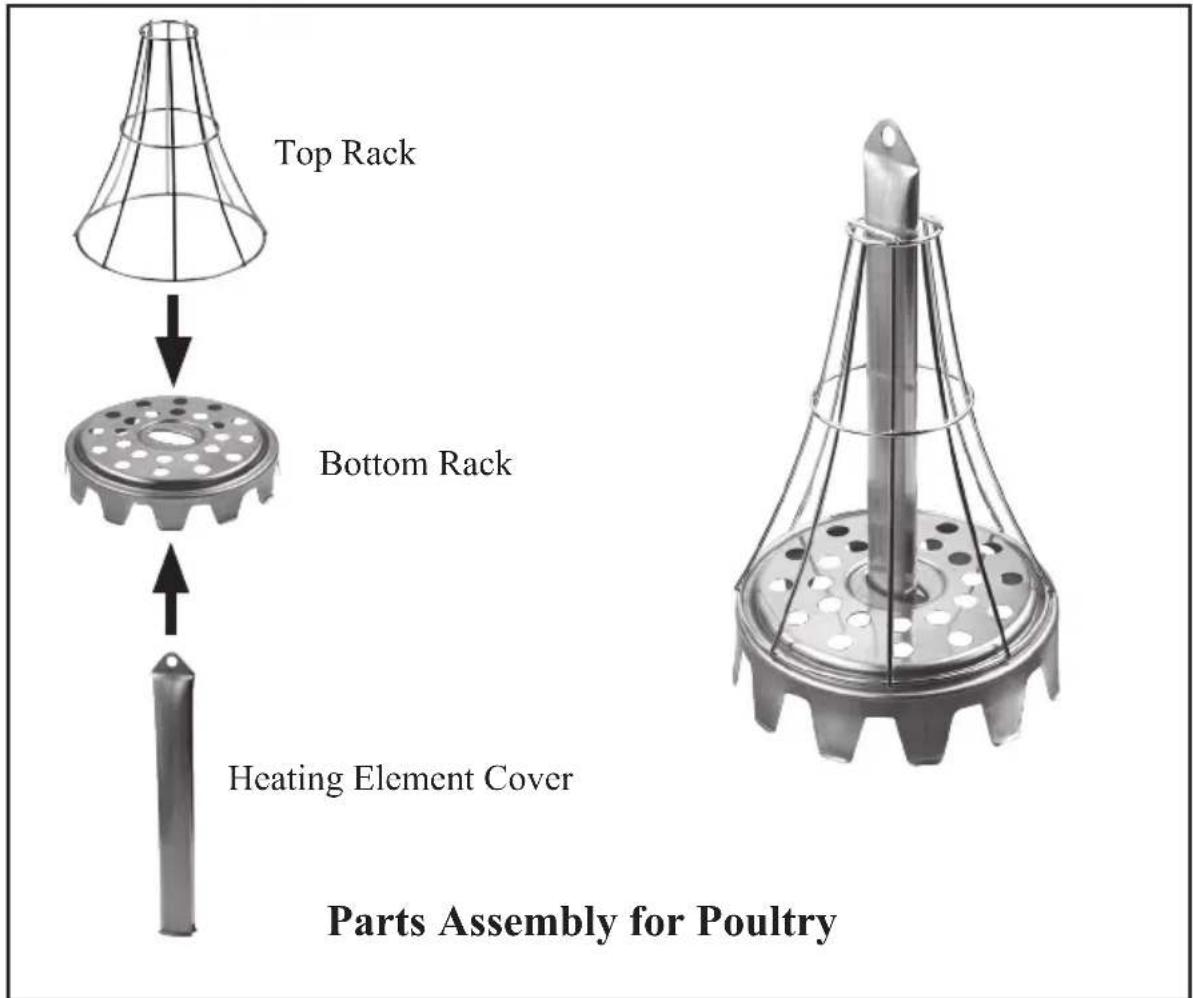
text_image
Top Rack Bottom Rack Heating Element Cover Parts Assembly for PoultryPARTS ASSEMBLY (CONTINUED)
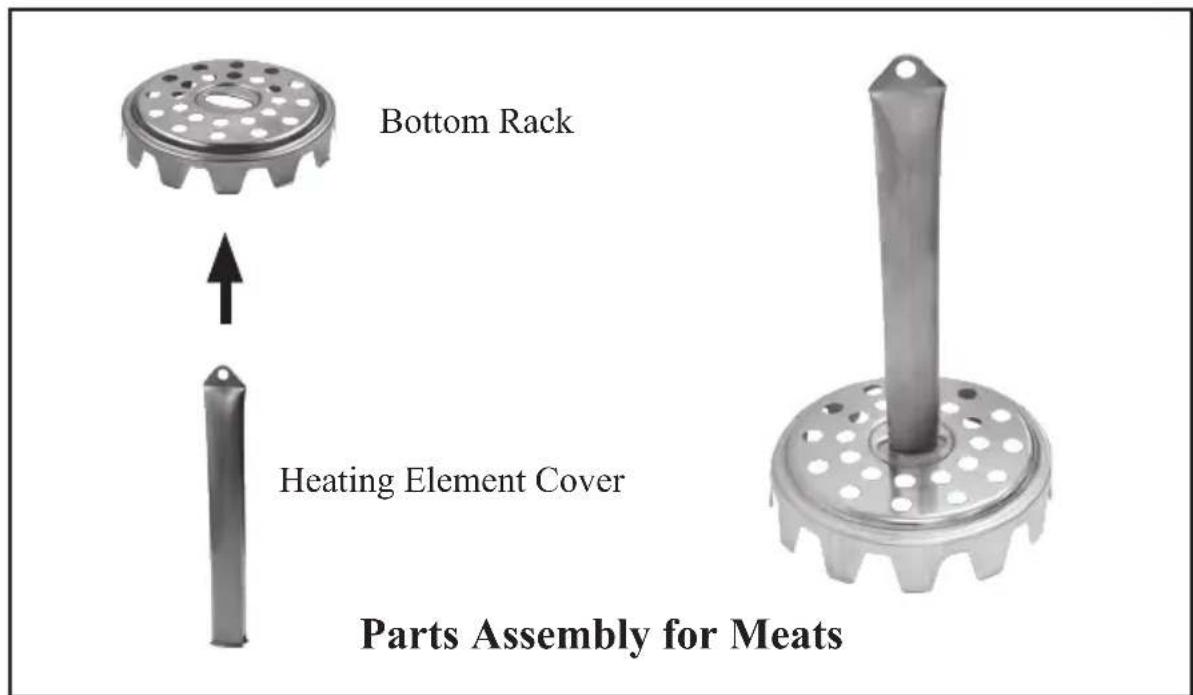
text_image
Bottom Rack Heating Element Cover Parts Assembly for MeatsBEFORE FIRST USE
- Unpack the appliance and remove all packaging and accessories, including the Glass Cover. Wash and wipe the accessories and set aside.
- It is normal for some smoke and odor to occur from the appliance when using it for the first time. This is not harmful. We recommend to ‘SMOKE OUT’ the appliance for 15 minutes, using the roaster on default setting (HIGH) in a well ventilated area. (garage, carport, etc.) Keep the Glass Cover and accessories off of the unit while operating during the “SMOKE OUT” session.
- Once the roaster is prepared for indoor usage, wipe the inside and outside of the roaster with a sponge or damp cloth and dry thoroughly.
• NEVER IMMERSE THE APPLIANCE IN WATER.
- Save the packaging for transporting or storage of the appliance when not in use.
PREPARATION INSTRUCTIONS
Preparing Poultry:
A. Thoroughly defrost the poultry before cooking.
B. Remove the giblets from the poultry. Rinse and pat dry the poultry. Season as desired.
C. Spray the surfaces of the cooking stand assembly with spray-on cooking oil.
D. Pull the poultry open and position it over the Top Rack. Ensure that the drumsticks hang downwards to the side of the Top Rack.
E. The Heating Element Cover end should come through the neck of the poultry as much as possible.
F. Using the Rack Remover, insert the hook into the hole at the end of the Heating Element Cover to lift the food.
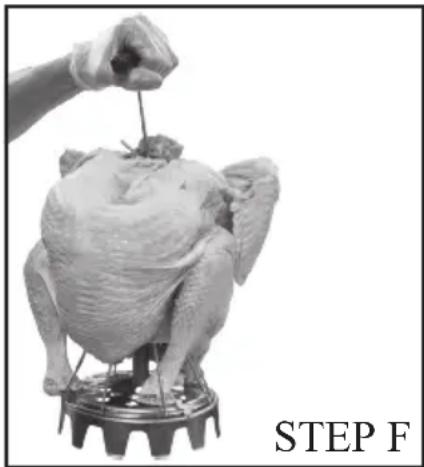
natural_image
Black-and-white photo of a hand holding a straw over a sculpted chicken on a rotating platform, labeled 'STEP F' (no other text or symbols)Preparing Meats:
A. Thoroughly defrost the meat before cooking.
B. Place the meat (roast) on a cutting board or knife friendly surface. Using a knife, carefully cut an X-shaped slit through the center of the roast, ensuring that the opening is large enough for the Heating Element Cover to fit through. Season as desired.
C. Spray the surface of cooking stand assembly with spray-on cooking oil.
D. Position the meat over Heating Element Cover. If the length of the roast isn't the same size as the Heating Element Cover, please leave the meat positioned near the top instead of near the bottom end of the Center Heating Element.
OPERATING INSTRUCTIONS
CAUTION!
NEVER OPERATE THIS APPLIANCE UNATTENDED!
WARNING!
THE GLASS COVER IS HOT DURING USE; ALWAYS USE THE HANDLE AND LIFT WITH CARE.
- Place the appliance on a flat, heat resistant surface.
- Remove the Glass Cover and position the Drip Tray over the heating element and lower it into position inside the Main Body until resting on bottom surface. (FIG. 1)
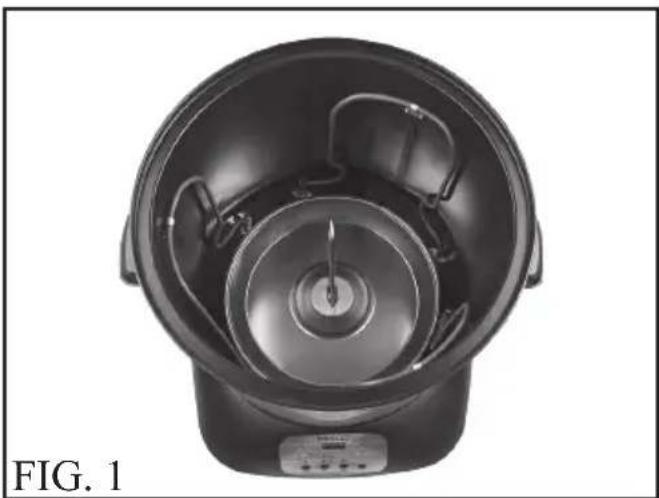
natural_image
Top-down view of a black appliance with circular internal components and a central dial (no visible text or symbols)- Using the Rack Remover, insert the hook into the hole of Heating Element Cover. Lift and place the prepared poultry or meat over the Drip Tray handle and Center Heater and lower into position. Always unhook and remove the Rack Remover before cook-
ing. (FIG.2)
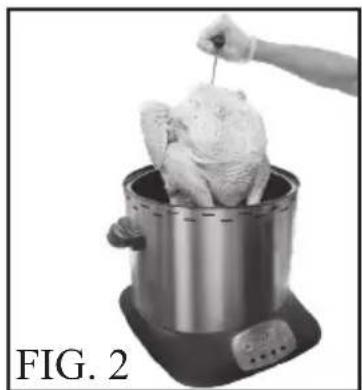
natural_image
Person using a skewer to place a whole chicken on a metal kitchen appliance (no text or symbols visible)- Place the Glass Cover into position on the Main Body.
OPERATING INSTRUCTIONS
- Plug the power cord into a polarized 120 Volt A.C. electrical outlet. If the plug does not fit try reversing the plug. If it still does not fit, consult a qualified electrician.
- Press the ‘POWER’ button. The Control Panel will be lit showing default settings. (Default settings: High Heat, Center Heating ON, Time 2:00 hours).
- Press the “▲” or “▼” keypad to increase or decrease cooking time in “minute” increments. Maximum cooking time is 4:00 hours.
- Press the “HEAT” button to select “HIGH” or “LOW” heat settings. On HIGH setting two of the outside heaters are active at all time. On LOW setting only one heater is active at all time.
- Press “START/PAUSE” button to begin cooking. The digital display will begin to countdown and show the time remaining. The ‘Circle of Heat’ will show which heating elements are active and will rotate around the food.
- When the cooking cycle has finished, the roaster will beep twice and the Digital Display will show “02:00” and the heating elements will turn off automatically.
CAUTION: The Glass Cover will become very hot during use. Always handle with care and use oven pads or mitts. The cooking process creates steam that can cause burns.
- Use a hot pad or oven mitt to carefully lift the Glass Cover and set aside on a heat resistant surface. Tilt the Glass Cover when opening so that the steam is directed away from the face and hands.
- To ensure that the food is cooked properly, check the internal temperature of the food periodically with a food thermometer.
- Using the Rack Remover, insert the hook into the hole at the end of the Heating Element Cover to lift the food from the Main Body.
ESTIMATED COOKING SETTINGS
Please find the estimated settings and cooking times below:
| Meat Type | Suggested Heat Setting | Recommended Internal Temperature | Estimated Cook Time |
| Whole Turkey 10 to 14 lbs. | HIGH 165°F 6 min/lb | ||
| Whole Turkey 14 to 18 lbs. | HIGH 165°F 6 min/lb | ||
| Whole Chicken 4-6 lbs. | HIGH 165°F 8 min/lb | ||
| Beef Roast 2 to 3 lbs. | HIGH 145°F | Allow to rest for at least 3 minutes. | 15 min/lb |
| Beef Roast 4 to 6 lbs. | HIGH 145°F | Allow to rest for at least 3 minutes. | 10 min/lb |
| Boneless Pork Loin Roast 2 to 4 lbs. | HIGH 145°F | Allow to rest for at least 3 minutes. | 8 min/lb |
- Estimated cooking times shall be used as a reference point. Adjust estimated cook times accordingly for desired results.
- Cook times will be slightly longer when using the LOW Heat setting.
- Cooking times for beef will vary depending on the desired doneness of the meat. Do not use the center heating element if you want the food to be cooked “rare”.
- Check the internal temperature of the food periodically with a food thermometer.
- Always reference the recommended internal temperatures of the food at the end of the cooking cycle, according to USDA Food Safety and Inspection guidelines.
- For best results, allow food to rest for 10 to 15 minutes before serving.
- A small amount of “trial and error” may occur as you perfect your cooking technique and experiment with different sizes and types of foods.
- A NOTES section has been added to this manual for documenting tips, recipes and other important cooking notes.
CLEANING AND MAINTENANCE
- Turn off the roaster by pressing “POWER” on the Control Panel. Remove the plug from the wall outlet and allow the appliance to cool completely.
- All removable parts are dishwasher safe or may be washed by hand in hot soapy water. Rinse and dry thoroughly after washing.
- Carefully remove the Drip Tray from the Main Body and pour the drippings into a suitable container. Always clean the Drip Tray after each use.
- The Glass Cover may be cleaned with a scouring pad, along with a non-abrasive cleanser to remove burnt-on residue. Dry thoroughly.
- After a few uses the Heating Element Cover will discolor - this is normal.
- Clean the interior of Main Body and heating elements with a damp cloth or sponge to remove residue. Dry with a paper towel or soft cloth. Do not use abrasive cleaners on interior or exterior surfaces.
- When cleaning cooked-on food residue located on the interior surfaces or Glass Cover, use a brush, non-abrasive mesh pad with a dishwashing detergent and water. NEVER spray water or cleaners directly onto the interior surface of the Main Body.
- Clean the exterior surface of the Main Body with a damp cloth after each use. Dry thoroughly with a soft cloth.
DO NOT SPRAY OR IMMERSE THE MAIN BODY OF THE APPLIANCE IN WATER OR ANY OTHER LIQUID.
FOR MISSING OR REPLACEMENT PARTS, PLEASE CALL 1-800-288-4545. DO NOT RETURN TO STORE.
STORAGE AND DISPOSAL
STORAGE:
- NEVER store the appliance on its side. Store the appliance on a flat, clean, cool, dry area out of the reach of children and pets.
- Always ensure that the appliance is unplugged and has cooled down completely before storing or cleaning.
- Clean with a damp cloth and mild detergent and dry thoroughly before storing.
- Save the packaging for transporting or storage of the appliance when not in use for extended periods of time.
DISPOSAL:
- This appliance may not be disposed of with ordinary household waste. Electrical and electronic waste must be disposed of properly.
- Contact your local municipal authorities for further information on product disposal.
IMPORTANT GUIDELINES
- Thoroughly defrost all meat and poultry before cooking.
- Cooking cycles will vary according to thickness, shape and consistency of the food. To avoid over-cooking, it is recommended that the food be checked after the minimum cook time stated in the estimated cooking settings on page 11.
- Select roasts that have even shape as they will cook in a more uniform way.
- The maximum recommended size for poultry is 18 lbs.
- Marinate, rubs, seasonings and spices should be applied to foods before loading into the roaster.
- Recommended internal temperatures for beef are: Rare 140^ ; Medium Rare 145^ ; Medium 160^ ; Well 170^ .
- For even cooking results, center the Heating Element Cover as much as possible inside the roast. The larger end of the roast should be positioned at the top, not at the bottom.
- If the length of the roast isn’t the same size as the Heating Element Cover, please leave the meat positioned near the top instead of near the bottom end of the Center Heating Element.
CAUTION: Always ensure that the poultry or meat is thoroughly cooked. The drippings from the poultry should be clear when cooking cycle is complete.
- We recommend using a meat thermometer to ensure that the food is thoroughly cooked.
- Before serving, let the food rest for 10 minutes after removing it from the roaster. For a juicier poultry or roast, do not serve the food immediately after the cooking cycle has finished.
- For easier cleanup, spray the Drip Tray, Top Rack, Bottom Rack and Heating Element Cover with a spray-on cooking oil before cooking. NEVER spray these parts while the roaster is in operation.
TROUBLESHOOTING
The turkey does not fit in the roaster:
- Try to center the turkey as much as possible when positioning on the Top Rack.
- If necessary, tuck the wing tips behind the neck or keep the turkey wings in place by using food safe string.
- Large birds may simply not fit in. We do not recommend using this roaster for poultry over 18 lbs.
Countdown minutes will not change on display:
- The keypad may not have been pushed long enough or with enough force.
- To advance the time faster on the digital display, push and hold the “▲” time button down.
The roaster does not turn on or will not get hot:
- The POWER button must be pressed before pushing the START/PAUSE button.
- Ensure that the roaster was plugged in properly.
The roasts and poultry are not thoroughly done:
- Estimated cooking cycles shall be used as a reference point. Make sure the Timer is set up properly.
- The cooking cycles in this manual are approximate. Increase the cooking times for desired results.
The meat is done on the inside but overdone on the outside:
- Turn off the center element when cooking or switch to Low heat half way through the cooking cycle.
- Thicker meats require more cooking time at a reduced heat.
TROUBLESHOOTING
The meat sticks to the Heating Element Cover:
- Spray the Center Heating Element with spray-on cooking oil before loading the roast.
- Let the roast rest for about 10 minutes before trying to remove it from the Heating Element Cover.
- If necessary, cut the roast lengthwise down one entire side to remove the Heating Element Cover.
Liquid or drippings are collecting at the bottom the Main Body :
- If cooked food is allowed to stand in the roaster to cool, condensation will collect and run down the interior walls into the bottom of the unit.
- Make sure the drip tray is in place and properly positioned. Clean before and after each use.
- Drippings may run down the Heating Element Cover and collect in the bottom.
- During operation, some drippings may bypass the drip tray and splatter onto the interior walls and run down into the bottom of the unit.
- Press the PAUSE button and carefully remove the cooking stand and food. Always use oven mitts or pads. Empty the Drip Tray halfway through cooking cycle if it is full or if the food being cooked has a high percentage of fat content.
Steam and/or smoke is present during operation:
- It is normal to have some smoke coming from the unit during first use. (Please refer to the Before First Use section on page 7.)
- Food residue or splatters on the interior surface may cause minimal smoke. Make sure to wipe out the interior of the roaster after every use.
- Always ensure that the food is not touching the outer heating elements. Tuck or tie the turkey wings in with food safe string so they won't touch the outer heating elements.
NOTES
WARRANTY
Your product warranty is good for one year from date of purchase against all defects in material and workmanship. Should your product prove defective within one year from date of purchase or receipt, return the unit, freight prepaid, along with an explanation of the claim. Please package your product carefully in its original box and packing material to avoid damage in transit. We are not responsible for any damage caused to the product in return shipment. Under this warranty, we undertake to repair or replace any parts found to be defective.
This warranty is only valid if the product is used solely for household purposes in accordance with the instructions. This warranty is invalid if the unit is connected to an unsuitable electrical supply, or dismantled or interfered with in any way or damaged through misuse.
We ask that you kindly fill in the details on your warranty card and return it with a copy of your receipt within one week from date of purchase. Send warranty card to:
NESCO ^® Upright Turkey Roaster / ITR-01
C/O MW
PO Box 237
Two Rivers, WI 54241-0237
NESCO®

text_image
Customer Satisfaction™1 - 800 - 288 - 4545
NESCO®

natural_image
Illustration of a simple cooking pot with a Tesco appliance (no text or symbols on the pot itself)Mode d'emploi
natural_image
Simple line drawing of a retro computer with monitor and keyboard (no text or symbols)natural_image
Top-down schematic of a mechanical or electrical device with circular components and a control panel (no text or symbols visible)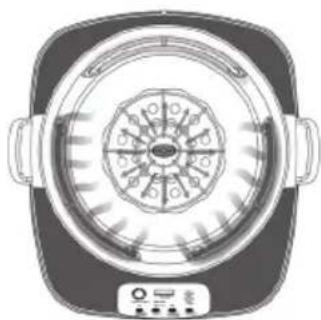
natural_image
Top-down schematic of a circular heating element with radial slots and control panel (no text or symbols)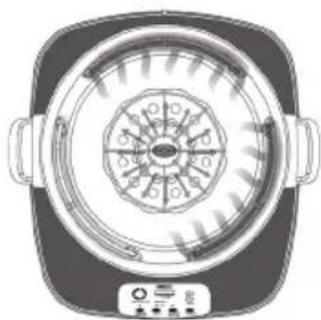
natural_image
Top-down technical illustration of a mechanical or electrical device with no visible text or symbolsnatural_image
Black-and-white photo of a sculpted chicken on a mechanical base, with no visible text or symbols in the main image area.natural_image
Top-down view of a black appliance with circular cavities and a central dial (no text or symbols visible)natural_image
Person using a kitchen appliance to stir a roasted chicken (no text or symbols visible)text_image
Customer Satisfaction™1 - 800 - 288 - 4545