
BL2338 - Blender TEFAL - Free user manual and instructions
Find the device manual for free BL2338 TEFAL in PDF.
| Brand | Tefal |
| Model | BL2338 |
| Product type | Blender |
| Bowl capacity | 1.5 L (thick mixtures) / 1.25 L (liquid mixtures) |
| Bowl material | Graduated glass |
| Number of speeds | 5 speeds + Pulse function |
| Motor | Electric with electronic overload protection |
| Included accessories | Blender bowl, herb mill, spice mill (depending on model) |
| Functions | Blending, chopping, emulsifying, preparing soups, sauces, etc. |
| Safety | Safety lock requiring a double click to operate |
| Care and cleaning | Bowl and accessories dishwasher safe (upper basket, ECO program); motor unit cleaned with a damp cloth |
| Blade unit disassembly | Removable for cleaning by pressing the click button |
| Lid seal | Removable for cleaning |
| Plug type | Standard mains plug |
| Warranty | See warranty booklet |
| Consumer service | Contact details in the warranty booklet |
| Repairability | Spare parts available (bowl, mills, etc.) from retailers or authorized service centers |
Frequently Asked Questions - BL2338 TEFAL
User questions about BL2338 TEFAL
0 question about this device. Answer the ones you know or ask your own.
Ask a new question about this device
Download the instructions for your Blender in PDF format for free! Find your manual BL2338 - TEFAL and take your electronic device back in hand. On this page are published all the documents necessary for the use of your device. BL2338 by TEFAL.
USER MANUAL BL2338 TEFAL
natural_image
Line drawing of a kitchen blender with a clic button and leafy interior (no text or symbols)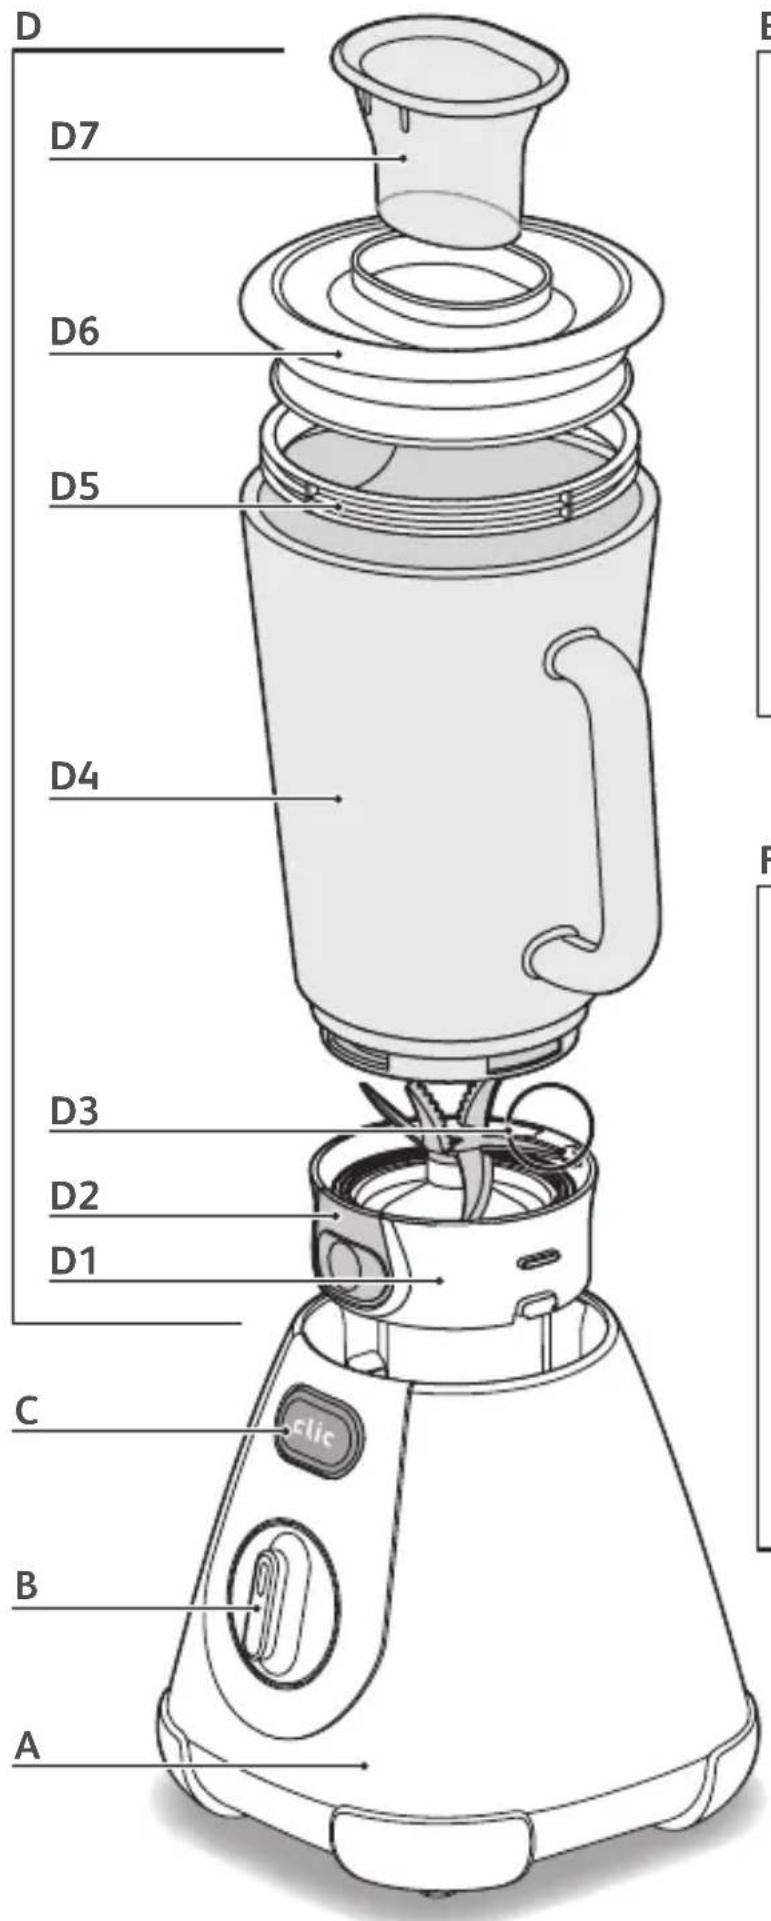
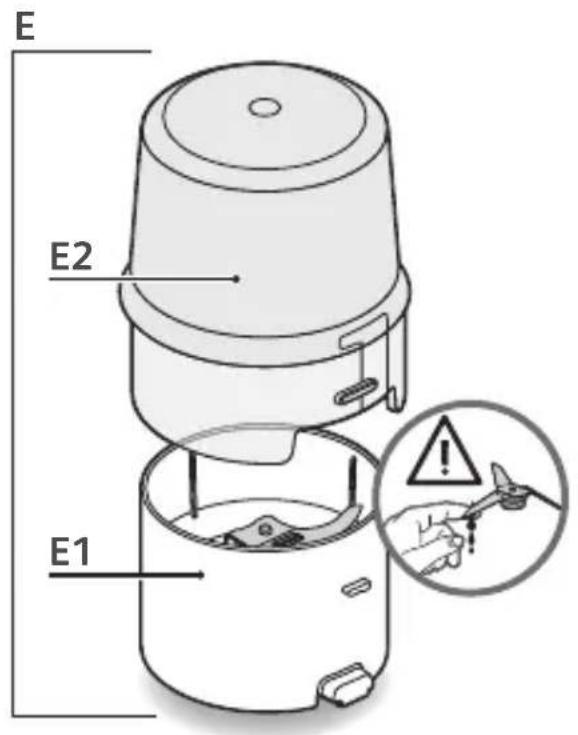
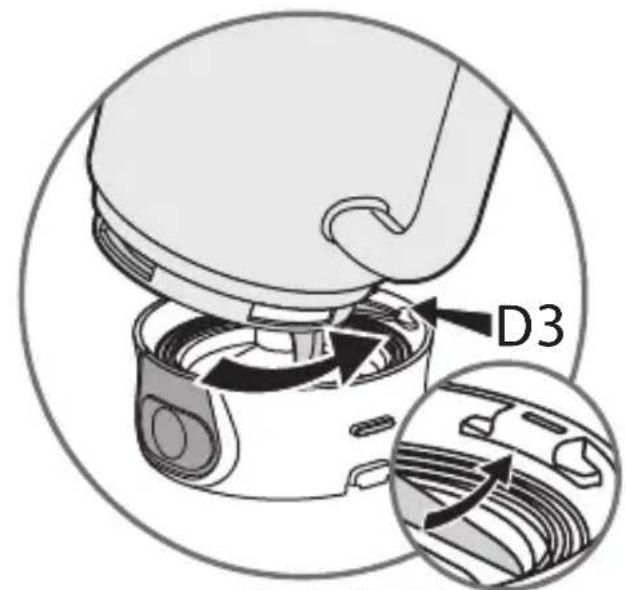
fig.1afig.1b
natural_image
Diagram of a hand pressing down on a device component, showing rotational motion with arrows (no text or symbols)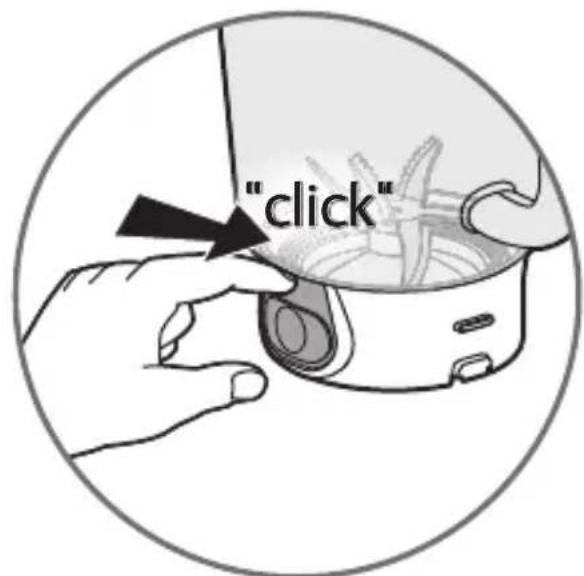
fig.1cfig.2b
4.gif3.gif
DESCRIPTION DE L'APPAREIL
FR
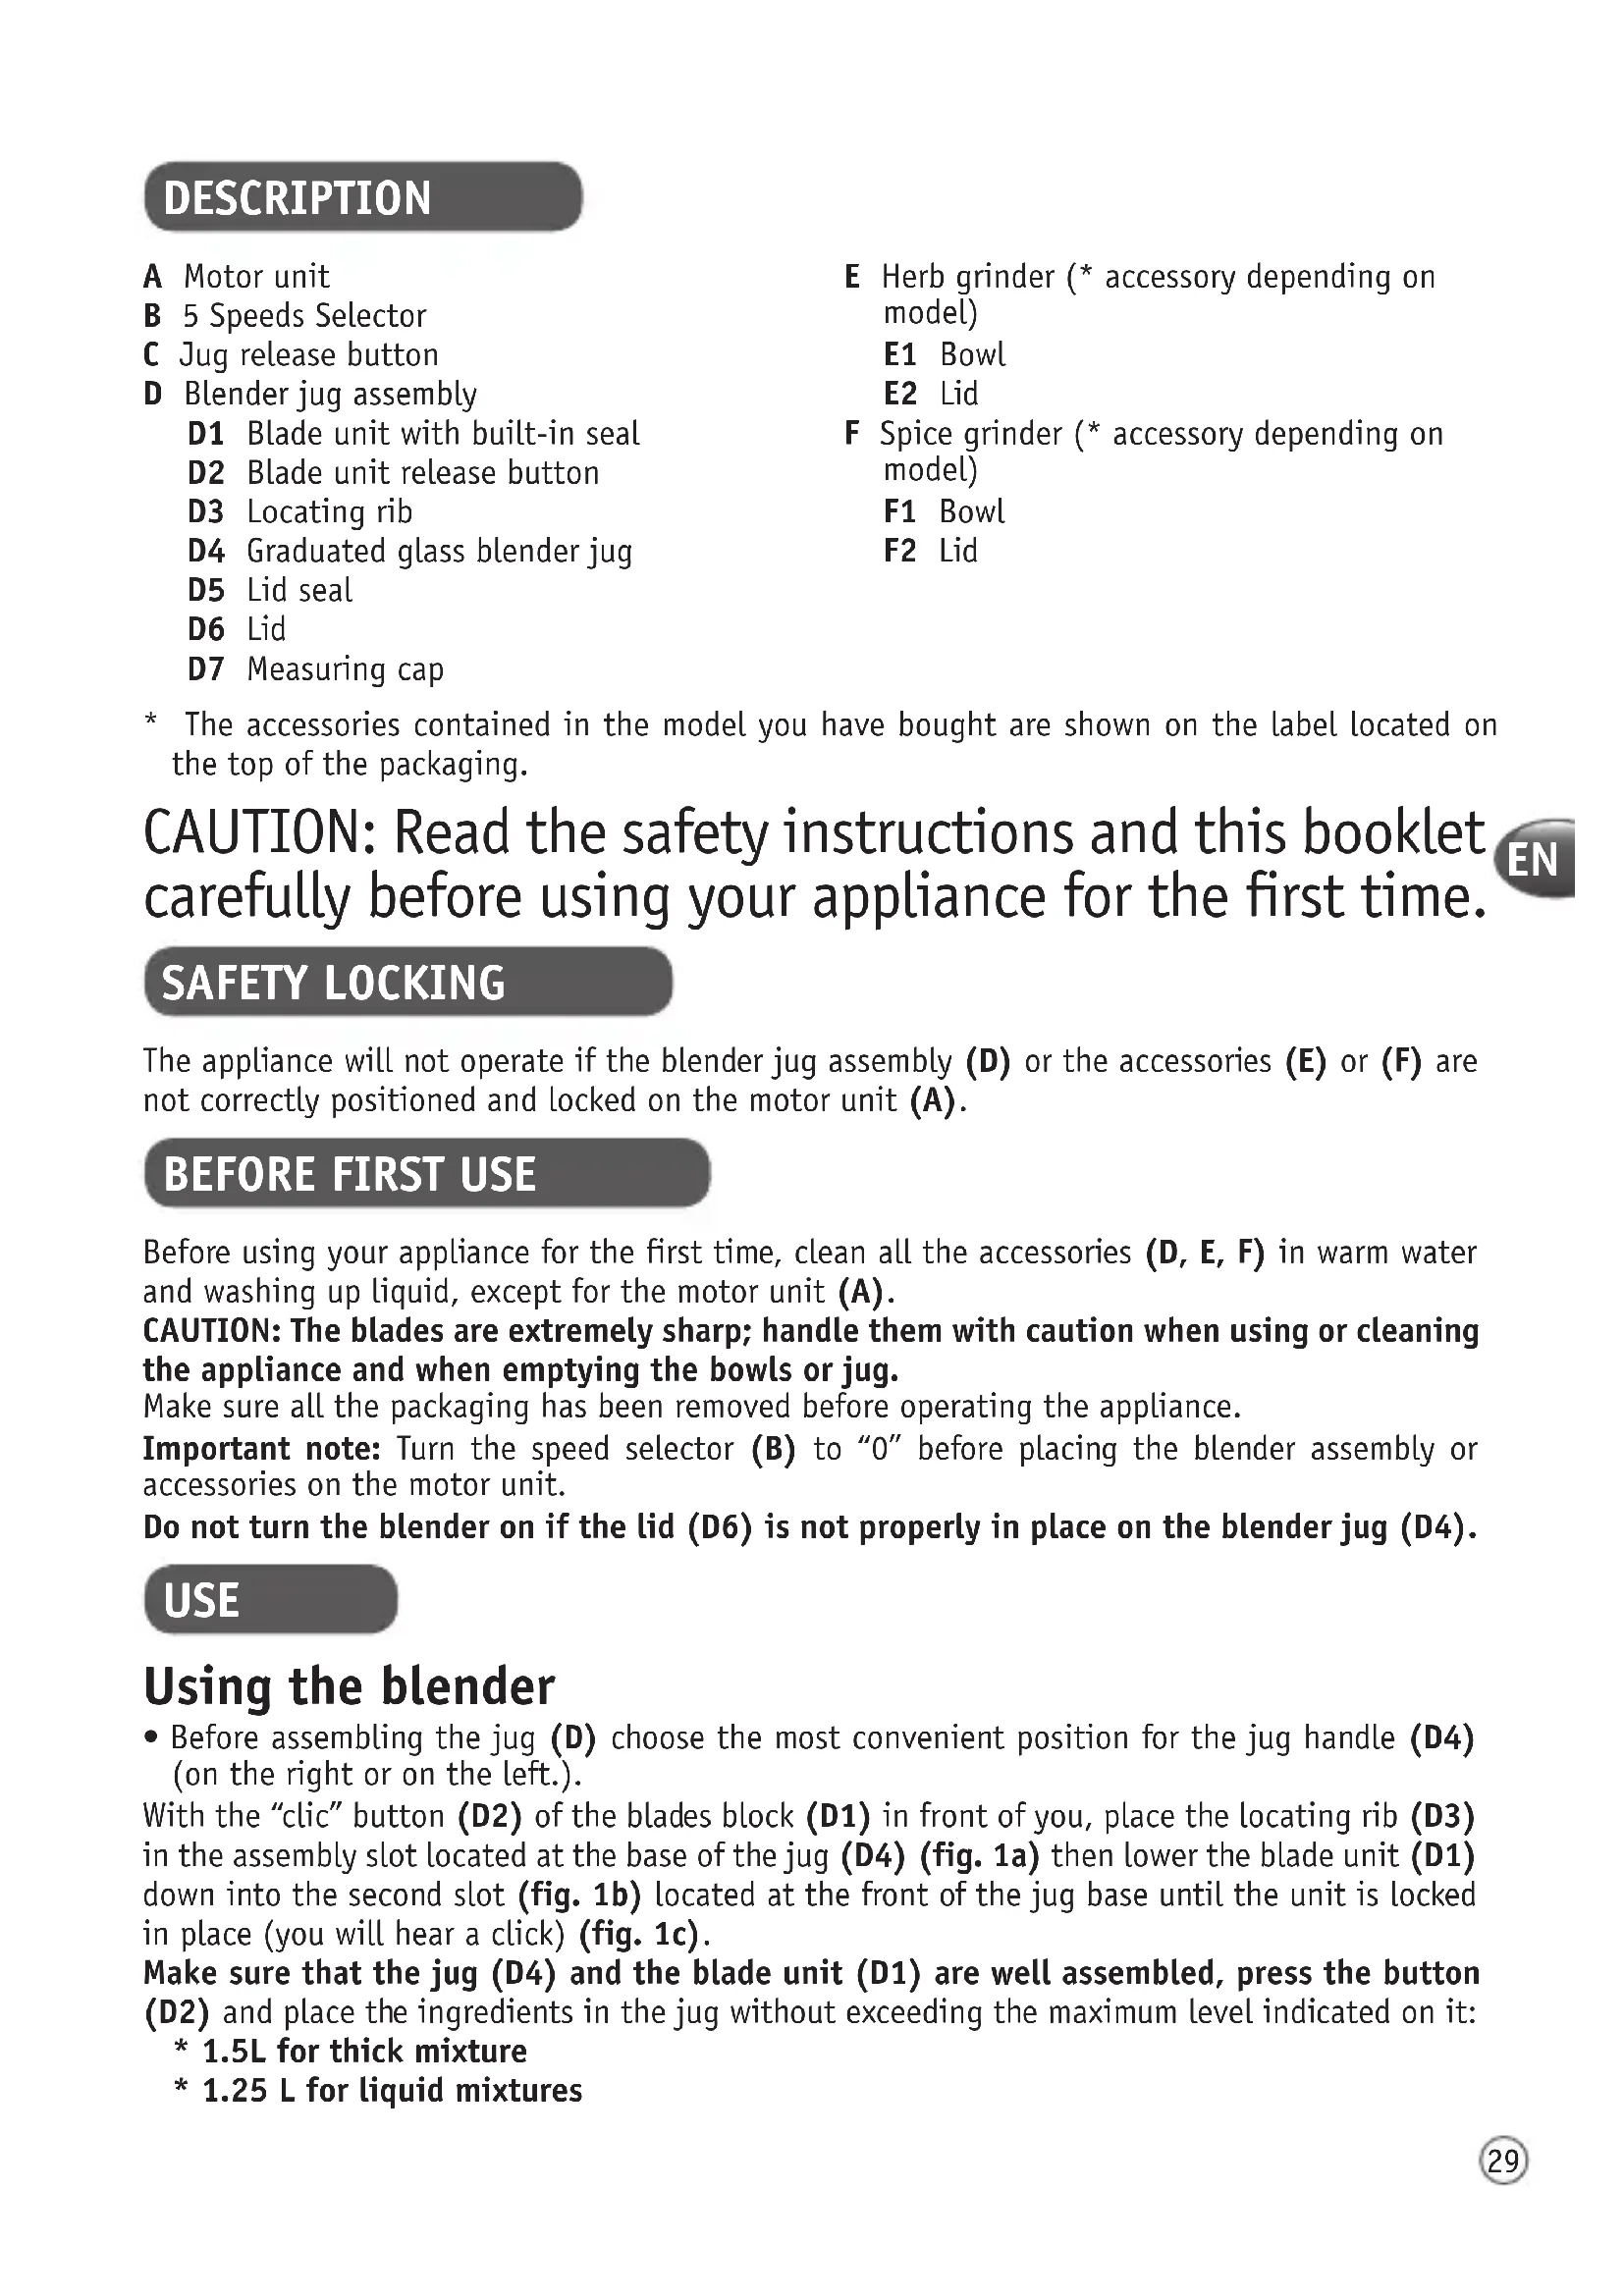
D1 Blade unit with built-in seal
D2 Blade unit release button
D3 Locating rib
D4 Graduated glass blender jug
D5 Lid seal
D6 Lid
D7 Measuring cap
E Herb grinder (* accessory depending on model)
E1 Bowl
E2 Lid
F Spice grinder (* accessory depending on model)
F1 Bowl
F2 Lid
* The accessories contained in the model you have bought are shown on the label located on the top of the packaging.
CAUTION: Read the safety instructions and this booklet carefully before using your appliance for the first time.
EN
SAFETY LOCKING
The appliance will not operate if the blender jug assembly (D) or the accessories (E) or (F) are not correctly positioned and locked on the motor unit (A).
BEFORE FIRST USE
Before using your appliance for the first time, clean all the accessories (D, E, F) in warm water and washing up liquid, except for the motor unit (A).
CAUTION: The blades are extremely sharp; handle them with caution when using or cleaning the appliance and when emptying the bowls or jug.
Make sure all the packaging has been removed before operating the appliance.
Important note: Turn the speed selector (B) to "0" before placing the blender assembly or accessories on the motor unit.
Do not turn the blender on if the lid (D6) is not properly in place on the blender jug (D4).
USE
Using the blender
- Before assembling the jug (D) choose the most convenient position for the jug handle (D4) (on the right or on the left).
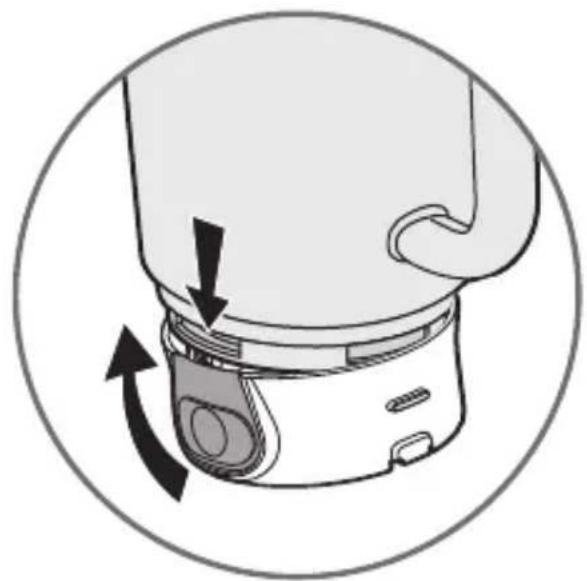
With the "clic" button (D2) of the blades block (D1) in front of you, place the locating rib (D3) in the assembly slot located at the base of the jug (D4) (fig. 1a) then lower the blade unit (D1) down into the second slot (fig. 1b) located at the front of the jug base until the unit is locked in place (you will hear a click) (fig. 1c).
Make sure that the jug (D4) and the blade unit (D1) are well assembled, press the button (D2) and place the ingredients in the jug without exceeding the maximum level indicated on it:
* 1.5L for thick mixture
* 1.25 L for liquid mixtures
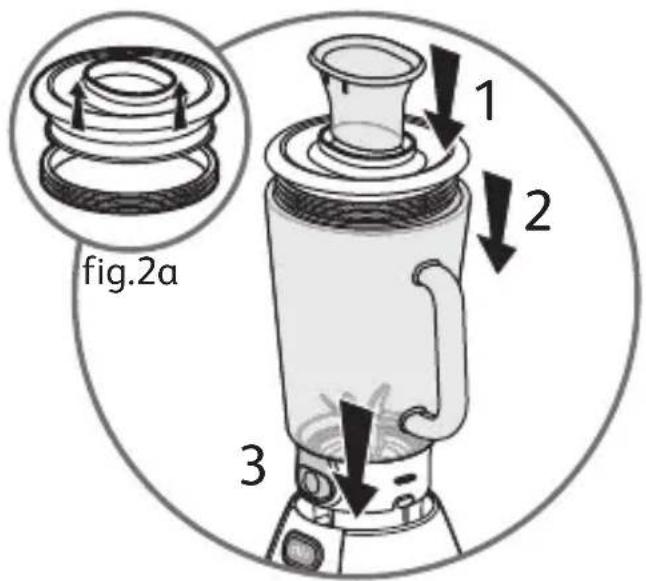
Make sure that the seal (D5) is on the lid (D6) (fig. 2a) and place the two together on the jug (D4). Put the cap (D7) in the slot on the top of the lid.
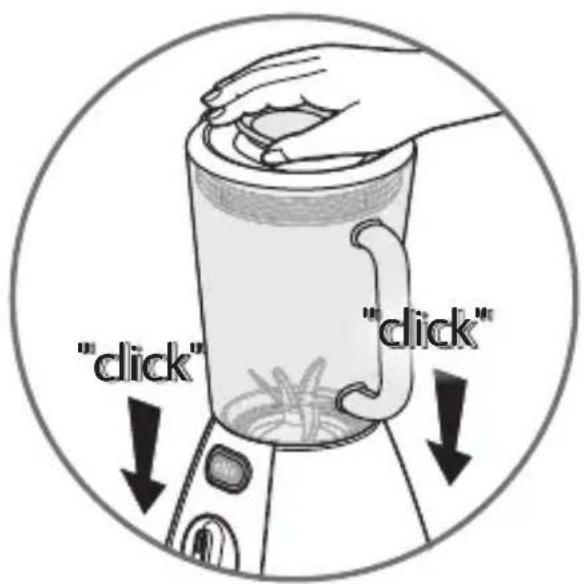
Place the assembled blender jug (D) on the motor unit (A), with the "clic" button (D2) on the blade unit aligned with the "clic" button (C) on the motor unit (fig. 2b) and press the jug down firmly to lock it on the motor unit (you will hear a double click) (fig. 3).
Plug in the appliance and turn the speed selector (B) to the desired position or press "Pulse" a few times.
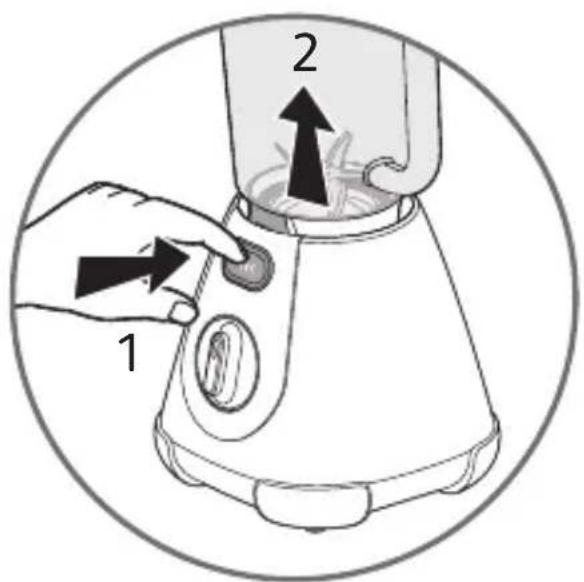
To stop the appliance, turn the speed selector (B) to the "0" position. Unplug the appliance. Remove the jug (D) from the motor unit (A) by pressing the "clic" button (C) then lift off the jug (fig. 4).
Using the lift herb grinder and spice grinder
- With the herb grinder (E), you can chop ingredients like onion, garlic, meat (cut into pieces), dried fruits and herbs in a few seconds and make crumbs (from rusks, etc). Do not use the herb grinder for liquid preparations (fruit juices, etc.).
- With the spice grinder (F), you can grind to a powder a variety of spices in a few seconds: coriander seeds, peppercorns, etc.
These accessories come with a lid that prevents access to the blades during use. Add the ingredients to the bowl (E1) or (F1). Line up the symbol ▼ on the lid (E2) or (F2) with the symbol ▲ on the bowl (E1) or (F1). Fit the bowl onto the lid and turn the lid clockwise up to 🔒 to lock the assembly (fig. 5).
Place the assembly (E) or (F) on the motor unit, lining up the 2 ribs of the accessory with the slots on the motor unit, with the "clic" mark on the lid aligned with the "clic" button (C) on the motor unit (fig. 6a) and press down the accessory firmly to lock it on the motor unit (you will hear a double click) (fig. 6b).
Plug in the appliance and turn the speed selector (B) to the desired position or press "Pulse" a few times. Hold the accessory firmly during operation. To stop the appliance, turn the speed selector (B) back to position "0". Unplug the appliance. Hold the accessory and release it from the motor unit by pressing the "clic" button (C) on the motor unit (A) (fig. 4).
Unlock the lid in the reverse order of the assembly.
You can then remove the preparation in the bowl.
| Ingredients Quantity (max) Operating time Accessories | |||
| Dried apricots 80g | Turn button to pulse continually for 4 seconds | E | |
| Breadcrumbs 1 rusk In pulses E | |||
| Onion 50g 5 seconds on speed 1 E | |||
| Parsley 6g In pulses E | |||
| Meat, cut into cubes (gristle and sinew removed) | 60g In pulses E | ||
| Coriander seeds 50g 60 seconds on speed 5 F | |||
| Peppercorns 50g 60 seconds on speed 5 F | |||
| Thick mixtures | Max. 1.5 L | 3 minutes max. on speed 5 | D |
| Liquid mixtures | Max. 1.25L | 3 minutes max. on speed 5 | D |
CLEANING
Unplug the appliance and remove the bowl or accessories.
The blades of the accessories are very sharp. Handle them with caution.
Rinse the jug, bowls and lids immediately under running water and the removable parts in hot water and washing up liquid.
For easy cleaning, you can detach the blade unit (D1) from the jug (D4) by pressing the "clic" button (D2) (fig. 7a, 7b, 7c).
The seal of the blade unit (D1) is not detachable. The lid joint (D6) is removable.
The jug (D) and the accessories (E) and (F) can be cleaned in the dishwasher in the top basket with the "ECO" or "LIGHTLY SOILED" programme.
Clean the motor unit (A) with a damp cloth and dry carefully.
Never immerse the motor unit (A) in running water or any other liquid..
WHAT TO DO IF YOUR APPLIANCE DOES NOT WORK?
| Problems Causes Solutions | ||
| The product does not work. | The plug is not connected. | Connect the appliance to a socket with the same voltage. |
| The jug or accessory is not correctly positioned or locked on the motor unit. | Check that the jug or accessories are correctly positioned and locked on the motor unit as shown in the instructions You must hear a double “click”. | |
| The blade unit (D1) is not correctly attached to the jug (D4). | Unlock the blade unit (D1) and bolt it to the jug (D4) (fig 1a, 1b, 1c) once again. | |
| The product stops while in use. | Overload of ingredients (activation of electronic motor safety device). | In this case, unplug the product, put the button back to 0 position and let it cool down for a minimum of 30 minutes. |
| Excessive vibrations. The product is not placed on a flat surface. | Place the product on a flat surface. | |
| Volume of ingredients is too high. | ||
| Leak from the lid. Volume of ingredients is too high. | Reduce the quantity of ingredients processed. | |
| The lid is not correctly positioned. | ||
| The seal (D5) is not well placed on the lid. | ||
| Problems Causes Solutions | ||
| Leak at the bottom of the jug. | The blade unit (D1) is not properly or securely locked on the jug (D4). | Place the blade unit correctly on the jug; you must hear a click.The button (D2) must be fully aligned with the blade unit (D1). |
| The blade does not turn easily. | Pieces of food too large or too hard. | Reduce the size or quantity of ingredients processed. Add liquid. |
YOUR APPLIANCE STILL DOES NOT WORK?
Contact customer services (see contact details in the guarantee booklet).
ACCESSORIES
You can customise your appliance and obtain the following accessories from your usual retailer or an approved service centre: Herb grinder accessory (E), Spice grinder accessory (F) or additional blender jug (D).
Please refer to this instruction leaflet first and contact an approved service centre (see list at the end) giving the product code for your appliance LMxxx or BLxxx.
RECYCLING

- Disposal of the appliance and its packaging materials.
The packaging is comprised exclusively of materials that present no danger for the environment and which may therefore be disposed of in accordance with the recycling measures in force in your area. For disposing of the appliance itself, please contact the appropriate service of your local authority.
• End of life electrical and electronic products.
Your appliance is expected to last for many years. However, when the time comes to replace it, do not throw it in the bin or in a dump, but take it to the recycling centre in your town (or to a waste reception centre where applicable).
i
Think of the environment!
Your appliance contains valuable materials which can be recovered or recycled. Leave it at a local civic waste collection point.