
Vega - Juicer Melchioni - Free user manual and instructions
Find the device manual for free Vega Melchioni in PDF.

User questions about Vega Melchioni
0 question about this device. Answer the ones you know or ask your own.
Ask a new question about this device
Download the instructions for your Juicer in PDF format for free! Find your manual Vega - Melchioni and take your electronic device back in hand. On this page are published all the documents necessary for the use of your device. Vega by Melchioni.
USER MANUAL Vega Melchioni
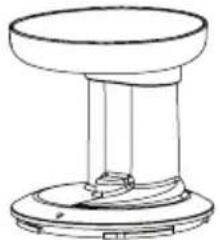
Slow Juicer Extractor
Estractor en frio
natural_image
White Melchioni family manual brush maker with black handle and red interior (no visible text or symbols on device body)ITManuale d'uso
ENUser manual
text_image
Technical diagram of a kitchen blender with labeled parts and directional arrow indicating flow or movementnatural_image
Line drawing of a kitchen blender with a spiral-shaped top and side arm (no text or symbols)text_image
① R co P b stext_image
OPEN CLOSE②
text_image
OPEN CLOSE3
natural_image
Technical line drawing of a mechanical component with no visible text or symbolsnatural_image
Technical line drawing of a mechanical component with no visible text or symbolsnatural_image
Technical line drawing of a mechanical component with no visible text or symbolsInserire saldamente
natural_image
Line drawing of a modern kitchen brush unit with handle and side compartments (no text or symbols)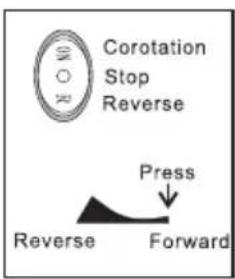
text_image
Corotation Stop Reverse Press Reverse Forwardtext_image
Corotation Stop Reverse Press Reverse Forwardnatural_image
Line drawing of a kitchen grimmer with handle and side blades, showing internal structure and motion indicator (no text or symbols)text_image
OPEN CLOSE②
natural_image
Line drawing of a kitchen blender with a side panel and handle (no text or symbols)③
natural_image
Technical line drawing of a two-tiered industrial filter or mixer device with an upward arrow indicating flow direction (no text or symbols present)④
natural_image
Diagram of a three-step cleaning or cleaning process: top view shows a spiral-shaped component, middle shows a cylindrical brush, and bottom shows a circular container with internal structure (no text or symbols)natural_image
Simple line drawing of a speaker or fan with a pointer and circular head (no text or symbols)natural_image
Line drawing of a simple cylindrical object with a flanged base and top, no text or symbols present.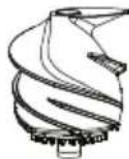
natural_image
Line drawing of a bucket and faucet with water splashing (no text or symbols)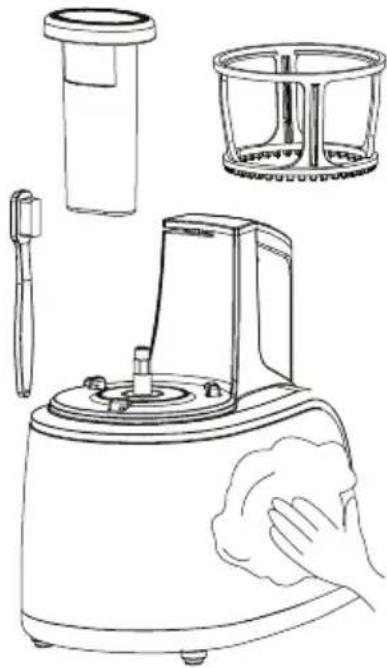
natural_image
Line drawings of a kitchen appliance with a hand cleaning it, showing components like a brush holder and filter (no text or symbols)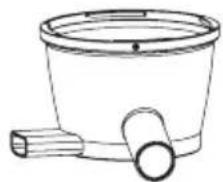
natural_image
Simple line drawing of a bucket with a handle and side outlet (no text or symbols)Note sull'utilizzo:
Before the first use, read these instructions carefully. Always follow the safety and operating instructions. Keep the instructions for future reference. Do not use the appliance for purposes other than intended. Important: This appliance can be used by children over 8 years only under supervision. Do not play with the appliance. Never leave the appliance or its cord unsupervised, or within reach of children under 8.
IMPORTANT SAFEGUARDS
-
- Do not plug the product into a socket connected to other appliances that consume a lot of energy, and provide for the installation of a 30mA differential switch.
• 2. To avoid electric shock, use the product as described in the manual.
• 3. It is absolutely forbidden to immerse the product, the power cord or the plug in water or other liquids.
• 4. Monitor the product during operation to avoid accidents.
• 5. If any parts of the product or structure are damaged (especially the protection circuit or the mains cable), do not use the centrifuge. Do not try to repair it yourself, but contact a service center.
- Do not plug the product into a socket connected to other appliances that consume a lot of energy, and provide for the installation of a 30mA differential switch.
-
- Do not let children o disabled people use the equipment unless under the supervision of an adult.
-
- Do not use the product near stoves or heat sources.
• 8. Do not use your fingers, spoons or chopsticks to press the food into the container.
• 9. During use, do not touch any of the moving parts.
- Do not use the product near stoves or heat sources.
- 10.Do not insert metal parts or objects into the motor body, to avoid short circuits.
• 11. Always disconnect the machine from the mains before cleaning or storing it or when not in use. - 12.Do not place it near flammable objects.
-
- If the power cord is damaged, have it replaced by qualified personnel.
-
14.Do not touch the cord or plug with wet or damp hands and do not pull the power cord to disconnect it from the mains, but take the plug and pull it out of the electrical socket.
- Place the centrifuge on a stable surface before turning it on.
- Keep it out of the reach of children and do not store it indoors.
- Disconnect the plug after use.
(*) Competent qualified electrician: the manufacturer's or importer's after-sales department, or any per-son who is qualified, approved and competent to perform this kind of repairs. Where necessary give the appliance to such an electrician for repairs.
SHORT CORD INSTRUCTIONS
The appliance has a short cord in order to reduce the risk of getting entangled in or tripping over a longer cord. Extension cords may be used if care is exercised in their use.
- The electrical rating of the extension cord should be at least 16 ampere. An extension cord of less than 16 ampere could overheat and get damaged.
- If you use a longer cord, arrange it properly so that it does not drape over the counter top or table top, where it could be pulled on by children or tripped over.
Product characteristics
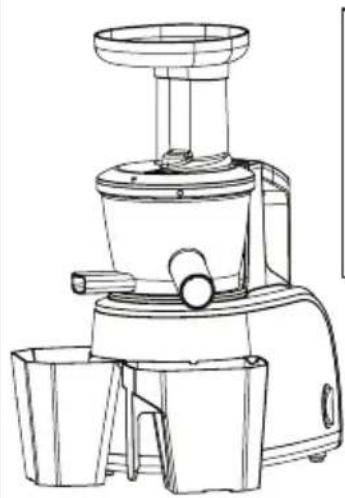
- The appliance features a non-grinding juicing method which involves slow squeezing so the natural flavour and nutrients contained in fruit and vegetables are well retained. The appliance has been designed for juicing fruit and vegetables.
- The squeezing cup may be separated from the main body for a more convenient cleaning.
- The appliance has a dual switch for great or safety (install the squeezing cup onto the main body; position the front cover and turn on the switch to make the juicer run).
*Notes: The juicer has been designed for family use. Do not use it for commercial purposes so as not to shorten its service life.
- Do not connect the appliance to the same power supply with other high-power electric appliances. Use a 30A leakage circuit breaker.
- To prevent electric leakage or other hazards, use the juicer according to these instructions.
- Do not leave the appliance unattended when in operation.
- Do not use your fingers, spoons or chopsticks to push fruit/vegetables into the feed inlet.
- Do not touch or move any moving parts during the appliance's operation.
- Do not insert any metal sheet or other conducting materials into the juicer, so as not to cause fire or short circuit.
- Do not put the appliance near inflammable goods.
- Hold the plug with your hands when pulling it out. Never pull the power line or touch the cord with wet hands.
- Make sure the juice r stands on a firm plane.
- Always pull out the power plug after use.
- Switch off the appliance and disconnect from supply before changing accessories or approaching parts that move in use.
- Always disconnect the appliance from the power supply if it is left unattended and before assembling, disassembling or cleaning.
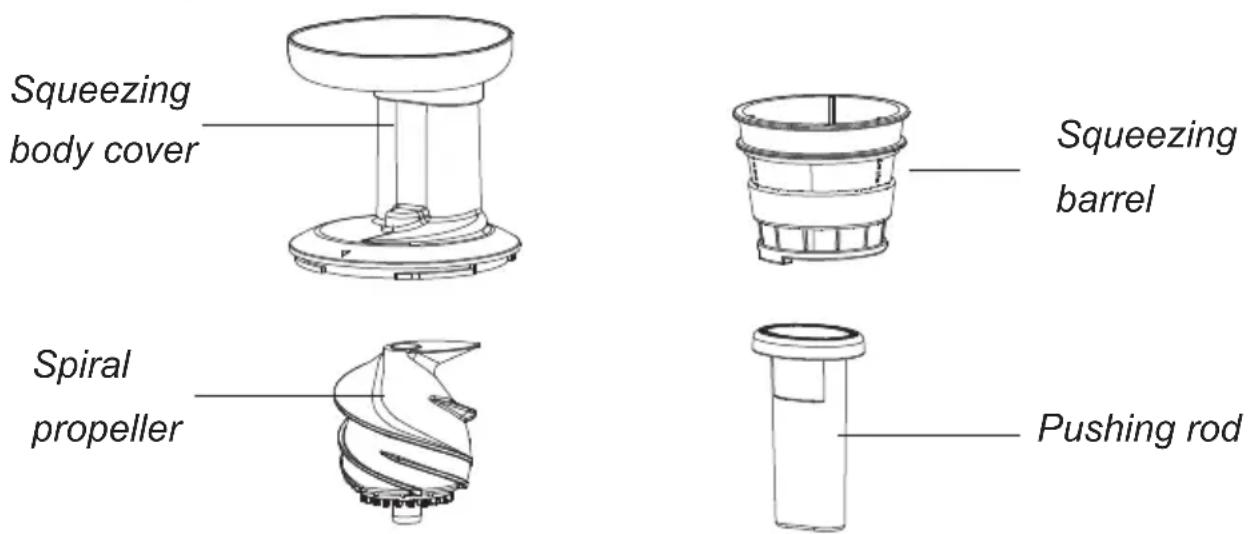
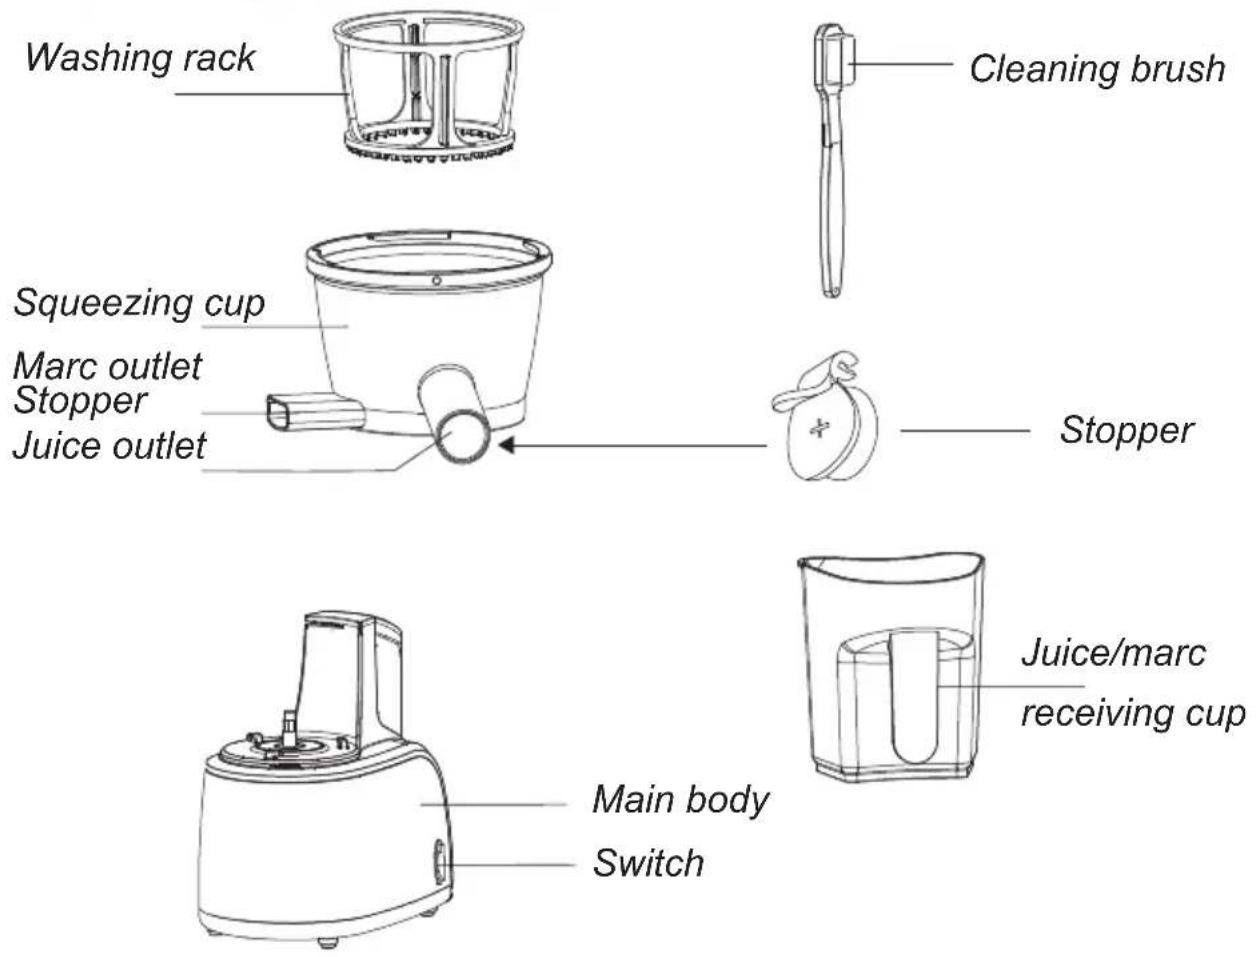
Schematic diagrams for parts
text_image
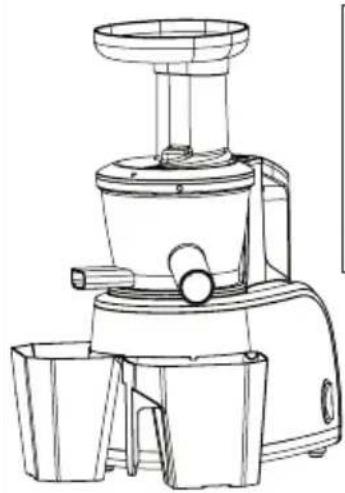
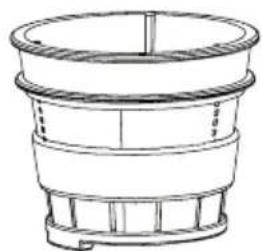
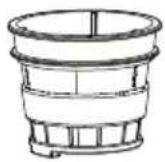
Squeezing body cover Squeezing barrel Spiral propeller Pushing rodSchematic diagrams for parts
Assembly Marking line
Reference lines
text_image
Technical diagram of a blender with labeled parts and directional arrows indicating process flow
natural_image
Technical line drawing of a cylindrical mechanical component with internal ribs and a central shaft (no text or symbols)
natural_image
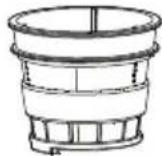
Line drawing of a cylindrical container with internal pipes and base (no text or symbols)1. Stopper
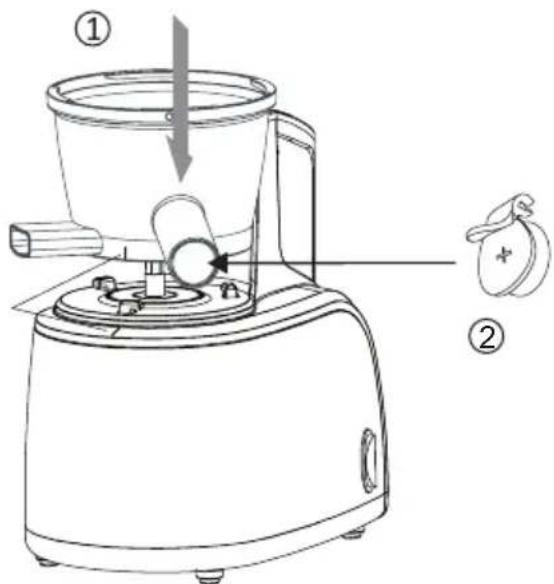
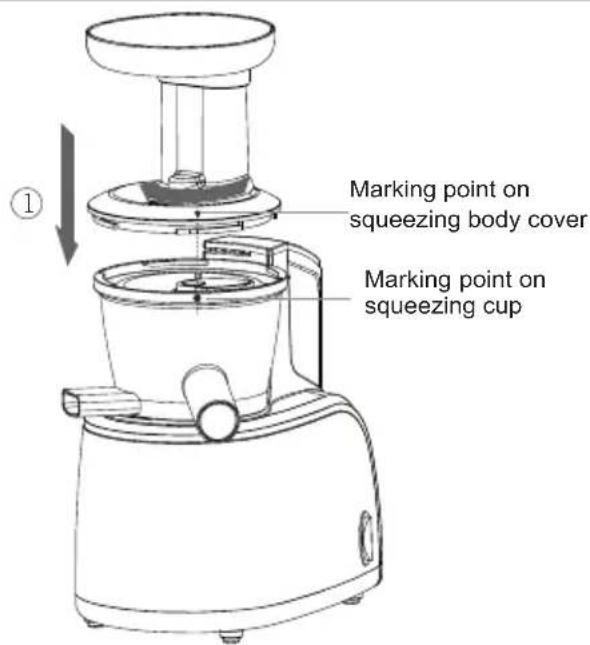
1 Insert the squeezing cup into the main body so that it is fixed in the marked position.
2 Put the stopper on the juice outlet.
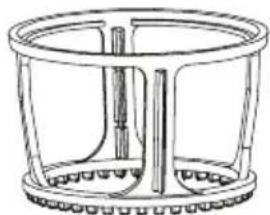
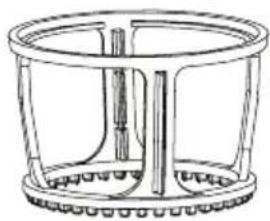
- Put the squeezing barrel into the washing rack.
text_image
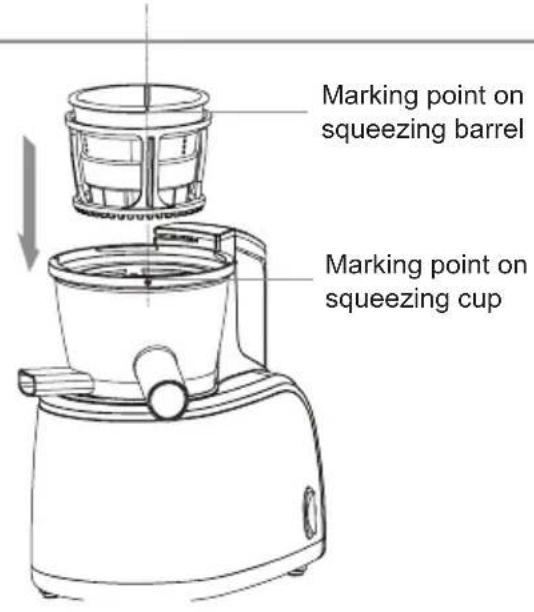
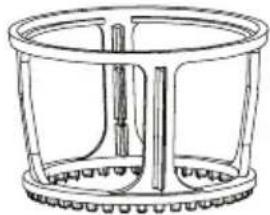
Marking point on squeezing barrel Marking point on squeezing cup- Insert the assembled squeezing barrel and washing rack into the squeezing cup.
*While inserting the barrel, align it to the marking point on the squeezing cup
natural_image
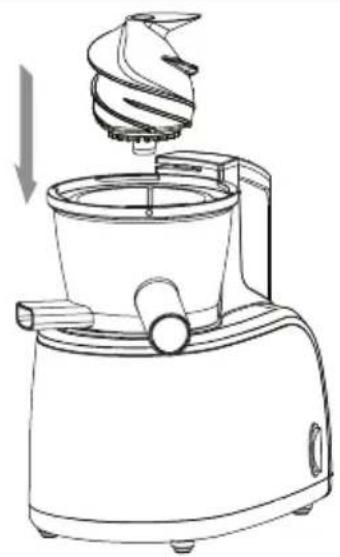
Line drawing of a kitchen blender with a spiral brush and side arm (no text or symbols)- Insert the spiral propeller into the squeezing barrel. Rotate the spiral propeller lightly to its right position.
text_image
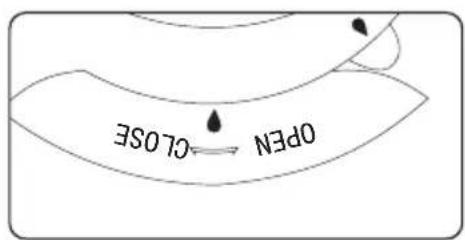
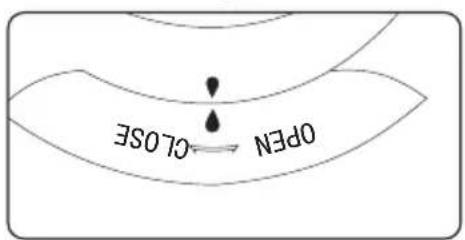
Marking point on squeezing body cover Marking point on squeezing cup- Install the squeezing body cover
1 When it is installed downwards, the marking point on squeezing body cover shall align with that on the squeezing cup.
2 3 Make “▼” at the back of the protruding part of squeezing body cover rotate towards “▲” on squeezing cup in clockwise direction and lock.
text_image
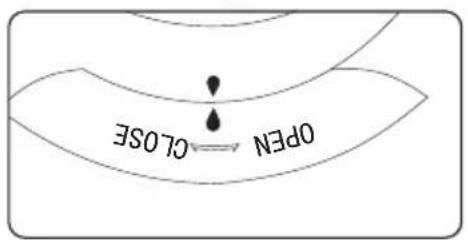
OPEN CLOSE2

text_image
Open Close3
- See the figure. Place the juice/marc receiving cups in their appropriate positions (the two cups have the same overall dimensions).
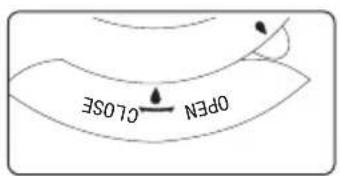
Assembly of the squeezing rubber pad
After the squeezing rubber pad is pulled out for cleaning, insert it back as indicated in the picture below.

natural_image
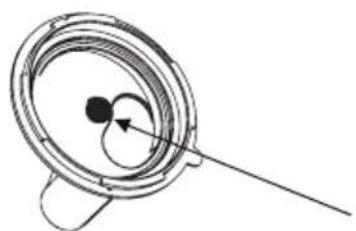
Technical line drawing of a mechanical component with no visible text or symbolsBottom of the squeezing cup
natural_image
Technical line drawing of a mechanical component with no visible text or symbolsInsert the rubber pad in the direction shown in the picture above
natural_image
Technical line drawing of a mechanical component with central bore and flange (no text or symbols)Insert it tight.
text_image
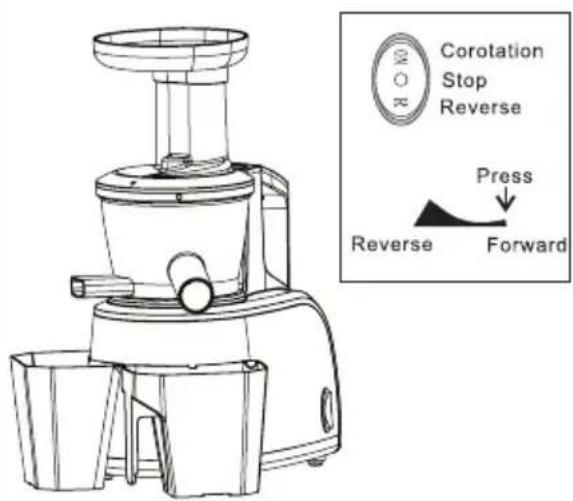
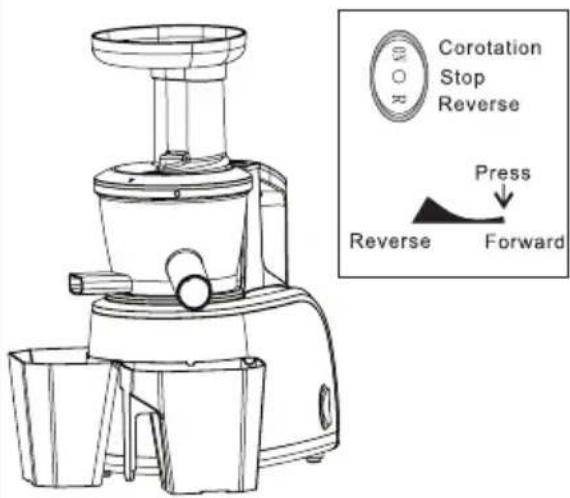
COR Corotation Stop Reverse Press Reverse ForwardTurn on the switch (forward)
Forward: Push fruit/vegetables downwards for squeezing.
Reverse: Fruit/vegetables return upwards
Note: Don't press the switch with wet hands. Don't let the unit run empty so as not to cause damage.
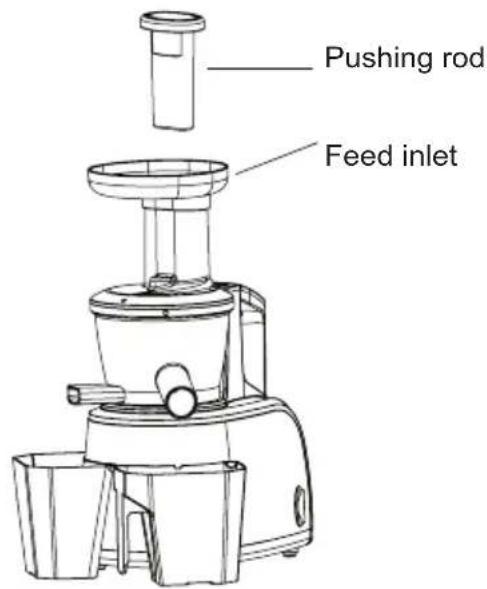
Wash the fruit/vegetables. If their sizes are larger than that of the feed inlet, cut them into blocks with proper size. Put the fruit/vegetables into the feed inlet and push inwards with the pushing rod.
Note: Use fresh fruit/vegetables. Fruit/vegetables that have been stored in a refrigerator for a long time should first be immersed in cold water for over 10min.
*Always remove kernels.
text_image
Pushing rod Feed inletIf the juicer stops suddenly during operation, press the "stop" button first, and then press the "reverse" button to push the fruit/vegetables in the spiral propeller upwards.
Press the "forward" button again (repeat the process about 3 times).
*During the "reverse" phase press the cover slightly with your hands.
*Unless the appliance runs properly after the aforesaid operation, disassemble the squeezing cup for cleaning, and then start squeezing again.
*Hard vegetables (such as carrots) should first be cut into strips so as not to cause clamping or even product damage.
The appliance has not been designed to crush grains (motor clamp and mechanical failure are likely).
text_image
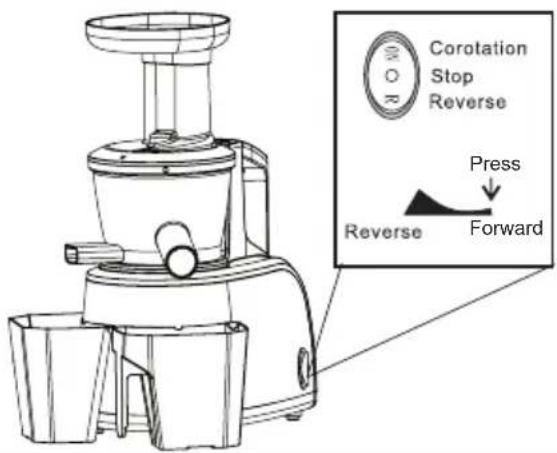
Corotation Stop Reverse Press Reverse ForwardAfter the squeezing process is completed, press the stop switch, and pull out the power plug.

Warning: Do not store the squeezed juice for a long time.
Disassembly of the squeezing rubber pad
①

natural_image
Line drawing of a small manual blender with a side panel and handle, showing no text or symbols.- Power off to stop the appliance, and pull the power plug out.
text_image
OPEN CLOSE②
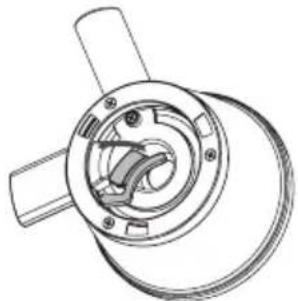
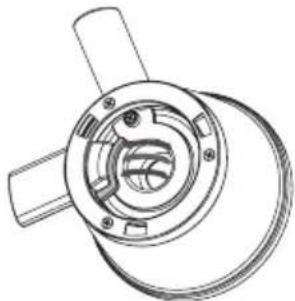
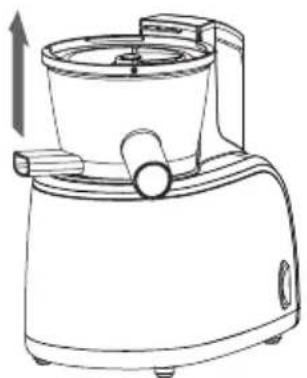
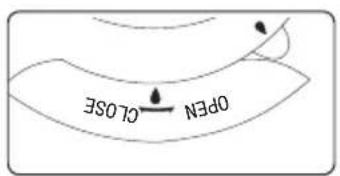
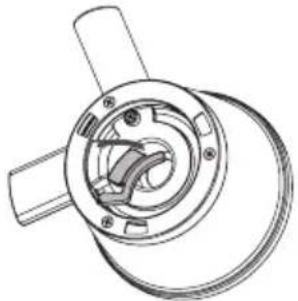
- Hold the squeezing body cover with your hands anti-clockwise (see the figure 1 2). Take the squeezing body cover out when it is rotated to the position indicated in the figure.
natural_image
Line drawing of a kitchen blender with a side panel and handle (no text or symbols)③
- Hold the juicer outlet on the squeezing cup. Shake it lightly and take it out (see the figure 3).
natural_image
Technical line drawing of a mechanical device with a top component and base, showing internal structure and flow direction (no text or symbols)4
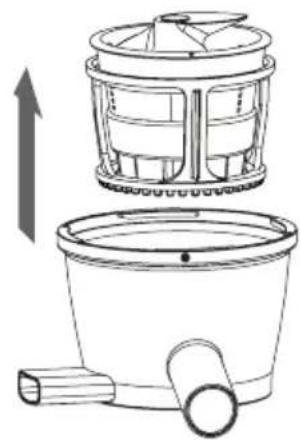
- Takethe spiral propeller + squeezing barrel + washing rack module out of the squeezing cup (see the figure 4).
natural_image
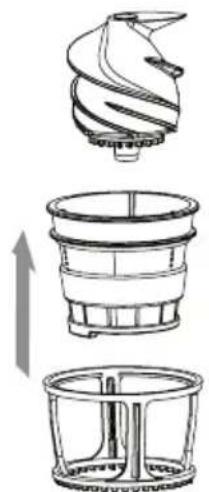
Technical line drawing of a three-step cleaning or cleaning process: top view shows a spiral-shaped component, middle shows a cylindrical filter with an arrow indicating rotation (no text or symbols)- Disassemble the spiral propeller, squeezing barrel and washing rack module.
natural_image
Simple line drawing of a speaker with a circular head and pointer, no text or symbols presentIMPORTANT. Make sure that black part is fixed inside the squeezing body cover. Using appliance without black part can damage the appliance components.
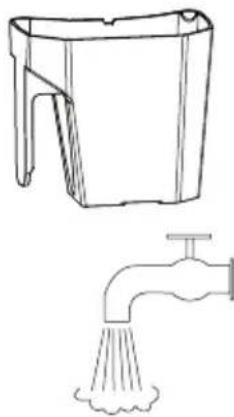
Cleaning
- Wash the disassembled parts with running water. If the meshes are blocked up by dreg, use the cleaning brush for the cleaning. Note: Do not use iron wire brushes, abradants or any sharp tools for cleaning.
- Do not put the main body in water for cleaning. Clean the main body with a wringed soft clotn.
- Let the parts dry after cleaning, and store them in a clean and ventilated place.
Notes:
- Wash the juicer in time after use, otherwise the dreg will attach to the container, which might affect the assembly and cleaning, or even result in deteriorated performance.
- The rubber pad at the bottom of the squeezing cup is washable.
natural_image
Line drawing of a simple cylindrical object with a base and top, resembling a stylus or mechanical component (no text or symbols)

natural_image
Line drawing of a bucket and a faucet (no text or symbols)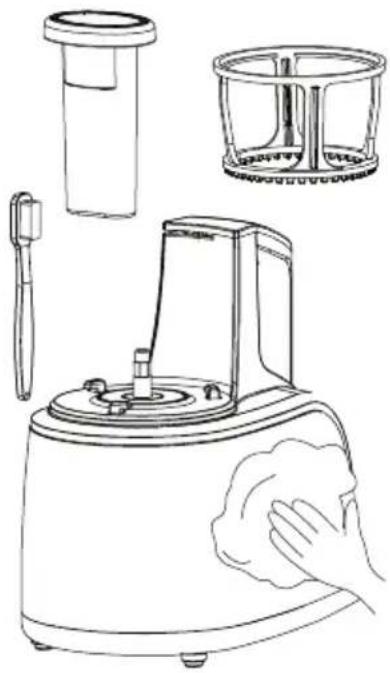
natural_image
Line drawing of a kitchen appliance with a hand cleaning it, showing components like a brush holder and filter (no text or symbols)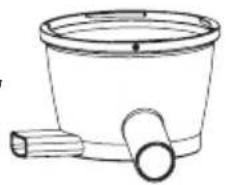
natural_image
Simple line drawing of a bucket with a handle and side outlet (no text or symbols)Notes for use:
* Please read the following contents before use
- Put the fruit/vegetables into the juicer slowly, one by one. Add new fruit/vegetables only after the previous batch has been squeezed.
- Fruit/vegetables with large fibre content (such as celery) should be put into the juicer after being cut into blocks of approx. 1-2 cm (Fruit/vegetables with particularly strong fibre should be put into the juicer slowly after being cut into blocks of about 3cm).
- For carrots which have been stored at low temperature for over one year, it is recommended to squeeze them together with some fruit/vegetables with large water content (such as pear or orange). The amount of juice will be greater when new batches are put into the juicer after previous batches have been squeezed. The amount of juice will vary depending on the fruit/vegetables water content.
- The amount of juice will be small if fruit/vegetables are not fresh. When using dry fruit/vegetables that have been stored in a refrigerator first immerse them in clear water for sufficient water absorption.
- Do not juice hard products such as kudzu, sugarcane, etc.
- There will be certain friction noise when carrots or apples are used for squeezing. It has no impact on the process
- When squeezing such products as cherry tomatoes or grapes, some juice may splash from the feed inlet.
Product specification and main parameters
Nominal Voltage : 220 - 240V
Nominal Frequency: 50 - 60Hz
Nominal Power consumption: 150W
Nominal time: ≤ 20min
Troubleshooting
| Phenomenon CAUSE | METHOD | |
| The appliance stops suddenly | A. The power plug is not properly insertedB. The quantity of fruit/vegetables put into the juicer is too largeC. Hard fruit/vegetables are not cut | A. Insert the plug into the socketB. Press “reverse” for 2-3s to make fruit/vegetables return upwards; then press “forward”(repeat the process about 3 times). If the machine still does not run, clean the machine and start juicing again.C. Hard fruit/vegetables (such as carrots) should be squeezed after being cut into strips. |
| The juice amount is small or juice flows out of the main body | A. Dry materials stored in refrigerator are used for squeezingB. The rubber pad at the bottom of the squeezing cup is not installed property | A. The juice amount will increase if fruit/ vegetables are squeezed after being immersed in clear water for sufficient water absorptionB. Reinstall the squeezing rubber pad by refer-ring to the installation method |
| There is abnormal noise | A. Accessories are notproperty installedB. The appliance is put on an uneven-surfaceC. Parts cause extrusion sound during squeezing | A. Stop the appliance and check whether the accessories are property installed.B. Put the juicer on an even surface.C. Certain friction noise can be heard when carrots or apples are used for squeezing. It has no impact on the process. |
| The container and accessories are dyed after use | A. Dreg attaches to thecontainer.B. The container and accessories are likely to be dyed when materials with pigment (such as carrots, spinach, etc.) are used for squeezing. | A. Clean the juicer soon after use.B.Wipe the appliance with some edible oil and clean it with some detergent. |
CONFORMITY OF THE PRODUCT
The producer Melchioni Spa declares that the product Slow Juicer Mod.
VEGA (cod. 118440011) is in compliance with Directive 2014/30/EU of the European Parliament and of the Council, of 26 february 2014, on the harmonisation of the laws of the Member States relating to electromagnetic compatibility.
The producer Melchioni Spa declares that the product Slow Juicer Mod.
VEGA (cod. 118440011) is in compliance with Directive 2014/35/EU of the European Parliament and of the Council, of 26 february 2014, on the harmonisation of the laws of the Member States relating to the making available on the market of electric equipment designed for use within certain voltage limits.
SIMPLIFIED EU DECLARATION OF CONFORMITY
Hereby, manufacturer Melchioni Spa declares that the radio equipment type Slow Juicer Mod. VEGA (cod. 118440011) is in compliance with Directive 2014/53/EU.
The full text of the EU declaration of conformity is available at the following internet address: http://www.melchioni.it.
The producer Melchioni Spa declares that the product Slow Juicer Mod.
VEGA (cod. 118440011) is in compliance with Directive 2009/125/EC of the European Parliament and of the Council, of 21 october 2009, establishing a framework for the setting of ecodesign requirements for energy-related products.
The producer Melchioni Spa declares that the product Slow Juicer Mod.
VEGA (cod. 118440011) is in compliance with Directive 2011/65/EU of the European Parliament and of the Council, of 8 June 2011 and subsequent Commission Delegated Directive 2015/863, on the restriction of the use of certain hazardous substances in electrical and electronic equipment.
According to Directive 2012/19/EU of the European Parliament and of the Council, of 4 July 2012, on waste electrical and electronic equipment (WEEE), the presence
of the crossed-out bin symbol 📁 indicates that this appliance is not to be considered as urban waste: its disposal must therefore be carried out by separate collection. Disposal in a non-separate manner may constitute a potential harm to the environment and health. This product can be returned to the distributor when purchasing a new device. Improper disposal of the appliance constitutes misconduct and is subject to sanctions by the Public Security Authority. For further information, contact the local administration responsible for environmental matters.
WARRANTY
Melchioni Spa, based in Milan (Italy), via Colletta 37, recognizes a conventional guarantee on the product for a period of two years from the date of the first purchase by the consumer. This guarantee does not affect the validity of the legislation in force concerning consumer goods (Legislative Decree 6 September 2005 n. 206 art. 128 and following), of which the consumer remains the owner. This guarantee applies to the entire territory of the European Union.
The components or parts that are found to be defective for ascertained manufacturing causes will be repaired or replaced free of charge through the dealer, during the above warranty period. Melchioni Spa reserves the right to make a complete replacement of the device, if repairability is impossible or excessively expensive, with another device of similar characteristics (Legislative Decree 6 September 2005 no. 206 art. 130) during the warranty period. In this case, the validity of the warranty remains that of the original purchase: the service provided under warranty does not extend the warranty period.
In any case, this appliance will not be considered defective in terms of materials or manufacture should it be adapted, changed or adjusted, in order to comply with national or local safety and / or technical standards, in force in a country other than the one for which it is was originally designed and manufactured. This appliance has been designed and built for domestic use only: any other use will invalidate the benefits of the guarantee.
The warranty does not cover:
- parts subject to wear or tear, nor those parts that require periodic replacement and / or maintenance
• professional use of the product - malfunctions or any defects due to incorrect installation, configuration, software / BIOS / firmware update not performed by authorized Melchioni Spa
• repairs or interventions carried out by persons not authorized by Melchioni Spa - manipulation of assembly components or, where applicable, of the software
• defects caused by falls or transport, lightning strikes, power surges, liquid infiltrations, opening of the appliance, bad weather, fire, public disturbances, inadequate ventilation or incorrect power supply - any accessories, for example: boxes, bags, batteries, etc. used with this product
• home interventions for convenience checks or presumed defects
The recognition of the guarantee by Melchioni Spa is subject to the presentation of a tax document that proves the actual date of purchase. The same must not show any tampering or deletions, in the presence of which Melchioni Spa reserves the right to refuse the provision of treatment under warranty.
The warranty will not be recognized if the serial number or model of the appliance is non-existent, abraded or modified.
This warranty does not include any right to compensation for direct or indirect damage, of any nature, to people or things, caused by any inefficiency of the appliance. Any extensions, promises or services in this regard, insured by the retailer, will be borne by the latter
text_image
Technical diagram of a kitchen appliance with labeled parts and directional arrows indicating process flow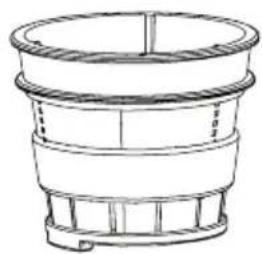
natural_image
Technical line drawing of a cylindrical mechanical component with internal ribs and a central hub (no text or symbols)
natural_image
Line drawing of a cylindrical container with internal pipes and a base, no text or symbols presentnatural_image
Line drawing of a kitchen blender with a side panel and handle (no text or symbols)natural_image
Line drawing of a kitchen blender with a spiral-shaped top and side arm (no text or symbols)text_image
Technical diagram of a food grimmer with labeled parts and directional arrow indicating rotationtext_image
OPEN CLOSE2
text_image
Open Close③
- Instalar la tapadera
natural_image
Technical line drawing of a mechanical component with no visible text or symbolsnatural_image
Technical line drawing of a mechanical component with no visible text or symbolsnatural_image
Technical line drawing of a mechanical component with no visible text or symbolsInsertar firmemente
text_image
Corotation Stop Reverse Press Reverse ForwardEncender el interruptor (Forward - adelante / Reverse - atrás)
text_image
Corotation Stop Reverse Press Reverse Forwardnatural_image
Line drawing of a modern kitchen brush with a handle and side arm, no text or symbols present- Apagar la máquina y de-sconectar laenchufe.
text_image
OPEN CLOSE②
natural_image
Line drawing of a kitchen blender with a side panel and handle (no text or symbols)③
natural_image
Technical line drawing of a two-tiered industrial filter or reactor component with an upward arrow indicating flow direction (no text or symbols present)4
natural_image
Technical line drawing of a three-step cleaning or cleaning process with no visible text or symbolsnatural_image
Simple line drawing of a speaker with an ear and antenna (no text or symbols)natural_image
Line drawings of various kitchen appliances including a blender, brush holder, and cleaning fan (no text or labels)text_image
Technical diagram of a blender with labeled parts and directional arrows indicating process flow
natural_image
Technical line drawing of a cylindrical mechanical component with concentric rings and a base (no text or symbols)
natural_image
Line drawing of a cylindrical container with internal structure and side supports (no text or symbols)natural_image
Line drawing of a kitchen blender with a side panel and handle (no text or symbols)natural_image
Line drawing of a kitchen blender with a spiral-shaped top and side handle (no text or symbols)text_image
OPEN CLOSE ② OPEN CLOSE ③natural_image
Technical line drawing of a mechanical component with no visible text or symbolsnatural_image
Technical line drawing of a mechanical component with no visible text or symbols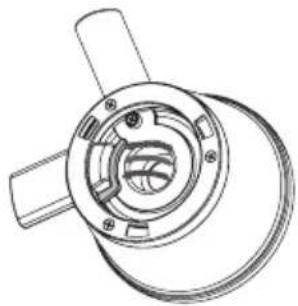
natural_image
Technical line drawing of a mechanical component with no visible text or symbolsJoin

natural_image
Line drawing of a modern kitchen brush with a side-mounted lid and base (no text or symbols)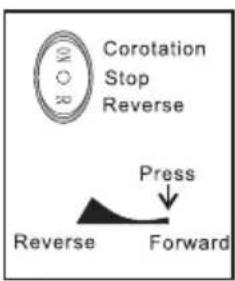
text_image
Corotation Stop Reverse Press Reverse Forwardtext_image
COR Corotation Stop Reverse Press Reverse Forwardnatural_image
Line drawing of a modern kitchen brush with a handle and side arm, showing no text or symbols.text_image
OPEN CLOSE②
natural_image
Line drawing of a kitchen blender with a side panel and handle (no text or symbols)③
natural_image
Technical line drawing of a portable coffee maker with a top panel and side view showing internal structure (no text or symbols)4
natural_image
Diagram of a three-step cleaning or cleaning process with a spiral-shaped component, showing top, middle, and bottom views (no text or symbols)natural_image
Simple line drawing of a speaker grille with a pointer and circular head (no text or symbols)natural_image
Line drawings of various kitchen appliances including a blender, brush holder, and cleaning fan (no text or labels)CONFORMITÉ DU PRODUIT
natural_image
Line drawing of a blender with handle and spout (no text or symbols)natural_image
Simple line drawing of a container with a U-shaped tube inside, no text or symbols present.text_image
Technical diagram of a blender with labeled parts and directional arrow indicating process flow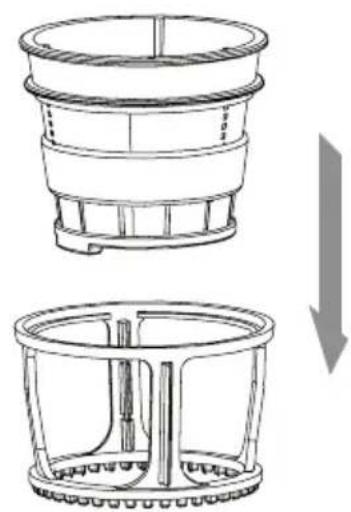
natural_image
Technical line drawing of a mechanical component with an arrow indicating downward motion (no text or symbols)natural_image
Line drawing of a kitchen blender with a side panel and handle (no text or symbols)natural_image
Line drawing of a kitchen blender with a spiral-shaped top and side arm (no text or symbols)text_image
Technical diagram of a food grimmer with labeled parts and directional arrow indicating rotationtext_image
OPEN CLOSE②

text_image
OPEN CLOSE3
natural_image
Technical line drawing of a mechanical component with no visible text or symbolsBoden des Glases
natural_image
Technical line drawing of a mechanical component with no visible text or symbolsnatural_image
Technical line drawing of a mechanical component with no visible text or symbolsFest einsetzen
natural_image
Line drawing of a modern kitchen brush with a side-mounted lid and bucket (no text or symbols)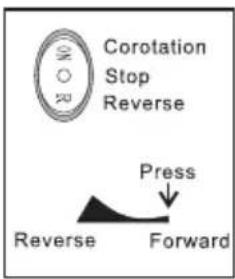
text_image
Corotation Stop Reverse Press Reverse Forwardtext_image
Corotation Stop Reverse Press Reverse Forwardnatural_image
Line drawing of a modern kitchen brush with a side-mounted blade and handle (no text or symbols)text_image
OPEN CLOSE②
natural_image
Line drawing of a kitchen blender with a side panel and handle (no text or symbols)③
natural_image
Technical line drawing of a coffee maker with a side panel and top view showing internal structure (no text or symbols)4