TMR50 - DJ Equipment KORG - Free user manual and instructions
Find the device manual for free TMR50 KORG in PDF.
| Product type | Tuner, metronome and digital recorder |
| Brand | Korg |
| Model | TMR-50 |
| Dimensions | 111 (W) x 82 (D) x 18 (H) mm |
| Weight | 119 g (with batteries) |
| Power supply | 2 AAA batteries (zinc-carbon, alkaline or nickel-metal hydride) |
| Battery life (tuner) | Approx. 24 h (backlight Off, alkaline batteries) |
| Battery life (metronome) | Approx. 18 h (backlight Off, alkaline batteries) |
| Battery life (recorder) | Approx. 16 h (backlight Off, alkaline batteries) |
| Display | LCD with backlight (Off/Light/Auto) |
| Main functions | Tuner (meter mode, sound, sound back), metronome (tempo 30-252 BPM), recorder (WAV 44.1 kHz/16 bits, 20 min, 100 tracks) |
| Detection range (tuner) | C1 (32.70 Hz) to C8 (4186.01 Hz) |
| Calibration | A4 = 410 - 480 Hz (1 Hz steps) |
| Tuner accuracy | ±1 cent |
| Time signatures (metronome) | 0-9 beats, duplets, triplets, quadruplets |
| Connectivity | INPUT jack (mono 1/4"), PHONES jack (mini 1/8"), USB port |
| Speaker | Dynamic 23 mm diameter |
| Included accessories | User manual, 2 AAA batteries, USB cable |
| Maintenance | Clean with a dry, clean cloth; do not use benzene or thinner |
| Safety | Avoid exposure to sunlight, heat, humidity, dust and vibrations; use only in the intended country |
| Repairability | Formatting possible via USB; no specified spare parts |
Frequently Asked Questions - TMR50 KORG
User questions about TMR50 KORG
0 question about this device. Answer the ones you know or ask your own.
Ask a new question about this device
Download the instructions for your DJ Equipment in PDF format for free! Find your manual TMR50 - KORG and take your electronic device back in hand. On this page are published all the documents necessary for the use of your device. TMR50 by KORG.
USER MANUAL TMR50 KORG
Using the unit in the following locations can result in a malfunction.
- In direct sunlight
- Locations of extreme temperature or humidity
• Excessively dusty or dirty locations - Locations of excessive vibration
- Close to magnetic fields
Power supply
Be sure to turn the power switch to OFF when the unit is not in use. Remove the battery in order to prevent it from leaking when the unit is not in use for extended periods.
Interference with other electrical devices
Radios and televisions placed nearby may experience reception interference. Operate this unit at a suitable distance from radios and televisions.
Handling
To avoid breakage, do not apply excessive force to the switches or controls.
Care
If the exterior becomes dirty, wipe it with a clean, dry cloth. Do not use liquid cleaners such as benzene or thinner, or cleaning compounds or flammable polishes.
Keep this manual
After reading this manual, please keep it for later reference.
Keeping foreign matter out of your equipment
Never set any container with liquid in it near this equipment. If liquid gets into the equipment, it could cause a breakdown, fire, or electrical shock. Be careful not to let metal objects get into the equipment.
DECLARATION OF CONFORMITY (for USA)
Responsible Party : KORG USA INC.
Address : 316 SOUTH SERVICE ROAD, MELVILLE
Telephone: 1-631-390-6500
Equipment Type : Tuner Metronome Recorder
Model : TMR-50
This device complies with Part 15 of FCC Rules.
Operation is subject to the following two conditions:
(1) This device may not cause harmful interference,and
(2) this device must accept any interference received, including interference that may cause undesired operation.
THE FCC REGULATION WARNING (for USA)
NOTE: This equipment has been tested and found to comply with the limits for a Class B digital device, pursuant to Part 15 of the FCC Rules.
These limits are designed to provide reasonable protection against harmful interference in a residential installation. This equipment generates, uses, and can radiate radio frequency energy and, if not installed and used in accordance with the instructions, may cause harmful interference to radio communications. However, there is no guarantee that interference will not occur in a particular installation. If this equipment does cause harmful interference to radio or television reception, which can be determined by turning the equipment off and on, the user is encouraged to try to correct the interference by one or more of the following measures:
- Reorient or relocate the receiving antenna.
- Increase the separation between the equipment and receiver.
- Connect the equipment into an outlet on a circuit different from that to which the receiver is connected.
- Consult the dealer or an experienced radio/TV technician for help.
If items such as cables are included with this equipment, you must use those included items.
Unauthorized changes or modification to this system can void the user's authority to operate this equipment.
Notice regarding disposal (EU only)

When this "crossed-out wheeled bin" symbol is displayed on the product, owner's manual, battery, or battery package, it signifies that when you wish to dispose of this product, manual, package or battery you must do so in an approved manner. Do not discard this product, manual, package or battery along with ordinary household waste. Disposing in the correct manner will prevent harm to human health and potential damage to the environment. Since the correct method of disposal will depend on the applicable laws and regulations in your locality, please contact your local administrative body for details. If the battery contains heavy metals in excess of the regulated amount, a chemical symbol is displayed below the "crossed-out wheeled bin" symbol on the battery or battery package.

IMPORTANT NOTICE TO CONSUMERS
This product has been manufactured according to strict specifications and voltage requirements that are applicable in the country in which it is intended that this product should be used. If you have purchased this product via the internet, through mail order, and/or via a telephone sale, you must verify that this product is intended to be used in the country in which you reside.
WARNING: Use of this product in any country other than that for which it is intended could be dangerous and could invalidate the manufacturer's or distributor's warranty. Please also retain your receipt as proof of purchase otherwise your product may be disqualified from the manufacturer's or distributor's warranty.
*All product names and company names are the trademarks or registered trademarks of their respective owners.
Table of Contents
Main features ......6
Installing batteries ....6
Using the stand 8
Parts of the TMR-50 8
Quick start....11
Turning the power on/off ....14
Backlight 15
Connections 15
Using the tuner ....16
Using the metronome ....19
Using the tuner and metronome simultaneously ....21
Using the recorder 22
Using the recorder and tuner simultaneously ....27
Using the recorder and metronome simultaneously ....28
Using the tuner, metronome and recorder simultaneously ....32
Connecting a computer ....34
Formatting 37
Troubleshooting ....38
Specifications ....39
Thank you for purchasing the Korg Tuner Metronome Recorder TMR-50.
Main features
The TMR-50 allows you to record and tune using the internal mic or a mic connected to the INPUT jack. Additionally, you can use the recorder, tuner and metronome either separately or simultaneously.
Installing batteries
Before replacing the batteries, make sure that the recorder has been turned off.
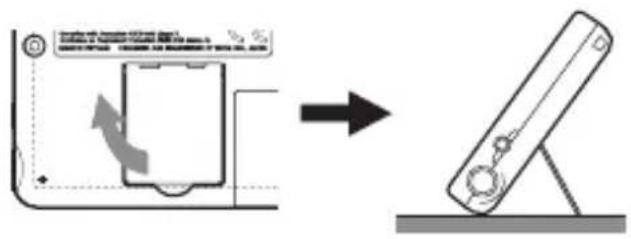
1. Slide the battery compartment cover on the back of the TMR-50 in direction "a" as shown in the illustration and lift up the cover in direction "b."
2. Insert the batteries, making sure to observe the correct polarity.
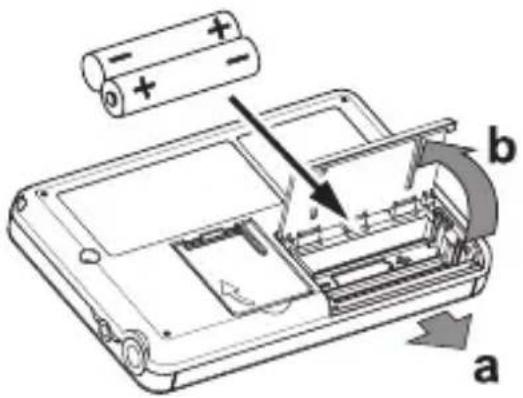
- In order to get accurate readings of the remaining battery power, please refer to the "Setting the battery type" section on page 7 and select the type of battery that's being used.
Depleted batteries should be immediately removed from the unit. In addition, remove the batteries if you do not expect to use the unit for an extended period of time.
If the unit malfunctions try removing and then reinstalling the batteries.

Do not mix partially used batteries with new ones, and do not mix batteries of differing types.

When the batteries run down, a battery symbol will appear on the left side of the display.
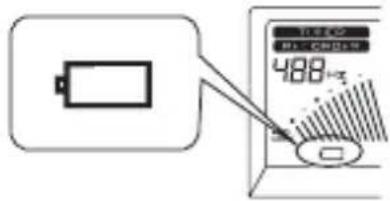
When the batteries run down even further, the battery symbol will blink. At this time, it will no longer be possible to use the recorder function to record. Although you will still be able to play back recorded data and use the tuner and metronome functions, you should replace the batteries as soon as possible.
Setting the battery type
In order to get accurate readings of the remaining battery power, select the type of battery that's being used.
- When you replace the batteries and turn on the power, the display will show a screen allowing you to specify the type of batteries you're using.

- Press the TAP TEMPO button to select the battery type.
AL: When using alkaline or zinc-carbon batteries nH: When using nickel-metal hydride batteries
- Press the button.
The setting will be completed, and the TMR-50 will start up.
Using the stand
You can use the stand provided on the back of the TMR-50 to tilt it back at an angle for easy viewing.
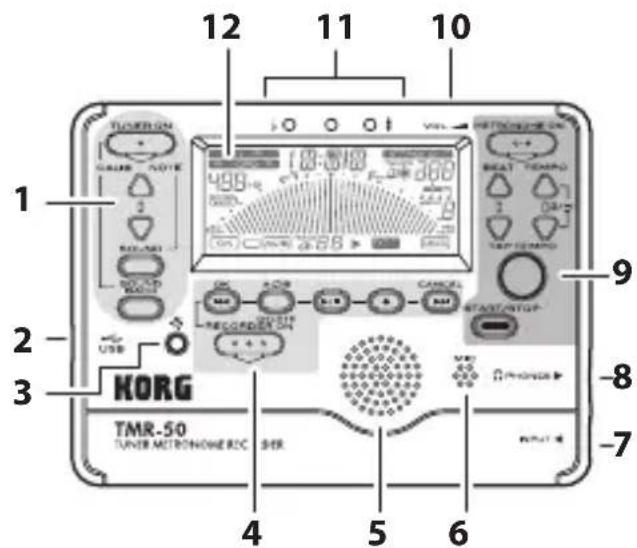
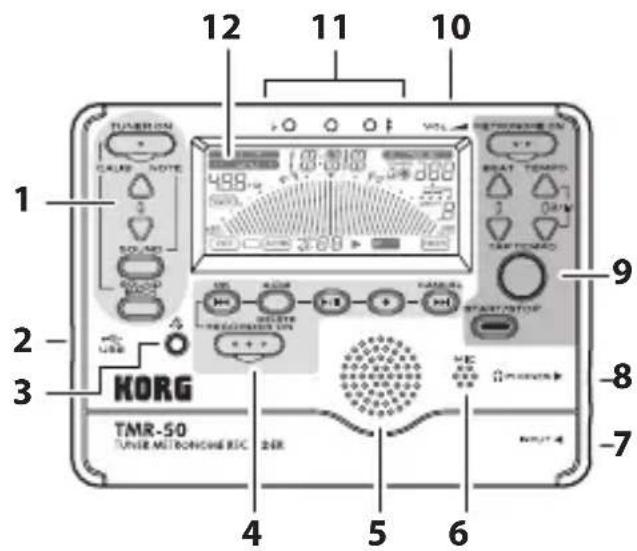
Parts of the TMR-50
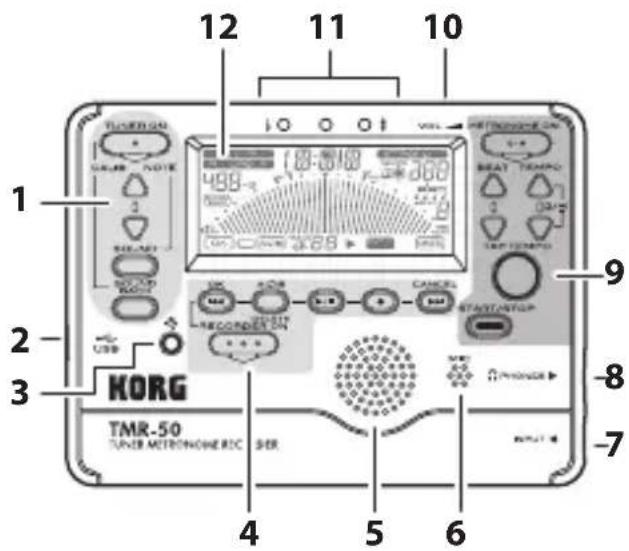
- TUNER section
- USB connector
- Backlight button
- Recorder section
- Speaker
-
Mic
-
INPUT jack
- PHONES jack
- Metronome section
- Volume
- Tuning guide
- Display
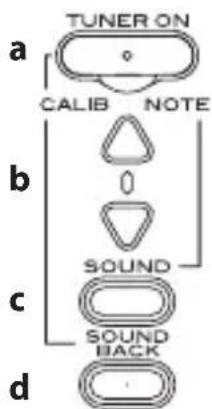
Tuner section
a. TUNER ON button
b. CALIB/NOTE▲, ▼ buttons
c. SOUND button
d. SOUND BACK button
Recorder section

flowchart
graph LR
    b["OK"] --> c["ACB"]
    c --> d["/■"]
    d --> e["●"]
    e --> f["CANCEL"]
    a["REORDER ON"] --> b
    a --> c
a. RECORDER ON button
b. ◀◀button
c. A-B/DELETE button
d. PLAY/STOP button
e. REC/PAUSE button
f. ▶▶▶button
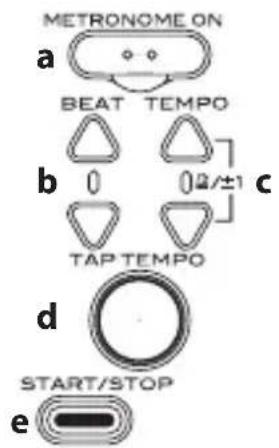
Metronome section
a. METRONOME ON button
b. BEAT▲, ▼ buttons
c. TEMPO ▲, ▼ buttons
d. TAP TEMPO button
e. START/STOP button
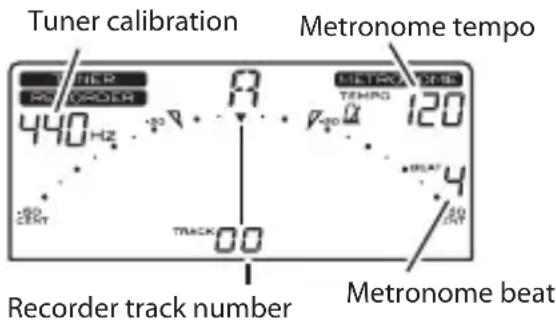
Display
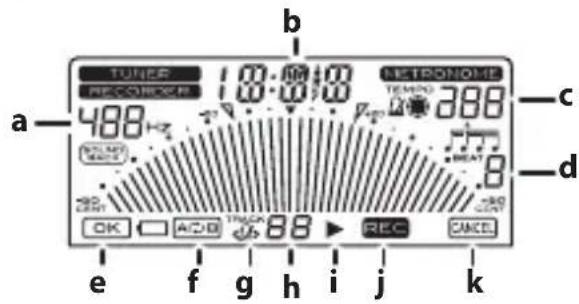
a. Reference pitch display
b. Note/Time display
c. Tempo display
d. Beat display
e. OK icon
f. A-B icon
g. Tempo Sync Track icon
h. Track number
i. PLAY icon
J. REC icon
k. CANCEL icon
Quick start
The TMR-50 allows you to record using the internal mic or an external mic that's connected to the INPUT jack.
It is unnecessary to specify complex settings, such as the recording level first. You can simply record your performance.
In addition, you can immediately play back your recorded performance in order to check it.
In this section, we will explain the basic procedures, from turning on the recorder and recording to playing back and deleting recorded data. Follow these procedures while referring to the "Parts of the TMR-50" section on page 8.
Recording a performance
1. Prepare your musical instrument.
With acoustic string instruments or wind instruments, use the internal mic.
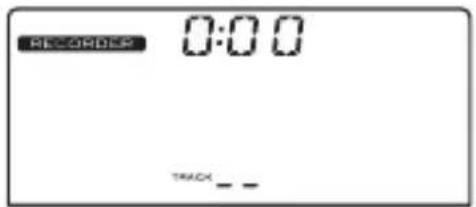
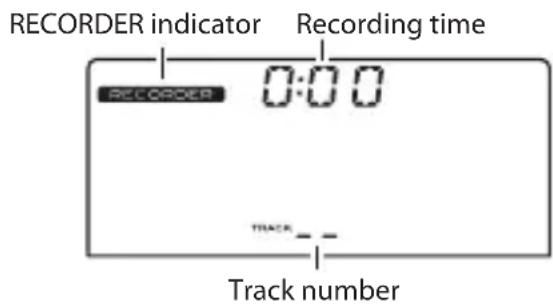
2. Press the RECORDER ON button to turn on the recorder.
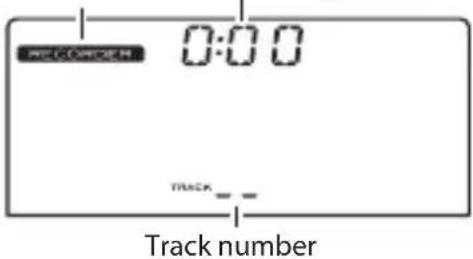
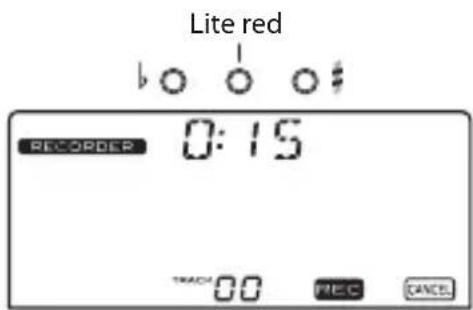
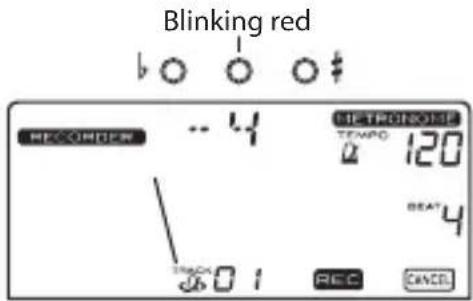
After the recorder is turned on, the RECORDER indicator, track number and recording time will appear on the display. If it is the first time a recording is being made or if there are no recorded tracks, “--” will appear on the track indicator of the display.
RECORDER indicator Recording time
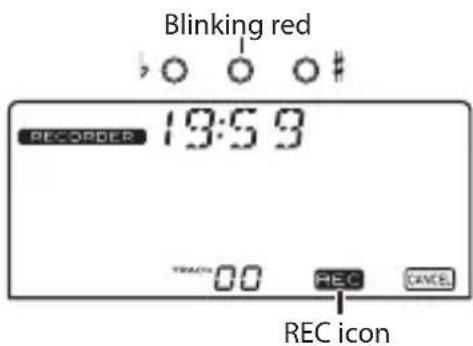
3. Press the REC button.
The recorder will enter standby mode, and the recording time indication will blink to show the amount of time available for recording.
The center indicator of the tuning guide will blink in red. In addition, the track number and REC icon will blink on the display, and the track number will change to "0".
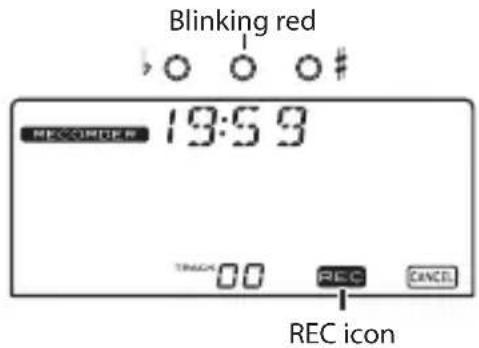
With the TMR-50, the recording level is automatically adjusted. It is unnecessary to specify settings in advance.
4. Press the PLAY/STOP button or the REC button to start recording. Play your instrument.
While recording, the center indicator of the tuning guide will light up in red.
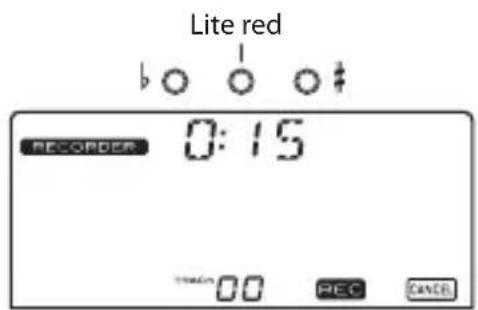
- When the performance is complete, press the PLAY/STOP button to stop recording.
Playing back the recorded performance
Next, let's play back the data for the recorded performance.
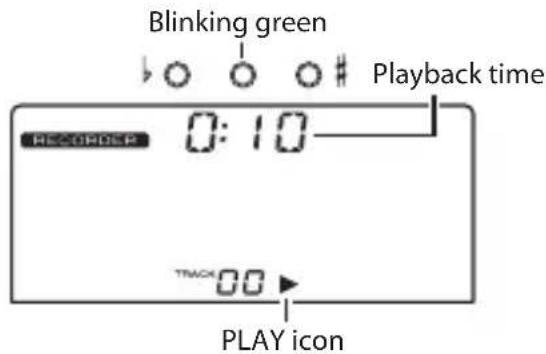
1. After recording was stopped, press the PLAY/STOP button.
The performance that was recorded is played back.
The center indicator of the tuning guide will blink in green, and the PLAY icon will appear on the display.

Use the volume control to adjust the playback sound.
After playing to the end of the recording, playback will automatically stop.
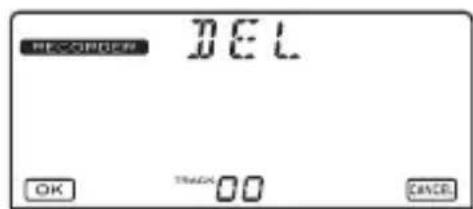
Deleting the recorded performance
Finally, let's delete the data for the recorded performance.
1. With the recorder stopped, press the A-B/DELETE button.
The delete screen will appear on the display, and the track number will blink.
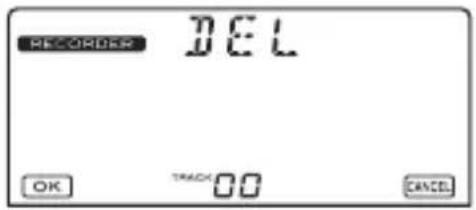
2. Press the button to delete the track.
Once the track has been deleted, “--” will appear on the track indicator of the display.
This completes the basic procedures for recording, playing back and deleting with the TMR-50.
The recorder of the TMR-50 can be used simultaneously with the tuner and metronome.
For more details on recorder operation, please refer to the “Using the recorder” section on page 22.
Turning the power on/off
The TUNER ON button, the METRONOME ON button, and the RECORDER ON button are the TMR-50's power button.
The power button is designed lower than other buttons so that the power is not turned on involuntarily when the TMR-50 is placed in your pocket or in a bag. To turn the device on or off, slightly push in the power button.
To turn the power on
Press either the TUNER ON button, the METRONOME ON button, or the RECORDER button and the power will turn on.
When the TUNER ON button is pressed,
the tuner starts in the Meter mode and “TUNER” will appear on the display. When the METRONOME ON button is pressed, the metronome starts and “METRONOME” will appear on the display. When the RECORDER ON button is pressed, the recorder starts and “RECORDER” appear on the display.
The TMR-50 can run the tuner, metronome, and recorder simultaneously.
To turn the power off
The power for the TMR-50 will turn off when the tuner, metronome and recorder are all turned off.
Turning the tuner off
When the tuner is in use, press the TUNER ON button to turn off the tuner. The tuner will also turn off automatically if no sound has been input nor any operation performed for 20 minutes.
Turning off the metronome
When the metronome is in use, press the METRONOME ON button to turn off the metronome. The metronome will also turn off automatically if it has remained stopped and no operation has been performed for 20 minutes.
Turning off the recorder
When the recorder is in use, press the RECORDER ON button to turn off the recorder. The recorder will also turn off automatically if not in use for 20 minutes.
Backlight
When necessary, press the Backlight button "⚡" to set the backlight.
Each time the Backlight button is pressed, you can switch to Soft → Auto → Off → Soft...
Soft: Low-intensity lighting to prevent battery consumption.
Auto: The backlight will light brightly when sound is input while the tuner is on, and when buttons are operated.
If a sound is not input or a button is not pressed for 10 seconds, the backlight will automatically light up to the soft setting brightness.
Off: The backlight does not light up.
Connections
If you want to connect an instrument or contact mic etc.
If you want to tune an instrument with a pickup, such as an electric guitar, connect a cable to your instrument, and plug the cable into the TMR-50's INPUT jack.
The INPUT jack is only for a 1/4" mono cable. Stereo (TRS) cables cannot be used.
If you want to tune your instrument using a separately sold Korg contact mic, plug the
contact mic into the TMR-50's INPUT jack.

In device is not connected to the INPUT jack, tuning will be performed by the internal mic.
Connecting headphone
You can connect headphones with a 1/8" mini-plug to the PHONES jack. When plugged in, no sound will be heard from the speaker. Use the volume control to adjust the volume of the headphone output.
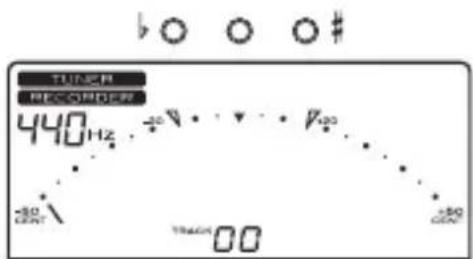
Using the tuner
Tuning while watching the meter (Meter mode)
- Connect your instrument cable or contact mic to the TMR-50's INPUT jack.

If a device is not connected to the INPUT jack, tuning will be performed by the internal mic
- Press the TUNER ON button.
“TIMPER” at the top of the display and the calibration (reference pitch) will be displayed below that.
- To change the calibration, press the CALIB/NOTE ▲ or ▼ button.
The calibration value increases and decreases in units of 1 Hz. By pressing and holding these buttons, you can increase or decrease the value continuously. This setting is stored even when the power is off.
- Play a single note on your instrument.
The closest note to the input sound will appear in the center of the display. Tune your instrument to the correct pitch, so that the desired note name appears.

If you're using the internal mic, place your instrument as close as possible to the mic so that extraneous sound is not picked up while tuning.
- While playing a single note on your instrument, tune your instrument so that the tip of the meter indicates “▼” and the center indicator of the tuning guide is lit up. The left tuning guide indicator will light up if the pitch of your instrument is flat, and the right indicator if the pitch is sharp. If you want to tune a just major third above or a minor third above a certain note, use the “▼(-13.7 cent) or “ ”(+15.6 cent) marks on the meter.
Tuning to a just major third above or a minor third above
If you want to tune to a just major third above A (0 cent), tune your instrument so that the note name indicator shows C and the meter is at “√”.
If you want to tune to a minor third above A (0 cent), tune your instrument so that the note name indicator shows C and the meter is at “.”
Tuning to a reference tone (Sound Out mode)
- Press the TUNER ON button.
You will enter the Meter mode.
- Press the SOUND button to select Sound Out mode.
The reference tone is output from the PHONES jack or speakers. Use the volume control to adjust the output volume.
- Press the CALIB/NOTE ▲ or ▼ button to select the note.
The output reference tone changes as follows.
$$ C (C 3) \leftrightarrow C _ {#} \leftrightarrow D \leftrightarrow E _ {b} \leftrightarrow E \leftrightarrow F \leftrightarrow F _ {#} \leftrightarrow G \leftrightarrow G _ {#} $$
$$ \Leftrightarrow \mathrm{A} \Leftrightarrow \mathrm{B} _ {\flat} \Leftrightarrow \mathrm{B} \Leftrightarrow \mathrm{C} (\mathrm{C} 4) \dots \mathrm{C} (\mathrm{C} 6) \Leftrightarrow \mathrm{C} (\mathrm{C} 3) \dots $$
This setting is stored even when the power is off.
-
Tune the instrument according to the reference tone.
-
Press the SOUND button again to return to the Meter mode.
If connected to either the INPUT jack or PHONES jack, the Meter mode will start simultaneously and you can tune your instrument while viewing the meter.
Tuning using the reference tone and meter (Sound Back mode)
This function can be used when you are connected to either the INPUT jack or PHONES jack (or both).
- Press the TUNER ON button.
You will enter the Meter mode.
- Press the SOUND BACK button to enter the Sound Back mode.
In the Sound Back mode, the reference tone closest to the tone of the input instrument is output. Use the volume control to adjust the volume.
" SOUND BACK " will appear on the display.
If headphones are connected to the PHONES jack, the input sound from the internal mic or INPUT jack will be received and the reference tone is output from the headphones.
If there is nothing connected to the PHONES jack, the input sound from the INPUT jack is received and the reference tone is output from speakers.

If both the PHONES jack and the INPUT jack are not connected, the Sound Back mode will not function.
-
Tune the instrument using the reference tone and meter.
-
If the SOUND BACK button is pressed again, you will return to the Meter mode.
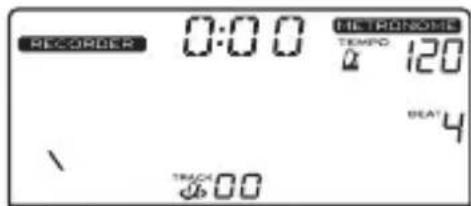
Using the metronome
Setting the tempo and time signature
1. Press the METRONOME ON button.
The pendulum of the metronome will appear on the display and “METRONOME” appear above.
2. Press the TEMPO ▲ or ▼ button to set the tempo.
Press and hold the TEMPO ▲ and ▼ buttons simultaneously for 1 second to switch between Pendulum Step (pendulum of a mechanical metronome) and Full Step. If Pendulum Step is selected, “ 📋 will appear on the display.
After selecting "PENDULUM STEP" or "FULL STEP", press the TEMPO ▲, ▼ buttons to set the tempo. This setting is remembered even when the power is off.
If you've selected "PENDULUM STEP"
Pressing the TEMPO ▲, ▼ buttons will switch the tempo successively through the following values. The value will change continuously if you hold down the button.
30, 32, 34, 36, 38, 40, 42, 44, 46, 48, 50, 52, 54, 56, 58, 60, 63, 66, 69, 72, 76, 80, 84, 88, 92, 96, 100, 104, 108, 112, 116, 120, 126, 132, 138, 144, 152, 160, 168, 176, 184, 192, 200, 208, 216, 224, 232, 240, 252
If you've selected "FULL STEP"
Pressing the TEMPO ▲, ▼ buttons will increment or decrement the tempo through the range of 30–252 in steps of one. The value will change continuously if you hold down the button.
3. Press the START/STOP button to start the metronome.
The metronome pendulum will swing from left to right according to the tempo and the TAP TEMPO button will blink according
to the tempo also.
- If you want to change the time signature, press the BEAT ▲, ▼ buttons to make your selection.
The time signature will change as follows.
Press the BEAT ▲, ▼ buttons: ⇔ 0 ⇔ 1 ...
9 (9 beats) ⇔ ∩(Duplet) ⇔ ∩(Triplet) ⇔
π(Triplet without the center beat)⇔
(Quadruplet)⇔ (Quadruplet without the center beat)⇔ 0 ... - Play along with the metronome tempo.
- To stop the metronome, press the START/STOP button.
Using tap tempo
The tap tempo that you input will be displayed as a BPM (Beats Per Minute) value.
1. Press the METRONOME ON button.
The pendulum of the metronome will appear on the display and “METRONOME” will appear above.
- Press the TAP TEMPO button several times at regular intervals at the tempo that you want.
The TMR-50 detects the interval used when pressing the button and displays it as a BPM (Beats Per Minute) value, and sets it as the tempo.
While the tempo is detected, "will appear on the display.
When the BPM detected by the tap tempo is less than 30, "Lo" will appear on the display and the tempo will be set at "30."
If the BPM detected by the tap tempo exceeds 252, "Hi" will appear on the display and the tempo will be set at "252."
- Press the START/STOP button to start the metronome.
The metronome pendulum will swing from left to right according to the tempo and the TAP TEMPO button will blink accordingly.

The tap tempo can also be input while the metronome is in use.
- Play according to the tempo.
- To stop the metronome, press the START/STOP button.
Using the tuner and metronome simultaneously
The TMR-50 lets you use the tuner and metronome simultaneously.
For more details on tuner and metronome operation, please refer to the “Using the tuner” and “Using the metronome” section.
Using the tuner and metronome simultaneously
For example, if you're playing along with the metronome and notice that your instrument is not tuned correctly, you can leave the metronome running while you tune.
Proceed as follows.
- Press the METRONOME ON button.
- Press the START/STOP button to start the metronome.
If necessary, specify the tempo and time signature etc.
To set the tempo: TEMPO ▲, ▼ buttons or TAP TEMPO button
To set the time signature: BEAT ▲, ▼ buttons

When using the tuner and metronome simultaneously, you can't select "triplets," "triplets without the center beat," "quadruplets" or "quadruplets without the center beats" as the time signature.
- Press the TUNER ON button to enter Meter mode.
The display will show the tuning meter. The tempo of the metronome tempo is indicated by the blinking of the TAP TEMPO button.
If you want to tune in Sound Out mode, you should then press the SOUND button. To tune in the Sound Back mode, press the SOUND BACK button.
Tuning in Meter mode
When you play a single note on your instrument, the display will show the name of the note that is closest to the pitch you played. Tune your instrument while watching the meter and the tuning guide.
Tuning in Sound Out mode
Tune your instrument to the pitch you hear.
Tuning in Sound Back mode
Using the tone, tuning meter and tuning guide, adjust the instrument.
- After tuning is complete, press the TUNER ON button and METRONOME ON button respectively to turn off the tuner and metronome.
Using the recorder
Recording
For more details on the information that will appear on the display, please refer to the "Quick start" section on page 11.
- Press the RECORDER ON button to turn on the recorder.
- Press the REC button to enter record-standby mode.
To cancel record-standby mode, press the ▶▶ button.
- Press the PLAY/STOP button to start recording.
A total of 100 tracks can be created with the TMR-50. However, a total of approximately 23 minutes can be recorded.
When the recording time of one track reaches 20 minutes, recording will automatically stop. At this time, the recording time indication will continue alternating between "19:59" and "End."
- To pause recording, press the REC button. The center indicator of the tuning guide will blink in red.
The REC icon will blink on the display.
-
To continue recording, press the REC button again.
-
Press the PLAY/STOP button to stop recording.
The recording time will blink on the display three times.
To record again, press the REC button. The track number will increase by one, and the
unit will enter record-standby mode for the next track.
If the memory becomes full
If the unit's memory becomes full while recording, the current recording time and "FUL" will alternately appear on the display, and recording will stop.
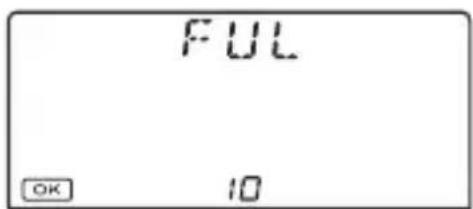
If you try to record after 100 tracks have already been recorded, "FL" will blink on the track indicator of the display, and the available recording time will appear on the time indicator.
Press the button, and then delete unnecessary tracks.
Page 26 "Deleting a track"
Playing back a recorded track
- With the recorder stopped, press the ◀ button or the ▶ button, and then select the track to play back.
- Press the PLAY/STOP button to start playback.
Use the volume control to adjust the playback sound.
- If you press the I button during playback, you'll move to the beginning of the track. If you press the I button
near the beginning of the track (within approximately 3 seconds from the beginning), the preceding track will play. If you press the ▶ button during playback, the next track will play.
- To fast rewind through the track during playback, press and hold down the ◄◀◀ button. To fast forward through the track, press and hold down the ▶button.
- To stop playback, press the PLAY/STOP button.
- To continue playback from the point where it was stopped, press the PLAY/STOP button again.
After playing to the end of the recording, playback will automatically stop.
Loop playback
This function allows you to loop playback between two specified points.
- Select the track, and then play it back.
- At the start point for loop playback, press the A-B/DELETE button.
Point A is specified, and the A-B icon will blink on the display.

To cancel the specified point A, press the ▶▶▶ button.
- At the end point for loop playback, press the A-B/DELETE button.
Point B is specified, and loop playback will start between points A and B.
The center indicator of the tuning guide will blink in orange.
The A-B icon on the display changes from
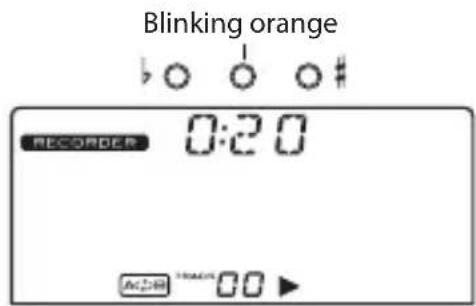
blinking to steadily lit up.
4. To stop loop playback, press the PLAY/STOP button.
To continue loop playback, press the PLAY/STOP button again.
To cancel points A and B, press the A-B/DELETE button during loop playback or while loop playback is stopped.
To loop (repeat) an entire track
While the track plays back, press and hold the A-B/DELETE button for approximately one second; the entire track will be specified as the region for loop playback.
Deleting a track
- With the recorder stopped, press the button or the button, and then select the track to be deleted.
2. Press the A-B/DELETE button.
The delete screen will appear on the display, and the track number will blink.
3. Press the ◀ button to delete the track.
To cancel the delete operation, press the ▶▶Ibutton.
The following screen will appear on the display during the delete operation.
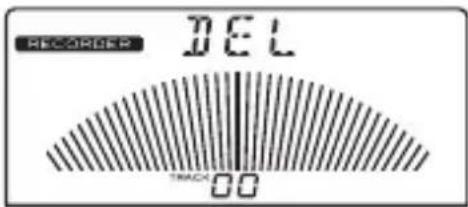
When the delete operation is complete, the recorded track that's located either before or after the deleted track will be selected.
If no recorded tracks remain after the track is deleted, “--” will appear on the track indicator of the display.
Using the recorder and tuner simultaneously
The TMR-50 lets you use the recorder and tuner simultaneously.
When the recorder is stopped or while recording, tuning is performed on the input from the INPUT jack or the internal mic.
When the recorder is being used for playback (including loop playback), tuning is performed on the playback sound for the track.
1. Press the RECORDER ON button and TUNER ON button to turn on the recorder and tuner, respectively.
The RECORDER indicator, track number, TUNER indicator, reference pitch and the meter will appear on the display.
When using the recorder and tuner simultaneously, the tuner only run in Meter mode. The Sound Out mode and Sound Back mode cannot be used.
The indicators above the display will be used as a tuning guide.
While recording, the center indicator will light up in red. However, if the indicators are being used as a tuning guide, the center indicator will light up in orange while recording.
For more details on tuner, please refer to the "Using the tuner" section on page 16.
For details on recorder operation, please refer to the “Using the recorder” section on page 22.
Note: When the tuner is turned on, the recording time and playback time do not appear.
Deleting a track
A track can be deleted by using the same procedure as when the recorder is used individually. (Page 26 "Deleting a track")
The tuner does not function while a track is being deleted.
Using the recorder and metronome simultaneously
The TMR-50 lets you use the recorder and metronome simultaneously.
By turning on the metronome before recording, the metronome will be synchronized with the track during playback. This allows you to check if the recorded performance is at the specified tempo.
A recorded track that can be played back in synchronization with the metronome is called a “tempo-synchronized track.”
When a tempo-synchronized track is selected, the tempo-synchronized track icon (2) will appear on the display.
Recording with the recorder and metronome synchronized
- Press the RECORDER ON button and METRONOME ON button to turn on the recorder and metronome, respectively. The METRONOME indicator, recording/ playback time, tempo, BEAT setting, tempo-synchronized track icon, metronome pendulum and track number will appear on the display.
- Press the REC button to enter record-standby mode.
The center indicator of the tuning guide will blink in red.
The REC icon, tempo-synchronized track icon and track number will blink on the display.
The metronome pendulum will start to swing, and the TAP TEMPO button will blink in time with this motion.
The time indication in the display will alternate between the precount number and the available recording time. The precount can be specified with tempo-synchronized recording (step 4).
The metronome will sound from the speakers. With the START/STOP button, you can select whether or not the
metronome will sound. Regardless of whether or not the metronome sounds, the metronome is running.
3. Specify the metronome tempo, beats and other settings.
For more details on the setting procedures, please refer to the “Using the metronome” section on page 19.
Note: When the recorder and metronome are being used together, the available range for the metronome's BEAT setting is 0 through 9.
4. Press the button to select the precount.
The precount switches each time the button is pressed. The available precount settings will differ depending on the selected BEAT setting.
| BEATP | precount |
| 0 | ...⇔-4⇔-8⇔-2⇔-1⇔-4... |
| 1 | ...⇔-4⇔-8⇔-2⇔-1⇔-4... |
| 2 | ...⇔-4⇔-8⇔-2⇔-1⇔-4... |
| 3 | ...⇔-3⇔-6⇔-3... |
| 4 | ...⇔-4⇔-8⇔-2⇔-1⇔-4... |
| 5 | ...⇔-5⇔-10⇔-5... |
| 6 | ...⇔-6⇔-12⇔-6... |
| 7 | ...⇔-7⇔-14⇔-7... |
| 8 | ...⇔-8⇔-16⇔-8... |
| 9 | ...⇔-9⇔-18⇔-9...9 |
5. Press the PLAY/STOP button or the REC button.
After the precount, recording will start. During the precount, the center indicator of the tuning guide will light up in orange. To cancel recording, press the button.
Note: When the recorder and metronome are being used simultaneously, recording
will start when precount “-1” (1 beat before) is displayed.
The metronome sound from the speaker will stop shortly before recording will start. To hear the metronome while recording, use headphones connected to the PHONES jack.
Playing back the tempo-synchronized track
- With the recorder stopped, press the ◀◀◀ button or the ▶button, and then select the tempo-synchronized track to play back.
When a tempo-synchronized track is selected, the tempo-synchronized track icon will appear on the display. The tempo and beat will be set to the tempo and beat values that are stored as track data.
Note: The tempo and beat settings will not change if you select a track that is not tempo-synchronized.
After selecting a tempo-synchronized
track, you can use the TEMPO UP/DOWN buttons, the TAP button, and the BEAT UP/DOWN buttons to change the tempo or beat settings. If you want to return these settings to the values that are stored as track data, temporarily select a different track number, and then re-select the tempo-synchronized track.
- Press the PLAY/STOP button to play back the tempo-synchronized track.
Playback will start 1 beat after the button is pressed. "0:00" will continue to blink on the time indicator of the display until playback starts.
When playback of the tempo-synchronized track starts, the metronome pendulum will swing. In addition, the TAP TEMPO button will blink in time with the tempo.
- You can mute or un-mute the metronome by pressing the START/STOP button while a tempo-synchronized track is playing.
Loop playback of a tempo-synchronized trak Loop playback of a tempo-synchronized track is done by using the same procedure as loop playback of a normal track when the recorder is used individually. (Page 25 "Loop playback")
Playing back a normal track
A normal track can also be played back when the metronome and recorder are being used simultaneously. When a normal track is selected, the tempo-synchronized track icon will not appear on the display.
Deleting a track
A track can be deleted by using the same procedure as when the recorder is used individually. (Page 26 "Deleting a track")
Using the tuner, metronome and recorder simultaneously
The tuner, metronome and recorder can be used simultaneously.
Press the TUNER ON button, METRONOME ONbutton and RECORDER ON button to turn on the tuner, metronome and recorder, respectively.
About tuner operations
The tuner will only function in Meter mode. The Sound Out mode and Sound Back mode cannot be used.
When the recorder is stopped or while recording, tuning is performed on the input from the INPUT jack or the internal mic. When the recorder is being used for playback (including loop playback), tuning is performed on the playback sound for the track.
Tuning is not performed when the recorder is in record-standby mode, during the precount or while a track is being deleted.
The tuner procedures are the same as when it is used individually. Please refer to the "Using the tuner" section on page 16 and the "Using the recorder and tuner simultaneously" section on page 27.
About metronome operations
The metronome pendulum will not appear on the display since the tuning meter will appear on the display.
All other operations and procedures are the same as when the metronome is used simultaneously with the recorder. Please refer to the “Using the metronome” section on page 19 and the “Using the recorder and metronome simultaneously” section on page 28.
About recorder operations
With the recorder, a tempo-synchronized track can be recorded by using the same procedure as when it is used simultaneously with the metronome.
For more details on the operations and procedures, please refer to the “Using the recorder and metronome simultaneously” section on page 28.
Deleting a track
A track can be deleted by using the same procedure as when the recorder is used individually. (Page 26 "Deleting a track")
Connecting a computer
By using the included USB cable to connect the TMR-50 to a computer, the TMR-50 can be used like a regular USB device.
Recorded data can be transferred to the computer, or music data saved on the computer can be transferred to the TMR-50.

hen the TMR-50 is connected to a computer, the tuner, metronome and recorder do not run.
Computer system requirements
Windows
Computer with a USB port that runs Microsoft Windows XP/Vista/7
Macintosh
Mac OS X 10.5 or later
Connecting the TMR-50 to the computer

Be sure to use the included USB cable to connect the TMR-50 to a computer.
- Turn off the power to the TMR-50.
- Turn on the power to the computer.
- Use the USB cable to connect the TMR-50 to the computer.
After the connections are complete, the following screen will appear on the display.
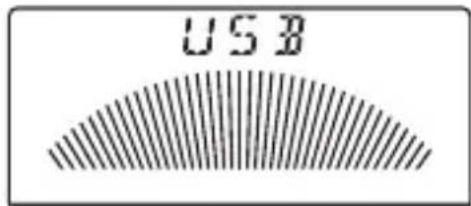
Note: When the TMR-50 is connected to a computer via the USB cable, the power to the device is supplied by the computer.
Transferring data
Data recorded by the TMR-50 can be copied to the computer, or music data saved on the computer can be copied to the TMR-50.

The TMR-50 is able to play back stereo or monaural PCM audio data that is in 44.1 kHz 16-bit WAV format.
Windows
- From "My Computer," double-click to open "Removable Disk *."
Note: “*” and “**” that follow “Removable Disk” vary depending on the computer environment.
- To copy data, drag and drop the recorded data to any location on the computer.
Mac OS X
- Double-click to open the drive icon (NO NAME) on the desktop.
- To copy data, drag and drop recorded data to any location on the computer.
Adding data from the computer
You can copy WAV format files from your computer, and play them back on the TMR-50.
- Copy the files into the EXTRA folder of the TMR-50.
Up to ten files can be detected.
When playing back files, the track numbers will be “E0”–“E9”.
Disconnecting the TMR-50 from the computer
Windows
-
Click the icon that appears on the right side of the task bar of the computer.
-
From the pop-up menu, click "Remove USB Mass Storage Device [drive letter] safely."
The following screen will appear on the display of the TMR-50.
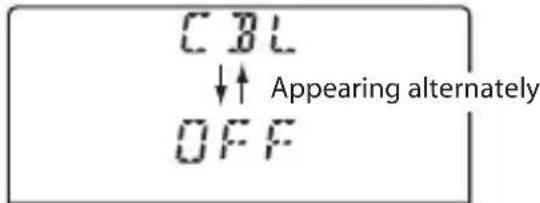
With Windows Vista and Windows 7, the screen shown above will not appear automatically after the disconnection operation is performed from the computer. After performing a safe disconnection operation from the computer, hold down the RECORDER ON button for approximately 3 seconds. Then, the screen shown above will appear.
Before disconnecting the USB cable, make sure that the screen shown above appears on the display.
After performing a safe disconnection operation from the computer, be sure to hold down the RECORDER ON button for approximately 3 seconds.
- Remove the TMR-50 from the computer.
Mac OS X
-
Drag the drive icon on the desktop into the Trash. Alternatively, select "Eject TMR-50" from File menu.
-
Remove the TMR-50 from the computer.
Formatting
If recording or playing back a recorded file is not possible, an error message will appear.
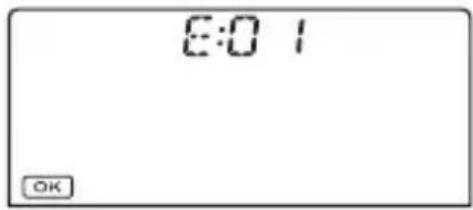
If this occurs, use a USB cable to connect the TMR-50 to a computer, and then try running Chkdsk (Windows) or Disk Utility (Mac OS X) from the computer. If the issue is still not improved, follow the procedure below to format the unit.

Be sure to format using the TMR-50.
Formatting while using batteries

e recommend using USB power when formatting the unit. (Page 38 "Formatting while using USB power")
- Turn off the power to the TMR-50.
- While pressing and holding down the A-B/DELETE button and the REC button, press the RECORDER ON button.
The TMR-50 enters format mode. The following screen will appear on the display, and the three indicators of the tuning guide will light up in red.
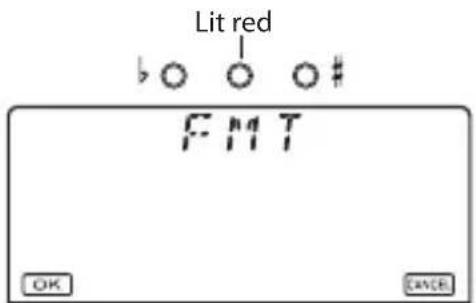
To cancel the formatting procedure, press the ▶ button.
- Press the 1 button to format.
While formatting, the following screen will appear on the display, and the three
indicators of the tuning guide will blink sequentially in red.
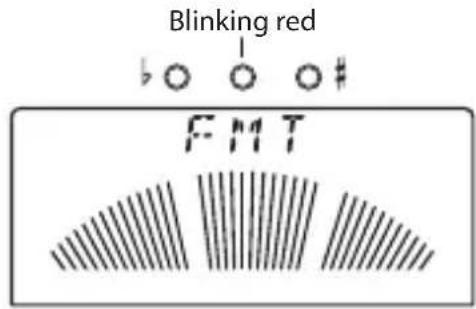
When the formatting procedure is complete, the power is turned off.
Formatting while using USB power
- Turn off the power to the TMR-50.
- Press and hold down the A-B/DELETE button and the REC button while using a USB cable to connect the TMR-50 to a computer.
- Follow the same procedure as that for
formatting while using the batteries.
Page 37 "Formatting while using batteries"
- When the formatting procedure is complete, a screen instructing you to disconnect the unit from the computer will appear on the display.
Page 35 "Disconnecting the TMR-50 from the computer"
- Disconnect the TMR-50 from the computer.
Troubleshooting
■ Power does not turn on.
•Could the battery symbol be blinking?
Replace the batteries. Recording is not possible if the battery symbol is blinking.
- Make sure the batteries are inserted with the polarities (+, -) in the correct orientation.
■ Nothing appears on the display.
- Is the power to the TMR-50 turned on?
■ No sound is heard.
- Are the headphones connected correctly?
- Make sure that the volume is not set to "0."
- Make sure that the battery power is sufficient.
■ Cannot record.
- Make sure that sufficient memory space is available. Check the available recording time.
- Make sure that the battery power is sufficient.
- If the error message has appeared, format the TMR-50.
■ Cannot play back.
- Has the error message appeared?
If it has appeared often, format the TMR-50.
- If you try to play music data transferred
from a computer, make sure that the file format is compatible with the TMR-50.
■The computer does not recognize the TMR-50.
- Make sure that the TMR-50 is connected to the computer correctly via the USB cable.
- Make sure that the power to the computer is turned on.
Specifications
Recorder section
Recording format: PCM audio format WAV format (extension: .wav), 44.1 kHz@16-bit
Available recording time: Approx. 20 minutes (Internal memory: 120 MB)
Total number of tracks: Up to 100 tracks
Tuner section
Scale: 12 note equal temperament
Detection range*: C1 (32.70 Hz)–C8 (4186.01 Hz) for a sine wave
Reference tone: C3 (130.81 Hz)–C6 (1046.50 Hz) 3 octave
Tuning modes: Meter mode (AUTO), Sound Out mode (MANUAL), Sound Back mode (AUTO)
Calibration range: A4 = 410 Hz - 480 Hz (1 Hz step)
Detection accuracy: Better than ±1 cent
Sound accuracy: C3 (130.81 Hz)–C6 (1046.50 Hz) Better than ±1 cent
Metronome section
Tempo range: 30–252 beats per minute (bpm)
Tempo setting: PENDULUM STEP, FULL STEP, TAP TEMPO
Time signatures: 0–9 beats, duplets, triplets, triplets without the center beat, quadruplets, quadruplets without the center beats
Tempo accuracy: ±0.3%
Main standard
Connectors: INPUT jack (1/4"mono), PHONES jack (1/8" mini)
Speaker: Dynamic speaker (ø23 mm)
Power supply: Two AAA batteries (zinc-carbon, alkaline or nickel-metal hydride batteries)
Battery life: Recorder ... Approximately 16/13/11 hours of recording/playback (backlight: Off/Soft/Auto, maximum length of approximately 20 minutes for a single recording/playback, when using alkaline batteries) Tuner ... Approximately 24/22/20 hours (backlight: Off/Soft/Auto, A4 continuous input, when using alkaline batteries) Metronome ... Approximately 18/16/14 hours (backlight: Off/Soft/Auto, tempo 120, four
| beats, maximum volume, when using alkaline batteries) | |
| Dimensions: | 111 (W) x 82 (D) x 18 (H) mm / 4.37" (W) x 3.23" (D) x 0.71" (H) |
Weight: 119g/4.20oz (including the included batteries)
Included items: Owner's manual, two AAA batteries, USB cable
The calibration and reference tone of the tuner as well as the tempo, beat, Pendulum Step, Full Step and backlight settings of the metronome are stored even when the power is off.
However when you exchange the batteries, these settings will return to the following default values.
Default values:
Calibration = 440 Hz, Detection range = A4, Tempo = 120, Time signature = four beats, Tempo setting type = PENDULUM STEP, Backlight setting = off
* Even if the pitch is within the range of detection, the TMR-50 may be unable to detect the pitch if the sound contains numerous overtones (such as the low and high notes on an acoustic piano) or if the instrument has a rapid decay.
Specifications and appearance are subject to change without notice for improvement.
Précautions
Emplacement
Raccordements ....55
Parties du TMR-50

Teile des TMR-50
Tempo-Einstellung: P E N D E L - M E T R O N O M SCHRITT, GANZER SCHRITT, TAP-TEMPOS
Partes del TMR-50