
PowerPro FP2620S - Food Processor BLACK & DECKER - Free user manual and instructions
Find the device manual for free PowerPro FP2620S BLACK & DECKER in PDF.
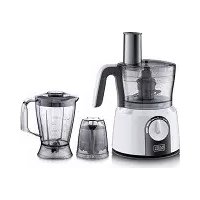
| Product Type | Food Processor with Blender |
| Brand | Black & Decker |
| Model | PowerPro FP2620S |
| Bowl Capacity | 2.4 L (10 cups) |
| Blender Capacity | 1 L (6 cups) |
| Power | 600 W |
| Voltage | 120 V ~ 60 Hz |
| Speeds | High, Low, Pulse (PULSE) |
| Main Functions | Chop, slice, shred, grate, blend, knead, puree |
| Included Blades and Discs | Stainless steel chopping blade, kneading blade, reversible slicing/shredding disc |
| Included Accessories | Pusher, large feed chute, storage lid, disc stem, 2.4 L bowl, 1 L glass blender jar with lid and measuring cap |
| Bowl Material | Clear plastic |
| Blender Jar Material | Glass |
| Safety | Safety locking system (bowl, cover, chute) |
| Cleaning | Removable parts are dishwasher safe (top rack) |
| Cord Storage | Yes, under the base |
| Non-Slip Feet | Yes (suction cups) |
| Warranty | Limited 1-year warranty (USA and Canada) |
| Replacement Parts | Replaceable removable parts (part numbers provided) |
Frequently Asked Questions - PowerPro FP2620S BLACK & DECKER
User questions about PowerPro FP2620S BLACK & DECKER
0 question about this device. Answer the ones you know or ask your own.
Ask a new question about this device
Download the instructions for your Food Processor in PDF format for free! Find your manual PowerPro FP2620S - BLACK & DECKER and take your electronic device back in hand. On this page are published all the documents necessary for the use of your device. PowerPro FP2620S by BLACK & DECKER.
USER MANUAL PowerPro FP2620S BLACK & DECKER
Please Read and Save this Use and Care Book
Register your product online at www.prodprotect.com/applica,
for a chance to WIN $100,000!
For US residents only
Accessories/Parts (USA/Canada)
When using electrical appliances, basic safety precautions should always be followed, including the following.
Read all instructions.
To protect against risk of electrical shock, do not put base, cord or plug in water or other liquid.
- Close supervision is necessary when any appliance is used by or near children.
Unplug from outlet when not in use, before putting on or taking off parts, and before cleaning.
Avoid contacting moving parts.
Do not operate any appliance with a damaged cord or plug or after the appliance malfunctions or is dropped or damaged in any manner. Return the appliance to the nearest authorized service facility for examination, repair, or electrical or mechanical adjustment. Or, call the appropriate toll-free number listed on the cover of this manual.
The use of attachments, including canning jars, not recommended by the manufacturer may cause fire, electric shock or injury.
Do not use outdoors.
Do not let cord hang over edge of table or counter.
- Keep hands and utensils away from moving blades or discs while processing food to prevent the possibility of severe personal injury or damage to the food processor. A scraper may be used, but it must be used only when the food processor is not running.
Blades are sharp. Handle carefully.
To reduce the risk of injury, never place cutting blade or discs on base without first putting bowl properly in place.
Be certain cover is securely locked in place before operating appliance.
Never feed food into chute by hand. Always use food pusher.
Do not attempt to defeat the cover interlock mechanism.
Do not use appliance for other than intended use.
- Keep hands and utensils out of container while blending to reduce the risk of severe injury to persons or damage to the blender. A scraper may be used, but must be used only when the blender is not running.
Blades are sharp. Handle carefully.
To reduce the risk of injury, never place cutter-assembly blades on base without jar properly attached.
Always operate blender with cover in place.
- When blending hot liquids, remove center piece of two-piece cover.
SAVE THESE INSTRUCTIONS.
POLARIZED PLUG
This appliance has a polarized plug (one blade is wider than the other). To reduce the risk of electric shock, this plug is intended to fit into a polarized outlet only one way. If the plug does not fit fully into the outlet, reverse the plug. If it still does not fit, contact a qualified electrician. Do not attempt to modify the plug in any way.
TAMPER-RESISTANT SCREW
Warning: This appliance is equipped with a tamper-resistant screw to prevent removal of the outer cover. To reduce the risk of fire or electric shock, do not attempt to remove the outer cover. There are no user-serviceable parts inside. Repair should be done only by authorized service personnel.
ELECTRICAL CORD
The cord of this appliance was selected to reduce the possibility of tangling in or tripping over a longer cord. If more length is needed, use an extension cord rated no less than 15 amperes. (For 220 volts rated products, use an extension cord rated no less than 6 amperes.) When using an extension cord, do not let it drape over the working area or dangle where someone could accidentally trip over it. Handle cord carefully for longer life; avoid jerking or straining it at outlet and appliance connections. The maximum rating is based on the chopping blade; other attachments may draw significantly less power.
Note: If the power supply cord is damaged, it should be replaced by qualified personnel or in Latin America by an authorized service center.
This product is for household use only.
TABLE OF CONTENTS
Pages
Getting familiar with your unit 3
How to use 6
Assembling the food processor 6
How to chop in the workbowl 7
Using the dough blade 8
How to slice or shred in the workbowl 9
How to use the blender 10
Care & Cleaning. 13
Recipes 14
Troubleshooting 19
INTRODUCTION
Thank you for choosing the Black & Decker® Power Pro® 10-Cup Wide-Mouth Food Processor from Power Pro®.
- 600-watt motor delivers the power to perform all your processing needs
- At the touch of a button you can slice, chop, shred, grate, puree and much more
- Handles large food items without having to section
- Brushed stainless steel exterior makes cleaning a breeze and removable parts are dishwasher safe
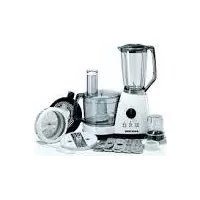
GETTING FAMILIAR WITH YOUR UNIT

FOOD
PROCESSOR

WIDF MOUTH FEED CIJUTE

BLENDER

SUCTION
FEET

SS BLADES

POWERFUL
MOTOR
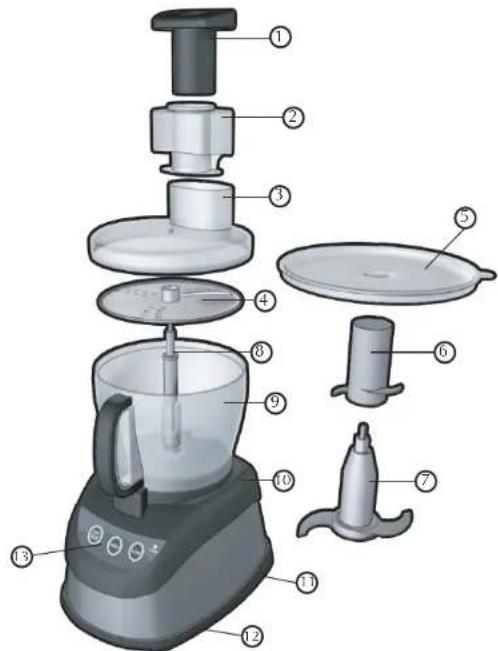
Product may vary slightly from what is illustrated.
† 1. Food pusher (Part # FP2650S-01)
+2. Wide-mouth feed chute (Part # FP2650S-02)
† 3. 10-cup processing workbowl cover (Part # FP2650S-03)
† 4. Reversible slice/shredd disc (Part # FP2650S-04)
† 5. Storage lid (Part # FP2650S-05)
† 6. Dough blade (Part # FP2650S-06)
7. Large, stainless steel chopping blade (Part # FP2650S-07)
† 8. Disc stem (Part # FP26505-08)
9. 10-cup processing workbowl (Part # FP2650S-09)
-
Base
-
Cord wrap (under base)
- Non-skid suction feet (Part # FP2650S-10)
-
Controls
-
Consumer replaceable/removable parts
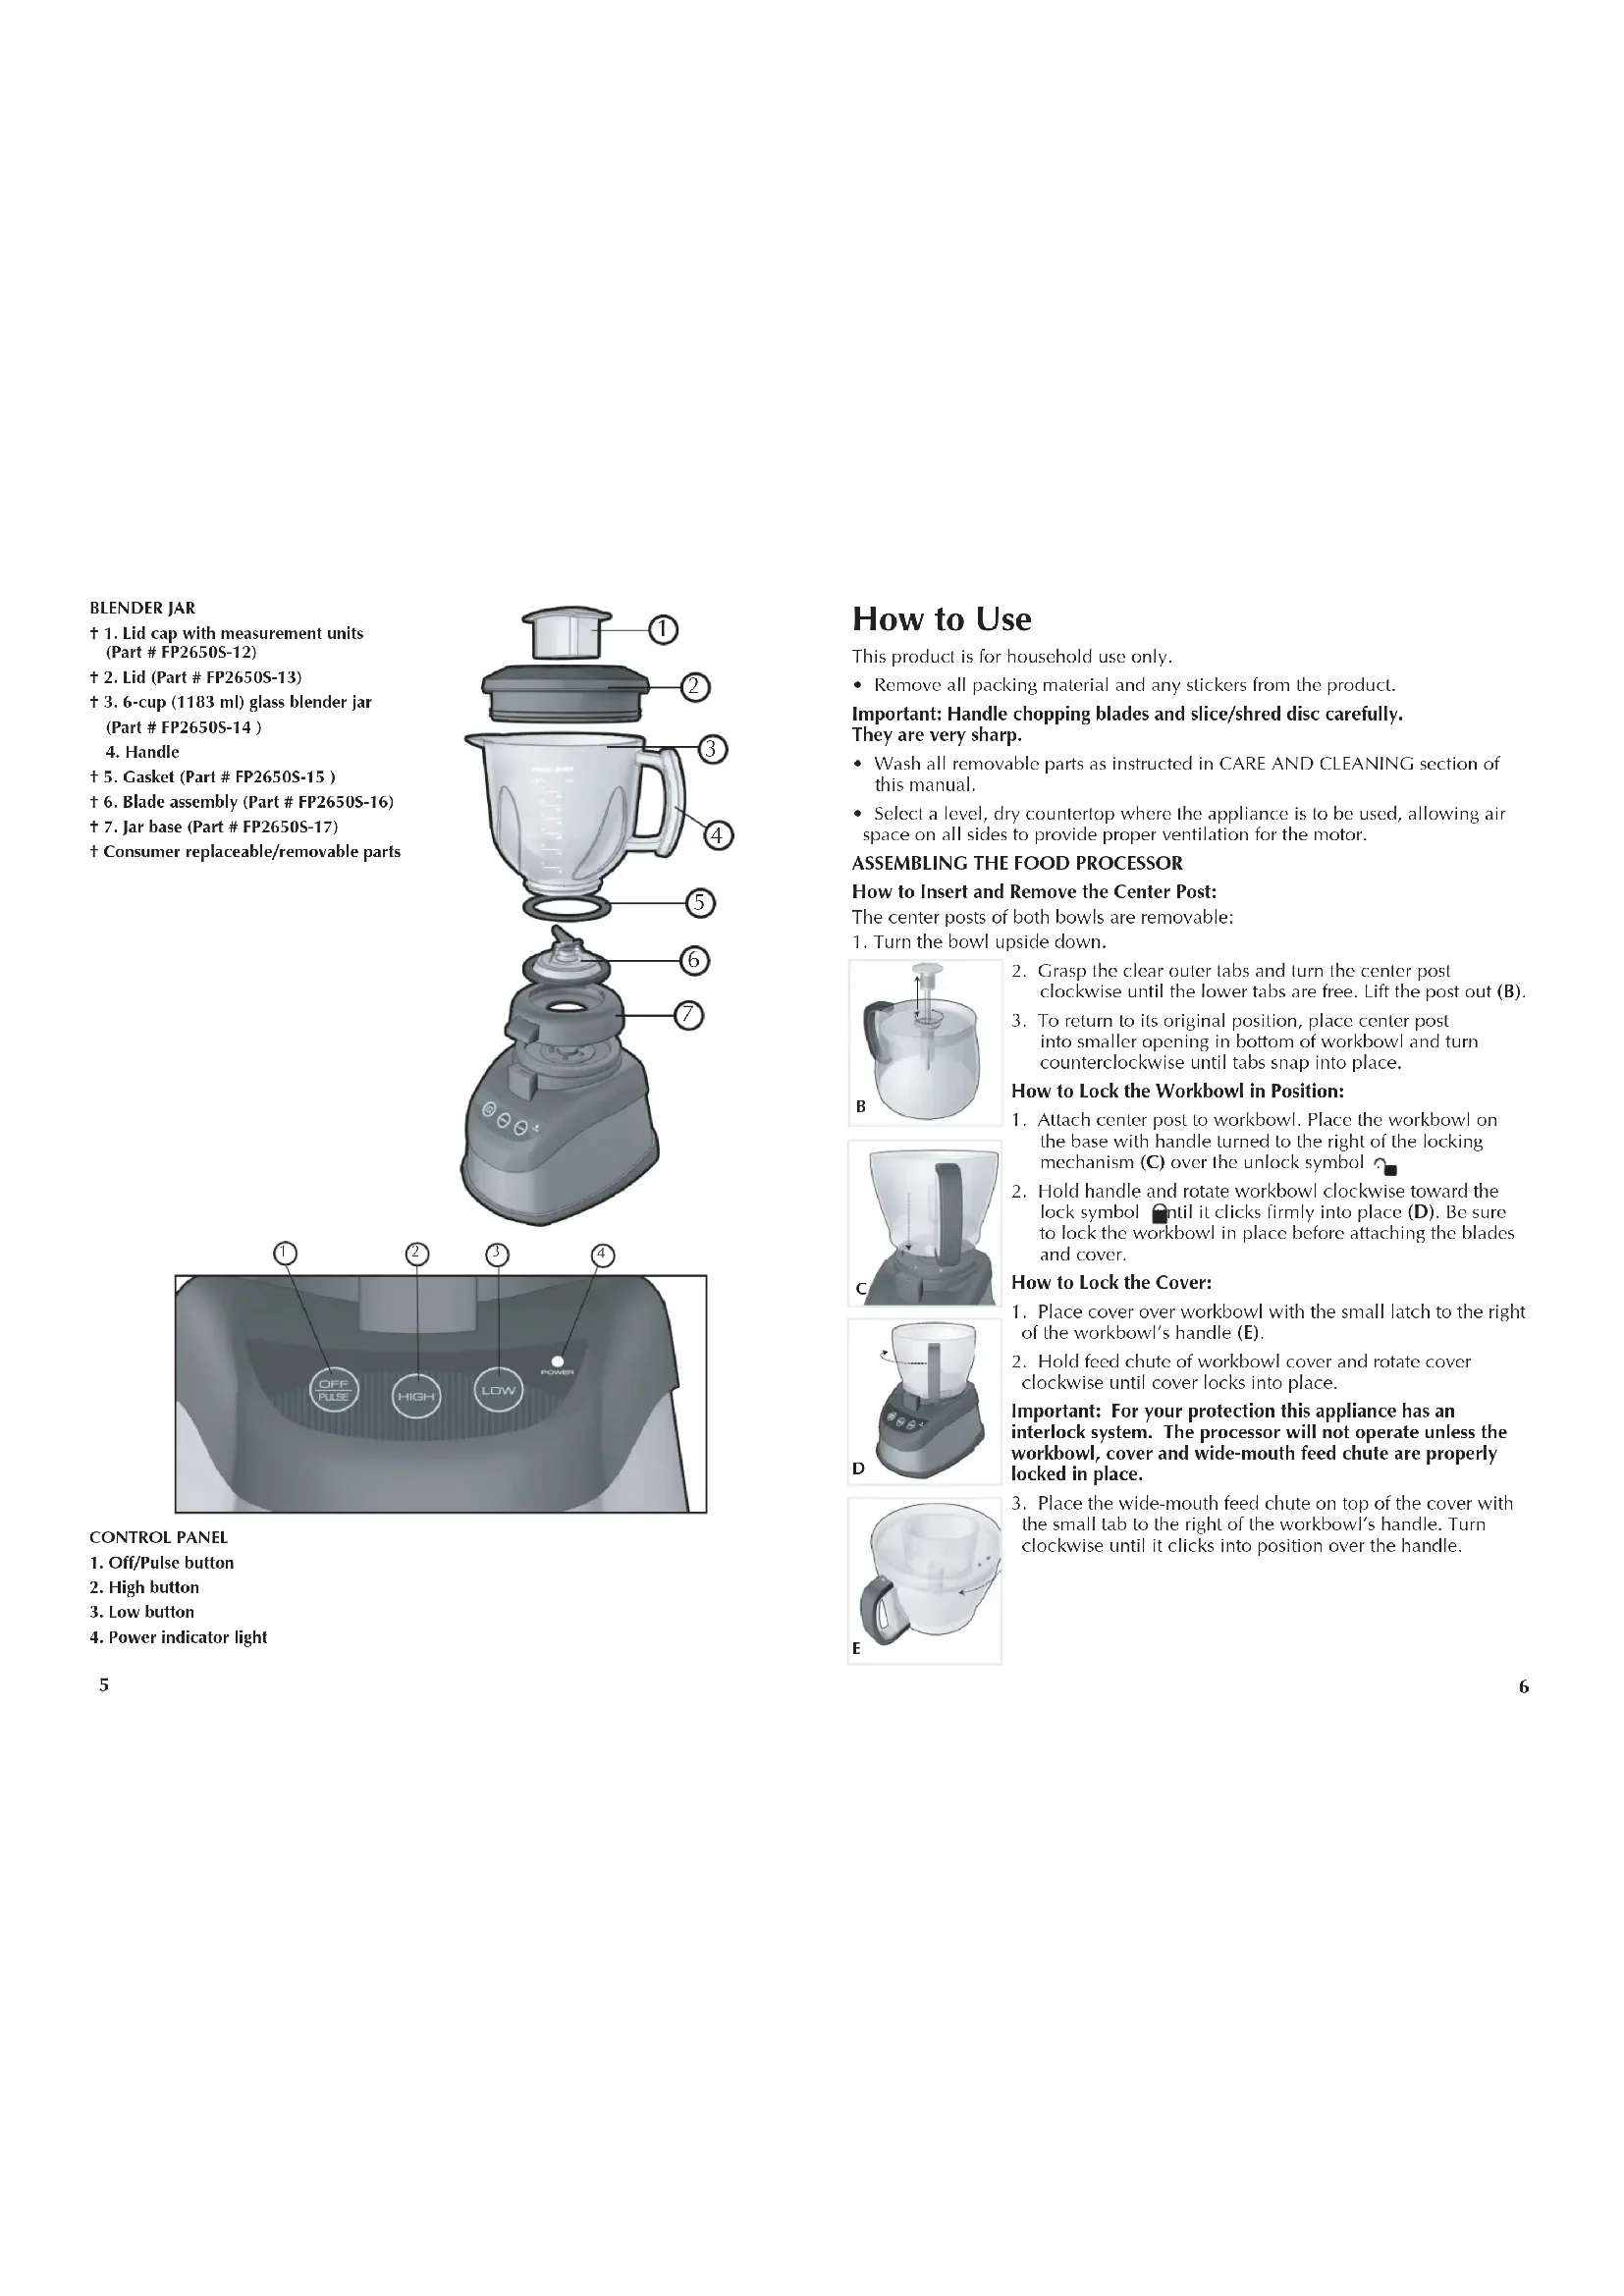
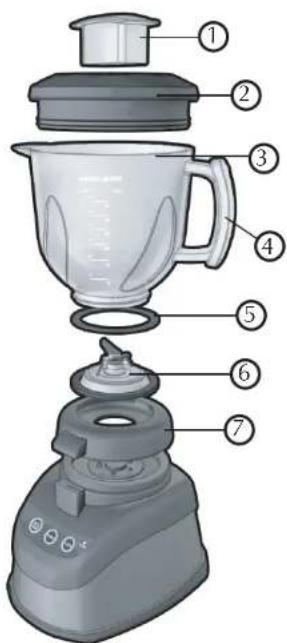
BLENDER JAR
- Lid cap with measurement units (Part # FP2650S-12)
† 2. Lid (Part # FP2650S-13)
+3.6-cup (1183 ml) glass blender jar (Part # FP26505-14)
4. Handle
† 5. Gasket (Part # FP2650S-15)
† 6. Blade assembly (Part # FP2650S-16)
† 7. Jar base (Part # FP2650S-17)
† Consumer replaceable/removable parts
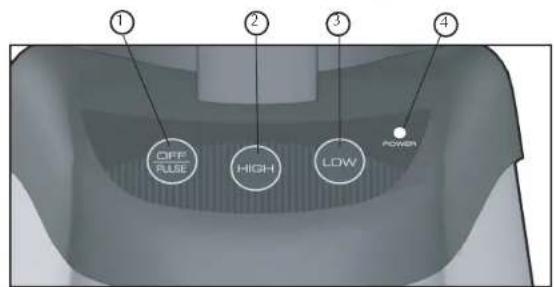
CONTROL PANEL
- Off/Pulse button
- High button
- Low button
- Power indicator light
How to Use
This product is for household use only.
- Remove all packing material and any stickers from the product.
Important: Handle chopping blades and slice/shredd disc carefully.
They are very sharp.
- Wash all removable parts as instructed in CARE AND CLEANING section of this manual.
- Select a level, dry countertop where the appliance is to be used, allowing air space on all sides to provide proper ventilation for the motor.
ASSEMBLING THE FOOD PROCESSOR
How to Insert and Remove the Center Post:
The center posts of both bowls are removable:
- Turn the bowl upside down.
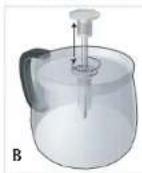
- Grasp the clear outer tabs and turn the center post clockwise until the lower tabs are free. Lift the post out (B).
- To return to its original position, place center post into smaller opening in bottom of workbowl and turn counterclockwise until tabs snap into place.
How to Lock the Workbowl in Position:
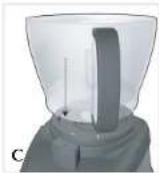
- Attach center post to workbowl. Place the workbowl on the base with handle turned to the right of the locking mechanism (C) over the unlock symbol
- Hold handle and rotate workbowl clockwise toward the lock symbol until it clicks firmly into place (D). Be sure to lock the workbowl in place before attaching the blades and cover.
How to Lock the Cover:
- Place cover over workbowl with the small latch to the right of the workbowl's handle (E).
- Hold feed chute of workbowl cover and rotate cover clockwise until cover locks into place.
Important: For your protection this appliance has an interlock system. The processor will not operate unless the workbowl, cover and wide-mouth feed chute are properly locked in place.
3. Place the wide-mouth feed chute on top of the cover with the small tab to the right of the workbowl's handle. Turn clockwise until it clicks into position over the handle.
- Insert the food pusher into the central tube of the wide-mouth feed chute. Turn clockwise to lock in place. The pusher is used to guide foods through the feed chute and can be removed when adding liquid or additional foods while the processor is running. To remove, turn counterclockwise.
CONTROLS

The controls are located on the front of the base (F). Press PULSE, HIGH or LOW to select a function (see directions below).
OFF/PULSE:
- Processor should be stored in OFF position and unplugged when not in use.
-
Use PULSE for short processing tasks. This lets you control the size and uniformity of foods being chopped.
-
The OFF/PULSE button must be pressed and held for the appliance to operate in PULSE mode. When released, the appliance will stop.
- The motor of the processor will run as long as the OFF/PULSE button is held down. Press the button and then release to allow the blades to stop running and the food to fall to the bottom of the workbowl.
- Pulsing gives better control when chopping, mincing, mixing and blending foods. You can control the size of the foods, from coarse to fine.
HIGH and LOW:
When either speed is selected, the processor will run continuously until the OFF/PULSE button is pressed.
HOW TO CHOP IN THE WORKBOWL:
The chopping blade is used to coarsely or finely chop, mince, mix and puree foods to a smooth consistency.
- Lock workbowl into position (see Illustrations B and C).
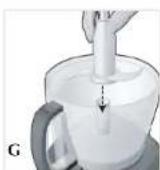
- Hold chopping blade by center shaft and insert onto center post (G).
Caution: The blade attachments are very sharp. Use caution when handling and storing. - Place food in workbowl.
-
Place cover on workbowl and lock into place by rotating clockwise (see Illustration D).
-
Place the wide-mouth feed chute and food pusher in place.
Important: Never use your fingers to direct food through the chute.
- Select your desired speed (PULSE, LOW or HIGH).
Note: Process foods for no more than a few seconds at a time. Pulsing produces excellent results and offers greater control.
- Food can be added while processor is running; remove food pusher and insert food through the feed chute. Replace food pusher in chute.
Important: Be sure chopping blade has completely stopped spinning before removing cover from processor.
- Press the OFF/PULSE button and allow blades to stop revolving before removing cover. Twist cover toward remove.
- Unlock workbowl by turning it counterclockwise and lift off base.
Note: Remove bowl from appliance before removing blade to prevent food from leaking through the center opening of the bowl.
- Carefully remove chopping blade.
- Unplug appliance when not in use.
Helpful Tips for Chopping and Blending:
The processor works very quickly.
- Watch carefully to avoid over-processing foods.
The PULSE button offers the best control and results.
- For best results, process foods that are about the same size.
- Do not overload the bowl.
- Never walk away from the processor while it is on.
Use hot but never boiling liquids.
- Do not process more than 3 cups liquid in the workbowl at one time.
To process meat, use no more than 2 cups of 34 -inch cubes in the workbowl. Process using PULSE in 5 second intervals.
The workbowl has a capacity of 10 cups.
- Insert a funnel into the feed chute when adding ingredients such as, oil, flour and sugar.
USING THE DOUGH BLADE
This blade makes preparing dough efficient and time-saving.
- This blade does not extend to the outside rim of the workbowl, so it cannot incorporate flour when very small amounts of flour are being processed.
- Push dough blade down as far as it will go into workbowl.
- Insert all the dry ingredients into the workbowl.
- Place cover on workbowl. Add wide-mouth feed chute and food pusher. Process to blend.
- Add liquids through the small feed chute with machine running.
HELPFUL TIPS WHEN USING THE DOUGH BLADE
For best results do not prepare recipes using more than 31 / 2 cups flour.
- Begin with 1 cup less than the maximum amount of flour and add additional flour once mixture is well blended.
- Pour liquid through food chute gradually.
- Knead dough no longer than 1 minute.
- Do not leave processor unattended during operation.
HOW TO SLICE OR SHRED
- Lock workbowl into position (see Illustrations B and C).
- Place disc stem onto center post in workbowl.
- Carefully place slice/shred disc on stem with appropriate side up (depending on work to be done).
Caution: The blade attachments are very sharp. Use caution when handling and storing.
- Place cover on workbowl and lock into place by rotating cover clockwise (see Illustration D).
- Fill feed chute with food. Select regular opening or wide-mouth, depending upon size of food to be processed. Position food pusher over food (H).

- Select PULSE, LOW or HIGH; press firmly on food pusher to guide food through processor, but do not force it.
Note: Heavy pressure on the pusher does not speed the work; use the pusher only as a guide. Let the processor do the work.
- When finished, press OFF/PULSE and wait for disc to stop rotating before removing cover. Twist cover toward remove.
- Carefully remove slice/shred disc. Unlock workbowl by turning it counterclockwise and lifting it off the base.
- Unplug appliance when not in use.
Helpful Tips When Slicing and Shredding
- Before slicing round fruits and vegetables in the processor, cut a thin slice from the bottom so food will be more stable. Place food cut side down in feed chute.
Always remove seeds and pits before processing. -
Select foods that are firm and not overripe.
-
Remove the core from hard vegetables, such as cabbage.
- When slicing thinner vegetables, cut them just short of the length of the feed chute and stand them vertically in feed chute so they are solidly packed and cannot turn or tilt.
- Shred hard cheeses at room temperature.
- Soft and semi-hard cheeses should be well chilled before shredding.
- After food has been processed, remove the cover and invert on countertop. Remove the slice/shredd disc before removing the workbowl from the processor. Place the disc on top of the inverted workbowl cover.
GENERAL GUIDELINES FOR USING THE FOOD PROCESSOR
- Organize processing tasks to avoid multiple cleanups of the bowl; process dry before wet.
- Although plastic parts of the processor are dishwasher safe, wash them by hand to retain their clear appearance.
- To easily clean the workbowl, once empty add a drop of detergent and a little hot water and pulse several times. Rinse before reusing.
- The processor will be more efficient if filled no more than 12 to 32 full.
- To take advantage of the speed of the processor, drop foods through the food chute with the processor running.
- Apply light pressure on the pusher for soft foods (berries and tomatoes) and slightly more pressure for hard foods (onions and potatoes).
- Do not process foods that are so frozen or so hard that the tip of a knife cannot be inserted into the food.
- When chopping dried fruits add a little flour to keep the pieces from sticking together.
- Chill soft cheeses before slicing and shredding to prevent the cheese from rolling into a ball on the disc.
- When using the slicing / shredding disc do not let the food accumulate too high; stop and empty the workbowl.
- Do not use the processor to:
Grind bones, grains or hard spices
Liquefy fruits and vegetables
- Slice warm meat and hard cooked eggs; chill them first.
HOW TO USE THE BLENDER
BLENDER JAR ASSEMBLY
- Turn blender jar upside down and place flat on counter top or work surface.
- Put the gasket on top of the blade assembly. Place the blade assembly with gasket in bottom opening of the jar with blades down.
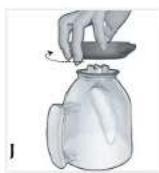
- Place jar base onto jar and rotate clockwise until it is tight (J).
- Turn assembled jar right side up.
- Place lid with lid cap in place on blender jar.
- Place jar on power base with tab on base slightly to the right of the locking mechanism and rotate clockwise until blender locks into place (Ks)
- Blender is now ready for use.
HOW TO USE
- Make sure appliance is OFF.
- Place foods to be blended into jar.
- Place lid on jar; make sure lid cap is in place.
- Plug power cord into standard electrical outlet.
Note: When in use do not leave blender unattended. When using hard foods, such as ice, nuts and coffee beans, keep one hand on the lid to keep blender in place.
- Select the speed that best suits your desired task.
Note: For blending tasks such as grinding coffee beans or nuts, or when blending thick mixtures, use the PULSE button for several seconds; then release. Releasing the PULSE button automatically turns the blender off.

- Open the Lid Cap to add ingredients while the blender is running, and drop ingredients through the opening (L).
Note: Do not remove the lid while the blender is running.
-
When finished, press the OFF/PULSE button.
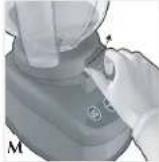
-
To remove the jar, using thumb and forefinger, push tab on blender base to the right to release the locking mechanism (M).
- Grasp the handle of the blender jar and lift up.
- Remove the lid to pour.
- Always unplug the appliance when not in use.
BLENDING TIPS AND TECHNIQUES
- Cut food into pieces no larger than 34 -inch for use in the blender.
- When ingredients splatter onto the sides of the jar or the mixture is very thick, press the OFF/PULSE button to turn appliance off. Remove the lid and use a rubber spatula to scrape down the sides of the jar and to redistribute the food pushing food toward the blades. Replace the lid and continue blending.
- Blender should always have lid with lid cap in place when in use.
- Do not place blender jar on base when motor is running.

- The lid cap holds 14 cup liquid and can be used when adding ingredients such as juices, milk, cream and liquor (N).
- When making bread crumbs, chopping nuts or grinding coffee beans make sure blender jar is completely dry.
-
When using a PULSE function use short bursts. Allow the blades to stop rotating between pulses.
-
Use the PULSE button when preparing beverages that include ice cubes; this helps to produce a smoother texture.
- It is helpful to begin the blending process on the lowest speed and then increase to a higher speed, if necessary.
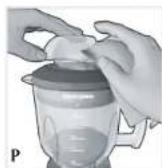
- When blending hot ingredients always open the lid cap and replace it ajar with the opened side away from you. Cover lid with a cloth to avoid splattering and only use low speed. Do not blend more than 3 to 312 cups at a time (P).
11. DO NOT place any of the following in the blender:
Large pieces of frozen foods
- Tough foods such as raw turnips, sweet potatoes and potatoes
Bones
- Hard salami, pepperoni
- Boiling liquids (cool for 5 minutes before placing in blender jar.)
12. Tasks not recommended for the blender:
Whipping cream
- Beating egg whites
- Mixing dough
- Mashing potatoes
Grinding meats
- Extracting juice from fruits and vegetables
SELECTING A SPEED
LOW Reconstituting frozen juices and drink mixes
Preparing salad dressings
Pureeing hot soups
Puddings
Blending pancake and waffle batter or mixes
Beating eggs for omelets and custards
Making cookie crumbs and bread crumbs
Preparing sauces and salsas
HIGH Coarse to fine chopping of nuts, vegetables and fruits
Grinding hard cheeses, spices and coffee beans
Baby foods - fruits and vegetables
Protein drinks
Milk shakes and malts
Frozen drinks; smoothies
PULSECrushing ice
Chopping vegetables
Thick beverages
Smoothies
Care and Cleaning
This product contains no user serviceable parts. Refer service to qualified service personnel.
Note: Do not attempt to sharpen the cutting edges of the blades or disc. They are permanently sharpened at the factory and will be ruined by attempted sharpening.
CARE AND CLEANING
Note: Before cleaning, be sure unit is turned off and cord is unplugged.
- Completely disassemble processor parts before washing.
- Whenever possible, rinse parts immediately after processing for easy cleanup.
- Wipe base and feet with a damp cloth and dry thoroughly. Stubborn spots can be removed by rubbing with a damp cloth and a mild, nonabrasive cleaner. Do not immerse base in liquid.
- All removable parts can be washed by hand or in a dishwasher. Hand washing of plastic parts will help to maintain the processor's appearance.
- If washing by hand, fill workbowl with hot soapy water and rapidly raise and lower the cutting blade and discs up and down on the center shaft.
If your sink has a sprayer nozzle, you will find it helpful in rinsing the blades. - If washing in a dishwasher, place removable parts on top rack only – not in or near utensil basket.
- Some staining of parts may occur. Make a paste of 2 tablespoons baking soda / 1 tablespoon water. Apply to stains and let stand overnight. Rinse and dry.
- Do not use rough scouring pads or cleansers on any plastic or metal parts.
- Do not allow blades or discs to soak in water for long periods of time.
- Remove the workbowl cover and blade. Invert an empty 35-mm film canister over the hole in the workbowl. Fill with hot, soapy water and allow to soak.
- Remember to clean the internal shaft of the chopping blade; use a baby bottle brush to remove any clogged food particles.
- If you are having trouble closing the cover over the workbowl, apply a small amount of vegetable oil to the rim of the cover and workbowl. This should make the pieces work smoother when attaching the cover to the bowl.
RECIPES
SPINACH PESTO PIZZA
1 recipe for pizza dough (see below)
21 cup spinach pesto (see below)
2 cups shredded mozzarella cheese
4 plum tomatoes, sliced
^1 / ^2 cup shredded Parmesan cheese
14 cup loosely packed thin strips basil leaves
Salt and pepper
Place ball of dough on lightly floured board; cover with plastic wrap and let rest 10 minutes. Roll out dough to 14-inch circle. Transfer to 14-inch lightly greased and dusted non-stick pizza pan or pizza peel* dusted lightly with cornmeal and shape pizza into 14-inch circle; lift edge and pinch to form a lip.
Spread pesto evenly on prepared crust leaving about 12 -inch border. Sprinkle mozzarella cheese evenly over pesto. Arrange tomato slices over cheese. Sprinkle with Parmesan cheese and basil. Season to taste with salt and pepper.
Bake in preheated 450^ F. till crust is browned and cheese is golden, about 12 minutes.
Makes one 14-inch pizza.
* If using a pizza stone; preheat stone for 45 minutes. Slide the pizza off the pizza peel onto the preheated stone.
SPEEDY PROCESSOR PIZZA DOUGH
114 teaspoons active dry yeast
1^1_3 cups warm water (105 - 115° F.)
14 teaspoon sugar
3% to 3% cups unsifted all-purpose flour
1 teaspoon salt
2 tablespoons olive oil
Sprinkle yeast over water; add sugar and let stand until yeast is dissolved, about 5 minutes.
Position dough blade in workbowl of processor. Add 3 cups flour, salt and olive oil. With processor running, gradually add yeast mixture down food chute. Add additional flour to make a soft dough. Continue processing dough for 1 minute. Transfer dough to lightly floured board. Shape into ball and cover with towel or large bowl. Let dough rest for 10 minutes.
On lightly floured board, knead several times until smooth and elastic; form into ball. Place in greased bowl, turning to grease top.
Cover and let rise at room temperature until doubled in bulk, about 1 hour.
Punch dough down.
SPINACH PESTO
2 cups packed fresh spinach leaves
1 cup packed basil leaves
12 cup packed Italian parsley leaves
12 cup grated Parmesan cheese
12 cup pine nuts (pignoli)
2 large cloves garlic, minced
1 teaspoon grated lemon peel
34 cup olive oil
Place all ingredients in workbowl of food processor fitted with cutting b
Cover and process about 1 minute or until smooth. Stop occasionally to scrape down sides of bowl.
Makes about 112 cups.
STUFFED MUSHROOMS
6 oz. sausage meat
1 large shallot, quartered
1 large clove garlic
1 slice white bread, torn into pieces
12 large stuffing mushrooms
2 tbsp. chopped parsley
2 tbsp. dry white wine
4 tbsp. melted butter or margarine
12 cup grated Parmesan cheese
In Black & Decker Electric Skillet, cook sausage over medium heat, stirring to break into bits.
In workbowl of food processor, combine shallot and garlic, process on low to chop. Add white bread and process 5 seconds to break into bits. Using a spoon, remove stem from mushrooms being careful not to break mushroom caps. Set mushroom caps aside. Add stems to food in processor and blend on low several seconds. Add cooked sausage and process several seconds. Stir in parsley and wine.
In large bowl, toss mushroom caps in melted butter. Arrange in single layer in shallow baking dish. Fill with sausage mixture. Top with cheese.
Bake at 350^ F. for 15 minutes until hot and bubbly.
Makes 6 servings.
CREAMY COLESLAW
2 medium head cabbage, cut into wedges
1 wedge purple cabbage
2 medium carrots, peeled and trimmed
1 small purple onion
12 cup pimento stuffed olives, coarsely chopped
4 cup mayonnaise
3 tbsp. red wine vinegar
12 tsp. celery seed
1/8 tsp. ground pepper
Using thin slicing blade, thinly slice cabbages. Cut carrots to fit feed tube; using food pusher as guide, slice carrots and onion.
Place vegetables in large bowl; add olives. In small bowl, blend remaining ingredients. Pour over cabbage mixture; toss to blend.
Cover and refrigerate at least 1 hour to allow flavors to blend. Makes about 6 cups.
BANANA RAMA SHAKE
2 cups cold milk
112 cups vanilla or banana ice cream
1 medium banana
2 tbsp. chocolate syrup
Combine all ingredients in order listed in blender container. Close cover securely. Pulse for several seconds three or four times. Press HIGH and let run until mixture is smooth and well blended, about 112 minutes.
Makes 2 thick shakes.
MANGO AND CORN SALSA
12 cup orange pepper, cut into 34 inch chunks
12 cup purple onion, cut in 12 -inch pieces
2 to 3 medium jalapeños, seeded and quartered
2 large cloves garlic
112 cups tomato, cubed
1 large mango, cubed
12 cup fresh cilantro leaves
1 cup canned whole kernel corn
Juice of 1 lime
In blender container, combine pepper, onion, jalapenos and garlic. Place cover on jar. Pulse several times for about 5 seconds, each, to chop ingredients. Add tomato, mango and cilantro and pulse several times until vegetables are chopped and mixture is blended. Spoon mixture into bowl; stir in corn and lime juice. Cover and refrigerate until ready to serve.
Serve with tortilla chips.
Makes about 4 cups.
TROPICAL ISLAND SMOOTHIE
2 cups orange juice
12 cup frozen pina colada drink mix
1 cup vanilla yogurt
1 cup frozen mixed berries
1 medium banana
2 cups ice cubes
Combine all ingredients in order listed in blender container. Close cover. Pulse for several seconds three or four times. Press HIGH and let run until mixture is smooth and well blended, about 112 minutes.
Makes 3 thick shakes.
2 cups apricot nectar
1 cup mango nectar
14 cup fresh lime juice
1/4 cup sugar
2 cups ice cubes
1 cup frozen cubed mango
Combine all ingredients in order listed in blender container. Close cover. Pulse for several seconds three or four times. Press HIGH and blend until mixture is smooth and well blended, about 1 minute.
Makes about 6 cups.
TROUBLESHOOTING FOR FOOD PROCESSOR
| PROBLEM POSSIBLE CAUSE SOLUTION | ||
| Food is unevenly chopped. | Workbowl is overfilled.You may be running the bowl continuously instead of on PULSE. Food may be cut in random sizes. | Smaller amounts will process more evenly.Use the PULSE button in 5-second or less increments. Allow the blades to stop completely before pressing the PULSE button again. Cut food in same size pieces before placing in processor. |
| Liquid leaks from the bottom of the workbowl. | Too much liquid in the workbowl. | Process smaller amounts.When processing liquids, do not add more than 3 cups to workbowl. Do not remove the blade before removing workbowl from processor when processing liquids. |
| Sliced foods are uneven and slanted. | The feed chute has not been well packed or uneven pressure has been applied to the food pusher during processing. | Cut pieces in even lengths, just a little shorter than the length of the feed chute. Pack the chute carefully and maintain even pressure on the food pusher as the food is being processed. |
| Foods being sliced or shredded fill up on one side of the bowl. | This is normal. Stop processing occasion-ally and either even out the food in the workbowl or move it to another bowl. When food accumulates close to the disc, empty the workbowl before continuing. | |
| PROBLEM POSSIBLE CAUSE SOLUTION | ||
| Some pieces of food remain on top of the slice/shreddisc. | This is normal. Slice or shredded those pieces by hand or save for another use, like soups that will be pureed. | |
| Soft cheese collects on top of the slice/shreddisc. | The cheese was not cold enough. The pressure exerted on the pusher was too great. | |
| PROBLEM POSSIBLE CAUSE SOLUTION | |
| Herbs or bread are stick- ing to sides of blender and not getting chopped. | Blender jar, food to be chopped and blade are not dry. |
| Jar separates from bottom when being removed from blender. Liquid spills onto counter. | Jar was twisted when be- ing removed from base of blender. |
TROUBLESHOOTING FOR BLENDER
| PROBLEM POSSIBLE CAUSE SOLUTION | ||
| Jar bottom does not come off of jar | A vacuum has been formed. | Place the jar on the blender and turn counterclockwise until jar is released from the bottom |
| Liquid is leaking from bottom of jar. | Gasket is either missing or not in place correctly. | Check that jar is assembled correctly. |
| Appliance does not turn on | Appliance is not plugged in jar is not in place. | Check that appliance is plugged into a working outlet. Blender jar and lid must be securely in place. |
| Mixture in blender does not seem to be blending. | Not enough liquid in mixture being blended or too much ice. | Turn the blender off and use a rubber spatula to redistribute the food; add some liquid and pulse the mixture to aid in the blending process. |
BATIDO "ISLA TROPICAL"
2 tazas鸯 de naranja
12 taza piña colada congelada
1 taza yogur de vainilla
1 taza bayas varias congeladas
1 banana mediana
2 tazas cubitos de hielo
IMPORTANT MISES EN GARDE
For service, repair or any questions regarding your appliance, call the appropriate 800 number on cover of this book. Please DO NOT return the product to the place of purchase. Also, please DO NOT mail product back to manufacturer, nor bring it to a service center. You may also want to consult the website listed on the cover of this manual.
One-Year Limited Warranty
(Appplies only in the United States and Canada)
What does it cover?
Any defect in material or workmanship provided; however, Applica's liability will not exceed the purchase price of product.
For how long?
- One year after date of purchase.
What will we do to help you?
- Provide you with a reasonably similar replacement product that is either new or factory refurbished.
How do you get service?
- Save your receipt as proof of date of sale.
- Visit the online service website at www.prodprotect.com/applica, or call toll-free 1-800-231-9786, for general warranty service.
If you need parts or accessories, please call 1-800-738-0245.
What does your warranty not cover?
- Damage from commercial use
- Damage from misuse, abuse or neglect
- Products that have been modified in any way
- Products used or serviced outside the country of purchase
Glass parts and other accessory items that are packed with the unit - Shipping and handling costs associated with the replacement of the unit
- Consequential or incidental damages (Please note, however, that some states do not allow the exclusion or limitation of consequential or incidental damages, so this limitation may not apply to you.)
How does state law relate to this warranty?
- This warranty gives you specific legal rights. You may also have other rights that vary from state to state or province to province.
JNECESITA AYUDA?
San Jose, Costa Rica
Tel: (506) 257-5716
223-0136
Ecuador
Col. Centro, Cuauhlemoc,
Mexico, D.F.
Tel: 01-600
Tel.018007142303E-mail:info@zzb.com.cn
Nicaragua
ServiTotal
De sematorio de portezuelo 520
500 metricals at sur.
Managua, Nkaragua,
Tel. (505) 248-7001
Panamá
City Market Nivel Plaza Local
153
Diagonal Iotel Melia,
Caracas.
Tel: (562) 324-0969
www.applica-latam.com
servicio@applicamail.com.mx
Col. Chapultepec Morales, Mexico D.F
Delegation Miguel Hidalgo
CP11570
Mexico
BLACK&DECKER is a trademark of The Black & Decker Corporation, Towson, Maryland, USA
Marca registrada de The Black & Decker Corporation, Towson, Maryland, E.U.
Copyright © 2008 Applica Consumer Products, Inc.
Made in People's Republic of China
Printed in People's Republic of China
Importado por:
Applica Manufacturing S. de R.L de C.V
Col. Chapultepec Morales, Mexico D.F
Delegation Miguel Hidalgo
CP 11570
Mexico
Del interior marque sin costo
01(800)7142503


- SAVE THESE INSTRUCTIONS.
- POLARIZED PLUG
- TAMPER-RESISTANT SCREW
- ELECTRICAL CORD
- TABLE OF CONTENTS
- INTRODUCTION
- GETTING FAMILIAR WITH YOUR UNIT
- BLENDER JAR
- Handle
- CONTROL PANEL
- How to Use
- ASSEMBLING THE FOOD PROCESSOR
- How to Lock the Workbowl in Position:
- How to Lock the Cover:
- CONTROLS
- OFF/PULSE:
- HIGH and LOW:
- HOW TO CHOP IN THE WORKBOWL:
- Important: Never use your fingers to direct food through the chute.
- Important: Be sure chopping blade has completely stopped spinning before removing cover from processor.
- Helpful Tips for Chopping and Blending:
- USING THE DOUGH BLADE
- HELPFUL TIPS WHEN USING THE DOUGH BLADE
- HOW TO SLICE OR SHRED
- Caution: The blade attachments are very sharp. Use caution when handling and storing.
- Helpful Tips When Slicing and Shredding
- GENERAL GUIDELINES FOR USING THE FOOD PROCESSOR
- HOW TO USE THE BLENDER
- BLENDER JAR ASSEMBLY
- BLENDING TIPS AND TECHNIQUES
- DO NOT place any of the following in the blender:
- Tasks not recommended for the blender:
- SELECTING A SPEED
- Care and Cleaning
- RECIPES
- SPINACH PESTO PIZZA
- SPEEDY PROCESSOR PIZZA DOUGH
- SPINACH PESTO
- STUFFED MUSHROOMS
- CREAMY COLESLAW
- BANANA RAMA SHAKE
- MANGO AND CORN SALSA
- TROPICAL ISLAND SMOOTHIE
- BATIDO "ISLA TROPICAL"
- IMPORTANT MISES EN GARDE
- One-Year Limited Warranty
- (Appplies only in the United States and Canada)
- What does it cover?
- For how long?
- What will we do to help you?
- How do you get service?
- What does your warranty not cover?
- How does state law relate to this warranty?
- JNECESITA AYUDA?
Brand : BLACK & DECKER
Model : PowerPro FP2620S
Category : Food Processor