
FX710 - Food Processor BLACK & DECKER - Free user manual and instructions
Find the device manual for free FX710 BLACK & DECKER in PDF.

| Brand | Black & Decker |
| Model | FX710 |
| Product type | Food processor (mixer, blender, grinder, juicer, citrus press) |
| Weight | 5.24 kg |
| Voltage | 220 – 240 V |
| Frequency | 50 – 60 Hz |
| Main functions | Chop, beat, cream, mince, cut, fold, crush, mix, grind, slice, grate, knead, blend, mill, extract juice |
| Included blades | Stainless steel blade (chopping), grinding blade, cutting blades (thick and thin slices), french fry blade, dough blade, kneading blade |
| Additional accessories | Blender, mill, external juicer, citrus press, measuring cup, spatula |
| Blade material | Stainless steel |
| Maintenance and cleaning | Dishwasher-safe removable parts (top rack); motor unit cleaned with a damp cloth; do not immerse motor unit |
| Safety | Double insulation; lid lock required for operation; automatic shut-off in case of overload? |
| Warranty | 24 months |
| Intended use | Indoor domestic use only |
Frequently Asked Questions - FX710 BLACK & DECKER
User questions about FX710 BLACK & DECKER
0 question about this device. Answer the ones you know or ask your own.
Ask a new question about this device
Download the instructions for your Food Processor in PDF format for free! Find your manual FX710 - BLACK & DECKER and take your electronic device back in hand. On this page are published all the documents necessary for the use of your device. FX710 by BLACK & DECKER.
USER MANUAL FX710 BLACK & DECKER
Parts Identification
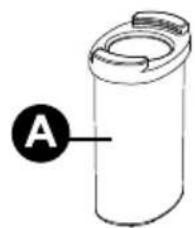
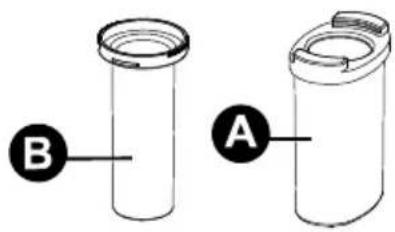
A Pusher
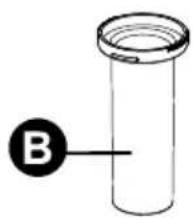
B Measuring jug
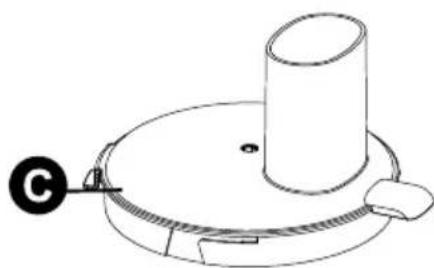
C Food processor lid
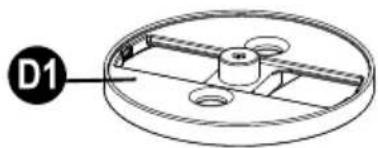
D1 Secondary blade holder
D2 Fine slicing blade
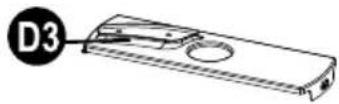
D3 Coarse slicing blade
D4 French fry blade
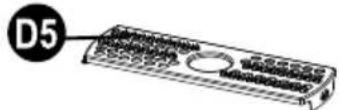
D5 Slurry cutting blade
D6 Fine grating blade
D7 Coarse grating blade
E Kneading blade
F Chopping blade
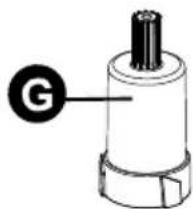
G Primary blade holder
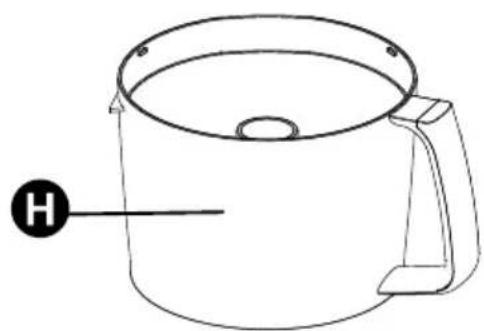
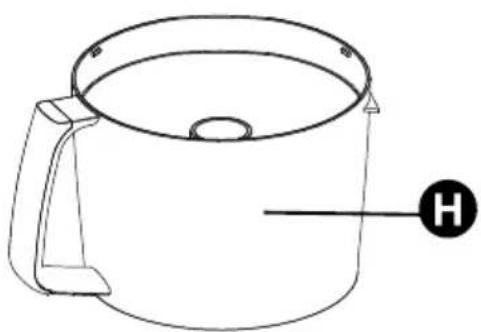
H Food processor jug
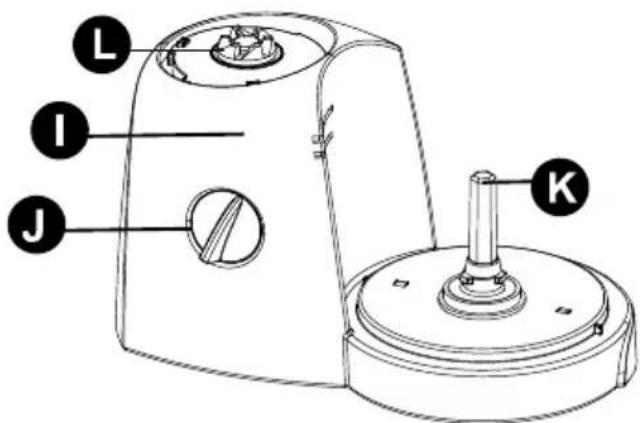
I food processor base
J Control knob
K Food processor drive
L Blender Drive
M Blender cover
NGrinderblade
OGrinder jug seal
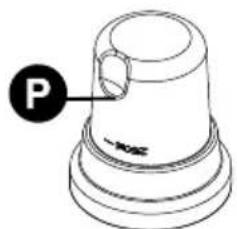
PGrindergug
Q Citrus juicer
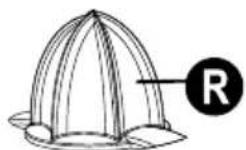
R Reamer
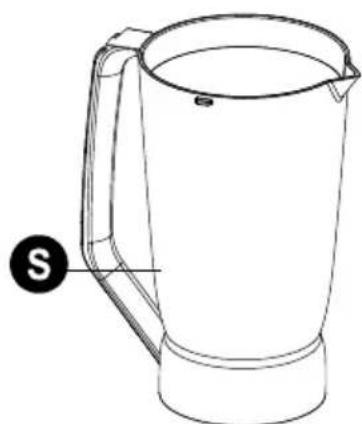
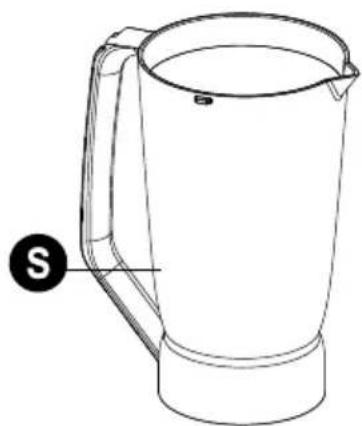
S Blender jug
T Blender lid
U Filler cap
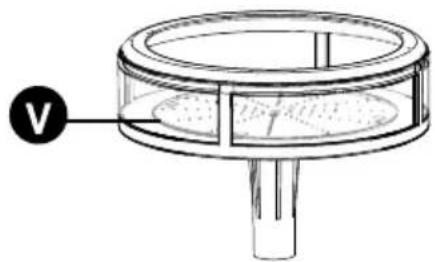
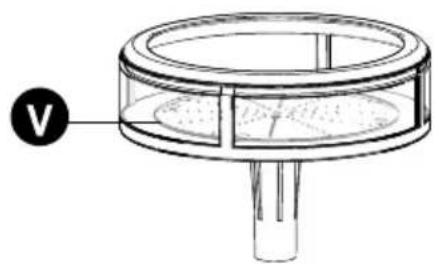
V Centrifugal juicer
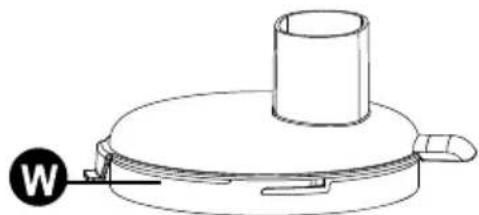
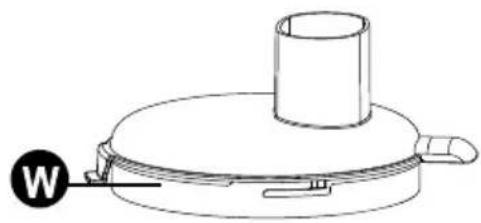
W Centrifugal juicer lid
X Chopper blade case
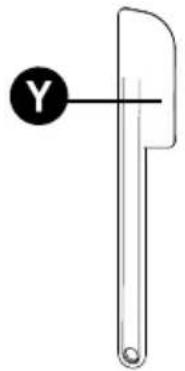
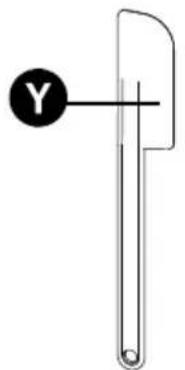
Y Spatula


ENGLISH
Intended use
Your Black & Decker appliance comes with 10 accessories to perform below functions:
Stainless Steel blade for chopping, beating, creaming, crumbling, cutting, folding in, mashing, mincing and mixing.
Shredding blade for coarse and fine grating and shredding vegetables, fruits and cheese.
Slicing blades for coarse and fine slicing of vegetables and fruits.
French fries blade for potatoes and other hard vegetables
Slurry cutter blade for slow mashing raw vegetables/fruits for baby food and for light peeling or rasping of vegetable pieces with hard skin.
Separate blade with spatula for kneading dough.
Blender for blending, crushing, foaming, grinding, pureeing, homogenizing, liquidizing, milling, shaking and stirring.
Grinder mill for grinding coffee, herbs and spices.
Juice Extractor attachment for juicing and pulping non-citrus fruits.
Citrus Juice Extractor for juicing and pulping of citrus fruits.
Do not use the centrifugal juicer if the rotating sieve is damaged
Do not use this appliance for any other purpose. This product is intended for indoor household use only.

Read this entire manual carefully before using the appliance.
Safety instructions
- Warning! When using mains-powered appliances, basic safety precautions, including the following, should always be followed to reduce the risk of fire, electric shock and personal injury.
- The intended use is described in this manual. The use of any accessory or attachment or the performance of any operation with this appliance other than those recommended in this instruction manual may present a risk of personal injury.
- Retain this manual for future reference.
Using your appliance
- Always take care when using the appliance.
- Never pull the power supply cord to disconnect the plug from the socket. Keep the power supply cord away from heat, oil and sharp edges.
- Do not place the appliance on or near heat sources or in a heated oven.
- Do not use the appliance outdoors.
- Always protect the motor unit from water or excessive humidity.
- If the power supply cord is damaged during use, disconnect the appliance from the power supply immediately. Do not touch the power supply cord before disconnecting from the power supply.
-
Disconnect the appliance from the power supply when not in use, before fitting or removing parts and before cleaning.
-
Never let the appliance operate unattended.
- Never reach into the jar with your fingers or an object while the appliance is running.
- Only remove the jar after you have switched the appliance off and any moving parts have stopped.
- Do not touch the cutting blades.
- Keep any loose clothing or long hair away from the feeding tube and any moving parts.
- Care shall be taken when handling the sharp cutting blades, emptying the bowl and during cleaning.
- Do not immerse the appliance, cord set or plug in liquids.
- Position cord so it does not hang over the edge of worktops & cannot be caught accidentally or tripped over.
- Caution: Ensure the Blender is turned off before removing from the stand.
Safety of others
- This appliance is not intended for use by persons (including children) with reduced physical sensory or mental capabilities, or lack of experience and knowledge, unless they have been given supervision or instruction concerning use of the appliance by a person responsible for their safety.
Children should be supervised to ensure that they do not play with the appliance.
After use
-
Remove the plug from the socket before leaving the appliance unattended and before changing, cleaning or inspecting any parts of the appliance.
-
When not in use, the appliance should be stored in a dry place. Children should not have access to stored appliances.
Inspection and repairs
- Switch off the appliance before cleaning, changing accessories or approaching parts which move in use
- Before use, check the appliance for damaged or defective parts. Check for breakage of parts, damage to switches and any other conditions that may affect its operation.
- Do not use the appliance if any part is damaged or defective.
- Do not use the appliance if the blade is damaged.
- Have any damaged or defective parts repaired or replaced by an authorised repair agent.
- Before use, check the power supply cord for signs of damage, ageing and wear.
- Do not use the appliance if the power supply cord or mains plug is damaged or defective.
- If the power supply cord or mains plug is damaged or defective it must be repaired by an authorised repair agent in order to avoid a hazard. Do not cut the power supply cord and do not attempt to repair it yourself.
- Never attempt to remove or replace any parts other than those specified in this manual.
Electrical safety
Before use, check that the mains voltage corresponds to the voltage on the rating plate.
ENGLISH

This appliance is double insulated in accordance with EN 60335-2-14; therefore no earth wire is required.
- To avoid the risk of electric shock, do not immerse the cord, plug or motor unit in water or other liquid.
- Check that the supply voltage shown on the rating plate of the appliance matches that of your electrical system. Any connection error will invalidate the guarantee.
Mains plug replacement
If a new mains plug needs to be fitted:
- Safely dispose of the old plug
- Connect the brown lead to the live terminal of the new plug
- Connect the blue lead to the neutral terminal
- If the product is class I (earthy), connect the green/yellow lead to the earth terminal
Warning! If your product is class II double insulated (only 2 wires in the cord set), no connection is to be made to the earth terminal
- Follow the fitting instructions supplied with good quality plugs
- Any replacement fuse must be of the same rating as the original fuse supplied with the product.
Warning! The above section on mains plug replacement is for authorized service centre professionals.
Assembly
Wash all detachable parts (see chapter 'Maintenance and cleaning').
Assembling the food processor
-
Fit the food processor jug (H) onto the food processor base (I), secure it by turning it clockwise.
-
For chopping or kneading fit the required blade (F or E) onto the primary blade holder (G).
- For shredding or slicing, fit the required blade (D2, D3, D4, D5, D6 or D7) into the secondary blade holder (D1).
- Place the assembled blade and holder into the food processor jug (H).
- Fit the food processor lid (C) and secure it by turning it clockwise.
- Fit the measuring jug (B) into the pusher (A) and then place the pusher into the food processor lid.
Note: The blender cover (M) must be in place for the food processor to work.
Assembling the blender
- Remove the blender cover (M) from the food processor base by turning it clockwise and lifting it off.
- Place the blender jug (S) onto the blender drive (L) and secure it by turning anti-clockwise.
- Fit the blender lid (T) to the blender jug (S) and secure it by turning it anti-clockwise.
- Fit the filler cap (U) to the blender lid (T) and secure it by turning it anti-clockwise.
Assembling the grinder
- Fit the grinder jug seal (O) into the grinder jug (P).
- Fit the grinder blade (N) into the grinder jug and secure by turning it clockwise.
- Place the grinder jug (P) onto the blender drive (L) and secure it by turning anti-clockwise.
Assembling the citrus Juicer
-
Fit the food processor jug (H) onto the food processor base (I), secure it by turning it clockwise.
-
Fit the citrus juicer (Q) onto the food processor jug (H), secure it by turning it clockwise.
- Place the reamer (R) onto the citrus juicer (Q).
Note: The blender cover (M) must be in place for the citrus juicer to work.
Assembling the centrifugal juicer
- Fit the food processor jug (H) onto the food processor base (I), secure it by turning it clockwise.
- Fit the centrifugal juicer (V) into the food processor jug.
- Fit the Centrifugal juicer lid (W) and secure it by turning it clockwise.
- Fit the measuring jug into the pusher and then place the pusher into the food processor lid.
Note: The blender cover (M) must be in place for the centrifugal juicer to work.
Note: The blender cover (M) must be in place for the centrifugal juicer to work.
Note: Do not use the centrifugal juicer if the rotating sieve is damaged
Use
- Place the appliance on a flat, stable surface.
- Assemble the required accessory as advised above.
- Put the ingredients into the required jug.
- Connect to the mains supply.
- Turn the control knob to the required setting.
Note: Additional items can be added during use by using the chutes in the lids and the pusher.
The following settings are available:-
P = Pulse Operation
O = Power Off
1 = Low Speed
2 = Medium Speed
3 = High Speed

The appliance should be disconnected from the mains supply before
removing the jug.
Recommendations when food processing
| Function | Types of food | Speed | Time |
| Chopping *1 Vegetables and fruits | Pulse or 2 15 sec | ||
| Chopping *1 Meat, cheese 1 20 sec and chocolate | |||
| Blending *1 Soups and 1 20 sec thick drinks | |||
| Pureeing *1 Cooked vegetables 1 or 2 10-15 sec and soft fruits | |||
| Mixing *1 Pastry and scones 2 or 3 40 sec | |||
| Mashing *1 and baby food | Cooked potatoes | 3 60 sec | |
| Kneading *2 Bread dough | 1 20 sec | ||
| Folding in *2 Mousse batter | 1 15 sec | ||
| Creaming *2 Cake batter | 1 30 sec | ||
| Slicing *3 Vegetables and fruits | 2 or 3 | 5 sec | |
| Slicing *3 Potatoes and cheese | 1 | 5 sec | |
| Shredding *3g Vegetables and fruits | 2 or 3 | 5 sec | |
| Grating *4 chocolate | Cheese and | 1 | 5 sec |
| Cutting *5 Potatoes for french fries | 1 | 5 sec | |
| Cutting *5 Vegetable and fruits | 1 | 5 sec | |
| Slow Mashing *6 Raw fruits and vegetables for babyfood | 2 or 3 | 5 sec | |
| Peeling/Rasping *6 Hard fruit or vegetable 1 pieces (3x2cm) with skin | 5 sec | ||
1 Use the chopping blade (F)
2 Use the kneading blade (E)
ENGLISH
3 Use the slicing blades (D2 or D3)
4 Use the grating blades (D6 or D7)
5 Use the french fry blade (D4)
6 Use the slurry cutting blade (D5)
Note: The blender should not be run for longer than 1 minute. After a continuous run of 1 minute, the blender should be allowed to cool down for at least 2 minutes before further use.
Warning: Pulse mode should not be operated more than 10 sec at a time.
Warning: While using the slurry cutter blade for peeling or rasping skin of vegetables, do not use pusher tightly. This action will slow mash the vegetable along with skin.
Recommendations when blending
| Function Types of food Speed Time |
| Blending Liquids 3 15 sec |
| Liquidizing Fruits or vegetables 2 30 sec cut in cubes with equal amount of water |
| Crushing Ice cubes of 1 or 2 15 sec dimension 3x2cm |
| Foaming milk shakes, juices etc 2 or 3 20 sec |
| Pureeing Vegetables and 2 30 sec soft fruits |
| Stirring Batter or soups 1 1 min |
Note: The blender should not be run for longer than 1 minute. After a continuous run of 1 minute, the blender should be allowed to cool down for at least 2 minutes before further use.
Warning: Pulse mode should not be operated more than 10 sec at a time.
Recommendations when grinding
| Function | Types of food | Speed | Time |
| Dry grinding | Coffee beans Pulse | 10-20 sec | |
| Dry grinding | Herbs | 1 20 sec | |
| Dry grinding | Spices | Pulse | 10-20 sec |
Note: The dry grinder should not be continuously run for longer than 40 seconds.
Warning: Pulse mode should not be operated more than 10 sec at a time.
Warning: Max capacity of Grinding mill is 50g and mincer mill is 150g
Warning! The grinder should NOT be used for wet grinding of hard food materials like pulses, beans, grains etc. This will lead to damage of blades and reduction of motor life span.
Recommendations when Juicing
| Function Types of food Speed Time | |||
| Juicing *1 | Non-citrus fruits | 2 or 3 | 1 min |
| Collecting pulp *1 | Draining and collecting the pulp of non-citrus fruits | 2 or 3 | 1 min |
| Juicing *2 | Citrus fruits and ground spices with water | 1 | 1 min |
| Collecting pulp *2 | Draining and collecting the pulp of citrus fruits | 1 | 1 min |
*1 Use the centrifugal juicer (V)
*2 Use the citrus juicer (Q)
Note: Fruits that contain starch, such as bananas, papayas, avocados, figs, strawberries and mangoes are not suitable for processing in this juice extractor attachment. Use the stainless steel blade attachment of food processor, blender or a stick blender to process these fruits.
Note: The juicer is not suitable for processing very hard and/or fibrous/starchy fruits, vegetables or plants such as sugar cane.
Note: The Juicer should not be run for longer than 1 Minute. After each 1 Minute use, the Juicer should be allowed to cool for at least 1 minute. After 3 consecutive cycles the juicer must be allowed to cool for 15 minutes before further use.
Useful advice
- Place the appliance on a clean, flat work surface.
- Connect the appliance to a suitable electrical supply. Rotate the control knob (J) to the required speed.
- When blending is complete return the control knob to the off (0) position.
- Once the blade has come to a complete stop, lift the jug from the blender body (I).
- Remove the lid and pour the ingredients into a suitable container.
Note: Ingredients can be added by inserting them through the hole left when the filler cap (A) is removed.
Warning! Never operate the Blender without the lid fitted.
Warning! Never operate the Food processor without the lid fitted.
Maintenance & cleaning
- Switch the appliance off, remove the plug from the wall socket and wait until the blade has stopped rotating.
- The appliance is easier to clean if you do so immediately after use.
-
Do not use abrasive cleaning agents, scourers, acetone, alcohol etc. to clean the appliance.
-
All removable parts can be cleaned with a cleaning brush in warm water with some washing-up liquid and rinse them under the tap.
- Remove the dirty parts from the motor unit. Clean the motor unit with a damp cloth.
- Never immerse the motor unit in water nor rinse it under the tap.
Technical data
| Voltage 220 – 240 Volts | |
| Supply 50/60 Hz | |
| Weight 5.24 Kg. |
ENGLISH
Protecting the environment

arate collection. This product must not be disposed of with normal household waste.
Should you find one day that your Black & Decker product needs replacement, or if it is of no further use to you, do not dispose of it with other household waste. Make this product available for separate collection.
- Black & Decker provides a facility for recycling Black & Decker products once they have reached the end of their working life. This service is provided free of charge. To take advantage of this service please return your product to any authorised repair agent who will collect them on our behalf.
- You can check the location of your nearest authorised repair agent by contacting your local Black & Decker office at the address indicated in this manual. Alternatively, a list of authorized Black & Decker repair agents and full details of our after-sales service and contact are available on the Internet at: www.2helpU.com.
Warranty
Black & Decker is confident of the quality of its products and offers an outstanding warranty.
This warranty statement is in addition to and in no way prejudices your statutory rights.
The warranty is valid within the territories of the Member States of the European Union and the European Free Trade Area.
If a Black & Decker product becomes defective due to faulty materials, workmanship or lack of conformity, within 24 months from the date of purchase, Black & Decker warranty to replace defective parts, repair products subjected to fair wear and tear or replace such products to ensure minimum inconvenience to the customer unless:
The product has been used for trade, professional or hire purposes;
The product has been subjected to misuse or neglect;
The product has sustained damage through foreign objects, substances or accidents;
Repairs have been attempted by persons other than authorised repair agents or Black & Decker service staff.
To claim on the warranty, you will need to submit proof of purchase to the seller or an authorised repair agent. You can check the location of your nearest authorised repair agent by contacting your local Black & Decker office at the address indicated in this manual.
Alternatively, a list of authorised Black & Decker repair agents and full details of our after-sales service and contacts are available on the Internet at: www.2helpU.com.
Identification des pieces
1iio jaiill psejly. Jaiill coill
aaiiie

J 1
eaoaia 1
eaii1i i aaii j 5i j sii jiaiaiaiaiaiaia
Juaaiaall
y
iLg iIgIgIgIgIgIgIgIgIgIgIgIg
oia piai piu. Jaoell Lgian Xua pucg Lauc
y
gss gaae aag sgs
Lc 1y
Jiee 1
J 1
1 2
J 1
LoLollloIgullaIgul
i 15 i 11
www.2helpU.com:
ARABIC
j 1 j 1 j 1 j 1 j 1 j 1 j 1 j 1 j 1 j 1 j 1 j 1 j 1 j 1 j 1 j 1 j 1 j 1 j 1 j 1 j 1 j 1 j 1 j 1 j 1 j 1 j 1 j 1 j 1 j 1 j 1 j 1 j 1 j 1 j
Jus Jus Jus Jus Jus Jus Jus
Ji Jai Jai Jai Jai Jai Jai Jai Jai Jai Jai Jai Jai Jai Jai
1 1 1 1 1 1 1 1 1 1 1 1 1 1 1 1 1 1 1 1 1 1 1 1 1 1 1 1 1 1 1 1 1 1
.
(B) 1bill k j bll J
J
J
J
J
J
(Y)
(K) 1111
a 11 11 11 11 11 11 11 11
ARABIC
jnnn nnnn nn nnnn nnnnnnnnnnnnnnnnnnnnnnnnnnnnnnnnnnnnnnnnnnnnnnnnnnnnnnnnnnnnnnnnnnnnnnnnnnnnnnnnnnnnnnnnnnn
P( ab) = 12
()sallallaaalaaalb3
acllll jocolj g aalg
4
pabla yaa jya 1bae
()b)
Jaa jai gj s jall yll lal all jal all
()b11c
Jaa gssrall ybbll aolll sall
s sssssssssssssssssss
jgljjjll j
1
.1
. 2
3
4
15
1i 1i i 1i 1i 1i 1i 1i 1i 1i
aill 2ie e bce gagall p
y
P
a|b|c|d=
= ( x1,y1) , = ( x2,y2)
ARABIC
(“s"g"g")aBallss
(j)
3
("7J"6J"5J"4J"3J"2J")
(1)
4
c( r - 1) k( r - 2)
5
aLl l a c 1
()g()wll 6
pabll jie 1b6
()bL 1
jLaa gia palaIgai jla
b
jLg jLg j0(p)blyllbcJy.1
L 1
()bX11 2
acllwljleuSce 4
3.
acll jrc aee
aogblyl lalbla bba hllg j
aess
1 1
aill 100000000000000000000000000000000000000000
a 11 a y
J 1
J 1
a
J 1
1 1111111111111111111111111111111
. 1
J. J. J. J. J. J. J. J. J. J. J. J. J. J. J. J. J. J. J. J. J. J. J. J. J. J. J. J. J. J. J. J. J. J. J. J. J. J. J. J. J. J. J. J. J. J. J. J. J. J. J.
yaa aag
bIyI plaii
bIaIpaiaIglaIjai
J 111 111 111 111 111 111 111 111 111 111 111 111 111 111 11
1
jzjjbly
e lae aee
J 1
a
eLg jI J 1000
puiiui
1
aillg aallg blll lss
a
1 1
1
aal 1/2g 111 111 111 111 111 111 111
a
jll jll jll jll jll jll jll jll
111111111111111111111111111
aaiiie 15gll sss gaae aae o ae aee
Jg jssrlll lolll 1saiy
paaaii1j. jr jr jll iip
JiLi Jolll Jil11 1j

ARABIC


1
A
B
pIabll jaijLbcC
D1
a a 1
D3
D4
CJIL 5
D6
D7
J E
F
G
H
pIaill jJcIe I
sill
pabjj j4. K
L
byssu. M
inball s. N
aaboll 1b0
aaboll. P
Q
R
bXJJI S
byallbcT
aill aie 1bc U
sRdBbLalalV
srrlll lalall sall lbc W
X
aol1.Y
Names & Addresses for Black & Decker Service Concessionaries
ALGERIA: SARL Outilage Corporation, After Sale Service Center-08, Rue Mohamed Boudiaf - Cheraga, Algiers, Algeria, Tel: +213 21 375131, Fax: +213-0-369667. AZERBAJAN: Kontakt - NN LLC, M.Qashqay 43, Baku, Azerbaijan Az1000. Tel: +994 12 4082050, Fax: +994 12 4117090. BAHRAIN: Alfouz Services Co. WLL., P.O. Box 26562, Tubli, Manama, Tel: +973-17783562/ 17879987, Fax: +973-17783479. Kewalram & Sons Co. WLL P.O. Box 84, Manama, Kingdom of Bahrain, Tel: +973-17213110/ 17210617/ 17210619, Fax: +973-17213211/ 17210627. BANGLADESH: Ultra Corporation, 8, Kushol Centre, Uttara, Dhaka 1230. Tel: +880-2-8922144, Fax: +880-2-8951339. EGYPT: Anasia Egypt for Trading S.A.E, P.O. Box 2443, 9, Mostafa Refaat Street, Sheraton Heliopolis 11361, Cairo, Tel: +202-22684159, Fax: +202-22684169. ETHIOPIA: Seif Sherif Trade PLC -Arada Sub City, Kebele 01-02, Global Insurance Bldg., 2nd Flr. Room 43, P.O.Box 2525, Addis Ababa, Ethiopia, Tel: 00-251-11-1563968/ 1563969, Fax: 00-251-11-1558009. INDIA: Gryphon Appliances Ltd., D-6/4, Okhla Industrial Area, Phase-I, New Delhi-110020, Tel: +91-11-46731111, Fax: +91-11-46731111. JORDAN: Bashiti Hardware, 93 King Abdullah 2nd St., Opp ELBA House, P.O. Box 3005, Tel: +962-6-5349098 ext.11, Fax: +962-6-5330731. KENYA: Leading Concepts, P.O. Box: 40877-00100, Nairobi, Kenya. Tel: +254 20 690 5000, Fax: +254 20 690 5111. KUWAIT: Al Omar Technical Co., P.O. Box 4062, Safat 13041, Kuwait, Tel: 00965-24848595/ 24840039, Fax: 00965-24845652. The Sultan Centre, P.O. Box 26567-13126 Safat, Kuwait, Tel: 00965-24343155 Etn. 432, Fax: 00965-24319071. LEBANON: Aces Service Centre, P.O. Box 90-102, Nahr El Mot, Seaside Highway Pharaon Building Beirut. Tel: 00961-1-898989, Fax: 00961-1-245880. LIBYA: Homeworld Co., Building No.5, Senidal St., Amr Ibn ElaaS Road, Benghazi, Libya. Tel: 00218-61-9094183. Service CenterI - Benghazi; Tel: +218-061-3383994, Fax: +218-092-7640688, Service Center2 - Tripoli; Tel: +218-021-3606430, Fax: +218-092-6514813. MALTA: John G Cassar Ltd. 36-Victory Street Qormi QRM 06 Malta. Tel: +356-21493251 Fax: +356-21483231. MAURITUS: J.M. Goupille & Co. Ltd., Rogers Industrial Park 1, Riche Terre, Mauritius, Tel: +230 206 9450/+ 230 207 170o Fax: +230 206 9474/+ 230 248 3188. MOROCCO: UATS 26 Rue Ennjarisse, Hay Errainan Beasejour - Hay Hassani-Casablanca, Morocco. Tel: +212 522945114, Fax: +212 522942442 NEPAL: Universal Electrocom Tripureshworkathmandu,NepalTel:+977-1-4265191. NIGERIA: Dana Electronics Ltd. (Lagos) 116/ 120 Apapa Oshodi Express Way Isolo Lagos Nigeria.Tel:+234-174318/ +234-8037767774/+ 234-8057445477.(Abuja) 18,A.E.Eukinam Street Off Obsfemi Awolowo Road,Utako Abuja Nigeria.Tel:+234-803227610l/+ 234-8037767774.Kano) 9A - Mai Malari Road,Bompai,Kano,Nigeria.Tel:+234-8053294947/+ 234-8037767774. OMAN: Oman Marketing & Service Co. (Omasco), P.O.Box 2734,Behind Honda Showroom,Wattayah,Oman,Tel:+968-2456023/ 24560255,Fax:+968-24560993.Oman Marketing & Service Co.(Omasco), Al Ohi,Sohar,Oman,Tel:+968-26846379,Fax:+968-26846379.Oman Marketing & Service Co.(Omasco)- Sanaya,Salahah,Oman,Tel: 00968-2321229o Fax:+968-2321O936. PAKISTAN: Ammar Service & Spares - 6Bank Arcade Serai Road Karachi,PakistanTel: 0092-2-324269oFax: 0092-2-324272l4 PHILIPPINES: 476 J.P.Rizal St., cor Kakarong St.Brgy Olympia,Makati CityTel:+632 403-5698.QATAR: Al MUTFah Service Centre Al Wakrah Road,P.O.Box 875,Doha,Qatar.Tel: 00974-465088o/ 465011o/ 4446868,Fax: 00974-44414l/ 4662599.SAUDI ARABIA Al Khobar) Al-Suwaiket Catering & Trading Co., P.O.Box 4228King Aziz Street Al KhobarTel:+966-3-8591o88Fax:+966-3-8595o48.Fawaz Ebrahim Al Zayani Trading Est.P.O.Box 76oZs Al Khobar #3l95zTel:+966-3-8l4o9l4Fax:+966-3-8l4o8z. (Jeddah) Banaja Trading Co.Ltd.P.O.Box 366,Jeddah-2l4lTel:+966-2-65llll+Fax:+966-2-65O366B.(Riyadh) Banaja Trading Co. Ltd.P.O.Box 566,Riyadh-1l4zTel: 00966-1-4l2444Fax:+966-1-4O33378.SOUTH AFRICA:Trevco Power Tool Service 1 Steenbok Street Koedoespoort, O186 Pretoria South AfricaTel:+27-86-1873826Fax:+27-86-5oo177.SRI LANKA Delmege Construction Products (Pvt) Ltd.No 1O Vinayalankara Mawatha Colombo-lo,Sri LankaTel:+94-ll-26933e+7Service hotline:+94-77-2l l l TUNISIA:Societe Tunisienne De Manutention - Rue de la Physique,Nouvelle Zone Industrielle de Ben Arous-2O13 TunisiaTel:+2Ib - Iy - Iy - Iy - Iy - Iy - Iy - Iy - Iy - Iy - Iy - Iy - Iy - Iy - Iy - Iy - Iy - Iy - Iy - Iy - Iy - Iy - Iy - Iy - Iy - Iy - Iy - Iy - Iy - Iy - Iy - Iy - Iy - Iy - Iy

BLACK&DECKER
WARRANTY REGISTRATION CARD
YOUR NAME/
YOUR ADDRESS
POSTCODE
DATE OF PURCHASE
DEALER'S NAME & ADDRESS/


- Parts Identification
- ENGLISH
- Intended use
- Safety instructions
- Using your appliance
- Safety of others
- After use
- Inspection and repairs
- Electrical safety
- Mains plug replacement
- Assembly
- Assembling the food processor
- Assembling the blender
- Assembling the grinder
- Assembling the citrus Juicer
- Assembling the centrifugal juicer
- Use
- The following settings are available:-
- Recommendations when food processing
- Useful advice
- Maintenance & cleaning
- Protecting the environment
- Warranty
- Identification des pieces
- ARABIC
- bIyI plaii
- puiiui
- Names & Addresses for Black & Decker Service Concessionaries
- BLACK&DECKER
- WARRANTY REGISTRATION CARD
Brand : BLACK & DECKER
Model : FX710
Category : Food Processor