
FX810 - Food Processor BLACK & DECKER - Free user manual and instructions
Find the device manual for free FX810 BLACK & DECKER in PDF.
| Product type | Food processor |
| Brand | Black & Decker |
| Model | FX810 |
| Power | 800 W |
| Voltage | 220-240 V |
| Frequency | 50/60 Hz |
| Weight | 5.03 kg |
| Double insulation | Yes (class II) |
| Warranty | 24 months |
| Usage | Indoor household |
| Speeds | 2 speeds + pulse function (P) |
| Main functions | Chopping, mixing, slicing, grating, shredding, pureeing, kneading, beating, whipping cream, grinding, juicing, centrifugal extraction |
| Mill capacity | 50 g max |
| Included accessories | Slicing blade, mixing blade, 5 slicing/grating discs, grinding blade, citrus juicer, blender, centrifugal juicer, pushers, spatula |
| Blade material | Stainless steel |
| Cleaning | Removable parts washable with warm water and dish soap; motor unit wiped with a damp cloth |
| Safety precautions | Never immerse motor unit; do not use if blade damaged; unplug before cleaning |
Frequently Asked Questions - FX810 BLACK & DECKER
User questions about FX810 BLACK & DECKER
0 question about this device. Answer the ones you know or ask your own.
Ask a new question about this device
Download the instructions for your Food Processor in PDF format for free! Find your manual FX810 - BLACK & DECKER and take your electronic device back in hand. On this page are published all the documents necessary for the use of your device. FX810 by BLACK & DECKER.
USER MANUAL FX810 BLACK & DECKER
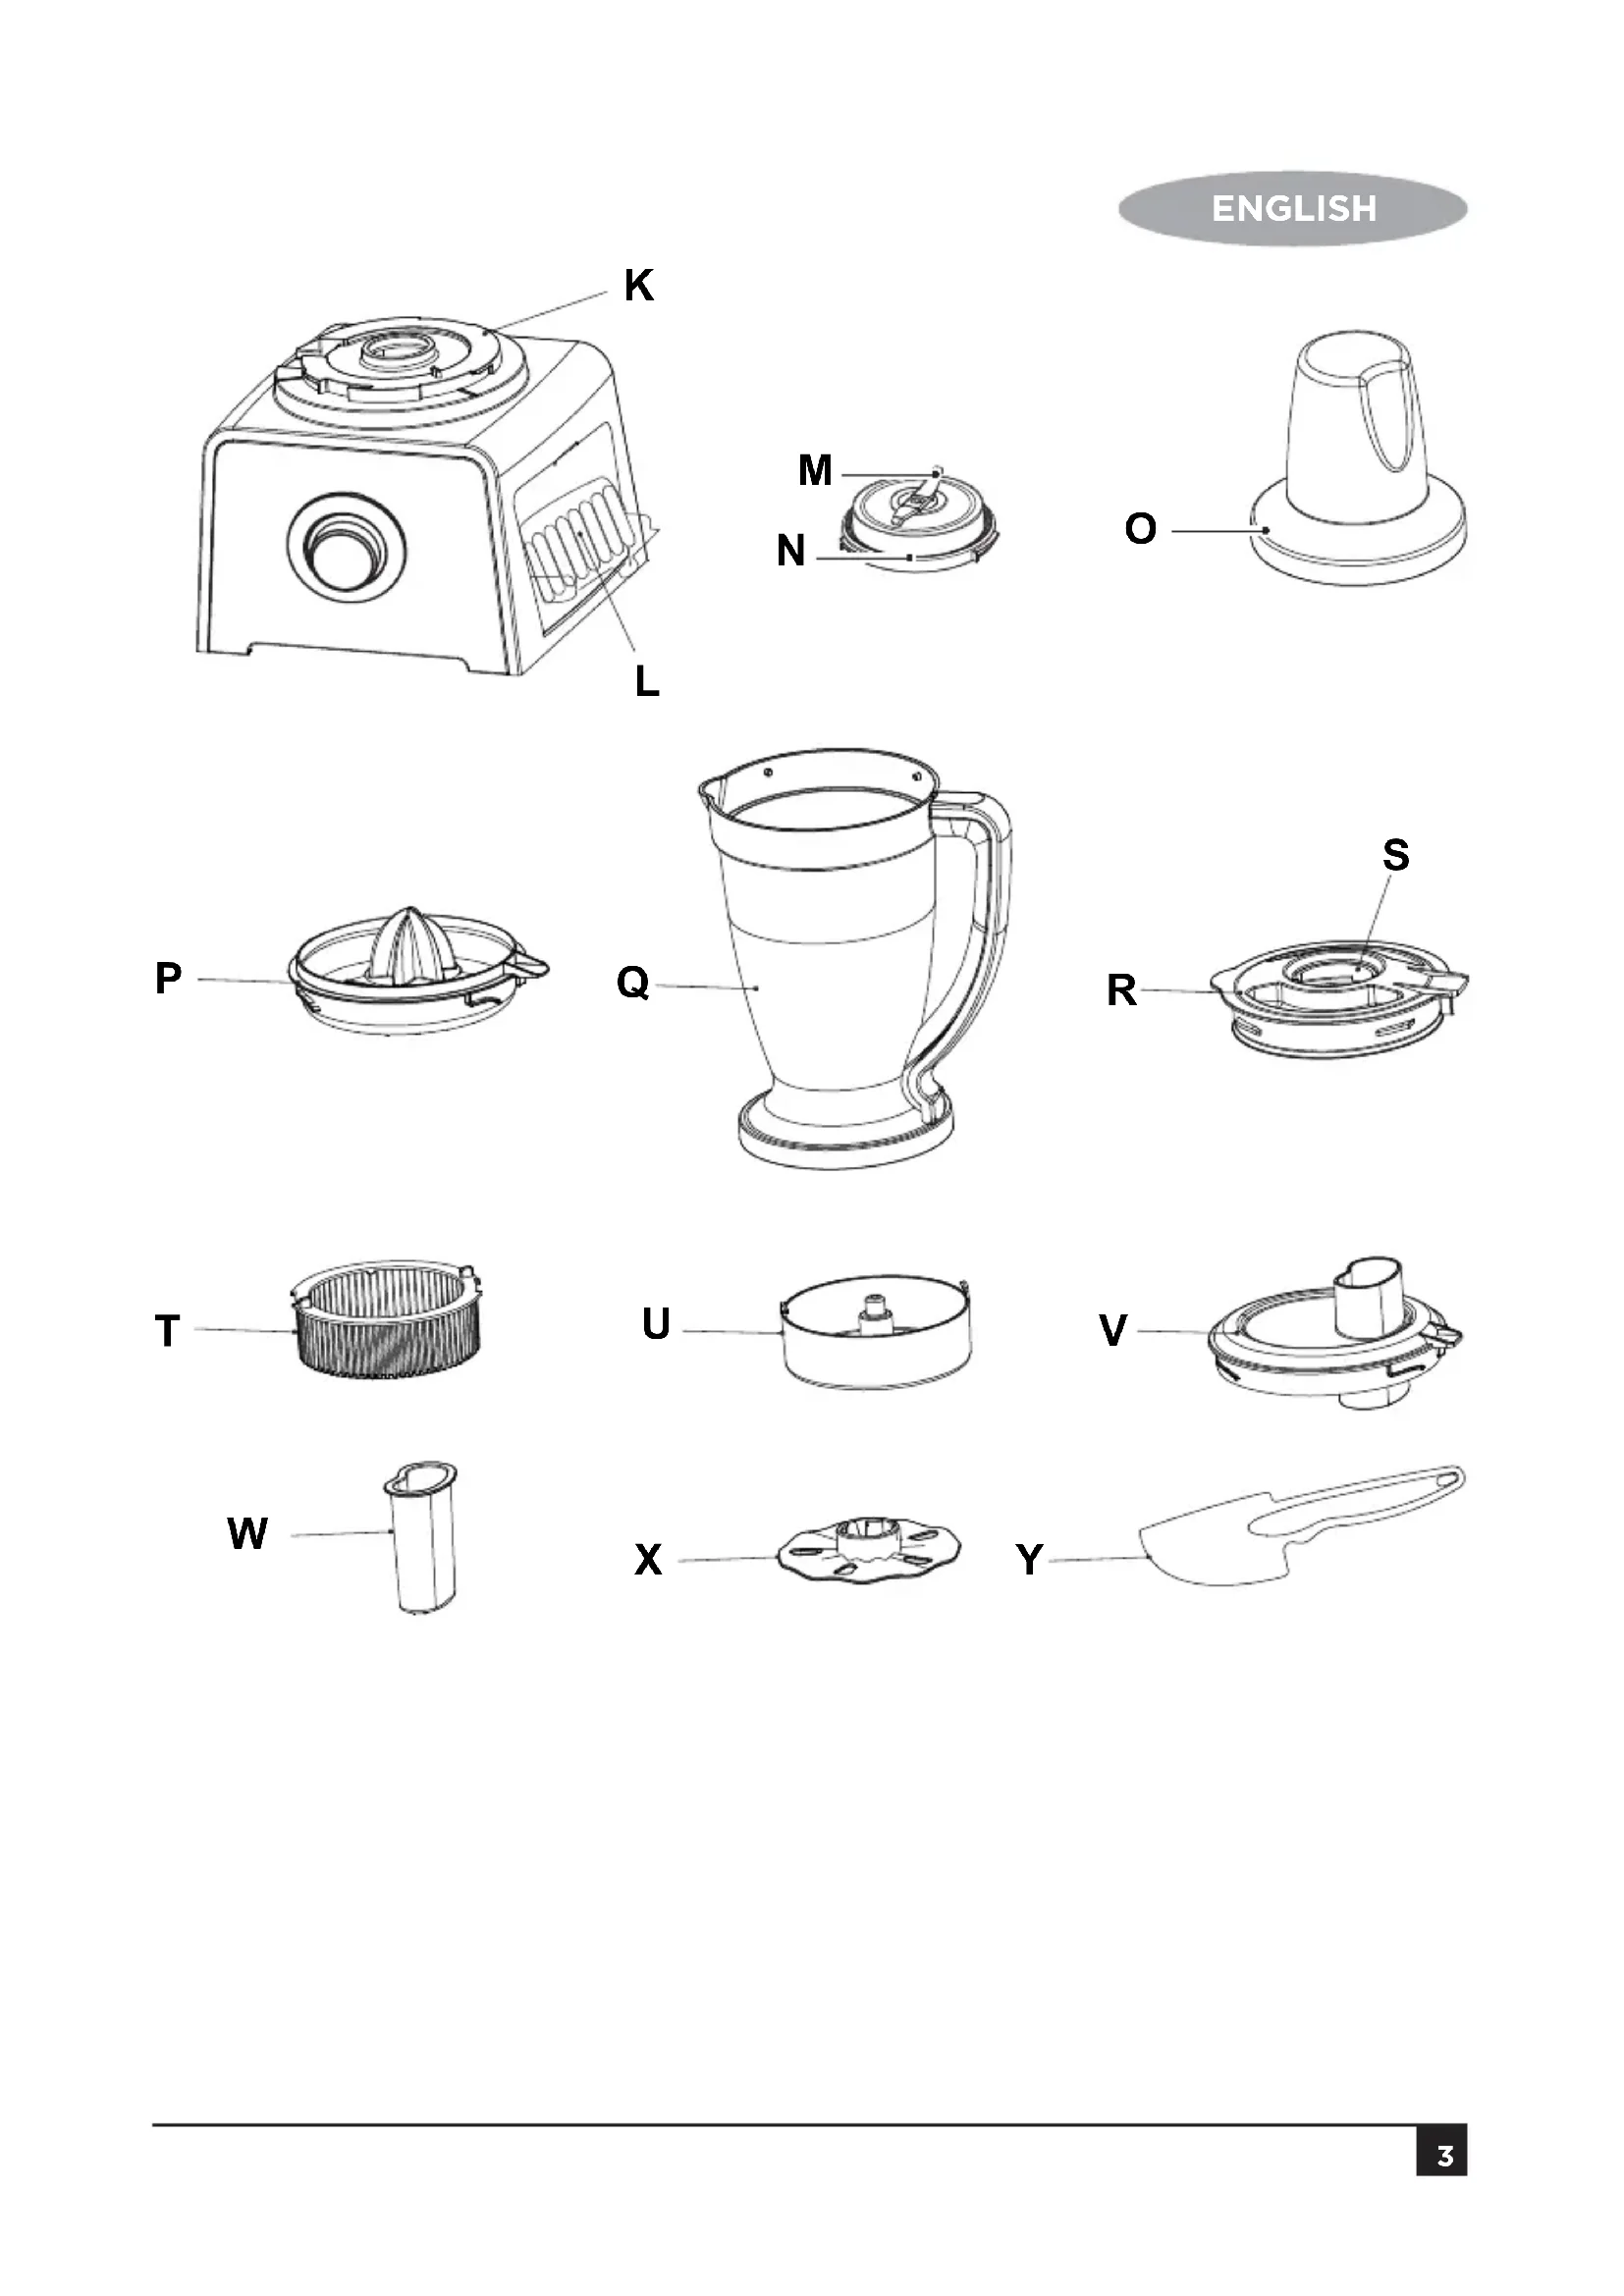
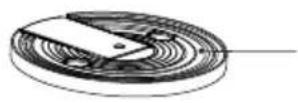
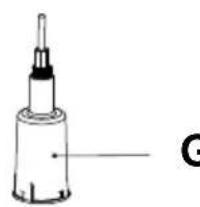
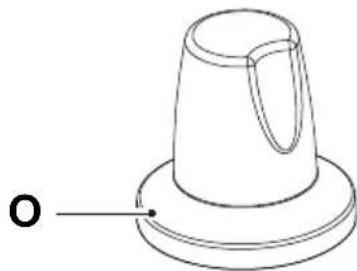
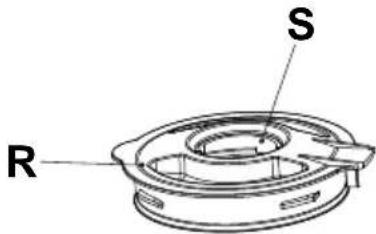
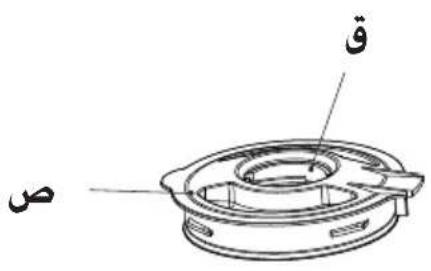
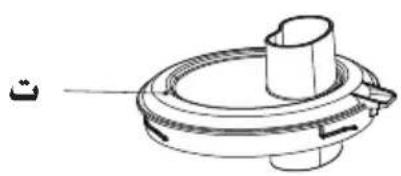
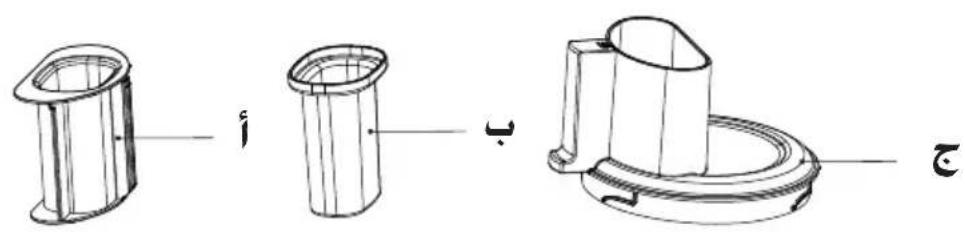
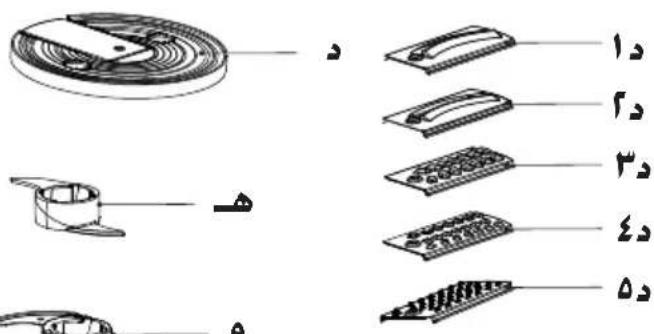
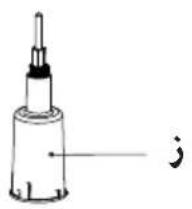
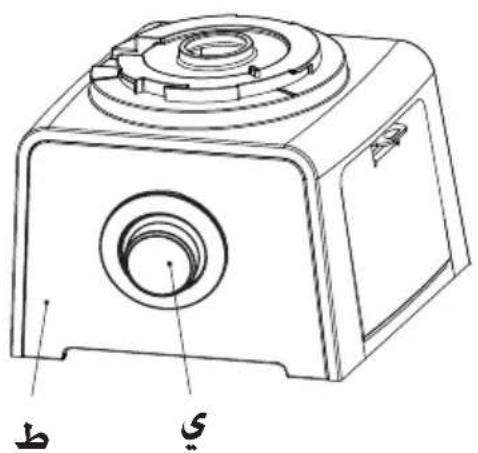
Parts Identification
A Pusher
B Inner pusher
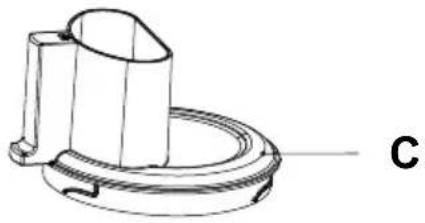
C Food processor lid
D Cutter disc
D1 Fine slice cutter
D2 Coarse slice cutter
D3 Fine grating cutter
D4 Medium grating cutter
D5 Coarse grating cutter
E Mixing blade
F Chopping blade
G Blade holder
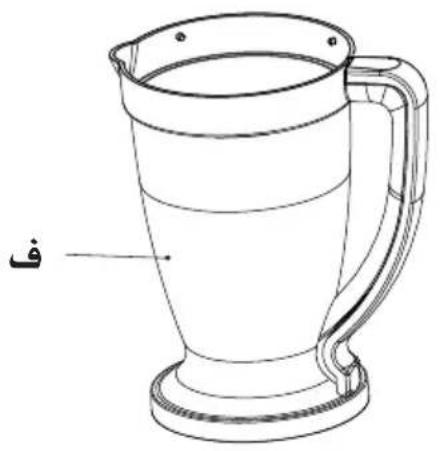
H Food processor bowl
I Food processor base
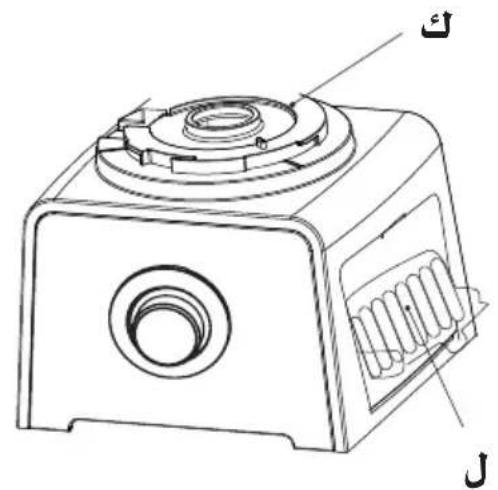
J Control knob
K Drive coupling
L Cutter storage
M Grinding blade
N Grinding jug seal
OGrinderrjar
P Citrus juicer
Q Blender jar
R Blender lid
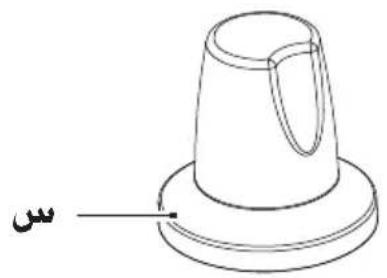
SFiller cap
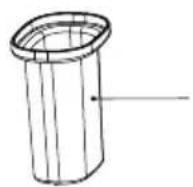
T Centrifugal juicer
U Centrifugal filter
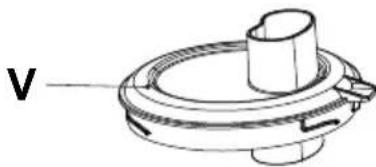
V Centrifugal juicer lid
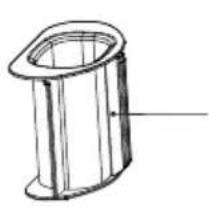
W Centrifugal juicer pusher
X Mixing Blade
Y Spatula
A
B


E


F

D1
D2
D3
D4
D5
G


ENGLISH
Intended use
Your Black & Decker appliance comes with accessories to perform these functions:
Blade for chopping, beating, creaming, crumbling, cutting, folding in, mashing, mincing, mixing & kneading.
Blades for coarse, medium and fine grating and shredding vegetables, fruits and cheese.
Slicing blades for coarse and fine slicing of vegetables and fruits.
Blender for blending, crushing, foaming, grinding, pureeing, homogenizing, liquidising, milling, shaking and stirring.
Grinder mill for grinding coffee, herbs and spices.
Juice Extractor attachment for juicing and pulping non-citrus fruits.
Citrus Juice Extractor for juicing and pulping of citrus fruits.
Warning!
Do not use the centrifugal juicer if the rotating sieve is damaged or has visible cracks
This appliance is intended for use in household and similar applications such as: staff kitchen areas in shops, offices and other working environments; farm houses; by clients in hotels, motels and other residential type environments; bed and breakfast type environments.
Do not use this appliance for any other purpose. This product is intended for indoor household use only.

Read this entire manual carefully before using the appliance.
Safety instructions
- Warning! When using mains-powered appliances, basic safety precautions, including the following, should always be followed to reduce the risk of fire, electric shock and personal injury.
- The intended use is described in this manual. The use of any accessory or attachment or the performance of any operation with this appliance other than those recommended in this instruction manual may present a risk of personal injury.
- Retain this manual for future reference.
Using your appliance
- Always take care when using the appliance.
- Never pull the power supply cord to disconnect the plug from the socket. Keep the power supply cord away from heat, oil and sharp edges.
- Do not place the appliance on or near heat sources or in a heated oven.
- Do not use the appliance outdoors.
- Always protect the motor unit from water or excessive humidity.
- If the power supply cord is damaged during use, disconnect the appliance from the power supply immediately. Do not touch the power supply cord before disconnecting from the power supply.
- Disconnect the appliance from the power supply when not in use, before fitting or removing parts and before cleaning.
- Misuse could cause injury
-
Be careful if hot liquid is poured into the food processor or blender as it can be ejected out of the appliance due to sudden steaming
-
Never let the appliance operate unattended.
- Never reach into the jar with your fingers or an object while the appliance is running.
- Only remove the jar after you have switched the appliance off and any moving parts have stopped.
- Do not touch the cutting blades.
- Keep any loose clothing or long hair away from the feeding tube and any moving parts.
- Care shall be taken when handling the sharp cutting blades, emptying the bowl and during cleaning.
- Do not immerse the appliance, cord set or plug in liquids.
- Position the cord so it does not hang over the edge of worktops & cannot be caught accidentally or tripped over.
Caution: Ensure the Blender is turned off before removing from the stand.
Safety of others
- This appliance is not intended for use by persons (including children) with reduced physical sensory or mental capabilities, or lack of experience and knowledge, unless they have been given supervision or instruction concerning use of the appliance by a person responsible for their safety.
- Children should be supervised to ensure that they do not play with the appliance.
After use
-
Remove the plug from the socket before leaving the appliance unattended and before changing, cleaning or inspecting any parts of the appliance.
-
When not in use, the appliance should be stored in a dry place. Children should not have access to stored appliances.
Inspection and repairs
- Switch off the appliance and disconnect from the supply before cleaning, changing accessories or approaching parts which move in use
- Before use, check the appliance for damaged or defective parts. Check for breakage of parts, damage to switches and any other conditions that may affect its operation.
- Do not use the appliance if any part is damaged or defective.
- Do not use the appliance if the blade is damaged.
- Have any damaged or defective parts repaired or replaced by an authorised repair agent.
- Before use, check the power supply cord for signs of damage, ageing and wear.
- Do not use the appliance if the power supply cord or mains plug is damaged or defective.
- If the power supply cord or mains plug is damaged or defective it must be repaired by an authorised repair agent in order to avoid a hazard. Do not cut the power supply cord and do not attempt to repair it yourself.
- Never attempt to remove or replace any parts other than those specified in this manual.
Electrical safety
Before use, check that the mains voltage corresponds to the voltage on the rating plate.

This appliance is double insulated in accordance with EN 60335-2-14; therefore no earth wire is required.
ENGLISH
- To avoid the risk of electric shock, do not immerse the cord, plug or motor unit in water or other liquid.
- Check that the supply voltage shown on the rating plate of the appliance matches that of your electrical system. Any connection error will invalidate the guarantee.
Mains plug replacement
If a new mains plug needs to be fitted:
- Safely dispose of the old plug
- Connect the brown lead to the live terminal of the new plug
- Connect the blue lead to the neutral terminal
If the product is class I (earthed), connect the green/yellow lead to the earth terminal.
Warning! If your product is class II double insulated (only 2 wires in the cord set), no connection is to be made to the earth terminal
- Follow the fitting instructions supplied with good quality plugs
- Any replacement fuse must be of the same rating as the original fuse supplied with the product.
Warning! The above section on mains plug replacement is for authorized service centre personnel.
Assembly

Wash all detachable parts (see chapter 'Maintenance and cleaning').
Assembling the food processor
-
Fit the food processor bowl (H) onto the food processor base (I), secure it by turning it clockwise.
-
For chopping or kneading fit the required blade (E or F) onto the blade holder (G).
- For shredding or slicing, fit the required blade (D1, D2, D3, D4 or D5) into the cutter disc (D).
- Place the assembled blade / cutter disc into the food processor jug (H).
- Fit the food processor lid (C) and secure it by turning it clockwise
- Fit the inner pusher (B) into the pusher (A), then place the assembly into the hole in the lid (C)
Assembling the blender
- Place the blender jug (Q) onto the food processor base (I) and secure it by turning clockwise.
- Fit the blender lid (R) to the blender jar (Q) and secure it by turning it anti-clockwise.
- Fit the filler cap (S) to the blender lid (R) and secure it by turning it clockwise.
Assembling the grinder
- Fit the grinder jug seal (N) into the grinder blade (M).
- Fit the grinder blade (M) into the grinder jar (O) and secure by turning it clockwise
- Place the grinder jar onto the food processor base (I) and secure it by turning it clockwise
Assembling the citrus Juicer
- Fit the food processor jug (H) onto the food processor base (I), and secure it by turning it clockwise
- Fit the citrus juicer (P) onto the food processor jug (H), and secure it by turning it clockwise.
Assembling the centrifugal juicer
- Fit the food processor bowl (H) onto the food processor base (I), secure it by turning it clockwise
- Place the blade holder (G) into the bowl (H)
- Fit the centrifugal juicer (T) into the food processor jug.
- Fit the centrifugal juicer filter(U) and secure this by pushing it down
- Fit the centrifugal juicer lid (V), locking in place by rotating it ant-clockwise, then place the pusher (W) into the lid.
Note: Do not use the centrifugal juicer if the rotating sieve is damaged
Use
- Place the appliance on a flat, stable surface.
- Assemble the required accessory as advised above.
- Put the ingredients into the jug or bowl.
- Connect to the mains supply.
- Turn the control knob to the required setting.
Note: Additional items can be added during use by using the chutes in the lids and the pusher.
The following settings are available:
$$ \begin{array}{l} P = \text {P u l s e} \ O = \text {P o w e r O f f} \ 1 = \text {L o w S p e e d} \ 2 = \text {H i g h S p e e d} \ \end{array} $$

The appliance should be disconnected from the mains supply before removing the jug.
Recommendations when food processing
| Function Types | of food Speed Time | ||
| Chopping *1 Vegetables 1 or 2 15 sec and fruits | |||
| Chopping *1 Meat, cheese 1 or 2 20 sec and chocolate | |||
| Blending *1 Soup and 1 or 2 20 sec thick drinks | |||
| Pureeing *1 Cooked vegetables 1 or 2 10-15 sec and soft fruits | |||
| Mixing *1 Pastry and scones | 1 or 2 40 sec | ||
| Mashing *1 Cooked potatoes and baby food | 1 or 2 60 sec | ||
| Kneading *2 Bread dough 1 or 2 20 sec | |||
| Folding in *2 Mousse batter | 1 or 2 15 sec | ||
| Creaming *2 Cake batter | 1 or 2 30 sec | ||
| Slicing *3 Vegetables and fruits | 1 or 2 5 sec | ||
| Slicing *3 Potatoes and cheese | 1 or 2 5 sec | ||
| Shredding *3 Vegetables and fruits | 1 or 2 5 sec | ||
| Grating *4 chocolate | Cheese and | 2 | 5 sec |
| Cutting *5 for french fries | 1 or 2 5 sec | ||
| Cutting *5 | Vegetables and fruits | 1 or 2 5 sec | |
| Slow Mashing *6 vegetables babyfood | Raw fruits and for | 1 or 2 5 sec | |
| Peeling/ Rasping *6 (3x2cm) with skin | Hard fruit or 2 vegetable pieces | 5 sec |
1 Use the chopping blade (F)
2 Use the mixing blade (E)
ENGLISH
*3 Use the slicing blades (D1 or D2)
*4 Use the grating blades (D3, D4 or D5)
Note: The processor should not be run for longer than 3 minutes at a time. Allow a rest period of 5 minutes between work cycles
Recommendations when blending
| Function Types of food Speed Time | ||
| Blending Liquids 2 15 sec | ||
| Liquidizing Fruits or vegetables 2 30 sec cut in cubes with equal amount of water | ||
| Crushing Ice dimension cubes of Pulse 10 sec 3x2cm | ||
| Foaming Milk shakes, juices etc 2 20 sec | ||
| Pureeing Vegetables and 2 30 sec soft fruits | ||
| Stirring Batter or soups 2 1 min |
Note: The blender should not be run for longer than 3 minutes at a time. Allow a rest period of 5 minutes between work cycles
Warning: Pulse mode should not be operated more than 10 sec at a time.
Recommendations when grinding
| Function Types | of food Speed | Time | |
| Dry grinding | Coffee beans | 2 | 10-15 sec |
| Dry grinding | Dry herbs | 2 | 10-15 sec |
| Dry grinding | Spices | 2 | 10-15 sec |
Note: The dry grinder should not be continuously run for longer than 15 seconds. Rest the grinder for 5 minutes afterwards.
Warning: Max capacity of Grinding mill is 50g.
Warning! The grinder MUST NOT be used for wet grinding of hard food materials like pulses, beans, grains etc. This will lead to damage of blades and reduction of motor life span.
Recommendations when juicing
| Function Types | es of food Speed Time | me | |
| Juicing *1 | Non-citrus fruits | 2 | 1 min |
| Collecting pulp *1 of non-citrus fruits | Draining and collecting the pulp fruits | 2 | 1 min |
| Juicing *2 and ground with water | Citrus fruits 2 spices | 1 min | |
| Collecting pulp *2 of citrus fruits | Draining and collecting the pulp fruits | 2 | 1 min |
*1 Use the centrifugal juicer (T)
*2 Use the citrus juicer (P)
Note: Fruits that contain starch, such as bananas, papayas, avocados, figs, strawberries and mangoes are not suitable for processing in this juice extractor attachment. Use the stainless steel blade attachment of the food processor or the blender to process these fruits.
Note: The juicer is not suitable for processing very hard and/or fibrous/starchy fruits, vegetables or plants such as sugar cane.
Note: The Juicer should not be run for longer than 3 Minute. After each 3 Minute use, the Juicer should be allowed to cool for at least 5 minutes. After 3 consecutive cycles the juicer must be allowed to cool for 15 minutes before further use
Useful advice
- Place the appliance on a clean, flat work surface.
- Connect the appliance to a suitable electrical supply. Rotate the control knob (J) to the required speed.
- When processing is complete return the control knob to the off (0) position.
- Once the blade has come to a complete stop, lift the jar / bowl from the blender body (I).
- Remove the lid and pour the ingredients into a suitable container.
Note: Ingredients can be added by inserting them through the hole left when the filler cap (S) or pushers (A), (B) or (W) are removed.
Warning! Never operate the Blender without the lid fitted.
Warning! Never operate the Food processor without the lid fitted.
Maintenance & cleaning
- Switch the appliance off, remove the plug from the wall socket and wait until the blade has stopped rotating.
- The appliance is easier to clean if you do so immediately after use.
- Do not use abrasive cleaning agents, scourers, acetone, alcohol etc. to clean the appliance.
-
All removable parts can be cleaned with a cleaning brush in warm water with some washing-up liquid and rinse them under the tap.
-
Remove the dirty parts from the motor unit. Clean the motor unit with a damp cloth.
- Never immerse the motor unit in water nor rinse it under the tap.
Technical data
| FX810 |
| Voltage 220 - 240 Volts |
| Supply 50/60 Hz |
| Power 800W. |
| Weight 5.03 Kg. |
ENGLISH
Protecting the environment

Separate collection. This product must not be disposed of with normal household waste.
Should you find one day that your Black & Decker product needs replacement, or if it is of no further use to you, do not dispose of it with other household waste. Make this product available for separate collection.
- Black & Decker provides a facility for recycling Black & Decker products once they have reached the end of their working life. This service is provided free of charge. To take advantage of this service please return your product to any authorised repair agent who will collect them on our behalf.
- You can check the location of your nearest authorised repair agent by contacting your local Black & Decker office at the address indicated in this manual. Alternatively, a list of authorized Black & Decker repair agents and full details of our after-sales service and contact are available on the Internet at: www.2helpU.com.
Warranty
Black & Decker is confident of the quality of its products and offers an outstanding warranty.
This warranty statement is in addition to and in no way prejudices your statutory rights.
The warranty is valid within the territories of the Member States of the European Union and the European Free Trade Area.
If a Black & Decker product becomes defective due to faulty materials, workmanship or lack of conformity, within 24 months from the date of purchase, Black & Decker warranty to replace defective parts, repair products subjected to fair wear and tear or replace such products to ensure minimum inconvenience to the customer unless:
The product has been used for trade, professional or hire purposes;
The product has been subjected to misuse or neglect;
The product has sustained damage through foreign objects, substances or accidents;
Repairs have been attempted by persons other than authorised repair agents or Black & Decker service staff.
To claim on the warranty, you will need to submit proof of purchase to the seller or an authorised repair agent. You can check the location of your nearest authorised repair agent by contacting your local Black & Decker office at the address indicated in this manual.
Alternatively, a list of authorised Black & Decker repair agents and full details of our after-sales service and contacts are available on the Internet at: www.2helpU.com.
Identification des pieces
Mains plug replacement
If a new mains plug needs to be fitted:
- Safely dispose of the old plug
- Connect the brown lead to the live terminal of the new plug
- Connect the blue lead to the neutral terminal
If the product is class I (earthed), connect the green/yellow lead to the earth terminal
Warning! If your product is class II double insulated (only 2 wires in the cord set), no connection is to be made to the earth terminal
- Follow the fitting instructions supplied with good quality plugs
- Any replacement fuse must be of the same rating as the original fuse supplied with the product.
Warning! The above section on mains plug replacement is for authorized service centre professionals.
Montagem

J 1 J 1 1 1 1 1 1 1 1 1 1
i 1
Lololololololololololololololololololololololololololololololololololololololololololol
i 1
www.2helpU.com:
111 111 111 111 111 111 111 111 1
Sdu ddu 2
y
diag. 1000
Jx Joo 100000000000000000000000000000
Jn
111 2
J 1
CLOU
i 15 i 11 11 11 11 11 11 11
www.2helpU.com:
Arabic
#
| FX1. | |
| \( \text{العَف}\text{;} \)2.-57. | \( \text{العَف}\text{;} \)3 |
| \( \text{العَف}\text{;} \)1./0. | \( \text{العَف}\text{;} \)4 |
| \( \text{العَف}\text{;} \)A. | \( \text{العَف}\text{;} \)5 |
| \( \text{العَف}\text{;} \)0. | \( \text{العَف}\text{;} \)6 |
g j 15
sLgl/1xj. Lc a 1
J 1 J 1 J 1 J 1 J 1 J 1 J 1 J 1 J 1 J 1 J 1 J 1 J 1 J 1 J 1 J 1 J 1 J 1 J 1 J 1 J 1 J 1 J 1 J 1 J 1 J 1 J 1 J 1 J 1 J 1 J 1 J 1 J 1 J 1 J
#
a a 1 1 1 1 1 1 1 1 1 1 1 1 1 1 1 1 1 1 1
a 10000000000000000000000000000000000000000000000
h13i sic Uwgi
| العربية | العربية | العربية | العربية |
| العربية 10 | العربية 10 | ||
| العربية 10 | العربية 10 | العربية 10 | |
| العربية 10 | العربية 10 | العربية 10 | |
| العربية 10 | العربية 10 | العربية 10 | |
| العربية 10 | العربية 10 | العربية 10 | |
| العربية 10 | العربية 10 | العربية 10 |
gla 1234567890123456789012345678901234567890123456789012345678901234567890123456789012345678901234567890123456789
1 1
jbl ic L
plwui wslj aelol sgl yelio 1s:
gjglg a hckg jlll plo
-:aJgaoJIJIU
[{\omega }{\omega } = {\omega }{\omega }\text{,即}\omega = \omega \text{,}\omega = 0]
= 0
aiaiaicayw=1
Arabic
(g)a[g]la aal 1
aai 5j a. gai jgai i 1 . (2) gai jgi (0g i g i g i 12) aigbll
sLg gabJI J/ aJl j 2 (c)pIbJI
aLwJ JAc o
JLL JIJI WJWJWJWJWJWJWJWJWJWJWJWJWJWJWJWJWJWJWJWJWJWJWJWJWJWJWJWJWJWJWJWJWJWJWJWJWJWJWJWJWJW
Ea
()JaiJIaJIgJALsJau

palebll janao 5j
jao ocl (2)plebJy jao sIcog ySjy a 1 .acLwJy lacol aal ay aag.(b)plebJl
Arabic
aolssiwlpsicjLgJgJgJz
8g 81 Jaa JSo Jc JlaBsl
2x
yj81gaiiaao yie gaii bii jbi
JLoeuiS JUs aSjail ai
aagbeo gfo sfo goc o
412 40
y
a1 = 43,b2 = - 43
Jbcg Jc g 1
.
a
.
a 1
aia J5gJ5s
pss
JSLJIgpaJIglaJIcLoLcNooglo
aieiellw aIe IALg e blll piaiuiip
Lagio g y c g g J LaJI g aJ Lg
1111111111111111
J 1
zha jibao auiia oaiu J5gJ
Lwai aXw! aJglao g aIySJI ayieil Lw
1 1
J
aIgS11 aOx
20 1111111111111111
aai 1 aeglgl
EN, Ls.0u Laoog Lggo:OgJg:O;Lg11
LJgJxJILJg.1-7-1

.
1sclg jdo yjglc g 1eLwJy
JbLiJI Joc sli
eaoaogobldslabla haoIolslcgoj
= 5_2
2
1
aSxio 1jgai gipolebxtgjic
gol golgl aill oJoo Joleil j 0
.
a
Jg
Jx 1
a#j01g a#glo1g JaoJI aJglb
=
J 1
aui j1 0>gJ1
81 40x
)
aJgLssuJn no ngilejnn (JLaBx
y31 1g aia g aai gai
yogaa Lai gla U Igea JLo aegellg
Jgws Joo bxtip
.
.
pIeWx1 eLo UoLoe
JzIygSJIaiejil jao JgJlJwJ
.
Arabic
aLwJlJwJ
pJoo
aLwA aolwll cIbIg aI gJy JdJ
aIgS aIgJ aIaI IgJ pIaI gJ
IgJ aIgJ aIaI IgJ gSall Lg
aIgS aIgJ aIgS cIaI g
i:ii:ii iJ 100000000000000000000000000000000000000000000000
g 1 g 1 g 1 g 1 g 1 g 1 g
J. J. J. J. J. J. J. J. J. J. J. J. J. J. J. J. J. J. J. J. J. J. J. J. J. J. J. J. J. J. J. J. J. J. J. J. J. J. J. J. J. J. J. J. J. J. J. J. J. J. J.
1 1 1 1 1 1 1 1 1 1 1 1 1 1 1 1 1 1 1 1
.
1 1 1 1 1 1 1 1 1 1 1 1 1 1 1 1
bIaI aIaaI IaIe
.131 p122 1 w
jllg jllg jllg jllg jllg jllg
J 1 JgSll a j iill lww Lalho Jg3 2 aiei I Iw Jia .aiei Jn o c Jai J g Jg
Jgjjg Jc8goggai
gJnLwJy gJ aRJrJLWu 8
a aolal 1
jill 1215 bllipssu 2
1
g 1u 1c LsLb y 1y 10 g aLw 1c La 1aL .d jll aag
gaiagaiolaiai jaojlaoi jaojloos
1 1 1 1 1 1 1 1 1 1 1 1 1 1 1 1 1 1 1 1 1 1 1 1 1 1 1 1 1 1 1 1 1 1
JLALI JgJjll jplssuJusio Jg11
JlJI LILgJlJlJfJlU 1:JIOaLIJI
LILgJgJgJgJgJgJgJgJgJgJgJgJgJgJgJgJgJgJgJgJgJgJgJgJgJgJgJgJgJgJgJgJgJgJgJgJgJg
aJg aJgS1 11 11 11 11 11 11 11 11 11 11 11 11 11 11 11 11 11 11 11 11 11 11 11 11 11 1
J 1
jLg1 1e pssw sww
gI ploJI JnJnJnJnJnJnJnJnJnJnJnJnJnJnJnJnJnJnJnJnJnJnJnJnJnJnJnJnJnJnJnJnJnJnJnJnJnJnJnJn
1 1


Arabic

1
a. 12
a1slae
PlehJy no sIbC
gla
aocli ci,di aoblo 1
aai 2ai aoe b
acliy aeblo
Inwgo yin: aoBolé 25
jus jus aoblo 0
S OBC = S COD + S_ BOC
p3e b3e 9
Jol
Plebji jno sIc9 C
plebJI jana oocIb
1053 20 8
aS>la:alog
golj jso J
a:b0
aiaiin11sIg oJU
aillslj
g_a = 与 L 相
上上上上上上
上列31 s.b.c. 20
aieiiae sbc
a
1
aJbJI aJLaeJI sIe
02jLJI 0JLnJIaeJ2
13
34
Names & Addresses for Black & Decker Service Concessionaries
ALGERIA: Sarl Outillage Corporation, DW, B&D Pet, HHD, 08, Rue Med Boudiaf (ex TELLA Achen) Cheraga, Alger, Tel: 00213-0-21375130/ 00213-0-21375131, Fax: 00213-0-21369667, Email: hakim.merdjadi@outillage-dz.com;
nefissa.merdjadi@outillage-dz.com; sidahmed.merdjadi@outillage-dz.com. AZERBAIJAN: Kontakt - NN LLC, HHD, M.Qashqay 43, Baku Azerbaijan Az1000, Tel: 00994 12 408 20 50, Mob: +994503442204, Fax: 00994 12 411 70 90, eganjaly@hotmail.com. BAHRAIN: Alfouz Services Co. WLL, Tubli, DW, B&D PET, HHD, P.O. Box 26562, Tubli, Manama, Tel: +973-17783562/ 17879987, Fax: 17783479, Email: alfouz@batelco.com.bh. EGYPT: Anasia Egypt for Trading S.A.E. (Mentreade), HHD, P.O. Box 2443, 9, Mostafa Refaat Street, Sheraton Heliopolis 11361, Cairo, Tel: 00202 22684159, Fax: 00202 22684169, Email: wael.salah@anasia.com; nevien.elbeshbishy@anasia.com. ETHIOPIA: Seif Tewfik Sherif, DW, B&D PET, HHD, Arada Sub City, Kebele 01/02, Global Insurance Bldg, 2nd Flr, Room 43, P.O. Box 2525, Addis Ababa, Tel: 00-251-11-1563968/ 1563969, Fax: 00-251-11-1558009, Email: seif@ethionet.et; nawanag@ethionet.et; seifudint@hotmail.com. IRAQ: Financial Links, B&D PET, HHD, Kazzaz Building Arasat Al-Hindia, Block No: 629, Street: 31, Building No: 1, Baghdad, Iraq, Tel: 00964-(0)780-195-2223/ +964-(0)781-3763044, Email: info@financiallinks-truevalue.com. JORDAN: Bashiti Hardware (Palestine), B&D pet, HHD,"93 King Abdullah, 2nd St., Opp ELBA House, P.O. Box 3005, Amman 11953, Tel: 00962-6-5349098, ext.11, Fax: 00962-6-5330731, Email: manal@bashithardware.com; info@bashithardware.com;
rami@bashithardware.com. KENYA: Zylog Enterprises Ltd. (T/A Leading Concepts), HHD, IPS Building,Kaunda Street, P.O. Box 40877-00100, Nairobi, Tel: 00254-20-6905000, Fax: 00254-20-6905111, Email: admin@alibhaishariff.co.ke; leading@alibhaishariff.co.ke; info@alibhaishariff.co.ke. LEBANON: Aces Service Centre (Est. F.A.Ketaneh SA), HHD, P.O. Box 90-102, Nahr El Mot, Seaside Highway, Pharaon Building, Beirut, Tel: 00961-1-898989/ + 961-(1)-262626, Fax: 0096-1-1245880, Email: Nissrine.hajj@aces.com.lb; Nassim.aziz@aces.com.lb; Johnny.sailian@aces.com.lb; Paul.tahan@aces.com.lb. LIBYA: North Africa Trading (El Ghoul Brothers), DW, B&D Pet, HHD, P.O. Box 348, 7 October Street 11, Benghazi, Tel: 00218-061-3383994, Fax: 00218-092-7640688, Email: nagte.ly@gmail.com; CC: nagte.dpt@gmail.com; elghol@technpower.com. North Africa Trading ( El Ghoul Brothers), DW, B&D Pet, HHD, AlBarniq Dewalt Center, Mokhazin-elsukar St., EIFallah, Tripoli, Tel: 00218-021-3606430, Fax: 00218-092-6514813, Email: nagte.ly@gmail.com; cc: (nagte.dpt@gmail.com; elghol@technpower.com. Homeworld Co., HHD, Senidal St. Amr Ibn Elaaas Road, Benghazi, Libya, P.O. Box 18182, Salmany, Tel: 00218-61-9094183, ext. 103, Fax: 00218.61.9094123, ext. 108, Email: nagte.ly@gmail.com. MAURITIUS: J.M. Goupille & Co.Ltd. The Brandhouse Ltd., HHD, Rogers Industrial Park 1, Riche Terre, Mauritius, Tel: 00230-2069450/ +230-207-1700, Fax: 00230-2483188/ 00230-2069474, Email: claims service centre@goupille.mu; stephanie.biou@gmail.com; beatrice.li@gmail.com; sharon.laprovidence.img@gmail.com, tim.moszuti@goupille.mu; Cc.
Jfrancois.dromart@goupille.mu; mario.catherine@goupille.mu; gerard.gouges@goupille.mu. MOROCCO: UATS, HHD, "No. 37, Lotissement KADIRIA, km 10 Route, Eljadida, LISASSFA, Casablanca, Morocco, Tel: 00212-522652602, Fax: 00212-522652603, Email: farah1406@yahoo.fr; nourededdine.uats@gmail.com. OMAN: Oman Marketing & Service Co.(Omasco), Wattayah/ Muscat, HHD, B&D PET, P.O. Box 2734, Behind Honda Showroom, Wattayah, Oman, Tel: +968 24560232/ 24560255, Fax: 24560993, Email: npservice@omasco.com.om; Cc. ashok.balan@omasco.com.om, damodaran.pillai@omasco.com.om; unnikrishnan@omasco.com.om. Oman Marketing & Service Co.(Omasco), Sohar, HHD, B&D PET, Al Ohi, Sohar, Oman, Tel: +968 26846379, Fax: 26846379, Email: sooraj.neeran@omasco.com.om. Oman Marketing & Service Co.(Omasco), Salalah, HHD, B&D PET, Sanaya, Salalah, Oman, Tel: +968 23212290, Fax: 23210936, Email: rajagopal.pr@omasco.com.om. Omar Mohammed Ali Bawain Trading Co., Salalah, Al-Awqadain, PC 217, P.O.Box 112, Salalah, Sultanate of Oman, Tel: +968 23214874, Fax: 23214874/ 23211878, Email: jthin@omartrad.com. PAKISTAN: Ammar Service & Spares, B&D PET, HHD, Office No 6068, 6th Floor Central Plaza, Behind Gul Plaza Marston Road, Karachi, Tel: 0092-21-32426905/ 021-32775252, Fax: 0092-21-32427214, Email: babji93@yahoo.com. QATAR: Al Mufahet Service Centre, Doha, HHD, B&D PET, Al Wakrah, Road, P.O. Box 875, Doha, Qatar, Tel: +974 44650880/ 44650110/ 44446868, Fax: 44441415/ 44662599, Email: service@almuftah.com; almuftah@almuftah.com. SAUDI ARABIA: Fawaz Ebrahim Al Zayani Trading Est., Dammam, DW, B&D PET, HHD, P.O. Box 76026, AI Raka: 31952, Tel: +966-3-8140914, Fax: 8140824, Email: dewaltdammam@hotmail.com; (vinoderakatyil@yahoo.com); Website: www.fawazalzayanigroup.com. Fawaz Ebrahim Al Zayani Trading Est., Makkah, DW, B&D PET, HHD, 4753-Wali Alashed, Makkah, 9130-24353 Tel: +966-12-8140914/ 581121778, Fax: 128140914, Email: meraj2515@gmail.com. Banaja Trading Co. Ltd., Riyadh, HHD, P.O. Box 566, Riyadh-11421, Tel: +966-1-4124444, Fax: 4033378, Email: jjophilip@hotmail.com. Banaja Trading Co. Ltd., Jeddah, HHD P.O.Box 366,Jeddah-21411Tel:+966-2-651111,Fax: 6503668 Email: afouad@banaja.com; jjophilip@hotmail.com. SOUTH AFRICA: Benray Tool Wholesalers C.C., B&D PET, HHD, 460 Koeberg Road Cape Town South Africa. Tel: 021-551-7244,Fax: 021-552-6395Email: dewaltct@benray.co.za.Stanley Black & Decker-RSA,BED,PET,HHD 199 Winze Drive Stormill Ext 9 Roodepoort Tel:(2711) 472-0454,Fax:(2711) 472-0482Email: service@sbdinc.co.za vincent.roets@sbdinc.co.za jacquesvincent.roets@sbdinc.com. SRI LANKA: Delmege Forsyth & Co. Ltd., DW,B&D Pet,HHD,Delmege Forsyth & Co.Ltd,Lifestyle Cluster, 101,Vinayalankara Mawatha Colombo 10,Sri LankaTel:+94-11-2688462/+94-11-2 Email:dgeservice@delmege.com; Samith.lifestyle@delmege.com cc: Jayantha.lifestyle@delmege.com. TUNISIA:Societe Tunisienne De Maintenance (STM), B&D Pet. HHD,Rue De La Physique.Nouvelle Zone Industrielle Ben Arous.2013 Ben Arous,TUNISIA.Tel:+216-79-389687,Fax:+216-71-385154. Email: importa@stqu.com. UAE: (Abu Dhabi) Galaxy Equipment Trading Abu Dhabi DW,B&D PETHHD,Madinath Zayed Baada Zaid), Abu Dhabi P.C. 58910Tel:+971-2-8844279Fax:8844297Email: galaxyeq@eim.aee; galaxyeq@emirates.net.ae.Light House Electrical,Abu DhabiDW,B&D PET,HHD,P.O.Box 120,Abu DhabiTel:+971-2-6726131Fax:6720667Email: dewalt_Ihe@hotmail.com Light House Electrical,MusaffahDW,B&D PET,HHD,P.O.Box 120,Abu DhabiTel:+971-2-5548315Fax: 5540461Email:dewalt_Ihe@hotmail.com.(Al Ain) Zillion Equipment and Spare Parts Trading LLC.Al AinDW,B&D PET,HHD,P.O.Box 19740Opp.Bin Sadal/ Trimix Redymix SanaiyaAl Ain Tel:+971-3-7216690Fax:7216103Email: zilliontrdg@gmail.com. (Dubai) BLACK & DECKER (OVERSEAS) GmbHDubaiDW,B&D PET,HHD,P.O.Box 5420DubaiTel:+971-4-8127400/ 8127406Fax: 2822765Email service.mea@sbdinc.com.Ras Al Khaimah) Mc Coy Middle East LLC,Ras Al KhaimahDW,B&D PET,HHD,P.O.Box 10584Ras Al KhaimahTel:+971-7-2277095Fax: 2277096 Email:mccoyrak@gmail.com. (Sharjah) Mc Coy Middle East LLC Sharjah DW,B&D PET,HHD,P.O.Box 25793SharjahTel:+971-6-5395931Fax:5395932Email:mccoy@emirates.net.ae; mccoydewalt@gmail.com.UGANDA: Anisuma Investment & Service Ltd. (Jacky's Electronics), HHD,J.R Complies,Ware house No.5 Plot No.101. 3rd Industrial Area,Jinja Rd,KampalaTel:00256-414237106Mob:00256 779429501Email ha.service.uganda@anisuma.com.YEMENMiddle East Trading Co.METCO)DW,B&D Pet,HHD,5th Flr.Hayel Saeed Anam Bldg. Al-Mugamma St. TaizYemenTel:+00967-4-213455Fax:00967-4-219869Email:meto@metcotading.com; sami@metcotading.com Middle East Trading Co.(METCO)DW,B&D Pet,HHD,Mulla DakkaAdenTel:00967-2-222670Fax:00967-2-222670 metco@metcotading.com; sami@metcotading.com Middle East Trading Co.(METCO)DW,B&D Pet,HHD,Yana YemenTel:00967-1-204201Fax:00967-1-204204 Email:meto@metcotading.com; sami@metcotading.com
WARRANTY REGISTRATION CARD
YOUR NAME
YOUR ADDRESS
POSTCODE
DATE OF PURCHASE
DEALER'S NAME & ADDRESS/


- Parts Identification
- ENGLISH
- Intended use
- Warning!
- Safety instructions
- Using your appliance
- Safety of others
- After use
- Inspection and repairs
- Electrical safety
- Mains plug replacement
- Assembly
- Assembling the food processor
- Assembling the blender
- Assembling the grinder
- Assembling the citrus Juicer
- Assembling the centrifugal juicer
- Use
- Recommendations when food processing
- Recommendations when blending
- Recommendations when grinding
- Recommendations when juicing
- Useful advice
- Maintenance & cleaning
- Technical data
- Protecting the environment
- Warranty
- Identification des pieces
- Montagem
- Arabic
- #
- 2x
- aIgS11 aOx
- 40x
- pIeWx1 eLo UoLoe
- aLwJlJwJ
- pJoo
- bIaI aIaaI IaIe
- Names & Addresses for Black & Decker Service Concessionaries
- WARRANTY REGISTRATION CARD
Brand : BLACK & DECKER
Model : FX810
Category : Food Processor