V42NAFC - TV Tatung - Free user manual and instructions
Find the device manual for free V42NAFC Tatung in PDF.
User questions about V42NAFC Tatung
0 question about this device. Answer the ones you know or ask your own.
Ask a new question about this device
Download the instructions for your TV in PDF format for free! Find your manual V42NAFC - Tatung and take your electronic device back in hand. On this page are published all the documents necessary for the use of your device. V42NAFC by Tatung.
USER MANUAL V42NAFC Tatung
natural_image
Illustration of a flat-screen television displaying a blank screen (no text or symbols)42" LCD Multi-Media Display
PAL/SECAM system
Contents:
CONTENTS: I
1.SAFETY AND PRECAUTIONS.... 1
Operating Safety .... 1
Repair....2
Notes for Service Engineers 2
Point of use 3
Environmental conditions 3
Connecting....4
Precautions 5
Important Additional Safety Instructions ....5
2. INTRODUCTION....6
Service 6
Performance Characteristics....6
Included Equipment 8
3. CONNECTING EXTERNAL DEVICES....9
4.CONTROLS AND LOCATION .... 10
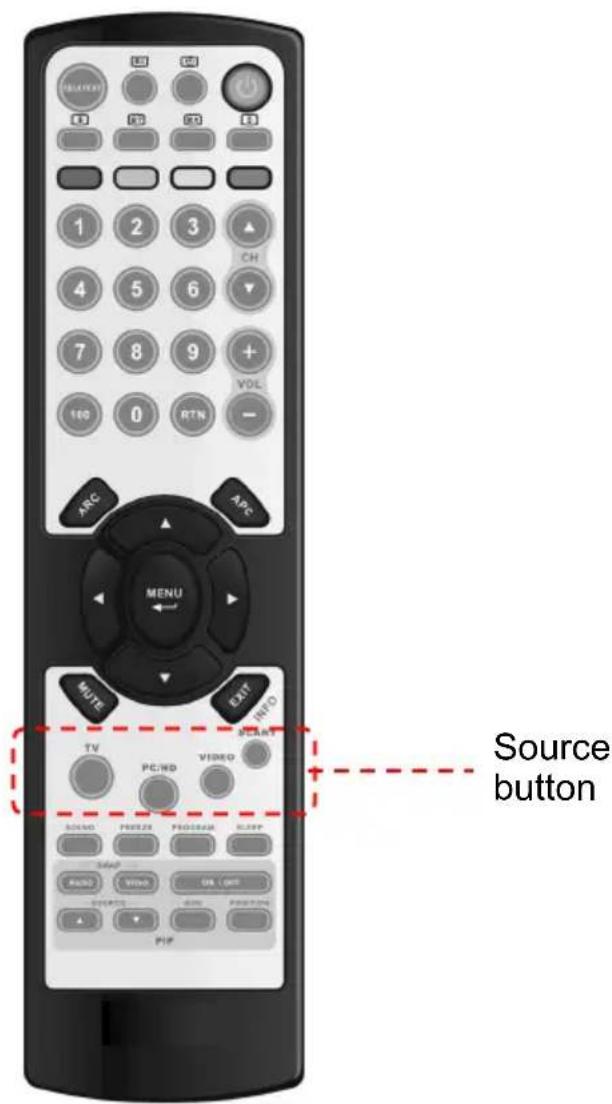
5.REMOTE CONTROL....11
6.SUMMARY OF REMOTE CONTROL BUTTONS....12
7. CONNECTIONS & APPLICATIONS .... 13
8.GENERAL CONTROLS & ADJUSTMENT 19
Turning the LCD display On and Off 19
Volume Control....19
Setting the Sleep Timer....19
Switching PC / HDMI / DVI / VIDEO / TV / SCART Modes.... 20
Viewing the Menus and On-Screen Displays....21
Picture Setting 22
Sound Adjustment....25
TV Channel 30
Function....34
PC menu 39
NICAM/IGR Broadcast Selection 42
9.TELETEXT 43
10. OTHER FUNCTIONS......45
11.TROUBLESHOOTING....46
12.PC INPUT PRESET TIMING TABLE 48
13.SPECIFICATIONS 49
Please read through this section carefully and follow the instructions to maximize the reliable operation and lifetime of your LCD display. Always keep these instructions handy and close by your LCD display. Keep the instructions and the packaging so that if you sell or give away your LCD display you can give them to the new owner.
OPERATING SAFETY

- Never open the housing of the LCD display /power supply! When the housing is open there is a danger of injury from electric shock!
- Do not insert any objects through the slots and openings of the monitor. This may lead to an electrical short-circuit or even fire resulting in damage to your LCD display.

- Slots and openings in the LCD display are for ventilation purpose. Do not cover these openings, as this may lead to overheating.
- Do not allow children to play unattended with electrical equipment. Children may not always correctly recognize danger.
- This LCD display is intended for personal use only. It not intended for commercial use in a heavy industry environment.
- An injury hazard exists when the display breaks. Wear protective gloves to pack the broken parts and send them into your service centre for proper disposal. Then wash your hands with soap, because it is possible for chemicals to escape.
- Never exert pressure on the display. This could break the monitor.
- Do not touch the display with your fingers or with sharp objects to avoid damage.
Contact the Call Centre immediately in any of the following situations. Do NOT plug in or turn on your display:
◆ if the power cable/power supply overheats or is damaged
◆ if liquid has got into the monitor
◆ if the LCD display is dropped or the housing damaged
REPAIR
- Leave all repairs of your LCD display to authorised and qualified personnel only.
- Should a repair be necessary, please contact one of our authorized service partners only.
NOTES FOR SERVICE ENGINEERS
- Before opening the housing, disconnect the product from all power sources and remove any connecting cables. If the display has not been disconnected from the power outlet before being opened, there is a danger to life through electric shock. There is also a risk of damage to the components.
- Internal components of the LCD display may be damaged by electrostatic discharge (ESD). Carry out repairs in an ESD-protected workshop. If no such workshop is available, wear an antistatic wrist strap or touch a highly conductive metal object. We can repair damage sustained by inappropriate handling for a fee.
• Use only original spare parts.
POINT OF USE
- Keep your LCD display and all units connected to it away from moisture and avoid dust, heat and direct sunlight. Failure to observe these instructions can lead to malfunctions or damage to the LCD display.
- Place and operate all units on a stable, level and vibration-free surface in order to avoid the LCD display from falling.
ENVIRONMENTAL CONDITIONS
- The LCD display can be operated most reliably at ambient temperatures between +41°F and +95°F (5°C to 35°C) and at a relative humidity between 20% and 85% (without condensation).
- When switched off, the LCD display can be stored most reliably between -4^ and +140^ (-20°C - +60°C), up to the maximum height of 39,000 ft (12,000 m) above sea level at a relative humidity between 10% and 85% (without condensation).
- After transporting your LCD display please wait until it has assumed the ambient temperature before connecting and switching it on. Extremely high variations in the temperature or humidity may result in condensation forming on the inside of the LCD display which could cause an electrical short-circuit.
CONNECTING
Observe the following instructions to connect your LCD display properly:
POWER SUPPLY

- Do not open the power supply housing. An open housing presents a lethal hazard from electrical shock. There are no parts inside to be cleaned or serviced.
- Operate your LCD display only with grounded outlets with AC 100-240V\~/ 50-60 Hz. If you are not sure about the power supply at your location, check with your power company.
- Use only the power supply and power connection cable provided.
- For additional safety we recommend use of a surge protector to protect your LCD display from damage resulting from voltage surges or lightning.
- To remove the LCD display from the power supply, disconnect the plug from the AC outlet.
- The power outlet must be in the vicinity of your LCD display and within reach of the power cables. DO NOT stretch the power cables tightly to reach a power outlet.
- You should arrange the LCD display cables in a manner that no one can trip over or step on them.
- To avoid damage of cable do not place any objects or furniture on the cable.
PRECAUTIONS
Caution! There are no parts which can be serviced or cleaned inside of the TV display housing.
You can increase the life of your LCD display by taking the following precautions:
- Before cleaning always disconnect the power line and all connection cables.
- Do not use any solvents, caustic or gaseous cleaning agents.
- Clean the display with a soft, lint-free cloth.
- Ensure that no water droplets remain on the screen. Water can cause permanent discoloration.
- Do not expose the screen to bright sunlight or ultraviolet radiation.
IMPORTANT ADDITIONAL SAFETY INSTRUCTIONS
When using any electronic equipment, basic safety precautions should always be taken. Following the guidelines below can reduce the risk of fire, electric shock and injury to person:
- Do not use this product near water (e.g., near a bathtub, wash bowl, kitchen sink or laundry tub, in a wet basement or near a swimming pool).
- Avoid using a telephone/modem (other than a cordless type) during an electrical storm. There may be a remote risk of electric shock from lightning.
- Do not use the telephone/modem to report a gas leak in the vicinity of the leak.
- Use only the power cord indicated in this manual. Do not dispose of batteries in a fire. They may explode. Check with local codes for possible special disposal instructions.
- Keep batteries away from children at all times.
Thank you for purchasing our LCD Multi-display. We thank you for your confidence in our products and are pleased to greet you as a new customer.
We focused on great features, ease of use and reliability in manufacturing your LCD display.
SERVICE
Your display comes with a one-year warranty, this is in addition to your statutory rights.
This manual contains a separate chapter on Troubleshooting on page 46.
PERFORMANCE CHARACTERISTICS
Advantages in relation to CRT (cathode ray tube) displays:
▶ Less space required
Lighter weight
▶ Lower power consumption
Further features
Multi-sources input included RF IN, D-SUB, HDMI, DVI, SCART 1, SCART 2, COMPONENT, and VIDEO, S-VIDEO.
➢ Easy-to-use remote control, and OSD (on-screen display) menu.
➢ Experience PIP (picture in picture) and Split Screen.
➢ Aspect Ratio modes include Full, Panoramic, Normal, Zoom 1, Zoom 2.
➢ APC (auto picture control) settings include Movie, Bright, Manual and Standard.
➢ APS (auto program searching) for automatic TV channel tuning.
▶ Teletext function is available.
▶ Child lock function is available.
Built-in dual channel speakers.
Built-in NICAM/IGR sound decoder for stereo and bilingual listening.
➢ Automatic sleep timer control from 10 to 120 minutes in 10-minute increments.
➢ Automatic Power Off feature after 10 minutes without a signal.
➢ Provided component video input for high definition TV program (HDTV ready), resolution up to 720p, 1080i, 1080p.
➢ Provided 6 Equalizer modes for selection.
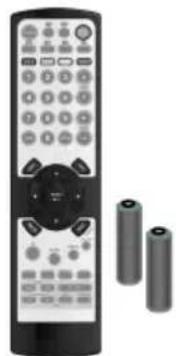
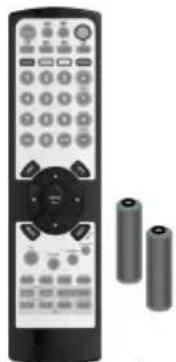
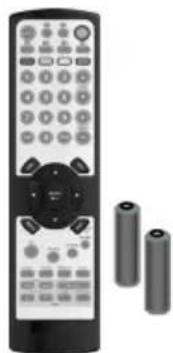
INCLUDED EQUIPMENT
Please check that you have received the following items with your LCD unit.

User's Manual
natural_image
Black remote control with two batteries on the right side (no visible text or symbols)Remote Control & Batteries(AAA X2)

Power Cord
3. CONNECTING EXTERNAL DEVICES
The level of audio output cannot be changed using the volume control on your display. This connector should be used with an external audio amplifier that can be used to control the volume.
Turn The LCD Display On
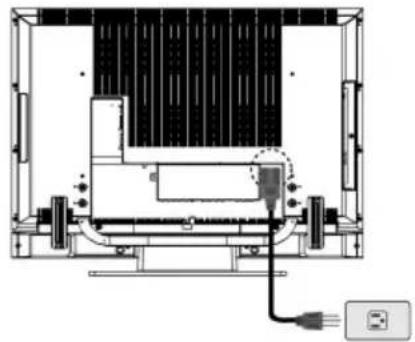
Plug the power cable into the AC-in socket located on the left rear of the LCD TV. Plug the other end into an electrical socket.
Press the power button on the remote control or right side of the TV to turn the TV on.
natural_image
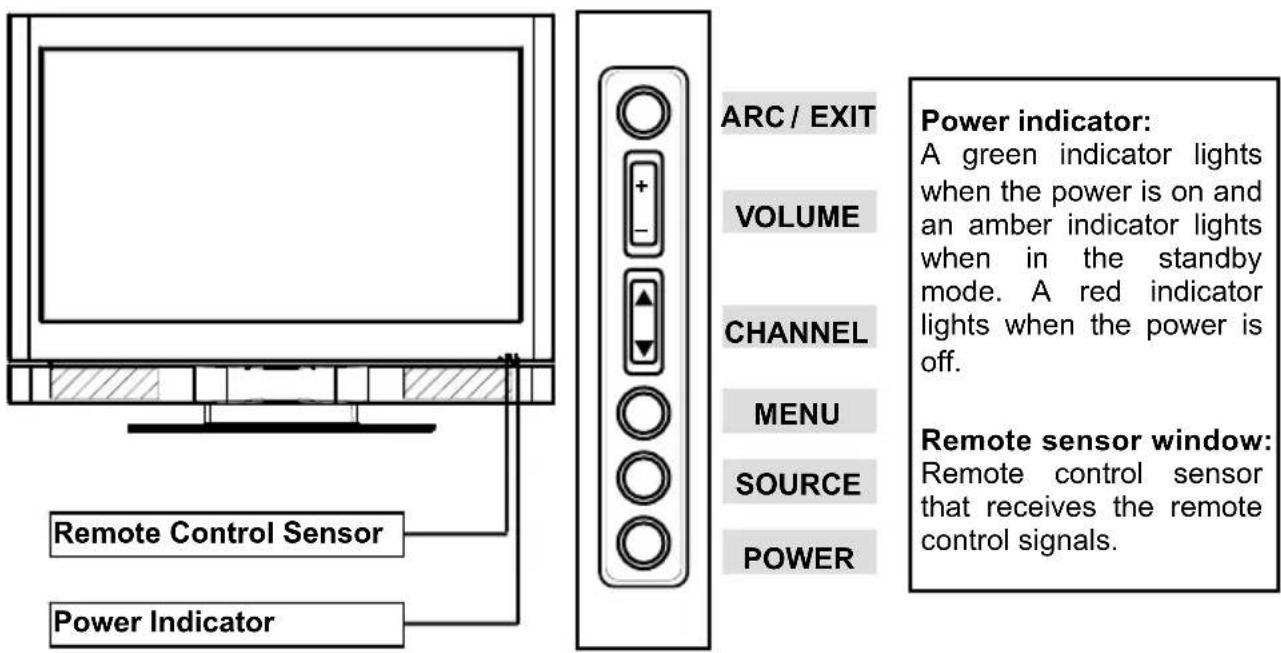
Technical diagram of a mechanical assembly with internal components and a cable, no visible text or symbolsFunction Key
These buttons control your LCD unit's basic features, including the on-screen menu. To use the more advanced features, you must use the remote control.
POWER : turn on or turn off the LCD unit.
SOURCE : select input source (PC, HDMI, DVI, TV, AV, SV, YPbPr, SCART 1, SCART 2, SCART 2S).
MENU : display the main menu.
CHANNEL (down/up) : change channels.
VOLUME (-/+) : turn up or turn down the volume.
ARC / EXIT : Set up the aspect ratio of display (TV/Video source: Panorama, Normal, Full, Zoom1, Zoom2 ; PC source: Full, Normal) or as exit function if OSD menu appear.
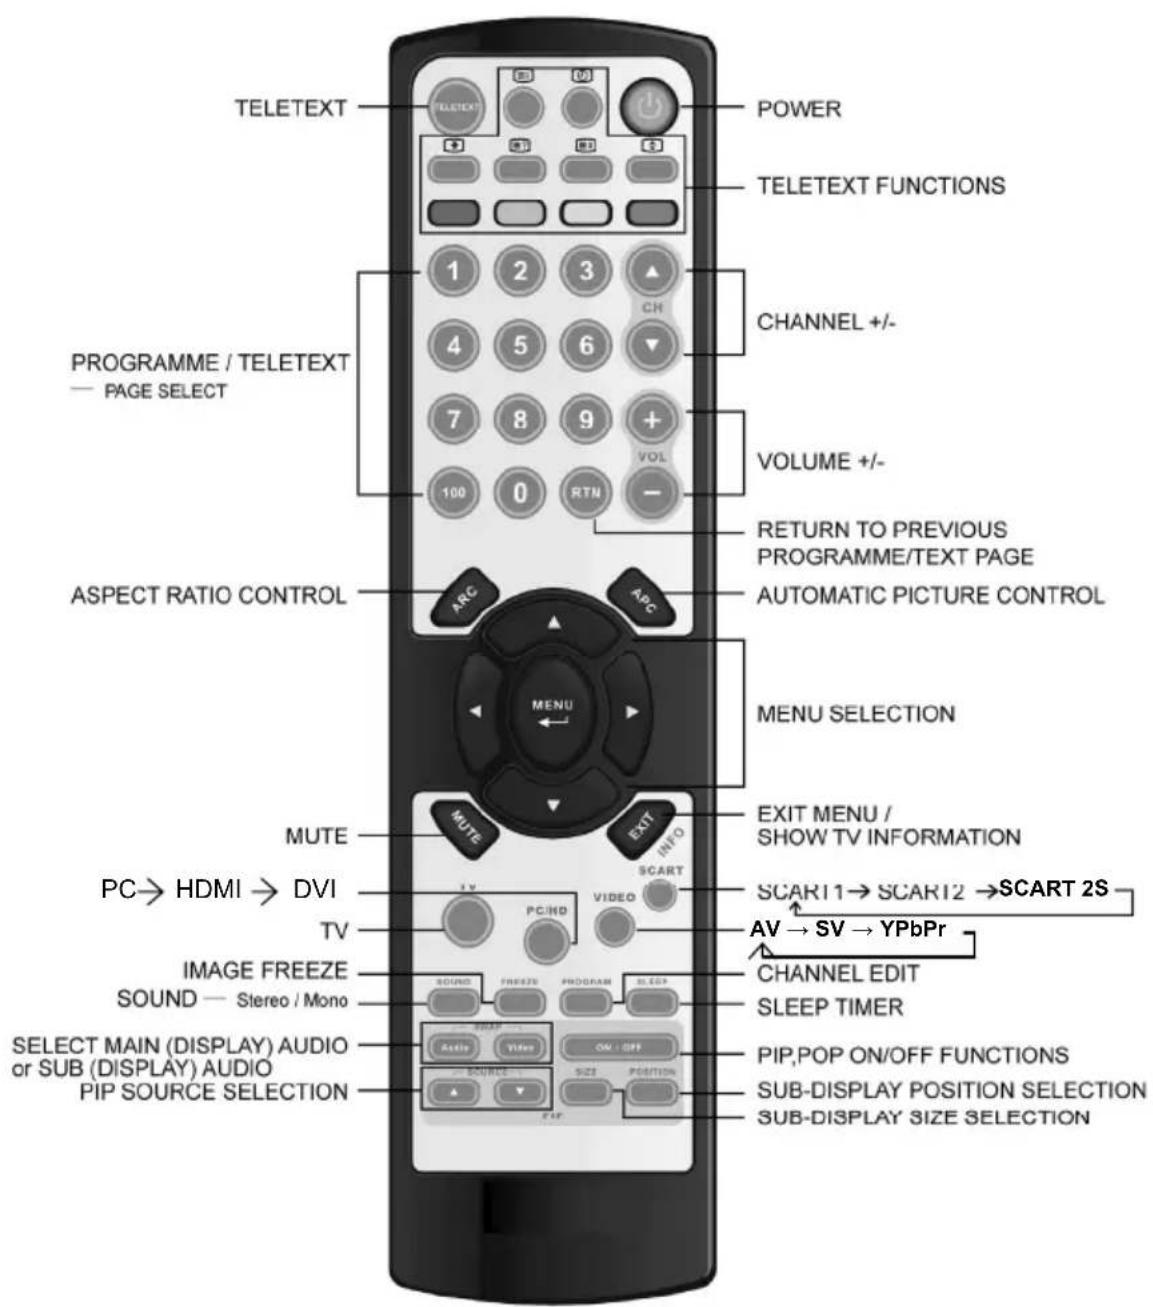
6.SUMMARY OF REMOTE CONTROL BUTTONS
Power control
POWER button Turn the TV on or off
Selecting the primary signal source
TV button Switch to TV mode
PC/HD button Switch to PC, HDMI and DVI mode
VIDEO button Switch to AV / S-Video and YPbPr mode
SCART Switch to SCART 1 / SCART 2 and SCART 2S mode
Menu Settings
MENU button Display the on-screen menu
EXIT Exit a menu or sub-menu
△ | ▽ | ◁ | ▷
Access menu items
TV Changing Channels
CH △/▽ button
Press Up/DOWN to change the channel
0\~9 ; +100 button To manually select channels
RTN button Return to the previous viewed channel
Sound Control
VOL△/▽ button
Increase/ Decrease volume level
MUTE button Temporarily turn off audio
SOUND button Press to choose Stereo, Dual and Mono broadcasts.
PIP Control
PIP ON/OFF button Enable/Disable PIP viewing window
Toggle PIPmode : PIP → POP → OFF
△/▽ button
Select PIP input source: PC→HDMI→DVI→AV→SV→SCART 1→SCART 2→SCART 2S→YPbPr→PC
SIZE button
Toggle PIP window size: Small / Middle / Large
Audio/Video button
Toggle audio/video source between the primary display and the PIP window
POSITION button Move the PIP window position
Other Function
INFO button
Display current channel/Input source/signal format..
ARC button (Aspect Ratio Control)
In PC mode : Set the picture mode to Full, Fill aspect, One to one.
In Video mode : Toggle the picture mode between Normal → Panoramic → Full → Zoom1 → Zoom2
APC button (Automatic Picture Control)
Toggle screen luminosity between Standard, Movie, Bright, Manual
SLEEP button
Select a pre-set time for automatic power down.
FREEZE button
Temporary pause current image
Teletext Control

TELETEXT button
Press to show the Teletext Service. Press again to return to TV Viewing
Press "INDEX" button to show the list of teletext contents.

HOLD
Press "HOLD" button to stop the automatic page change

INTERRUPT
Press "INTERRUPT" button to switch to TV while waiting for the next text page.

REVEAL
Press "REVEAL" button to display concealed information, such as solutions of riddles or a quiz.

EXPAND
Press "EXPAND" button to enlarge the top half or bottom half of the Teletext page.

SUB-PAGE/TIME
Press "SUB-PAGE/TIME" button to access to the sub-page you required
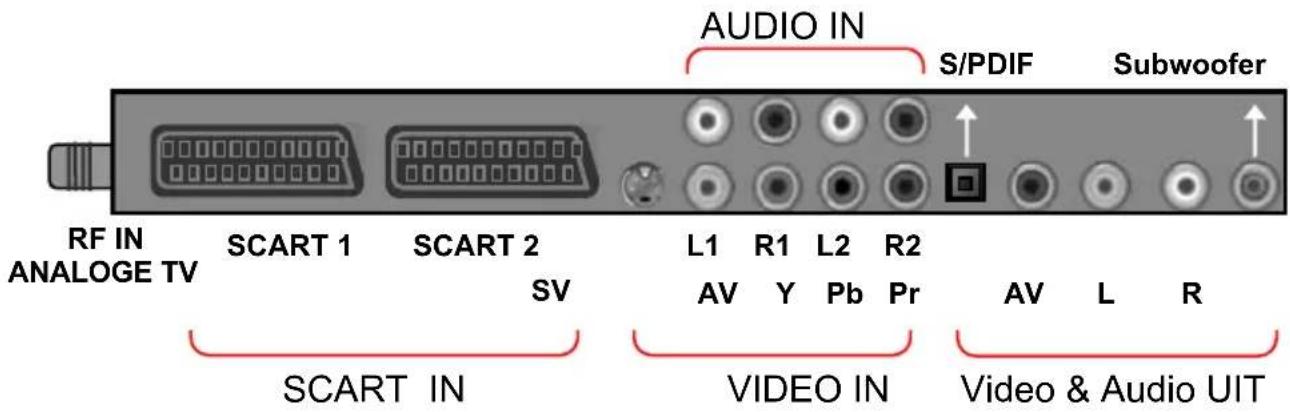
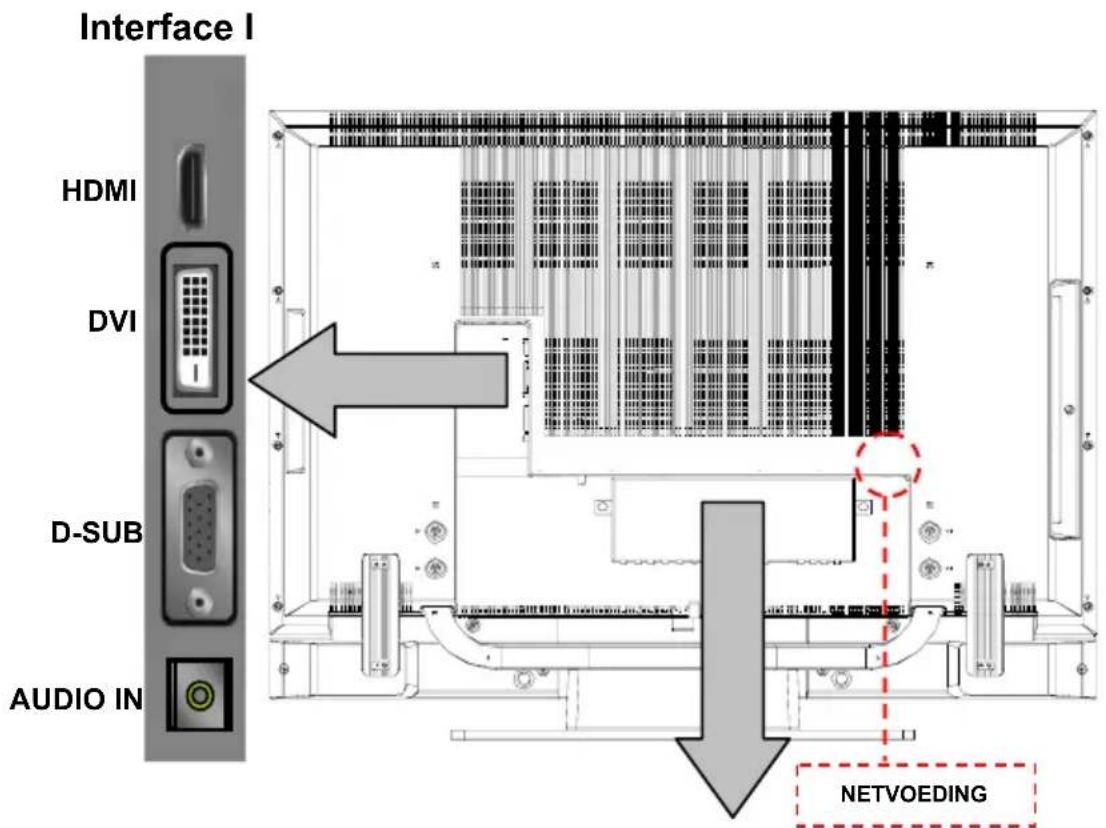
7. CONNECTIONS & APPLICATIONS
VIDEO DEVICE
(ex. DVD Player or Set-top Box...)
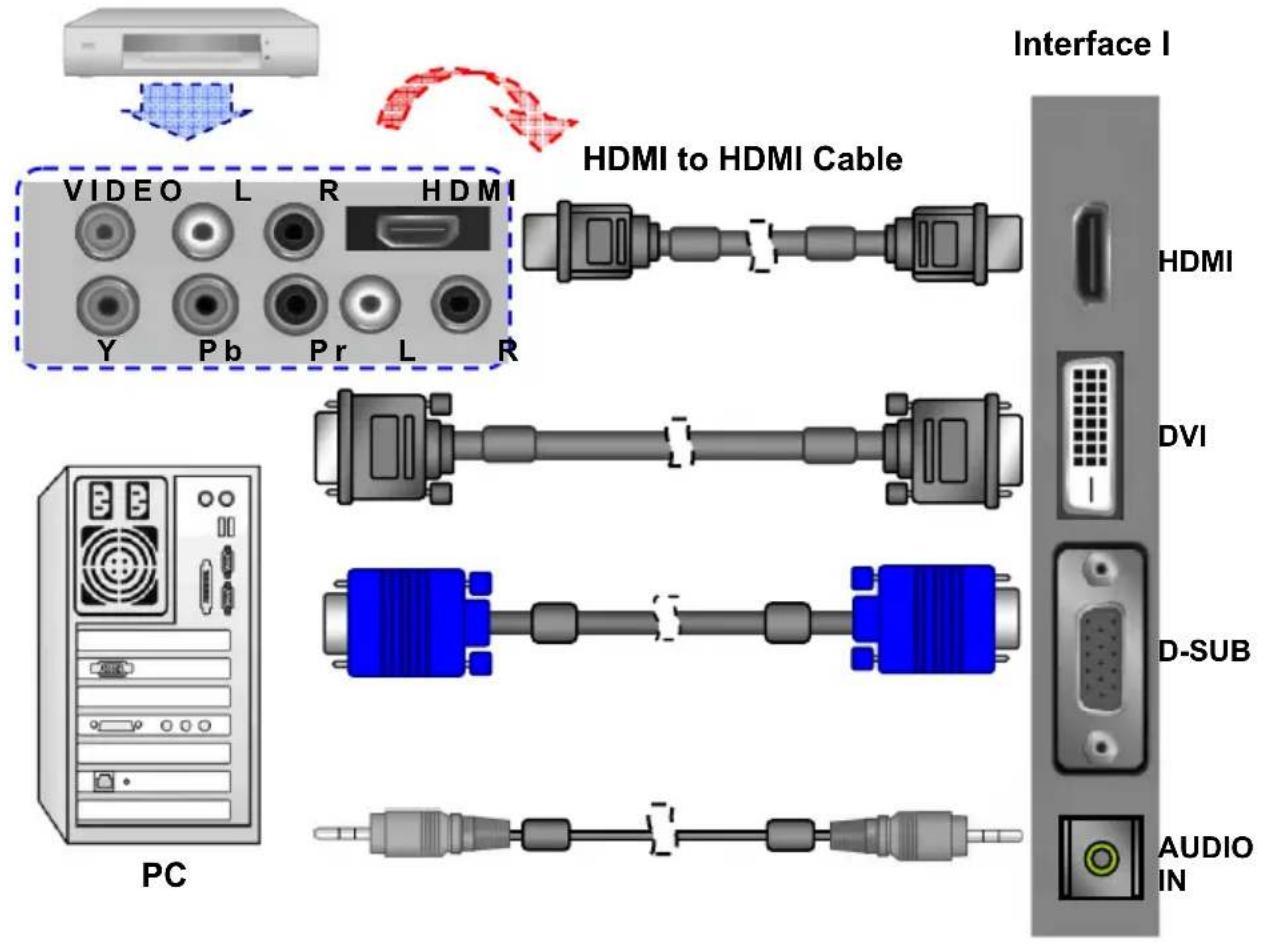
\* How do I connect a Video device via HDMI - HDMI ?
This can be applied only if there is the HDMI Output connector on the external device.
VIDEO DEVICE
(ex. DVD Player or Set-top Box...)
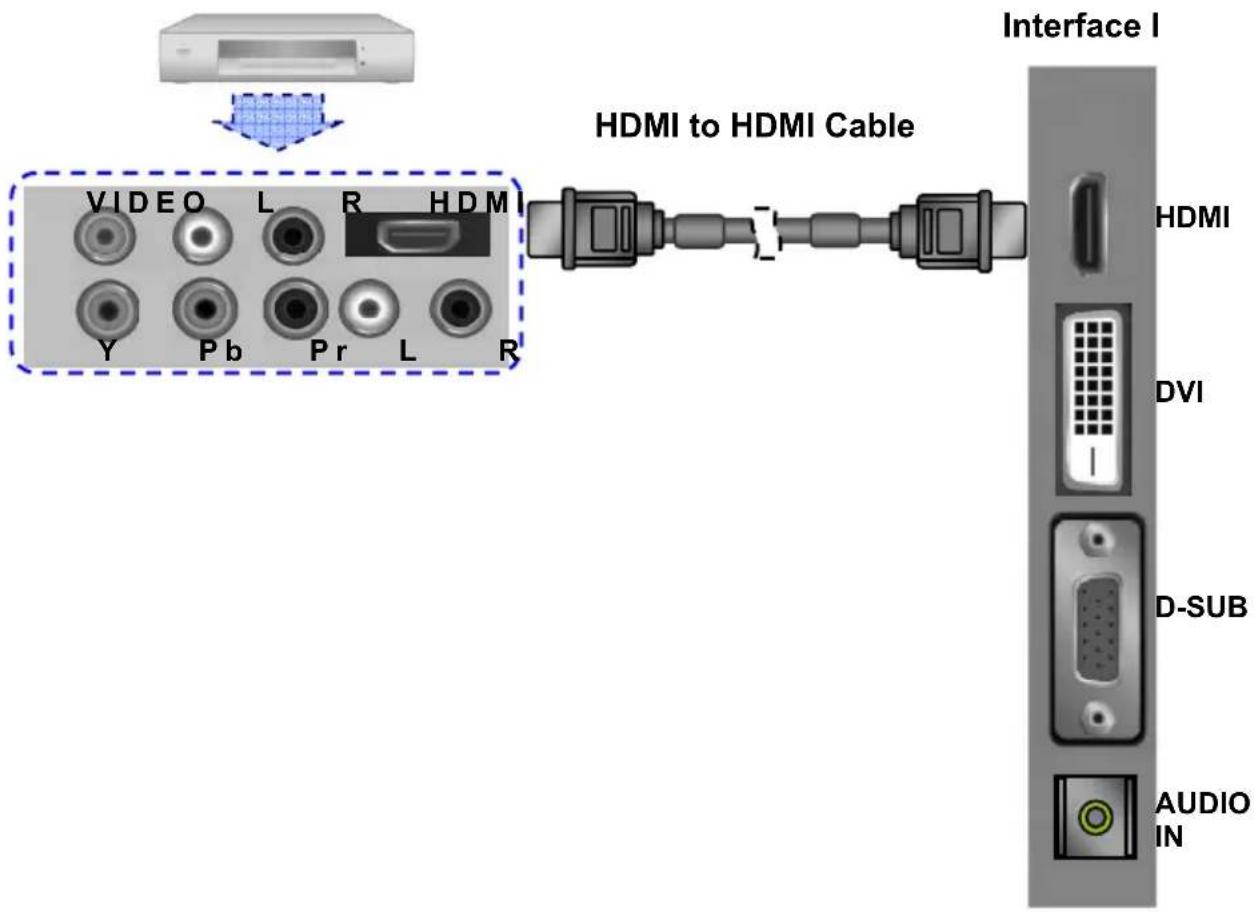
Note: No sound connector is needed for a HDMI to HDMI connection.
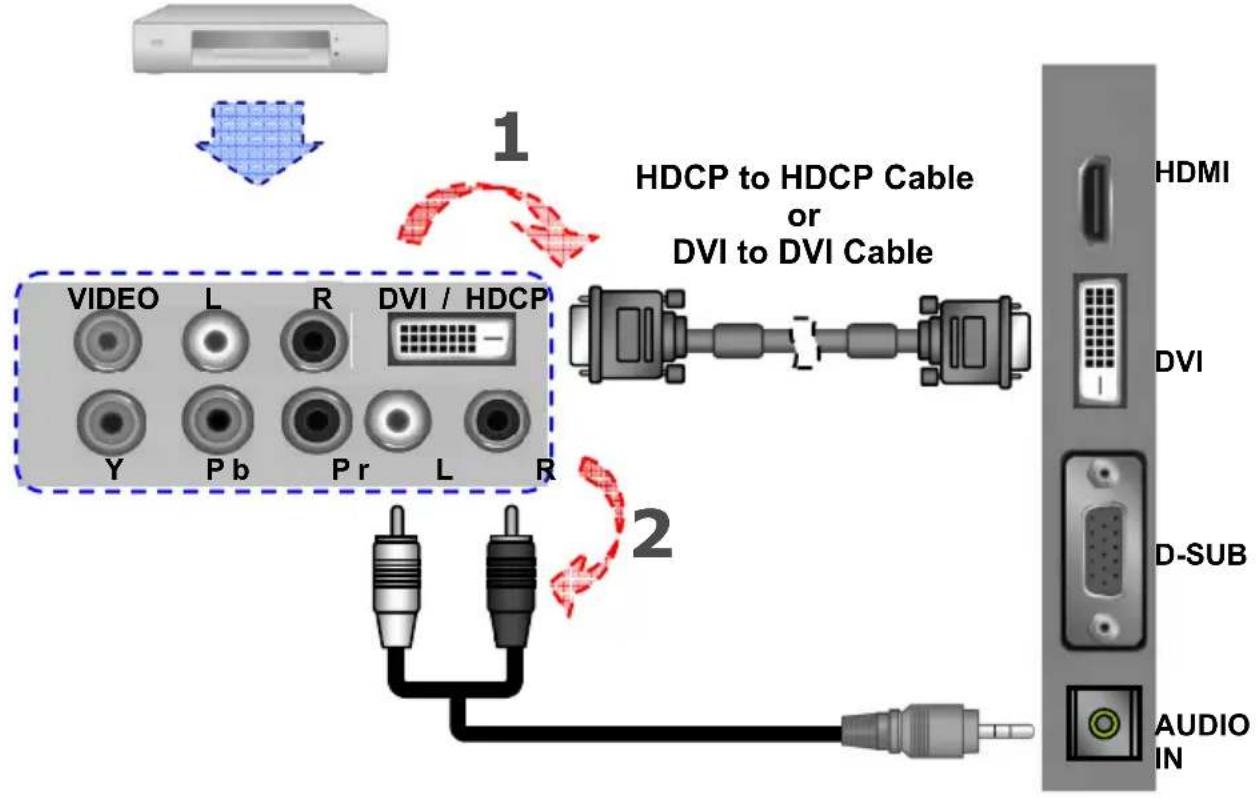
\* How do I connect a Video device via HDCP - HDCP ?
This can be done only if there is the HDCP (DVI) Output connector on the external device.
VIDEO DEVICE
(ex. DVD Player or Set-top Box...)
flowchart
graph TD
    A["Input Image"] --> B["HDCP Cable"]
    B --> C["Video / HDCP"]
    C --> D["DVI / DVI Cable"]
    D --> E["HDMI"]
    D --> F["DVI"]
    D --> G["D-SUB"]
    D --> H["AUDIO IN"]
- Connect a HDCP or DVI cable between the DVI connector on the TV and the HDCP / DVI connector on the DVD player/ Set-top box.
- Connect an audio cable between the PC AUDIO IN jack on the TV and AUDIO OUT jack on the DVD player/ Set-top box.
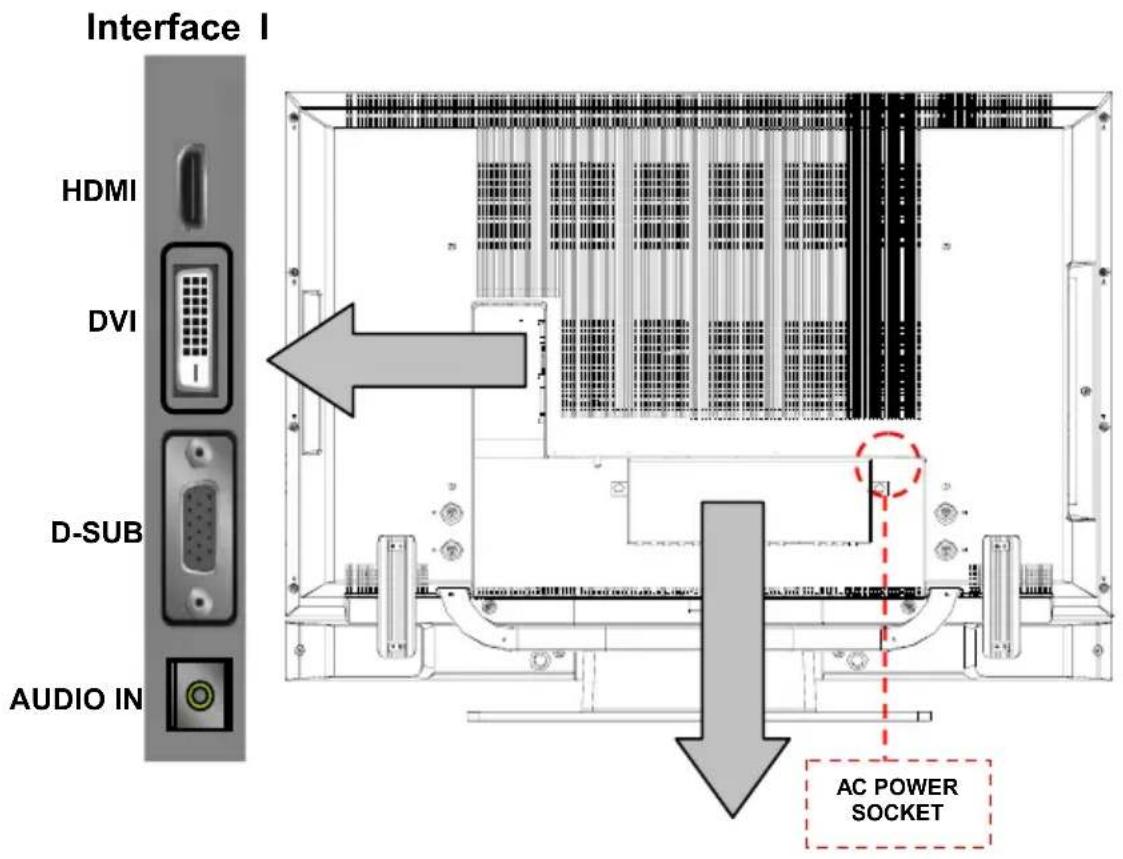
* How do I connect a PC via DVI - DVI ?
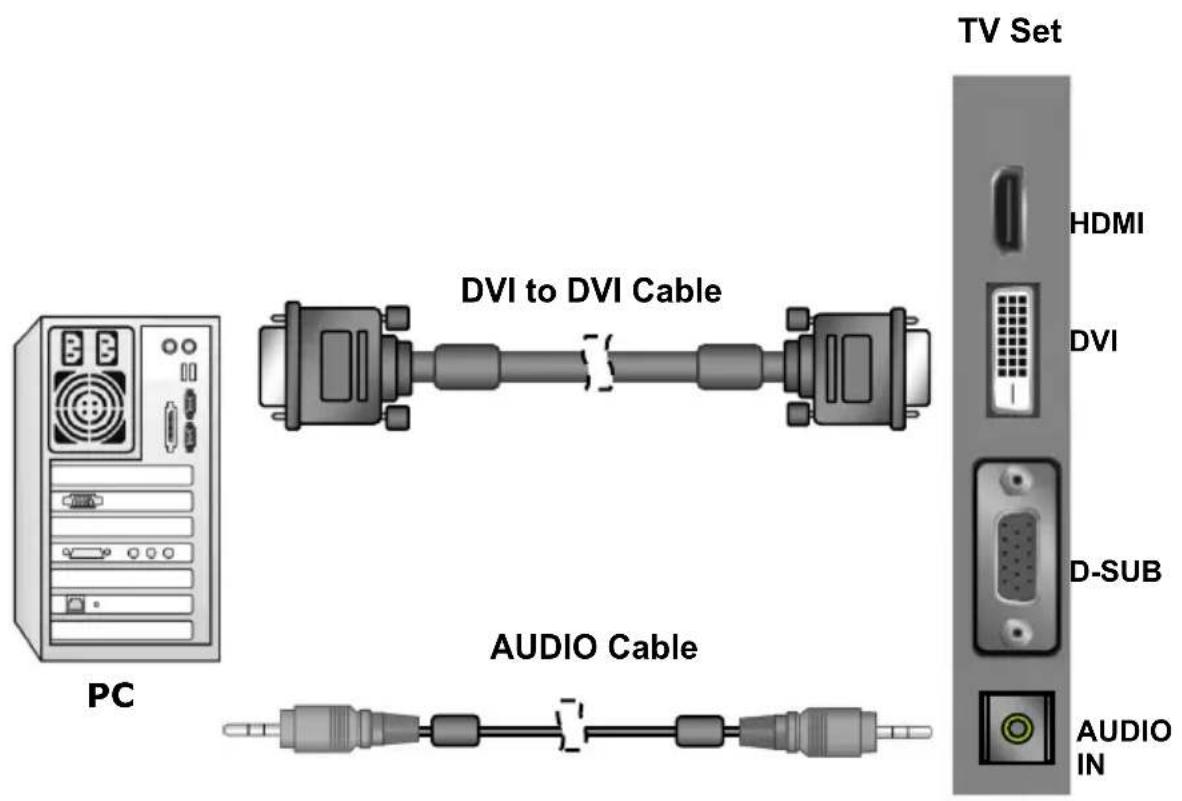
- Connect a DVI cable between the DVI connector on the TV and the DVI connector on PC.
- Connect an audio cable between the PC AUDIO IN jack on the TV and AUDIO OUT jack on PC.
* How do I connect a PC via D-SUB ?
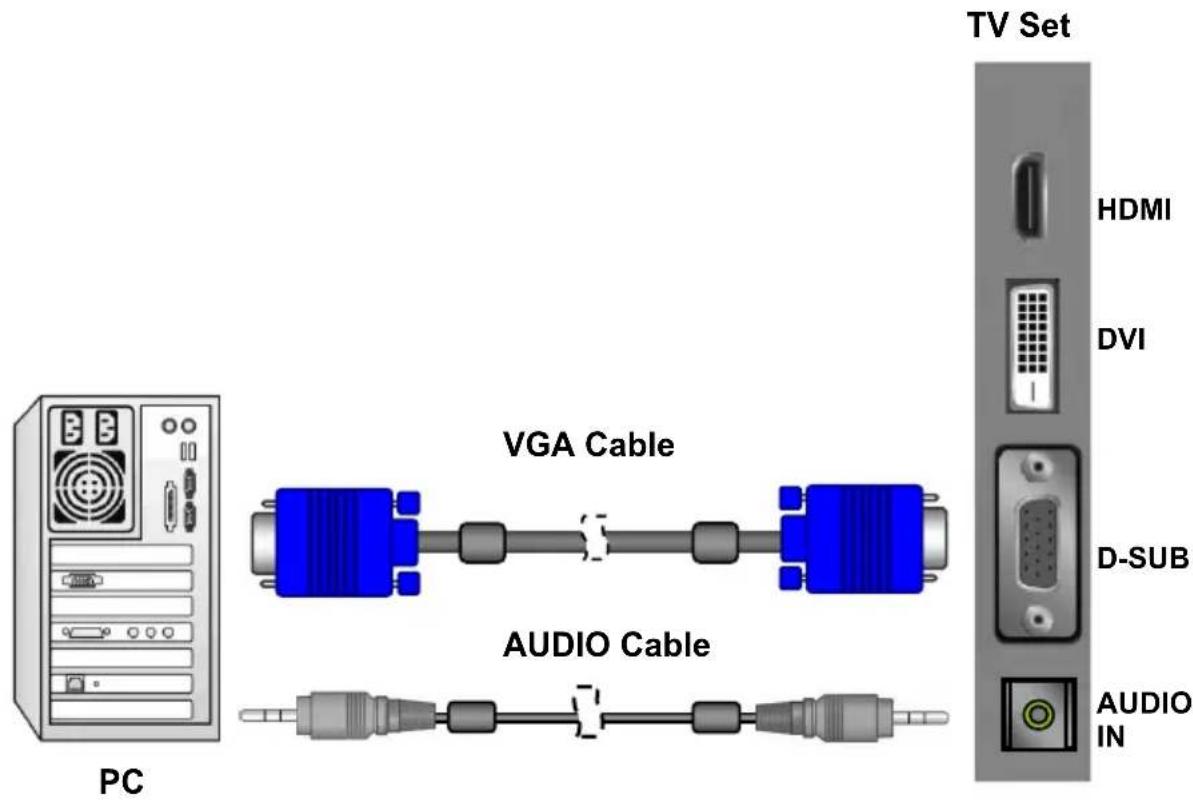
- Connect a VGA cable between the D-SUB connector on the TV and the D-SUB connector on PC.
- Connect an audio cable between the PC AUDIO IN jack on the TV and AUDIO OUT jack on PC.
* How do I connect a Video device via general cables?
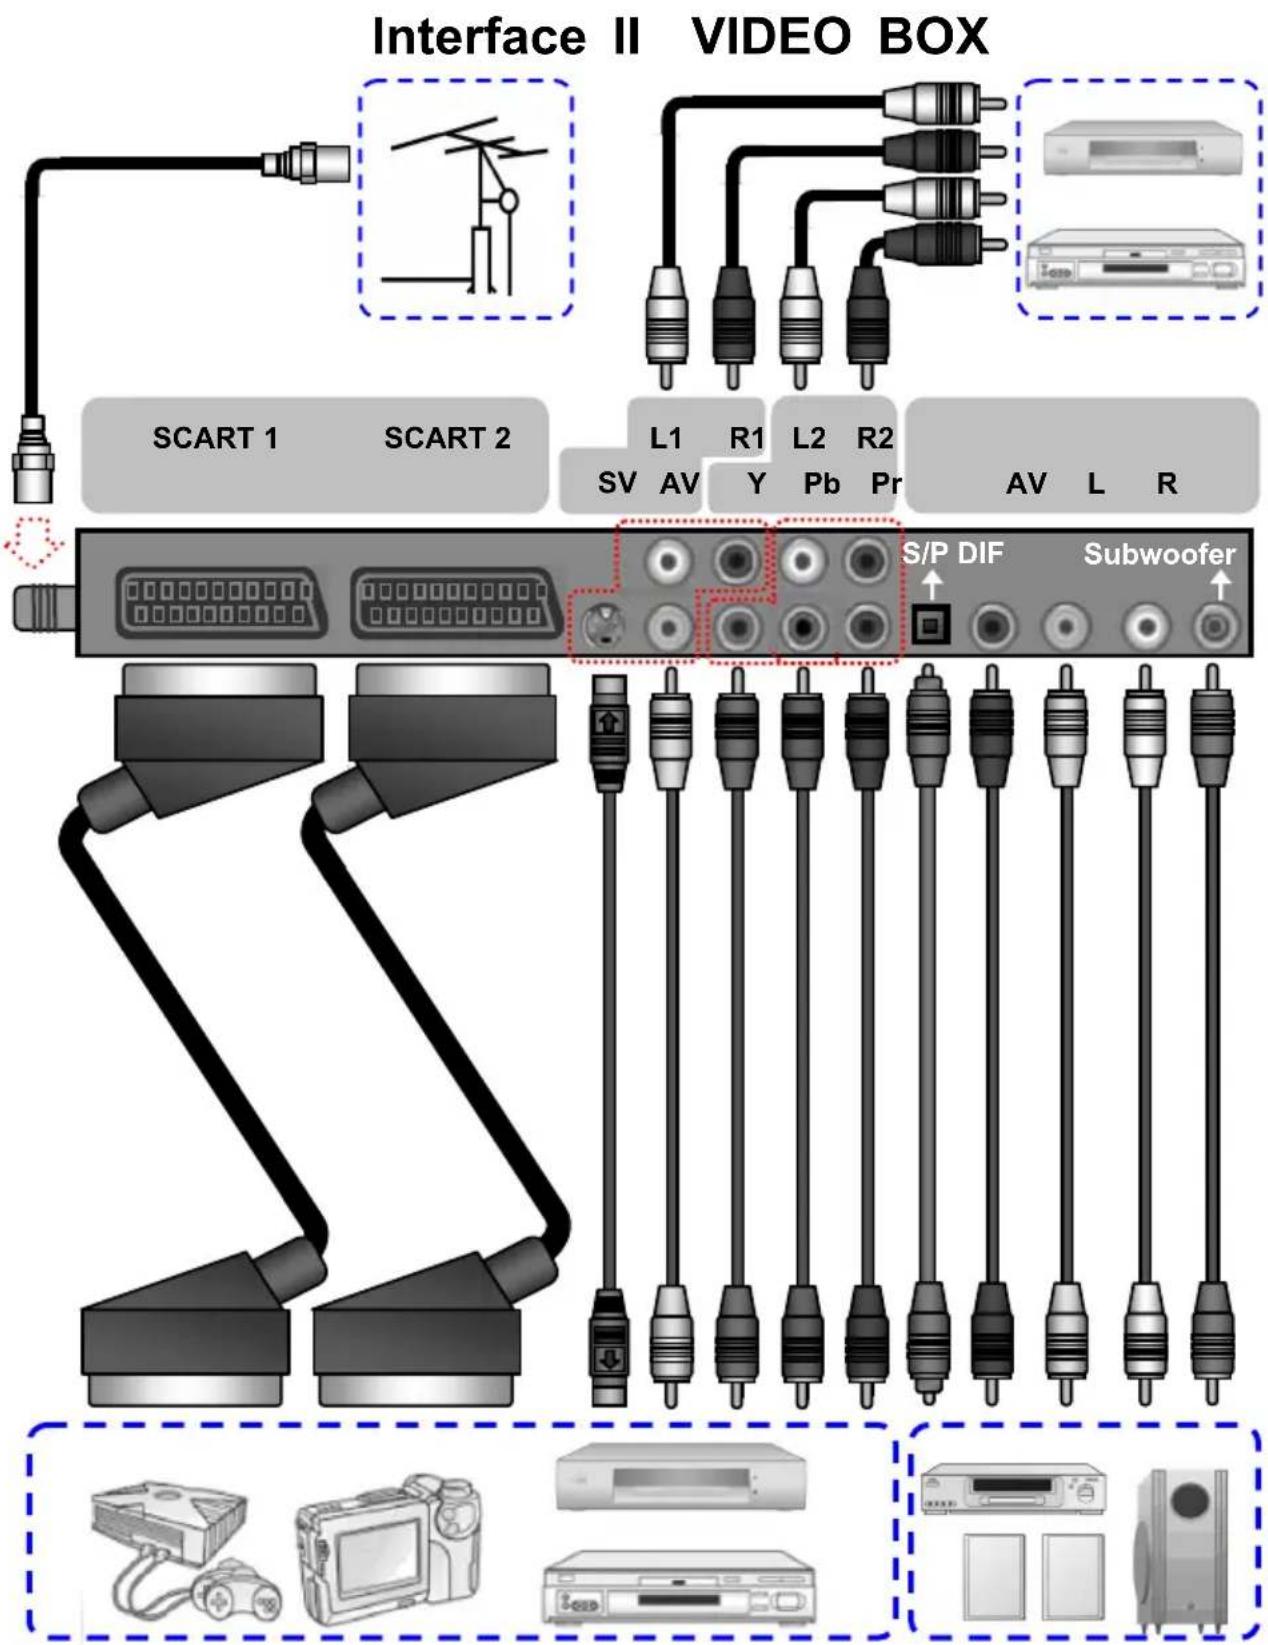
This TV accept different Video Input, if video device has a connector with better quality, please connect the better one. The sequence of video quality is Component, Scart, S-video, Video from the best quality to the normal one.
TURNING THE LCD DISPLAY ON AND OFF
- Press the POWER button on the Remote Control.
- You can also use the POWER button at the bottom of the panel.
VOLUME CONTROL
Using Volume Control
Press VOL▲ / VOL▼ button to turn up or turn down the sound volume.
Using Mute

At any time, users can temporarily turn off the sound by pressing the MUTE button.
- Press the MUTE button and the sound cuts off.
- Press the MUTE again or VOL▲ / VOL▼ button to turn the sound back to the previous level.
SETTING THE SLEEP TIMER
You can set the Sleep Timer to turn off the TV automatically. The time can be set from OFF to 120 minutes.
- Press the SLEEP button to set the Sleep Timer screen.
- Press the SLEEP button repeatedly to change the sleep time (in 10 minutes intervals).
SWITCHING PC / HDMI / DVI / VIDEO / TV / SCART MODES
- Turn on the power.
- Select an input source as described below:
TV button switch to TV mode.
PC/HD button switch to PC, HDMI and DVI mode (Analog or Digital)
VIDEO button switch to AV / SV / YPbPr mode (Composite, Y/C and Component signal)
SCART button switch to SCART 1, SCART 2, SCART 2S
VIEWING THE MENUS AND ON-SCREEN DISPLAYS
- With the power on, press the MENU button. The main menu appears on the screen.
- Use the ◀ / ▶ button to select one of the menu options, and then press the ▲ / ▼ button to access the sub-menu.
- Press the ◀ / ▶ button to make adjustments.
- Press EXIT/INFO button to exit from the menu.
Note: The menu varies according to which input source is selected.
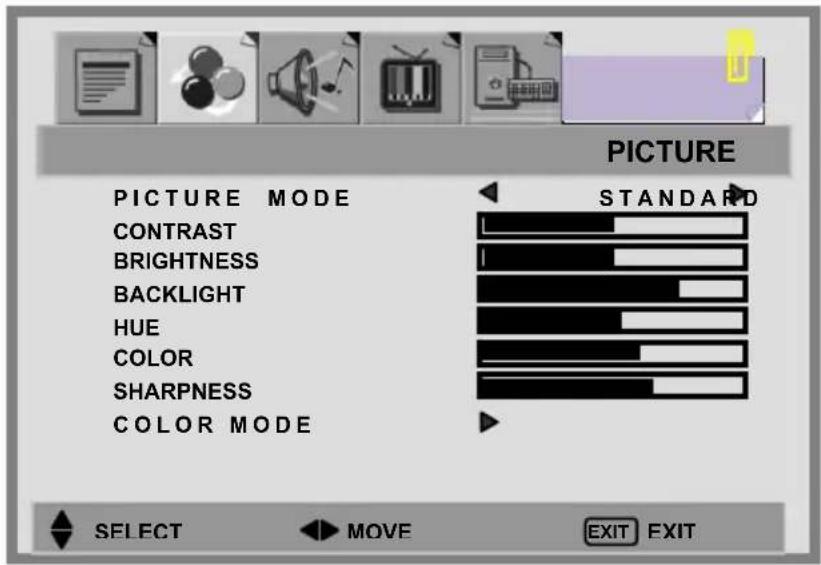
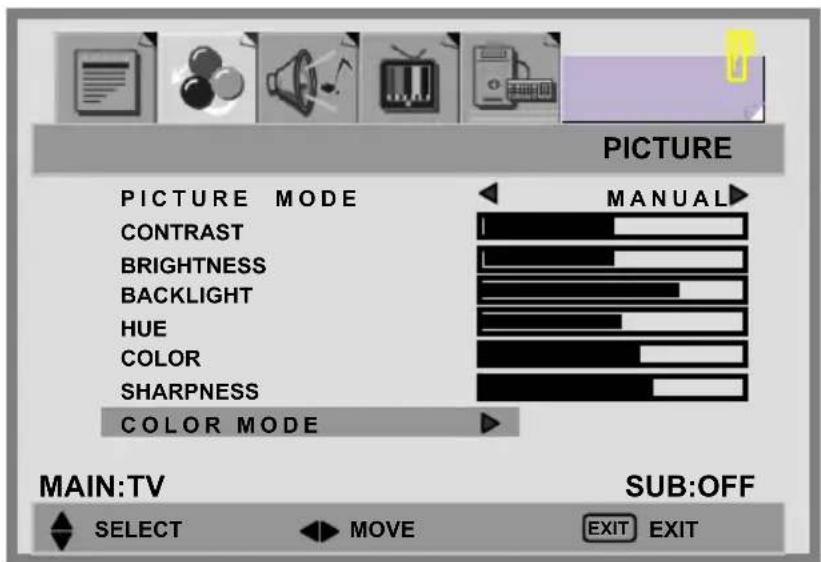
PICTURE SETTING
You may need to perform separate adjustments for brightness and contrast for the different video modes. Typically, PC mode will be best viewed with lower brightness and contrast settings than are appropriate for the other modes.
- Press the MENU button to display PICTURE from the main menu.
- Press the ▲ / ▼ button to select the desired item.
- Press the ◀ / ▶ button to adjust ranges from minimum to maximum.
- Press the EXIT/INFO button to return to the previous screen.
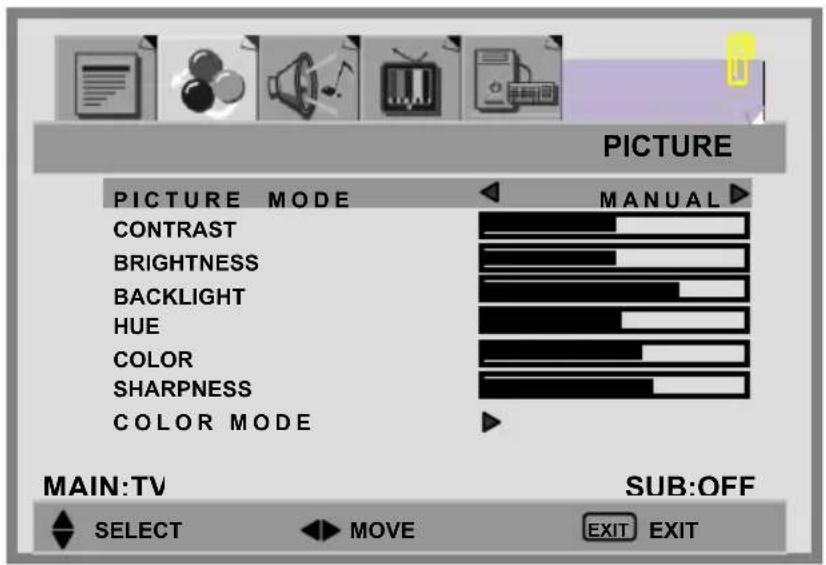
PICTURE MODES:
■ [MANUAL]: select this mode if you want to manually adjust each setting. Adjustments are only available under this mode.
■ [STANDARD]: standardizes picture adjustment
■ [MOVIE]: heightens contrast and sharpness
■ [BRIGHT]: displays a clear and bright picture.
PICTURE SETTINGS:
CONTRAST: Increase and decrease picture contrast BRIGHTNESS: Darker and brighter picture brightness BACKLIGHT: Adjust the back light level of screen COLOR: Deeper and lighter picture color SHARPNESS: Softer and sharper image COLOR MODE:
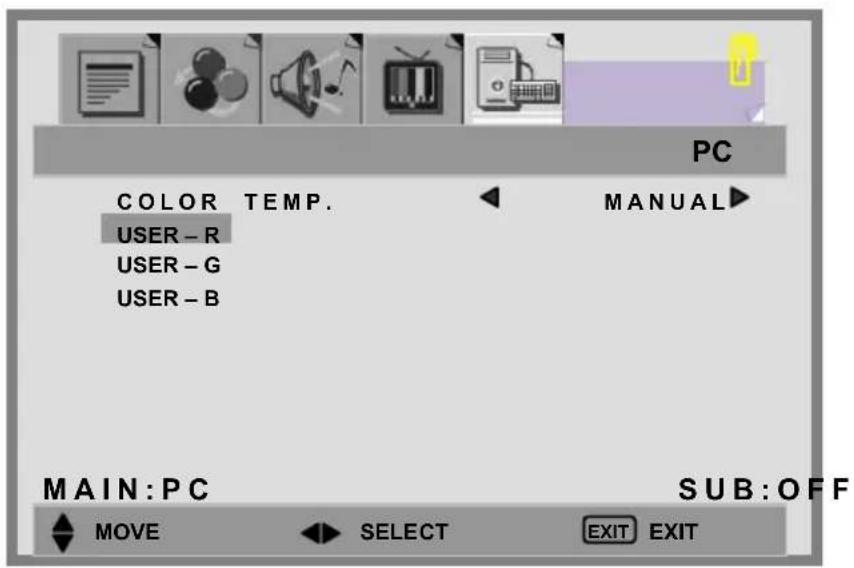
- Press the ▲ / ▼ buttons to select COLOR MODE option, and then press the ▶ button to enter the COLOR TEMP. sub-menu.
- Press the ▶ button to choose the color of picture mode. [NORMAL], [WARM], [COOL], [MANUAL].
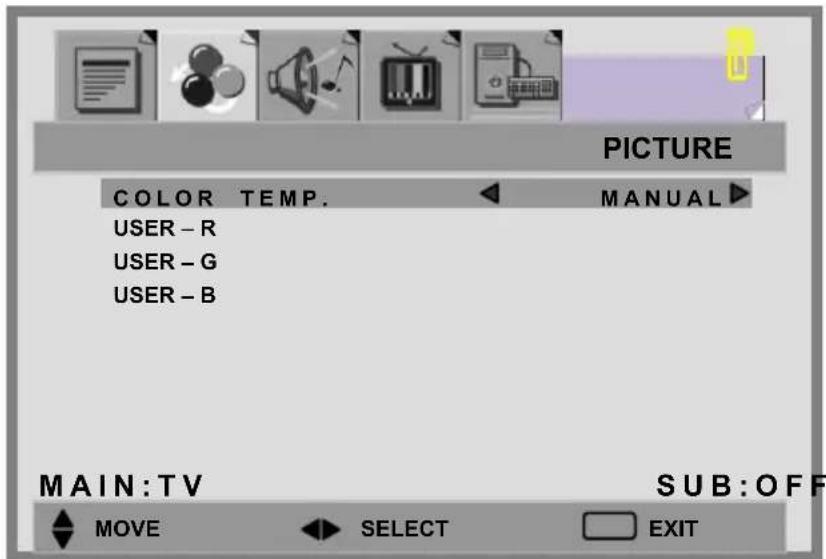
- Press ▲ / ▼ buttons to move USER-R/G/B and then press the ▶
button to enter the desired setting.
USER-R: adjust color of red rate.
USER-G: adjust color of green rate.
USER-B: adjust color of blue rate.
RECALL:User can reset the picture settings to the original / normal settings.
SOUND ADJUSTMENT
- Press the MENU button to display SOUND from the main menu.
- Press the ▲ / ▼ button to move to one of the sub-menu options.
- Press the ◀ / ▶ button to select the settings.
- Press the EXIT/INFO button to return to the previous screen.
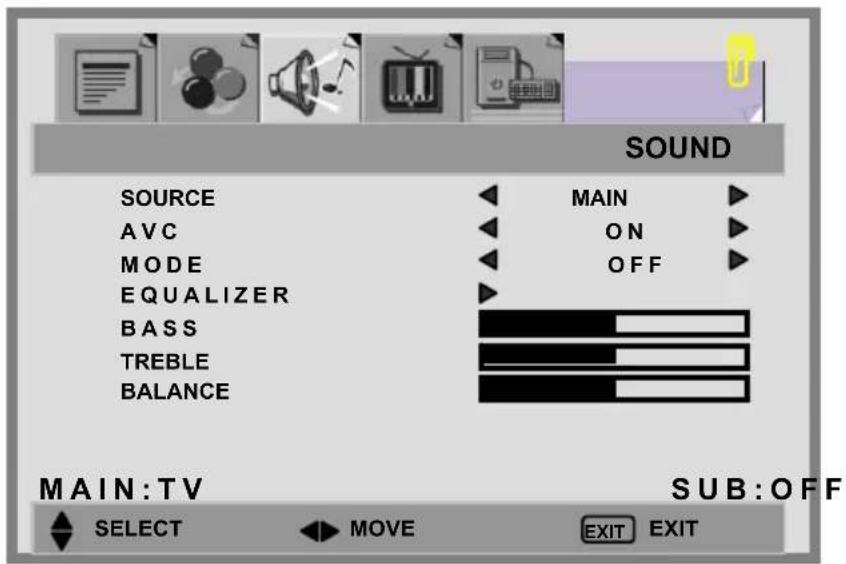
SOURCE: Choose the sound source from the [MAIN] or [SUB] display.
AVC: You can set AVC(Auto Volume Control) options to ON or OFF.
[ON]: For general use, like commercial advertisement, AVC can avoid the sound turns up or down suddenly.
[OFF]: For special sound effect, like opera or symphony, volume can be performed in accordance with the original sound level.
MODE: select the audio mode to [OFF], [EQ].
BASS: Adjust low tone of sound.
TREBLE: Adjust high tone of sound.
BALANCE: Adjust the volume balance between the left and right speakers.
EQUALIZER:
- Press the ▲ / ▼ button to enter the EQUALIZER menu.
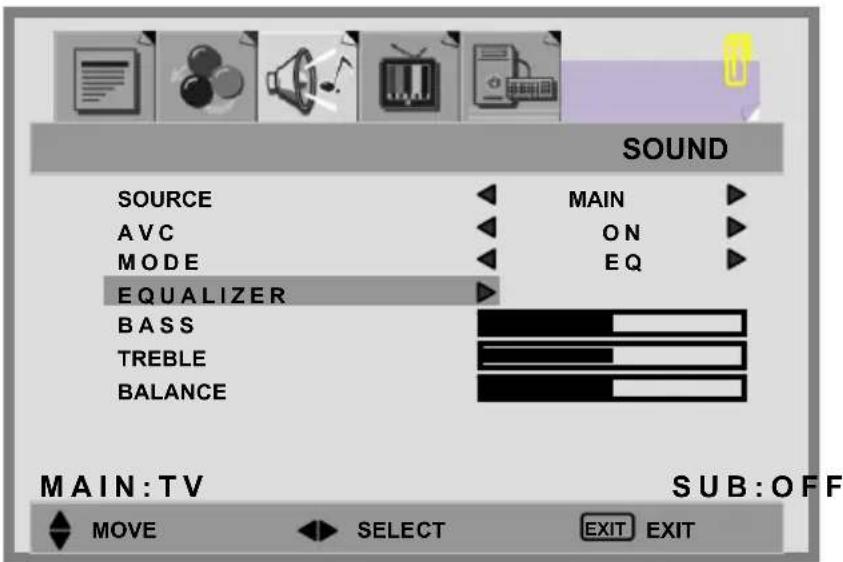
- Press the ▶ button to select the EQUALIZER options.
-
There are 6 Equalizer modes available: [MANUAL], [VOICE], [POP], [ROCK], [JAZZ], [CLASSIC].
-
Settings for VOICE, POP, ROCK, JAZZ and CLASSICAL are pre-configured. You cannot change these settings. The frequency responses are as below:
VOICE:
POP:
ROCK:
JAZZ:
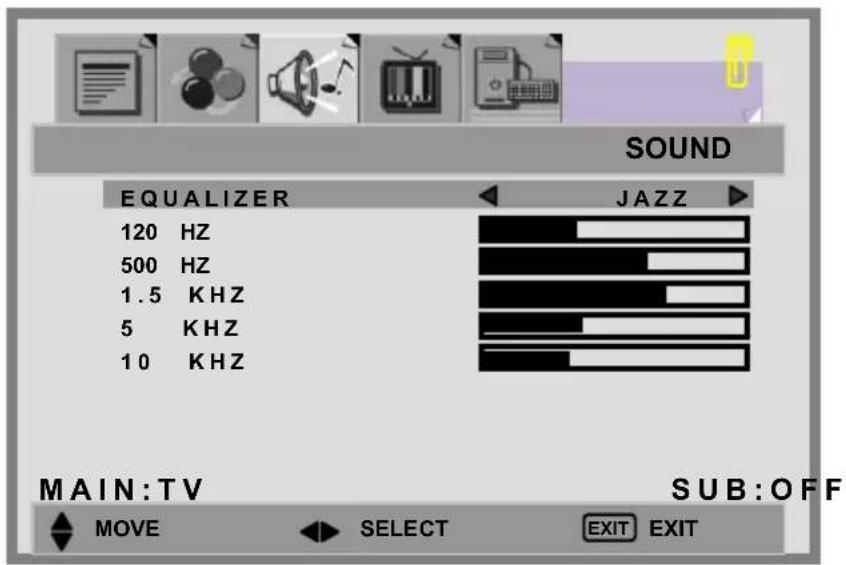
CLASSICAL:
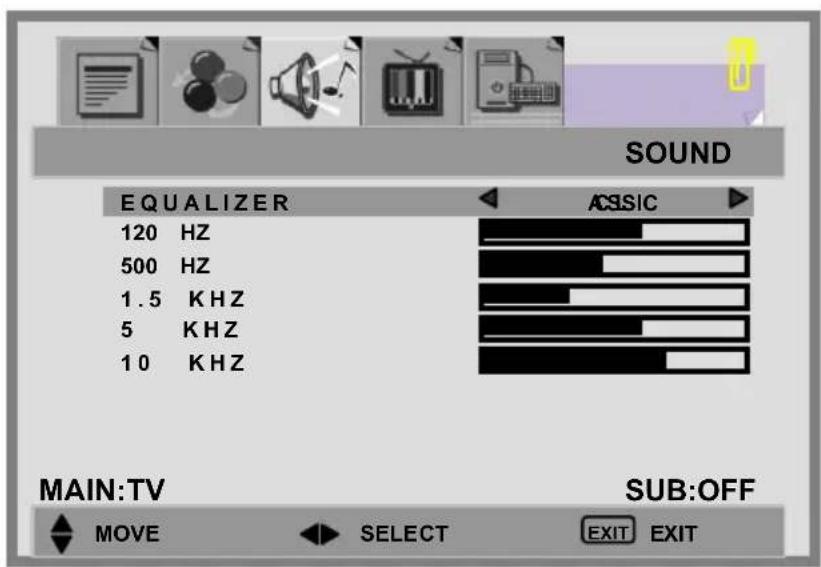
- In MANUAL mode, use ▲ / ▼ buttons to move a band and ◀ / ▶ buttons to select the desired frequency settings.
MANUAL:
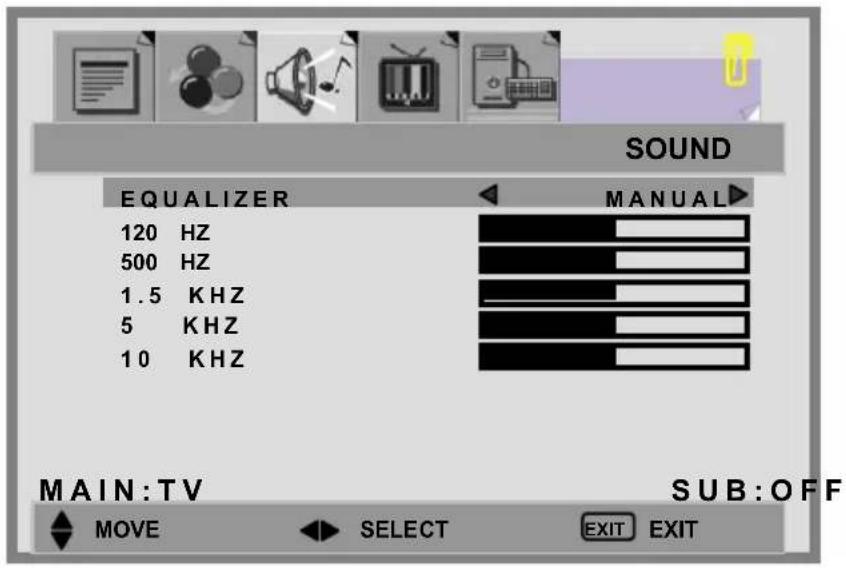
Note:
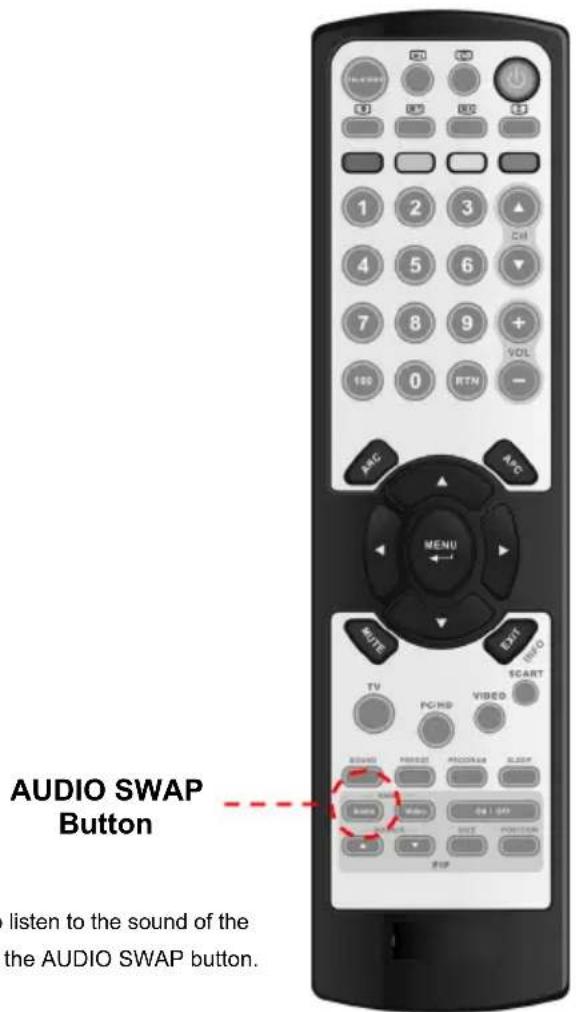
When using the PIP feature in PC mode, you are able to listen to the sound of the [SUB] screen instead of the [MAIN] screen by selecting the AUDIO SWAP button.
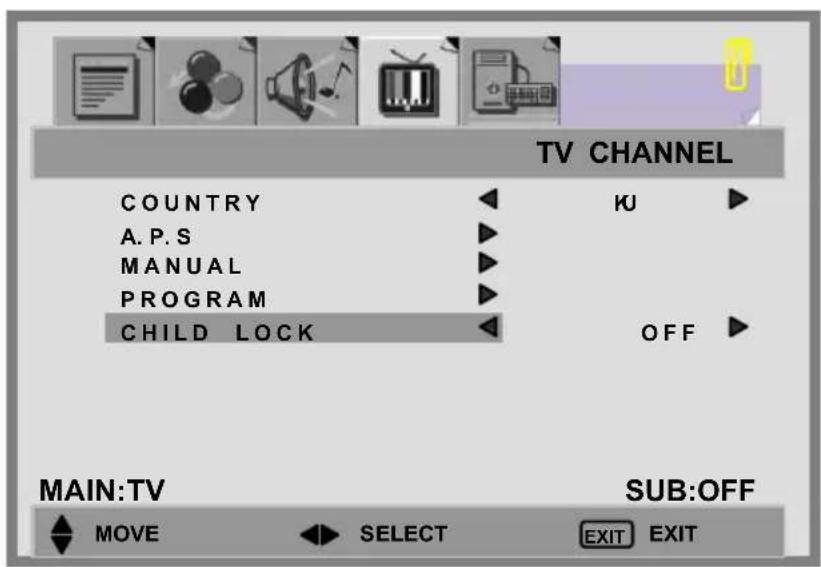
TV CHANNEL
- Press the MENU button to display TV CHANNEL from the main menu.
- Press the ▲ / ▼ button to move one of the sub-menu options.
- Press the ◀ / ▶ button to select the settings.
- Press the EXIT/INFO button to return to the previous screen.
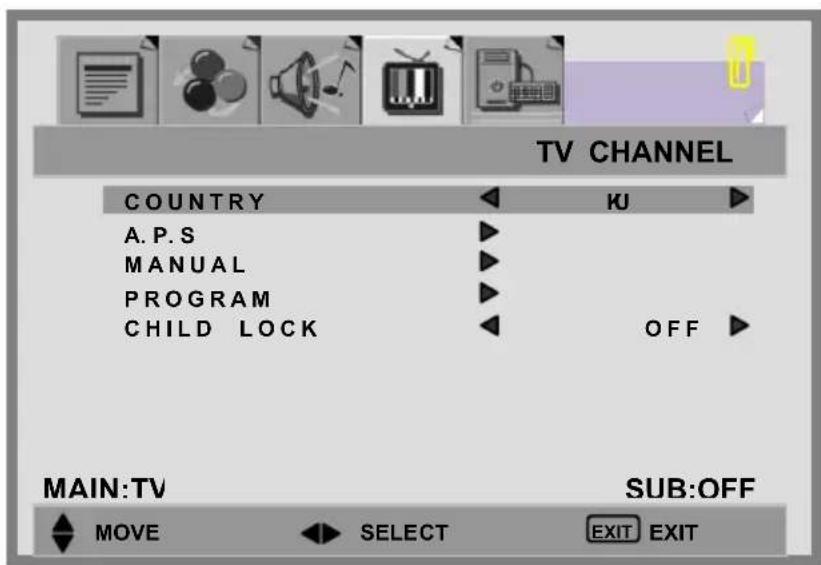
COUNTRY:[UK],[IRELAND],[DENMARK],[FINLAND],[ITALY],[NORWAY],[SPAIN],[SWEDEN],[LUXEMBURG],[FRANCE],[CZECH],[POLAND],[HUNGARY],[AUSTRIA],[GERMANY],[SWITZERLAND],[BELGIUM], [NETHERLANDS]
A.P.S:
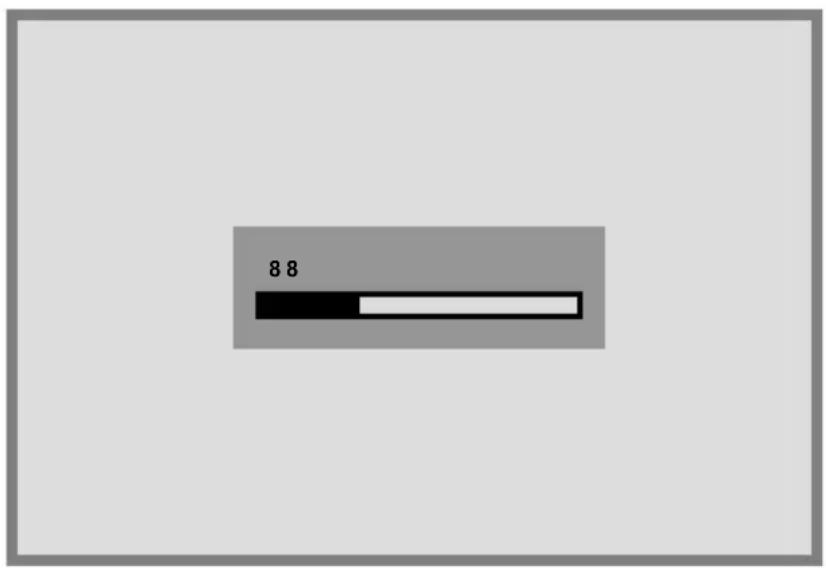
- Press the ▲ / ▼ button to select A.P.S option and then press the ▶ button to enter A.P.S (Automatic Programming Search).
- When the sub menu appears on the screen, press MENU again to start scanning.
- After APS has completed, the Program List will appear on the screen. You can select, rename, delete or insert programs within the Program List.
Programming Manual
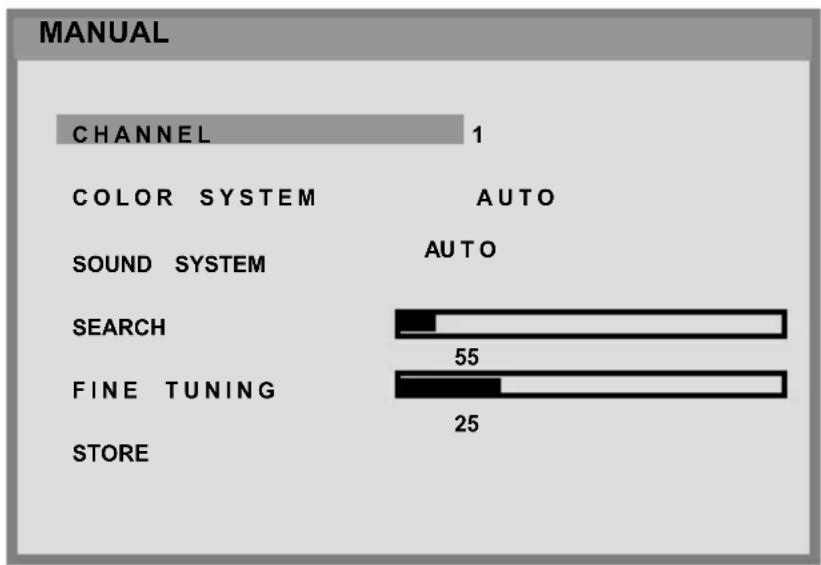
MANUAL:
- Press ▲ / ▼ button to select MANUAL option, and then press number or ◀ / ▶ button to select the program that the user wants the tuned channels to store.
- Press ▲ / ▼ button to select the items, and then press ◀ / ▶ button to select the setting.
bar
MANUAL | Category | Count | |---|---| | CHANNEL | 1 | | COLOR SYSTEM | AUTO | | SOUND SYSTEM | AUTO | | SEARCH | 55 | | FINE TUNING | 25 | | STORE | 0 |CHANNEL: choose channels by pressing ◀ / ▶.
COLOR SYSTEM: choose [AUTO], [PAL], [SECAM] by pressing ◀ / ▶.
SOUND SYSTEM: choose [AUTO], [B/G], [D/K], [L], [I], [L'] by pressing ◀ / ▶.
SEARCH: press ▶ to search receivable channels by pressing ◀ / ▶.
FINE TUNING: indicate searching programs by pressing ◀ / ▶.
STORE: store the found channel by pressing ◀ / ▶.
- After searching, press ▲ / ▼ button to select Store, and then press MENU button to store the searched channel.
- Press EXIT/INFO button to exit from the menu.
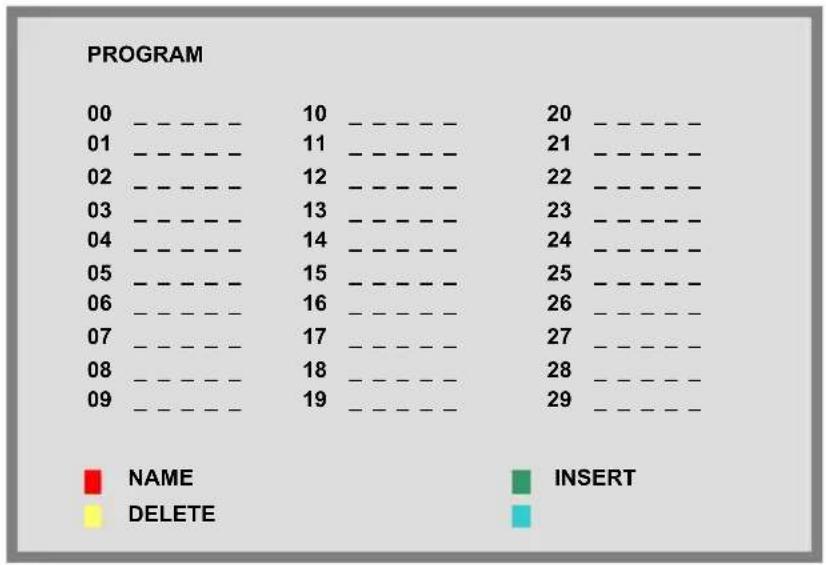
PROGRAM:
Program List is used to display the Program numbers and names. You can use this list to edit the name, delete, or insert programs.
- Select channel by pressing the ▲ / ▼ or ◀ / ▶ buttons. Selecting the program list will display the stored program on the screen.
- A highlighted gray bar appears on the chosen program. Press the red button (NAME).
- Press the ▲ / ▼ buttons to edit name of channel and ◀ / ▶ to move to next letter.
- Press the red button (STORE) when you have completed editing. This will store the program name..
Note: When the channel number changes, the TV channel shown on screen stores the program.
- Choose a program and press the green button (INSERT), the program is highlighted by red bar.
- Press ▲ / ▼ to select a program you would like to switch with the highlighted program.
- Press the green button to store.
- Choose a program, then press the yellow button (DELETE).
The program is highlighted by a red bar, and then press yellow button again to erase. To cancel, press blue button.
other
| | 10 | 20 | 21 | 22 | 23 | 24 | 25 | 26 | 27 | 28 | 29 | | ------ | ---- | ---- | ---- | ---- | ---- | ---- | ---- | ---- | ---- | ---- | ---- | | 00 | | | | | | | | | | | | | 01 | | | | | | | | | | | | | 02 | | | | | | | | | | | | | 03 | | | | | | | | | | | | | 04 | | | | | | | | | | | | | 05 | | | | | | | | | | | | | 06 | | | | | | | | | | | | | 07 | | | | | | | | | | | | | 08 | | | | | | | | | | | | | 09 | 19 | 29 | 29 | 29 | 29 | 29 | 29 | 29 | 29 | 29 | 29 |CHILD LOCK:
- Press the MENU button to display TV CHANNEL from the main menu.
- Press the ▲ / ▼ buttons to select CHILD LOCK option.
- Press the ◀ / ▶ buttons to enable / disable the function key of front cover.
[ON]: Function key is locked.
[OFF]: Function key is active.
FUNCTION
- Press the MENU button to display FUNCTION from the main menu.
- Press the ▲ / ▼ button to move to one of the sub-menu options.
- Press the ◀ / ▶ button to select the settings.
- Press the EXIT/INFO button to return to the previous screen.
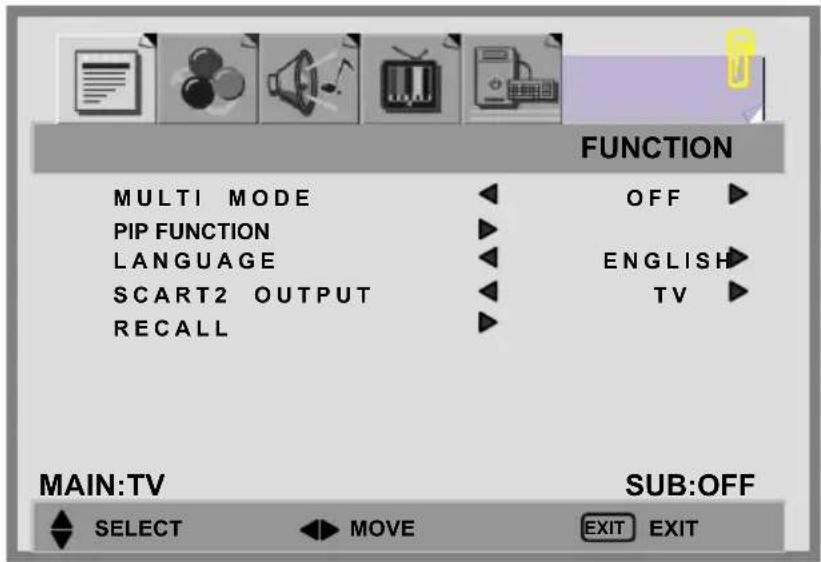
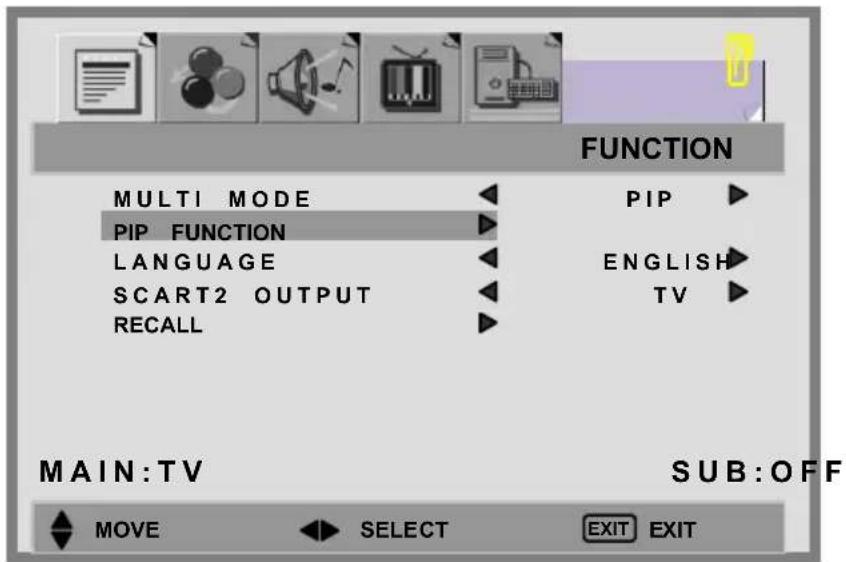
MULTI MODE:
- Press the ▼ button to select MULTI MODE option.
- Press the ◀ / ▶ button to select the [OFF], [PIP], [POP] mode.
[OFF]: Only show the primary source.(No PIP/POP)
[PIP] :Show PIP in a window.

natural_image
Blank gray rectangle with a small gray rectangular block on the left (no text or symbols)[POP] : Show PIP side by side with the main source.

natural_image
Two adjacent gray rectangles separated by a white horizontal bar, no text or symbols present.- Press the EXIT/INFO button to return to the previous screen.
PIP FUNCTION:
- Press the ▼ button to select PIP FUNCTION option.
- Press the ▶ button to enter PIP FUNCTION sub-menu.
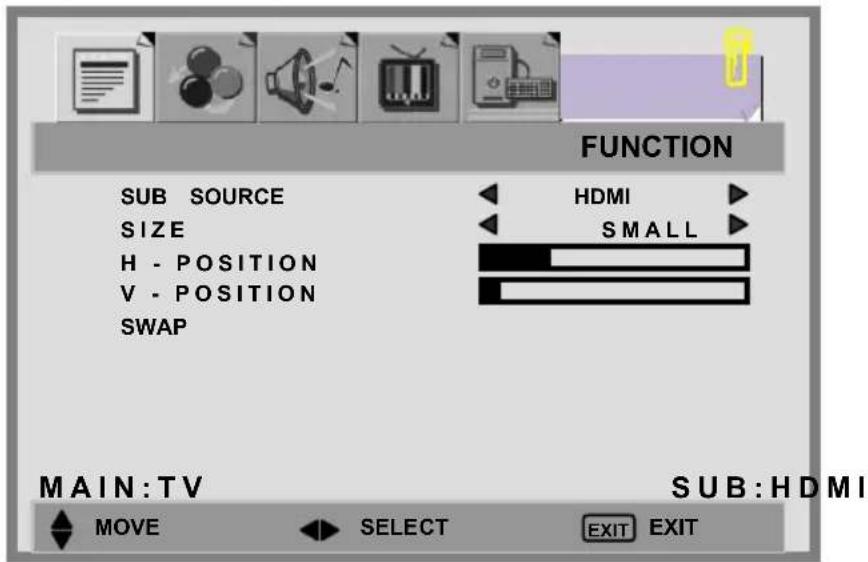
- Press the ▲ / ▼ button to move to one of the sub-menu items.
- Press the ◀ / ▶ button to select the settings.
SUB SOURCE: You can select a second source [HDMI], [DVI], [AV], [SV], [SCART 1], [SCART 2], [SCART 2S], [YPbPr], [PC], as sub-window.
SIZE: Three different PIP sizes. [SMALL], [MIDDLE], [LARGE].
H-POSITION / V-POSITION: Pressing the ◀ / ▶ button can make PIP window move from corner to corner on the TV screen.
SWAP: To exchange the display of main source and sub-source.
SCART 2 OUTPUT: choose the output. [SCART 1] or [TV].
RECALL: Reset to factory settings.
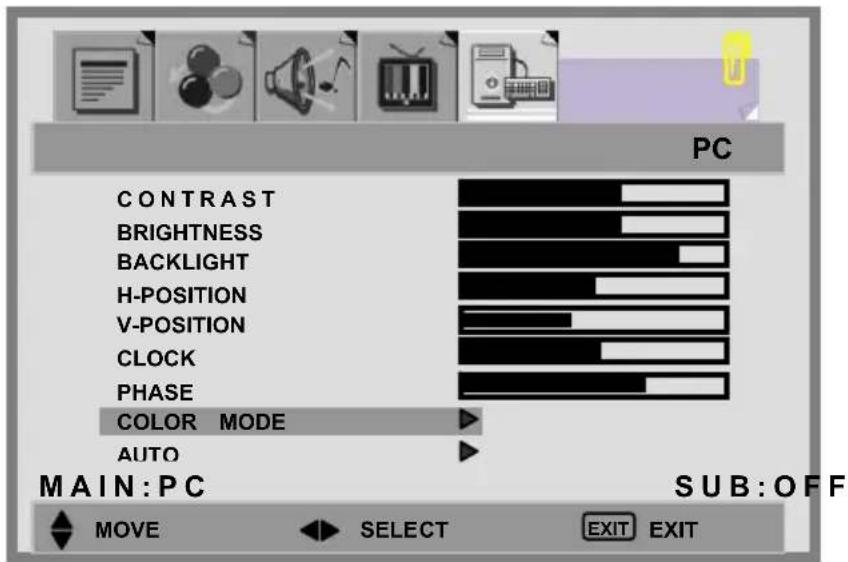
PC MENU
- Press the MENU button to display PC from the main menu.
- Press the ▲ / ▼ button to move to one of the sub-menu options.
- Press the ◀ / ▶ button to select the settings.
- Press the EXIT/INFO button to return to the previous screen.
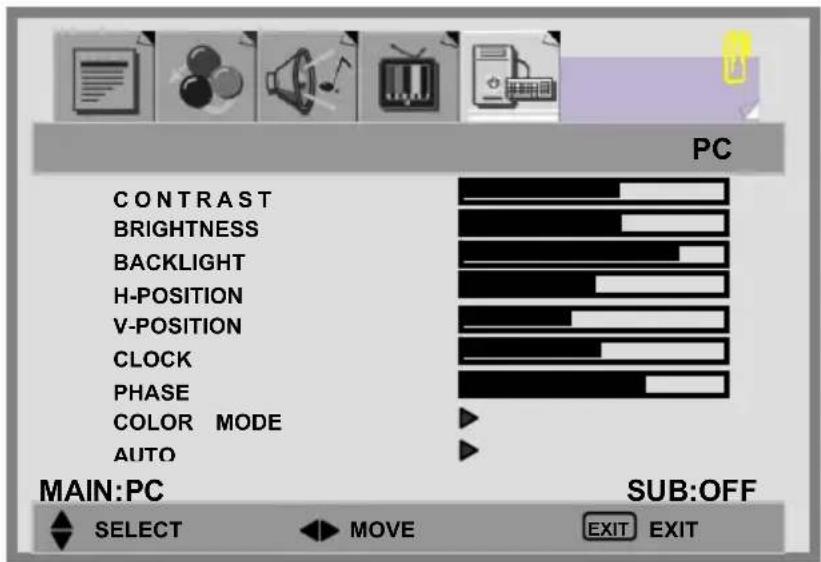
CONTRAST: Increase and decrease picture contrast
BRIGHTNESS: Darker and brighter picture brightness
BACKLIGHT: Adjust the back light level of screen
H POSITION: Adjust picture horizontal position.
Note: Not available in HDMI / DVI source.
V POSITION: Adjust picture vertical position.
Note: Not available in HDMI / DVI source.
CLOCK: Adjust picture width.
Note: Not available in HDMI / DVI source.
PHASE: Adjust picture focus quality.
Note: Not available in HDMI / DVI source.
COLOR MODE :
- Press the ▲ / ▼ buttons to select COLOR MODE option, and then press the ▶ button to enter the COLOR TEMP. sub-menu.
- Press the ▶ button to choose the color of picture mode. [NORMAL], [WARM], [COOL], [MANUAL].
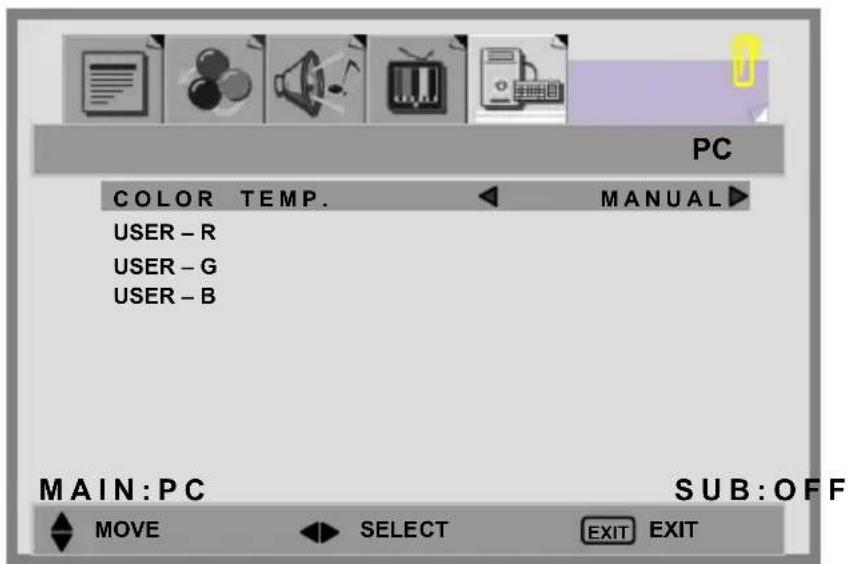
- Press ▲ / ▼ buttons to move USER-R/G/B and then press the ▶ button to enter the desired setting.
USER-R: adjust color of red rate.
USER-G: adjust color of green rate.
USER-B: adjust color of blue rate.
AUTO: Automatically adjust picture. Press the ▶ button to adjust picture position automatically. Screen will disappear until it has completed adjustment.

NICAM/IGR BROADCAST SELECTION
Depending on the particular program being broadcast, you can press the SOUND button to listen to different language sources.
Under different systems, broadcast function will show differently.
I : sends the primary broadcast language to the loudspeakers.
II: sends the secondary broadcast language to the loudspeakers.
O : sends mono sound
⑩ : sends stereo sound
NICAM System
| Digital | Stereo | O |
| ∅ | ||
| Dual | O | |
| I | ||
| II | ||
| Mono | O | |
| I |
Two Carrier System
Teletext is a free service broadcast by some TV stations (dependant upon country) which gives up-to-the-minute information, news, weather, television programs, share prices, subtitles, and many other topics.
Note : No OSD adjustment apart from volume control will be available in teletext mode.
In teletext mode, NUMBER buttons, ◀ / ▶ and RTN buttons are used for Teletext function.
To operate TELETEXT
* Select a TV station on which Teletext is being transmitted.
* Press the ☐TELETEXT button once to make the Teletext screen appear
-Two page numbers, TV station name, date, and time are displayed on the screen headline. The first page number indicates your selection, while the second shows the current page being displayed.
* Press the ☐TELETEXT button again to switch off Teletext. The previous program will reappear.
Teletext Page Selection
- Enter the required Teletext page as a three digit number.
-The selected page number is displayed at the top left corner of the screen. The Teletext page counter searches until the selected page number is located, so that the desired page is displayed on the screen. - The ▲ / ▼ button can be used to select the preceding or following page.
- Fastext movement by the 4 coloured buttons.
-Four subject-heading pages can be selected quickly by pressing the corresponding coloured button Red, Green, Yellow, or Blue on the remote control handset.
Useful features for Teletext

INDEX
* Press this button to select the index page that displays the list of Teletext contents.

HOLD
The teletext page you have selected may contain more information than what is on the screen; the rest of the information will be displayed after a period of time on a sub-page.
* Press HOLD button to stop the automatic page change.
-The HOLD symbol will be displayed at the top left-hand corner on the screen and the automatic page change will be stopped.
* Press HOLD button again to continue.

UPDATE
In the Teletext mode, pressing UPDATE button will switch the screen to the TV mode while waiting for the next text page.
* Select required page number in Teletext mode.
* Press UPDATE button to switch to TV mode while waiting for the text page. A small blue box in which “---” shows appears in the upper left corner.
* When the required text page is found, the required page number appears in the blue box.
* Press UPDATE button again to revert to Teletext mode.

REVEAL
* Press this button once to display concealed information, such as solutions of riddles, puzzles, or a quiz.
* Press this button again to conceal the revealed answers.

EXPAND
Select double height text.
* Press this button to enlarge the top half of the page.
* Press this button again to enlarge the bottom half of the page.
* Press this button once more to return to the normal display.

TIME
* While watching a TV program with Teletext transmission press TIME button. The current time information will be displayed on the upper right corner of the screen.
* The time information will disappear after pressing TIME button again.
1. - ARC - Aspect Ratio Control (Modes available are dependant upon the current source)
* FULL: This mode expands the width of 4:3 video sources evenly to fill the 16:9 screen. There will be distortion at the centre of the screen as well as the edges.
* NORMAL: This sets the aspect ratio to 4:3 for traditional TV programs. There will be black bars at either side of the screen.
* PANORAMIC: Expands 4:3 video sources to fit the 16:9 screen by expanding the image at the edges of the screen. This creates less distortion at the centre of the screen.
* ZOOM 1: Some DVD movies may not fill the top and bottom of the screen. The 14:9 zoom function extends the height to fill the screen.
* ZOOM 2 : Same as"16:9 ZOOM", but the button edge of the screen pulls up a little for the subtitle purpose.
(In PC mode, only have FULL and NORMAL)
2. - APC - Automatic Picture Control
Press APC button on the remote control repeatedly to cycle through the APC settings. This is to adjust the brightness and contrast of screen.
* Movie: the contrast is around 0.51 times of standard mode.
* Manual: default brightness is around 0.91 times that of standard mode, and adjustment is available.
* Standard: the standard settings for the best picture.
* Bright: the contrast is around 1.37 times that of standard mode.
Many times, problems have simple causes. We would like to give you some tips to solve some common problems. Should these tips not help, please contact your dealer.
There is no picture and sound.
● Make sure the power cord is properly connected.
● Make sure the input mode is set correctly.
● Make sure the main power switch of the main unit is on.
There is no picture.
● Make sure the Contrast/Brightness is properly adjusted.
● Make sure all external devices are connected properly.
There is no sound.
● Make sure the volume is not set to minimum.
● Make sure the sound is not set to mute.
There is no picture or sound, just noise.
● The reception may be weak.
● Make sure the aerial is not disconnected.
Picture is not clear.
● The reception may be weak.
● Make sure the aerial is not disconnected.
Picture is too bright.
- Check the APC function setting.
- Check Contrast/Brightness adjustment.
The picture is too dark.
- Check the APC function setting.
- Check Contrast/Brightness adjustment.
Remote control does not work.
- Check the batteries in the remote control are not flat.
● Make sure the sensor window of TV set is not under strong lighting.
The picture is not sharp.
- Check the colour adjustment.
- Check the Sharpness adjustment.
The picture is jittery.
- Make sure the TV set isn't near Microwave Oven or other equipment.
The picture has double or triple image.
● Make sure the aerial is facing the right direction.
● There may be reflected signals from mountains or buildings.
The picture is spotty.
- There may be interference from automobiles, trains, high voltage lines, neon light, etc.
There are stripes on the screen or colours fade.
- Is the unit receiving interference from other devices?
Transmission of radio broadcasting station and transmission of amateur radio and cellular phones may also cause interference. - Place the unit as far apart as possible from devices that may cause possible interference.
12.PC INPUT PRESET TIMING TABLE
| Analog Input | |||||||
| No. | Mode Name | H-Resolution V-Resolution | H.Freq. (KHz) | V.Freq. (Hz) | H. Polarity | V. Polarity | Pixel CLK (MHz) |
| 1 | VGA 640 | * 480 31.469 | 59.940 - | - 25.175 | |||
| 2 | VGA 640 | * 480 37.500 | 75.000 - | - 31.500 | |||
| 3 | US TEXT | 720 * 400 3 | 1.472 70. | 100 - + | 28.325 | ||
| 4 | STB 768 | * 576 31.250 | 50.000 - | - 29.750 | |||
| 5 | SVGA 8 | 00 * 600 37.87 | 9 60.300 | + + 40.000 | |||
| 6 | SVGA 8 | 00 * 600 46.87 | 5 75.000 | + + 49.500 | |||
| 7 | XGA | 1024 * 768 | 48.363 60. | 000 - - | 65.000 | ||
| 8 | XGA | 1024 * 768 | 56.476 70. | 000 - - | 75.000 | ||
| 9 | WSGA | 1280 * 768 | 47.708 | 60.000 | + | - | 80.150 |
| 10 | WXGA | 1366 * 768 | 48.54 | 59.93 | + | + | 80 |
| 11 | UXGA | 1920 * 1080 | 66.587 | 59.934 | + | - | 138.50 |
* The resolution and frequencies displayed on the screen may not exactly match this list.
| ITEMS SPECIFICATION | ||
| Panel | Screen Size 42" TFT-L | CD Panel |
| Aspect Ratio 16:9 | ||
| Resolution | 1920 x 1080 | |
| Display Area (Opening) | 930.24 mm x 523.26 mm | |
| Display colors 16,7M colors (8 bits) | ||
| Contrast Ratio 1000 : 1 | (typ.) | |
| Brightness (center) 550 cd / m ^2 (typ.) | ||
| Viewing Angle (CR>10) | 176°(Hor.) / 176°(Ver.) | |
| Response Time (GTG) | 6.5 ms (typ.) | |
| TV Function | Broadcasting System PAL / SECAM | |
| Receiving Channel | B / G, D / K, I and L / L' (Multi-Europe) | |
| Sound System | NICAM / A2 (IGR) | |
| Data Broadcasting | Teletext 255 pages | |
| Auto Program Searching (APS) | ||
| Video Input | Video Colour System | PAL / SECAM / NTSC |
| AV1 (scart) | 21-pin SCART (RGB / CVBS / SVHS) x 2 | |
| AV2 (composite) | Composite (RCA jack) x 1 | |
| S-Video x 1 | ||
| AV3 (component) | Y Pb Pr (720p / 1080p , HDTV ready) x 1 | |
| AV4 (HDMI) | HDMI 19 pin x 1 (HDMI 1.0/HDCP 1.1) | |
| PC Input | DVI / HDCP Connection | DVI-D 24 pin x 1 (DVI 1.0 / HDCP 1.1) |
| VGA Connection | D-Sub 15 pin x 1 | |
| Scanning Frequency f | _H = 31.5 ~ 75KHz / f_v = 56 ~ 75Hz | |
| Audio Input | Audio 1 Scart | x 2 |
| Audio 2 | Composite x 1 | |
| S - Video x 1 | ||
| Audio 3 Component | x 1 | |
| Audio 4 PC x 1 | ||
| Video Output | SCART 1 TV x 1 | |
| SCART 2 TV / CVBS | (SCART 1) x 1 | |
| Composite(RCA jack) | TV x 1 | |
| Audio Output | Speaker ( build-in) | 15W + 15W (rms) @ THD < 10% |
| (10W+10W @ THD < 1%) | ||
| Line Out Left / Right / S/P DIF HDMI loop th | Subwoofer | |
| rough | ||
| Feature | OSD Language | English, French, German, Spanish, Italian, Finnish, Swedish, Dutch, Danish, Norwegian |
| Function Keys | Power, Source, Menu, Up/Down(Channel), +/-Volume), ARC/EXIT | |
| Video Performance | 3D Comb-filter, 3D De-interlace , Canal Plus, Teletext, Aspect Ratio Control (ARC) ,Auto Picture Control (APC), Video Enhance,Noise Reduction, Picture in Picture (PIP), Picture on Picture (POP) | |
| Audio Performance Equalizer, Subwoofer, Auto Volume Control (AVC) | ||
| Other Control Sleep Timer, Auto Power Off | ||
| Power | Power Supply AC 100V ~ 240V , 50 / 60Hz | |
| Power Consumption | 300 W | |
| Dimension W x H x D | 1067mm × 815mm × 270 mm | |
| Weight (net) | Without Accessories | 36.1kg |
Contenu:
CONTENU: ....I
1.SÉCURITÉ ET PRÉCAUTIONS .... 1
2. INTRODUCTION....6
Réparation....6
natural_image
Black and white remote control with two cylindrical batteries on the right side (no visible text or symbols)natural_image
Technical diagram of a server rack with internal components and a cable, no visible text or symbolsTouches de fonction
natural_image
Vertical control panel with five circular buttons and a plus/minus indicator (no text or symbols)ARC/ EXIT
VOLUME
CANAL
MENU
SOURCE
POWER
VISUALISATION DES MENUS ET DE L'AFFICHAGE SUR L'ECRAN
natural_image
Blank white image with a small gray rectangular border on the left (no text or symbols)natural_image
Two adjacent rectangular blocks with black borders, one gray and one white, separated by a vertical split (no text or symbols)Manuale utente
natural_image
Black and white remote control with two cylindrical batteries beside it (no visible text or symbols)natural_image
Technical line drawing of a mechanical assembly with no visible text or symbolsTasti funzione
natural_image
Vertical control panel with five circular buttons and directional arrows (no text or symbols)ARC / EXIT
VOLUME
CANALE
MENU
SORGENTE
ACCENSIONE
Tasto APC (Automatic
Tasto Sorgente
natural_image
Blank white rectangle with a small gray rectangular block on the left (no text or symbols)natural_image
Two adjacent rectangular blocks with black borders, no text or symbols present.(Modes available are dependant upon the current source)

natural_image
Black and white remote control with multiple buttons and two cylindrical batteries (no visible text or symbols)natural_image
Technical diagram of a mechanical assembly with internal components and a cable, no visible text or symbolsFunktionstasten
natural_image
Vertical control panel with four circular buttons and a plus/minus indicator (no text or symbols)ARC / EXIT
VOLUME
CHANNEL
MENU
SOURCE
POWER
Betriebsanzeige:
Bei eingeschaltetem
Gerät leuchtet die
natural_image
Blank white image with a small gray rectangular border on the left (no text or symbols)natural_image
Two adjacent rectangular blocks with black borders, no text or symbols present.natural_image
Technical diagram of an electronic device with internal components and a cable, no visible text or symbolsTecla de función
natural_image
Vertical control panel with four circular buttons and a plus/minus indicator (no text or symbols)ARC/ EXIT
VOLUMEN
CANAL
MENÚ
FUENTE
ENCENDID
natural_image
Blank white image with a small gray rectangular border on the left (no text or symbols)natural_image
Two adjacent rectangular blocks, one gray and one white, with black borders (no text or symbols)INHOUDSOPGAVE: ....I
1. VEILIGHEIDSMAATREGELEN....1
Bedieningsveiligheid ....1
Reparatie....2
11.PROBLEEMOPLOSSING 46
12.TIMING VAN DE COMPUTERINGANG....48
13.SPECIFICATIES 49
1. VEILIGHEIDSMAATREGELEN
Handleiding
natural_image
Black and white remote control with two cylindrical batteries on the right side (no visible text or symbols)Afstandsbediening & Batterijen(AAA X2)

Voedingskabel
3. EXTERNE APPARATEN AANSLUITEN
Interface II VIDEOBOX