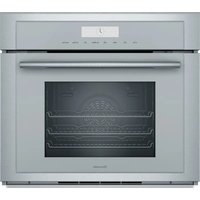
ME302YP - Oven THERMADOR - Free user manual and instructions
Find the device manual for free ME302YP THERMADOR in PDF.

User questions about ME302YP THERMADOR
0 question about this device. Answer the ones you know or ask your own.
Ask a new question about this device
Download the instructions for your Oven in PDF format for free! Find your manual ME302YP - THERMADOR and take your electronic device back in hand. On this page are published all the documents necessary for the use of your device. ME302YP by THERMADOR.
USER MANUAL ME302YP THERMADOR
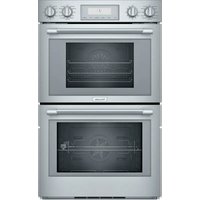
Built-in oven ME301YP ME302YP

natural_image
Top-down view of a black wok containing fried eggs and chopped corn and leafy greens on a wooden table, with a wooden spoon and small bowl nearby (no text or symbols visible)THERMADOR.COM
en-us
Table of contents
IMPORTANT SAFETY INSTRUCTIONS .... 4
Safety definitions .... 4
General information.... 4
Intended use.... 4
Restriction on user group.... 4
Safe use .... 4
Child safety.... 7
Cleaning function .... 7
Proper installation and maintenance.... 8
State of California Proposition 65 Warnings.... 9
Preventing material damage 10
General.... 10
Environmental protection and energy-saving..... .. 10
Disposal of packaging 10
Saving energy.... 10
Familiarizing yourself with your appliance .... 11
Appliance 11
Control panel.... 12
Basic features.... 12
Heating modes and functions .... 12
Oven cavity.... 14
Accessories.... 15
Other accessories 15
Safe use of oven racks 15
Inserting the wire rack.... 15
Inserting the telescopic rack .... 15
Before using for the first time .... 16
Cleaning the appliance before using it for the first time.... 16
Setting the clock.... 16
Pairing your oven with Home Connect® .... 16
Basic Operation 17
Setting the heating mode and temperature ..... 17
Temperature range by heating mode ..... 17
Heating time limitation.... 17
Fast preheat 17
Turning the panel lock on or off.... 17
Timer functions 17
Kitchen timer 17
Oven timer.... 18
Delay cook 18
Sabbath mode.... 18
Basic settings.... 20
Overview of the basic settings .... 20
Changing the basic settings .... 20
Oven temperature offset.... 20
Auto convection conversion.... 20
Home Connect® 21
Home Connect® setup 21
Remote start.... 22
Home Connect® settings.... 22
Setting remote control.... 23
Remote diagnostics .... 23
Software update 23
Data Protection .... 23
Wi-Fi module 23
Getting the most out of your appliance.... 24
Rack positions .... 24
Getting the best results.... 24
General tips for heating modes .... 24
Cleaning and maintenance.... 26
Cleaning agents 26
Self clean function.... 27
Maintenance.... 28
Eliminating faults.... 31
Malfunctions .... 31
Disposal.... 33
Disposal of your old appliance .... 33
Cooking charts.... 33
Customer support.... 36
Contacting customer support .... 36
Product number (E-Nr.), production number (FD)
and Z-Nr. 37
Rating plate location .... 37
Filters, cleaners, accessories and parts .... 37
Home Connect®.... 37
STATEMENT OF LIMITED PRODUCT WARRANTY. .. 37
What this warranty covers & Who it applies to.... 37
How long the warranty lasts.... 37
Repair/replace as your exclusive remedy .... 37
Out of warranty product .... 38
Warranty exclusions.... 38
Obtaining warranty service .... 38

IMPORTANT SAFETY INSTRUCTIONS
READ AND SAVE THESE INSTRUCTIONS
Please read the safety information to ensure that you use the appliance safely.
Safety definitions
Here you can find explanations of the safety signal words used in this manual.
⚠ WARNING – Risk of injury!
This indicates that death or serious injuries may occur as a result of non-observance of this warning.
CAUTION – Risk of injury!
This indicates that minor or moderate injuries may occur as a result of non-observance of this warning.
NOTICE!
This indicates that damage to the appli-ance or property may occur as a result of non-compliance with this advisory.
Note: This alerts you to important information and/or tips.
General information
Here you can find general information about this manual.
■ This manual is intended for the user of the appliance.
■ Please read this manual carefully.
- Observe the safety instructions and warnings.
- Keep the manual and the product information in a safe place for future reference or for the next owner.
- Check the appliance for damage after unpacking it. Do not connect the appliance if it has been damaged in transit.
Intended use
Read all information about this appliance, including its intended use.
Only a licensed professional may connect appliances without plugs. The manufacturer is not responsible for damage caused by incorrect connections. An incorrect connection is not covered by the Statement of Limited Product Warranty.
Only use this appliance:
■ as specified in this Use and Care Guide.
■ to prepare meals and drinks.
■ in private households (non-commercial).
Restriction on user group
Avoid placing children and vulnerable persons at risk.
■ This appliance is not intended for use by persons (including children) with reduced physical, sensory or mental capabilities, or lack of experience and knowledge, unless they have been given supervision or instruction concerning use of the appliance by a person responsible for their safety.
■ Do not let children play with the appliance.
- When children become old enough to use the appliance, it is the responsibility of the parents or legal guardians to ensure that they are instructed in safe practices by qualified persons.
■ Children should be supervised to ensure that they do not play with the appliance.
Safe use
Follow these safety instructions when using the appliance.
Risk of injury
⚠ WARNING – Risk of injury!
When properly cared for, your new appliance has been designed to be safe and reliable.
▶ Read all instructions carefully before use. These precautions will reduce the risk of burns, electric shock, fire, and injury to persons.
- When using kitchen appliances, basic safety precautions must be followed, including those in the following pages.
Risk of fire
⚠ WARNING – Risk of fire!
■ If materials inside an oven or warming drawer should ignite, keep door closed.
▶ Turn off the appliance and disconnect the circuit at the circuit breaker box.

IMPORTANT SAFETY INSTRUCTIONS
READ AND SAVE THESE INSTRUCTIONS
■ A fire could occur during cooking.
▶ Always have a working smoke detector near the kitchen.
▶ Have an appropriate fire extinguisher available, nearby, highly visible and easily accessible near the appliance.
■ NEVER cover any slots, holes or passages in the oven bottom or cover an entire rack with materials such as aluminum foil.
- Doing so blocks air flow through the oven.
- Aluminum foil linings may also trap heat, causing a fire hazard.
■ Cooking fires can spread if extinguished incorrectly.
▶ Never use water on cooking fires.
■ Wear proper apparel. Loose-fitting or hanging garments, such as ties, scarves, jewelry, or dangling sleeves, should never be worn while using the appliance.
▶ Tie long hair so that it does not hang loose.
- Secure all loose garments, etc. before beginning.
■ In the event that personal clothing or hair catches fire, drop and roll immediately to extinguish flames.
■ Do not use water on grease fires.
▶ Smother fire or flame or use dry chemical or foam-type extinguisher.
Risk of fire
CAUTION – Risk of fire!
The oven vents are important for air circulation. Covering the oven vents will cause the oven to overheat. Refer to the appliance overview for the location of the oven vents.
→ "Familiarizing yourself with your appliance", Page 11
▶ Do not obstruct oven vents.
Risk of fire
⚠ WARNING – Risk of fire!
Grease and fat can ignite when heated.
- Keep the oven free from grease build up.
Risk of burns
⚠ WARNING – Risk of burns!
■ Use only dry potholders. Moist or damp potholders on hot surfaces may result in burns from steam.
- Do not let potholders touch hot heating elements.
▶ Do not use a towel or other bulky cloth.
■ DO NOT TOUCH HEATING ELEMENTS OR INTERIOR SURFACES OF OVEN - Heating elements may be hot even though they are dark in color. Interior surfaces of an oven become hot enough to cause burns.
▶ During and after use, do not touch, or let clothing, potholders, or other flammable materials contact heating elements or interior surfaces of oven until they have had sufficient time to cool. Other surfaces of the appliance may become hot enough to cause burns. Among these surfaces are oven vent openings, surfaces near these openings and oven doors.
■ Exercise caution when opening the appliance.
▶ Standing to the side, open the door (or drawer) slowly and slightly to let hot air and/or steam escape.
- Keep your face clear of the opening and make sure there are no children or pets near the unit.
▶ After the release of hot air and/or steam, proceed with your cooking.
- Keep doors shut unless necessary for cooking or cleaning purposes.
▶ Do not leave open doors unattended.
Risk of burns
CAUTION – Risk of burns!
■ Use caution when cooking foods with high alcohol content (e.g. rum, brandy, bourbon) in the oven. Alcohol evaporates at

IMPORTANT SAFETY INSTRUCTIONS
READ AND SAVE THESE INSTRUCTIONS
high temperatures. There is a risk of burning as the alcohol vapors may catch fire in the oven.
▶ Use only small quantities of alcohol in foods, and open the oven door carefully.
■ The oven racks and the oven cavity surfaces become very hot during cooking.
- Place oven racks in the desired positions before turning oven on.
▶ Always use oven mitts when the oven is warm.
▶ If a rack must be moved while the oven is hot, do not let oven mitts contact hot heating elements.
▶ Use caution when removing oven racks from the lowest rack position to avoid contact with the hot oven door.
Risk of injury
⚠ WARNING – Risk of injury!
■ Malfunctions can cause injuries.
▶ Do not operate this appliance if it is not working properly, or if it has been damaged. Contact an authorized service provider.
■ Storage in or on appliance - The use of corrosive chemicals in heating or cleaning will damage the appliance and could result in injury.
▶ Flammable materials, corrosive chemicals, vapors or non-food products should not be stored or used in an oven or on or near surface units.
▶ The appliance is specifically designed for use when heating or cooking food.
■ This appliance is intended for normal family household use only.
- It is not approved for outdoor use.
▶ See the Statement of Limited Product Warranty. If you have any questions, contact the manufacturer.
■ Using this appliance other than for its intended use can cause fire or injury to persons.
▶ Use this appliance only for its intended use as described in this manual.
▶ NEVER use this appliance as an space heater to heat or warm the room. Doing so may result in overheating the appliance.
▶ Never use the appliance for storage.
■ TO REDUCE THE RISK OF INJURY TO PERSONS IN THE EVENT OF A GREASE FIRE, OBSERVE THE FOLLOWING
▶ SMOTHER FLAMES with a close-fitting lid, cookie sheet, or metal tray, then turn off the burner. BE CAREFUL TO PREVENT BURNS. If the flames do not go out immediately, EVACUATE AND CALL THE FIRE DEPARTMENT.
▶ NEVER PICK UP A FLAMING PAN – You may be burned.
▶ DO NOT USE WATER, including wet dishcloths or towels – a violent steam explosion will result.
▶ Use an extinguisher ONLY if:
- You know you have a Class ABC extinguisher, and you already know how to operate it.
- The fire is small and contained in the area where it started.
- The fire department is being called.
- You can fight the fire with your back to an exit.
- Do not heat or warm unopened food containers.
▶ Build-up of pressure may cause the container to burst and cause injury.
- Injury and damage to the appliance may occur if control knobs are not used properly.
▶ Operate control knobs as described in this manual.
■ Cooking or roasting bags might explode.
- Follow the manufacturer's directions when using cooking or roasting bags.
Risk of injury
⚠️ CAUTION – Risk of injury!
■ To avoid possible injury or damage to the appliance, ensure rack is installed exactly per installation instructions and not backwards or upside down.

IMPORTANT SAFETY INSTRUCTIONS
READ AND SAVE THESE INSTRUCTIONS
■ Do not place food directly on the oven cavity bottom.
■ In the event of an error the display flashes and beeps continuously.
▶ Disconnect appliance from the power supply and call an authorized service provider.
Risk of electric shock
⚠ WARNING – Risk of electric shock!
- In the event of a malfunction, it might become necessary to turn of the power supply.
▶ Have the installer show you the circuit breaker or fuse. Mark it for easy reference.
■ Penetrating moisture may cause an electric shock. - Do not use any steam cleaners or high-pressure cleaners to clean the appliance.
■ If the appliance or the power cord is damaged, this is dangerous.
▶ Never operate a damaged appliance.
▶ Never operate an appliance with a torn or fractured surface.
▶ Call after-sales service.
▶ Repairs to the appliance must only be performed by qualified personnel trained for this purpose.
Child safety
Risk of injury
⚠️ CAUTION – Risk of injury!
- Do not store items of interest to children in cabinets above a range or on the back-guard of a range. Children climbing on the range to reach items could be seriously injured.
■ Do not leave children alone.
▶ Children should not be left alone or unattended in the area where the appliance is in use.
▶ They should never be allowed to sit or stand on any part of the appliance.
- When children become old enough to use the appliance, it is the responsibility of the parents or legal guardians to ensure that they are instructed in safe practices by qualified persons.
Risk of injury
⚠ WARNING – Risk of injury!
- Do not allow anyone to climb, stand, lean, sit, or hang on any part of an appliance, especially a door, warming drawer, or storage drawer.
This can damage the appliance, and the unit may tip over, potentially causing severe injury.
■ Do not allow children to use this appliance unless closely supervised by an adult.
▶ Children and pets should not be left alone or unattended in the area where the appliance is in use. They should never be allowed to play in its vicinity, whether or not the appliance is in use.
Cleaning function
Follow these safety instructions when using the cleaning function.
Risk of injury
⚠ WARNING – Risk of injury!
■ During the elimination of soil during self-cleaning, small amounts of carbon monoxide can be created and the fiberglass insulation could give off very small amounts of formaldehyde during the first several cleaning cycles.
▶ To minimize exposure to these substances, provide good ventilation with an open window, or use a ventilation fan or hood.
■ The oven heats up to very high temperature during self cleaning. Opening the door can result in injury.
- When self-cleaning, confirm that the door locks and will not open.
▶ If the door does not lock, do not run self clean. Contact Customer support.

IMPORTANT SAFETY INSTRUCTIONS
READ AND SAVE THESE INSTRUCTIONS
Risk of harm to health
⚠️ CAUTION – Risk of harm to health!
Remove broiler pans, pots, and other utensils and excess spillage before self-cleaning.
Risk of injury
CAUTION – Risk of injury!
Birds have very sensitive respiratory systems.
- Keep pet birds out of the kitchen or other rooms where kitchen fumes could reach them.
▶ During self clean, fumes are released that may be harmful to birds.
▶ Other kitchen fumes such as overheating margarines and cooking oils may also be harmful.
Proper installation and maintenance
Risk of electric shock
⚠ WARNING – Risk of electric shock!
■ To avoid electrical shock hazard, before servicing the appliance, turn power off at the service panel and lock the panel to prevent the power from being switched on accidentally.
■ Proper installation - Improper installation or grounding can cause electric shock.
- This appliance must be properly installed and grounded by a qualified technician.
- Connect only to properly grounded outlet.
▶ Refer to installation instructions for details.
■ User servicing
▶ Do not repair or replace any part of the appliance unless specifically recommended in this manual.
▶ All other servicing should be referred to an authorized service provider.
■ Light socket is live when door is open if main power supply is not turned off.
▶ Turn off main power supply at the service panel before changing the light bulbs.
Risk of injury
⚠ WARNING – Risk of injury!
■ Make sure the appliance and lights are cool and power to the appliance has been turned off before replacing the light bulb(s). Failure to do so could result in electrical shock or burns.
- The lenses must be in place when using the appliance.
▶ The lenses serve to protect the light bulb from breaking.
▶ The lenses are made of glass. Handle carefully to avoid breaking. Broken glass can cause an injury.
■ Failure to follow these instructions when removing the oven door may lead to personal injury or product damage.
▶ Make sure oven is cool and power to the oven has been turned off before removing the door.
√ Failure to do so could result in electrical shock or burns.
▶ The oven door is heavy and parts of it are fragile. Use both hands to remove the oven door.
▶ The door front is glass. Handle it carefully to avoid breakage.
▶ Grasp only the side of the oven door. Do not grasp the handle.
√ It may swing in your hand and cause damage or injury.
√ Failure to grasp the oven door firmly and properly could result in personal injury or product damage.
▶ To avoid injury from hinge bracket snapping closed, be sure both levers are securely in place before removing the door.
▶ Do not force the door open or closed.
√ The hinge could be damaged and cause damage or injury.

IMPORTANT SAFETY INSTRUCTIONS
READ AND SAVE THESE INSTRUCTIONS
▶ Do not lay the removed door on sharp or pointed objects as this could break the glass. Lay it on a flat, smooth surface, positioned so that the door cannot fall over.
State of California Proposition 65 Warnings
This product may contain a chemical known to the State of California, which can cause cancer or reproductive harm. Therefore, the packaging of your product may bear the following label as required by California:
STATE OF CALIFORNIA PROPOSITION 65 WARNING:

WARNING
Cancer and Reproductive Harm - www.P65Warnings.ca.gov
IMPORTANT SAFETY NOTICE: The California Safe Drinking and Toxic Enforcement Act requires the Governor of California to publish a list of substance known to the state to cause cancer, birth defect or other reproductive harm, and requires businesses to warn customers of potential exposure to such substances. The burning of gas cooking fuel and the elimination of soil during self-cleaning can generate small amounts of carbon monoxide. The fiberglass insulation in self clean ovens gives off very small amounts of formaldehyde during the first several cleaning cycles. California lists formaldehyde as a potential cause of cancer. Carbon monoxide is a potential cause of reproductive toxicity. Exposure to these substances can be minimized by:
■ Providing good ventilation when cooking with gas.
■ Providing good ventilation during and immediately after self-cleaning the oven.
- Operating the unit according to the instructions in this manual.
Preventing material damage
To prevent material damage to your appliance, accessories or any other objects in your kitchen, follow these instructions.
General
Follow these instructions when using the appliance.
NOTICE!
- The presence of objects on the oven cavity bottom will cause heat to build up. The baking and roasting times will no longer be correct and the enamel will be damaged.
- Do not cover the oven cavity bottom with any sort of foil or greaseproof paper.
- Do not place accessories on the oven cavity bottom.
■ If aluminum foil comes into contact with the door pane, it could cause permanent discoloration.
- Do not allow aluminum foil in the oven cavity to come into contact with the door pane.
- When the oven cavity is hot, any water inside it will create steam. The change in temperature may cause damage.
▶ Never pour water into the oven cavity when it is still hot.
- Never place cookware containing water on the oven cavity bottom.
■ The prolonged presence of moisture in the oven cavity leads to corrosion.
- Allow the oven cavity to dry after use.
- Do not keep moist food in the oven cavity for a long time with the door closed.
▶ Do not store food in the oven cavity.
■ Leaving the appliance to cool down with the door open will damage the front of neighboring kitchen units over time.
▶ Always allow the oven cavity to cool down with the door closed after cooking at high temperatures.
▶ Take care not to trap anything in the appliance door.
▶ Only leave the oven cavity to dry with the door open if a lot of moisture was produced during operation.
■ Fruit juice dripping from the baking tray leaves stains that cannot be removed.
- When baking very juicy fruit flans, do not pack too much on the baking tray.
▶ If possible, use the deeper universal pan.
■ If the seal is very dirty, the appliance door will not close properly when the appliance is in operation. This may damage the front of adjacent kitchen units.
▶ Do not clean the door gasket.
■ Sitting or placing objects on the appliance door may damage it.
- Do not place or hang objects on the appliance door.
- Do not place cookware or accessories on the appliance door.
■ With certain models, accessories may scratch the door pane when closing the appliance door.
▶ Always push accessories fully into the oven cavity.
- Carrying the appliance by the door handle could break it. The door handle cannot support the weight of the appliance.
- Do not carry or hold the appliance by the door handle.
Environmental protection and energy-saving
Protect the environment by using your appliance in a way that conserves resources and by disposing of reusable materials correctly.
Disposal of packaging
The packaging materials are environmentally compatible and can be recycled.
- Sort the individual components by type and dispose of them separately. Information about current disposal methods can be obtained from your specialist dealer or local authority.
Saving energy
If you follow these recommendations, your appliance will use less energy.
Only preheat the appliance if the recipe or the recommended settings tell you to do so.
+ Not preheating the appliance can reduce the energy used by up to 20%.
Use dark-colored, black-coated or enameled baking pans.
+ These types of baking pans absorb the heat particularly well.
Open the appliance door as little as possible during operation.
+ This will maintain the temperature in the oven cavity and eliminate the need for the appliance to reheat.
When baking multiple dishes, do so in succession or in parallel.
+ The oven cavity is heated after baking the first dish. This reduces the baking time for the second cake.
If the cooking time is relatively long, you can switch the appliance off 10 minutes before the cooking time ends.
+ There will be enough residual heat to finish cooking the dish.
Remove any accessories that are not being used from the oven cavity.
+ Accessories that are not being used do not need to be heated.
Allow frozen food to defrost before cooking.
+ This will save the energy that would otherwise be required to defrost it.
Familiarizing yourself with your appliance
Familiarize yourself with the parts of your appliance.
Appliance
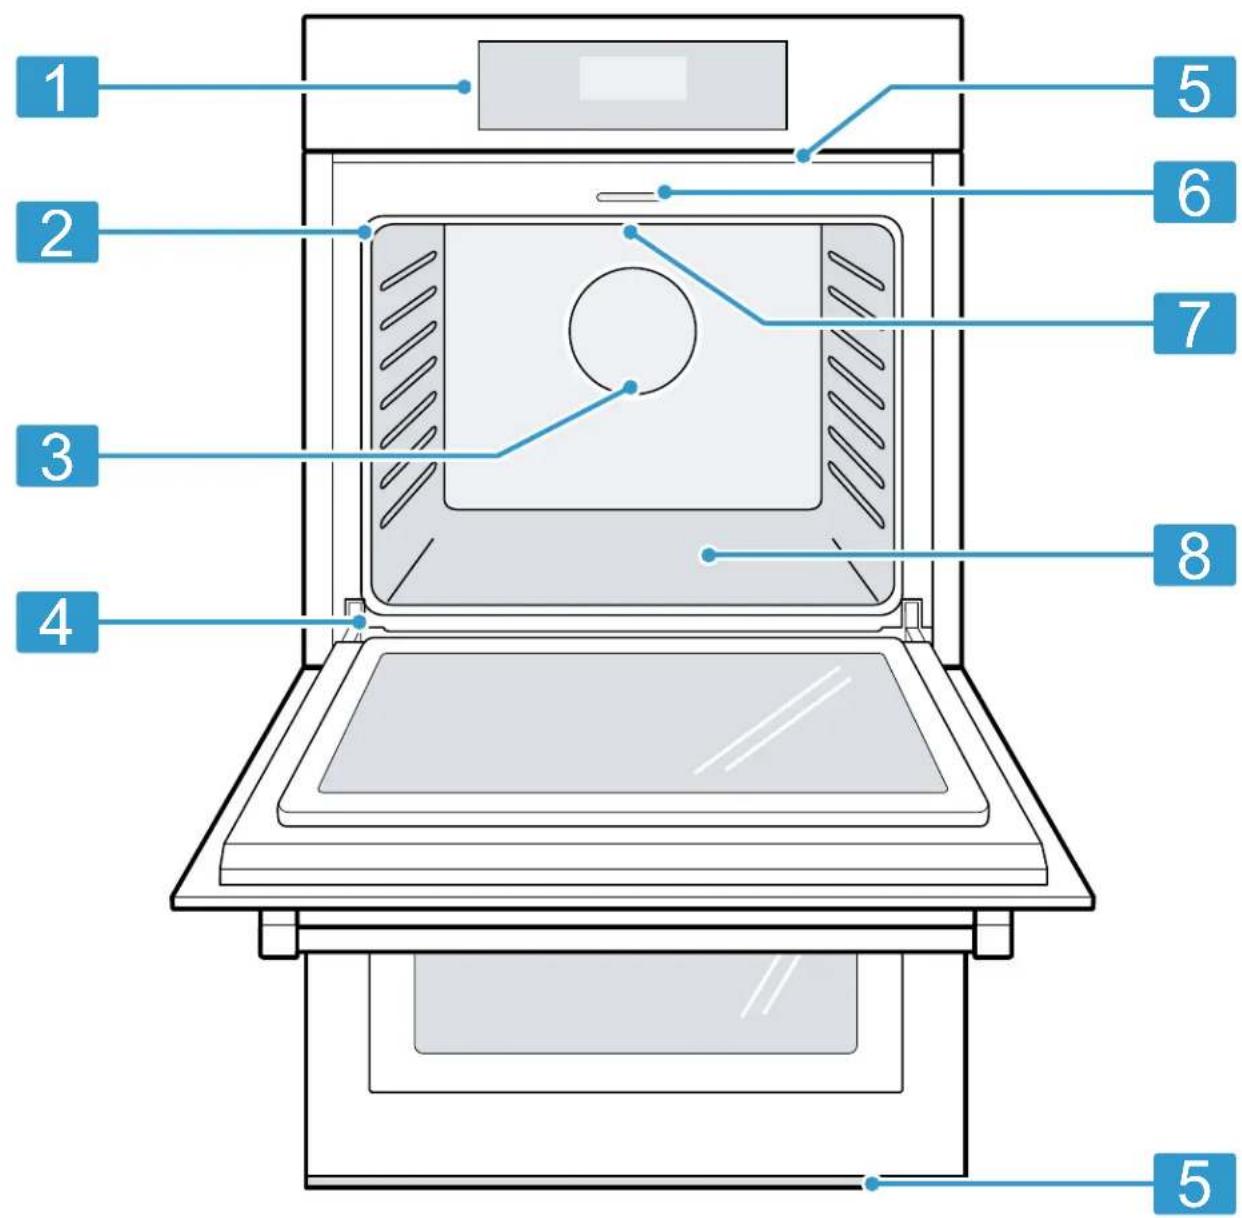
Here you can find an overview of the parts of your appliance.
text_image
1 2 3 4 5 6 7 8 51 Control panel
2 Door gasket
3 Convection fan
4 Door hinge (left and right)
5 Oven vent
6 Door latch
7 Broil element
8 Oven cavity bottom
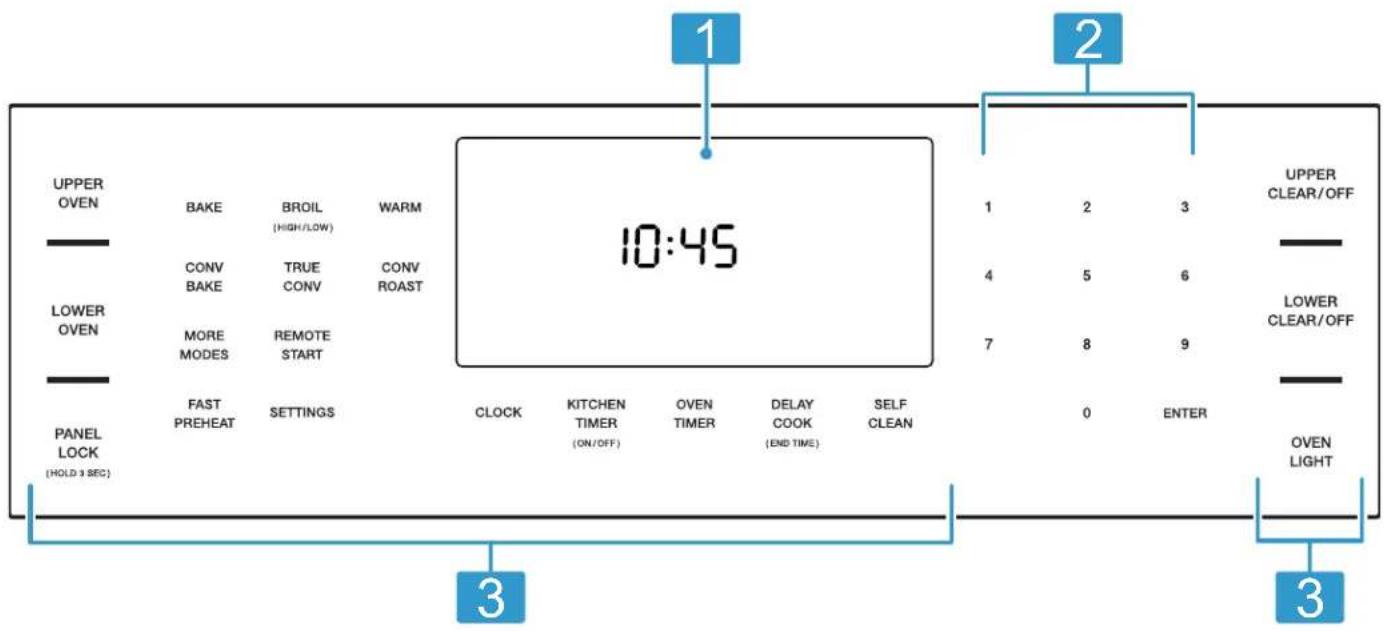
Control panel
You can use the control panel to configure all functions of your appliance and to obtain information about the operating status.
Note: The control panel graphics are representative. Your oven may have different graphic appearances.
flowchart
graph LR
    A["10:45"] --> B["1"]
    A --> C["2"]
    A --> D["3"]
    A --> E["3"]
    F["UPPER OVEN"] --> G["BAKE"]
    F --> H["BROIL (HIGH/LOW)"]
    F --> I["WARM"]
    J["LOWER OVEN"] --> K["CONV BAKE"]
    J --> L["TRUE CONV"]
    J --> M["CONV ROAST"]
    N["PANEL LOCK (HOLD 3 SEC)"] --> O["FAST PREHEAT"]
    N --> P["SETTINGS"]
    Q["CLOCK"] --> R["KITCHEN TIMER (ON/OFF)"]
    Q --> S["OVEN TIMER"]
    Q --> T["DELAY COOK (END TIME)"]
    Q --> U["SELF CLEAN"]
    V["1"] --> W["2"] --> X["3"] --> Y["UPPER CLEAR/OFF"]
    Z["4"] --> AA["5"] --> AB["6"] --> AC["LOWER CLEAR/OFF"]
    AD["7"] --> AE["8"] --> AF["9"]
    AG["0"] --> AH["ENTER"]
    AI["OVEN LIGHT"] --> AJ["3"]
1 Display Depending on your oven model the display shows information on the currently active modes and features. In standby mode the display shows the time of day.
2 Numeric keypad Used for entering numeric values, such as timer values.
3 Touch keys Touch keys are touch sensitive areas. You only have to press on the keys lightly to operate them. The touch keys will not work if you press several of them at once, such as when cleaning them.
Basic features
Here you can find information on the basic operating features of your oven.
This Use and Care Guide covers several models. Your model may have some but not all of the touch keys listed.
Touch key Function
| CLEAR/OFF Main switch. Clear settings or turn the oven on or off. |
| UPPER OVEN Select upper oven cavity to change settings. |
| LOWER OVEN Select lower oven cavity to change settings. |
Touch key Function
| UPPER OVEN CLEAR/OFF | Clear settings or turn off upper oven cavity. |
| LOWER OVEN CLEAR/OFF | Clear settings or turn off lower oven cavity. |
| OVEN LIGHT While the oven door is closed, press the oven light keypad to turn the light on and off. When the oven door is opened, the oven light will automatically turn on.During self clean the oven light cannot be turned on. | |
| CLOCK Set the time of day. | |
Heating modes and functions
Here you can find a list of heating modes and other features of your appliance.
This Use and Care Guide covers several models. Your model may have some but not all of the features or displays listed.
Button / Mode Symbol Mode How it works and what it is used for
| BAKE Bake Cooks with dV. heated air. | For a variety of foods, such as cakes, cookies, pastries, quick breads, quiche and casseroles.→ "How to use bake mode", Page 24 |
| Button / Mode Symbol Mode How it works and what it is used for | ||
| CONV BAKE Convection | Similar to bake, but air is circulated by a fan at the back of the oven. Best for baked goods such as cakes, cornbread, pies, quick breads, tarts, and yeast breads.→ "How to use convection bake mode", Page 25 | |
| TRUE CONV Multi-rack convection / true | convection | Well suited for cooking individual serving-sized foods such as cookies and biscuits. It is also good for cooking on multiple racks (2 or 3) at the same time. Baking cookies is possible on 6 racks simultaneously.→ "How to use convection multi-rack/true convection mode", Page 25 |
| BROIL Broil high intensity | Broil low intensity | Use for tender cuts of meat 1" (2.5 mm) or less thick, poultry, browning bread and casseroles.→ "How to use broil mode", Page 25 |
| CONV BROIL Convection | Combines intense heat from upper element with fan circulation. Use for tender cuts of meat more than 1" (2.5 mm) thick, poultry and fish. Not for browning.→ "How to use convection broil mode", Page 26For some models, press MORE MODES to access this mode. | |
| WARM Warm Maintains | temperature in order to keep food hot. | Best for baked goods such as cakes, cornbread, pies, quick breads, tarts, and yeast breads.→ "How to use warm mode", Page 26 |
| ROAST Roast Best suited | meats, poultry, less tender cuts of meats and roasting vegetables.→ "How to use roast mode", Page 25For some models, press MORE MODES to access this mode. | |
| CONV ROAST Convection | Past Uses intense heat and air circulated by a fan. Use for tender cuts of meat and poultry and roasting vegetables. Meats are more juicy and moist than results with roast mode.→ "How to use convection roast mode", Page 25 | |
| PROOF Proofing dough | tains the warm, non-drafty environment needed for proofing yeast leavened products.→ "How to use proof mode", Page 26 | |
| PIZZA | Pizza | Heat is circulated throughout the oven by the convection fan. Use for fresh or frozen pizza.→ "How to use pizza mode", Page 25For some models, press MORE MODES to access this mode. |
| MORE MODES | More modes | Some models have a more modes button for accessing additional heating modes.Depending on your model these may include:■ Convection broilIn the More Modes section Convection Broil has two choices HI/LO.Press the #2 to change■ Pizza■ Proof■ Roast |
| REMOTE START | Remote start | Allows user to start, pause, and abort oven programs remotely via the Home Connect® app on a mobile device.→ "Home Connect® ", Page 21 |
| DELAY COOK | Delay cook | Allows the oven to be programmed to finish a timed cooking mode at a predetermined time.→ "Delay cook", Page 18 |
| FAST PREHEAT | Fast preheat | Fast preheat heats the oven quicker than standard preheat.→ "Fast preheat", Page 17 |
| SABBATH | Sabbath | The Sabbath mode enables those of particular faiths to use their ovens on the Sabbath.→ "Sabbath mode", Page 18 |
| SELF CLEAN | Pyrolytic self-cleaning | The oven reaches a high temperature to burn off food soil.→ "Self clean function", Page 27 |
| HOME CONNECT | Home Connect® feature → "Home Connect®", Page 21 | |
| Wi-Fi on | ||
| Wi-Fi off | ||
| KITCHEN TIMER | Kitchen timer The kitchen timer is a countdown timer that has no affect on oven heating. The kitchen timer is used for general kitchen timing needs.→ "Kitchen timer", Page 17 | |
| OVEN TIMER Oven timer The oven timer is a countdown timer which upon reaching 00:00 turns the oven off, stopping the current mode. The oven timer is used to set how long a mode will run.→ "Oven timer", Page 18 | ||
| SETTINGS Press to access the settings. | → "Basic settings", Page 20 | |
| PANEL LOCK → "Turning the panel lock on or off", Page 17 | ||
Oven cavity
Here you can find information about the features of the oven cavity.
CAUTION
Risk of injury!
Do not place food directly on the oven cavity bottom.
Convection fan
Convection baking uses a fan to circulate the oven's heat evenly and continuously within the oven. This improved heat distribution allows for even cooking and excellent results using multiple racks at the same time.
Cooling fan
The cooling fan runs during all cooking modes. The fan can be heard when it is running, and warm air may be felt as it is released from the oven vent. The fan may also run after the oven is off.
Oven vent
Warm air may be released from the oven vent before, during and after cooking. It is normal to see steam escaping from the vent, and condensation may collect in this area. This area may be warm when the oven is in use.
CAUTION
Risk of fire!
The oven vents are important for air circulation. Covering the oven vents will cause the oven to overheat. Refer to the appliance overview for the location of the oven vents.
→ "Familiarizing yourself with your appliance", Page 11
▶ Do not obstruct oven vents.
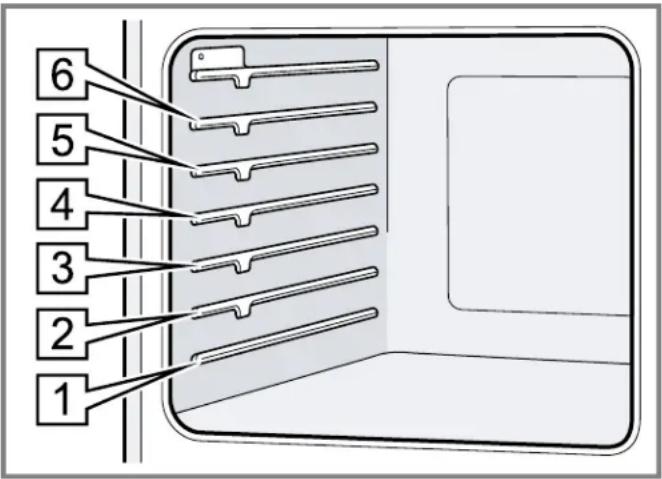
Rack positions
Your oven has six rack positions. The rack positions are counted from bottom to top. Use rack positions 1 through 6 only. DO NOT attempt to use the top guide to support an oven rack.
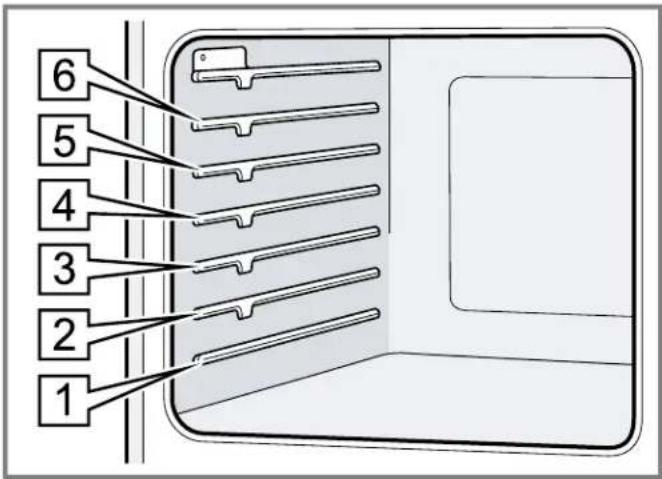
text_image
1 2 3 4 5 6Rack position Best for
| 6 Broiling hamburgers and 1" (2.5 cm) steaks |
| 5 Broiling 1 12 " (4 cm) steaks, toasting bread, broiling most meats, melting cheese |
| 4 Thicker meats |
| 3 Broiling poultry, most baked goods on a cookie sheet or baking pan using a single rack, includes frozen convenience foods, cakes, casseroles, frozen pizza |
| 2 Small roasts or poultry, Bundt cakes, pies, breads |
| 1 Large roasts, turkey, angel food cake |
Accessories
Only use original accessories. These are designed especially for your appliance. Here you can find an overview of your appliance's accessories and how to use them.
Note: Accessories may become deformed if they get hot. Deformation has no effect on function. As the accessory cools down, it will regain its original shape.
The accessories supplied may differ depending on the appliance model.
Accessories Use
Wire rack ■ These racks can be used for most cooking.

■ You can use multiple racks at the same time.
Note: Do not clean using the SELF CLEAN function.
Telescopic rack Use with heavier dishes to make placement into
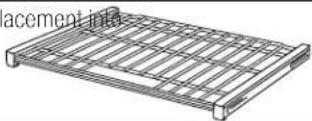
the oven easier.
Note: Do not clean using the SELF CLEAN function.
Other accessories
You can purchase other accessories from our customer service, specialist retailers or online.
You will find a comprehensive range of products for your appliance in our brochures and online: www.thermador.com
Accessories are appliance-specific. When purchasing them, always give the exact designation (E no.) of your appliance.
You can find out which accessories are available for your appliance in our online shop or from our customer service.
Safe use of oven racks
For your safety, follow these recommendations on how to use the oven racks correctly.
CAUTION
Risk of burns!
The oven racks and the oven cavity surfaces become very hot during cooking.
- Place oven racks in the desired positions before turning oven on.
▶ Always use oven mitts when the oven is warm.
▶ If a rack must be moved while the oven is hot, do not let oven mitts contact hot heating elements.
▶ Use caution when removing oven racks from the lowest rack position to avoid contact with the hot oven door.
CAUTION
Risk of injury!
To avoid possible injury or damage to the appliance, ensure rack is installed exactly per installation instructions and not backwards or upside down.
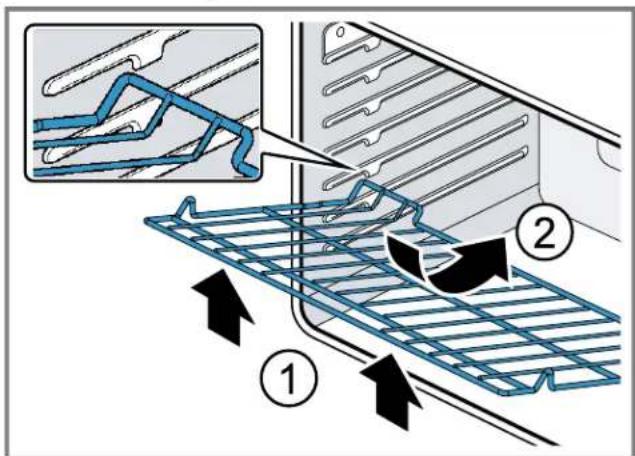
Inserting the wire rack
Requirement: You have read the recommendation on → "Safe use of oven racks", Page 15.
-
Grasp the rack firmly on both sides.
-
Tilt the rack up to allow the stop into rack guide ①
-
Bring the rack to a horizontal position and push it in the rest of the way ②
text_image
Diagram illustrating airflow or ventilation process with labeled components and directional arrowsThe rack should be straight and flat, not crooked.
Inserting the telescopic rack
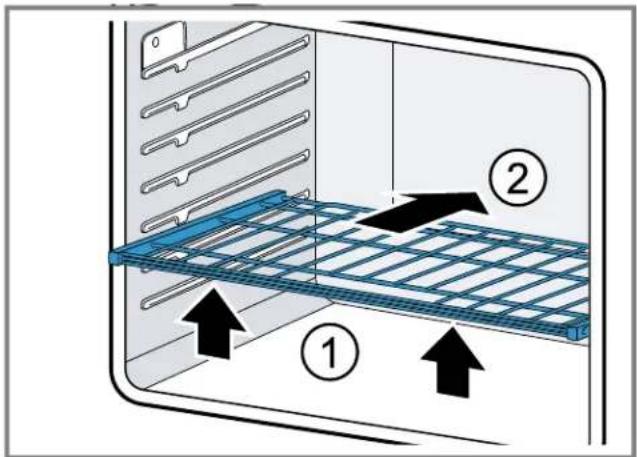
Requirement: You have read the recommendation on → "Safe use of oven racks", Page 15.
-
Slide the rack in evenly until the rear of the rack is about 2" (5 cm) from the back of the oven.
-
Tilt the front of the rack up about 3/4" (2 cm) ① and finish pushing the rack all the way back ②
text_image
Diagram showing a blue mesh panel inside a container with numbered arrows indicating direction of movement or assembly.Note: Avoid striking the oven light cover glass when pushing the rack into position.
√ The back of the telescopic rack drops in to place.
3. Pull the rack forward to engage the bottom of the rack onto the rear of the rack position guide.
4. Lower the front of the rack to finish seating it on the rack guide. The rack should feel stable when properly seated.
5. Slide the movable part of the telescopic rack in and out a few times to make sure it is able to move freely and that the non-moving part of the telescopic rack is securely anchored.
Removing a telescopic rack
- Lift the front of the telescopic rack assembly about 1/2" (1 cm) and push the rack to the rear about 3/4" (2 cm).
√ The rack can disengage from the rack position guide. - Lift the rear of the telescopic rack assembly so it clears the rack position guide and gently pull the rack from the oven.
Note: Do not pull the rack unevenly, this will cause it to bind during removal, catching on the oven walls.
Before using for the first time
Carry out these steps before using your appliance.
■ The appliance must be properly installed by a qualified service provider before use.
- Read and understand all "safety precautions" → Page 4 and information in the Use and Care Guide prior to operating.
■ Download the Home Connect® app to remotely control your appliance, get cooking inspiration, and access service tips and support.
■ This Use and Care Guide covers several models. Not all features are available to all models.
Cleaning the appliance before using it for the first time
Clean the oven cavity and accessories before using the appliance to prepare food for the first time.
- Remove all packaging materials from the oven cavity. For double ovens, check both oven cavities.
- Before heating the appliance, wipe the smooth surfaces in the oven cavity with a soft, damp cloth.
- Keep the room ventilated while the appliance is heating.
- Set the heating mode and temperature.
Heating mode Convection bake
Temperature maximum
Duration 1 hour
- Switch off the appliance after the specified cooking time.
- Wait until the oven cavity has cooled down.
- Clean the smooth surfaces with soapy water and a dish cloth.
- Clean the accessories using soapy water and a dish cloth or soft brush.
√ There may be a slight odor during first uses. This is normal and will disappear.
Setting the clock
The oven includes time functions that require the current time to be set.
Tip: Activate Home Connect® to set and maintain the clock automatically.
→ "Home Connect®", Page 21
Setting the clock
Requirement: The oven is in standby mode.
- Press CLOCK.
√ The display shows "SET CLOCK". - Press ENTER.
- Use the numeric keypad to enter the desired time. The numbers fill in from right to left. To enter 10:45, type 1, 0, 4, 5.
- Press ENTER.
Pairing your oven with Home Connect®
In order to utilize the full feature potential of the appliance, download the Home Connect® app on a smart device and pair the appliance to the home's Wi-Fi device.
- For step-by-step instructions, see → "Home Connect®", Page 21.
Basic Operation
Here you will find out everything you need to know about operating your appliance.
Setting the heating mode and temperature
-
For double ovens, press UPPER OVEN or LOWER OVEN to select the desired oven cavity.
-
Press the button for the desired heating mode.
√ The heating mode and the default temperature are displayed.
√ The temperature flashes to show it can be edited.
-
If desired, enter a temperature using the numeric keypad.
-
Press ENTER.
√ The oven begins to preheat. The preheat bar on the display begins to fill up.
Temperature range by heating mode
| Heating mode Lowest in °F (°C) Highest in °F (°C) | |
| Bake 100 (38) 550 (285) | |
| Roast 100 (38) 550 (285) | |
| Broil (low, high) 450 (230) 550 (285) | |
| Warm 150 (65) 225 (105) | |
| Proof 85 (30) 125 (52) | |
| Convection bake 100 (38) 550 (285) | |
| Convection multi-rack/True convection 100 (38) 550 (285) | |
| Convection roast 100 (38) 550 (285) | |
| Pizza 100 (38) 550 (285) | |
| Convection broil (low, high) | 450 (230) 550 (285) |
Heating time limitation
The maximum heating time is limited. If you forget to turn off the oven, it turns off automatically after a set period of time.
The maximum time for Sabbath mode is 74 hours. For all other heating modes the maximum allowed time is 24 hours.
| Temperature °F Temperature °C | Max. time allowed without activity | |
| 100 - 200 | 30 - 120 | 24 hours |
| 201 - 550 | 121 - 300 | 12 hours |
Fast preheat
With this function you can shorten the time the oven needs to reach the set temperature.
Fast preheat is available for the following heating modes:
■ bake
■ true convection / convection multi-rack
■ convection bake
■ convection roast
■ roast
- pizza
Fast preheat is not available for the following heating modes:
■ broil
■ convection broil
■ proof
warm
Setting fast preheat
- Set the desired heating mode.
Note: If fast preheat is not allowed for the selected heating mode an error tone sounds.
-
Enter the desired temperature using the numeric keypad.
-
Press FAST PREHEAT.
- To turn off fast preheat press FAST PREHEAT again.
Turning the panel lock on or off
With the panel lock you can disable all buttons on the control panel.
Requirement: The oven is in standby mode.
- Press and hold PANEL LOCK for 3 seconds.
- Press and hold PANEL LOCK again for 3 seconds to turn off the panel lock.
√ The display returns to standby mode.
Timer functions
Your appliance has various time setting functions.
Kitchen timer
The kitchen timer is a countdown timer that has no affect on oven heating.
You can set a kitchen timer value up to 99:59 hours.
Setting the kitchen timer
1. Press KITCHEN TIMER.
√ 0:00 blinks in the display.
- Enter the desired timer value in H/MM format using the numeric keypad.
3. Press ENTER.
√ The timer starts to count down.
√ When the kitchen timer has counted down an alarm tone sounds for 2 minutes.
√ Press KITCHEN TIMER to cancel the timer or to turn off the alarm tone.
Editing the kitchen timer
1. Press KITCHEN TIMER.
√ The current timer value blinks and can be edited.
-
Enter the desired timer value using the numeric keypad.
-
Press ENTER.
Oven timer
If you set an oven timer, operation of the oven stops automatically once this time has elapsed.
Setting the oven timer
The oven timer automatically ends a heating mode after a set period of time.
Note: The oven timer is not available for the heating modes broil, convection broil, proof, or self clean.
-
Set a heating mode and temperature.
-
Press OVEN TIMER.
-
Press ENTER.
-
Enter the desired timer value in H/MM format using the numeric keypad.
5. Press ENTER.
√ The oven timer starts to count down.
√ When the oven timer reached 0:00 the cooking mode ends and "OVEN TIMER FINISHED" is displayed.
√ The oven timer alarm tone sounds every 10 seconds for 2 minutes.
Delay cook
With this feature you can program your oven to finish a heating mode at a predetermined time.
CAUTION
Risk of harm to health!
Food might spoil when left standing for too long.
- To maintain food safety, do not leave food in the oven for more than one hour before or after cooking.
Setting delay cook
-
For double ovens: Press UPPER OVEN or LOWER OVEN to select the desired oven cavity.
-
Set a heating mode and temperature.
3. Press DELAY COOK.
- "ENTER COOK TIME" is displayed. - 0:00 blinks in the display.
-
Press ENTER.
-
Enter the desired cook time in H/MM format using the numeric keypad.
You can set a cook time of up to 11 hours and 59 minutes.
6. Press ENTER.
"ENTER END TIME" is displayed.
√ 00:00 blinks in the display.
- Enter the desired end time in H/MM format using the numeric keypad.
8. Press ENTER.
√ If you program delay cook while a heating mode is running, the heating mode turns off until the calculated start time is reached.
√ When the end time is reached the cooking mode ends.
√ An alarm tone sounds every 10 seconds for 2 minutes.
-
To change the timer values after the oven has been started, press DELAY COOK.
-
To cancel delay cook, press CLEAR/OFF. For double ovens, select the upper or lower oven cavity first.
Sabbath mode
The Sabbath mode enables those of particular faiths to use their ovens on the Sabbath.
■ Sabbath mode is only available in bake mode.
■ The temperature range may be set between 100^ F ( 38^ C) and 450^ F ( 230^ C).
■ You can set a duration of up to 74 hours.
■ Kitchen timer and oven timer are not available in Sabbath mode.
- Pressing any of the buttons while the oven is in Sabbath mode will have no effect.
■ If the oven light is on when Sabbath Mode is set, the light remains on. If it is off when Sabbath Mode is set, the light remains off.
- For double ovens: You can run Sabbath mode on one oven cavity or on both oven cavities at the same time. The two oven cavities share one Sabbath mode timer but you can set different temperatures for each oven cavity.
Setting the Sabbath mode
Requirement: No kitchen timer or oven timer is running, otherwise the display indicates that Sabbath mode is not available.
- For double ovens: Select the desired oven cavity.
- Set BAKE mode and a temperature within the allowed temperature range.
- Press ENTER to start the heating mode.
- Press and hold OVEN TIMER for 5 seconds.
√ In the Sabbath mode timer the default value 74:00 hours blinks.
- Set the desired time using the numeric keypad. If you want to keep the default value you do not have to enter anything.
6. Press OVEN TIMER.
√ Sabbath mode begins. If you do not press ENTER within 5 seconds Sabbath mode auto starts.
"SABBATH ON" is displayed.
"SAb" is displayed in the temperature display.
√ The timer counts down until it reaches :00, then "SAB-BATH" is displayed.
√ The heating mode ends, but the oven stays in Sabbath mode. No changes can be made at this point.
Tip: You can change the temperature while Sabbath mode is running. Enter the desired value with the numeric keypad and press ENTER. There is not visual or audible response to the input.
Canceling Sabbath mode
For single ovens: Press CLEAR/OFF. For double ovens: Press UPPER OVEN CLEAR/OFF or LOWER OVEN CLEAR/OFF. You have to cancel Sabbath mode for each oven cavity separately.
√ Sabbath mode is ended.
Basic settings
You can configure your appliance to meet your needs.
Overview of the basic settings
Here you can find an overview of the basic settings and factory settings. The basic settings depend on the features of your appliance.
Basic settings
| Menu item Description Settings | |
| Home Connect → "Home Connect®", Page 21 | |
| 1 Temperature unit ■ °F | 1°C |
| 2 Display brightness ■ High | 1MediumLow |
| 3 Volume ■ High | 1MediumLowOff |
| 4 Clock mode ■ 12-hour/12HR | 124-hour/24HR |
| 5 Auto convection conversionDecreases the set oven temperature by 25°F for convection bake and convection multi-rack/true convection heating modes. | OnOff |
| 6 Button beepTone when a button is pressed. | OnOff |
| 7 Standby clock display ■ On | 1Off |
| 8 Language ■ EN | 1FR |
| 9 Temperature offsetSets the temperature offset value for bake, convection bake, roast, convection roast and convection multi-rack/true convection. When an offset value is entered, the actual oven temperature is increased or decreased by this value. This feature is useful if food is either too brown or too light. | Between +/- 35°F (+/- 19 °C) in 1° increments0' |
^1 Factory setting (may vary according to model)
Changing the basic settings
1. Press SETTINGS.
√ The display shows "HOME CONNECT SETTINGS".
2. Press SETTINGS to enter the settings menu.
3. Press SETTINGS to cycle through the settings list.
4. Press ENTER to access the menu for a setting.
5. Enter the desired value with the numeric keypad.
√ The new value is automatically accepted as the display reverts from edit mode back to standby mode.
- Press CLEAR/OFF to leave the basic settings menu.
Oven temperature offset
The oven is calibrated to provide accurate results. This feature is useful if you prefer your foods lighter or darker.
■ When an offset temperature is selected, the actual oven temperature is raised or lowered by this value.
■ Do not use residential oven thermometers to evaluate oven temperatures as they will fluctuate throughout cooking.
- You can set a temperature offset in the basic settings menu. Repeat the process until a satisfactory result is achieved. Each time you enter the temperature offset in the basic settings menu, the temperature offset is restored to zero and you can set a new value.
Auto convection conversion
Convection bake and convection multi-rack modes require a 25°F reduction in temperature. Auto convection conversion reduces the temperature you enter automatically.
■ Simply enter the package or recipe temperature when setting the mode. The control calculates the correct temperature and it is shown in the display.
Home Connect®
This appliance is network-capable. Connecting your appliance to a mobile device lets you control its functions via the Home Connect® app, adjust its basic settings and monitor its operating status.
Home Connect® services are not available in every country. Availability of the Home Connect® function depends on the availability of Home Connect® services in your country. You can find information on this at: www.home-connect.com.
To be able to use Home Connect®, you must first set up the connection to the WLAN home network (Wi-Fi ^1 ) and to the Home Connect® app.
The Home Connect® app will guide you through the entire registration process. Follow the instructions in the Home Connect® app to make the settings.
Tips
■ Please consult the Home Connect® documents supplied.
- Please also note the information in the Home Connect® app.
Notes
- Please also note the safety information in this instruction manual and ensure that it is also observed when operating the appliance using the Home Connect® app.
- Operating the appliance on the appliance itself always takes priority. It is not possible to operate the appliance using the Home Connect® app during this time.
■ In networked standby mode, the appliance requires a maximum of 2 W.
Home Connect® setup
To implement settings via Home Connect®, you must have installed and set up the Home Connect® app on your mobile device.
Follow the steps specified by the app to implement the settings. The app must be open in order to perform the setup process.
Note: We are constantly working to improve the Home Connect® app, which may lead to differences in the setup steps. Please rely on the instructions in the latest version of the Home Connect® app to guide you through the setup process.
To help your pairing experience, follow the link for a quick 'how-to' video guide: www.thermador.com/us/home-connect/wifi-pairing-instructions
What do you need to connect your appliance to Home Connect®?
■ Your appliance must be installed properly.
■ A smartphone or tablet is equipped with the latest version of iOS or Android operating system.
- Your home appliance is within the Wi-Fi signal of your home network.
- You have the name of your Wi-Fi network (SSID) and its password (key) or access to the WPS button on your Wi-Fi router.
Downloading the Home Connect® app and creating a user account
- Open the App Store (Apple® devices) or Google Play™ store (Android™ devices) on your smartphone or tablet.
- Search for the Home Connect® (America) app published by BSH Home Appliances Corporation in the store's search.
- Open the app and register to create a Home Connect® account.
- Write down your Home Connect® account credentials (user account and password). You will need them later.
Save your Home Connect® login details here: - Network name (SSID):......
- Password
(Key):......
√ The app will guide you through the steps of adding your appliance to Home Connect®.
Automatically connecting your appliance to your home network
- Your appliance must be installed properly.
- Open your Home Connect® app to add an appliance.
- Please follow the directions in the app and refer to this guide only when prompted by the app.
Note
■ A router that has WPS functionality is required.
- You can begin connecting your appliance to a Wi-Fi network by pressing the REMOTE START touch key located on the control panel or by using the SET-TINGS.
Manually registering your appliance in the home network
- Press SETTINGS.
√ The first setting is "HOME CONNECT SETTINGS". - Press ENTER.
√ If no network has been established, the Home Connect® assistant will guide you. - Press ENTER to select the Home Connect® assistant.
- Follow the instructions in the app.
- Wait until "NETWORK CONNECTED" is shown on the display.
The connection may fail. The display will alert you to try again or connect automatically.
√ The appliance is ready to connect to the app. - Follow the instructions of the app on your mobile device for automatic network registration.
√ The process for registering is completed once "PAIRING SUCCESSFUL" is shown in the display.
Connecting your appliance to your home network with WPS
1. Press SETTINGS.
√ The first setting is "HOME CONNECT SETTINGS".
2. Press ENTER.
√ If no network has been established, the Home Connect® assistant will guide you.
3. Press ENTER to select the Home Connect® assistant.
4. Press SETTINGS to start the WPS network setup process.
5. Within 2 minutes press the WPS button on the router. Wait until "NETWORK CONNECTED" is shown in the display.
√ The connection may fail. In this case "CONNECTION FAILED" is shown on the display.
6. Return to the Home Connect® setup menu and try to connect manually.
√ The appliance is ready to connect to the app.
7. Follow the instructions of the app on your mobile device for automatic network registration.
√ The process for registering is completed once "PAIRING SUCCESSFUL" is shown in the display.
Remote start
If you want to start an oven operation using your mobile device, you must activate Remote Start.
WARNING
Risk of injury!
REMOTE OPERATION This appliance is configurable to allow remote operation at any time.
- Do not store any flammable materials or temperature sensitive items inside, on top or near surface units of the appliance.
Note
- For some models a permanent Remote start can be activated via the Home Connect® app. This function allows a remote start of the available operating modes without automatically deactivating Remote start.
- Remote start can only be activated if the Home Connect® set-up has been successfully completed.
■ Some operating modes can only be started on the oven itself.
Setting remote start
▶ Select REMOTE START.
Remote start is automatically deactivated 24 hours after remote start has been activated. When you start the oven operation on the appliance, remote start is automatically activated. You can therefore make changes from your mobile device or start a new operation.
√ □ appears in the display.
Home Connect® settings
Adapt Home Connect® to your needs.
You can find the Home Connect® settings in the basic settings for your appliance. Which settings the display shows will depend on whether Home Connect® has been set up and whether the appliance is connected to your home network.
Activating or deactivating Wi-Fi
You can use the Home Connect functions, if Wi-Fi is activated.
- Press SETTINGS to cycle through available options until "HOME CONNECT SETTINGS" is displayed.
- Press ENTER.
- Press SETTINGS to cycle through available options until "WI-FI ON" or "WI-FI OFF" is displayed.
- Press ENTER.
- Press 0 for turning Wi-Fi off, or 1 for turning Wi-Fi on.
"DEACTIVATING WI-FI" or "ACTIVATING WI-FI" is displayed.
Disconnecting from the network
You can disconnect your oven from the network at any time.
Note: If your oven is disconnected from the network, it is not possible to operate the oven using Home Connect®.
- Press SETTINGS to cycle through available options until "HOME CONNECT SETTINGS" is displayed.
- Press ENTER.
- Press SETTINGS to cycle through the available options until "NETWORK CONNECTED" is displayed.
- Press ENTER
"PRESS 0 TO DISCONNECT" is displayed.
5. Press 0.
"DELETING NETWORK" is displayed.
Connecting to the network
- Press SETTINGS to cycle through available options until "HOME CONNECT SETTINGS" is displayed.
- Press ENTER.
"PRESS ENTER FOR HC" is displayed.
3. Press ENTER to start the Home Connect® assistant.
4. Follow the instructions in the sections
→ "Manually registering your appliance in the home network", Page 21 or
→ "Connecting your appliance to your home network with WPS", Page 21.
Connecting to app
If the Home Connect® app is installed on your mobile device, you can connect it to your oven.
Requirement: The appliance is connected to the network.
- Press SETTINGS to cycle through available options until "HOME CONNECT SETTINGS" is displayed.
- Press ENTER.
"PRESS ENTER FOR HC" is displayed.
- Press SETTINGS to cycle through available options until "CONNECT TO HC APP" is displayed.
- Press ENTER.
"CONFIRM ON HC APP" is displayed.
- Confirm the connection on your Home Connect® app.
Setting remote control
You can use the Home Connect app to easily access the functions of your oven.
Note
-
Operating the appliance directly from the oven always has priority. During this time, it is not possible to operate the oven using the Home Connect® app.
■ The remote control is already activated when you connect your oven
If the remote control has been deactivated, only the oven's operating statuses will be displayed in the Home Connect® app.
■ The remote control is automatically activated when the remote start is activated. -
Press SETTINGS to cycle through available options until "HOME CONNECT SETTINGS" is displayed.
-
Press ENTER.
"PRESS ENTER FOR HC" is displayed.
3. Press SETTINGS to cycle through available options until "REMOTE CTRL DISABLED" or "REMOTE CTRL ENABLED" is displayed.
- Press ENTER.
"PRESS 1 REMOTE CTRL ON" or "PRESS 0 REMOTE CTRL OFF" is displayed.
5. Press 1 or 0 to switch remote control on or off.
Remote diagnostics
The after-sales services can access your appliance via Remote Diagnostics if you ask them to do so, if your appliance is connected to the Home Connect® server and if Remote Diagnostics is available in the country where you are using the appliance.
Tip: Further information and details about the availability of Remote Diagnostics in your country can be found in the Service/Support section of your local website: www.home-connect.com
Software update
Using the software update function, your oven's software can be updated, e.g. for the purpose of optimization, troubleshooting or security updates.
To do this, you need to be a registered Home Connect® user, have installed the app on your mobile device and be connected to the Home Connect® server.
As soon as a software update is available, you will be informed by the Home Connect® app, from which you will also be able to download the update. Once the update has been successfully downloaded, you can start installing it via the basic settings of your oven, or the Home Connect® app if you are on your local area network. The Home Connect® app will notify you once installation is complete.
Note
■ You can continue to use your oven as usual while updates are downloading.
■ Depending on your personal settings in the app, software updates can also be set to download automatically.
■ We recommend that you install security updates as soon as possible.
Data Protection
Please see the information on data protection.
The first time your appliance is registered on a home network connected to the Internet, your appliance will transmit the following types of data to the Home Connect® server (initial registration):
■ Unique appliance identification (consisting of appliance codes as well as the MAC address of the installed Wi-Fi communication module).
■ Security certificate of the Wi-Fi communication module (to ensure a secure data connection).
■ The current software and hardware version of your appliance.
■ Status of any previous reset to factory settings.
This initial registration prepares the Home Connect® functions for use and is only required when you want to use the Home Connect® functions for the first time.
Note: Please note that the Home Connect® functions can be utilized only with the Home Connect® app. Information on data protection can be called up in the Home Connect® app.
Wi-Fi module
FCC/IC Statements
| Model: COM2 |
| FCC ID: 2AHES-COM2 |
| IC ID: 21152-COM2 |
The Home Connect® Wi-Fi module is a communication device designed to provide communication between appliances and smart devices.
FCC COMPLIANCE STATEMENT
CAUTION
Risk of injury!
Changes or modifications not expressly approved could void your authority to use this equipment.
This device complies with Part 15 of the FCC Rules.
Operation is subject to the following two conditions:
■ This device may not cause harmful interference, and
- This device must accept any interference received, including interference that may cause undesired operation.
INDUSTRY CANADA STATEMENT
This device complies with Industry Canada license exempt RSS standard(s).
Operation is subject to the following two conditions:
■ This device may not cause interference, and
- This device must accept any interference, including interference that may cause undesired operation of the device.
Getting the most out of your appliance
Here, you can find tips on how best to use the heating modes and accessories of your oven. You can also find recommended settings for various dishes as well as the best accessories and cookware.
Download the Home Connect® app to access cooking tips and tricks, as well as get cooking inspiration.
Rack positions
Your oven has six rack positions. The rack positions are counted from bottom to top.
Use rack positions 1 through 6 only. DO NOT attempt to use the top guide to support an oven rack.
text_image
1 2 3 4 5 6Rack position Best for
| 6 Broiling hamburgers and 1" (2.5 cm) steaks |
| 5 Broiling 1 12 " (4 cm) steaks, toasting bread, broiling most meats, melting cheese |
| 4 Thicker meats |
| 3 Broiling poultry, most baked goods on a cookie sheet or baking pan using a single rack, includes frozen convenience foods, cakes, casseroles, frozen pizza |
| 2 Small roasts or poultry, Bundt cakes, pies, breads |
| 1 Large roasts, turkey, angel food cake |
Getting the best results
■ Minimize opening the oven door(s).
■ Use the rack position recommended by the recipe.
■ Use the bakeware recommended in the recipe.
■ Store pan(s) outside the oven. An extra pan without food affects the browning and cooking.
■ The type of pan used affects the browning.
- For tender, golden brown crusts, use light non-stick/anodized or shiny metal pans.
- For brown crisp crusts, use dark non-stick, anodized or dark, dull metal pans or glass bakeware. These may require lowering the bake temperature 25^ .
Preheating the oven
■ Most cooking times in recipes are designed for a preheated oven and require that the oven already be at a certain temperature before cooking starts. Refer to your recipe for preheating recommendations.
■ Preheating time depends on the temperature setting and the number of racks in the oven.
Bakeware type
■ Metal bakeware with or without a non-stick finish, heat-proof glass, glass-ceramic, pottery, or other utensils are suitable for the oven.
- Suitable cookie sheets have a small lip on one side. Heavy sheets or those with more than one side may affect the baking time.
Pan placement
- Allow at least 1" (2.5 cm) of space between the pans and the oven walls so heat can circulate around each pan.
- Stagger bakeware so that one is not directly above another. Allow 1 12 (4 cm) above and below each pan.
High altitude baking
When cooking at high altitudes, recipes and cooking times will vary. For accurate information, go to www.csuextstore.com, or write to the Extension Service, Colorado State University, Fort Collins, Colorado 80521. There may be a cost for the guides. Specify which high altitude food preparation guide you prefer: general information, cakes, cookies breads, etc.
Condensation
It is normal for a certain amount of moisture to evaporate from the food during any cooking process. The amount depends on the moisture content of the food. The moisture will condense on any surface cooler than the inside of the oven, such as the control panel.
General tips for heating modes
How to use bake mode
Use the bake mode to prepare a variety of food items, from pastries to casseroles. Refer to recipe or package directions for oven temperature and baking time.
Note
■ Fully preheat the oven before baking items like cakes, biscuits and breads.
■ BAKE is the best function to use for baking cakes on two racks.
- Allow at least 2" (5 cm) of space between bakeware for proper air circulation.
■ Dark or dull bakeware absorbs more heat than shiny bakeware, resulting in dark or over browned foods. It may be necessary to reduce oven temperature or cook time to prevent overbrowning of some foods.
■ Shiny pans are recommended for cakes, cookies, and muffins.
- Do not open oven door often. Opening the door will reduce the temperature in the oven and may increase cook time.
■ For cakes use rack positions 2 and 4. Stagger pans so that one is not directly above the other.
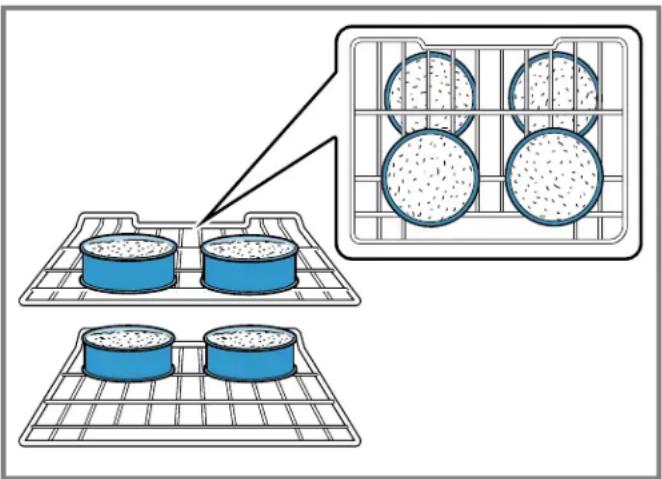
natural_image
Illustration showing three blue petri dishes on a grid with an inset of two circular samples, no text or symbols present.How to use convection bake mode
Use the convection bake mode for bar cookies and breads. This mode takes advantage of the bottom heat, yielding a better crust on baked items.
The benefits of convection bake include a slight decrease in cook time and a higher dough volume, for example yeast items rise higher with this mode.
Note
■ Reduce recipe temperature by 25^ F. Refer to the cooking chart.
■ Place food in shallow, uncovered pans, such as cookie sheets without sides.
■ If baking more than one pan on a rack, allow at least 1" to 1½" (2.5 to 4 cm) of air space around the pan.
- Allow at least 2" (5 cm) of space between bakeware for proper air circulation.
How to use convection multi-rack/true convection mode
Use convection multi-rack or true convection for cooking individual serving-sized foods such as cookies and biscuits. It is also good for cooking on multiple racks (2 or 3) at the same time.
The benefits of convection multi-rack include even browning and time savings as a result of using multiple racks at one time.
Note
■ Baking cookies is possible on 6 racks simultaneously. In this case, the baking time increases slightly.
■ Reduce recipe temperature by 25^ F if auto convection conversion is not activated.
■ Place food in low-sided, uncovered pans such as cookie sheets without sides.
■ If baking more than one pan on a rack, allow at least 1" to 1½" (2.5 to 4 cm) of air space around the pan.
■ Stagger pans so that one is not directly above the other.
How to use pizza mode
Note
Follow these recommendations:
■ There might be a slight decrease in baking time. Check before minimum package time.
- When baking a frozen pizza: For a crispy crust, place directly on the rack. For a softer crust, use a pizza pan.
- When proofing pizza dough, coat dough with olive oil and cover it in a bowl tightly with plastic wrap to prevent crust formation.
■ If par baking handmade pizza dough, prick the dough with a fork before baking.
■ If using a pizza pan, choose a dark, perforated pan for a more crisp crust and a non-perforated pan for a softer crust. - Preheat baking stones following manufacturer's recommendations while the oven is preheating.
- Bake homemade pizzas on rack position 2 in the center of the rack.
- Follow manufacturer's directions for frozen pizza.
■ The convection fan cycles on and off when using pizza mode.
How to use roast mode
Use roast mode for large cuts of meat and poultry.
Note
■ Preheating the oven is not necessary.
■ Use a high-sided broil pan or roasting pan. Cover dish with a lid or foil for less tender cuts of meat.
- For less tender cuts of meat, add liquids, such as water, juice, wine, bouillon or stock for flavor and moisture.
■ Roasting bags and using a liquid are suitable for use in this mode.
■ When roasting whole chicken or turkey, tuck wings behind back and loosely tie legs with kitchen string.
How to use convection roast mode
Use the convection roast mode for preparing tender cuts of meat and poultry. It is also suitable for roasting vegetables.
The benefits of convection roast mode include as much as 25% faster cooking than non-convection modes and rich, golden browning.
Note
■ Preheating the oven is not necessary.
■ Use the same temperature as indicated in the recipe.
- Check doneness early, since roasting time may decrease.
■ Do not cover meat or use cooking bags.
■ Use a broil pan with a rack and grid or a shallow, uncovered pan with a rack for roasting.
■ Use a meat thermometer to determine the internal temperature of the meat.
■ If the meat is browned to your liking, but is not yet done, foil can be placed over the meat to prevent overbrowning.
- Let meat stand covered with foil 10-15 minutes after removing it from the oven.
How to use broil mode
The broil mode uses intense heat radiated from the upper element. Use the broil mode for cooking thin, tender cuts of meat, 1" (2.5 cm) or less, poultry and fish. It can also be used to brown breads and casseroles..
Note
■ Always broil with the oven door closed.
■ Preheat the oven for 3 to 4 minutes. Do not preheat for more than 5 minutes.
■ Steaks and chops should be at least 34 " (2 cm) thick.
■ Use the broil pan and grid or a deep pan with a metal rack, for broiling.
- Do not cover the broil grid with foil. It is designed to drain fats and oils away from the cooking surface to prevent smoking and spattering.
■ Turn meats once during the recommended cook time. Fish does not need to be turned.
- When top browning casseroles, use only metal or glass ceramic dishes such as Corningware®.
■ Never use heat-proof glass, such as Pyrex®; it cannot tolerate the high temperature.
How to use convection broil mode
Use the convection broil mode for cooking thick, tender cuts of meat, poultry and fish. Convection broil is not recommended for browning breads, casseroles and other foods.
In addition to the benefits of standard broiling, convection broiling is faster.
Note
■ Always use convection broil with the oven door closed.
■ Preheat the oven for 3 to 4 minutes. Do not preheat for more than 5 minutes.
■ Steaks and chops should be at least 112 " (4 cm) thick.
■ Use the broil pan and grid or a deep pan with a metal rack, for broiling.
- Do not cover the broil grid with foil. It is designed to drain fats and oils away from the cooking surface to prevent smoking and spattering.
■ Turn meats once during the recommended cook time. Fish does not need to be turned.
- Never use heat-proof glass, such as Pyrex®; it cannot tolerate the high temperature.
How to use proof mode
Use the proof mode to raise yeast dough.
Note
■ Start with a cool oven when using the proof mode.
■ Allow frozen dough to thaw first.
- The ideal temperature for proofing will be maintained until the mode is turned off. Dough has proofed when it has doubled in size.
■ Loosely cover the bowl or pan and use any rack that accommodates the size of the container.
- Keep the door closed and use the oven light to check the rising of the dough.
Size Time in min.
| Loaf, 1 lb (4.5 kg) 60 - 75 |
| Rolls, 0.1 lb (50 g) 30 - 45 |
How to use warm mode
Use the warm mode to keep hot, cooked foods at serving temperature.
CAUTION
Risk of harm to health!
Food may perish when kept warm for too long.
▶ Do not use the warm mode to heat cold food.
▶ Be sure to maintain proper food temperature. The USDA recommends holding hot food at 140^ F ( 60^ C) or warmer.
▶ DO NOT warm food longer than one hour.
Note
■ ALWAYS start with hot food. DO NOT use this mode to heat cold food other than for crisping crackers, chips, and dry cereal.
■ Serving dishes, plates, and cups may be kept warm with this mode.
■ Foods that must be kept moist should be covered with a lid or aluminum foil.
■ Aluminum foil may be used to cover food. Use only heat-safe dishes.
■ DO NOT open the oven door unnecessarily. Opening the door will reduce the temperature of the oven.
■ When keeping cooked food warm, allow time for the oven to preheat before placing the item in the oven.
Cleaning and maintenance
To keep your appliance working efficiently for a long time, it is important to clean and maintain it carefully.
Cleaning agents
Only use suitable cleaning agents to avoid damage to the appliance surfaces.
You can be purchase suitable cleaners for your appliance online at http://www.bosch-home.com/us/shop or through our distributors in Canada.
→ "Customer support", Page 36
Brand names
■ The use of brand names is intended only to indicate a type of cleaner. This does not constitute an endorsement.
■ The omission of any brand name cleaner does not imply its adequacy or inadequacy.
■ Many products are regional in distribution and can be found in local markets.
■ It is imperative that all cleaning products be used in strict accordance with the instructions on its package.
Avoid these cleaners
Do not use commercial oven cleaners such as Easy Off®. They may damage the oven finish or parts. Chlorine or chlorine compounds in some cleansers are corrosive to stainless steel. Check ingredients on label. Never use scouring pads or abrasive cleaners.
WARNING
Risk of electric shock!
Penetrating moisture may cause an electric shock.
- Do not use any steam cleaners or high-pressure cleaners to clean the appliance.
Cleaning recommendations
Clean only those parts of you oven that are listed in this cleaning chart.
| Part Suitable cleaning method Recommendations | ||
| Flat rack■Wash with soapy water.■ Rinse thoroughly and dry, or gently rub with cleansing powder or soap-filled pads as directed. | ■ DO NOT CLEAN USING THE SELF CLEAN FUNCTION.■ If the flat racks remain in the oven during the self clean mode, they will loose their shiny finish and may not glide smoothly. If this happens, wipe the rack edges with a small amount of vegetable oil. Then wipe off excess oil. | |
| Telescopic rack■Wash with soapy water.■ Rinse thoroughly and dry, or gently rub with cleansing powder or soap-filled pads as directed. | ■ DO NOT CLEAN USING THE SELF CLEAN FUNCTION.■ Avoid getting cleansing powder in the telescopic slides. Re-lubrication may become necessary. Use only high-temperature food-grade lubricants to re-lubricate the slides. | |
| Door gasket None■DO NOT CLEAN THE DOOR GASKET. | ■ The door gasket is essential for a good seal. Care should be taken not to rub, damage, or move the gasket. | |
| Glass■Wash with soap and water or glass cleaner.■ Use Fantastik® on a clean sponge or paper towel and wipe clean. | Avoid using powder cleaning agents, steel wool pads and oven cleaners. | |
| Painted surfaces Clean with hot soapy water or apply Fantastik® to a clean sponge or paper towel and wipe clean. | Avoid using powder cleaning agents, steel wool pads and oven cleaners. | |
| Porcelain surfaces■Immediately wipe up acid spills like fruit juice, milk, and tomatoes with a dry cloth.■ When cool, clean with hot soapy water or apply Bon-Ami® or Soft Scrub® to a damp sponge. Rinse and dry.■ For stubborn stains, use soap-filled pads. | Do not use a moistened sponge/cloth on hot porcelain. It is normal for porcelain to show fine lines with age due to exposure to heat and food soil. | |
| Heat resistant enamel and polished components in the oven cavity | Use the self clean function for heavy soil-ing. | ■ These surfaces can become discolored over time. This is normal and does not affect operation.■ Do not use scouring pads or abrasive cleaners to treat discolorations. |
| Stainless steel surfaces■Clean with a soapy sponge, then rinse and dry, or wipe with Fantastik® sprays on a paper towel.■ Protect and polish with Stainless Steel Magic® and a soft cloth.■ Remove water spots with a cloth dampened with white vinegar.■ Remove heat discoloration with Bar Keeper's Friend®. | ■ Never allow food stains or salt to remain on stainless steel for any length of time.■ Always wipe or rub in the direction of the grain.■ Chlorine or chlorine compounds in some cleansers are corrosive to stainless steel. Check the ingredients on the label of the cleanser. | |
| Black stainless surfaces/anti-fingerprint surfaces■ Clean with a soft, dry towel.■ For stubborn dirt, use warm water diluted with a non-abrasive, mild cleansing soap. | Never use stainless steel polish. | |
| Plastic and controls When cool, clean with soapy water, rinse and dry. | ||
| Printed areas (words and numbers) | Do not use abrasive cleaners or petroleum based solvents. | |
Certain trademarks contained herein are third-party trademarks belonging to their respective owners. All others are trademarks of BSH Home Appliances Corporation or its affiliates.
Self clean function
With pyrolytic self cleaning the oven is heated to a very high temperature. Stubborn soil is burnt off and can be wiped out after self clean is finished. After the completion of a self-clean cycle, the oven will not allow you to start another self-clean cycle for 24 hours. For a double oven, if one cavity runs self clean, neither cavity may operate a self clean cycle for 24 hours.
Preparing self clean
WARNING
Risk of injury!
■ During the elimination of soil during self-cleaning, small amounts of carbon monoxide can be created and the fiberglass insulation could give off very small amounts of formaldehyde during the first several cleaning cycles.
▶ To minimize exposure to these substances, provide good ventilation with an open window, or use a ventilation fan or hood.
■ During the self clean cycle, parts of the appliance may become potentially harmful to persons who lack adult knowledge of appliances and adult reactions to potentially harmful conditions.
- Children should not be left alone or unattended in an area where appliances are in use.
■ The oven heats up to very high temperature during self cleaning. Opening the door can result in injury.
- When self-cleaning, confirm that the door locks and will not open.
▶ If the door does not lock, do not run self clean. Contact Customer support.
CAUTION
Risk of harm to health!
■ Remove broiler pans, pots, and other utensils and excess spillage before self-cleaning.
- Do not leave food or cooking utensils, etc., in the oven during the pyrolytic self-cleaning mode of operation.
CAUTION
Risk of fire!
The oven vents are important for air circulation. Covering the oven vents will cause the oven to overheat. Refer to the appliance overview for the location of the oven vents.
→ "Familiarizing yourself with your appliance", Page 11
▶ Do not obstruct oven vents.
NOTICE!
Do not clean parts or accessories with the self clean function.
-
Remove all accessories and racks from the oven.
-
Wipe out excessive spillage from the oven cavity.
Starting self clean
Requirements
■ All heating modes or timers are canceled.
■ You have carried out the steps for preparing the oven for self clean.
→ "Preparing self clean", Page 27
- For double ovens: Select the oven cavity you want to clean.
2. Press SELF CLEAN.
√ lights up on the display.
√ The default self clean time "4:00" blinks on the timer display.
- You can set a self clean time between 2 and 4 hours with the numeric keypad.
Tip: Use a longer setting for a heavily soiled oven.
4. Press ENTER.
√ The oven door locks blinks on the display and then remains lit until the oven has cooled down after self clean is finished.
"SELF CLEAN" lights up on the display.
√ The timer starts to count down.
√ When self clean is finished, the display shows 0:00. The oven remains locked until it has cooled down sufficiently. "COOLING DOWN" is displayed.
√ When the oven has cooled down the door unlocks and "SELF CLEAN FINISHED" is displayed.
5. Press CLEAR/OFF.
- Wipe the remaining ash from the oven with a moist cloth.
Canceling self clean
1. Press CLEAR/OFF.
"COOLING DOWN" is displayed.
√ The door remains locked.
√ When the oven has cooled down the door unlocks and "SELF CLEAN FINISHED" is displayed.
2. Press CLEAR/OFF.
- Wipe the remaining ash from the oven with a moist cloth.
Maintenance
Replacing an oven light bulb
When the oven light fails you can exchange the light bulbs.
WARNING
Risk of electric shock!
Light socket is live when door is open if main power supply is not turned off.
▶ Turn off main power supply at the service panel before changing the light bulbs.
WARNING
Risk of injury!
Make sure the appliance and lights are cool and power to the appliance has been turned off before replacing the light bulb(s). Failure to do so could result in electrical shock or burns.
- The lenses must be in place when using the appliance.
- The lenses serve to protect the light bulb from breaking.
- The lenses are made of glass. Handle carefully to avoid breaking. Broken glass can cause an injury.
Light bulb specifications by oven type
Refer to this chart for information on the light bulb you have to use for your oven model.
Oven type Bulb description Bulb image
One light per oven cavity 25 Watt, halogen bulb, G9 base, 120 Volts
Replacing a G9 base oven light with round glass cover
Requirements
■ "Refer to the oven light bulb chart for the oven light specification of your oven." → Page 28
■ "Follow the safety instructions on replacing a light bulb." → Page 28
-
Turn off the power to the oven at the main power supply (fuse or breaker box).
-
Remove the oven racks.
- Turn the glass cover counterclockwise to remove it ①
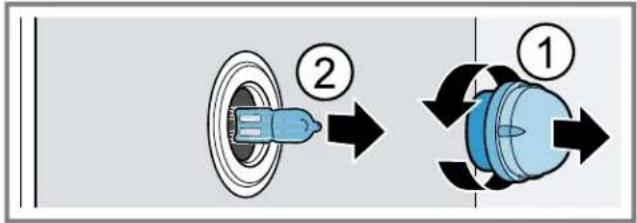
flowchart
graph TD
    A["Step ①"] --> B["Step ②"]
    B --> C["Arrow Direction"]
    C --> D["Step ①"]
    D --> E["Arrow Direction"]

text_image
Diagram showing a hand inserting a plug into a circular component with number 3, likely illustrating a medical or electrical installation.- Remove the old bulb by grasping and sliding the bulb straight back until the two prongs have cleared the ceramic holder ②
- Do not touch the glass of the new replacement bulb directly as oil from your fingers may cause the bulb to fail prematurely. Instead, grasp the replacement bulb with a clean dry cloth. Locate the two prongs in the ceramic holder, gently poking until the two prongs locate in the ceramic socket ③
- Press in to seat the bulb.
- Screw the glass cover back on.
- Turn on the circuit breaker.
Removing the oven door from bottom hinge conventional ovens
For ease of cleaning you can remove the oven door of bottom hinge ovens.
WARNING
Risk of injury!
Failure to follow these instructions when removing the oven door may lead to personal injury or product damage.
- Make sure oven is cool and power to the oven has been turned off before removing the door.
√ Failure to do so could result in electrical shock or burns. - The oven door is heavy and parts of it are fragile. Use both hands to remove the oven door.
- The door front is glass. Handle it carefully to avoid breakage.
- Grasp only the side of the oven door. Do not grasp the handle.
√ It may swing in your hand and cause damage or injury.
√ Failure to grasp the oven door firmly and properly could result in personal injury or product damage.
▶ To avoid injury from hinge bracket snapping closed, be sure both levers are securely in place before removing the door.
▶ Do not force the door open or closed.
√ The hinge could be damaged and cause damage or injury.
- Do not lay the removed door on sharp or pointed objects as this could break the glass. Lay it on a flat, smooth surface, positioned so that the door cannot fall over.
- Open the oven door to its fully open position.
- Flip levers on hinges toward you.
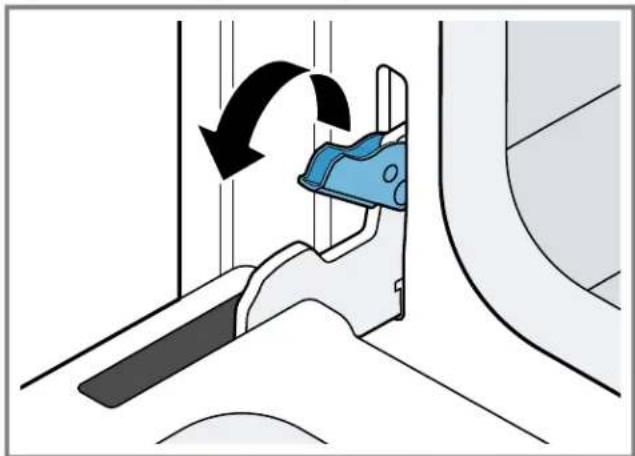
natural_image
Diagram of a car seatbelt mechanism with directional arrow indicating rotation (no text or symbols)If necessary, use a tool, such as a screwdriver, to gently pry the upper part of the lever away from the housing. Take care to avoid scratching the housing
- Bring both door hinge levers to their fullest down position. The left and right door hinges differ slightly but operate in the same manner.
- ⚠️ CAUTION - Risk of injury! Follow the instructions below to prevent the latch from slamming shut and pinching or cutting your hand.
Close the oven door until it catches on the hinge stop levers, locking the hinges at the proper angle for door removal.
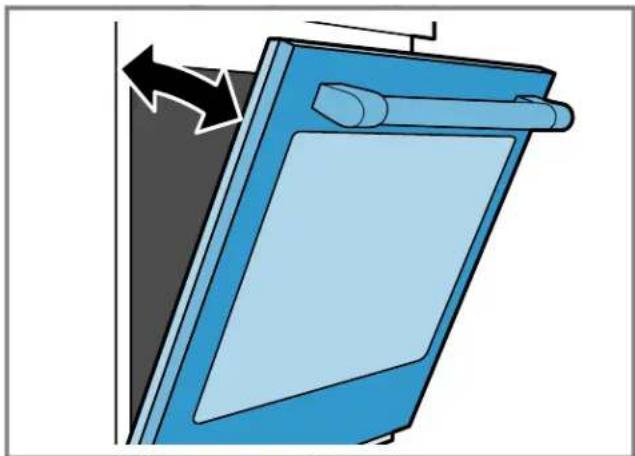
natural_image
Illustration of a blue electronic device with a scroll and arrow indicating left-side motion (no text or symbols)√ The door will be open about 7" (18 cm) at the top.
- ⚠️ CAUTION - Risk of injury! The door is heavy.
Do not grip the door by the handle. Use both hands to firmly grip it by the sides.
Maintaining the door angle, lift the door straight up approximately 3/4" (2 cm) to unhook the hinges from the slots and then pull it out towards you until the hinges are clear of the oven housing.
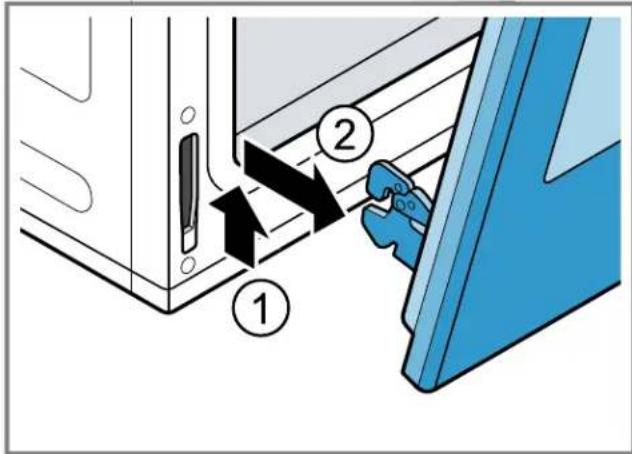
text_image
Diagram showing a mechanical assembly with labeled parts and directional arrows indicating motion or force directions.- Place the door in a convenient and stable location. Do not lay the door on its handle. This could cause dents or scratches.
Reinstalling the oven door
- Hold the door firmly in both hands. Grip it on either side, not by the handle.
- Tilt the door back slightly towards you until it opens about 7" (18 cm) at the top.
- Slide the hinges into the slots as far as they will go ① and lower the door straight down .②
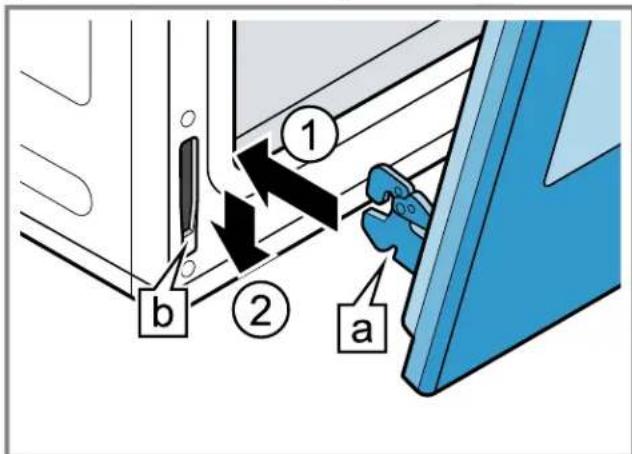
text_image
b ② ① aThe angle of the door may need to be adjusted slightly to allow the hinges to engage properly and the door to lower into place. The door should lower about 3/4" (2 cm) and stop. If it does not, the hinges have not engaged properly and the door could fall if it is released.
-
Once both hinges are fully engaged, gently open the door until it is fully open.
-
Push the levers on both the hinges up and forward until they are locked into the slot and flush with the front of the oven body.
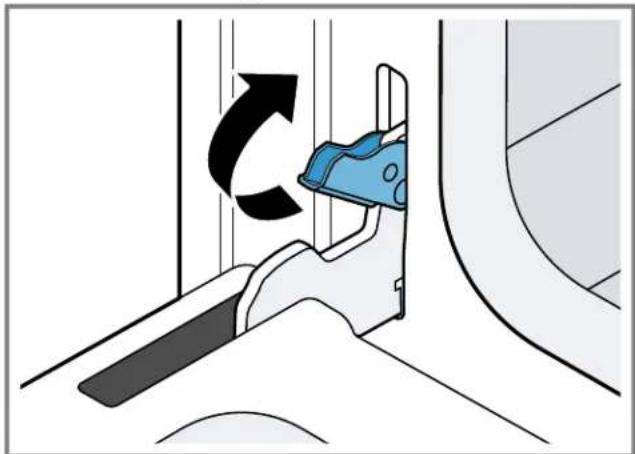
natural_image
Diagram of a car seatbelt mechanism with a blue handle and black arrow indicating rotation (no text or symbols)- Close and open the door slowly to be sure it is correctly and securely in place.
Eliminating faults
You can eliminate minor faults on your appliance yourself. Please read the information on eliminating faults before contacting Customer Support. This may avoid unnecessary repair costs.
WARNING
Risk of injury!
Improper repairs are dangerous.
▶ Only authorized service providers should repair the appliance.
▶ If the appliance has an issue, call Customer Support.
WARNING
Risk of electric shock!
Improper repairs are dangerous.
- Repairs to the appliance should only be performed by authorized service providers.
▶ Only original spare parts may be used to repair the appliance.
Malfunctions
| Fault Cause Troubleshooting | ||
| Oven door is locked and will not open, even after cooling | The door lock is engaged | 1. Turn the oven off at the circuit breaker and wait five minutes.2. Turn breaker back on.√ The oven should reset itself and will be operable. |
| Oven is not heating | There is no power supply to the appliance | 1. Check circuit breaker or fuse box to your house.2. Make sure there is proper electrical power to the oven. |
| There is no cooking temperature set | ▶ Set a heating mode temperature. | |
| Baking results are not as expected | The rack position in not ideal | 1. Refer to the cooking charts for the recommended rack position.2. Check "Getting the most out of your appliance" for tips and suggestions. |
| Food takes longer to cook than expected | The oven temperature needs to be recalibrated | Note: The oven is carefully calibrated to provide accurate results.▶ If food is consistently too brown or too light the temperature can be offset.→ "Oven temperature offset", Page 20 |
| Food is overcooked | The oven temperature needs to be recalibrated | Note: The oven is carefully calibrated to provide accurate results.▶ If food is consistently too brown or too light the temperature can be offset.→ "Oven temperature offset", Page 20 |
| Oven light is not working properly | The oven light bulb is loose or defective | ▶ Replace or reinsert the light bulb.→ "Replacing an oven light bulb", Page 28Tip: Touching the bulb with fingers may cause the bulb to burn out. |
| Oven light does not turn off | The oven door does not close properly | 1. Check the oven door for obstructions.2. Check to see if the hinge is bent. |
| The oven light is turned on | ▶ Press the oven light button to turn the oven light off. | |
| Cannot remove lens cover on light | There is soil build-up around the lens cover | ▶ Wipe the lens cover area with a clean, dry towel, then try to remove the lens cover. |
| Oven is not self-cleaning properly | The oven is too hot to start self clean | 1. Allow the oven to cool before running self clean.2. Always wipe out loose soils or heavy spillovers before running self clean.3. If the oven is heavily soiled, set the maximum self clean time. |
| Clock and timer are not working properly | There is no power supply to the appliance | 1. Check circuit breaker or fuse box to your house.2. Make sure there is proper electrical power to the oven. |
| "E" and a number appears in display and control beeps | An electronics fault has occurred | 1. Press any key to stop the beeping.2. Reset the oven if necessary.3. Call an authorized service provider. |
| With a new oven there is a strong odor when oven is turned on | This is normal with a new oven and will disappear after a few uses | ▸ Operate the self clean mode to burn-off the smell more quickly. |
| Control does not react when a key is touched | The control is wet or soiled | ▸ Clean the control panel an wipe it dry. |
| The buttons are not pressed correctly | 1. Press the center of the button.2. Use the flat part of your finger. | |
| Warm air or steam escapes from oven vent It is normal to see or feel steam or warm air escaping from the oven vent | ⚠️ CAUTIONRisk of fire!The oven vents are important for air circulation. Covering the oven vents will cause the oven to overheat. Refer to the appliance overview for the location of the oven vents.→ "Familiarizing yourself with your appliance", Page 11▸ Do not obstruct oven vents. | |
| Cooling fan runs even when the oven is turned off | The cooling fan will continue to run, even after the oven has been turned off, until the oven has cooled sufficiently | ▸ This is normal. There is no action required. |
Disposal
Find out here how to dispose of old appliances correctly.
Disposal of your old appliance
Environmentally compatible disposal allows valuable raw materials to be recycled.
- Dispose of the appliance in an environmentally compatible manner.
Cooking charts
The charts can be used as a guide. Follow the package or recipe directions.
Baked goods/entrées
The charts can be used as a guide. Follow package or recipe directions.
The convection temperatures have been reduced by 25^ F from the recipe or package directions.
Cakes
| Food Recommended heating mode | Oven temperature in °F(°C) | Preheat oven | Number of racks | Rack position | Time in min. | Pan size and type |
| Angel food CONV BAKE 350 (175) Yes Single 1 35-50 10" tube | ||||||
| Bundt® CONV BAKE 350 (175) Yes Single 2 45-65 12-cup Bundt | ||||||
| Cupcakes TRUE CONV 350 (175) | Yes Single | 4 | 17-27 | 12-cup muffin pan | ||
| 350 (175) | Multiple | 2 & 4 | 17-27 | 12-cup muffin pan | ||
| 350 (175) | Multiple | 1, 3 & 5 | 17-27 | 12-cup muffin pan | ||
| Round layers BAKE 350 (175) | Yes Single | 3 | 28-40 | 8" or 9" round | ||
| 350 (175) | Multiple | 2 & 4 | 28-40 | 8" or 9" round | ||
| Sheet cake CONV BAKE 350 (175) Yes Single 3 45-60 13" x 9" x 2" | ||||||
Cookies
| Food Recommended | heating mode | Oven temperature in °F(°C) | Preheat oven | Number of racks | Rack position | Time in min. | Pan size and type |
| Brownies CONV BAKE 325 (160) Yes Single 3 33-40 8" or 9" square | |||||||
| Chocolate chips TRUE CONV 325 (160) | Yes Single | 3 | 8-17 | Cookie sheet | |||
| 325 (160) | Multiple | 2 & 5 | 8-17 | Cookie sheet | |||
| 325 (160) | Multiple | 1, 3 & 5 | 8-17 | Cookie sheet | |||
| Cookie bars | CONV BAKE 325 (160) Yes Single 3 23-33 8" or 9" square | ||||||
| Sugar | TRUE CONV 325 (160) | Yes Single | 3 | 8-10 | Cookie sheet | ||
| 325 (160) | Multiple | 2 & 5 | 8-10 | Cookie sheet | |||
| 325 (160) | Multiple | 1, 3 & 5 | 8-10 | Cookie sheet | |||
Entrées and vegetables
| Food Recommended | heating mode | Oven temperature in °F(°C) | Preheat oven | Number of racks | Rack position | Time in min. Pan size and type |
| Casseroles | BAKE Recipe | Yes Single 3 recipe Casserole dish | ||||
| Quiche | BAKE 375 (190) | Yes Single 2 30-40 Quiche dish | ||||
| Soufflé | BAKE 325 (160) | Yes Single 3 45-55 Soufflé dish | ||||
| Vegetables CONV ROAST Recipe | No | Single 3 recipe Cookie sheet | ||||
Pastries
| Food Recommended | heating mode | Oven temperature in °F(°C) | Preheat oven | Number of racks | Rack position | Time in min. Pan size and type |
Cream puffs
TRUE CONV 400 (205) Yes Single 3 23-33 Cookie sheet
| Food Recommended | heating mode | Oven temperature in °F(°C) | Preheat oven | Number of racks | Rack position | Time in min. | Pan size and type |
| TRUE CONV | 400 (205) | Yes | Multiple | 2 & 5 | 23-33 | Cookie sheet | |
| TRUE CONV | 400 (205) | Yes | Multiple | 1, 3 & 5 | 23-33 | Cookie sheet |
Puff pastry TRUE CONV 375 (190) Yes Single 3 10-12 Cookie sheet
Pies
| Food Recommended | heating mode | Oven temperature in °F(°C) | Preheat oven | Number of racks | Rack position | Time in min. Pan size and type |
| 1 crust shell CONV BAKE 475 (245) Yes Single 2 8-12 9" pie pan | ||||||
| 2 crust, fruit CONV BAKE 375 (190) Yes Single 2 45-60 9" pie pan | ||||||
| Frozen CONV BAKE 375 (190) Yes Single 3 70-85 9" pie pan | ||||||
| Meringue BAKE 350 (175) Yes Single 2 10-15 9" pie pan | ||||||
| Pecan BAKE 350 (175) Yes Single 2 45-60 9" pie pan | ||||||
| Pumpkin BAKE 425 (220) Yes Single 2 15 | 9" pie pan | |||||
Pizza
| Food Recommended | heating mode | Oven temperature in °F(°C) | Preheat oven | Number of racks | Rack position | Time in min. | Pan size and type |
| Baking stone | PIZZA | 425 (220) | Yes | Single | 2 | recipe time | Baking stone |
| Fresh | PIZZA | 425 (220) | Yes | Single | 2 | recipe time | Pizza pan |
| Thick crust, frozen | PIZZA | on package | Yes | Single | on package | on package | Package directions |
| Thin crust, frozen | PIZZA | on package | Yes | Single | on package | on package | Package directions |
Quick breads
| Food Recommended | heating mode | Oven temperature in °F(°C) | Preheat oven | Number of racks | Rack position | Time in min. | Pan size and type |
| Biscuits | TRUE CONV | 325 (160) | Yes | Single | 3 | 10-20 | Cookie sheet |
| TRUE CONV | 325 (160) | Yes | Multiple | 2 & 5 | 10-20 | Cookie sheet | |
| Loaf | CONV BAKE 350 (175) | Yes Single 2 | 48-60 | 8" x 4" loaf pan | |||
| Muffins | TRUE CONV | 400 (205) | Yes | Single | 3 | 14-25 | 12-cup muffin pan |
| TRUE CONV | 400 (205) | Yes | Multiple | 2 & 5 | 14-25 | 12-cup muffin pan |
Yeast breads
| Food Recommended | heating mode | Oven temperature in °F(°C) | Preheat oven | Number of racks | Rack position | Time in min. | Pan size and type |
| Dinner rolls | TRUE CONV | 375 (190) | Yes | Single | 3 | 10-20 | Cookie sheet |
| TRUE CONV | 375 (190) | Yes | Multiple | 2 & 5 | 10-20 | Cookie sheet | |
| TRUE CONV | 375 (190) | Yes | Multiple | 1, 3 & 5 | 10-20 | Cookie sheet | |
| Loaf | CONV BAKE 400 (205) Yes Single 2 22-35 9" x 5" loaf pan | ||||||
| Sweet rolls | TRUE CONV 325 (160) Yes Single 3 20-25 Cookie sheet | ||||||
Meats
The charts can be used as a guide. Follow package or recipe directions.
The convection temperatures have been reduced by 25^ F from the recipe or package directions.
Beef
| Food Recommended | heating mode | Oven temperature in °F (°C) | Rack position | Internal temperature in °F (°C) | Time in min. Food covered | Stand time in min |
| Chuck roast, 2-4 lbs ROAST 350 (175) 2 Well, 170 | (76) | 1.5-2 hours Yes none | ||||
| Hamburgers, 34 -1" thick BROIL High 6 Medium, | 160 (71) | Side 1: 5-8; No noneSide 2: 4-6 | ||||
| Rib eye, boneless, 3-3.5 lbs CONV ROAST 325 (160) 2 Medium-rare, | 145 (63) | 27-31 min/lb No 10-15 | ||||
| Rib eye, boneless, 3-3.5 lbs CONV ROAST 325 (160) 2 Medium, | 160 (71) | 30-38 min/lb No 10-15 | ||||
| Rump, eye, sirloin, boneless, CONV ROAST 325 (160) 2 Medium-rare, 3-5.5 lbs | 145 (63) | 18-33 min/lb No 10-15 | ||||
| Rump, eye, sirloin, boneless, CONV ROAST 325 (160) 2 Medium, 3-5.5 lbs | 160 (71) | 0-35 min/lb No 10-15 | ||||
| Steak, 1" thick BROIL High 6 Medium-rare, | 145 (63) | Side 1: 5-8; No noneSide 2: 4-6 | ||||
| Steak, 1" thick BROIL High 5 Medium, | 160 (71) | Side 1: 8-9; No noneSide 2: 5-7 | ||||
| Steak, 1 12 " thick | CONV BROIL | High 3 Medium-rare, | 145 (63) | Side 1: 11-13; Side 2: 9-11 | No none | |
| Steak, 1 12 " thick | CONV BROIL | High 3 Medium, | 160 (71) | Side 1: 13-15; Side 2: 11-13 | No none | |
| Tenderloin, 2-3 lbs | CONV ROAST 425 (220) 2 Medium-rare, | 145 (63) | 15-24 min/lb No 5 | |||
Lamb
| Food Recommended | heating mode | Oven temperature in °F(°C) | Rack position | Internal temperature in °F(°C) | Time in min. Food covered | Stand time in min |
| Leg, boneless, 2-3 lbs | CONV ROAST 325 (160) 2 Medium, | 160 (71) | 25-30 min/lb No 10-15 | |||
| Leg, boneless, 4-6 lbs | CONV ROAST 325 (160) 2 Medium, | 160 (71) | 30-35 min/lb No 10-15 | |||
| Chops, 1" thick | BROIL High 4 Medium-rare, | 145 (63) | Side 1: 4-6; Side 2: 4-5 | No none | ||
| Chops, 1" thick | BROIL High 4 Medium, | 160 (71) | Side 1: 5-7; Side 2: 5-6 | No none |
Pork
| Food Recommended | heating mode | Oven temperature in °F(°C) | Rack position | Internal temperature in °F(°C) | Time in min. Food covered | Stand time in min |
| Ham slice 1/2" thick | BROIL High 5 160 (71) | Side 1: 4-5; | No noneSide 2: 3-4 | |||
| Loin roast 11/2"-3 lbs | CONV ROAST 350 (175) 2 Medium, | 160 (71) | 19-36 min/lb No 10-15 | |||
| Food Recommended heating mode | Oven temperature in °F(°C) | Rack position | Internal temperature in °F(°C) | Time in min. Food covered | Stand time in min |
| Loin roast, 3-6 lbs CONV ROAST 350 (175) 2 Medium, | 160 (71) | 14-23 min/lb No 10-15 | |||
| Chops, 1" thick BROIL Medium 4 Medium, | 160 (71) | Side 1: 8-10; No noneSide 2: 8-9 | |||
| Chops, 1 12 " thick CONV BROIL High 4 Medium, | 160 (71) | Side 1: 9-11; No noneSide 2: 8-10 | |||
| Sausage, fresh BROIL High 4 170 (77) Side 1: 3-5; | No noneSide 2: 2-4 | ||||
| Tenderloin, 2-3 lbs CONV ROAST 425 (220) 3 Medium, | 160 (71) | 18-28 min/lb No 5-10 |
Poultry
| Food Recommended | heating mode | Oven temperature in °F(°C) | Rack position | Internal temperature in °F(°C) | Time in min. | Food covered | Stand time in min |
| Chicken breasts, bone-in | CONV BROIL 450 (230) 3 170 (77) Side 1: | 18-22; Side 2: 17-20 | No none | ||||
| Chicken thighs, bone-in | BROIL Low | 3 180 (82) in | thigh | Side 1: 14-15; Side 2: 12-13 | No none | ||
| Chicken, whole | CONV ROAST 375 (190) 2 180 (82) in | thigh | 13-20 min/lb | No none | |||
| Cornish game hen, 1-1 12 " lbs | CONV ROAST 350 (175) 2 180 (82) in | thigh | 45-75 min total time | No none | |||
| Turkey breast, 4-8 lbs | CONV ROAST 325 (160) 2 170 (77) 19-23 min/lb No 15-20 for easy carv- | ing | |||||
| Turkey, unstuffed, 12-19 lbs | CONV ROAST 325 (160) 1 180 (82) in | thigh | 9-14 min/lb | Foil to prevent over-browning | 15-20 for easy carv-ing | ||
| Turkey, unstuffed, 20-25 lbs | CONV ROAST 325 (160) 1 180 (82) in | thigh | 6-12 min/lb | Foil to prevent over-browning | 15-20 for easy carv-ing | ||
Seafood
| Food Recommended | heating mode | Oven temperature in °F(°C) | Rack position | Internal temperature in °F(°C) | Time in min. Food covered | Stand time in min |
| Fish filets, 3/4-1" thick | BROIL Low | 3 145 (63) | 11-15 No none |
Customer support
We're happy to assist you with cleaning and care instructions, accessories, troubleshooting, scheduling service visits and more.
Browse our online resources, such as FAQs and How-to Videos, or call us.
Contacting customer support
Please have the product number (E-Nr.), the production number (FD) and the consecutive numbering (Z-Nr.) of your appliance noted.
This information can be found on the appliance rating plate.
→ "Rating plate location", Page 37
■ USA:
800-735-4328
www.thermador.com/support
Canada:
1-800-735-4328
www.thermador.ca
You can see the rating plate with these numbers when you open the appliance door.
"Rating plate location", Page 37

Making a note of your appliance's details and the after-sales telephone number will enable you to find them again quickly.
Rating plate location
Refer to this section to see where the rating plate of your appliance is located.
Single and double oven rating plate
The rating plate is located at the left hand side of the door trim.
natural_image
Diagram of a door corner with two arrows indicating direction of movement or force (no text or symbols present)
natural_image
Technical line drawing of a door or shelf assembly with directional arrows indicating movement (no text or symbols)Filters, cleaners, accessories and parts
Filters, descalers, cleaners, griddles, parts, and more
can be purchased at Thermador online.
■ USA: www.store.thermador.com/us
■ Canada:
Purchase through our distributors:
- Marcone: 1-800-287-1627
- Reliable Parts: 1-800-663-6060
Home Connect®
Connect your appliance via the Home Connect® app for a world of possibilities that enhance your appliance experience.
For assistance with connecting, contact us at the phone number above, or view instructions here: www.home-connect.com/us/en/help-support/set-up.
STATEMENT OF LIMITED PRODUCT WARRANTY
What this warranty covers & Who it applies to
The limited warranty provided by BSH Home Appliances ("Thermador") in this Statement of Limited Product Warranty applies only to the Thermador appliance sold to you ("Product"), provided that the Product was purchased:
■ For your normal, household (non-commercial) use, and has in fact at all times only been used for normal household purposes.
■ New at retail (not a display, "as is", or previously returned model), and not for resale, or commercial use.
■ Within the United States or Canada, and has at all times remained within the country of original purchase.
The warranties stated herein apply to the original purchaser of the product warranted herein and to each succeeding owner of the product purchased for ordinary home use during the term of the warranty.
Please make sure to return your registration card; while not necessary to effectuate warranty coverage, it is the best way for Thermador to notify you in the unlikely event of a safety notice or product recall.
How long the warranty lasts
Thermador warrants that the Product is free from defects in materials and workmanship for a period of seven hundred and thirty (730) days from the date of the original purchase. The foregoing timeline begins to run upon the date of original purchase, and shall not be stalled, tolled, extended, or suspended, for any reason whatsoever. This Product is also warranted to be free from cosmetic defects in material and workmanship (such as scratches of stainless steel, paint/porcelain blemishes, chip, dents, or other damage to the finish) of the Product, for a period of sixty (60) days from the date of purchase or closing date for new construction. This cosmetic warranty excludes slight color variations due to inherent differences in painted and porcelain parts, as well as differences caused by kitchen lighting, product location, or other similar factors. This cosmetic warranty specifically excludes any display, floor, "As Is", or "B" stock appliances.
Repair/replace as your exclusive remedy
During this warranty period, Thermador or one of its authorized service providers will repair your Product without charge to you (subject to certain limitations stated herein) if your Product proves to have been manufactured with a defect in materials or workmanship. If reasonable attempts to repair the Product have been made without success, then Thermador will replace your Product (upgraded models may be available to you, in Thermador's sole discretion, for an additional charge). Nothing in this warranty requires damaged or defective parts to be replaced with parts of a different type or design than the original part. All removed parts and components shall become the property of Thermador at its
sole option. All replaced and/or repaired parts shall assume the identity of the original part for purposes of this warranty and this warranty shall not be extended with respect to such parts. Thermador's sole liability and responsibility hereunder is to repair manufacturer-defective Product only, using a Thermador authorized service provider during normal business hours. For safety and property damage concerns, Thermador highly recommends that you do not attempt to repair the Product yourself, or use a non-authorized service provider; Thermador will have no responsibility or liability for repairs or work performed by a non-authorized service provider. Authorized service providers are those persons or companies that have been specially trained on Thermador products, and who possess, in Thermador's opinion, a superior reputation for customer service and technical ability (note that they are independent entities and are not agents, partners, affiliates or representatives of Thermador). Notwithstanding the foregoing, Thermador will not incur any liability, or have responsibility, for the Product if it is located in a remote area (more than 100 miles from an authorized service provider) or is reasonably inaccessible, hazardous, threatening, or treacherous locale, surroundings, or environment; in any such event, if you request, Thermador would still pay for labor and parts and ship the parts to the nearest authorized service provider, but you would still be fully liable and responsible for any travel time or other special charges by the service company, assuming they agree to make the service call.
Out of warranty product
Thermador is under no obligation, at law or otherwise, to provide you with any concessions, including repairs, prorates, or Product replacement, once this warranty has expired.
Warranty exclusions
The warranty coverage described herein excludes all defects or damage that are not the direct fault of Thermador, including without limitation, one or more of the following:
■ Use of the Product in anything other than its normal, customary and intended manner (including without limitation, any form of commercial use, use or storage of an indoor product outdoors, use of the Product in conjunction with air or water-going vessels).
- Any party's willful misconduct, negligence, misuse, abuse, accidents, neglect, improper operation, failure to maintain, improper or negligent installation, tampering, failure to follow operating instructions, mishandling, unauthorized service (including selfperformed "fixing" or exploration of the appliance's internal workings).
■ Adjustment, alteration or modification of any kind.
■ A failure to comply with any applicable state, local, city, or county electrical, plumbing and/or building codes, regulations, or laws, including failure to install the product in strict conformity with local fire and building codes and regulations.
■ Ordinary wear and tear, spills of food, liquid, grease accumulations, or other substances that accumulate on, in, or around the Product.
■ Any external, elemental and/or environmental forces and factors, including without limitation, rain, wind, sand, floods, fires, mud slides, freezing temperatures,
excessive moisture or extended exposure to humidity, lightning, power surges, structural failures surrounding the appliance, and acts of God.
In no event shall Thermador have any liability or responsibility whatsoever for damage to surrounding property, including cabinetry, floors, ceilings, and other structures or objects around the Product. Also excluded from this warranty are Products, on which the serial numbers have been altered, defaced, or removed; service visits to teach you how to use the Product, or visits where there is nothing wrong with the Product; correction of installation problems (you are solely responsible for any structure and setting for the Product, including all electrical, plumbing or other connecting facilities, for proper foundation/flooring, and for any alterations including without limitation cabinetry, walls, floors, shelving, etc.); and resetting of breakers or fuses TO THE EXTENT ALLOWED BY LAW, THIS WARRANTY SETS OUT YOUR EXCLUSIVE REMEDIES WITH RESPECT TO PRODUCT, WHETHER THE CLAIM ARISES IN CONTRACT OR TORT (INCLUDING STRICT LIABILITY, OR NEGLIGENCE) OR OTHERWISE. THIS WARRANTY IS IN LIEU OF ALL OTHER WARRANTIES, WHETHER EXPRESS OR IMPLIED. ANY WARRANTY IMPLIED BY LAW, WHETHER FOR MERCHANTABILITY OR FITNESS FOR A PARTICULAR PURPOSE, OR OTHERWISE, SHALL BE EFFECTIVE ONLY FOR THE PERIOD THAT THIS EXPRESS LIMITED WARRANTY IS EFFECTIVE. IN NO EVENT WILL THE MANUFACTURER BE LIABLE FOR CONSEQUENTIAL, SPECIAL, INCIDENTAL, INDIRECT, "BUSINESS LOSS", AND/OR PUNITIVE DAMAGES, LOSSES, OR EXPENSES, INCLUDING WITHOUT LIMITATION TIME AWAY FROM WORK, HOTELS AND/ OR RESTAURANT MEALS, REMODELLING EXPENSES IN EXCESS OF DIRECT DAMAGES WHICH ARE DEFINITIVELY CAUSED EXCLUSIVELY BY THERMADOR, OR OTHERWISE. SOME STATES DO NOT ALLOW THE EXCLUSION OR LIMITATION OF INCIDENTAL OR CONSEQUENTIAL DAMAGES, AND SOME STATES DO NOT ALLOW LIMITATIONS ON HOW LONG AN IMPLIED WARRANTY LASTS, SO THE ABOVE EXCLUSIONS OR LIMITATIONS MAY NOT APPLY TO YOU. THIS WARRANTY GIVES YOU SPECIFIC LEGAL RIGHTS, AND YOU MAY ALSO HAVE OTHER RIGHTS WHICH VARY FROM STATE TO STATE. No attempt to alter, modify or amend this warranty shall be effective unless authorized in writing by an officer of BSH.
Obtaining warranty service
To obtain warranty service for your product, you should contact Thermador Customer Support at 1-800-735-4328 to schedule a repair.
Table des matières
IMPORTANTES CONSIGNES DE SÉCURITÉ.... 40
text_image
Diagram illustrating airflow or ventilation patterns in a vehicle, labeled with arrows and numbered sections ① and ②.text_image
Diagram showing a blue mesh rack inside a storage unit with numbered arrows indicating assembly or movement steps.→ "Home Connect®", Page 60
natural_image
Illustration showing two rows of blue test tubes with granular contents, one highlighted by an arrow (no text or symbols present)text_image
Diagram showing two mechanical components with numbered parts and directional arrows indicating motion or assembly.
text_image
Diagram showing a hand inserting a plug into a circular component with number 3, likely illustrating a medical or electrical installation.natural_image
Diagram of a car door lock mechanism with blue handle and black arrow indicating clockwise motion (no text or symbols)natural_image
Illustration of a blue electronic device with a scroll and arrow indicating motion (no text or symbols)text_image
Diagram showing a mechanical assembly with labeled parts and directional arrows indicating movement or force.natural_image
Diagram of a car door lock mechanism with a blue handle and circular arrow indicating rotation (no text or symbols)natural_image
Diagram of a door corner with two arrows indicating direction of movement or force (no text or symbols present)
natural_image
Diagram of a door or cabinet structure with directional arrows indicating movement or force (no text or symbols present)www.store.thermador.com/us
Canada :