
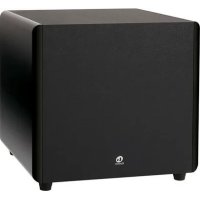
Classic CPS 8Wi - Subwoofer BOSTON ACOUSTICS - Free user manual and instructions
Find the device manual for free Classic CPS 8Wi BOSTON ACOUSTICS in PDF.

| Product Type | Powered Subwoofer |
| Brand | Boston Acoustics |
| Model | Classic CPS 8Wi |
| Speaker | 8 inch (203 mm) DCD (Deep Channel Design) |
| Amplifier Power | 200 W RMS (350 W max) |
| Frequency Response | 31 Hz – 150 Hz |
| Dimensions (H x W x D) | 292 × 309 × 389 mm |
| Weight | Approx. 12 kg |
| Power Supply | 230 V AC (power switch on 230V models) |
| Power Consumption | Standby: < 0.5 W (estimated) |
| Key Features | BassTrac® (anti-distortion), DCD, adjustable crossover, volume control, switchable polarity, Auto/On/Mute mode, signal sensing, line and speaker level inputs, compatible with WT 50 wireless transmitter (optional) |
| Inputs | Line Level (RCA), LFE (RCA), Speaker Level (screw terminals) |
| Outputs | None (active subwoofer) |
| Crossover | Variable, 50 Hz – 150 Hz (approximate), slope 24 dB/octave |
| Cabinet Material | Reinforced MDF, black finish |
| Included Accessories | Power cord, user manual |
| Options | WT 50 wireless transmitter (sold separately) |
| Maintenance and Cleaning | Clean with a dry cloth. Inspect and clean connections at least once a year. |
| Safety | Do not expose to water or moisture. Maintain at least 50 mm ventilation around the unit. Unplug during thunderstorms. Use only accessories specified by the manufacturer. |
| Spare Parts and Repairability | Contact your Boston Acoustics dealer or visit Bostonacoustics.com for authorized service centers. |
| Warranty | 5 years (parts and labor) for the original purchaser. |
| General Information | Active subwoofer from the Classic series, ideal for 5.1 home theater or stereo system. |
Frequently Asked Questions - Classic CPS 8Wi BOSTON ACOUSTICS
User questions about Classic CPS 8Wi BOSTON ACOUSTICS
0 question about this device. Answer the ones you know or ask your own.
Ask a new question about this device
Download the instructions for your Subwoofer in PDF format for free! Find your manual Classic CPS 8Wi - BOSTON ACOUSTICS and take your electronic device back in hand. On this page are published all the documents necessary for the use of your device. Classic CPS 8Wi by BOSTON ACOUSTICS.
USER MANUAL Classic CPS 8Wi BOSTON ACOUSTICS
natural_image
Front view of a gray rectangular device with a small logo at the bottom (no text or symbols on the body)
natural_image
Front view of a gray rectangular device with a small square button at the bottom (no text or symbols visible)
natural_image
Blank gray rectangular panel with white border and small square at bottom (no text or symbols)Classic
CPS 12Wi, CPS 10Wi, CPS 8Wi
Wireless-Ready Subwoofers
Español
Subwoofers Boston
Classic Series
IMPORTANT SAFETY INSTRUCTIONS

This symbol found on the apparatus indicates hazards arising from dangerous voltages.

This symbol found on the apparatus indicates the user should read all safety statements found in the user manual.

This symbol found on the apparatus indicates double insulation.
- Read these instructions.
- Keep these instructions.
- Heed all warnings.
- Follow all instructions.
- Do not use this apparatus near water.
- Clean only with dry cloth.
- Do not block any ventilation openings. Install in accordance with the manufacturer's instructions.
- Do not install near any heat sources such as radiators, heat registers, stoves, or other apparatus (including amplifiers) that produce heat.
- Do not defeat the safety purpose of the polarized or grounding type plug. A polarized plug has two blades with one wider than the other. A grounding-type plug has two blades and a third grounding prong. The wide blade or the third prong is provided for your safety. If the provided plug does not fit into your outlet, consult an electrician for replacement of the obsolete outlet.
- Protect the power cord from being walked on or pinched particularly at plugs, convenience receptacles, and the point where they exit from the apparatus.
- Only use attachments/accessories specified by the manufacturer.
- Unplug this apparatus during lightning storms or when unused for long periods of time.
- Refer all servicing to qualified service personnel. Servicing is required when the apparatus has been damaged in any way, such as power-supply cord or plug is damaged, liquid has been spilled or objects have fallen into the apparatus, the apparatus has been exposed to rain or moisture, does not operate normally, or has been dropped.
- Maintain a minimum distance of 2" (50mm) around the front, rear, and sides of the apparatus for sufficient ventilation. The ventilation should not be impeded by covering the ventilation openings or placing on or around the apparatus items such as newspapers, table-cloths, curtains, etc.
- No open flame sources, such as lighted candles, should be placed on the apparatus.
- The apparatus shall not be exposed to dripping or splashing. No objects filled with liquids, such as vases, shall be placed on the apparatus.

WARNING! To reduce the risk of fire or electrical shock, do not expose this apparatus to rain or moisture.

This symbol found on the apparatus indicates that the apparatus must be placed in a separate collection facility for electronic waste and not disposed with household waste.
-
Either the power inlet connector on the rear of the apparatus or the power plug at the wall must remain accessible, to be able to disconnect power from the apparatus.
-
T o completely disconnect this apparatus from the AC Mains, disconnect the power supply cord plug from the AC receptacle.
-
The mains plug of the power supply cord shall remain readily operable.

American Users:
Note: This equipment has been tested and found to comply with the limits for a Class B digital device, pursuant to part 15 of the FCC Rules. These limits are designed to provide reasonable protection against harmful interference in a residential installation. This equipment generates, uses, and can radiate radio frequency energy and, if not installed and used in accordance with the instructions, may cause harmful interference to radio communications. However, there is no guarantee that interference will not occur in a particular installation. If this equipment does cause harmful interference to radio or television reception, which can be determined by turning the equipment off and on, the user is encouraged to try to correct the interference by one or more of the following measures:
• Reorient or relocate the receiving antenna.
- Increase the separation between the equipment and receiver.
- Connect the equipment into an outlet on a circuit different from that to which the receiver is connected.
- Consult the dealer or an experienced radio/TV technician for help.

Canadian Users
Specifications CPS 12Wi CPS 10Wi CPS 8Wi
Frequency Range: 25Hz – 150Hz 28Hz – 150Hz 31Hz – 150Hz
Amplifier Power: 400 watts RMS 300 watts RMS 200 watts RMS (850 watts Peak) (650 watts Peak) (350 watts Peak)
Bass Driver: 12" (305mm) DCD 10" (254mm) DCD 8" (203mm) DCD
| Dimensions: (H x W x D) 15(397 x 416 x 431mm) | ^11/_16 × 16^7/_16 × 17^ (352 x 372 x 431mm) | 13 ^7/_8 × 14^11/_16 × 17^ (292 x 309 x 389mm) | 11 ^1/_2 × 12^3/_16 × 15^3/_8 |
| Weight:(22kg) | 48.5 lbs(16.8kg) | 40 lbs(11.7kg) | 26 lbs |
Introduction
Boston Acoustics Classic Series Wireless-Ready Subwoofers
Thank you for choosing Boston Acoustics. The Classic Series Wireless-Ready subwoofers incorporate high-quality components that produce the legendary Boston Sound. The subwoofers are ideally suited for use in a high-quality 5.1 channel home theater or stereo music system. They are capable of impressive deep bass and high output from remarkably compact enclosures. In addition, they feature BassTrac ^® , a proprietary Boston-designed circuit that tracks the input signal to the subwoofer and prevents its amplifier from being driven into audible distortion. The benefit: the bass stays clean and strong at any listening level.
Features
• Play wirelessly with the optional WT 50 Wireless Transmitter
• 12", 10", and 8" woofers
• 200 to 400 watts RMS
• High-output front-firing, front-ported design
- Deep Channel® Design (DCD) woofers for more bass from less amplifier power
• BassTrac circuitry for tight, distortion-free bass at all output levels
• Adjustable crossover frequency and volume control
- Switchable polarity
• Signal-sensing automatic audio-on circuitry
• Speaker and line level inputs
• Ultra-rigid reinforced cabinetry
Unpacking the System
Carefully unpack the subwoofer. If there is any sign of damage from transit, report it immediately to your dealer and/or delivery service. Keep the shipping carton and packing materials for future use. Be sure to keep your purchase receipt in a safe place, as it may be required for warranty purposes.
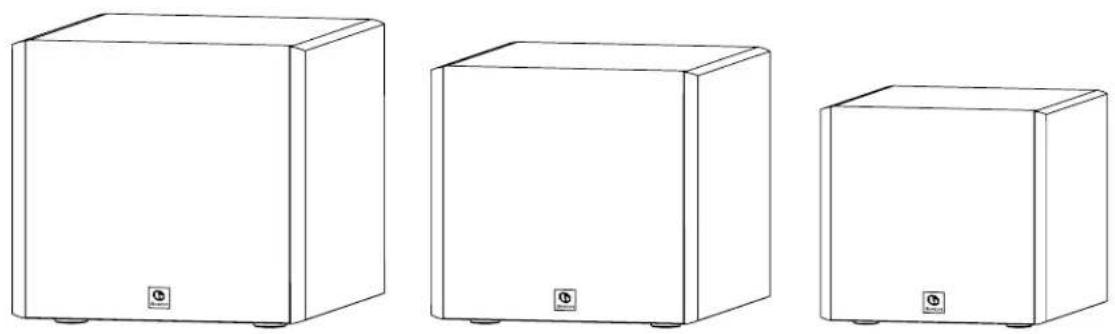
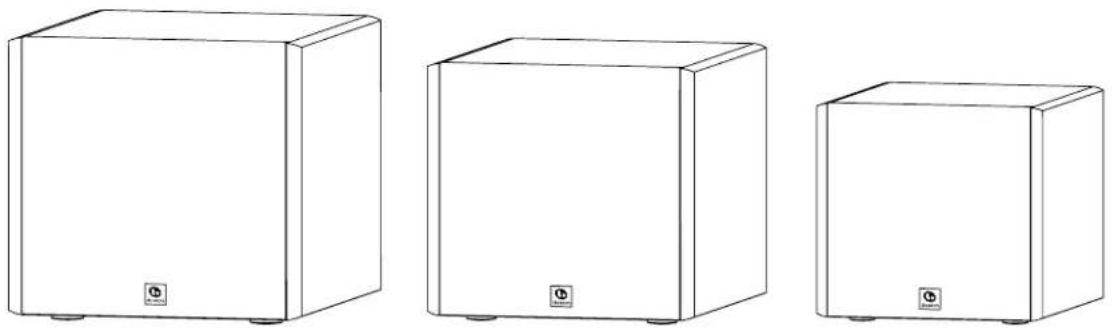
CPS 12Wi, CPS 10Wi, and CPS 8Wi subwoofers
natural_image
Three identical white rectangular boxes with small circular buttons at the bottom, arranged horizontally (no text or symbols)Placement Options
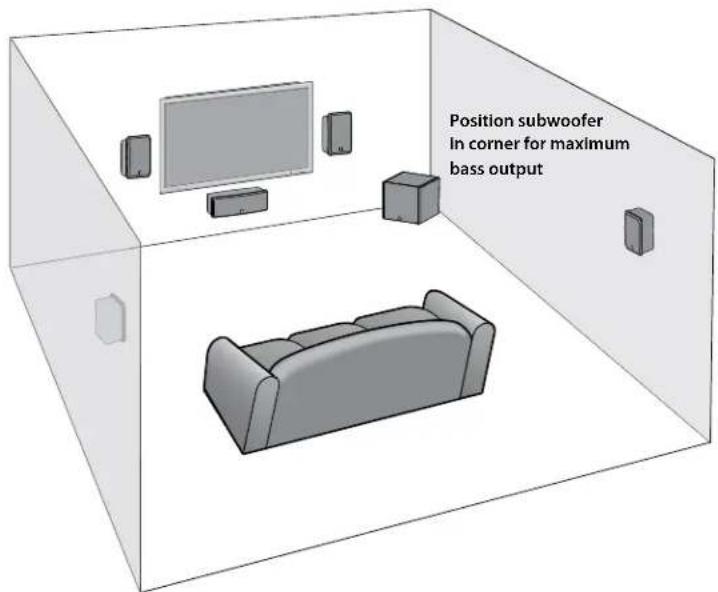
Place the subwoofer next to a wall or in a corner near your main speakers. The sound is typically best when the subwoofer is within 15 feet (4.5m) of the main speakers. The sharp 24dB/octave crossover roll-off permits placement farther from the main speakers if necessary. Since the ear is unable to localize the low frequencies of the subwoofer, the bass still appears to come from the main speakers. Experimentation is key, however most positions in the room will work well.
The level of bass output from the subwoofer will vary at different positions in a room. When placed near walls, its loudness is emphasized. Corner placement provides the most bass output. Placement completely away from walls may produce too little bass. Regardless of the natural bass level within the room you will always have the ability to adjust the level of the subwoofer from the built in volume control. If at any time you move the subwoofer be sure to check all of your settings.
IMPORTANT: Do not place the subwoofer where there is a chance of contact between the rear panel and drapes or furniture.
Connections
After your speakers are properly placed, you are ready to wire your system.
NOTE: Power is always supplied to the subwoofer electronics unless it is unplugged or switched to the Mute position using the Audio On switch located on the rear panel. The auto-on circuitry only activates or deactivates the power amplifier. Make sure your subwoofer and receiver are unplugged when making the connection (230v models include a main power switch which turns off all power of the subwoofer).
Power: When plugging your subwoofer in be sure to use a wall outlet, or dedicated electrical outlet. Some receivers will provide a switched outlet. Do not use this. These on-board electrical outlets do not offer the amount of current or proper isolation required by a power amplifier, such as the one in your subwoofer.
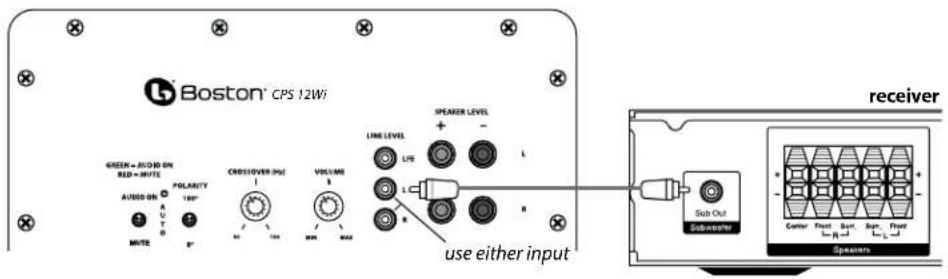
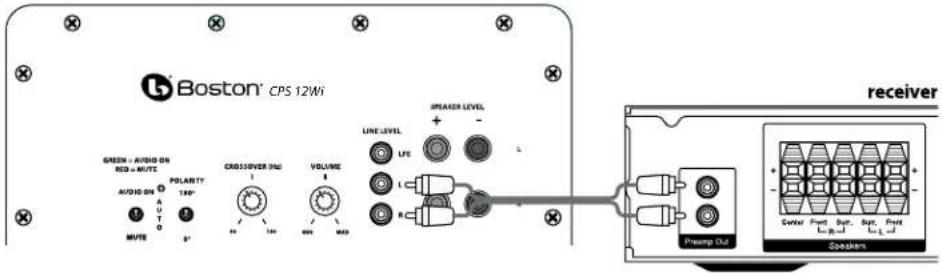
Line level or LFE: On most systems use the line level input or the LFE input. These inputs accept the line-level signal from your receiver's subwoofer output. Your receiver's manual should indicate which input is most appropriate.
Connecting the Subwoofer to Digital Home Theater Systems Using LFE
Digital 5.1, 6.1 and 7.1 home theater electronics dedicate one channel (the ".1") to reproduce the special low-frequency effects (LFE) information (such as explosions and thunder) contained in digitally-encoded soundtracks.
Select "subwoofer-yes" from your receiver's set-up menu. Hooked up this way, the receiver's amplifier is relieved of having to reproduce the difficult low bass signals that can drive the receiver into audible distortion. In some cases it can also depend on several other settings within a receiver. We recommend consulting your receiver manual for further assistance in this area.
Use an RCA cable (not included), as shown, to connect your digital receiver's LFE/subwoofer output to the subwoofer.

Connect the other end to the Line Level/LFE input.
Connecting the Subwoofer to Stereo or Dolby® Pro Logic®
For stereo or Dolby Pro Logic systems use the "sub out" connection from your receiver to the input on the subwoofer marked "L" or "R".
Connecting to Electronics Without a Subwoofer Output
If the receiver in your system does not have a subwoofer or LFE output you can connect the CPS Wi subwoofer to a preamp output. Use a stereo RCA cable (not included) to connect the preamp outputs to the "L" and "R" Line Level inputs.
Adjusting the Crossover Control
When using the Line Level inputs (not the LFE input) the subwoofer's built-in crossover is engaged. As a starting point, set the crossover control on the subwoofer about 10Hz higher than the lower limit of your main speakers' bass response. Fine-tune the crossover setting by ear for the smoothest blend with your main speakers. The best setting of the crossover control will depend on speaker placement and personal preference.
Speaker level
Use these high-level terminals with receivers that do not have subwoofer output. The speaker inputs accept both left and right channel speaker signals from your receiver. When using a home theater receiver, set the speaker type to "Large." The large setting will produce a fuller sound.
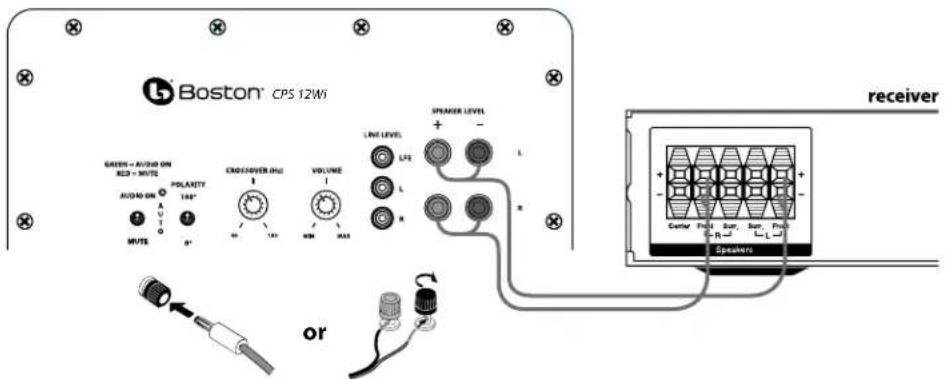
Note
Certain receivers use speaker grounding circuits that may be incompatible with external powered audio products, such as powered subwoofers. When speaker wire is used instead of line level cables, this incompatibility can result in an audible hum when the receiver is turned off or switched to a different speaker channel.
If this should happen with your Boston Acoustics subwoofer, you will need to make a ground cable and connect it to either RCA
line input on the subwoofer and any unused
RCA line input or output on your receiver (see diagram). The proper ground cable for this application should consist of two male RCA plugs that have their negative outside terminals (or "sleeve") connected to each other by any length of single conductor copper cable. The inside positive (or "pin") terminals should not be wired in either plug.

single conductor (-) RCA to (-) RCA ground cable
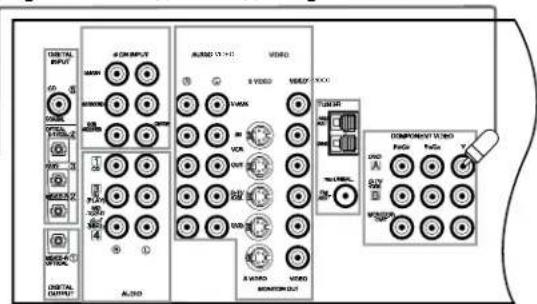
use any available RCA jackback of receiver
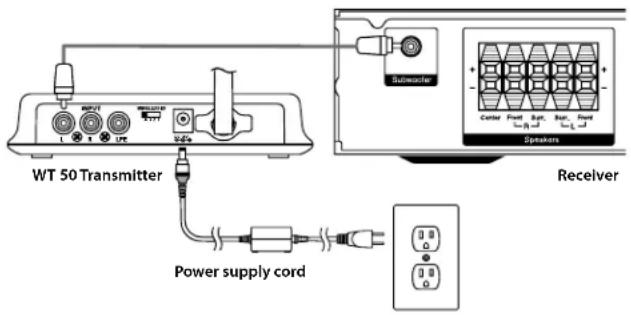
Optional WT 50 Wireless Transmitter
Transmitter Power
Plug the transmitter power supply into a power outlet. The transmitter power supply requires very little power so you can plug it into an auxiliary power outlet on the receiver. Plug the connector on the power supply cable into the transmitter power input labeled 18V DC.
Wireless ID Switches
Both the CPS Wi Subwoofer and optional WT 50 Wireless Transmitter have Wireless ID switches (located on the rear of the subwoofer and transmitter). The various switch settings change the digital identification code of the wireless signal the WT 50 sends to the subwoofer. The two switches must be set to the same position. Typically you'll never need to adjust these switches. They are included in case you have more than one CPS Wi subwoofer in your house. Use different Wireless ID switch settings so the subwoofers won't interfere with each other.
WIRELESS ID
Note: Do not connect the same audio source to the subwoofer and WT 50 wireless transmitter at the same time.
Operation
Audio On/Auto/Mute
Plug the subwoofer's AC cord into a wall outlet. Do not use the outlets on the back of the receiver. Set the audio switch to the desired setting.
AUDIO ON – The subwoofer audio is always on.
AUTO – The subwoofer audio will turn on whenever a signal is detected. If no signal is detected after several minutes, it will automatically enter the Mute mode.
MUTE – The subwoofer is muted and will not produce any sound. You may want to unplug your subwoofer if you will not be using it for some time or wish to conserve electricity. (On 230v models only, you may turn off the main power switch, located next to the power cord)
An LED indicator next to the Polarity switch indicates what mode the subwoofer is in:
OFF – The subwoofer is unplugged (or the main power switch is off on 230v models)
RED - Mute (No signal detected, Amp Off)
gREEN – Audio On (Signal detected, Amp On)
The subwoofer will automatically enter the Mute mode after several minutes when no signal is detected from your system. The subwoofer audio will then turn ON instantly when a signal is detected.
Polarity Control
(0° or 180°): Selects regular (0°) or inverted (180°) phase for the subwoofer. Set this switch to provide the fullest, most dynamic bass. The effect of phase will be most audible on low-frequency percussion instruments or music with a continuously repeating bass line.
Crossover Control
Adjusts the frequency of the low pass filter for the subwoofer. Note: This control is not active when using the LFE input jack.
Volume Control
Turn the subwoofer Volume control to the 11 o'clock position. If no sound emanates from the subwoofer, check the AC-line cord, Audio On switch, Power switch (on 230v models), and input cables.
Adjust the subwoofer Volume control until you hear a match between the main speaker and subwoofer. Bass response should not overpower the room but rather be adjusted so there is a natural blend across the entire musical range.
Maintenance and Service
All wiring connections should be inspected and cleaned or remade at least once a year.
If a problem does occur, make sure that all connections are properly made, secure and clean. If a problem occurs in one loudspeaker, rewire that speaker in a different location within the system. Should the problem persist then the problem is within the speaker. If the speaker sounds fine in the new position it is a strong indication of a more in depth issue with the electronics in the system. In the event that your speakers ever need service, contact your local Boston Acoustics dealer or visit bostonacoustics.com/dealers for a list of dealers in your area.
Limited Warranty
Boston Acoustics warrants to the original purchaser of an Classic Series subwoofer that it will be free of defects in materials and workmanship in its mechanical parts for a period of 5 years from the date of purchase. The warranty period for the electrical components is 1 year.
Your responsibilities are to install and use them according to the instructions supplied, to provide safe and secure transportation to an authorized Boston Acoustics service representative, and to present proof of purchase in the form of your sales slip when requesting service.
Excluded from this warranty is damage that results from abuse, misuse, improper installation, accidents, shipping, or repairs/modifications by anyone other than an authorized Boston Acoustics service representative.
This warranty is limited to the Boston Acoustics product and does not cover damage to any associated equipment. This warranty does not cover the cost of removal or reinstallation. This warranty is void if the serial number has been removed or defaced. This warranty gives you specific legal rights, and you may also have other rights which vary from state to state.
If Service Seems Necessary
First, contact the dealer from whom you purchased the product. If that is not possible, write to:
Boston Acoustics, Inc.
100 Corporate Drive
Mahwah, NJ 07430 U.S.A.
Or contact us via e-mail at:
US: support@bostona.com
Japan: ba_info@dm-holdings.com
Asia Pacific: service@dm-singapore.com
We will promptly advise you of what action to take. If it is necessary to return your Classic Series subwoofer, please ship it prepaid. After it has been repaired, we will return it freight prepaid in the United States and Canada.

For EU Customers Only
This symbol found on the product indicates that the product must not be disposed of with household waste. Instead, it may be placed in a separate collection facility for electronic waste or returned to a retailer when purchasing similar product. The producer paid to recycle this product. Doing this contributes to reuse and recycling, minimizes adverse effects on the environment and human health and avoids any fines for incorrect disposal.
Subwoofers CPS 12Wi, CPS 10Wi, y CPS 8Wi
natural_image
Simple line drawing of a rectangular box with a small circular mark at the bottom (no text or symbols)
natural_image
Simple line drawing of a rectangular box with a small circular mark at the bottom (no text or symbols)
natural_image
Simple line drawing of a rectangular box with a small circular mark on the front face (no text or symbols)Optional WT 50 Wireless Transmitter
Boston Acoustics, Inc.
100 Corporate Drive
Mahwah, NJ 07430 USA
Japan: ba_info@dm-holdings.com
Asia Pacific: service@dm-singapore.com
| Weight: | 48.5 lbs | 40 lbs | 26 lbs |
| (22kg) | (16.8kg) | (11.7kg) |
Introduction
Caissons de graves Boston Acoustics de série Classic compatibles Sans fil
natural_image
Three identical white rectangular boxes with small circular bases, arranged horizontally (no text or symbols)Optional WT 50 Wireless Transmitter
Boston Acoustics, Inc.
100 Corporate Drive
Japan: ba_info@dm-holdings.com
Asia Pacific: service@dm-singapore.com
CPS 12Wi, CPS 10Wi, E CPS 8Wi subwoofer
natural_image
Three identical white rectangular boxes with small circular buttons at the bottom, arranged horizontally (no text or symbols)Boston Acoustics, Inc.
100 Corporate Drive
Mahwah, NJ 07430 U.S.A.
Asia Pacifico: service@dm-singapore.com
natural_image
Three identical white rectangular boxes with small square footprints, arranged horizontally (no text or symbols)Placeringsalternativ
OBS!
Boston Acoustics, Inc.
100 Corporate Drive
Mahwah, NJ 07430 U.S.A.
Japan: ba_info@dm-holdings.com
Asien Stilla havet: service@dm-singapore.com
Hinweis
Boston Acoustics, Inc.
100 Corporate Drive
Mahwah, NJ 07430 U.S.A.
Japan: ba_info@dm-holdings.com


- Classic
- CPS 12Wi, CPS 10Wi, CPS 8Wi
- Wireless-Ready Subwoofers
- Español
- IMPORTANT SAFETY INSTRUCTIONS
- American Users:
- Canadian Users
- Specifications CPS 12Wi CPS 10Wi CPS 8Wi
- Introduction
- Boston Acoustics Classic Series Wireless-Ready Subwoofers
- Features
- Unpacking the System
- Placement Options
- Connections
- Connecting the Subwoofer to Digital Home Theater Systems Using LFE
- Connecting the Subwoofer to Stereo or Dolby® Pro Logic®
- Connecting to Electronics Without a Subwoofer Output
- Adjusting the Crossover Control
- Speaker level
- Note
- Optional WT 50 Wireless Transmitter
- Transmitter Power
- Wireless ID Switches
- Operation
- Audio On/Auto/Mute
- Polarity Control
- Crossover Control
- Volume Control
- Maintenance and Service
- Limited Warranty
- If Service Seems Necessary
- For EU Customers Only
- Caissons de graves Boston Acoustics de série Classic compatibles Sans fil
- Placeringsalternativ
- OBS!
- Hinweis
Brand : BOSTON ACOUSTICS
Model : Classic CPS 8Wi
Category : Subwoofer