NDE5805AYW - Tumble drier WHIRLPOOL - Free user manual and instructions
Find the device manual for free NDE5805AYW WHIRLPOOL in PDF.

User questions about NDE5805AYW WHIRLPOOL
0 question about this device. Answer the ones you know or ask your own.
Ask a new question about this device
Download the instructions for your Tumble drier in PDF format for free! Find your manual NDE5805AYW - WHIRLPOOL and take your electronic device back in hand. On this page are published all the documents necessary for the use of your device. NDE5805AYW by WHIRLPOOL.
USER MANUAL NDE5805AYW WHIRLPOOL
Important Safety Instructions ..... 1-2

Using the Controls Auto Dry Models .... 3-4 Electronic Controls .... 5-7

Operating Tips 8

Accessories 8

Care & Cleaning 9

Reversing the Door 10

Dryer Exhaust Tips .... 11

Troubleshooting 12

Service & Warranty 13
natural_image
Close-up of textured fabric with a woven mesh pattern below (no visible text or symbols)Installer: Please leave this guide with this appliance.
Consumer: Please read and keep this guide for reference. Keep sales receipt and/or canceled check as proof of purchase.
Model Number ____
Serial Number ____
Date of Purchase
If you have questions, call:
Customer Assistance
1-800-688-9900 U.S.A.
1-866-688-2002 Canada
(Mon.-Fri. 8 a.m.-8 p.m. Eastern Time)
Internet: http://www.amana.com
U.S.A. Customers using TTY for deaf, hearing impaired or speech impaired, call 1-800-688-2080.
In our continuing effort to improve the quality and performance of our appliances, it may be necessary to make changes to the appliance without revising this guide.
For service information, see page 13.
What You Need to Know About Safety Instructions
Warning and Important Safety Instructions appearing in this guide are not meant to cover all possible conditions and situations that may occur. Common sense, caution and care must be exercised when installing, maintaining or operating appliance.
Always contact the manufacturer about problems or conditions you do not understand.
Recognize Safety Symbols, Words, Labels
WARNING
WARNING – Hazards or unsafe practices which COULD result in severe personal injury or death.
CAUTION
CAUTION – Hazards or unsafe practices which COULD result in minor personal injury.
WARNING
For your safety, the information in this guide must be followed to minimize the risk of fire or explosion or to prevent property damage, personal injury or death.
- Do not store or use gasoline or other flammable vapors and liquids in the vicinity of this or any other appliance.
WHAT TO DO IF YOU SMELL GAS
- Do not try to light any appliance.
- Do not touch any electrical switch.
- Do not use any phone in your building.
- Clear the room, building or area of all occupants.
- Immediately call your gas supplier from a neighbor's phone. Follow the gas supplier's instructions.
- If you cannot reach your gas supplier, call the fire department.
Installation and service must be performed by a qualified installer, service agency or the gas supplier.
WARNING! FIRE HAZARD
Do not place into your dryer items that have been spotted or soaked with vegetable oil or cooking oil. Even after being washed, these items may contain significant amounts of these oils. The remaining oil can ignite spontaneously. The potential for spontaneous ignition increases when the items containing vegetable oil or cooking oil are exposed to heat. Heat sources, such as your clothes dryer, can warm these items, allowing an oxidation reaction in the oil to occur. Oxidation creates heat. If this heat cannot escape, the items can become hot enough to catch fire. Piling, stacking or storing these kinds of items may prevent heat from escaping and can create a fire hazard.
All washed and unwashed fabrics that contain vegetable oil or cooking oil can be dangerous. Washing these items in hot water with extra detergent will reduce, but will not eliminate, the hazard. Always use the Cool Down cycle for these items to reduce the items' temperature. Never remove these items from the clothes dryer hot or interrupt the drying cycle until the items have run through the Cool Down cycle. Never pile or stack these items when they are hot.
WARNING
To reduce the risk of fire, explosion, electric shock, or personal injury when using your dryer, follow basic safety precautions, including the following:
- Read all instructions before using the appliance.
- To avoid the possibility of fire or explosion:
a. Do not dry items that have been previously cleaned in, washed in, soaked in, or spotted with gasoline, dry-cleaning solvents, other flammable or explosive substances as they give off vapors that could ignite or explode. Any material on which you have used a cleaning solvent, or which is saturated with flammable liquids or solids, should not be placed in the dryer, until all traces of these flammable liquids or solids and their fumes have been removed. There are many highly flammable items used in homes, such as: acetone, denatured alcohol, gasoline, kerosene, some liquid household cleaners, some spot removers, turpentine, waxes and wax removers.
b. Items containing foam rubber (may be labeled latex foam) or similarly textured rubber-like materials must not be dried on a heat setting. Foam rubber materials when heated, can under certain circumstances produce fire by spontaneous combustion.
- Do not allow children or pets to play on, in, or in front of the appliance. Close supervision is necessary when the appliance is used near children and pets.
- Before the appliance is removed from service or discarded, remove the door to the drying compartment.
- Do not reach into the appliance if the drum is moving.
- Do not install or store this appliance where it will be exposed to the weather.
- Do not tamper with controls.
- Do not repair or replace any part of the appliance or attempt any servicing unless specifically recommended in published user-repair instructions that you understand and have the skills to carry out.
- Do not use fabric softeners or products to eliminate static unless recommended for dryer use
by the manufacturer of the fabric softener or product.
- Clean the lint screen before or after each load.
- Keep the area around the exhaust opening and surrounding areas free from lint accumulation, dust and dirt.
- The interior of the dryer and exhaust duct should be cleaned periodically by qualified service personnel.
- This appliance must be properly grounded. Never plug the appliance cord into a receptacle which is not grounded adequately and in accordance with local and national codes. See installation instructions for grounding this appliance.
- Do not sit on top of the clothes dryer.
Important Safety Notice & Warning
The California Safe Drinking Water and Toxic Enforcement Act of 1986 (Proposition 65) requires the Governor of California to publish a list of substances known to the State of California to cause cancer or reproductive harm, and requires businesses to warn customers of potential exposures to such substances.
Users of this appliance are hereby warned that the burning of gas can result in low-level exposure to some of the listed substances, including benzene, formaldehyde, and soot, due primarily to the incomplete combustion of natural gas or liquid petroleum (LP) fuels. Exhaust ducts should be kept free of obstructions and properly exhausted dryers will minimize exposure.
WARNING
Gas leaks may occur in your system and result in a dangerous situation. Gas leaks may not be detected by smell alone. Gas suppliers recommend you purchase and install an UL approved gas detector. Install and use in accordance with the manufacturer's instructions.
Note: Because of continuing product improvements, Amana reserves the right to change specifications without notice. For complete details, see the Installation Instructions packed with your product before selecting cabinetry, making cutouts or beginning installation.
Using the Controls - Auto Dry Models
STEP 1
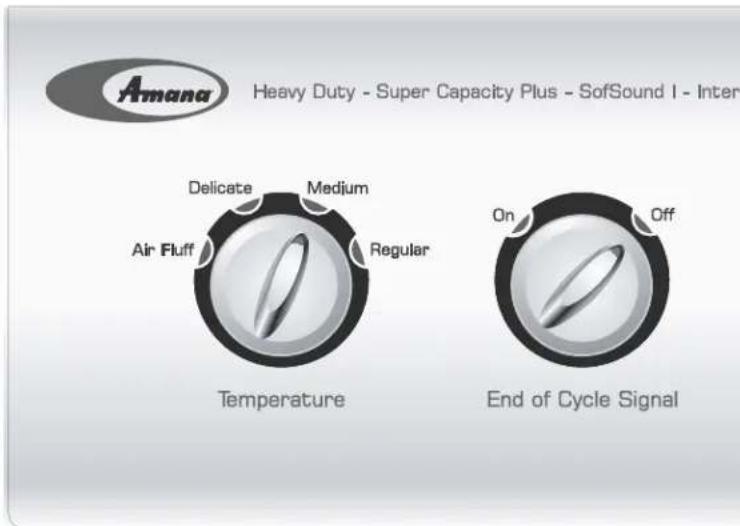
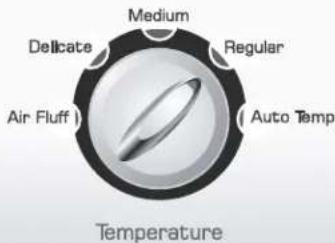
Select Temperature
In order to select the correct temperature, turn the Temperature control to one of four choices; Regular, Medium (select models), Delicate or Air Fluff.
| DRYER TEMPS | LOAD TYPE |
| Regular | Sturdy cottons or labels marked Tumble Dry. |
| Medium (select models) | For wrinkle-free/permanent press synthetics and lightweight cottons labeled Tumble Dry Medium. |
| Delicate | For heat sensitive items labeled Tumble Dry Low or Tumble Dry Medium. |
| Air Fluff | Items which need freshening.Load tumbles with room temperature air. |
STEP 2
Select Options
End of Cycle Signal
When the cycle is complete, a signal will sound. The signal can be canceled by turning the switch to Off.
Remove load immediately to reduce wrinkling.
Extended Tumble (select models)
Extended Tumble is provided to minimize wrinkles in the Auto Dry No Iron Fabrics cycle. This feature provides an extra 60 minutes of unheated tumble action at the end of the cycle. Clothes can be removed any time during this portion of the cycle.
The additional 60 minutes of unheated tumbling can be canceled by turning the switch to Off.
text_image
Amana Heavy Duty - Super Capacity Plus - SofSound I - Inter Delicate Medium Air Fluff Regular Temperature On Off End of Cycle SignalSTEP 3
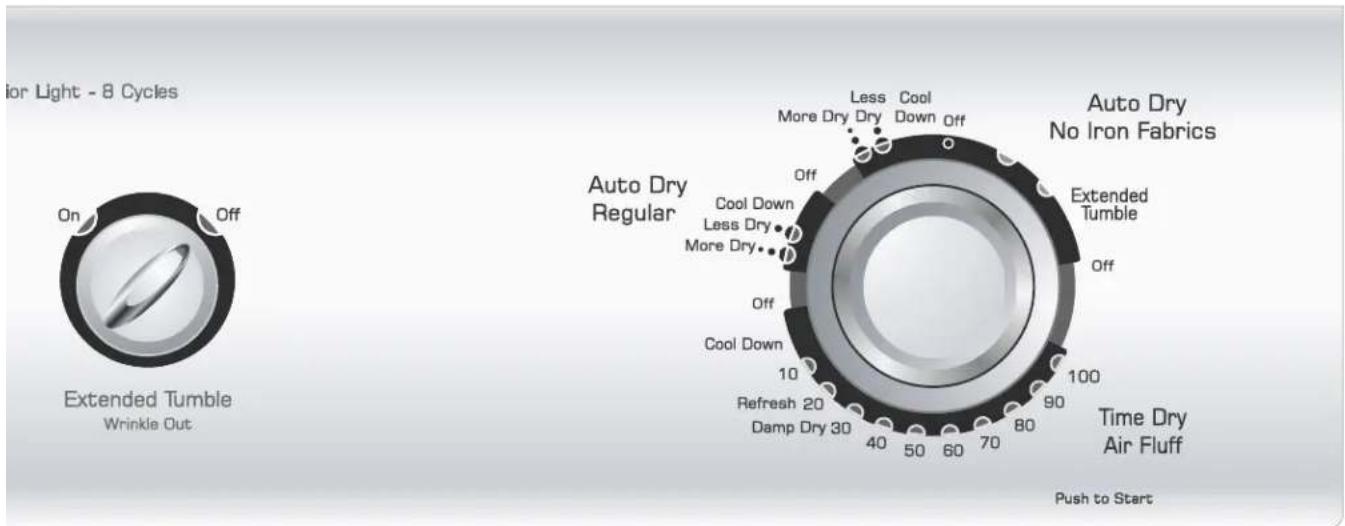
Select Cycle
To select a cycle, rotate the control dial to the desired setting. When using an Auto Dry Regular cycle, the control dial should point between More Dry and Less Dry for most loads.
Loads of larger or bulkier size may require the More Dry setting to completely dry the load. The Less Dry setting is best suited for lightweight fabrics or for leaving some moisture in the clothing at the end of the cycle.
Auto Dry Regular
The Auto Dry Regular cycle is designed to dry most cottons and linens. At the end of the cycle, the clothes are cooled to reduce wrinkling for approximately 10 minutes.
Auto Dry No Iron Fabrics
The Auto Dry No Iron Fabrics cycle is designed to dry wrinkle-free cottons, synthetic fabrics, double knits and permanent press fabrics automatically. At the end of the cycle, the clothes are cooled for approximately 10 minutes to reduce wrinkling. If the load is not removed from the dryer and Extended Tumble (select models) has been selected, the cycle will advance to Extended Tumble which provides additional unheated tumbling time. (See Step 2).
text_image
Prior Light - 8 Cycles On Off Extended Tumble Wrinkle Out Auto Dry Regular Cool Down Less Dry More Dry Off Cool Down 10 Refresh 20 Damp Dry 30 40 50 60 70 More Dry Less Dry Down Cool More Dry Off Less Cool No Iron Fabrics Extended Tumble Off 100 90 80 Time Dry Air Fluff Push to Start Auto Dry No Iron FabricsTime Dry/Air Fluff
This cycle can be used to regulate the drying time. Use with Air Fluff, Delicate, Medium (select models) or Regular temperature settings. For timed drying, turn the control dial until the pointer points to the proper time setting in the Time Dry/Air Fluff cycle.
Note: Using the Air Fluff temperature setting will require a longer drying time.
Damp Dry
Damp Dry is located on the Time Dry/Air Fluff section of the dial. It is designed to partially dry items and can be used with any temperature selection. Damp Dry will provide 20 minutes of tumbling time, followed by 10 minutes of cool-down tumbling.
Touch Up/Refresh
Touch Up/Refresh will release wrinkles from items that are clean and dry but only slightly wrinkled, such as from a crowded closet or suitcase, or from sitting in the dryer too long after the cycle has ended. Touch Up/Refresh provides 10 minutes of tumbling followed by 10 minutes of cool-down tumbling and can be used with any temperature selection.
STEP 4
Push the Control Dial in to Start
Push the control dial in to start the dryer. The dryer door must be closed for the dryer to start.
Note: The dial can be turned in either direction to select a cycle. Once started, the dial will not advance at a specific rate during the Auto Dry cycles. At first the dial may not advance at all. Toward the end of the cycle (when the load begins to dry), the dial will advance at a more regular rate and much more quickly. This is normal operation.
STEP 1
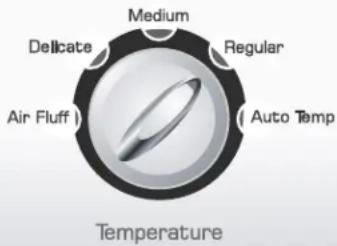
Select Temperature
Auto Temp (preferred setting)
When Auto Temp is selected, the dryer will automatically select the most appropriate drying temperature based on the cycle and dryness settings selected.
If you prefer not to use Auto Temp, turn the temperature selector knob to the desired setting.
| DRYER TEMPS | LOAD TYPE |
| Regular | Sturdy cottons or labels marked Tumble Dry. |
| Medium | For wrinkle-free/permanent press synthetics, lightweight cottons labeled Tumble Dry Medium. |
| Delicate | For heat sensitive items labeled Tumble Dry Low or Tumble Dry Medium. |
| Air Fluff | Items which need freshening.Load tumbles with room temperature air. |
STEP 2
Select Options (if desired)
End of Cycle Chime
When the cycle is complete, an audible chime will sound. The chime will sound intermittently during Wrinkle Prevent. To turn the Chime off, turn the Chime selector switch to Off.
Wrinkle Prevent
Wrinkle Prevent provides approximately 95 minutes of intermittent tumbling in unheated air at the end of the cycle to reduce wrinkling. Set the Wrinkle Prevent knob On to activate this feature. The additional 95 minutes of unheated tumbling can be canceled by turning the switch to Off.

Heavy Duty - Stainless Drum - Super Capacity Plus - Sol
text_image
Medium Delicate Regular Air Fluff Auto Temp Temperature
text_image
Off On Wrinkle PreventSTEP 3
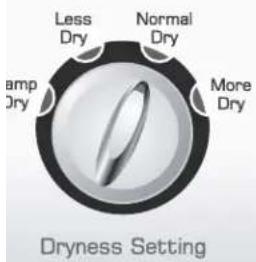
Select Dryness Setting
To select the dryness level, turn the Dryness Setting knob to the desired setting.
Most loads will use the Normal Dry setting. Loads of larger or bulkier size may require the More Dry setting to completely dry the load.
The Less Dry setting is best suited for lightweight fabrics or for leaving some moisture in the load at the end of the cycle. Damp Dry is designed to partially dry items. Use for items that lay flat or hang to dry.
STEP 4
Select Cycle
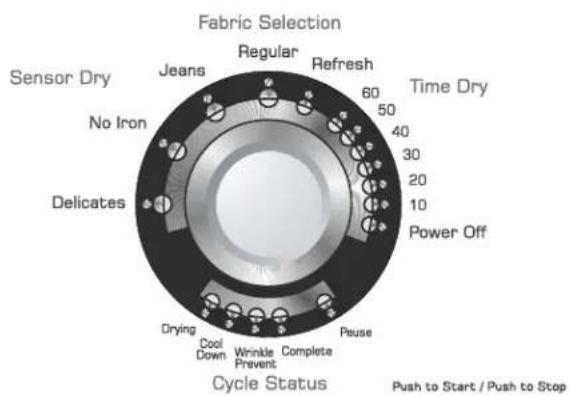
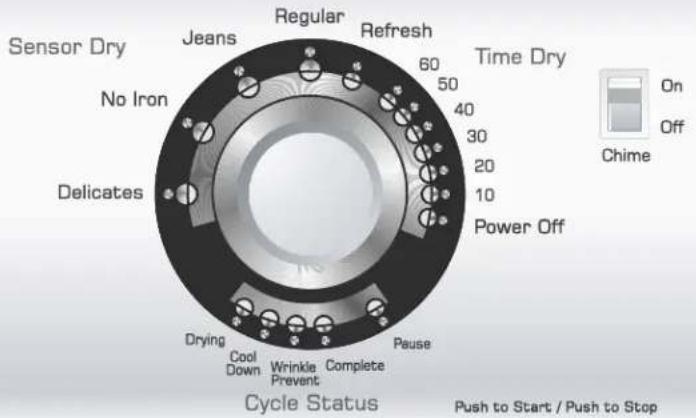
To select a cycle, rotate the Cycle Selector dial to the desired cycle. The indicator light by the cycle name will illuminate.
The dryer cycles are Sensor Dry cycles. Sensor Dry automatically senses the moisture in the load and shuts the dryer off when the selected dryness level (Damp Dry to More Dry) is reached.

text_image
Sound II - Interior Light - Drying Rack - 16 Cycles Dryness Setting Sensor Dry Jeans Regular Refresh Time Dry No Iron Delicates Drying Cool Down Wrinkle Prevent Complete Pause Power Off Chime Push to Start / Push to Stop Fabric Selection Cycle StatusRefresh
The Refresh cycle is designed to release wrinkles from items that are clean and dry but only slightly wrinkled, such as from a crowded closet or suitcase or from sitting in the dryer too long after the cycle has ended. Refresh can be used with any temperature selection.
Regular
The Regular cycle is designed to dry loads such as towels and underwear.
Jeans
The Jeans cycle is designed to reduce wrinkling and tangling in loads of jeans.
No Iron
The No Iron cycle is designed to dry wrinkle-free cottons, synthetic fabrics, knits and permanent press fabrics automatically. The cycle minimizes wrinkling by providing a longer unheated cool-down period at the end of the cycle.
Delicates
The Delicates cycle is designed to dry heat-sensitive items at the Delicates drying temperature.
Time Dry
The Time Dry cycle can be used to regulate the drying time. Use with any temperature setting. For timed drying, turn the cycle selector dial to the number of minutes desired. An indicator light will illuminate by the setting.
Note: Using the Air Fluff temperature setting will require a longer drying time.
STEP 5
Start the Dryer
After setting the cycle and desired options, press the cycle selector dial to start the dryer. To pause the cycle, press cycle selector dial again. To restart the cycle, press cycle selector dial and the cycle will resume from the point of interruption.
Power Off
Turn the cycle selector dial to Power Off and press cycle selector dial to cancel the cycle and stop the dryer.
Cont.
Features
Cycle Status Lights
The Drying light will illuminate and remain lit until the dryer enters the cool down portion of the cycle. When the dryer is in the cool down portion of the cycle, the Cool Down light will illuminate.
The Wrinkle Prevent and Complete light will illuminate when the dryer has moved into the Wrinkle Prevent portion of the cycle. On some models, Wrinkle Prevent will automatically follow the Wrinkle Control cycle.
The Complete light will illuminate when the cycle is complete. The light will remain illuminated until the dryer door is opened.
If the dryer is paused during a cycle, the Pause light will illuminate until the cycle is resumed or the dryer is turned off.
pie
Fabric Selection | Category | Value | |---|---| | Time Dry | 60 | | Power Off | 50 | | Pause | 40 | | Complete | 30 | | Wrinkle Prevent | 20 | | Cool Down | 10 | | Drying | 60 | | Delicates | 30 | | No Iron | 60 | | Sensor Dry | 60 | | Jeans | 60 | | Regular | 60 | | Refresh | 60 | | Push to Start / Push to Stop | 60 |
Operating Tips
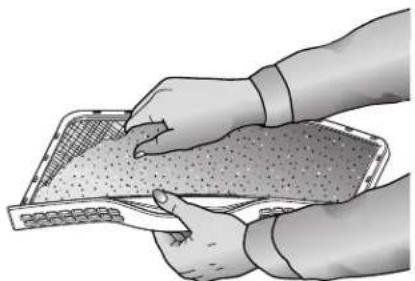
Clean the Lint Filter
• After each load.
• To shorten drying time.
• To operate more energy efficiently.
natural_image
Illustration of hands handling a tray with granular material (no text or symbols)Note: Do not operate the dryer without the lint filter in place.
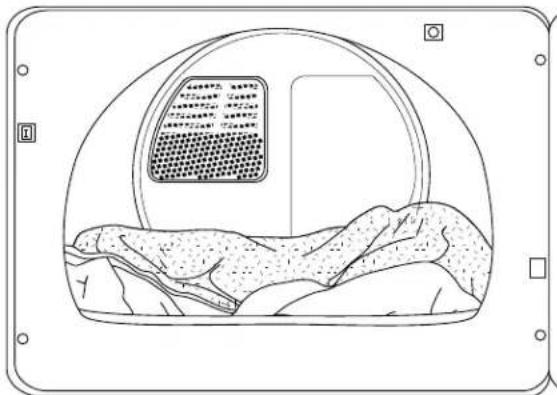
Load the Dryer Properly
- Place only one washload in the dryer at a time.
- Mixed loads of heavy and lightweight clothes will dry differently. Lightweight clothes will dry, while heavy clothes may be damp.
- Add one or more similar items to the dryer when only one or two articles need drying. This improves the tumbling action and drying efficiency.
• Overloading restricts tumbling action, resulting in uneven drying as well as excessive wrinkling of some fabrics. - When drying large, bulky items such as a blanket or comforter, it may be necessary to reposition the load during the cycle to ensure even drying.
natural_image
Line drawing of a spacecraft capsule with a textured dome and mountainous base (no text or symbols)
Accessories
Optional Drying Rack
Select dryer models are equipped with a drying rack. The drying rack is useful for drying items that require no tumble drying, such as tennis shoes, sweaters, stuffed toys or other delicate items.
Note: The Drying Rack, part no. 504105, is available when not included with your dryer. See your dealer or call 1-877-232-6771 to order.

natural_image
Line drawing of a simple kitchen oven with lid open and side pan, no text or symbols presentControl Panel
Clean with a soft, damp cloth. Do not use abrasive substances.
Tumbler
Remove any stains such as crayon, ink pen or fabric dye from new items (such as towels or jeans) with an all-purpose cleaner. Then tumble old towels or rags to remove any excess stain or cleaning substance. Once these steps are done, stains may still be visible, but should not transfer to subsequent loads.
Cabinet
Wipe off any marks with soap and water. Use an appliance wax once a year if desired.
Dryer Exhaust System
Inspect and clean once a year to maintain optimum performance. The outside exhaust hood should be cleaned more frequently to ensure proper operation. (Refer to the Installation Instructions for more information.)
Special Laundry Tips
Please follow the care label or manufacturer's instructions for drying special items. If care label instructions are not available, use the following information as a guide.
| ITEM | LAUNDERING TIPS |
| Bedspreads and Comforters | Follow the care label instructions or dry on the Regular cycle.Be sure the item is thoroughly dry before using or storing.May require repositioning to ensure even drying. |
| Blankets | Dry only one blanket at a time for best tumbling action.Be sure the item is thoroughly dry before using or storing. |
| Curtains and Draperies | Select the No Iron cycle to help minimize wrinkling.Dry in small loads for best results and remove as soon as possible. |
| Cloth Diapers | Select the Regular cycle for soft, fluffy diapers. |
| Down-Filled Items (jackets, sleeping bags, comforters, etc.) | Select the Regular cycle and a Delicate temperature setting.Place a clean pair of sneakers in the dryer with the item to fluff the down comforters, etc.Adding a couple of dry towels shortens dry time and absorbs moisture. |
| Foam Rubber (rug backs, stuffed toys, certain shoulder pads, etc.) | Do not dry on a heat setting. Select the Time Dry/Air Fluff (no-heat) cycle.WARNING - Drying a rubber item with heat may damage it or be a fire hazard. |
| Pillows | Do not dryer-dry kapok or foam pillows.Select the Regular cycle.Add a couple of dry towels and a pair of clean sneakers to help the tumbling action and to fluff the item. |
| Plastics(shower curtains, outdoor furniture covers, etc.) | Select the Time Dry cycle on a Delicate or Air Fluff temperature depending on the care label instructions. |
IMPORTANT: Avoid Dryer Drying ...
• Fiberglass Items (curtains, draperies, etc.).
- Woolens, unless recommended on the label.
- Vegetable or cooking oil soaked items (see fire hazard warning, page 1).

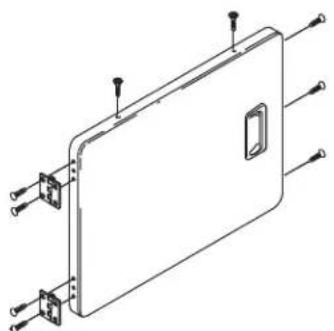
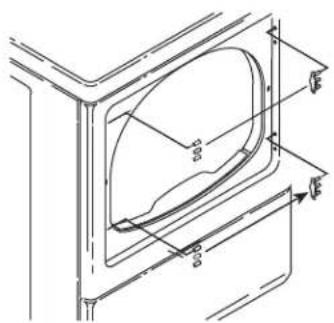
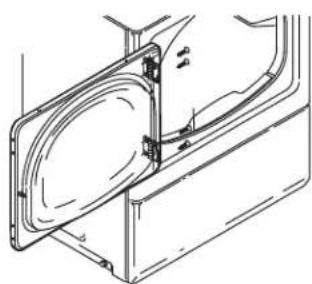
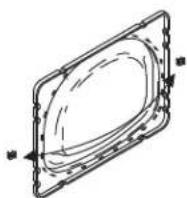
Reversing the Door
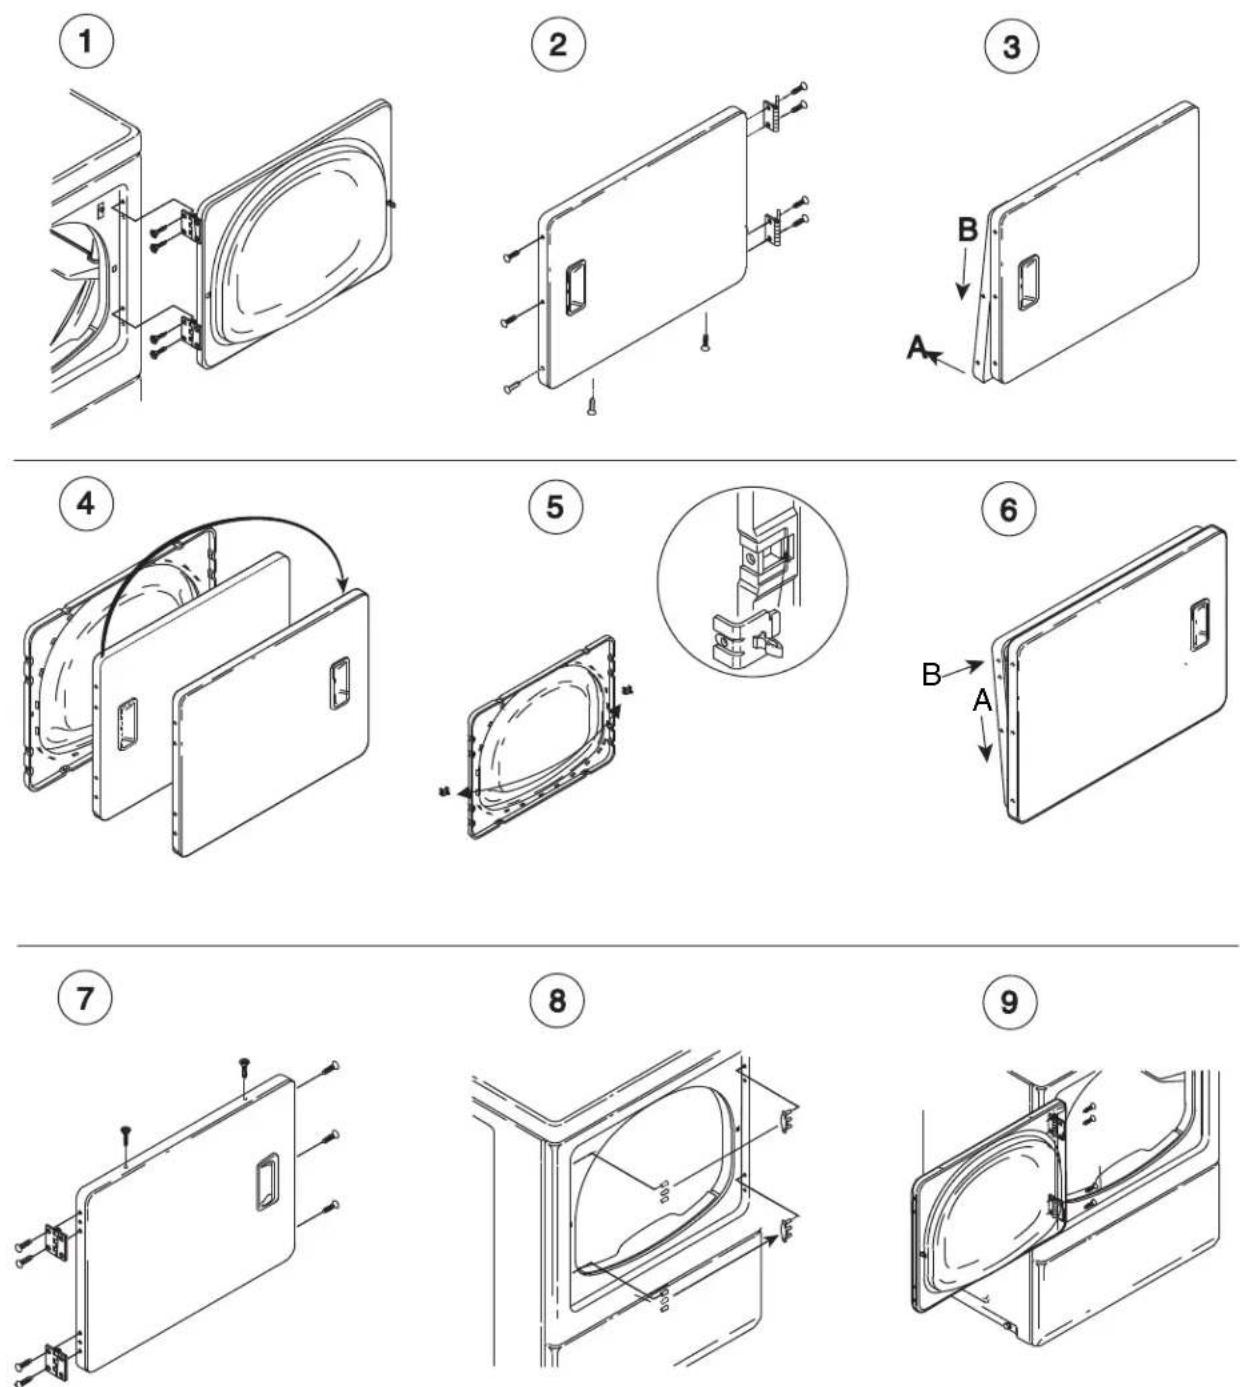
Reversing the Door
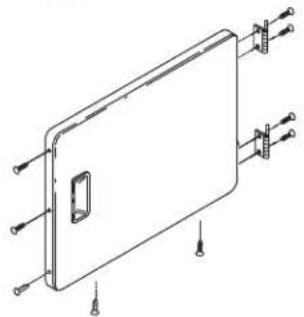
Follow these steps to reverse the door:
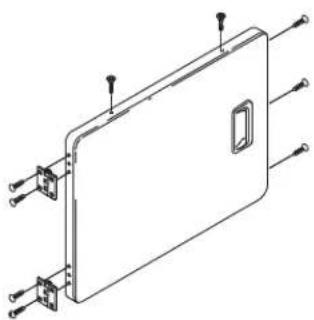
- Remove four hinge-attaching screws.
- Remove all nine screws from door and hinges.
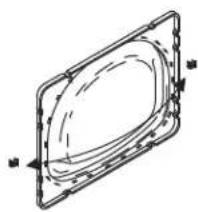
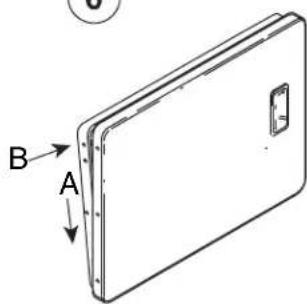
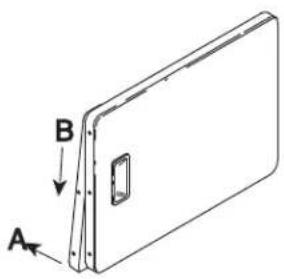
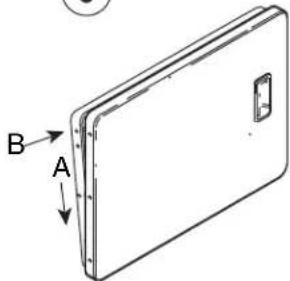
- Pull bottom of door liner out (A), then pull down (B), removing door liner from door panel.
-
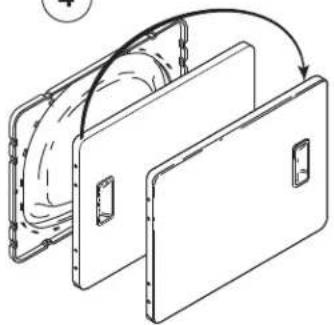
Rotate door panel 180° as shown.
-
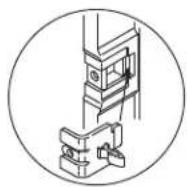
Remove door strike from door liner and reinstall on opposite side.
- Insert liner under flange on bottom of door (A), then push top of door liner into place (B).
- Reinstall nine screws removed in Step 2.
- Using screwdriver, remove two door plugs and reinstall on opposite side of door opening.
- Reinstall four hinge attaching screws removed in Step 1.
WARNING
Plastic or nonmetal flexible duct presents a potential fire hazard.
Do
Read the Installation Instructions and the Use and Care Guide.
Don't
Let a poor exhaust system cause slow drying.
Do
Let your dryer exhaust the air easily.
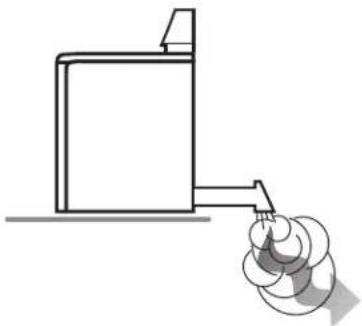
natural_image
Simple line drawing of a container with a handle and a spool of contents (no text or symbols)Don't
Restrict your dryer with a poor exhaust system.
natural_image
Diagram of a crossed-out rope knot with no text or symbols, no readable text presentDo
Use 4 inch diameter rigid metal duct. Tape all joints, including at the dryer. Never use lint-trapping screws.

text_image
4" pe all ing at the dryer. -trapping screws.DON'T
Use plastic, thin foil, or non-metal flexible duct.
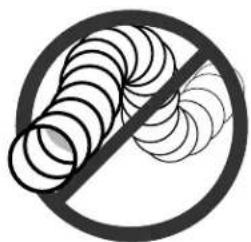
natural_image
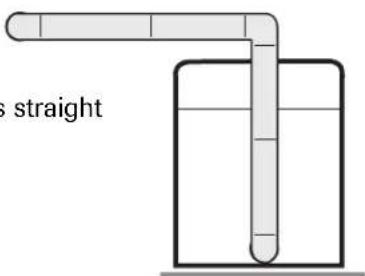
Prohibition sign showing a circular arrangement of coiled springs crossed out by a diagonal line (no text or symbols)Do
Keep duct runs as straight as possible.
text_image
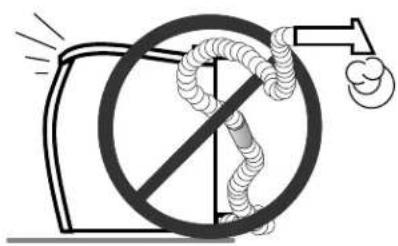
is straightDon't
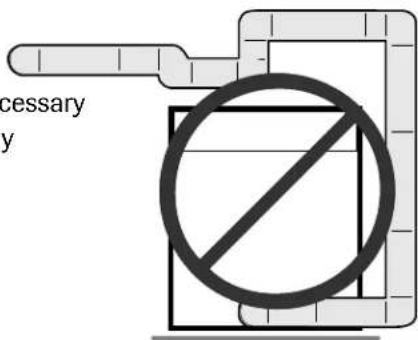
Use longer than necessary duct runs with many elbows.
text_image
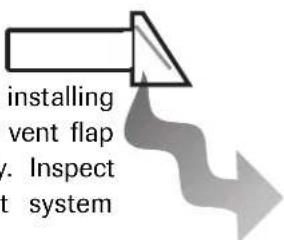
necessary yDo
Clean all old ducts before installing your new dryer. Be sure vent flap opens and closes freely. Inspect and clean the exhaust system annually.
text_image
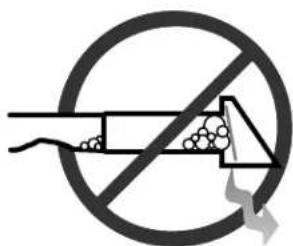
installing vent flap /. Inspect t systemDon't
Allow crushed or clogged ducts and vent.
text_image
Prohibition sign with circular outline and prohibition symbol, featuring a hand holding a trash bin and falling objects| Doesn't Run | ·Be sure the door is shut.·Check to make sure the electrical cord is plugged in.·Check fuse or reset circuit breaker.·Push the control dial in again if the door was opened during the cycle. |
| Doesn't Heat | ·Check fuse or reset circuit breaker.·Select a heat setting, not air fluff.·Check that the gas supply is on for gas dryers.·Clean the lint filter and exhaust duct.·Dryer timer may have moved into the cool-down portion of the cycle. |
| Doesn't Dry Properly | Check all of the above, plus . . .·Check the exhaust hood outside the house, make sure it opens and closes freely.·Check exhaust system for lint buildup. Ducting should be inspected and cleaned annually.·Use rigid 4" metal exhaust duct.·Do not overload. 1 wash load = 1 dryer load.·Sort heavy items from lightweight items.·Large, bulky items like blankets or comforters may require repositioning to ensure even drying.·Check the washer to be sure it is draining properly to extract water from the load.·Clothes load is too small to tumble properly. Add a few towels. |
| Is Noisy | ·Check the load for objects such as coins, nails, etc. Remove promptly from dryer.·It is normal to hear the dryer gas valve or heating element cycle on and off during the drying cycle.·The dryer should be level and installed on a solid floor.·A clicking noise may be the timer advancing.·It is normal for the dryer to hum due to the high velocity of air moving through the dryer drum and exhaust system. |
| Control Knob Advances Slowly (select models) | ·This is normal operation for an Auto Dry or Sensor cycle, especially at the beginning of cycle. Once the load begins to dry, the control knob will start to advance. The rate of advancement will be slow at the beginning of the cycle because there is more moisture in the load. As the load becomes more dry, the control knob will advance more quickly. |
| Dries Unevenly | ·Seams, pockets and other similar heavy areas may not be completely dry when the rest of the load has reached the selected dryness level. This is normal. Select the More Dry setting if desired.·If one heavy item is dried with a lightweight load, such as one towel with sheets, it is possible that the heavy item will not be completely dry when the rest of the load has reached the selected dryness level. Sort heavy items from lightweight items for best drying results. |
| Has an Odor | ·Household odors such as from painting, varnishing, strong cleaners, etc. may enter the dryer with the surrounding room air. This is normal as the dryer draws the air from the room, heats it, pulls it through the tumbler and exhausts it to the outside. When these odors are present in the air, ventilate the room completely before using the dryer. |
For further assistance contact Maytag Services ^SM , Customer Assistance: U.S.A. 1-800-688-9900 or
Canada 1-800-688-2002. U.S.A. Customers using TTY for deaf, hearing impaired or speech impaired, call 1-800-688-2080.
Warranty
Limited One Year Warranty - Parts and Labor
For one (1) year from the original retail purchase date, any part which fails in normal home use will be repaired or replaced free of charge.
Canadian Residents
The above warranties only cover an appliance installed in Canada that has been certified or listed by appropriate test agencies for a compliance to a National Standard of Canada unless the appliance was brought into Canada due to transfer of residence from the United States to Canada.
The specific warranties expressed above are the ONLY warranties provided by the manufacturer. These warranties give you specific legal rights, and you may also have other rights which vary from state to state.
CUSTOMER'S SOLE AND EXCLUSIVE REMEDY UNDER THIS LIMITED WARRANTY SHALL BE PRODUCT REPAIR AS PROVIDED HEREIN. IMPLIED WARRANTIES, INCLUDING WARRANTIES OF MERCHANTABILITY OR FITNESS FOR A PARTICULAR PURPOSE, ARE LIMITED TO ONE YEAR OR THE SHORTEST PERIOD ALLOWED BY LAW. MAYTAG CORPORATION SHALL NOT BE LIABLE FOR INCIDENTAL OR CONSEQUENTIAL DAMAGES. SOME STATES AND PROVINCES DO NOT ALLOW THE EXCLUSION OR LIMITATION OF INCIDENTAL OR CONSEQUENTIAL DAMAGES, OR LIMITATIONS ON THE DURATION OF IMPLIED WARRANTIES OF MERCHANTABILITY OR FITNESS, SO THESE EXCLUSIONS OR LIMITATIONS MAY NOT APPLY TO YOU. THIS WARRANTY GIVES YOU SPECIFIC LEGAL RIGHTS AND YOU MAY ALSO HAVE OTHER RIGHTS, WHICH VARY STATE TO STATE OR PROVINCE TO PROVINCE.
What is Not Covered By These Warranties
- Conditions and damages resulting from any of the following:
a. Improper installation, delivery, or maintenance.
b. Any repair, modification, alteration, or adjustment not authorized by the manufacturer or an authorized servicer.
c. Misuse, abuse, accidents, unreasonable use, or acts of God.
d. Incorrect electric current, voltage, electrical and/or gas supply.
e. Improper setting of any control.
- Warranties are void if the original serial numbers have been removed, altered, or cannot be readily determined.
- Light bulbs, water filters and air filters.
- Products purchased for commercial or industrial use.
- The cost of service or service call to:
a. Correct installation errors. For products requiring ventilation, rigid metal ducting must be used.
b. Instruct the user on the proper use of the product.
c. Transport the appliance to and from the servicer.
- Any food loss due to refrigerator or freezer product failures.
- Expenses for travel and transportation for product service in remote locations.
- Outside of the United States and Canada this warranty does not apply. Contact your dealer to determine if another warranty applies.
- Consequential or incidental damages sustained by any person as a result of any breach of these warranties. Some states do not allow the exclusion or limitation of consequential or incidental damages, so the above exclusion may not apply.
If You Need Service
First see the Troubleshooting section in your Use and Care Guide or call the dealer from whom your appliance was purchased or call Maytag Services, LLC, Customer Assistance at 1-800-688-9900 USA and 1-800-688-2002 Canada to locate an authorized servicer.
- Be sure to retain proof of purchase to verify warranty status. Refer to WARRANTY for further information on owner's responsibilities for warranty service.
- If the dealer or service company cannot resolve the problem, write to Maytag Services, LLC, Attn: CAIR® Center, P.O. Box 2370, Cleveland, TN 37320-2370, or call 1-800-688-9900 USA and 1-800-688-2002 Canada. U.S. customers using TTY for deaf, hearing impaired or speech impaired, call 1-800-688-2080.
- User's guides, service manuals and parts information are available from Maytag Services, LLC, Customer Assistance.
Notes: When writing or calling about a service problem, please include:
a. Your name, address and telephone number;
b. Model number and serial number;
c. Name and address of your dealer or servicer;
d. A clear description of the problem you are having;
e. Proof of purchase (sales receipt).
Amana®
ND-1
Sécheuse
natural_image
Microscopic view of a textured surface with a wavy pattern at the bottom (no visible text or symbols)text_image
Delicate Medium Air Fluff RegularTemperature

End of Cycle Signal
ÉTAPE 3
text_image
Interior Light - 8 Cycles On Off Extended Tumble Wrinkle Out Auto Dry Regular Cool Down Less Dry More Dry Cool More Dry Cool Down Less Off No Iron Fabrics Extended Tumble Off 100 90 Refresh 20 Damp Dry 30 40 50 60 70 Time Dry Air Fluff Push to Start Press to StartTime Dry/Air Fluff (séchage minuté/gonflant)
text_image
Amana Heavy Duty - Stainless Drum - Super Capacity Plus - Sol Delicate Medium Regular Air Fluff (Auto Temp) Temperature Off On Wrinkle PreventÉTAPE 3
Sound II - Interior Light - Drying Rack - 16 Cycles
text_image
Less Dry Normal Dry amp Dry More Dry Dryness SettingFabric Selection
other
| Category | Value | | -------------- | ----- | | Sensor Dry | 7 | | Jeans | 60 | | Regular | 50 | | Refresh | 40 | | Time Dry | 30 | | Power Off | 20 | | Pause | 10 | | Complete Prevent | 10 | | Wrinkle Down | 10 | | Cool Down | 10 | | Drying | 10 | | Delicates | 10 | | No Iron | 60 | | Sensor Dry | 7 |other
| Fabric Type | Value | | ----------------- | ----- | | Sensor Dry | 60 | | Jeans | 50 | | No Iron | 40 | | Delicates | 30 | | Drying | 20 | | Cool Down | 10 | | Wrinkle Prevent | 5 | | Complete | 3 | | Pause | 2 | | Power Off | 1 | | Time Dry | 0 | | Push to Start / Push to Stop | 0 |
Fonctionnement
natural_image
Illustration of two hands exchanging a tray with granular material (no text or symbols)natural_image
Diagram of a biological or geological structure inside a circular enclosure, showing layered rock formations and a central circular feature (no text or symbols)
natural_image
Line drawing of a simple kitchen oven with lid open and vented, showing internal compartments (no text or symbols)Tableau de commande
natural_image
Technical line drawing of a mechanical assembly with no visible text or symbols5
natural_image
Pure technical line drawing of a circular component with internal dashed lines, no text or symbols present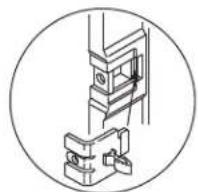
6
text_image
B A7
natural_image
Technical line drawing of a rectangular electronic component with mounting holes and internal structure (no text or symbols)8
text_image
Technical drawing of a mechanical part with dimension annotations including 100 and 200 units9
natural_image
Technical line drawing of a mechanical component with no visible text or symbolsAVERTISSEMENT
natural_image
Simple line drawing of a mechanical or architectural component with a base and a curved pipe (no text or symbols)À NE PAS FAIRE
natural_image
Diagram of a mechanical device with a circular component and a diagonal line, no text or symbols present.À FAIRE
natural_image
Prohibition sign showing a circular arrangement of coiled springs crossed out by a diagonal line (no text or symbols)À FAIRE
text_image
Prohibition sign with no smoking symbol and circular backgroundnatural_image
Microscopic view of a textured surface with a wavy pattern at the bottom (no text or symbols visible)text_image
Amana Heavy Duty - Super Capacity Plus - SofSound I - Inter Delicate Medium Air Fluff Regular Temperature On Off End of Cycle SignalPASO 3
Selección del ciclo
text_image
Prior Light - 8 Cycles On Off Extended Tumble Wrinkle Out Auto Dry Regular Cool Down Less Dry More Dry Off Cool Down 10 Refresh 20 Damp Dry 30 40 50 60 70 80 90 100 More Dry More Dry Dry Down Cool Off Less Add No Iron Fabrics Extended Tumble Off Time Dry Air Fluff Push to Start Push to Start'Touch Up/Refresh' (retocar/refresar)
Heavy Duty - Stainless Drum - Super Capacity Plus - Sol
text_image
Medium Delicate Regular Air Fluff Auto Temp Temperature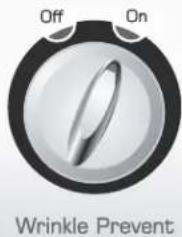
text_image
Off On Wrinkle PreventPASO 3
text_image
Sound II - Interior Light - Drying Rack - 16 Cycles Dryness Setting Sensor Dry Jeans Regular Refresh Time Dry No Iron Delicates Drying Cool Down Wrinkle Prevent Complete Pause Power Off Chime Push to Start / Push to Stop Fabric Selection Cycle Status'Refresh' (refrescar)
pie
Fabric Selection | Category | Value | |---|---| | Time Dry | 60 | | Power Off | 50 | | Pause | 40 | | Complete Prevent | 30 | | Wrinkle Down | 20 | | Cool | 10 | | Drying | 10 | | Delicates | 10 | | No Iron | 10 | | Sensor Dry | 10 | | Jeans | 10 | | Regular | 10 | | Refresh | 10 | | Push to Start / Push to Stop | 10 |
natural_image
Illustration of hands handling a tray with granular material (no text or symbols)text_image
Technical diagram of a spacecraft capsule with labeled components and a central screen showing a grid pattern.
natural_image
Line drawing of a simple kitchen oven with lid open and vented, showing internal structure (no text or symbols)Panel de control
natural_image
Technical line drawing of a mechanical component with mounting brackets and a curved housing (no text or symbols)2
natural_image
Technical line drawing of a rectangular electronic component with mounting holes and a central slot (no text or symbols)3
natural_image
Technical line drawing of a rectangular panel with labeled points A and B, showing internal structure and arrows (no text or symbols beyond labels)4
natural_image
Technical line drawing of a mechanical assembly with no visible text or symbols5
6
text_image
B A7
natural_image
Technical line drawing of a rectangular electronic device with mounting connectors and a central panel (no text or symbols)8

natural_image
Technical line drawing of a mechanical component with dimension annotations (no readable text or symbols)9