SLATE 4 - DJ Equipment GEMINI - Free user manual and instructions
Find the device manual for free SLATE 4 GEMINI in PDF.
User questions about SLATE 4 GEMINI
0 question about this device. Answer the ones you know or ask your own.
Ask a new question about this device
Download the instructions for your DJ Equipment in PDF format for free! Find your manual SLATE 4 - GEMINI and take your electronic device back in hand. On this page are published all the documents necessary for the use of your device. SLATE 4 by GEMINI.
USER MANUAL SLATE 4 GEMINI
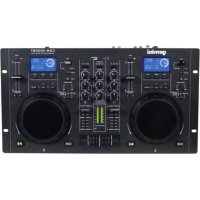
natural_image
Black vinyl vinyl vinyl vinyl vinyl vinyl vinyl vinyl vinyl vinyl vinyl vinyl vinyl vinyl vinyl vinyl vinyl vinyl vinyl vinyl vinyl vinyl vinyl vinyl vinyl vinyl vinyl vinyl vinyl vinyl vinyl vinyl vinyl vinyl vinyl vinyl vinyl vinyl vinyl vinyl vinyl vinyl vinyl vinyl vinyl vinyl vinyl vinyl vinyl vinyl vinyl vinyl vinyl vinyl vinyl vinyl vinyl vinyl vinyl vinyl vinyl vinyl vinyl vinyl vinyl vinyl vinyl vinyl vinyl vinyl vinyl vinyl vinyl vinyl vinyl vinyl vinyl vinyl vinyl vinyl vinyl vinyl vinyl vinyl vinyl vinyl vinyl vinyl vinyl vinyl vinyl vinyl vinyl vinyl vinyl vinyl vinyl vinyl vinyl vinyl
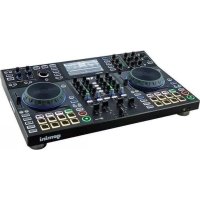
natural_image
Black vinyl vinyl vinyl vinyl vinyl vinyl vinyl vinyl vinyl vinyl vinyl vinyl vinyl vinyl vinyl vinyl vinyl vinyl vinyl vinyl vinyl vinyl vinyl vinyl vinyl vinyl vinyl vinyl vinyl vinyl vinyl vinyl vinyl vinyl vinyl vinyl vinyl vinyl vinyl vinyl vinyl vinyl vinyl vinyl vinyl vinyl vinyl vinyl vinyl vinyl vinyl vinyl vinyl vinyl vinyl vinyl vinyl vinyl vinyl vinyl vinyl vinyl vinyl vinyl vinyl vinyl vinyl vinyl vinyl vinyl vinyl vinyl vinyl vinyl vinyl vinyl vinyl vinyl vinyl vinyl vinyl vinyl vinyl vinyl vinyl vinyl vinyl vinyl vinyl vinyl vinyl vinyl vinyl vinyl vinyl vinyl vinyl vinyl vinyl vinyl Vinyl 4 (no visible text or symbols on the device itself)gemini ^ DJ
WWW.GEMINISOUND.COM
OPERATIONS MANUAL || MANUAL DE INSTRUCCIONESS MANUEL D'INSTRUCTIONS || BEDIENINGSHANDBUCH
INTRODUCTION (ENGLISH)
Thank you for purchasing our SLATE or SLATE 4 USB controller. We are confident that the Gemini platform of products will not only make your life easier through the use of the latest technological advancements in cross-platform connectivity and sound reproduction but will raise the bar for DJ and pro audio products. With the proper care & maintenance, your unit will likely provide years of reliable, uninterrupted service. All Gemini products are backed by a 1-year limited warranty*.
REGISTRATION
Please go to www.geminisound.com to register your Slate. Registering your product allows Gemini to keep you up-to-date with any new product developments such as product updates or enhancements.
PREPARING FOR FIRST USE
Please ensure that you find these accessories included with the SLATE Controller:
(1) Slate
(1) USB Cable
(1) Serato DJ Intro Software Installation Instructions
(1) Operating instructions
(1) Safety and Warranty Information
SLATE SETUP
Locate the Serato DJ Intro installation card in the box to download and install the software. Once installed connect your Slate to your computer. Then connect speakers to the RCA outputs and headphones to the headphone output. Power on your computer, open Serato DJ Intro and load music to the decks. You are now ready to DJ with your Gemini Slate for Serato DJ Intro!
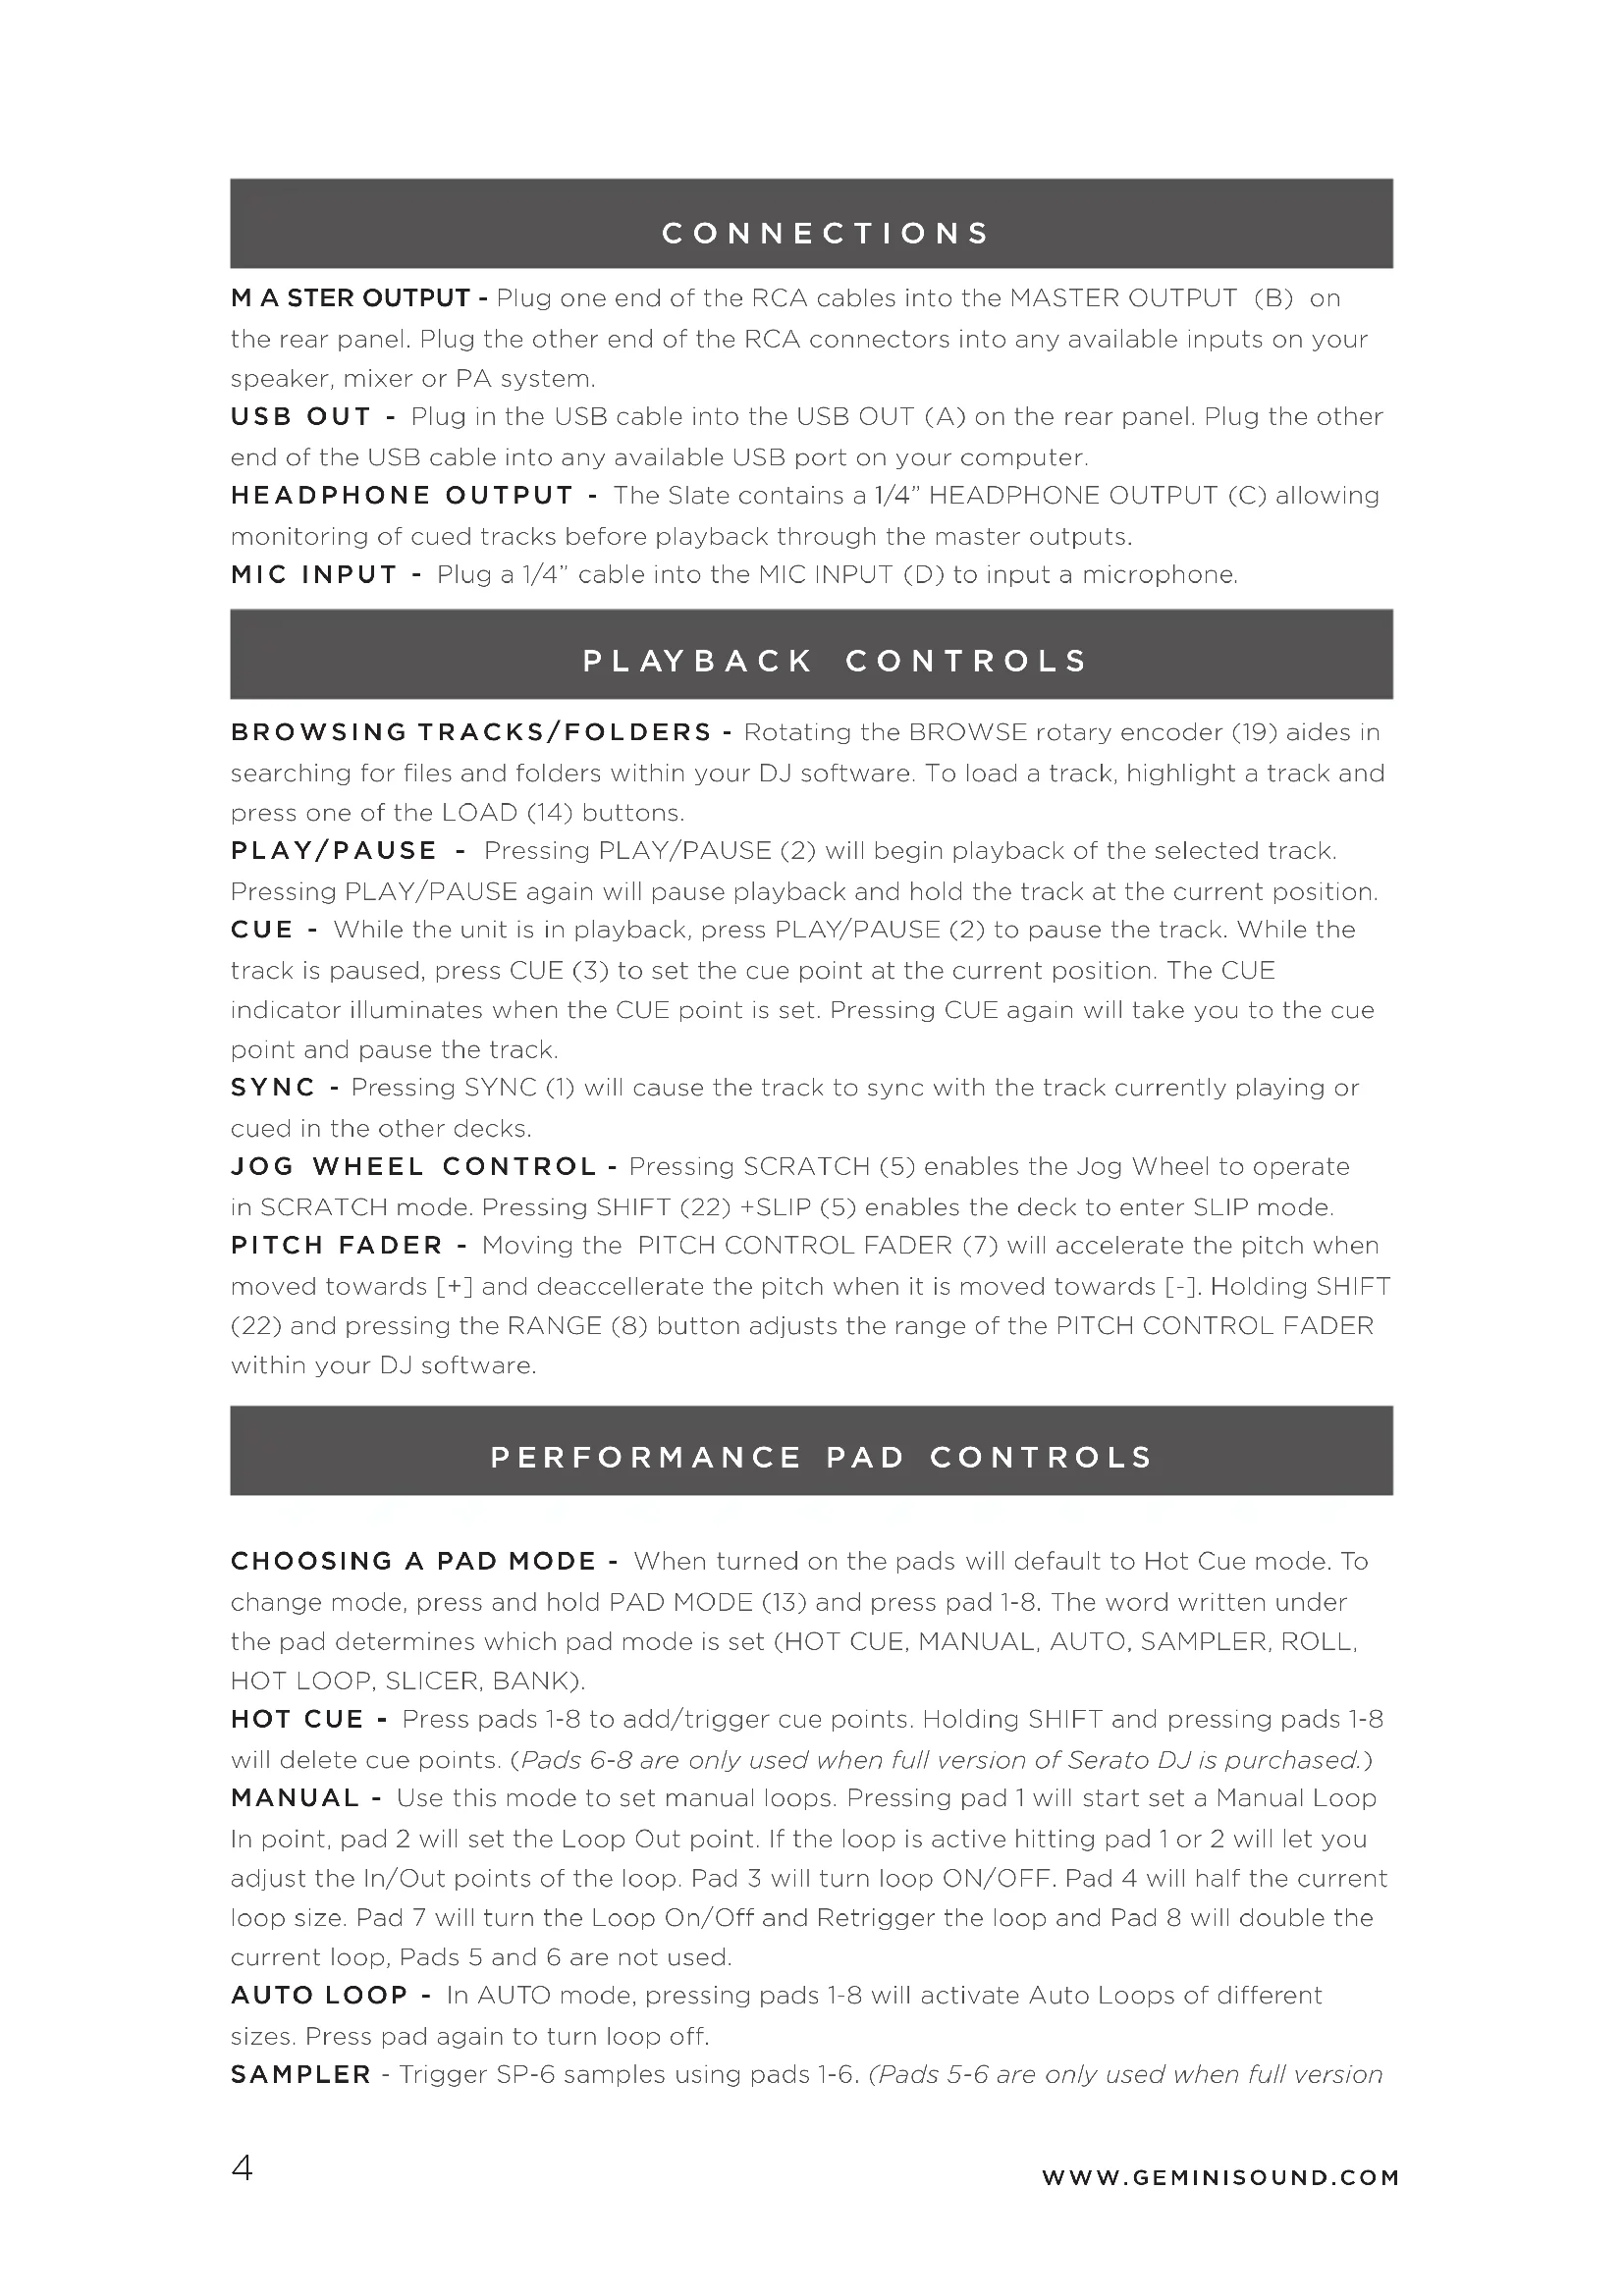
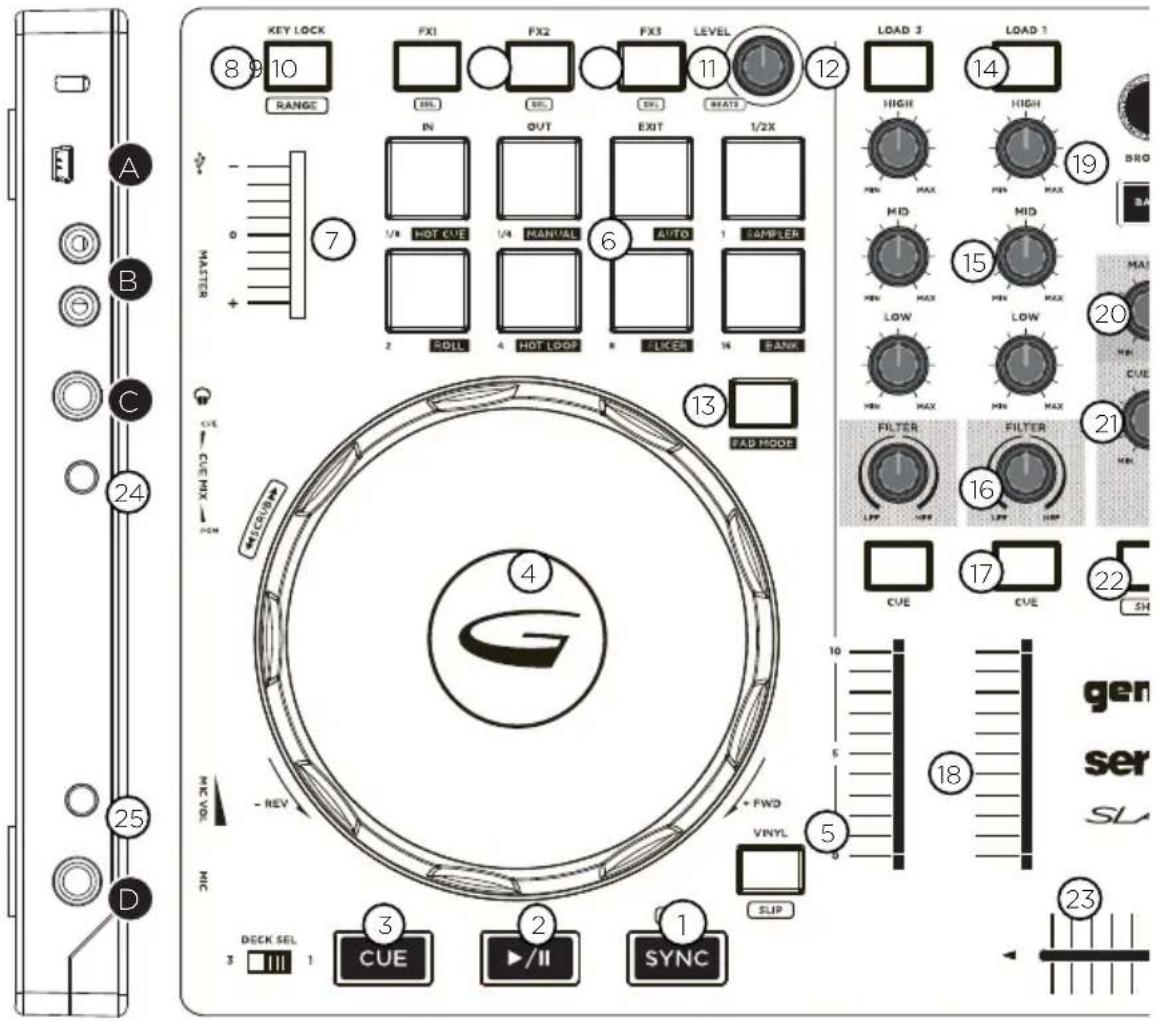
TOP/SIDE VIEW
text_image
KEY LOCK 8 9 10 RANGE FX1 FX2 FX3 LEVEL 11 12 LOAD 3 14 HIGH HIGH IN OUT EXIT 1/2X 1/N HOT CUE 1/4 MANUAL AUTO 1 SAMPLER 2 RDIL 4 HOT LOOP 5 LIKER 6 SAMPER 16 BANG 13 FAD MODE 17 CVE CVE 22 SH MID MID MIN MAX MIN MAX BRO 24 CVE CUE NIX - HOM 4 - REV + FWD VINYL 5 10 5 18 23 GEN SER SL 3 DECK SEL 1 CUE 2 ▶/II SYNC 1 SLIPCONTROLS
- Sync
- Play/Pause
- Cue
- Jog Wheel
- Scratch/Slip
- Performance Pads 1-8
- Pitch fader
- Keylock/Range
- FX 1/FX 1 Select
- FX 2/FX 2 Select
- FX 3/FX 3 Select
- FX Level & Beats
-
Pad Mode
-
Load
- EQ High/Mid/Low
- Filter
- Cue
- Track Fader
- Browse/Back
- Master Volume
- Cue Volume
- Shift
- Cross Fader
- Cue Mix
- Mic Volume
INPUTS - OUTPUTS
A. USB Output
B. Master Output RCA
C. Headphone Output
D. Microphone Input
CONNECTIONS
M A STER OUTPUT - Plug one end of the RCA cables into the MASTER OUTPUT (B) on the rear panel. Plug the other end of the RCA connectors into any available inputs on your speaker, mixer or PA system.
USB OUT - Plug in the USB cable into the USB OUT (A) on the rear panel. Plug the other end of the USB cable into any available USB port on your computer.
HEADPHONE OUTPUT - The Slate contains a 1/4" HEADPHONE OUTPUT (C) allowing monitoring of cued tracks before playback through the master outputs.
MIC INPUT - Plug a 1/4" cable into the MIC INPUT (D) to input a microphone.
PLAYBACK CONTROLS
BROWSING TRACKS/FOLDERS - Rotating the BROWSE rotary encoder (19) aides in searching for files and folders within your DJ software. To load a track, highlight a track and press one of the LOAD (14) buttons.
PLAY/PAUSE - Pressing PLAY/PAUSE (2) will begin playback of the selected track. Pressing PLAY/PAUSE again will pause playback and hold the track at the current position.
CUE - While the unit is in playback, press PLAY/PAUSE (2) to pause the track. While the track is paused, press CUE (3) to set the cue point at the current position. The CUE indicator illuminates when the CUE point is set. Pressing CUE again will take you to the cue point and pause the track.
SYNC - Pressing SYNC (1) will cause the track to sync with the track currently playing or cued in the other decks.
JOG WHEEL CONTROL - Pressing SCRATCH (5) enables the Jog Wheel to operate in SCRATCH mode. Pressing SHIFT (22) + SLIP (5) enables the deck to enter SLIP mode.
PITCH FADER - Moving the PITCH CONTROL FADER (7) will accelerate the pitch when moved towards [+] and deaccelerate the pitch when it is moved towards [-] . Holding SHIFT (22) and pressing the RANGE (8) button adjusts the range of the PITCH CONTROL FADER within your DJ software.
PERFORMANCE PAD CONTROLS
CHOOSING A PAD MODE - When turned on the pads will default to Hot Cue mode. To change mode, press and hold PAD MODE (13) and press pad 1-8. The word written under the pad determines which pad mode is set (HOT CUE, MANUAL, AUTO, SAMPLER, ROLL, HOT LOOP, SLICER, BANK).
HOT CUE - Press pads 1-8 to add/trigger cue points. Holding SHIFT and pressing pads 1-8 will delete cue points. (Pads 6-8 are only used when full version of Serato DJ is purchased.)
MANUAL - Use this mode to set manual loops. Pressing pad 1 will start set a Manual Loop In point, pad 2 will set the Loop Out point. If the loop is active hitting pad 1 or 2 will let you adjust the In/Out points of the loop. Pad 3 will turn loop ON/OFF. Pad 4 will half the current loop size. Pad 7 will turn the Loop On/Off and Retrigger the loop and Pad 8 will double the current loop, Pads 5 and 6 are not used.
AUTO LOOP - In AUTO mode, pressing pads 1-8 will activate Auto Loops of different sizes. Press pad again to turn loop off.
SAMPLER - Trigger SP-6 samples using pads 1-6. (Pads 5-6 are only used when full version
of Serato DJ is purchased.) Pads 7 and 8 are not used.
ROLL - (Only available when full version of Serato DJ is purchased.) Pressing pads 1-8 will set loop rolls of specified length as long as the pad is held. The track will slip and continue playing from original play- head position when you lift your finger off the pad.
HOT LOOP - (Only available when full version of Serato DJ is purchased.) Hot loop mode will allow you to engage a set loop from the cue points you have set. Press pad once to jump to that cue point and set a loop. The loop size can be toggled on the virtual deck in the loop size area. Pressing the pad again will turn the loop off. Hold SHIFT and press pad to re-trigger the Cue Point with the loop on.
SLICER - (Only available when full version of Serato DJ is purchased.) A specified range (or domain) is divided into eight equal sections, and these eight sliced sections are assigned to the respective performance pads. Holding Pad Mode and pressing SLICER once for the first mode, is a shifting Slicer Domain. Pressing SLICER twice, for the second mode is a fixed Slicer Domain or "loop". Use the PARAMETER knob to set the quantization for the slicer function. The quantization can be set in four ways: 1/8, 1/4, 1/2 and 1. SHIFT + PARAMETER knob will set the domain. The domain can be set to one of six settings: 2 beats, 4 beats, 8 beats, 16 beats, 32 beats or 64 beats.
BANK - (Only available when full version of Serato DJ is purchased.) When in BANK mode, pads 1-4 control SP-6 sample banks while pads 5-8 control SP-6 output channels.
FX CONTROLS
FX SELECT - Hold SHIFT (22) and press FX1 (9), FX2 (10), or FX3 (11) to select the effect for that slot.
FX ON/OFF - Press FX1 (9), FX2 (10), or FX3 (11) to toggle the currently selected FX on and off.
FX LEVEL & BEATS - Turning FX AMOUNT & DEPTH (12) will control the parameter of FX slot 1-3. Hold SHIFT (22) and turning FX AMOUNT & DEPTH (12) will adjust the FX BEATS Multiplier.
USING THE SERATO DJ TOOL TIPS
Click on the Tips icon to enable Tool Tips. This is located next to the setup button in the top right hand corner of the screen. Tool Tips provide a handy way to learn the various features of Serato DJ Intro
- Sync
- Play/Pause
- Cue
- Jog Wheel
- Scratch/Slip
- Performance Pads 1-8
- Pitch fader
- Keylock/Range
- FX 1/FX 1 Select
- FX 2/FX 2 Select
- FX 3/FX 3 Select
- FX Level & Beats
-
Pad Mode
-
Load
- EQ High/Mid/Low
- Filter
- Cue
- Track Fader
- Browse/Back
- Master Volume
- Cue Volume
- Shift
- Cross Fader
- Cue Mix
- Mic Volume
ENTRADAS - SALIDAS
A. USB Output
B. Master Output RCA
C. Headphone Output
D. Microphone Input
CONEXIONES
- Sync
- Play/Pause
- Cue
- Jog Wheel
- Scratch/Slip
- Performance Pads 1-8
- Pitch fader
- Keylock/Range
- FX 1/FX 1 Select
- FX 2/FX 2 Select
- FX 3/FX 3 Select
- FX Level & Beats
-
Pad Mode
-
Load
- EQ High/Mid/Low
- Filter
- Cue
- Track Fader
- Browse/Back
- Master Volume
- Cue Volume
- Shift
- Cross Fader
- Cue Mix
- Mic Volume
ENTRÉES - SORTIES
A. USB Output
B. Master Output RCA
C. Headphone Output
D. Microphone Input
CONNEXIONS
JOG WHEEL CONTROL - Pressing SCRATCH (5) enables the Jog Wheel to operate in SCRATCH mode. Pressing SHIFT (22) + SLIP (5) enables the deck to enter SLIP mode.
- Sync
- Play/Pause
- Cue
- Jog Wheel
- Scratch/Slip
- Performance Pads 1-8
- Pitch fader
- Keylock/Range
- FX 1/FX 1 Select
- FX 2/FX 2 Select
- FX 3/FX 3 Select
- FX Level & Beats
-
Pad Mode
-
Load
- EQ High/Mid/Low
- Filter
- Cue
- Track Fader
- Browse/Back
- Master Volume
- Cue Volume
- Shift
- Cross Fader
- Cue Mix
- Mic Volume
EINGÄNGE - AUSGÄNGE
A. USB Output
B. Master Output RCA
C. Headphone Output
D. Microphone Input
VERBINDUNGEN
M A STER OUTPUT - Plug one end of the RCA cables into the MASTER OUTPUT (B) on the rear panel. Plug the other end of the RCA connectors into any available inputs on your speaker, mixer or PA system.
USB OUT - Plug in the USB cable into the USB OUT (A) on the rear panel. Plug the other end of the USB cable into any available USB port on your computer.
HEADPHONE OUTPUT - The Slate contains a 1/4" HEADPHONE OUTPUT (C) allowing monitoring of cued tracks before playback through the master outputs.
MIC INPUT - Plug a 1/4" cable into the MIC INPUT (D) to input a microphone.
WIEDERGABESTEUERUNG
BROWSING TRACKS/FOLDERS - Rotating the BROWSE rotary encoder (19) aides in searching for files and folders within your DJ software. To load a track, highlight a track and press one of the LOAD (14) buttons.
PLAY/PAUSE - Pressing PLAY/PAUSE (2) will begin playback of the selected track. Pressing PLAY/PAUSE again will pause playback and hold the track at the current position.
CUE - While the unit is in playback, press PLAY/PAUSE (2) to pause the track. While the track is paused, press CUE (3) to set the cue point at the current position. The CUE indicator illuminates when the CUE point is set. Pressing CUE again will take you to the cue point and pause the track.
SYNC - Pressing SYNC (1) will cause the track to sync with the track currently playing or cued in the other decks.
JOG WHEEL CONTROL - Pressing SCRATCH (5) enables the Jog Wheel to operate in SCRATCH mode. Pressing SHIFT (22) + SLIP (5) enables the deck to enter SLIP mode.
PITCH FADER - Moving the PITCH CONTROL FADER (7) will accelerate the pitch when moved towards [+] and deaccelerate the pitch when it is moved towards [-] . Holding SHIFT (22) and pressing the RANGE (8) button adjusts the range of the PITCH CONTROL FADER within your DJ software.
PERFORMANCE PAD- STEUERELEMENTE
Warranty and Repair:
All Gemini products are designed and manufactured to the highest standards in the industry. With proper care and maintenance, your product will provide years of reliable service.
LIMITED WARRANTY
A. Gemini guarantees its products to be free from defects in materials and workmanship for One (1) year from the original purchase date. Exceptions: Laser assemblies on CD Players, cartridges, and crossfaders are covered for 90 days.
B. This limited warranty does not cover damage or failure caused by abuse, misuse,
abnormal use, faulty installation, improper maintenance or any repairs other than those provided by an authorized Gemini Service Center.
C. There are no obligations of liability on the part of Gemini for consequential damages arising out of or in connection with the use or performance of the product or other indirect damages with respect to loss of property, revenues, of profit, or costs of removal, installation, or reinstallation. All implied warranties for Gemini, including implied warranties for fitness, are limited in duration to One (1) year from the original date of purchase, unless otherwise mandated by local statutes.
RETURN/REPAIR
A. In the U.S.A., please call our helpful Customer Service Representatives at (732) 346-0061, and they will be happy to give you a Return Authorization Number (RA#) and the address of an authorized service center closest to you. B. After receiving an RA#, include a copy of the original sales receipt, with defective product and a description of the defect. Send by insured freight to: Gemini and use the address provided by your customer service representative. Your RA# must be written on the outside of the package, or processing will be delayed indefinitely! C. Service covered under warranty will be paid for by Gemini and returned to you. For non-warrantied products, Gemini will repair your unit after payment is received. Repair charges do not include return freight. Freight charges will be added to the repair charges. D. On warranty service, you pay for shipping to Gemini, we pay for return shipping within the continental United States. Alaska, Hawaii, Puerto Rico, Canada, Bahamas, and the Virgin Islands will be charged
for freight.
E. Please allow 2-3 weeks for return of your product.
Under normal circumstances your product will spend no more than 10 working days at Gemini.
We are not responsible for shipping times.
Gemini
Worldwide Headquarters
107 Trumbull Street
Building F8
Elizabeth, NJ 07206 USA
Tel: (732) 346-0061
Fax: (732) 346-0065
Register your product online at
GEMINISOUND.COM to be
stay up to date with product updates!
In the USA: if you experience problems with this unit, call 732-346-0061 for Gemini customer service. Do not attempt to return this equipment to your dealer.
Parts of the design of this product may be protected by worldwide patents.
Information in this manual is subject to change without notice and does not represent a commitment on the part of the vendor. Gemini shall not be liable for any loss or damage whatsoever arising from the use of information or any error contained in this manual. No part of this manual may be reproduced, stored in a retrieval system or transmitted, in any form or by any means, electronic, electrical, mechanical, optical, chemical, including photocopying and recording,
for any purpose without the express written permission of Gemini It is recommended that all maintenance and service on this product is performed by Gemini or its authorized agents. Gemini will not accept liability for loss or damage caused by maintenance or repair performed by unauthorized personnel.
Worldwide Headquarters
107 Trumbull Street, Building F8 • Elizabeth, NJ 07206
• USA
Tel: (732)346-0061 • Fax: (732)346-0065