— Radio — Mode d'emploi PDF")
LIFE P85025 (MD 86955) - Radio MEDION - Free user manual and instructions
Find the device manual for free LIFE P85025 (MD 86955) MEDION in PDF.
| Product Type | WiFi Internet Radio with DAB+ and FM reception |
| Brand | Medion |
| Model | LIFE P85025 (MD 86955) |
| Dimensions (W x H x D) | Approx. 235 x 128.7 x 130 mm |
| Weight | Approx. 1.8 kg |
| Power Supply | Power adapter 12 V 2.5 A (model YN36W-1200250VW), AC input 100-240 V ~ 50/60 Hz |
| Network Connectivity | WiFi 802.11 a/b/g/n (2.4 and 5 GHz), Ethernet LAN (RJ45) |
| Radio Types | Internet Radio (via vTuner), DAB (Band III), FM (87.5-108 MHz) with RDS |
| Audio Functions | Media player (USB, UPnP), AUX input (3.5mm jack), line output (3.5mm jack), headphone jack |
| Speakers | 2 x 5 W RMS + subwoofer |
| Supported Audio Formats | MP3, WMA, WAV, FLAC, AAC |
| Remote Control | Yes, with CR2025 button cell battery (included) |
| Practical Functions | Dual alarm, sleep timer, equalizer (presets + custom), favorites list (up to 500 stations), control via Lifestream IR app |
| Display | Display with adjustable backlight |
| USB Port | USB 2.0, power 5 V 300 mA max. |
| Maintenance and Cleaning | Turn off the device, wipe with a soft dry cloth; do not use harsh cleaners |
| Safety | Instructions: do not open, do not expose to moisture, use only the supplied adapter, keep out of reach of children |
| Spare Parts and Repairability | Do not repair yourself; contact Medion after-sales service (SAV hotline: 02 43 16 60 30) |
| General Information | Indoor use only, operating temperature 5-35 °C, CE compliance |
Frequently Asked Questions - LIFE P85025 (MD 86955) MEDION
User questions about LIFE P85025 (MD 86955) MEDION
0 question about this device. Answer the ones you know or ask your own.
Ask a new question about this device
Download the instructions for your Radio in PDF format for free! Find your manual LIFE P85025 (MD 86955) - MEDION and take your electronic device back in hand. On this page are published all the documents necessary for the use of your device. LIFE P85025 (MD 86955) by MEDION.
USER MANUAL LIFE P85025 (MD 86955) MEDION
natural_image
Black MEDION portable radio with digital display and control knobs (no readable text or symbols beyond branding)Bedienungsanleitung
Instruction manual
Inhaltsverzeichnis
DE
text_image
Technical diagram of a device with labeled components, showing two numbered parts and a central chamber.text_image
DAB 03:28 BBC Radio 6Music to vote for a track that missed out on the 6Music playlist ① ② ⑤ 4 3 6Dynamic Range Control
text_image
① PM 03:28 Alice 97.3 Best Music in the world R-D-S ② ⑤ 4 3 6 7text_image
Music player 03:28 All Out of Love Album: Sweet Dreams: The Encore Collection 7 6 5 4 ① ② ③www.medion.com/conformity.
C€0700
text_image
QR code image containing encoded data, no visible human-readable textSommaire
text_image
Technical diagram of a device with labeled components, showing internal structure and numbered parts.text_image
Setup wizard Start now? YES NO
REMARQUE!
text_image
Internet radio Last listened > Station list > System settings > Main menu >text_image
Station list My Favourites Germany My Weather Change my location Stations
text_image
Station list Podcasts My added stations My added podcasts HelpMy Favourites
text_image
① DAB 03:28 BBC Radio 6Music to vote for a track that missed out on the 6Music playlist ② ⑤ 4 36text_image
① FM 03:28 Alice 97.3 Best Music in the world ② 5 4 3 6 7text_image
Music player Shared media > USB playback > Repeat play: Off Shuffle: Off System settings >15.1. Menu principal en mode Music Player
Shared Media
text_image
Music player 03:28 All Out of Love Album: Sweet Dreams: The Encore Collection ① ② ③ ⑦ ⑥ ⑤ ④Keep network connected
natural_image
Symbol of a trash bin crossed with a diagonal line and a horizontal bar below (no text or numbers present)Appareil
Fabricant: winna, China
Codage : WEP/WPA/WPA2
www.medion.com/conformity.
C€0700
text_image
QR code image containing encoded data, no visible human-readable textInhoudsopgave
text_image
1 2 3 UX INL NE OUT DC IN LAN DC POWER 468 7 5text_image
Technical diagram of a device with labeled components, showing two numbered parts and a central square chamber.6.1. Bediening in de menu's
Bediening via de afstandsbediening
text_image
Setup wizard Start now? YES NO10.1. Taal kiezen
text_image
Internet radio Last listened > Station list > System settings > Main menu >text_image
Station list My Favourites Germany My Weather Change my location Stations
text_image
Station list Podcasts My added stations My added podcasts HelpMy Favourites
text_image
DAB 03:28 BBC Radio 6Music to vote for a track that missed out on the 6Music playlist ① ② ⑤ 4 3 6Dynamic Range Control
text_image
Music player Shared media > USB playback > Repeat play: Off Shuffle: Off System settings >Keep network connected
natural_image
Symbol of a trash bin crossed out by two crossed lines, with no text or labels present.Toestel
Codering: WEP/WPA/WPA2
www.medion.com/conformity.
C€0700
text_image
QR code image containing encoded data, no visible human-readable textContents
DE
1. Notes on how to use these instructions .... 139
1.1. Symbols and keywords used in these instructions ....139
FR
2. Proper use
3. Safety instructions
3.1. People not permitted to use this device 140
3.2. Setting up the device safely 140
3.3. Mains connection
3.4. Thunderstorms....142
3.5. Never carry out repairs yourself ....142
3.6. Headphones 142
3.7. Safe handling of batteries 142
4. Getting started
4.1. Check package contents 143
4.2. Inserting the battery in the remote control 144
4.3. Connections....144
4.4. Resetting the device in case of malfunction 145
5. Overview of WLAN radio 145
5.1. Front 145
5.2. Rear....146
5.3. Top....147
5.4. Remote control....148
6. Menu structure.... 14
6.1. Navigating the menus....150
7. Internet radio settings.... 150
7.1. Network requirements
8. Network configuration.... 151
9. Connecting to a power supply 151
10. Using the device for the first time 151
10.1. Select language....151
10.2. Setting the time and date.... 152
10.3. Maintain network connection.... 152
10.4. Select WLAN region 152
10.5. Establishing a connection to a network....152
10.6. WLAN connection via WPS 153
10.7. Enter network key....154
10.8. Using the WLAN radio as media client.... 155
10.9. Connection between the Internet radio and a media server .....155
11. Listening to music.... 155
12. Listening to Internet radio.... 156
12.1. Connection to an Internet radio station/a podcast .....159
- Listening to DAB radio 160
13.1. Main menu in DAB radio mode 161
- Listening to FM radio 162
14.1. Setting radio stations 162
14.2. Saving radio stations ....162
14.3. Main menu in FM radio mode 163
- Listening to audio files from your computer/USB.... 163
15.1. Main menu in music player mode 164
15.2. Playback display....165
- Settings in the System Settings menu 166
16.1. Equalizer....166
16.2. Network.... 166
16.3. Time/Date....167
16.4. Language....167
16.5. Factory Resez.... 167
16.6. Software-update.... 167
16.7. Setup wizard.... 168
16.8. Info....168
16.9. Backlight 168
- Settings in the "Main Menu" menu 169
17.1. Sleep....169
17.2. Alarm....169
-
Playing audio signals from external devices 170
-
Accessing the web interface of the Internet radio 170
-
Control using Lifestream IR Application 171
20.1. Installation via Google Play 171
20.2. Installation via App Store 171
20.3. Using the app....171
-
Manually resetting the device to factory settings 172
-
Troubleshooting 173
-
Cleaning....176
-
Disposal 176
-
Technical data 177
-
Conformity and licence information 178
-
Licence agreements for end users 178
27.1. Audio products for use with Internet radio 178
- Legal notice 180
1. Notes on how to use these instructions

Before using the device for the first time, you should read these operating instructions thoroughly and follow the safety advice!
Please keep these instructions in a safe place for future reference. Always include these instructions, if you pass the device on to a new owner.
1.1. Symbols and keywords used in these instructions
 | DANGER!Warning: life-threatening danger!WARNING!Warning: possible mortal danger and/or serious irreversible injuries!BEWARE!Warning: possible minor or moderate injuries! |
 | CAUTION!Please follow the guidelines to prevent property damage! |
 | NOTE!More detailed information on the use of the device! |
 | NOTE!Read notes in the operating instructions! |
 | WARNING!Warning: danger of electric shock! |
 | WARNING!Warning: danger due to loud volume! |
| ·Bullet point/information on operating steps and results | |
| ►Tasks to be performed | |
2. Proper use
This device is used for playing audio files streamed over the Internet or via a network. You can also use this device to play back audio files on USB storage media as well as FM/DAB radio signals.
Never use the device for any other purpose. Only use the device indoors.
This device is not intended for use by people (including children) with reduced physical, sensory or mental abilities or by those without experience and/or knowledge, unless they are supervised by a person responsible for their safety or they have been instructed in its use by that person. Children should be supervised to ensure they do not play with this device.
3. Safety instructions
3.1. People not permitted to use this device
Keep the device and its accessories out of reach of children.
- This appliance may be used by children over the age of 8 and by persons with reduced physical, sensory or mental abilities or by those without experience and/or knowledge, if they are supervised or have been instructed in the safe use of the appliance and have understood the dangers that result from it. Children must not play with the device. Cleaning and user maintenance must not be carried out by children, unless they are aged 8 or over and are supervised.
- Children younger than 8 should be kept away from the device and the mains cable.
- DANGER! Keep plastic packaging out of the reach of children. There is a risk of suffocation!
3.2. Setting up the device safely
- Set up and operate all components on a stable, level and vibration-free surface to prevent the device from falling down.
- Do not jolt or shake the device. Knocks and vibrations may damage the sensitive electronics.
- Do not place the device near heat sources (e.g. heaters) that could affect it.
- Do not place naked flames (e.g. lit candles) on or near the device.
-
Make sure that the vents are never covered so as to ensure there is always adequate ventilation.
-
Do not place any objects on the cables to avoid damaging them.
- Maintain a minimum distance of approx. 10 cm between the device or mains adapter and any walls. Ensure that ventilation is adequate.
- Do not place liquid containers, e.g. vases, on or near the device. The container may tip over and the liquid may impair the electrical safety of the device. Keep the device away from moisture and from water in droplet or spray form.
- In order to prevent malfunctions, avoid knocks, dust, heat and direct sunlight. The operating temperature is 5-35°C.
- Do not use the device outdoors as it could be damaged by rain, snow, etc.
- To avoid malfunctions, keep the device at a distance of at least one metre from high frequency or magnetic interference sources (televisions, loudspeaker boxes, mobile telephones, etc.). If any malfunctions occur, set up the device at a different location.
- Large changes in temperature or fluctuations in humidity can cause moisture build-up within the device due to condensation – this can cause an electrical short circuit.
3.3. Mains connection
- Connect the mains adapter only to a power socket (AC 100–240 V \~ 50/60 Hz) that is easy to reach and close to the place where you have set up the device. The socket outlet must be freely accessible, so that you can unplug the device from the mains quickly if necessary.
- Only use the power cable supplied with the device. Never try to connect the mains adapter to other connectors as this may cause damage.
- If the device has been moved from a cold to a warm room, wait before connecting it to the power supply. The ensuing condensation could damage the device. The device can be operated safely as soon as it has reached room temperature.
- Make sure that the mains cable does not present a trip hazard. Do not allow the connecting cable to become trapped or squashed.
3.4. Thunderstorms
Pull out the mains plug if you are away for a long period of time or if there is a thunderstorm.
3.5. Never carry out repairs yourself
- If the plug, cable or device is damaged, immediately unplug the device from the mains.
- Do not use the appliance if it or the connecting cable is visibly damaged or if the appliance itself has been dropped.

WARNING!
Never try to open and/or repair an appliance component yourself. There is a risk of electric shock!
- In the event of a fault, contact our Service Centre or another suitable professional repair workshop.
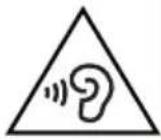
3.6. Headphones
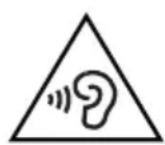
WARNING!
Listening to the unit at a high volume with headphones or earphones can damage your hearing.
Reduce the volume to a minimum before putting on headphones/earphones! Your hearing can be damaged if you listen at high volumes over a long period or if the volume is increased too suddenly.
3.7. Safe handling of batteries
The remote control of the device requires a button cell battery. Please note the following:
- Keep batteries away from children. They can be fatal if swallowed. If a battery is swallowed, please obtain immediate medical assistance.
- Do not throw batteries into a fire; do not short-circuit them and do not dismantle them.
- If necessary, clean the battery and device contacts before insertion.
- Please note the polarity (+/−) when inserting the battery.
-
Remove the battery if the device is not going be used for long periods.
-
Remove spent batteries immediately from the device! There is an increased risk of leakage!
- Do not expose the battery to extreme conditions; for example, do not place the device on top of radiators! There is an increased risk of leakage!
- Never try to recharge non-rechargeable batteries! There is a risk of an explosion!
- Immediately remove leaking batteries from the remote control. Clean the contacts before inserting a new battery. There is a risk of skin irritations from battery acid!
- If battery acid has leaked out, under no circumstances allow it to come into contact with the skin, eyes and mucous membranes! If the acid does come into contact with skin, immediately rinse the affected areas with plenty of clear water and consult a doctor immediately.
4. Getting started
4.1. Check package contents
Remove all packaging materials including the film on the display.

DANGER!
Do not let children play with the plastic film. There is a risk of suffocation!
Please check your purchase to ensure that all items are included. If anything is missing, please contact us within 14 days of purchase. The following items are supplied with the product you have purchased:
- Internet radio
- Remote control and battery (button cell 3 V, CR2025)
- Audio cable
- Mains adapter (model YN36W-1200250VW)
• These operating instructions - Warranty terms
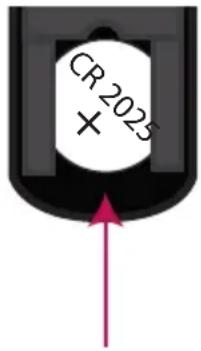
4.2. Inserting the battery in the remote control
The remote control works with one 3 V button battery, type CR2025.

WARNING!
There is a risk of explosion if batteries are replaced incorrectly.
Replace batteries only with the same or equivalent type.
▶ Slide down the battery compartment cover on the back of the remote control. Remove any spent batteries by pushing them down and out of the guide and dispose of them at a collection point for used batteries.
Insert a fresh CR 2025 battery into the battery compartment with the positive pole facing up. Ensure the +/- terminals are correct.
▶ Replace the cover.
4.3. Connections
Before connecting the radio, switch it off using the power switch at the back of the unit.
text_image
CR 2025 ×WLAN mode: The device has an integrated Wi-Fi antenna.
▶ LAN mode: Connect an Ethernet cable to the RJ45 port.
▶ Operation of the FM/DAB-radio: Align the aerial towards the rear of the device for reception.
Mains adapter: Connect the connector plug on the mains adapter (supplied) to the DC IN port and plug the mains power plug into a AC 100–240 V \~ 50/60 Hz socket.
LINE OUT: Connect a 3.5 mm stereo jack to the LINE OUT socket to transfer the stereo sound output of the Internet radio to other audio devices.
▶ AUX IN: Connect a 3.5 mm stereo jack to the AUX IN socket to play back stereo sound output from other audio devices via the Internet radio.
USB: Connect a USB storage medium here to play back the audio files on the storage medium on the Internet radio.
4.4. Resetting the device in case of malfunction
If the device fails to react, switch it off using the power switch at the back and then switch it on again after a few seconds.
Then reset the menu settings to the factory settings by accessing the menu SYSTEM SETTINGS" -> "FACTORY RESET" and confirming the prompt with YES.
You will have to repeat the installation process.

NOTE!
Please note that all settings, e.g. the network WEP key, will be irretrievably lost and will need to be input again after the device has been reset.
5. Overview of WLAN radio
5.1. Front
text_image
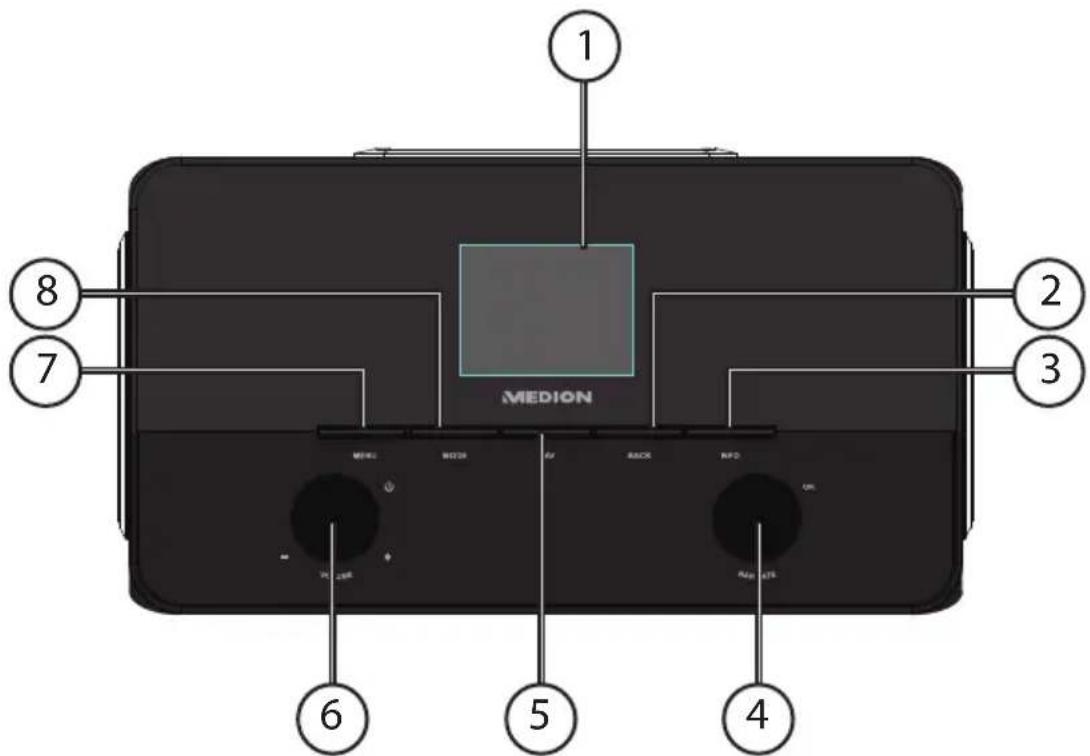
1 2 3 4 5 6 7 8 MEDION1) Display
2) BACK: back one menu level
3) INFO: change displays, WPS button
4) OK: confirm/select entries
5) FAV: open/save favourites list
6) Standby: switch the device into standby mode/volume control
7) MENU: call up settings menu
8) MODE: select operating mode
5.2. Rear
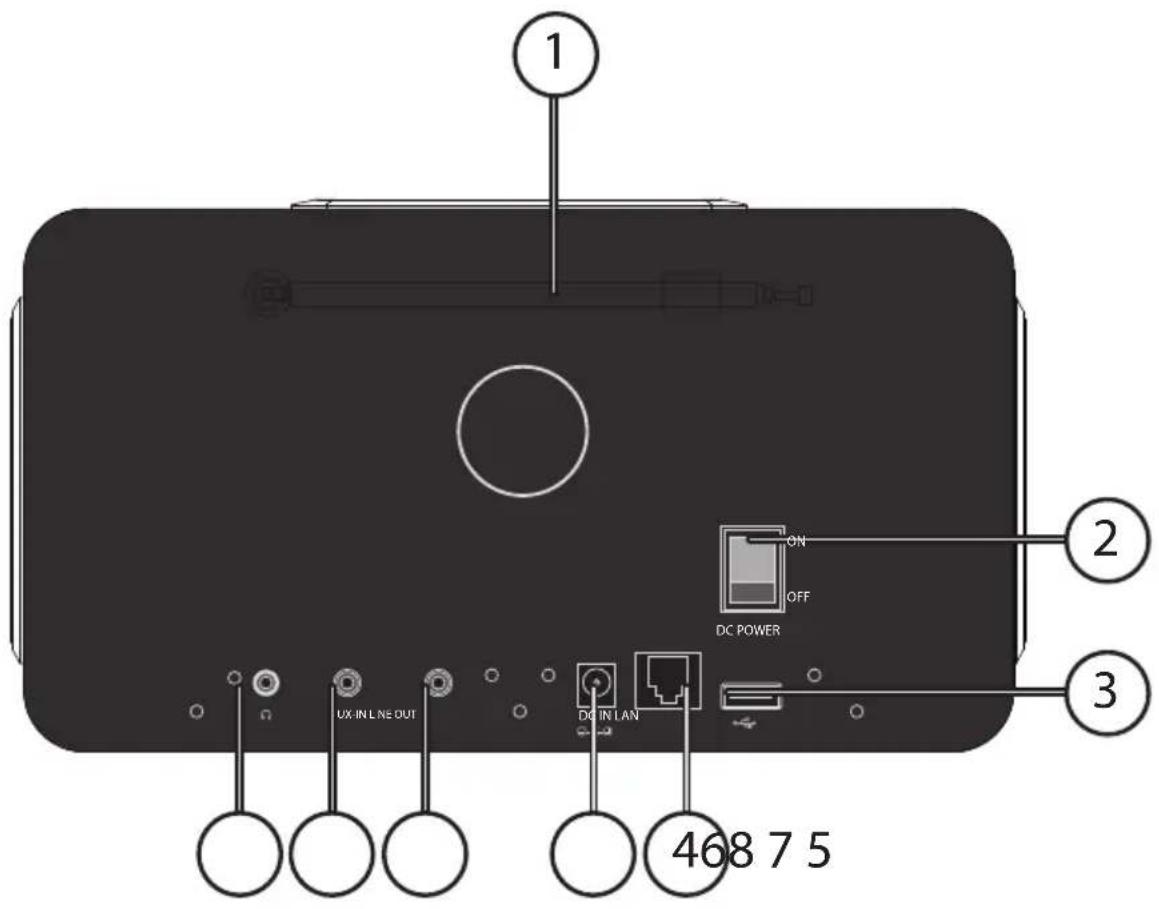
text_image
1 2 3 468 7 5 ON OFF DC POWER UX-IN LINE OUT DC IN LAN1) Aerial
2) POWER: on/off switch
3) USB connection
4) LAN: RJ45 network socket
5) DC IN: socket for the mains power adapter
6) LINE OUT: audio output, 3.5 mm stereo socket
7) AUX IN: audio input, 3.5 mm stereo socket
8) Headphone connection 3.5 mm stereo jack
5.3. Top
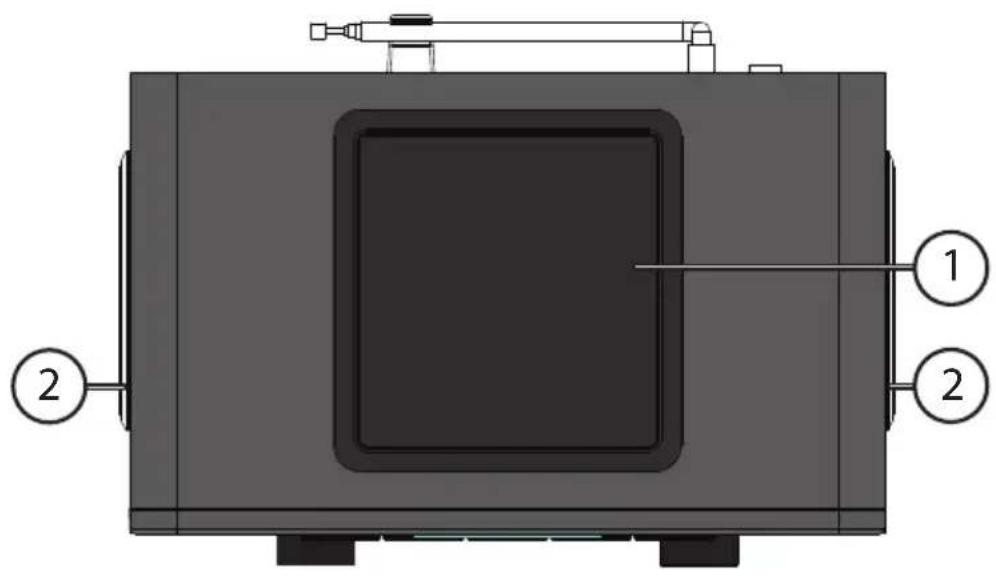
text_image
Technical diagram of a device with labeled components, showing two numbered parts and a central chamber.1) Subwoofer on top
2) Speakers left and right
5.4. Remote control
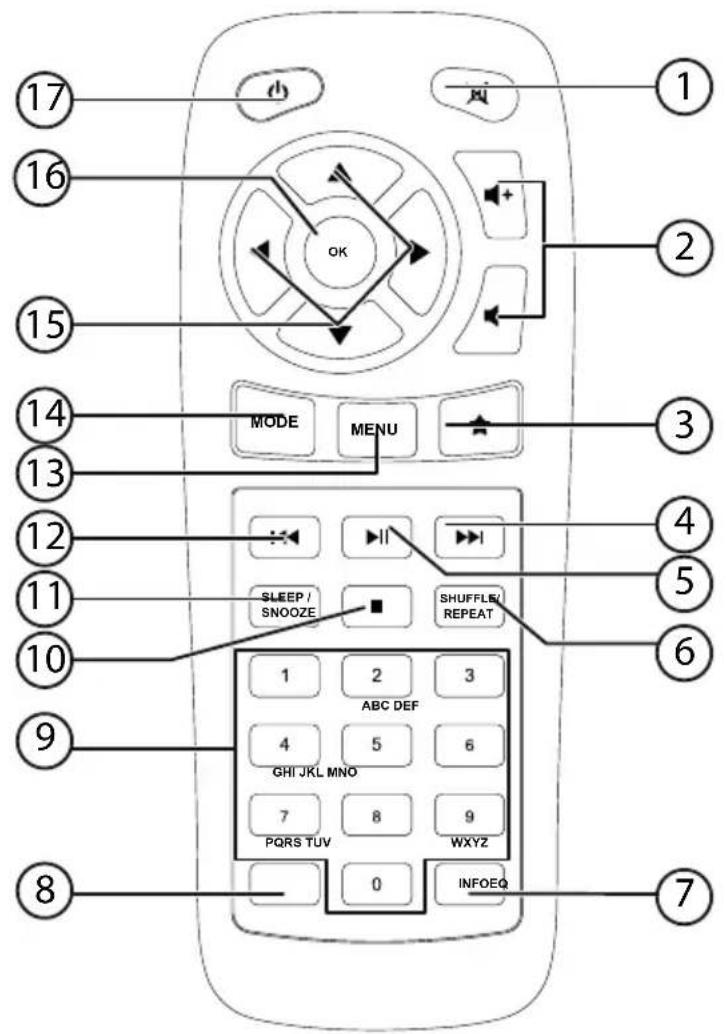
text_image
17 16 15 14 13 12 11 10 9 8 MODE MENU SLEEP / SNOOZE SHUFFLE/ REPEAT 1 2 3 ABC DEF 4 5 6 GHI JKL MNO 7 8 9 PQRS TUV WXYZ 0 INFOEQ 1 2 3 2 3 4 5 6 71) MUTE: all sounds switched off
2) Decrease/increase volume
3) Open favourites
4) Playback next track, FM station search forwards
5) : start/pause playback
6) SHUFFLE/REPEAT: shuffle/repeat function
7) INFO: change displays
8) EQ: setting the equaliser
9) ALPHANUMERIC KEYS: for entering characters
10) STOP: stop playback
11) SLEEP/SNOOZE: set sleep/snooze time
12) Playback previous track, FM station search backwards
13) MENU: main menu
14) MODE: select operating mode
15) Navigation buttons▼ ◀▶
16) OK: Confirm entries;
keep pressed to add track to playback list
17) STANDBY: switch the device into standby mode
6. Menu structure
The radio has the following menu structure:

NOTE!
The menus "MAIN MENU" and "SYSTEM SETTINGS" can be accessed from any operating mode. You can also access the "SYSTEM SETTINGS" from the "MAIN MENU".

flowchart
graph TD
    A["Main Menu"] -->|OK| B["Internet Radio"]
    B --> C["Music player FM"]
    C --> D["AUX in Sleep"]
    D --> E["Alarms System settings >"]
    F["System settings"] -->|OK| G["Equalizer Network"]
    F -->|BACK| H["Time/Date Language Factory Reset Software update Setup wizard Info Backlight"]
    I["Internet radio"] -->|MODE| J["Music player"]
    J --> K["DAB"]
    K -->|MODE| L["FM"]
    L -->|MODE| M["AUX IN"]
    M -->|MODE| N["Main menu >"]
    O["Last listened Station list >"] -->|OK| P["Submenus"]
    Q["Shared media USB playback"] -->|OK| R["Submenus"]
    S["Manual tune Prune invalid DRC"] -->|OK| T["Submenus"]
    U["Station list Scan Manual tune Prune invalid DRC"] -->|OK| V["Submenus"]
    W["Scan setting Audio setting System settings Main menu >"] -->|OK| X["Submenus"]
    Y["Main menu"] -->|BACK| Z["Back"]
6.1. Navigating the menus
Remote control operation
All functions can be operated using the remote control as well as the control buttons on the device. However, some functions are easier and more immediate to operate using the remote control:
- Entering symbols and numbers by repeatedly pressing the digit/symbol buttons
- Music playback functions PLAY, STOP, previous/next track, track search
Navigating in the menus
▶ Press the MODE button and turn the OK dial to call up an operating mode. Confirm the mode selection by pressing the OK dial.
▶ Press the MENU button to open the main menu for the corresponding mode.
▶ Use the OK dial to select an entry and press it to confirm your selection. Alternatively, you can also use the navigation and OK buttons on the remote control.
▶ Press the MENU or BACK button to return to a previous menu level.
7. Internet radio settings
When connected to the Internet, the radio is logged into the Service vTuner service (see also: www.vtuner.com). This enables you to receive more than 15000 radio stations from around the world. You can save up to 500 stations in a favourites list.
You can connect the radio to the Internet, via an access point to a PC, in two ways:
- Wireless in "WLAN mode": the radio's Wi-Fi antenna receives the signals from your DSL router.
- By cable via the radio RJ45-LAN connection in "LAN Mode", inasmuch as an Ethernet network is available.
The PC does not need to be switched on for the radio to receive radio stations.

NOTE!:
The station list on your Internet radio is provided free of charge by the www.vTuner.com Internet service and is updated regularly.
If a radio station is not available, this can be due to reasons on the part
of the radio station operator. This is not, however, a device fault.
When connecting to Internet radio stations, there may be temporary delays due to the high occurrence of requests. Try to set up a connection to the Internet service at a later time.
7.1. Network requirements
The network must meet the following requirements for the device to function as a WLAN radio:
- The router used for the network must have a DHCP server function so it can automatically assign the device a network IP address.
- If your router is configured in this way, you can connect your WLAN radio to the network without further action.
8. Network configuration
Two network configurations are possible for the Internet radio: WLAN mode (wireless) or LAN mode (with an Ethernet cable).
- If the Internet connection is to be set up using an Ethernet cable, go to the setup wizard and select the connection type WIRED. You can manually change all settings later in the system settings.
- If you have a wireless 802.11 a/b/g/n network, you can connect the Internet radio to the Internet via Wi-Fi:
On first use, you will need to select an access point (AP) and, if necessary, enter the network key. The radio will then always tune in to this AP automatically. A message will appear if the device is unable to find the AP.
9. Connecting to a power supply
Plug the mains cable supplied (model number YN36W-1200250VW) into the DC IN socket on the device.
▶ To switch on the power, switch on the radio using the On/Off switch at the back.
10. Using the device for the first time
On first use, confirm the query "SETUP WIZARD START NOW?" with YES to start the setup wizard.

PLEASE NOTE!
If you select NO, you can specify in the next display whether the wizard should start the next time you switch on the device.
10.1. Select language

text_image
Setup wizard Start now? YES NO▶ Select the desired language by turning the dial and press it to confirm the language.
10.2. Setting the time and date
• In the 12/24-STUNDENFORMAT 12 or 24.
- Specify whether the time is to be set automatically via DAB reception (UPDATE FROM DAB), FM reception (UPDATE FROM FM) or via the network (UPDATE FROM NET).
UPDATE VIA NETWORK
If you have selected the option "UPDATE FROM NET", proceed as follows:
In the next query window set your time zone.
▶ Then set the automatic setting of summer/winter time to ON or OFF.
NO UPDATE
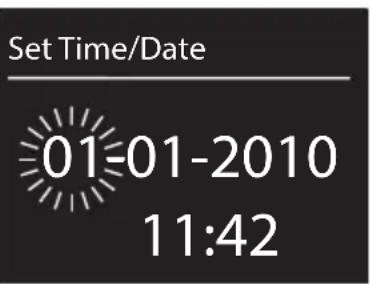
▶ If you have selected the last option (NO UPDATE), set the time manually as follows:
The digits indicating the date will flash. Use the OK dial to set the day and then press it to confirm.
The digits indicating the month will flash. Use the OK dial to set the month and then press it to confirm.
The digits indicating the year will flash. Use the OK dial to set the year and then press it to confirm.
The digits indicating the hours will flash. Use the OK dial to set the hour and then press it to confirm.
The digits indicating the minutes will flash. Use the OK dial to set the minutes and then press it to confirm.
10.3. Maintain network connection
If the network connection is to be maintained even in standby mode or operation modes which do not require WLAN (AUX IN, DAB radio, FM radio, USB playback), select the setting YES. If you select the setting NO, the network connection is re-established when the Internet radio is switched back on from the standby mode.
10.4. Select WLAN region
▶ Select the region in which you are operating the Internet radio.
The device will then start searching for available WLAN networks (access points).
10.5. Establishing a connection to a network
Any networks found will be listed by their name (SSID). WLAN access points which provide a connection over WPS are displayed with [WPS].
Below these you will see the entries:
RESCAN: start a new search
WIRED: search for networks via Ethernet
MANUAL CONFIG.: enter the connection data manually
text_image
Set Time/Date 01-01-2010 11:42Connection via LAN:
▶ If you have connected a network cable to access the Internet, then select the entry WIRED.
The Internet radio will then search for an Internet connection via Ethernet and will establish the connection automatically. A successful or failed connection will be indicated by a corresponding message.
Connection via WLAN:
▶ Select the WLAN access point via which the Internet radio is to be connected and press the dial to confirm.
If this is an unencrypted (open) WLAN access point, the Internet radio will establish the connection automatically.
▶ To connect via an encrypted network, please note the following sections.
10.6. WLAN connection via WPS
If a WLAN network has been selected that allows a connection via WPS, the WPS menu appears. If you do not want to establish a connection via WPS, then select the entry "SKIP WPS" here.
WPS button
▶ Select the PUSH BUTTON option, in order to use the WPS function by means of the WPS button on the router.
Then press the WPS button on the router and confirm the connection on the Internet radio by pressing the dial (OK).

NOTE!
Please also refer to the instructions for the router.
The device will now establish a connection with the network. A successful connection will be indicated by a corresponding message.
The device can now play back media over the network and also receive Internet radio stations – as long as there is an Internet connection via the network.
The device saves the connection data so that it does not need to be entered again for the next connection.
Entering the PIN
If the router does not have a WPS button but provides the possibility of WPS connection via PIN entry in the router's web interface, select the option PIN.
When prompted in the router's web interface, enter the PIN number specified on the display of the Internet radio and confirm the entry by pressing the dial (OK).

NOTE!
Please also refer to your instructions for the router, if required.
The device will now establish a connection with the network. A successful connection will be indicated by a corresponding message.
▶ Press the OK button to confirm.
The device saves the connection data so that it does not need to be entered again for the next connection.
The device can now play back media over the network and also receive Internet radio stations – as long as there is an Internet connection via the network.
10.7. Enter network key
If you have skipped the WPS menu, the network key entry will appear.
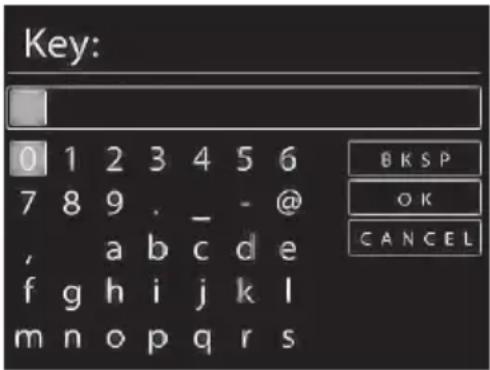
text_image
Key: 0 1 2 3 4 5 6 7 8 9 . _ - @ , a b c d e f g h i j k l m n o p q r s B K S P O K C A N C E LEnter the network key for the WLAN access point here using the digit/symbol buttons on the remote control. You can also enter the network key using the buttons on the device:
▶ To do so, select a digit using the dial and then press the dial (OK) to confirm.
▶ To delete a digit, select the entry BKSP and press the dial (OK).
▶ To cancel the input, select the entry CANCEL and press the dial (OK).
When you have entered the network key, select the entry OK and confirm with the dial (OK).
The device saves this key, which means you do not have to enter it the next time it connects to the network.
The device will now establish a connection with the network. A successful connection will be indicated by a corresponding message.
▶ Press the dial (OK) to confirm.
The device can now play back media over the network and also receive Internet radio stations – as long as there is an Internet connection via the network.
10.8. Using the WLAN radio as media client
Your WLAN radio supports the UPnP, or "Universal Plug and Play", protocol. This means you can wirelessly stream audio files from your PC to the WLAN radio if you have UPnP software installed.
The Internet radio supports the connection as a digital media renderer (DMR). You can play back music files from the computer on the Internet radio and also adjust the volume from the computer.

NOTE!
In Windows XP, the UPnP protocol is only available as of Windows Media Player 11.
In Windows 7, the UPnP connection must be confirmed on the computer beforehand. Also read the corresponding documentation for your operating system!
10.9. Connection between the Internet radio and a media server
Connect your radio to the media server as follows:
▶ Open the "MUSIC PLAYER" menu in the main menu (or press the MODEbutton repeatedly) and select the entry SHARED MEDIA.
The radio starts to search for available media content in the network. After a few seconds, the media server name will be displayed, if found, e.g.: "NAS server living room"
▶ If you wish to connect the installed media server to the radio, confirm with the dial (OK).
The folders and music files on the media server will appear. You can now select and play music files.

NOTE!
You may also need to confirm and authorise the connection on your PC!
11. Listening to music
You can use your Internet Radio to listen to music from various sources: Internet radio, FM radio, DAB radio, the audio files on your computer and the audio files on portable MP3 players.
The following section describes how you can listen to audio from these sources on your radio.
12. Listening to Internet radio
To listen to Internet radio, select the entry "INTERNET RADIO" in the main menu and confirm with OK or press the MODE button and then select the "INTERNET RADIO" icon and confirm with OK.
The first screen contains two entries in addition to the menu items:
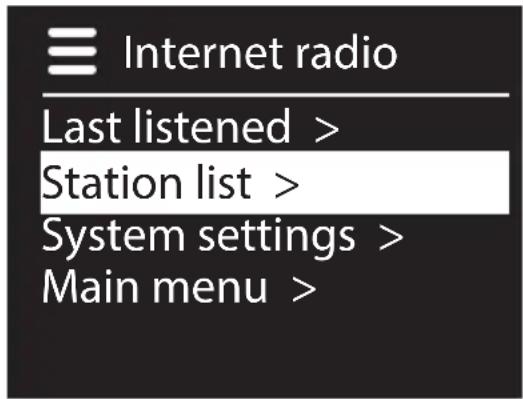
text_image
Internet radio Last listened > Station list > System settings > Main menu >"LAST LISTENED": selects the station you listened to last
"STATION LIST": calls up the available Internet radio services from the Internet server.
Select radio services
Select the Station List entry in order to select the following services:
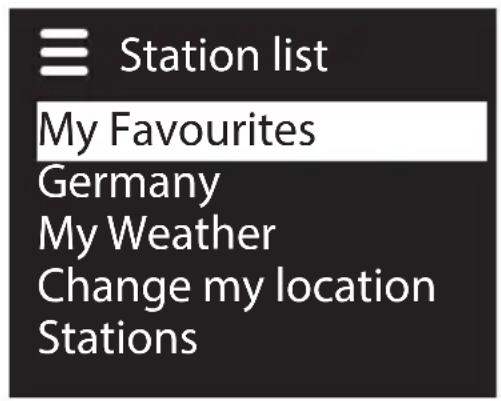
text_image
Station list My Favourites Germany My Weather Change my location Stations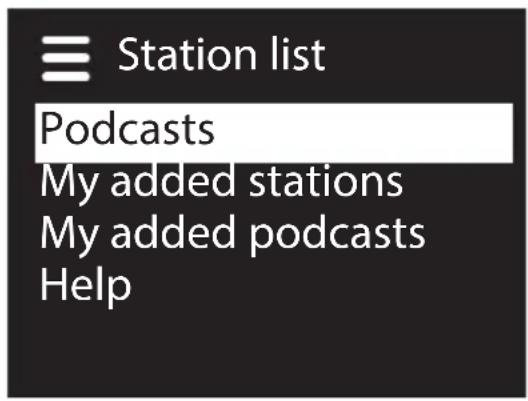
text_image
Station list Podcasts My added stations My added podcasts HelpMy favourites
Here you can open the stored stations.
Location [Germany]
Here you can view all the stations that are assigned to the region (here: Germany) in which the Internet radio has accessed the Internet.
My weather
The Internet radio has an Internet-based weather service which you can use to retrieve weather data and forecasts.
If you select this menu entry, the weather display for your region appears. With the OK dial you can now scroll forwards and backwards through 4 days of weather data.
The following symbols are displayed to indicate the weather situation:
| Daytime display Night time display | ||
 | Sunny Clear |  |
 | Partly sunny Cloudy |  |
 | Overcast Cloudy with snow |  |
 | Hazy | |
 | Cloudy with rain | |
 | Rain showers | |
 | Heavy rain | |
 | Thunderstorms | |
 | Cloudy with snow | |
 | Snowfall | |
 | Heavy snowfall | |
 | Fog | |
Change my location
Open this menu entry to change the regional setting for the weather data:
SEARCH CITY: enter the first letter or the entire name of the city you are searching for and confirm with OK.
Then select the corresponding city from the results list and confirm with OK.
COUNTRY BROWSE: first select the country from the list here and then confirm with OK.
Then select a city from the list and confirm with OK.

NOTE!
If your city cannot be found, select a city that is close by.
Press and hold OK to save the selected location as a favourite.
Stations
Select this entry in order to select Internet radio stations based on the following criteria.
LOCATION: select stations according to country
GENRE: select stations according to genre
SEARCH STATIONS: search for stations by name
POPULAR STATIONS: Select a station from a list of popular stations
NEW STATIONS: select a station from a list of the latest stations
Select a station based on the previous search criteria and press the OK dial.
Podcasts
Here you can select podcasts based on the following criteria:
LOCATIONS: select a region from the list here and confirm with OK. Then select a podcast and confirm with OK.
GENRE: select a genre from the list here and confirm with OK. Then select a podcast and confirm with OK.
SEARCH PODCASTS: search for podcasts by name
My added radio stations
You can register free of charge on the website http://intenetradio.medion.com. Here you can register your Internet radio using the access code. You will receive the access code as follows:
Switch to Internet radio mode and select "HELP"/"GET ACCESS CODE".
My stored podcasts
Here you can open the stored podcasts.
Other
Here you can request the access code for your Internet radio.
12.1. Connection to an Internet radio station/a podcast
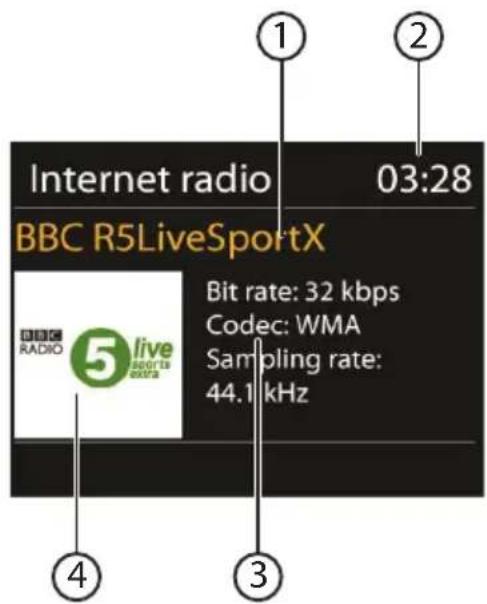
text_image
Internet radio BBC R5LiveSportX 1 03:28 BBC R5LiveSportX BIT rate: 32 kbps Codec: WMA Sampling rate: 44.1 kHz ① ② ③ ④After you have selected a station/podcast as described previously, the radio connects to the Internet radio server. The following will be displayed:
1) Name of radio station
2) Time
3) Additional radio station information
4) Radio station icon
The radio has successfully connected to the Internet server and is receiving the Internet radio station.

NOTE!
If an error message appears, it means the radio is unable to locate the Internet server.
Saving radio stations
- Keep the FAV button pressed down until the list of memory spaces appears in the display.
▶ Use the OK dial and select a memory space from 1–10 and then press the OK dial. The radio station is now stored.
To access the radio station again, press the FAV button and use the OK dial to select the station from the list. Press the OK dial to play back the station.
13. Listening to DAB radio
To listen to DAB radio, select the "DAB RADIO" function in the main menu and confirm with the dial (OK) or press the MODE button several times.
The DAB radio display will appear:
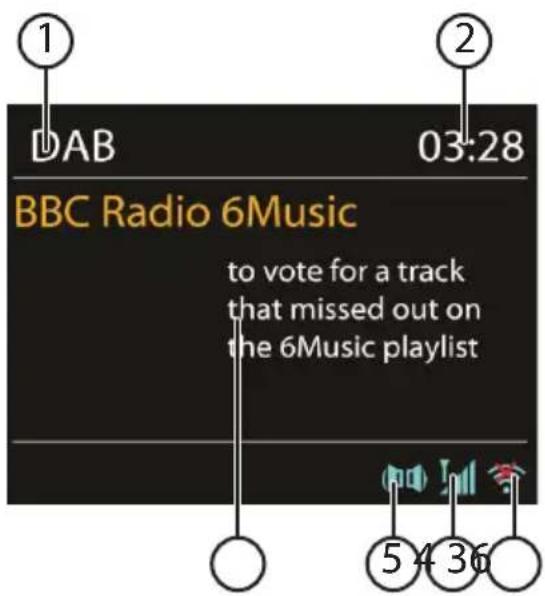
text_image
1 DAB 03:28 BBC Radio 6Music to vote for a track that missed out on the 6Music playlist 5 4 361) DAB reception
2) Time
3) WLAN-reception strength
4) DAB-reception strength
5) DAB stereo reception
6) Radio text
Setting radio stations
▶ Turn the dial (OK) to the left or right to select a radio station from the station list.
▶ Press the dial (OK), to listen to the station.
Saving radio stations
▶ Press the FAV button until the list of memory spaces appears in the display.
▶ Use the (OK) dial to select a memory space from 1–10 and then press the (OK) dial. The radio station is now stored.
To access the radio station again, press the FAV button and use the (OK) dial to select the station from the list. Press the (OK) dial to play back the station.
13.1. Main menu in DAB radio mode
▶ Press the MENU button to display the menu for DAB radio mode.
text_image
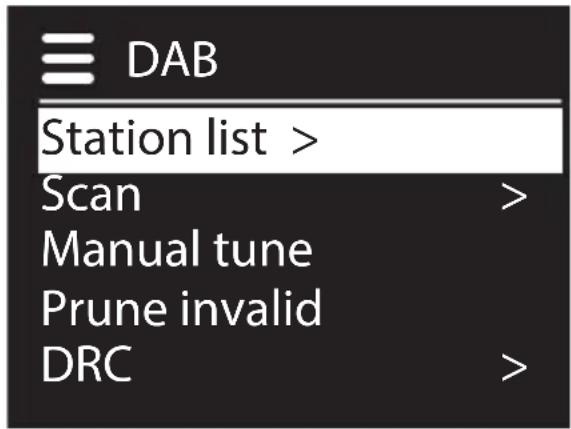
DAB Station list > Scan > Manual tune Prune invalid DRC >Station list
Here you can view the station list
Scan
Select the SCAN entry to start a station search immediately. The progress of the search is displayed via a progress bar.
After the search has completed, the station list will be displayed.
Manual tune
The display shows the channels 5A to 13F with the corresponding frequencies. Select a channel and then use the SKIP ◀◀◀ and ▶▶◀! buttons to select a station.
Prune invalid
Select this option and confirm the subsequent query with JA to delete stations that are no longer available from the station list.
Dynamic range control
Set the dynamic range control (DRC) here. Dynamic range control reduces the differences between soft and loud sounds.
Station
Here you can specify a sort order for your stored stations.
Alphanumeric
The stations are listed in alphabetical order and then sorted numerically.
Ensemble
The stations are sorted based on their affiliation to a DAB ensemble.
Valid
The stations are sorted based on the strength of the signal being broadcast.
14. Listening to FM radio
text_image
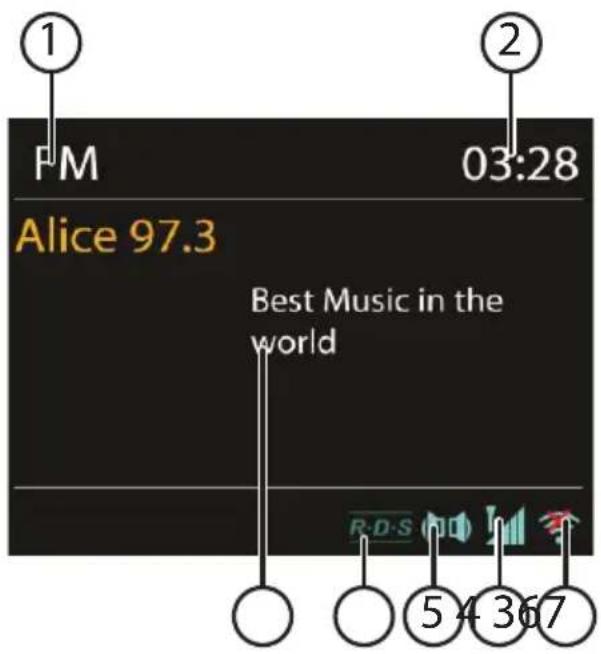
① PM 03:28 Alice 97.3 Best Music in the world R.D.S ⑤ 4 367To listen to FM radio, select the entry "FM RADIO" in the main menu and confirm with OK or press the MODE button and then select the "FM RADIO" icon and confirm with OK.
The FM radio display will appear:
1) Station name (for RDS reception)/frequency display
2) Time
3) WLAN reception strength
4) FM reception strength
5) FM stereo reception
6) RDS reception
7) Frequency, PTY information, date, radio text (press INFO button)
14.1. Setting radio stations
▶ Turn the OK dial to the left and right to set the radio frequency. Alternatively, you can press the hand buttons on the remote control several times.
Press the OK dial or the OK button on the remote control to start an automatic station search. The automatic search will run either forwards or backwards – depending on the direction you last turned the dial.
Alternatively, you can also keep the ▲ and ▶ buttons on the remote control pressed down until automatic search starts.
14.2. Saving radio stations
- Keep the FAV button pressed down until the list of memory spaces appears in the display.
▶ Use the OK dial and select a memory space from 1–10 and then press the OK dial. The radio station is now stored.
To access the radio station again, press the FAV button and use the OK dial to select the station from the list. Press the OK dial to play back the station.
14.3. Main menu in FM radio mode
▶ Press the MENU button to display the menu for the FM radio mode.
Scan setting
Confirm the following query "STRONG STATIONS ONLY?" with
• YES if the radio should only search for stations with a strong signal;
• NO if the radio should also search for stations with a weak signal.
Audio setting
Confirm the following query "LISTEN IN MONO ONLY?" with
- YES if you want the radio to play stations in mono. Use this setting for weak signals.
- NO if you want the radio to only play stations in stereo.
15. Listening to audio fi les from your computer/USB
To listen to audio files via USB, select the entry "MUSIC PLAYER" in the main menu and confirm with OK or press the MODE button and then select the "MUSIC PLAYER" icon and confirm with OK.

NOTE!
To stream audio files from the network over the radio, you must use media server software in the network ("10.8. Using the WLAN radio as media client" on page 155).

WARNING!
To avoid damaging the device, do not use a USB extension cable and do not connect the device directly to the USB port of a computer.
The USB connection is only designed to be used for USB memory sticks; other external storage media such as external hard disks cannot be operated via the USB port.
If you want to listen to audio files on a USB data medium, connect a USB data medium to the USB port.
If you connect a USB data medium, the device will automatically switch to the music playback mode, and the query appears
"USB DISK ATTACHED. OPEN FOLDER?".
▶ Confirm with YES to open the contents of the USB data medium directly.
If no audio file is available, the main menu will appear after opening the music play-
back:
text_image
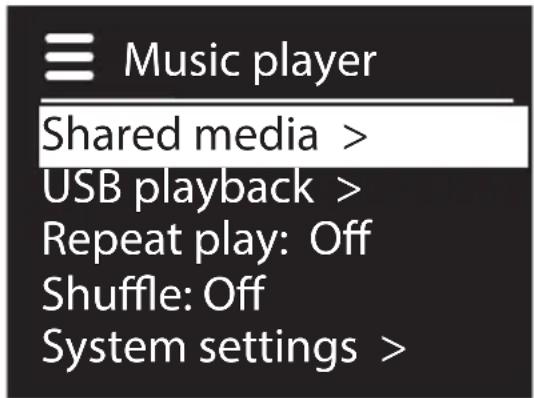
Music player Shared media > USB playback > Repeat play: Off Shuffle: Off System settings >15.1. Main menu in music player mode
Shared media
Confirm the entry to search for audio files on the network.
Once a media server has been found, a selection menu appears on the display that allows you to select items that can be streamed from the media server. The list may look like this:

text_image
JB-Laptop: Audio Pictures > Video > Music >USB playback
Confirm the SEARCH entry to directly search for audio files on the USB data medium.
My Playlist
Confirm the entry to search for playlists on the network.
Repeat Play
Set this function to ON to repeat the current folder.
Shuffle Play
Set this function to ON to play the files in the current folder/playlist in random order.
Clear My playlist
Confirm to delete the entries in the playlist.
Prune Servers
Select this setting and confirm the subsequent dialogue "PRUNE SHARED MEDIA WAKE ON LAN SERVERS?" with YES, if inactive media servers are to be displayed. You can then select a media server and "wake it up" (WOL; 'wake on LAN' function) in order to play back media contents.
15.2. Playback display
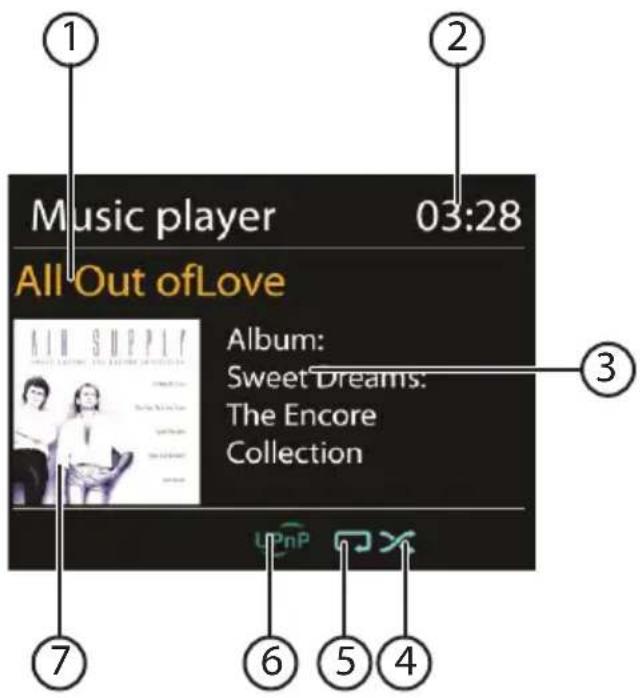
text_image
Music player 03:28 All Out of Love Album: Sweet Dreams: The Encore Collection 7 6 5 4 ① ② ③1) Track name
2) Time
3) ID3 day display (Press INFO to display more information)
4) Shuffle mode
5) Repeat mode
6) Media playback over the server
7) Album cover (if available)

NOTE!
You can use the playback buttons during playback as you would on a normal CD player.
The formats supported are: *.mp3, *.wma, *.wav, *.flac, *.aac.
16. Settings in the System Settings menu
16.1. Equalizer
Here you can select a default sound format or configure your own.
Select one of the following sound formats
NORMAL, FLAT, JAZZ, ROCK, MOVIE, CLASSIC, POP, NEWS, MY EQ or MY EQ PROFILE SETUP and confirm with the OK dial. The setting will take effect immediately.
MY EQ
If you have set up your own sound format in the following entry, select MY EQ to directly apply the sound format.
MY EQ PROFILE SETUP
Here you can configure your own sound format for the MY EQ setting.
Adjust the bass, treble and volume by turning the OK dial and press the OK button to store the entry.
▶ Confirm the following query with YES to save the sound format.
16.2. Network
Network Wizard
Select this menu item to start a network search.
Then enter the WEP/WPA key to connect the device to the wireless AP.
PBC Wlan Setup
Here you can set up a WPS connection:
Activate the WPS connection on the device which supports WPS and then confirm the connection on the Internet radio by selecting YES and confirm with the OK button.
Viewsettings
Information on the currently connected network and the device's MAC address is displayed here.
WLAN region
▶ Here you can select the WLAN region in which you are operating the device.
Manual settings
▶ Select Cable (Ethernet) or Wireless (WLAN) and set the respective DHCP function to On or Off.
NetRemotePIN-Setup
In this entry you can assign a new four-digit code which needs to be entered when connecting using the Lifestream IR application on a smartphone or tablet PC.
Network profile
The device stores the last 4 WLAN networks to which it has been connected.
▶ Select a network and press OK. Confirm the subsequent query with YES to delete the network from the list.

NOTE!
The currently connected network cannot be deleted.
Keep network connected
Select this menu item and set the function to YES if you want the Internet radio to remain connected to the network even when in standby mode or when using operating modes that do not require WLAN (AUX IN, FM radio, DAB radio, USB playback). Other media players can then access the Internet radio and “wake it up”.
If the network connection is not to be maintained, set the function to NO. In this setting, the WLAN function will also be switched off for operating modes which do not use WLAN (AUX IN, FM radio, DAB radio, USB playback). It will not be possible to control the device using the Lifestream IR app if this is the case.

NOTE!
Please note that when a network connection is maintained in standby (setting YES), the Internet radio will consume more power in standby mode than indicated in the technical data.
16.3. Time/Date
Set the time and date here as described in the section 'Using the device for the first time'.
16.4. Language
You can set the menu language here.
16.5. Factory Resez
Select this menu item and confirm the subsequent query with YES to reset the device to the factory settings.
All existing network information will be deleted and will have to be re-entered to establish a network connection.
16.6. Software-update
You can search for and install software updates using this function.
Auto-check Setting
Select YES to enable regular automatic searches for software updates.
Check now
Starts search for software updates immediately.
16.7. Setup wizard
Starts the setup wizard as described in the section 'Using the device for the first time'.
16.8. Info
This section displays the software version and the device's radio ID.
16.9. Backlight
You can adjust the display lighting with this function:
–Dim the display in standby mode after a specified time
-Display brightness
Set dimming time
▶ Select the entry TIMEOUT and then turn the OK dial to select ON, 10, 20, 30, 45, 60, 90, 120 or 180 seconds.
Display brightness during operation
▶ Select the entry POWER ON LEVEL by turning and then pressing the OK dial and then set the desired brightness level to HIGH, MEDIUM, or LOW.
17. Settings in the "Main Menu" menu
You can access the operating modes from the Main Menu just as you would with the MODE button:
INTERNET RADIO
MUSIC PLAYER
DAB
FM
AUX IN
You can also set the snooze and radio alarm function here.
17.1. Sleep
▶ Select this entry and use the OK dial to select the following automatic switch-off settings:
SLEEP OFF - 15 MINS - 30 MINS - 45 MINS - 60 MINS
When the SLEEP OFF setting is activated no snooze function is set.
You can set the switch-off time by pressing the SLEEP button several times.
17.2. Alarm
You can set two alarm times on your Internet radio.

NOTE!
Before you can set an alarm, you need to set the clock ("10.2. Setting the time and date" on page 152).
▶ Select an alarm clock and press the OK dial.
▶ Select one of the following entries and press the OK dial to make the settings:
Enable
▶ Select OFF to deactivate the alarm.
Select DAILY, ONCE, WEEKENDS or WEEKDAYS to activate the alarm.
Time
▶ Set the alarm time here.
Mode
▶ Set the mode for the alarm clock here:
SUMMER: wake up to the alarm buzzer
INTERNET RADIO: wake up to the Internet radio
DAB: wake up to the DAB radio
FM: wake up to the FM radio
Preset
▶ Select a station memory position if you selected either the Internet radio alarm or FM radio alarm options.
Volume
▶ Set the alarm volume here.
Save settings
To accept the above settings for the alarm clock, select the entry SAVE and then turn the OK dial.
18. Playing audio signals from external devices
There is an audio input (AUX IN) at the back of the device.
▶ Use a 3.5 mm audio cable to connect the AUX IN socket to the audio output of an external device to play back the audio signal on the Internet radio.
Then select the AUX IN menu. You can also press the MODE button on the remote control and then select the operating mode with the arrow buttons and confirm with OK.
The audio signals from the external device are now played back via the loudspeakers of the Internet radio.
19. Accessing the web interface of the Internet radio
When you enter the IP address of the Internet radio in your browser, the web interface of the Internet radio appears.
You can find the current IP address under SYSTEM SETTINGS/
NETWORK/VIEW SETTINGS ("View settings" on page 166).
Here you can assign a new friendly name for your Internet radio (factory setting is [MEDION]+[MAC-Adresse].
20. Control using Lifestream IR Application
You can control your Internet radio using the Lifestream IR application on your smartphone or tablet PC.
In addition to the established setting options such as start, stop, repeat or the creation of favourites lists and station searches, the Lifestream IR application makes it possible to individually customise the sound output.
20.1. Installation via Google Play
▶ Open the Android "Play Store" and search for the term "MEDION Lifestream IR" ^1 .
- Install the Medion "Lifestream IR" app. Follow the installation instructions on the screen.
20.2. Installation via App Store

NOTE
To be able to install the Lifestream IR application for iOS, there must be an Internet connection.
▶ Open the App Store and search for the term "MEDION Lifestream IR" ^1 .
- Install the Medion "Lifestream IR" app. Follow the installation instructions on the screen.
20.3. Using the app
▶ After you have installed the app, you must connect the Internet radio to your smartphone/tablet PC.
To do this, start the app and switch on the Internet radio. Make sure that the smartphone/tablet PC and Internet radio are logged in to the same WLAN network.
When started for the very first time, the app will list all compatible Internet radios detected in the WLAN network by their friendly name (see also "19. Accessing the web interface of the Internet radio" on page 170).
▶ Select the right Internet radio in order to use the app.
When prompted, enter the code "1234". You can also reassign this NetRemote PIN for the Internet radio ("NetRemote PIN-Setup" on page 166).

NOTE
If the WLAN function is deactivated in operating modes that do not require WLAN (AUX IN, FM radio, DAB radio, USB playback) (setting "Keep network connected" on page 167), you will not be able to control the radio via the Lifestream IR app.
21. Manually resetting the device to factory settings
If the Internet radio no longer responds or if problems occur with the network connection, it may be necessary to reset the device to the factory settings.
In addition to resetting the device using the menu settings ("16.5. Factory Resez" on page 167), you can also reset the Internet radio manually using button combinations.
How to manually reset the Internet radio to its factory settings:
▶ Disconnect the plug of the supplied mains adapter from the connection DC IN.
▶ Keep the dial (OK) and the MENU button pressed down.
Insert the plug of the supplied mains adapter back into the connection DC IN and keep the dial (OK) and the MENU button pressed down until the setup wizard appears.

NOTE
All existing network information will have been deleted and will have to be re-entered to establish a network connection.
22. Troubleshooting
If the device malfunctions, please check first if you can eliminate the error yourself with the help of the following overview.
Never try to repair the devices yourself. Contact our Service Centre or other qualified personnel if a repair is necessary.
| Problem Possible cause Solution | ||
| The remote control is not working. | Are the batteries inserted correctly? | Correctly insert the bat-teries. |
| Are you more than 7 me-tres from the radio? | Move closer. | |
| Is the space between the remote control and the in-frared sensor clear of ob-structions? | Remove obstacles. | |
| Is the remote control pointing at the sensor? | Point the remote control correctly. | |
| The display remains blank. | Is the mains cable con-nected properly at both ends? | Plug the mains cable of the supplied adapter into the DC IN socket of the device. Plug the mains plug into an AC 100–240 V ~ 60 Hz power outlet. |
| The selected station can-not be heard. | You need to confirm the choice of station with OK | |
| Mute is activated. Press the | MUTE button to deactivate the mute set-ting. | |
| Volume level too low. Check the volume level. | ||
| Headphones are connect-ed. | The speakers are set to mute. Remove the head-phones. | |
| No reception. Check the net-work set-tings. | ||
| FM reception is disrupted. | Aerial not directed pro-perly. | Direct the aerial. |
| No access to Internet radio. | No WLAN connection. Check the WLAN router or connections. | |
| No access from PC as AP (Media Server) to radio. | Radio encryption. Enter the code. To do this, note also the enabling settings on your PC. | |
| Alarm does not work. Function is not activated. Check the alarm settings. | ||
| Problems with the router connection. | No DHCP server is activated. | Check the router settings. |
| An incorrect encryption algorithm was entered into the network. | Re-enter the network encryption algorithm. | |
| The RJ45 port or the WiFi module is faulty. | Contact the Service Centre. | |
| No IP address found. No res | ponse from DNS (domain name server). | Check the DNS settings on your router. |
| The DNS used does not recognise the vTuner.com name. | Use a different DNS server. | |
| No connection to vTuner server. | Internet access is blocked. | Try again. |
| vTuner is not in operation or is overloaded. | Check the vTuner server. | |
| Registration was not successful. | Repeat the registration procedure. | |
| The radio station's streamer is not available or is overloaded. | Try again. | |
| The Internet radio does not support the radio station's service type. | - | |
| Problems with the Internet buffer. The bandwidth is not sufficient to provide stable data streams. | Increase the bandwidth as necessary. | |
| The Internet radio booted as normal but did not receive an IP address. | There is no DHCP server activated. | Check the router settings. |
| Incorrect WiFi encryption algorithm entered. | Re-enter the WiFi encryption algorithm. | |
| There is a problem with the network interfaces. | Check the interfaces. | |
| The Internet radio cannot by controlled by the Lifestream app. | Internet radio and smart-phone/tablet PC are not on the same WLAN network. | Check the network status of the Internet radio and smartphone/tablet PC. |
23. Cleaning
Switch off the device before cleaning it.
Use a soft, dry cloth to wipe the device. Never use rough cloths, abrasive detergent, thinners or solutions containing alcohol to clean the device. These can damage the device.
24. Disposal

Packaging
Your device is packaged to protect it from transportation damage. Packaging is raw material and can be reused or added to the recycling system.

natural_image
Symbol of a trash bin crossed with a diagonal line and a horizontal bar below (no text or labels)Appliance
Do not dispose of the product in the household rubbish at the end of its service life. Take it to a local collection point for used appliances in order to comply with environmental regulations. Contact your local authority to find out where your nearest collection point is located.

Batteries
Batteries must be properly disposed of. Retailers who stock batteries and local authority collection points have appropriate disposal containers for this purpose. You can contact your local waste disposal company or municipal authorities for further information.
25. Technical data
Mains adapter
Manufacturer: winna,
China
Input voltage: AC 100 – 240 V \~ 50/60 Hz 1 A
Output voltage: 12 V 2,5 A


Remote control
Battery for remote control: 1x button cell battery 3 V, type CR2025
Device
Speakers: 2 x 5 W RMS
Dimensions: approx. 235 x 128,7 x 130 mm
Weight: approx. 1.8 kg
WLAN
Frequency range: 2.4 GHz/5 GHz
WiFi standard: 802.11 a/b/g/n
Encryption: WEP/WPA/WPA2
Range: inside approx. 35–100 m/
outside approx. 100–300 m
Radio
Frequency range FM: 87.5–108 MHz
Frequency range DAB III: 174–230 MHz
Connections
Mains adapter input: DC 12 V, 2.5 A

Line out: 3.5 mm stereo jack
AUX in: 3.5 mm stereo jack
Headphones: 3.5 mm stereo jack
Output voltage: max. 150 mV
USB connection
Version: 2.0
USB output: DC 5 V max. 300 mA
26. Conformity and licence information
The device uses the weather information service provided by Adaptive Navigation GmbH.
The weather data is provided by www.wetter.net.
This device is supplied with the following wireless features:
- Wireless LAN
Due to the 5 GHz frequency range of the integrated wireless LAN solution, the device may only be used inside buildings in the EU.
Medion AG hereby declares that the product conforms to the following European requirements:
• R&TTE Directive 1999/5/EC
• Ecodesign Directive 2009/125/EC
• RoHS Directive 2011/65/EU.
Full declarations of conformity are available at www.medion.com/conformity.
C€0700 Ⓖ
27. Licence agreements for end users
27.1. Audio products for use with Internet radio
This document is the property of MEDION. It may not be copied nor its contents disclosed without written permission by MEDION. All third parties to whom this document is issued must sign a non-disclosure agreement.
This document replaces all previous versions. In accordance with its respective principle of continual improvements to its products, services and documentation, MEDION, the providers of online content and web services reserve the right to make changes without prior notice.
MEDION shall not be held liable for losses that are alleged to have occurred from the use of this document or its associated products.
Audio coding technology MPEG Layer 3: licensed by Fraunhofer IIS and by Thomson.
This product contains software. You have the single and non-transferable right to use the software only in the form of the object code and only to operate the product.
The rights to the intellectual property of the software contained in this product remain with the providing contract party (or with the respective licensor). All their rights remain reserved.

Fraunhofer
Institut
It is strictly prohibited to modify, translate or use reverse engineering to reconstruct, decompile, disassemble or try to determine the source code in any other manner, or to attempt to replicate the function of the software contained in this product as far as this restriction is not explicitly inadmissible in accordance with the applicable legislation.
We assume no guarantee whatsoever for the function or performance of the software, and neither we nor our suppliers or licensors shall be held liable for indirect damages, special, incidental or consequential damages (such as loss of profit) arising from the use of the software contained in this product, unless such an exclusion of liability is inadmissible for the region in which you have acquired this product.
These provisions apply to all updates of the software which you carry out on the product.
This product is protected by certain intellectual property rights belonging to Microsoft. Without a licence issued by Microsoft, any use or distribution of this technology not linked to the product is prohibited.
Eric Young hereby declares his right to be recognised as the author of parts of the OpenSSL software library that is used in this tool.
UPnP ^™ is a brand of the UPnP Implementers Corporation.
28. Legal notice
Copyright © 2014
All rights reserved.
This operating manual is protected by copyright.
Mechanical, electronic and any other form of reproduction is prohibited without the written permission of the manufacturer.
The owner of the copyright is:
Medion AG
Am Zehnthof 77
45307 Essen
Germany

text_image
QR code image containing encoded data, no visible human-readable textThese instructions can be re-ordered from the Service Hotline and are also available for download via the service web page at www.medionservice.de.
You can also scan the QR code above to download the instructions onto your mobile appliance via the service portal.
X
MEDION®
Medion B.V.
John F. Kennedylaan 16a
5981 XC Panningen
Nederland

Hotline: 022006198
Fax: 022006199

Hotline: 34-20 808 664
Fax: 34-20 808 665
120 Faraday Park, Faraday Road, Dorcan
Swindon SN3 5JF, Wiltshire
United Kingdom
Hotline: 0871 37 61 020
(Costs 7p/min from a BT landline,
mobile costs may be higher)
Fax: 01793 71 57 16
To contact us by email please visit the “Service and Support” section of our website at www.medion.co.uk.
www.medion.co.uk