
41920A70 - Hi-fi system Leviton - Free user manual and instructions
Find the device manual for free 41920A70 Leviton in PDF.

| Product Type | Audio Mixing Amplifier |
| Brand | Leviton |
| Model | 41920A70 |
| Output Power | 40 W (Class D) |
| Output Voltage | Constant 70 V or 100 V |
| Power Supply | 24 VDC power adapter included |
| Audio Inputs | 2 stereo (RCA + 3.5 mm mini-jack), 1 digital optical (PCM), 1 microphone (balanced/unbalanced combo) |
| Audio Output | Mono on terminal block for 70/100 V speakers |
| Control | RS232 (9600 baud, 8N1), infrared, front panel buttons |
| Special Functions | Output prioritization (ducking), bass/treble equalization, addressing up to 16 amplifiers |
| Microphone | Supports condenser (48V), dynamic, and wireless microphones |
| Cooling | Convection cooling, fanless |
| Indicators | Power and status LED |
| Package Contents | Amplifier, mounting brackets, screws, terminal block, RS232 cable, 24V adapter, plastic feet, manual |
| Warranty | Visit Leviton website |
Frequently Asked Questions - 41920A70 Leviton
User questions about 41920A70 Leviton
0 question about this device. Answer the ones you know or ask your own.
Ask a new question about this device
Download the instructions for your Hi-fi system in PDF format for free! Find your manual 41920A70 - Leviton and take your electronic device back in hand. On this page are published all the documents necessary for the use of your device. 41920A70 by Leviton.
USER MANUAL 41920A70 Leviton
- Read and understand all instructions. Follow all warnings and instructions marked on the product.
- Do not use this product near water — e.g., near a tub, wash basin, kitchen sink or laundry tub, in a wet basement, or near a swimming pool.
- Never push objects of any kind into this product through openings, as they may touch dangerous voltages.
- SAVE THESE INSTRUCTIONS.
SAFETY INFORMATION
- Never install communications wiring or components during a lightning storm.
- Never install communications components in wet locations unless the components are designed specifically for use in wet locations.
- Never touch uninsulated wires or terminals unless the wiring has been disconnected at the network interface.
- Use caution when installing or modifying communications wiring or components.

WARNING
THE TERMINALS MARKED WITH THIS SYMBOL ARE HAZARDOUS LIVE. THE EXTERNAL WIRING TO THESE TERMINALS REQUIRES INSTALLATION BY AN INSTRUCTED PERSON
Leviton and Leviton Block & Design are trademarks of Leviton Manufacturing Co., Inc. and are registered trademarks in many countries throughout the world.
Table of Contents
IMPORTANT INSTRUCTIONS 2
SAFETY INFORMATION 2
Introduction 4
Features 4
Package Contents 4
Panel Description 5
Front Panel 5
Rear Panel 6
System Connection 7
Usage Precautions 7
Audio Signal Connection 7
Audio Output 7
Audio Inputs 8
System Operation 8
Front Panel 8
Audio Switching 8
Volume/EQ Control 9
RS-232 Control 10
Settings 10
RS-232Commands 10
Technical Support 12
Warranty 12
Introduction
The Leviton 41920-A70 Mixing Audio Amplifier is a 40 Watt (Class-D) power amplifier with either a 70V or 100V output. It has 2 stereo inputs (3.5mm and RCA), 1 digital audio fiber input and 1 MIC input. It includes a priority muting (ducking) function, EQ control, MIC mixer, and supports 3 MIC types (condenser, dynamic, and line audio input).
Features
- Mono audio output at 40Watts
Supports 70V or 100V constant voltage output
RS-232 and IR control - Priority muting (ducking) function
16 ID codes for controlling separate amplifiers via RS-232
Supports condenser, dynamic, and wireless microphones - MIC port supports balanced and unbalanced signals
- Two stereo audio inputs and one digital audio input (fiber)
Volume/Bass/Treble - Fast switching speed
- Convection cooling so a fan is not needed
- LED indicators for power and status
Package Contents
- 1 x Power Amplifier
- 2 x Mounting ears
- 4 × Screws
- 1 x Pluggable Terminal Block
- 1 x RS232 cable
- 1 x Power adapter (DC 24V)
- 4 × Plastic feet
- 1 x User Manual
Panel Description
Front Panel
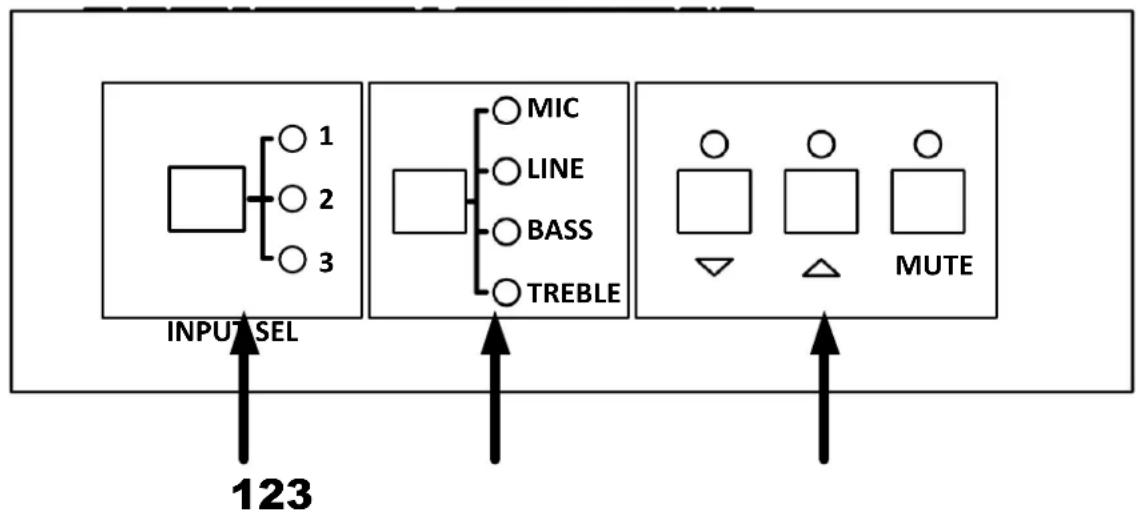
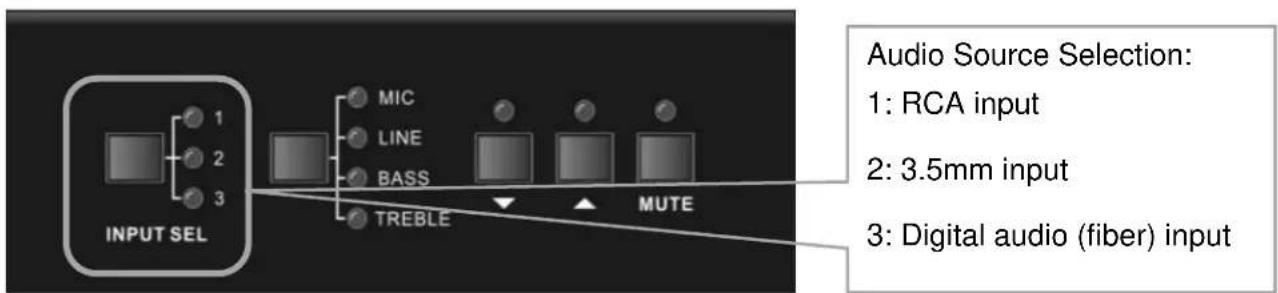
- INPUT SELECT - 1 is for the 2 RCA connectors, 2 is for the 3.5mm mini jack, and 3 is for the optical audio digital audio input (fiber)
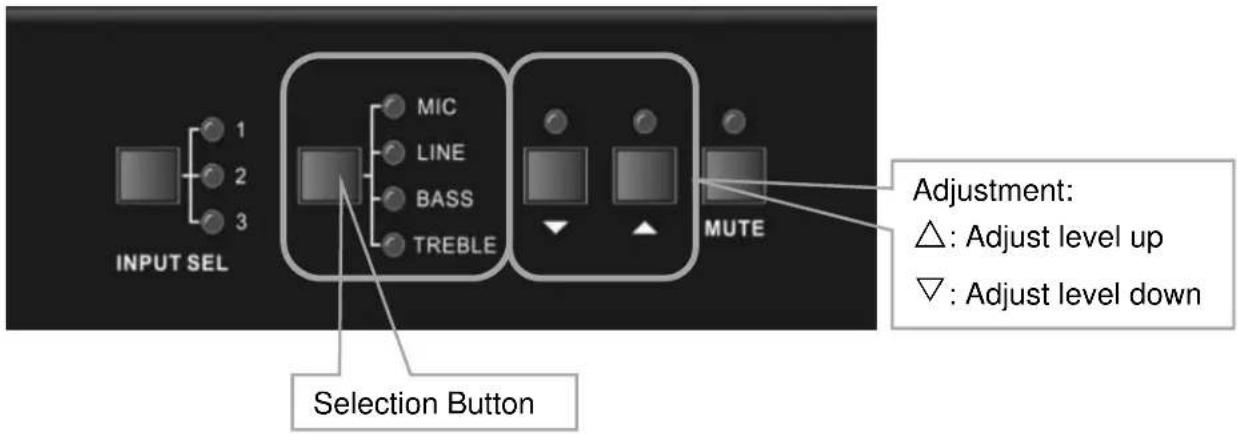
- AUDIO CONTROL - Select the attribute to adjust with this button. Mic and Line adjusts volume. Bass and Treble adjusts the low and high frequency response
- ADJUST - To adjust or mute the corresponding audio
: Adjust level up
: Adjust level down
MUTE: Mute the output of the selected input
Rear Panel
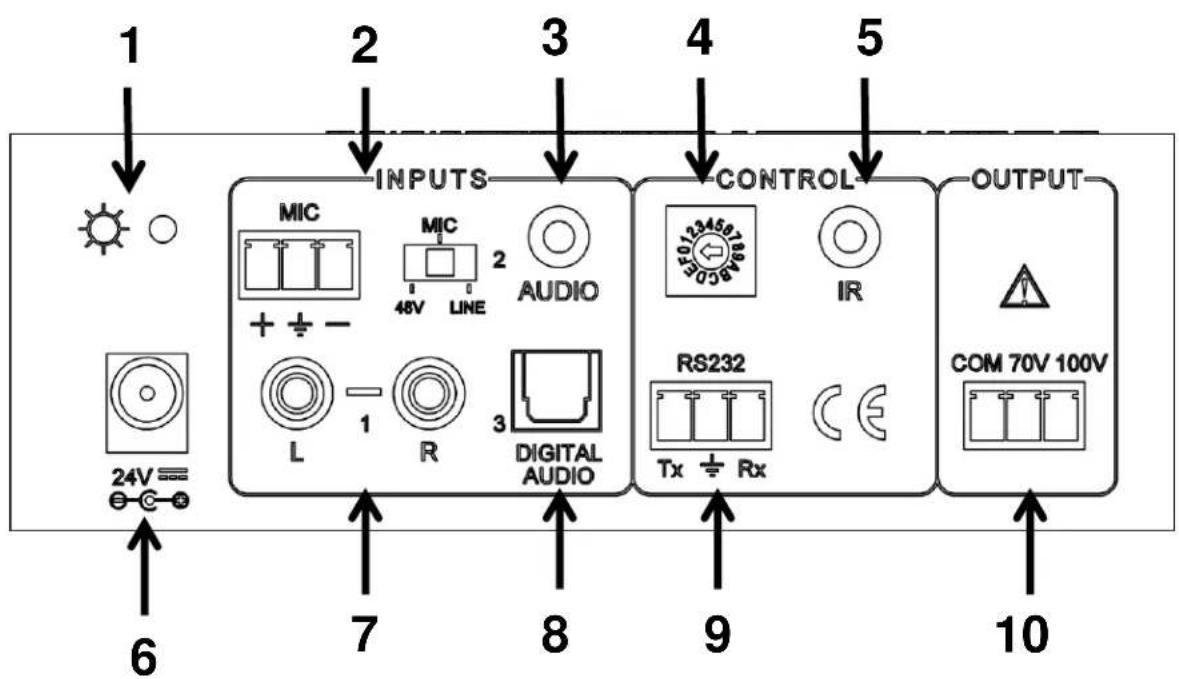
- POWER INDICATOR - Lights red when the power is connected
- MICROPHONE INPUT - 3-pole captive screw connector for microphone input, the switch selects 48V (for condenser microphones), MIC (for dynamic microphones), and LINE for line level input
- 3.5MM INPUT - 3.5mm mini jack for stereo audio input
- ID CODE - 16 codes range from 0 to F (hexadecimal) for RS-232 addressing
- IR INPUT- Connects to an IR target to allow the use of an IR remote control
- PORT POWER - Connects to the power adapter (24VDC)
- RCA INPUT-L+R audio input
- DIGITAL AUDIO INPUT - Connects to an optical digital audio output (PCM format only)
- RS232 - 3-pole captive screw connector for serial control
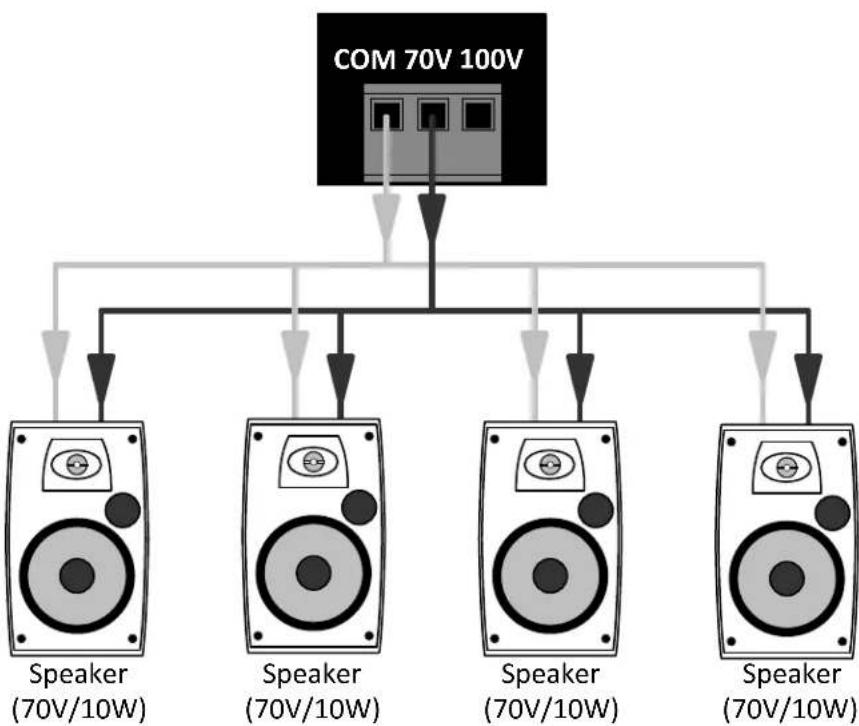
- AUDIO OUTPUT - Connects with 70V or 100V speakers
System Connection
Usage Precautions
- DO NOT operate with an empty load
- Speakers MUST be connected before applying power
Audio Signal Connection
Audio Output
Audio Inputs
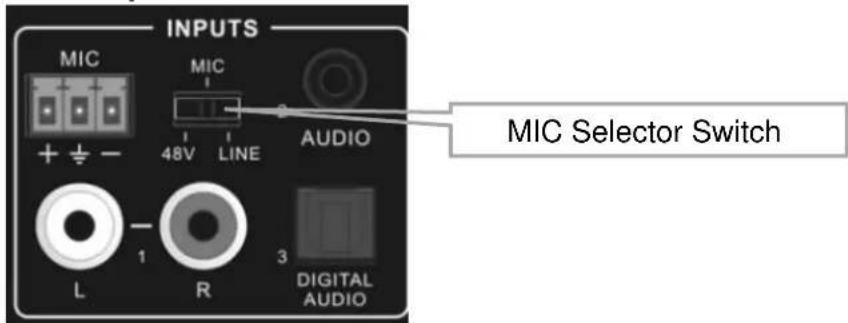
Microphone input
MIC Selector Switch
- 48V When selected the MIC input will provide 48V phantom power for condenser microphones
- MIC When selected the MIC input is used for connecting with dynamic microphones and does not supply 48V phantom power
- LINE When selected the MIC input is used for connecting with line level audio sources or wireless microphone outputs
Digital Audio Input
Used to connect with digital audio source devices
Notice: This digital audio input can support/decode PCM format signals only. If the CD/DVD is DTS or AC3 format, please set the player to PCM format output before connecting
System Operation
Front Panel
Audio Switching
There are three switchable audio inputs; RCA input, 3.5mm input, and one digital audio (fiber) input. These are switched via the input select button
Volume/EQ Control
The attribute that is selected via the Selection button is what is adjusted with the Adjustment buttons. When MIC and LINE are selected it is the volume that is adjusted. When BASS and TREBLE are selected it is the frequency response that is adjusted.
RS-232 Control
Settings
| Setting | Value |
| Baud Rate | 9600 |
| Parity | None |
| Data Bits | 8 |
| Stop Bits | 1 |
| Flow Control | None |
RS-232 Commands
| Command | Function Description | Feedback Code |
| 1A1. | Switch the audio to input 1 | A: 1 -> 1 |
| 2A1. | Switch the audio to input 2 | A: 2 -> 1 |
| 3A1. | Switch the audio to input 3 | A: 3 -> 1 |
| 0A0. | Mute Audio of MIC and Line out | Mute |
| 1A0. | Mute audio of MIC | Mute MIC |
| 2A0. | Mute audio of line out | Mute LIN |
| 3A0. | Enable noise gate. | Gate On |
| 4A0. | Disable noise gate. | Gate Off |
| 0A1. | Unmute Audio | Unmute Audio |
| 600% | Check status | A: 1 -> 1 Volume of MIC : 50 Volume of LINE : 50 Bass of LINE : 4 Treble of LINE : 4 Ducking Off |
| 601% | MIC volume up | Volume of MIC: 51 |
| 602% | MIC volume down | Volume of MIC: 51 |
| 603% | Line volume up | Volume of LINE: 51 |
| 604% | Line volume down | Volume of LINE: 51 |
| 605% | Bass level up | Bass of LINE: 4 |
| 606% | Bass level down | Bass of LINE: 4 |
| 607% | Treble level up | Treble of LINE: 4 |
| 608% | Treble level down | Treble of LINE: 4 |
| 609% | Initialization, back to the default setting | Init OK |
| 610% | Enable/disable the priority muting function. | Ducking on/Ducking off |
| 4[x][x]% | Preset the volume level of the priority muting function. [xx] sets level from [00] to [60]. 61 levels total | Ducking of LINE: 50 |
| 5[x][x]% | Preset MIC volume, [xx] sets level from [00] to [60]. 61 levels total | Volume of MIC: 50 |
| 7[x][x]% | Preset line volume, [xx] sets level from [00] to [60]. 61 levels total | Volume of LINE: 50 |
| 8[x][x]% | Preset the bass level, [xx] sets level from [00] to [08]. 9 levels total | Bass of LINE: 4 |
| 9[x][x]% | Preset the treble level, [xx] sets level from [00] to [08]. 9 levels total | Treble of LINE: 4 |
Note:
- The numbers inside the brackets [ ] are variable
- The brackets [ ] are not included in the RS232 commands
- Any dot "." after the letters is part of the command
Priority muting (Ducking) function:
Upon MIC input, the volume of the line audio will be automatically turned down to the preset volume level. If there is no MIC input audio signal for 5 seconds, the volume will be automatically turned back up to the original level. To disable/enable the priority muting function, send the command "610%" again.
ID Address
- The ID addresses range from 0 to F (hexadecimal). When sending RS232 commands, please note how the ID address is set
- If the address is 0, the RS232 commands do not need a prefix
- If the address is 1 F , only a command sent with the correct ID address prefix will affect the amplifier
- The ID address prefix is added to commands by putting "ID" in front of the command
- For example, to mute an amplifier with an ID address of 5, the RS232 command needed is 5/0A0.
There is no need to add "ID/" before the command when the ID code is 0
Examples:
- Switching input 2 to line out, the command is: 2A1.
- Turning the volume up of line out, the command is: 603%
- Setting the MIC volume to "21", the command is: 521%
- To check the working status, the command is: 600%
- If the ID address is 0, sending the command 601% will turn up the MIC volume. However, if the ID address is 2, sending the command 601% will not work and the MIC volume will remain unchanged. The correct command is 2 / 601% .
Technical Support
For technical support please call (800) 824-3005
Warranty
Go to www.leviton.com/warranty for more information

Network Solutions
41920-A70
Volumen/Control EQ 33
Control RS-232 34
Programación 34
Comandos RS-232 34
Soporte Técnico 36
Garantía 36