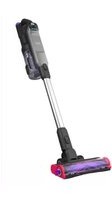
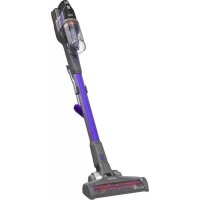
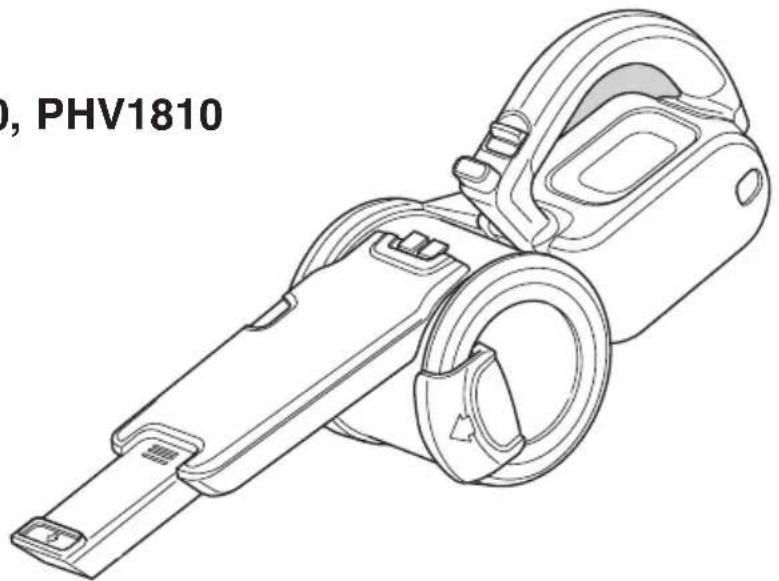
PHV1410 - Hand vacuum cleaner BLACK & DECKER - Free user manual and instructions
Find the device manual for free PHV1410 BLACK & DECKER in PDF.

User questions about PHV1410 BLACK & DECKER
0 question about this device. Answer the ones you know or ask your own.
Ask a new question about this device
Download the instructions for your Hand vacuum cleaner in PDF format for free! Find your manual PHV1410 - BLACK & DECKER and take your electronic device back in hand. On this page are published all the documents necessary for the use of your device. PHV1410 by BLACK & DECKER.
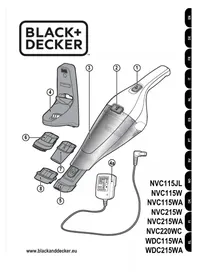
USER MANUAL PHV1410 BLACK & DECKER
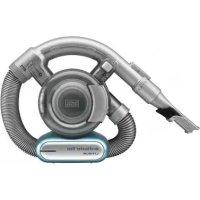
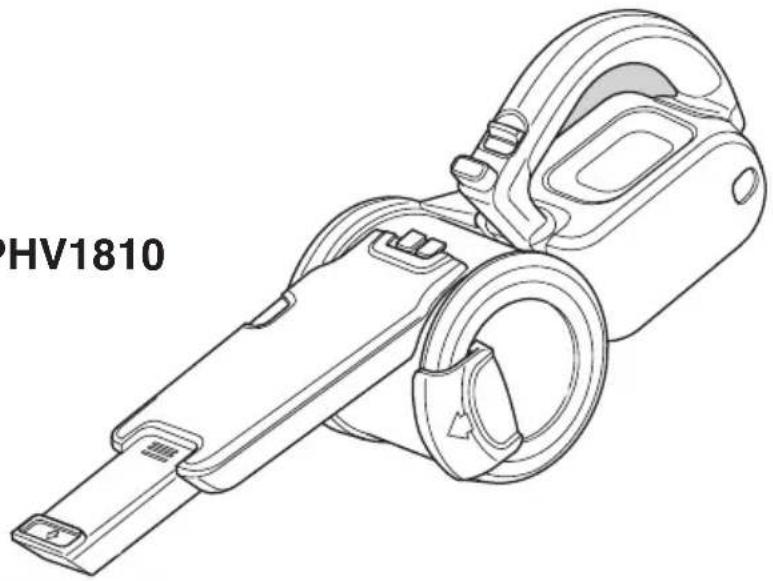
Catalog Numbers PHV1210, PHV1410, PHV1810
Thank you for choosing Black & Decker! Go to www.BlackandDecker.com/NewOwner to register your new product.
PLEASE READ BEFORE RETURNING THIS PRODUCT FOR ANY REASON:
If you have a question or experience a problem with your Black & Decker purchase, go to HTTP://WWW.BLACKANDDECKER.COM/INSTANTANSWERS
for instant answers 24 hours a day.
If you can't find the answer or do not have access to the internet, call 1-800-544-6986 from 8 a.m. to 5 p.m. EST Mon. -- Fri. to speak with an agent.
Please have the catalog number available when you call.
To purchase a replacement filter
call 1-888-678-7278.
SAVE THIS MANUAL FOR FUTURE REFERENCE.
It is important for you to read and understand this manual. The information it contains relates to protecting YOUR SAFETY and PREVENTING PROBLEMS. The symbols below are used to help you recognize this information.
DANGER: Indicates an imminently hazardous situation which, if not avoided, will result in death or serious injury.
WARNING: Indicates a potentially hazardous situation which, if not avoided, could result in death or serious injury.
CAUTION: Indicates a potentially hazardous situation which, if not avoided, may result in minor or mod er ate injury.
NOTICE: Used without the safety alert symbol indicates potentially hazardous situation which, if not avoided, may result in property damage.
IMPORTANT SAFETY INSTRUCTIONS
When using an electrical appliances, basic precautions should always be followed, including the following:
READ ALL INSTRUCTIONS BEFORE USING THIS APPLIANCE
WARNING: Read all safety warnings and all instructions.
Failure to follow the warnings and instructions listed below may result in electric shock, fire and/or serious injury.
WARNING: Some household dust contains chemicals known to the State of California to cause cancer, birth defects or other reproductive harm such as asbestos and lead in lead based paint.
WARNING: To reduce the risk of fire, electrical shock or injury:
WARNING: To reduce the risk of electric shock - Do not use outdoors or on wet surfaces.
- Do not allow to be used as a toy. Close attention is necessary when used by or near children.
- Use only as described in this manual. Use only manufacturer's recommended attachments.
- Do not use with damaged cord or plug. If appliance is not working as it should, has been dropped, damaged, left outdoors, or dropped into water, return it to a service center.
- Do not pull or carry by cord, use cord as a handle, close a door on cord, or pull cord around sharp edges or corners. Do not run appliance over cord. Keep cord away from heated surfaces.
- Do not unplug by pulling on cord. To unplug, grasp the plug, not the cord.
- Do not handle charger, including charger plug, and charger terminals with wet hands.
- Do not put any object into openings. Do not use with any opening blocked; keep free of dust, lint, hair, and anything that may reduce air flow.
- Keep hair, loose clothing, fingers, and all parts of body away from openings and moving parts.
- Use extra care when cleaning on stairs.
- Do not use to pick up flammable or combustible liquids, such as gasoline, or use in areas where they may be present.
- Do not pick up anything that is burning or smoking, such as cigarettes, matches, or hot ashes.
- Do not use without dust bag and/or filters in place.
- Do not charge the unit outdoors.
- Use only the charger supplied by the manufacturer to recharge.
- Do not incinerate the appliance even if it is severely damaged. The batteries can explode in a fire.
-
This appliance is intended for household use only and not for commercial or industrial use.
-
Shock Hazard. To protect against risk of electrical shock, do not put unit or charging base in water or other liquid.
- Do not allow the cord to hang over the edge of a table or counter or touch hot surfaces. The unit should be placed or mounted away from sinks and hot surfaces.
- Plug the charger directly into an electrical outlet.
- Use the charger only in a standard electrical outlet (120V/60Hz).
- Unplug the charger from outlet before any routine cleaning or maintenance.
- This product includes rechargeable nickel cadmium batteries. Do not incinerate batteries as they will explode at high temperatures.
- Leaks from battery cells can occur under extreme conditions. If the liquid, which is a 20 - 35% solution of potassium hydroxide, gets on the skin (1) wash quickly with soap and water or (2) neutralize with a mild acid such as lemon juice or vinegar. If the liquid gets into the eyes, flush them immediately with clean water for a minimum of 10 minutes. Seek medical attention.
- Do not look into the air vents when the unit is switched on, as sometimes there is a possibility of small debris being discharged from the air vents, especially after cleaning / replacement of the filters as debris inside the unit can be disturbed.
SAVE THESE INSTRUCTIONS
Symbols
- The label on your tool may include the following symbols. The symbols and their definitions are as follows:
V.....volts
Hz......hertz
min.........minutes
or DC..direct current
Class I Construction (grounded)
Class II Construction (double insulated)
A.......amperes
W.....watts
or AC......alternating current n_0 . no load speed
...earthing terminal
…………………………………… safety alert symbol
.../min or rpm ......... revolutions or reciprocation per minute
- When using an extension cord, be sure to use one heavy enough to carry the current your product will draw. An undersized cord will cause a drop in line voltage resulting in loss of power and overheating. The following table shows the correct size to use depending on cord length and nameplate ampere rating. If in doubt, use the next heavier gauge. The smaller the gauge number, the heavier the cord.
| Minimum Gauge for Cord Sets Volts Total Length of Cord in Feet | |||||
| 120V | 0-25 | 26-50 | 51-100 | 101-150 | |
| (0-7,6m) | (7,6-15,2m) | (15,2-30,4m) | (30,4-45,7m) | ||
| 240V | 0-50 | 51-100 | 101-200 | 201-300 | |
| (0-15,2m) | (15,2-30,4m) | (30,4-60,9m) | (60,9-91,4m) | ||
| Ampere Rating | |||||
| More | Not more | American Wire Gauge | |||
| Than | Than | ||||
| 0 | 6 | 18 | 16 | 16 | 14 |
| 6 | 10 | 18 | 16 | 14 | 12 |
| 10 | 12 | 16 | 16 | 14 | 12 |
| 12 | 16 | 14 | 12 | Not Recommended | |
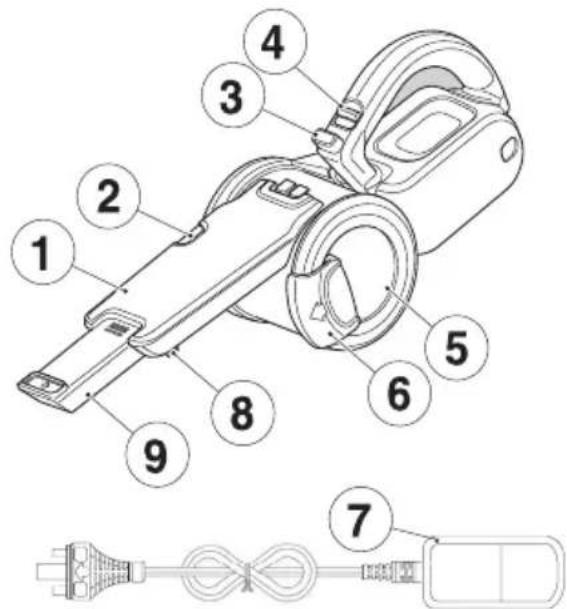
Product Features
- Dust collector
- Dust container release button
- Pivot lock button
- On/off switch
- Container door
- Container door release latch
- Charger
- Flip-out brush
- Dust collector extension
Assembly
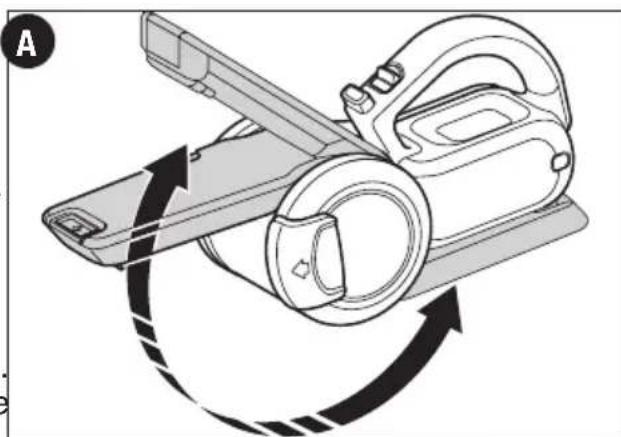
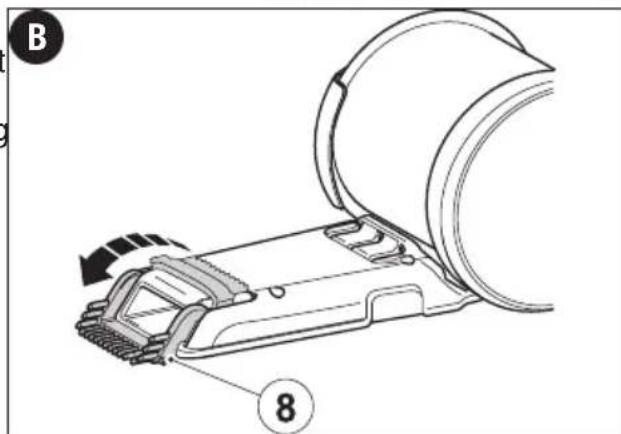
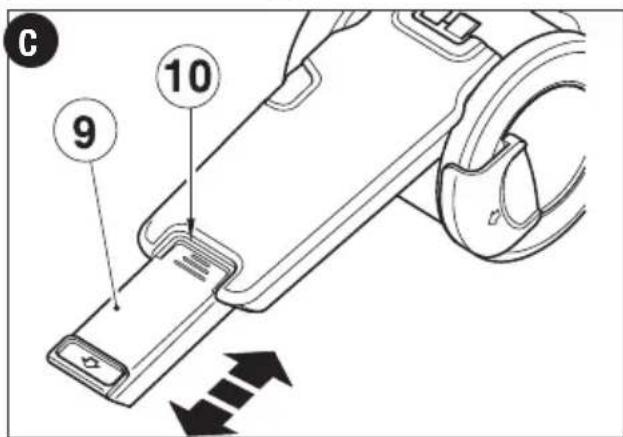
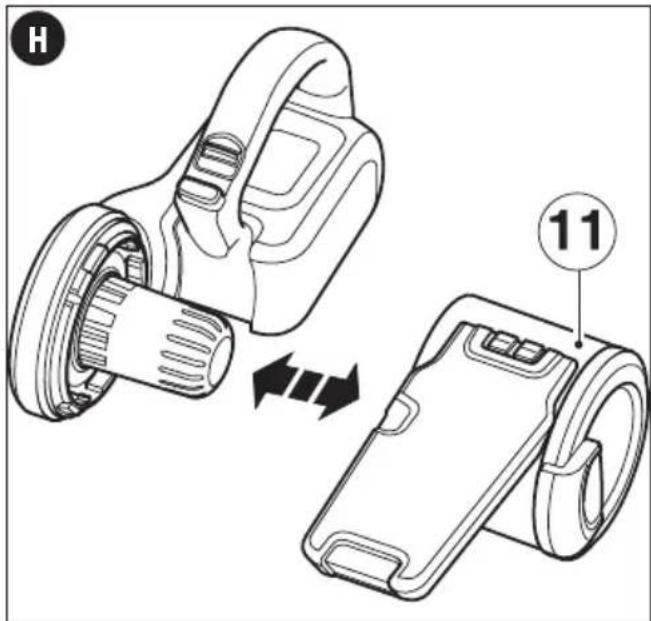
Adjusting the dust collector (fig. A - C)
The dust collector (1) has a brush that can be folded forward for dusting and upholstery cleaning.
- The dust collector (1) is stored under the appliance. To adjust for use, unplug the appliance from the charger (7).
- Press the pivot lock button (3) and rotate the dust collector (1) to the required position.
- Release the pivot lock button (3) to lock the dust collector in position
- The dust collector can be extended by pulling the dust collector extension (9) until it locks into position.
- The extension can be retracted by pressing the button (10) and pushing the extension back into the dust collector.
- The dust collector should be returned to the storage position under the appliance after use and while charging the appliance.
Use
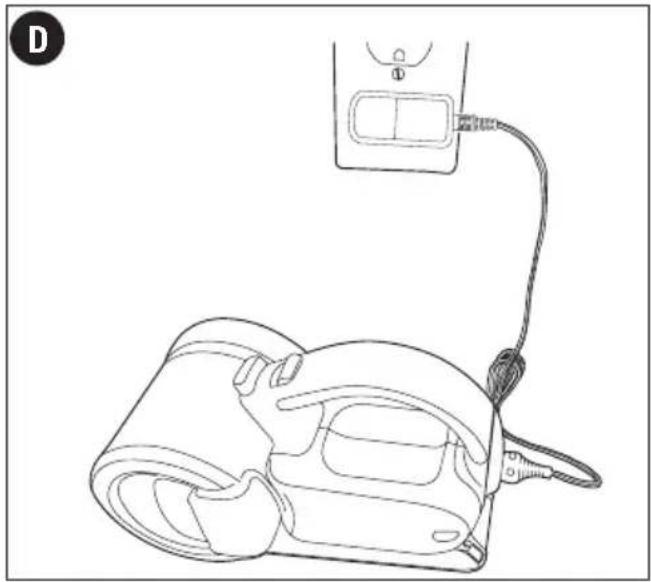
- Before first use, the battery must be charged for at least 9 hours.
- Plug the appliance into the charger whenever power gets low.
Charging the battery (fig. D)
- Make sure that the appliance is switched off. The battery will not be charged with the on/off switch (4) in the on position.
- Plug the appliance into the charger (7) as shown. The charging indicator will be lit.
- Leave the appliance on charge for at least 9 hours. While charging, the charger may get warm, this is perfectly normal and safe. It is safe to leave the appliance connected to the charger indefinitely. The charger automatically reduces power consumption when charging is complete.
- When charging is complete, the LED will turn off.
WARNING:
Do not
charge the battery at ambient temperatures below 39^ (4^) or above 104^ (40^) .
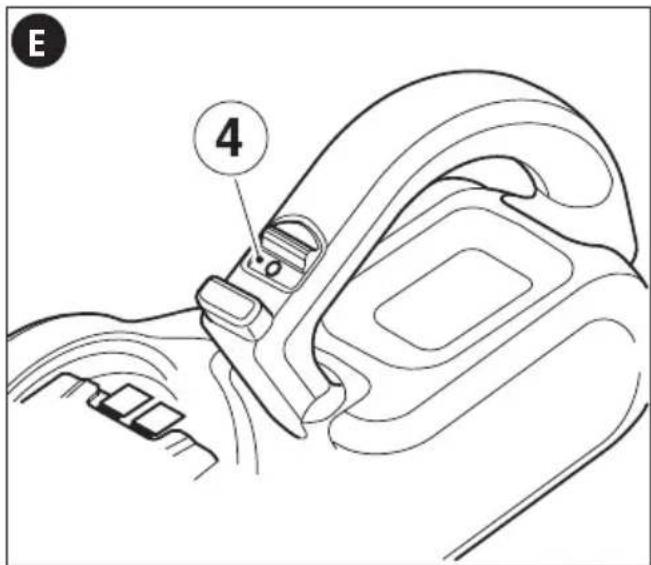
Switching on and off (fig. E)
- To switch the appliance on, slide the on/off switch (4) forward to position I.
- To switch the appliance off, slide the on/off switch (4) back to position 0.
Optimizing the suction force
Rotating the bowl (fig. A) agitates the filter to remove dirt; however, in order to keep the suction force optimized, the dust container and filters must be cleaned regularly.
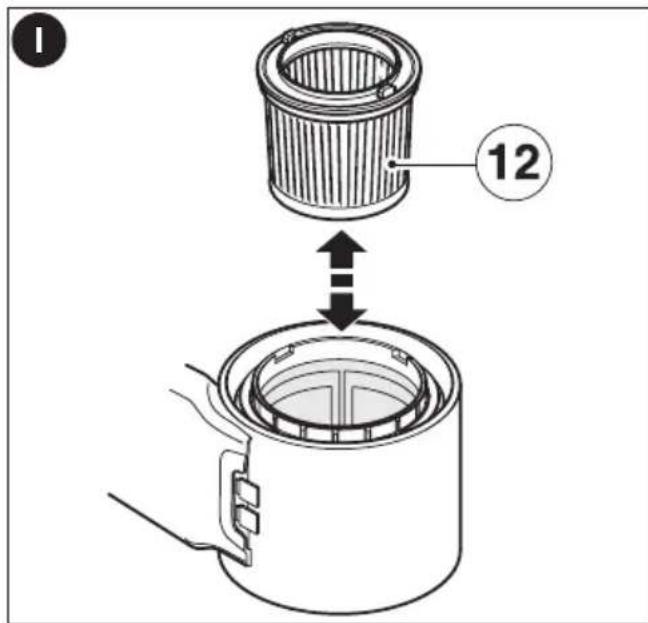
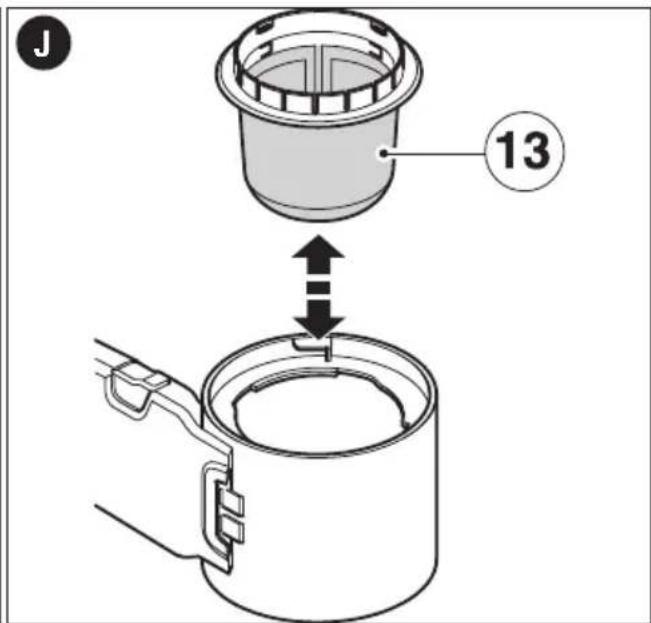
Cleaning the dust container and filters (fig. F - J)
There are two methods of cleaning the bowl, a quick empty method and a thorough clean method.
For the quick empty method use the following instructions.
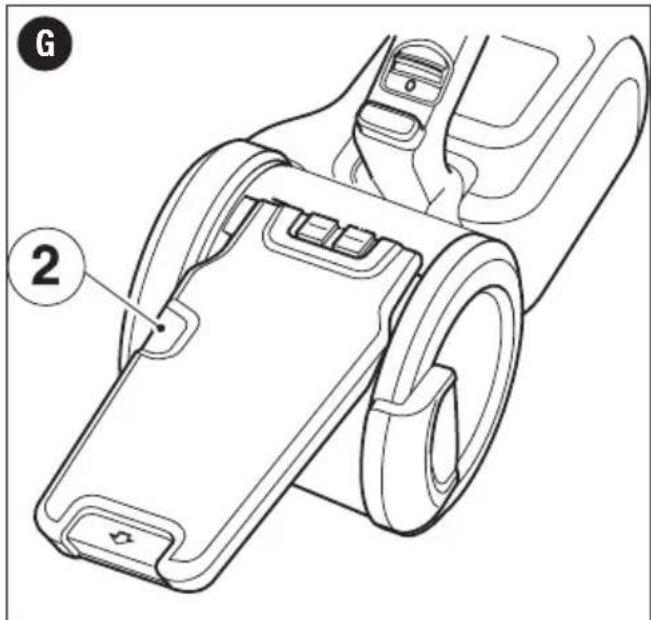
- Press the release latch (6) and open the container door (5) (fig. F).
- Empty the dust container (11).
- Close the dust container door (5). Make sure that the release latch (6) clicks into place.
For the thorough clean method use the following instructions.
- The dust container (11) is attached to the body of the appliance. To remove the dust container, press the dust container release button (2) and rotate the dust container (11) counterclockwise and carefully slide the dust container clear of the appliance.
- Remove the main filter (13).
- Brush any loose dust off the filter (12).

- To remove the pre-filter, rotate the pre-filter counterclockwise and carefully slide it clear of the dust container.
- The dust container can be cleaned. Wipe with a damp cloth or rinse with warm soapy water and allow to dry.
- The filters are re-usable and should be cleaned regularly. Rinse with warm soapy water and allow to dry.
- Install the pre- filter into the dust container (11) rotating it clockwise until it locks into place.
- Install the main filter into the pre-filter.
Install the dust container (11) to the appliance, rotate it clockwise until it locks into place.
WARNING:Projectile/
Respiratory Hazard: Never use the appliance without the filters. Optimum dust collection will only be achieved with clean filters.
CAUTION: Do not turn appliance on when dust container is removed.
Replacing the filters
The filters should be replaced every 6 to 9 months and whenever worn or damaged. Replacement filters are available from your Black & Decker dealer (cat. no. PVF110):
- Remove the old filters as described above.
- Fit the new filters as described above.
Maintenance
Use only mild soap and damp cloth to clean the tool. Never let any liquid get
inside the tool; never immerse any part of the tool into a liquid.
IMPORTANT:To assure product SAFETY and RELIABILITY, repairs, maintenance and adjustment (other than those listed in this manual) should be performed by authorized service centers or other qualified service personnel, always using identical replacement parts.
Troubleshooting
Problem
Possible Cause
Possible Solution
- Unit will not start. - Battery not charged. - Check battery charging requirements.
- Battery will not charge.
- Charger not plugged in.
- Plug charger into a working outlet.
Charging
Notes"
for
-
Check current at receptacle by plugging in a lamp or other appliance.
-
Check to see if receptacle is
connected to a light switch which turns power off when you turn out
the lights.
- Surrounding air temperature too hot or surrounding air temperature too cold. of above 40 degrees F(4.5°C) or below 105 degrees F (+40.5°C).
For assistance with your product, visit our website www.blackanddecker.com for the location of the service center nearest you or call the BLACK & DECKER help line at 1-800-544-6986.
Accessories
Recommended accessories for use with your tool are available from your local dealer or authorized service center. If you need assistance regarding accessories, please call:
1-800-544-6986.
WARNING:
this tool could be hazardous.
The use of any accessory not recommended for use with
BATTERY REMOVAL AND DISPOSAL
This product uses nickel-cadmium (Ni-Cd) rechargeable and recyclable batteries.
When the batteries no longer hold a charge, they should be removed from the Vac and recycled. They must not be incinerated or composted.
The batteries can be taken for disposal to a Black & Decker, Company-Owned or Authorized Service Center. Some local retailers are also participating in a national recycling program (see "RBRC™ Seal"). Call your local retailer for details. If you bring the batteries to a Black & Decker Company-Owned or Authorized Service Center, the Center will arrange to recycle old batteries. Or, contact your local municipality for proper disposal instructions in your city/town.
To remove the battery pack for disposal:
1.) First, before attempting to disassemble the product, turn it on and leave it on until the motor completely stops insuring a complete discharge of the batteries.
2.) Ensure nozzle is rotated out of storage position.
3.) Using a phillips screwdriver, remove the seven screws securing the two housing halves.
4.) Lift the housing cover away from the assembly.
5.) Remove the single screw which secures the motor assembly. (located at bottom of unit, adjacent to the bowl.
6.) Lift out the motor assembly.
7.) Remove the three screws in the cover and lift the cover off of the assembly exposing the batteries.
8.) Detach motor connections and lift motor away from assembly.
9.) Detach all lead connections and remove batteries from battery casing.
10.) Dispose of batteries as per recommended guidelines.
The RBRC™ Seal
The RBRC™ (Rechargeable Battery Recycling Corporation)
Seal on the nickel-cadmium battery (or battery pack) indicates that the costs to recycle the battery (or battery pack) at the end of its useful life have
already been paid by Black & Decker. In some areas, it is illegal to place spent nickel-cadmium batteries in the trash or municipal solid waste stream and the RBRC program provides an environmentally conscious alternative.
RBRC in cooperation with Black & Decker and other battery users, has established programs in the United States and Canada to facilitate the collection of spent nickel-cadmium batteries. Help protect our environment and conserve natural resources by returning the spent nickel-cadmium battery to an authorized Black & Decker service center or to your local retailer for recycling. You may also contact your local recycling center for information on where to drop off the spent battery, or call 1-800-8-BATTERY.

SERVICE INFORMATION
All Black & Decker Service Centers are staffed with trained personnel to provide customers with efficient and reliable power tool service. Whether you need technical advice, repair, or genuine factory replacement parts, contact the Black & Decker location nearest you. To find your local service location, refer to the yellow page directory under "Tools-Electric" or call: 1-800-544-6986 or visit www.blackanddecker.com
TWO-YEAR LIMITED WARRANTY
Black & Decker (U.S.) Inc. warranties this product to be free from defects in material or workmanship for a period of two (2) years following the date of purchase, provided that the product is used in a home environment. This limited warranty does not cover failures due to abuse, accidental damage or when repairs have been made or attempted by anyone other than Black & Decker and its Authorized Service Centers. A defective product meeting the warranty conditions set forth herein will be replaced or repaired at no charge in either of two ways:
The first, which will result in exchanges only, is to return the product to the retailer from whom it was purchased (provided that the store is a participating retailer). Returns should be made within the time period of the retailer's policy for exchanges. Proof of purchase may be required. Please check with the retailer for its specific return policy regarding time limits for returns or exchanges. The second option is to take or send the product (prepaid) to a Black & Decker owned or authorized Service Center for repair or replacement at Black & Decker's option. Proof of purchase may be required. Black & Decker owned and authorized service centers are listed under "Tools-Electric" in the yellow pages of the phone directory or online at www.blackanddecker.com.
This warranty does not apply to accessories. This warranty gives you specific legal rights and you may have other rights which vary from state to state. Should you have any questions, contact the manager of your nearest Black & Decker Service Center. This product is not intended for commercial use, and accordingly, such commercial use of this product will void this warranty. All other guarantees, express or implied, are hereby disclaimed.
LATIN AMERICA: This warranty does not apply to products sold in Latin America. For products sold in Latin America, check country specific warranty information contained in the packaging, call the local company or see the website for such information.
Imported by
Black & Decker (U.S.) Inc.,
701 E. Joppa Rd.
Towson, MD 21286 U.S.A.
BlackandDecker.com
1-800-544-6986
ASPIRATEUR PORTATIF SANS FIL
MODE D'EMPLOI
N° de catalogue PHV1210, PHV1410, PHV1810
CARACTERISTIQUES DU PRODUIT
Black & Decker Canada Inc.
100 Central Ave.
Black & Decker (No. cat. PVF110):
C.P.05120, Mexico, D.F.
Tel: (01 55) 5326 7100
Col. Americana, S. Juarez
Guadalajara, Jalisco
Tel. 01 33 38 25 69 78
Col. Fracc. Universidad
Chihuahua, Chihuahua
Tel. 01 614 413 64 04
Fernando González Armenta
Bolivia No. 605
Col. Felipe Carrillo Puerto
Cd. Madero, Tampico
Tel. 01 833 221 34 50
Copyright © 2014 Black & Decker FORM NO. 90605593 January 2014