BDH1855SM - Steam cleaner BLACK & DECKER - Free user manual and instructions
Find the device manual for free BDH1855SM BLACK & DECKER in PDF.

| Brand | Black & Decker |
| Model | BDH1855SM |
| Product Type | Steam mop with handheld function |
| Use | Cleaning and disinfecting sealed floors (hardwood, laminate, linoleum, vinyl, ceramic tile, stone, marble) and various surfaces with the handheld unit |
| Power Supply | Mains 120 V, polarized plug |
| Water Tank | Capacity not specified, fill with the included graduated cup to the max line |
| Heat-up Time | Approximately 15 seconds |
| Main Functions | SmartSelectMC (3 modes: stone/marble, tile/vinyl, hardwood/laminate), extra steam burst, disinfection (kills 99.9% of bacteria with microfiber pad and 90 seconds of continuous use) |
| Included Accessories | Hose and handle, pivoting mini mop, adjustable steam nozzle, detailed crevice cleaning tool, large scrubbing brush with scraper, small brush, window squeegee, fresh scent tablet, garment steam cover |
| Cleaning Pads | Microfiber, machine washable at 60 °C, no bleach or fabric softener, air dry |
| Safety | Do not direct steam towards people, animals, electrical appliances or outlets; do not use on leather, waxed furniture, delicate fabrics, unsealed wood; do not immerse; wear appropriate shoes |
| Maintenance | Clean the appliance with a damp cloth, do not immerse; repairs by an authorized center |
| Weight | Approximately 3.5 kg (estimated) |
| Warranty | 2 years for domestic use (excluding accessories) |
| Customer Service | 1 800 544-6986 (United States/Canada) |
Frequently Asked Questions - BDH1855SM BLACK & DECKER
User questions about BDH1855SM BLACK & DECKER
0 question about this device. Answer the ones you know or ask your own.
Ask a new question about this device
Download the instructions for your Steam cleaner in PDF format for free! Find your manual BDH1855SM - BLACK & DECKER and take your electronic device back in hand. On this page are published all the documents necessary for the use of your device. BDH1855SM by BLACK & DECKER.
USER MANUAL BDH1855SM BLACK & DECKER
2-IN-1 STEAM MOP WITH FRESH SENTINSTRUCTION MANUAL
CATALOG NUMBER BDH1855SM
Thank you for choosing BLACK+DECKER!
PLEASE READ BEFORE RETURNING THIS PRODUCT FOR ANY REASON.
If you have a question or experience a problem with your BLACK+DECKER purchase, go to http://www.blackanddecker.com/instantanswers If you can't find the answer or do not have access to the Internet, call 1-800-544-6986 from 8 a.m. to 5 p.m. EST Mon. - Fri. to speak with an agent. Please have the catalog number available when you call. SAVE THIS MANUAL FOR FUTURE REFERENCE.
VEA EL ESPANOL EN LA CONTRAPORTADA. INSTRUCTIVO DE OPERATION, CENTROS DE SERVICIO Y POLIZA DE GARANTIA. ADVERTENCIA: LÉASE ESTE INSTRUCTIVO ANTES DE USAR EL PRODUCTO.
SAFETY GUIDELINES - DEFINITIONS
It is important for you to read and understand this manual. The information it contains relates to protecting YOUR SAFETY and PREVENTING PROBLEMS. The symbols below are used to help you recognize this information.

DANGER: Indicates an imminently hazardous situation which, if not avoided, will result in death or serious injury.

WARNING: Indicates a potentially hazardous situation which, if not avoided, could result in death or serious injury.

CAUTION: Indicates a potentially hazardous situation which, if not avoided, y result in minor or moderate injury.
NOTICE: Used without the safety alert symbol indicates potentially hazardous situation which, if not avoided, may result in property damage.
INTENDED USE
Your BLACK+DECKER steam mop has been designed for sanitizing and cleaning the following SEALED floors: hardwood, laminate, linoleum, vinyl, ceramic tile, stone, and marble. Upright unit is for floor use only, hand-held can be used on all surfaces; do not use the unit upside down. This appliance is intended for indoor household use only.
SAFETY INSTRUCTIONS
WARNING: Read all safety warnings and all instructions. Failure to follow the warnings and instructions listed below may result in electric shock, fire and/or serious injury.
WARNING: When using electrical appliances, basic safety precautions, including the following, should always be followed to reduce the risk of fire, electric shock, personal injury and material damage.
SAFETY WARNINGS AND INSTRUCTIONS: POLARIZED PLUGS
To reduce the risk of electric shock, this equipment has a polarized plug (one blade is wider than the other). This equipment must be used with a suitable polarized 2 wire or 3 wire extension cord. Polarized connections will fit together only one way. Make sure that the receptacle end of the extension cord has large and small blade slot widths. If the plug does not fit fully into the extension cord, reverse the plug. If it still does not fit, obtain a suitable extension cord. If the extension cord does not fit fully into the outlet, contact a qualified electrician to install the proper outlet. Do not change the tool plug or extension cord in any way.
| Minimum Gauge for Cord Sets Volts Total Length of Cord in Feet | |||||
| 120V | 0-25 | 26-50 | 51-100 | 101-150 | |
| (0-7,6m) | (7,6-15,2m) | (15,2-30,4m) | (30,4-45,7m) | ||
| 240V | 0-50 | 51-100 | 101-200 | 201-300 | |
| (0-15,2m) | (15,2-30,4m) | (30,4-60,9m) | (60,9-91,4m) | ||
| Ampere Rating | |||||
| More | Not more | American | Wire | Gauge | |
| Than | Than | ||||
| 0 | 6 | 18 | 16 | 16 | 14 |
| 6 | 10 | 18 | 16 | 14 | 12 |
| 10 | 12 | 16 | 16 | 14 | 12 |
| 12 | 16 | 14 | 12 | Not Recommended | |
- Read all of this manual carefully before using the appliance.
- The intended use is described in this manual. The use of any accessory or attachment or the performance of any operation with this appliance other than those recommended in this instruction manual may present a risk of personal injury.
- Retain this manual for future reference.
USING YOUR APPLIANCE
- Do not direct steam at people, animals, electrical appliances or electrical outlets.
- Do not expose to rain.
- Do not immerse the appliance in water.
- Do not leave the appliance unattended. Keep children away from unit while in use.
-
Do not leave the appliance connected to an electrical outlet when not in use.
-
Never pull the power cord to disconnect the appliance from the socket. Keep the appliance cord away from heat, oil and sharp edges.
- Do not handle steam cleaner with wet hands.
- Do not pull or carry by cord, use cord as a handle, close door on cord, pull cord around sharp corners or expose cord to heated surfaces.
- Do not use appliance in an enclosed space filled with vapor given off by oil-based paint thinner, some moth-proofing substances, flammable dust, or other explosive or toxic vapors.
- Do not use on leather, wax polished furniture or floors, synthetic fabrics, velvet or other delicate, steam-sensitive materials.
- Do not use on any unsealed hard floor surfaces. Additionally, on surfaces that have been treated with wax or some no-wax floors, the sheen may be removed by the heat and steam action. It is always recommended to test an isolated area of the surface to be cleaned before proceeding. We also recommend that you check the use and care instructions from the floor manufacturer.
- Never put de-scaling, aromatic, alcoholic or detergent products into the steam mop, as this may damage it or make it unsafe for use.
- If the circuit breaker activates while using the steam function, discontinue product use immediately and contact the customer support center. (Beware of the risk of electrical shock.)
- The appliance emits very hot steam to sanitize the area of use. This means that the steam head and cleaning pads get very hot during use.
CAUTION: Always wear suitable shoes when using your steam mop and when changing the accessories on your steam mop. Do not wear slippers or open-toed footwear.
- Steam may escape from the appliance during use.
- Care should be taken when using this appliance. DO NOT touch any parts which may become hot during use.
AFTER USE
- Unplug the appliance and allow to cool down on before cleaning.
- When not in use, the appliance should be stored in a dry place. Do not store with wet pad.
Children should not have access to stored appliances.
INSPECTION AND REPAIRS
- Unplug the appliance and allow to cool down before performing any maintenance or repairs.
- Before use, check the appliance for damaged or defective parts. Check for breakage of parts, damage to switches and any other conditions that may affect its operation.
- Regularly check the power cord for damage.
- Do not use the appliance if any part is damaged or defective.
- Have any damaged or defective parts repaired or replaced by an authorized repair agent.
- Never attempt to remove or replace any parts other than those specified in this manual.
SAFETY OF OTHERS
- This appliance is not intended for use by persons (including children) with reduced physical, sensory or mental capabilities, or lack of experience and knowledge, unless they have been given supervision or instruction concerning the use of the appliance by a person responsible for their safety.
Children should be supervised to ensure that they do not play with the appliance.
RESIDUAL RISKS
Additional residual risks may arise when using the tool which may not be included in the enclosed safety warnings. These risks can arise from misuse, prolonged use, etc. Even with the application of the relevant safety regulations and the implementation of safety devices, certain residual risks can not be avoided. These include:
- Injuries caused by touching any moving parts.
- Injuries caused by touching any hot parts.
- Injuries caused when changing any parts or accessories.
- Injuries caused by prolonged use of the appliance. When using any appliance for prolonged periods ensure you take regular breaks.
FIRST AID MEASURES FOR SCENT COMPONENTS
If the contents within the scent tab become exposed and results in skin contact wash with soap and water; For eye contact, flush with flowing water for 15 minutes and seek immediate medical attention. If swallowed or inhaled, seek medical attention. Material Safety Data Sheet (MSDS) available from 1-800-544-6986
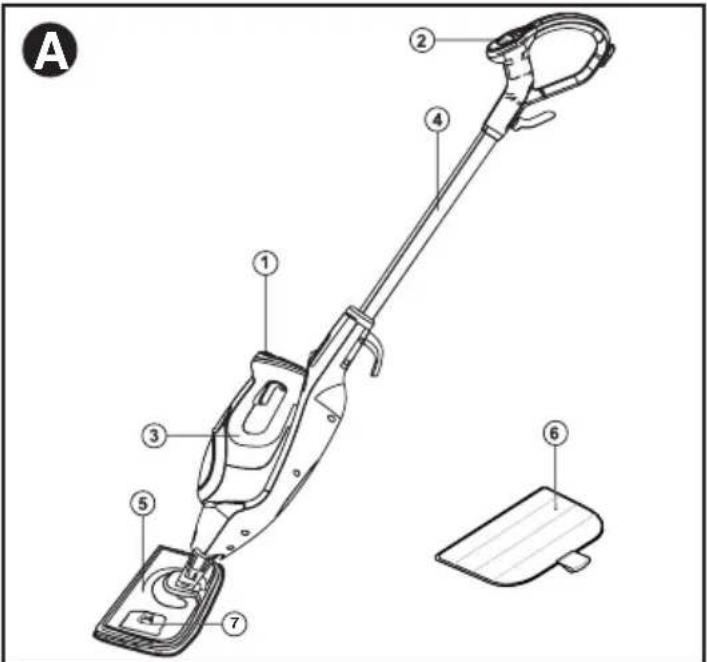
FUNCTIONAL DESCRIPTION
- ON/Off Switch
- SmartSelect™ Button
- Hand-held Steam Cleaner
- Handle Tube
- Steam Head
- Micro-Fiber Cleaning Pad
- Fresh Scent Door Release Button
ACCESSORIES
This appliance includes some or all of the following accessories. The performance of your appliance depends on the accessory used. BLACK+DECKER accessories are engineered to high quality standards and designed to enhance the performance of your appliance. By using these accessories you will get the very best from your appliance.
| Flexible hose and handle. For convenient use of all accessories. | Mini pivot mop. For cleaning tiles and large flat surfaces. | ||
| Detail grout cleaner. For cleaning grouted areas between tiles. | |||
| Variable steam jet nozzle. For higher pressure steam bursts, twist to change the spray pattern of the steam burst. | Large scrub brush cleaner with scraper. For cleaning heavily soiled object such as BBQ's. | ||
| Fresh Scent tab. | |||
| Small brush (Blue). For cleaning small hard surfaces. | Fresh Scent tab. | ||
| Window Squeezegee. For cleaning glass doors and windows. WARNING: Do not use the window squeezegee on cold glass. It may cause the glass to break. | Garment steamer cover For removing wrinkles from clothing, curtains, and other fabrics. |
ASSEMBLY
NOTICE: Each steam mop is 100% tested in the factory to ensure product performance and safety. When assembling your new steam mop for the first time you may notice water residue inside of the unit.
WARNING: Before attempting any of the following operations, make sure that the appliance is switched off and unplugged and that the appliance is cold and contains minimal or no water.
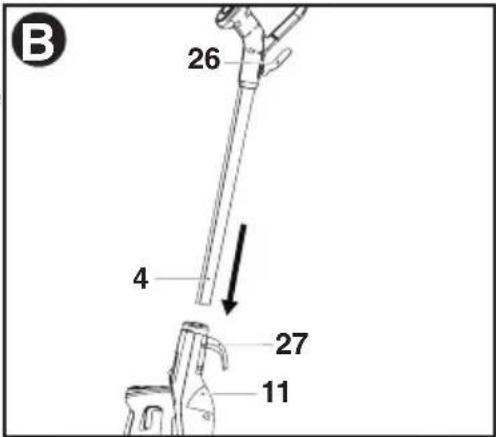
ATTACHING THE HANDLE - Fig. B
- With both cord hooks (26 & 27) facing the back, slide the bottom end of the handle tube (4) into the top end of the steam mop body (11) until it is firmly seated and clicks into place.
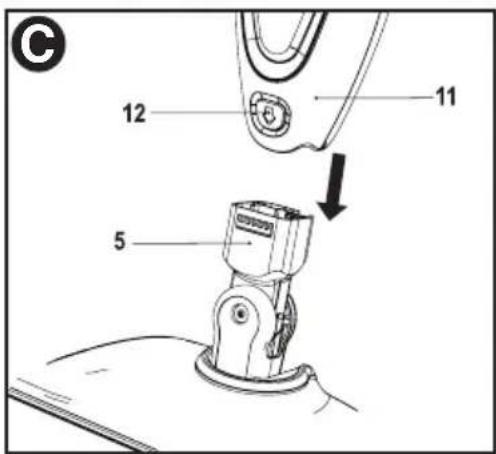
ATTACHING THE STEAM HEAD - Fig. C
- Slide the bottom end of the steam mop body (11) onto the steam head (5) until it clicks into place.
- The steam head can be removed from the steam mop body by pressing the steam head release button (12) and pulling the steam mop body off the steam head.
ATTACHING THE HANDHELD STEAM CLEANER - Fig. D
- Push the hand-held steam cleaner (3) firmly into the steam mop body (11) until it clicks into place.

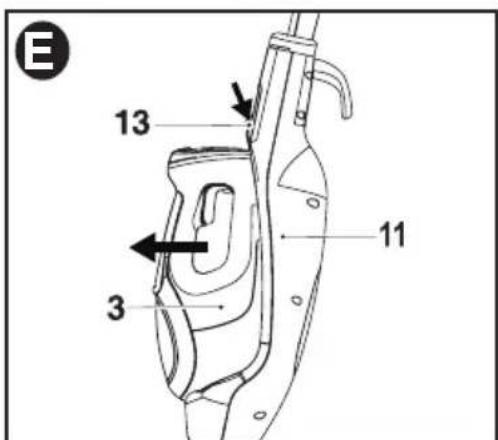
REMOVING THE HAND-HELD STEAM CLEANER - Fig. E
- Push the release button (13) down and pull the hand-held steam cleaner (3) away from the steam mop body.
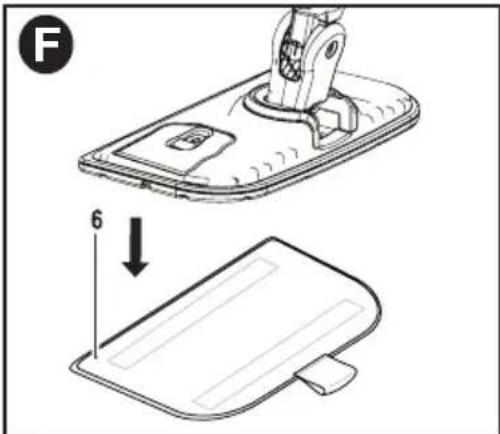
ATTACHING A CLEANING PAD - Fig. F
Replacement cleaning pads are available from your BLACK+DECKER dealer (cat. no. SMP20).
- Place a micro-fiber cleaning pad (6) on the floor with the 'hook & loop' side facing up.
- Press steam mop down onto the cleaning pad. You are now ready to steam clean and sanitize your floor.
NOTICE: Do not store with a wet pad as this can damage your floor. Always place the steam mop with the handle (4) in the upright position when stationary and make sure the steam mop is turned off when not in use.
REMOVING A CLEANING PAD - Fig. G
CAUTION: Always wear suitable shoes when changing the cleaning pad on your steam mop. Do not wear slippers or open-toed footwear.
- Return the handle tube (4) to the upright position and turn the steam mop 'OFF'.
- Wait until it cools down. (approximately five minutes)
- Place the front of your shoe onto the cleaning pad removal tab (14) and press down firmly.
- Lift the steam mop up off the cleaning pad.
NOTICE: Do not store with a wet pad as this can
damage your floor. Always place the steam mop with
the handle (4) in the upright position when stationary and make sure the steam mop is
turned off when not in use.

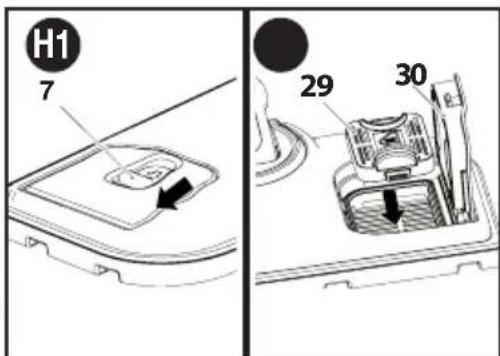
FITTING A SCENT PACK - Fig. H
Return the handle (4) to the upright position and turn the steam mop 'OFF'. Wait until the steam mop cools down. (approximately five minutes).
- Slide the Fresh Scent door release button (7), the door will open.
- Place the Fresh Scent tab into the pocket (29) as shown in figure H2.
- Close the door (30) py pushing it firmly down until an audle click is heard.
NOTICE: Do not store with a wet pad as this can
damage your floor. Always place the steam mop with the handle (4) in the upright position when stationary and make sure the steam mop is turned off when not in use.
HAND-HELD STEAM CLEANER ATTACHMENTS
NOTICE: First remove the hand-held steam cleaner from the steam body.
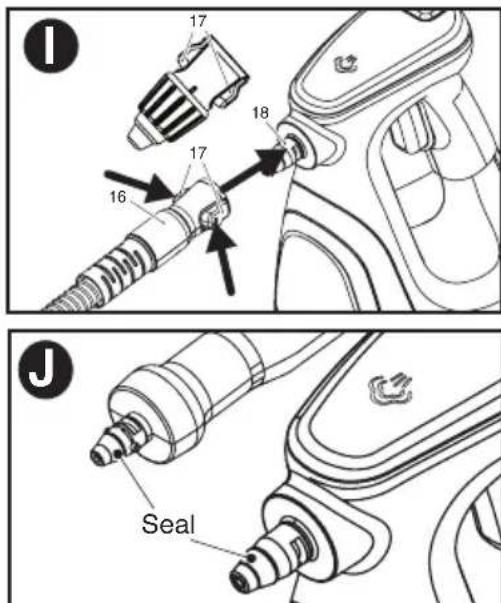
ATTACHING THE HOSE OR VARIABLE NOZZLE - Fig.1
- Press in the clips (17) on either side of the hose (16) or variable nozzle.
- Align the two keys on the inside flange of the hose or variable nozzle with the two slots adjacent to the steam nozzle on the hand-held steam cleaner or hose.
- Firmly press the hose or variable nozzle onto the steam nozzle (18) of the hand-held steam cleaner or hose such that it is fully seated, and release the clips.
WARNING: Inspect the seal on the steam nozzle of the hose and handheld steam cleaner before each use (Figure J). If the seal is missing or damaged contact your nearest authorized repair agent. Do not use the appliance.
CAUTION: Ensure that the hose and/or variable nozzle is securely fastened before using the hand-held steam cleaner.
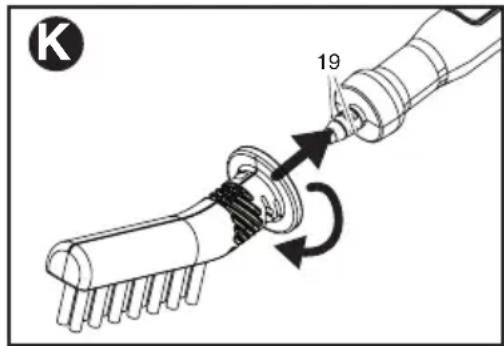
ATTACHING OTHER ACCESSORIES TO THE HOSE - Fig. K
- For accessories other than the variable nozzle, align the lugs (19) on the hose with the recesses on the accessory.
- Press the accessory onto the hose and twist clockwise until the accessory is fully seated and clicks into place.
ATTACHING GARMENT STEAMER COVER - Fig. L
WARNING: Burn hazard, do not use the garment steamer on clothes that are being worn.
CAUTION: Wait until steam cleaner cools down to attach or remove the garment steamer cover. (approximately five minutes)
NOTE: The garment steamer works only with the window squeezegee.
NOTE: To ensure the steamer is safe for a fabric, first test it in an inconspicuous area of the item you are to us it on.
- Attach the hose (5) to the steam cleaner as described for Figure B.
- Attach the squeezegee (8) to the hose as described for Figure D.
- Hook the garment steamer cover (9) around one side of the squeegee and stretch it to the other side of the squeegee as shown in Figure E. Ensure the garment steamer fully covers the squeegee.
- Hang garment in an open area.
- Lightly press garment steamer into the garment and slowly move around the garment.

REMOVING OTHER ACCESSORIES FROM THE HOSE
- For accessories other than the variable nozzle, twist accessory counterclockwise then pull away from the hose.
REMOVING THE HOSE
- Press in the clips on either side of the hose and pull away from the steam nozzle.
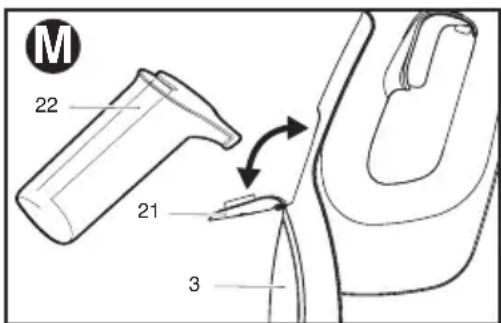
FILLING THE WATER TANK - Fig. M
This steam cleaner incorporates an anti-calcium system to help prolong the life of the system.
NOTICE: Fill the water tank with regular tap water.
NOTICE: In areas of very hard water, the use of de-ionized water is recommended.
WARNING: Do not over fill the tank. Use supplied jug (22) to fill tank, and do not fill jug above indicated max line.
-
Ensure that the appliance is switched off and the power cord is disconnected from the power supply.
-
Place the steam mop down with the handle tube (4) in the upright position.
-
Open the filler cap (21) by pulling down.
-
Fill the supplied jug (22) with water to the max line, and then use jug to fill water tank (3)
: Close the filler cap.
NOTICE: Always empty the water tank after use.
OPERATION
CAUTION: FOR FLOOR USE ONLY; DO NOT USE THE UNIT UPSIDE DOWN.
SWITCHING ON/OFF - Fig. N
NOTICE: When the steam mop is first turned on the water reservoir will glow red. Once the steam mop is ready to use the water reservoir will glow blue. It takes approximately 15 seconds for the steam mop to heat up.
- To switch the appliance on, press the ON/OFF button (1).
- To switch the appliance off, press the ON/OFF button.
NOTICE: Never leave the steam mop in one spot on any surface for any period of time. Do not store with

a wet pad as this can damage your floor. Always place the steam mop with the handle (4) in the upright position when stationary and make sure the steam mop is turned off when not in use.
NOTICE: Always empty the water tank after use.
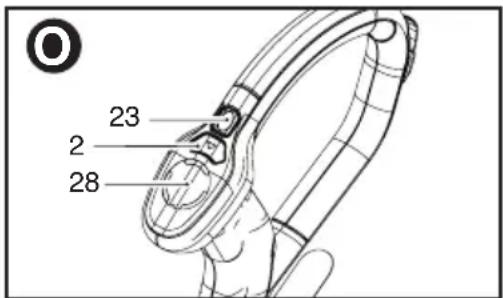
SmartSelectTM Dial - Fig. O
The steam mop is equipped with a SmartSelect™ dial (28) which shows various hard floor surface cleaning applications. A light will glow next to the selected application. To change the application, press and release the SmartSelect™ button (2) until the light glows next to the correct operating mode for your particular hard floor surface.
NOTICE: Do not use on any unsealed hard floor surfaces. Additionally, on surfaces that have been treated with wax or some no wax floors, the sheen may be removed by the heat and steam action. It is always recommended to test an isolated area of the surface to be cleaned before proceeding. We also recommend that you check the use and care instructions from the floor manufacturer.
Using the SmartSelectTM button (2), choose from one of the following applications:
| Stone/Marble | |
| Tiles/Vinyl | |
| Wood/Laminate |
The steam mop will select the correct volume of steam required for your particular cleaning operation.
NOTICE: SmartSelect™ has a memory. Switching the steam mop on will recall the previously used setting.
STEAM BURST BUTTON
The steam burst button is a built in feature that aides in the removal of stubborn floor marks or stuck on grime.
- To apply an extra burst of steam to trouble areas, press the Steam Burst button (23).
NOTICE: The steam burst will last for 10 seconds then the steam mop will return to the chosen setting.
NOTICE: This unit will kill 99.9% of bacteria and germs when used in accordance with this manual and with the micro fiber pad fitted and a continuous run time of 90 seconds.
HINTS FOR OPTIMUM USE
GENERALUSE
CAUTION: Never use the steam mop without first attaching a cleaning pad.
WARNING: It is important to monitor the water level in the water tank. To refill the water tank and continue to sanitize/ clean, see Filling the Water Tank section.
NOTICE: Never leave the steam mop in one spot on any surface for any period of time.
Do not store with a wet pad as this can damage your floor. Always place the steam mop with the handle (4) in the upright position when stationary and make sure the steam mop is turned off when not in use.
Always vacuum or sweep the floor before using the steam mop.
- The easiest way to use the steam mop is to tilt the handle to a 45^ angle and clean slowly, covering a small area at a time.
- Do not use chemical cleaners with your steam mop. To remove stubborn stains from vinyl or linoleum floors, you can pre-treat them with a mild detergent and some water before using the steam mop.
STEAM MOP CLEANING
- Place a cleaning pad (6) on the floor with the 'hook & loop' side facing up.
- Lightly press it down onto the cleaning pad.
Plug the steam mop electric cord into the outlet. - Press the ON/OFF button (1). It takes approximately 15 seconds for the steam mop to heat up.
- Press the SmartSelect™ button (2) until the required setting is reached.
Pulling the handle tube back will activate the steam pump. After a few seconds steam will start to come out of the steam head.
NOTICE: If the system has been run dry it may take up to 30 seconds to prime the system on first use.
- It takes a few seconds for steam to enter the cleaning pad. The steam mop will now glide easily over the surface to be sanitized/cleaned.
- Push and pull the steam mop slowly across the floor to thoroughly steam clean each section.
NOTICE: During use you may turn off the steam pump by returning the handle to the upright position, this convenient feature will allow you to put the steam mop down for a short time so that you may move items of furniture, then continue cleaning without the need to switch the appliance off.
- When you have finished using the steam mop, return the handle tube to the upright position and turn it 'OFF', and wait until the steam mop cools down (approximately five minutes).
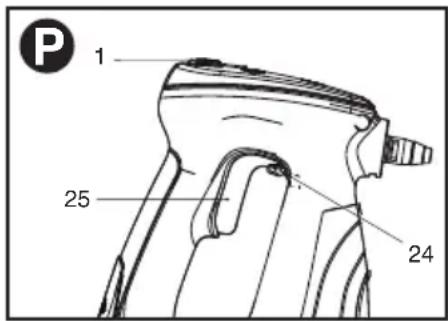
HAND-HELD STEAM CLEANING - Fig P
NOTICE: To effectively sanitize an area, the lift and reach head with microfiber pad must be used.
- Remove the hand-held steam cleaner (3) from the steam mop body (11).
- Attach the required accessory.
Plug hand-held steam cleaner electric cord into the outlet. - Press the ON/OFF button (1). It takes approximately 15 seconds for the hand-held steam cleaner to heat up.
- Lift the lock off (24) and pull the trigger switch (25)to activate the steam pump. After a few seconds steam will start to come out of the accessory.
NOTICE: During use you may turn off the steam pump by returning the handle to the upright position, this convenient feature will allow you to put the steam mop down for a short time so that you may move items of furniture, then continue cleaning without the need to switch the appliance off.
- When you have finished using the hand held steam cleaner, release the trigger switch and turn it 'OFF.' Wait until it cools (approximately five minutes) before reattaching to steam mop body.
AFTER USE - Fig. Q
- Return the handle tube (4) to the upright position and turn the steam mop 'OFF'.
- Wait until the steam mop cools down. (approximately five minutes)
- Unplug the steam mop from the wall outlet.
- Empty the water tank (3).
- Remove the hand-held unit and empty the water tank.
- Remove the cleaning pad (6) and wash it so that it is ready for the next use. (Take care to follow the wash care instructions printed on the cleaning pad).
- Wrap the electric cord around the cord hooks (26 & 27).

NOTICE: The top cord hook rotates to easily release the cord ready for next use.
NOTICE: With the handle tube in the upright position, the cord neatly wrapped around the cord hooks your steam mop will stand on its own for storage. Alternatively there is a hanging bracket built into the hand grip which will allow your steam mop to be hung from a suitable hook on the wall. Always ensure that your wall hook is capable of supporting the weight of the steam mop safely.
MAINTENANCE AND CLEANING
Your BLACK+DECKER corded appliance has been designed to operate over a long period of time with a minimum of maintenance. Continuous satisfactory operation depends upon proper appliance care and regular cleaning.
WARNING: Before performing any maintenance or cleaning on corded appliances switch off and unplug the appliance.
- Clean your appliance using a soft damp cloth. Never let any liquid get inside the appliance; never immerse any part of the appliance into a liquid. IMPORTANT: To assure product SAFETY and RELIABILITY, repairs, maintenance and adjustment should be performed by authorized service centers or other qualified service organizations, always using identical replacement parts.
- For stubborn marks you can use a mild solution of soap and water to dampen your cloth.
CARE OF THE CLEANING PADS
NOTICE: Follow the cleaning instructions printed on the label of your cleaning pad. Wash care instructions - Machine wash warm 140^ (60^) - No bleach - No fabric softener - Air dry only - Allow to dry fully before re-use.
ACCESSORIES
Recommended accessories for use with your appliance are available from your local dealer or authorized service center. If you need assistance regarding accessories, please call: 1-800-544-6986.
WARNING: The use of any accessory not recommended for use with this appliance could be hazardous.
TROUBLESHOOTING
PROBLEM POSSIBLE CAUSE POSSIBLE SOLUTION
| ·Unit will not start. ·Cord not plugged in. ·Plug appliance into a working outlet. ·Main switch not on. ·Turn main switch on. ·Floor head not correctly ·Ensure floor head is correctly fitted. attached. ·Handle not fitted ·Fit Handle correctly correctly - LED's do not light up. ·Circuit fuse is blown. ·Replace circuit fuse. (If the product repeatedly causes the circuit fuse to blow, discontinue use immediately and have it serviced at BLACK+DECKER service center or authorized servicer.) ·Circuit breaker is tripped. ·Reset circuit breaker. (If the product repeatedly causes the circuit breaker to trip, discontinue use immediately and have it serviced at a BLACK+DECKER service center or authorized servicer.) ·Cord or switch is ·Have cord or switch replaced damaged. at BLACK+DECKER Service Center or Authorized Servicer. ·Mop will not make steam. ·No water in water tank. ·Mop leaves water on floor. ·Cleaning pad is too wet. ·Unplug unit from power outlet and change the micro-fiber cleaning pad. |
- Mop left spot on floor. - Mop left in one spot too - Never leave the steam mop on long. the floor with a damp or wet cleaning pad still attached when
not in use.
- Hard water. - Use distilled water. For assistance with your product, visit our website www.blackanddecker.com for the location of the service center nearest you or call the BLACK+DECKER help line at 1-800-544-6986.
SERVICE INFORMATION
All BLACK+DECKER Service Centers are staffed with trained personnel to provide customers with efficient and reliable power tool service. Whether you need technical advice, repair, or genuine factory replacement parts, contact the BLACK+DECKER location nearest you. To find your local service location, call: 1-800-544-6986 or visit www.blackanddecker.com
LIMITED TWO-YEAR HOME USE WARRANTY
BLACK+DECKER warrants this product to be free from defects in material or workmanship for a period of two (2) years following the date of purchase, provided that the product is used in a home environment. This limited warranty does not cover failures due to abuse, accidental damage or when repairs have been made or attempted by anyone other than BLACK+DECKER and its Authorized Service Centers. A defective product meeting the guarantee conditions set forth herein will be replaced or repaired at no charge in either of two ways:
The first, which will result in exchanges only, is to return the product to the retailer from whom it was purchased (provided that the store is a participating retailer). Returns should be made within the time period of the retailer's policy for exchanges. Proof of purchase may be required. Please check with the retailer for its specific return policy regarding time limits for returns or exchanges. The second option is to take or send the product (prepaid) to a BLACK+DECKER owned or authorized Service Center for repair or replacement at BLACK+DECKER's option. Proof of purchase may be required. BLACK+DECKER owned and authorized service centers are listed online at
www.blackanddecker.com.
This warranty does not apply to accessories. This warranty gives you specific legal rights and you may have other rights which vary from state to state. Should you have any questions, contact the manager of your nearest BLACK+DECKER Service Center. This product is not intended for commercial use, and accordingly, such commercial use of this product will void this warranty. All other warranties, express or implied, are hereby disclaimed.
LATIN AMERICA: This warranty does not apply to products sold in Latin America. For products sold in Latin America, check country specific warranty information contained in the packaging, call the local company or see the website for such information.
FREE WARNING LABEL REPLACEMENT: If your warning labels become illegible or are missing, call 1-800-544-6986 for a free replacement.
Imported by
Black & Decker (U.S.) Inc.,
701 E. Joppa Rd.
Towson, MD 21286 U.S.A.
BLACK+ DECKER
BALAI À VAPEUR 2 EN 1 AVEC PARFUM FRAIS
MODE D'EMPLOI
NUMERO DE CATALOGUE BDH1855SM
INTRODUCTION DU PARFUM - FIG. H
PROBLEM CAUSE POSSIBLE SOLUTION POSSIBLE
Black & Decker Canada Inc.
100 Central Ave.
PROBLEMA CAUSA POSIBLE SOLUCION POSIBLE
Col. Americana, S. Juarez
Guadalajara, Jalisco
Tel. 01 33 38 25 69 78
Col. Fracc. Universidad
Chihuahua, Chihuahua
Tel. 01 614 413 64 04
Fernando González Armenta
Bolivia No. 605
Col. Felipe Carrillo Puerto
Cd. Madero, Tamaulipas
Tel. 01 833 221 34 50
Cat. No. BDH1855SM Form No. 90609548
Copyright © 2014 BLACK+DECKER
March 2014
Printed in China