
XR-C453RDS - Car stereo SONY - Free user manual and instructions
Find the device manual for free XR-C453RDS SONY in PDF.
User questions about XR-C453RDS SONY
0 question about this device. Answer the ones you know or ask your own.
Ask a new question about this device
Download the instructions for your Car stereo in PDF format for free! Find your manual XR-C453RDS - SONY and take your electronic device back in hand. On this page are published all the documents necessary for the use of your device. XR-C453RDS by SONY.
USER MANUAL XR-C453RDS SONY
FM/MW/LW Cassette Car Stereo
Operating Instructions EN
INHCTpyKcIyno3KcNpyaTaCNI RF
For installation and connections, see the supplied installation/connections manual.
Thank you for purchasing the Sony Cassette Car Stereo. This unit lets you enjoy a variety of features by using a rotary remote.
In addition to the tape playback and the radio operation you can expand your system by connecting optional CD/MD changer.
Table of contents
This Unit Only
Getting Started
Resetting the unit 4
Detaching the front panel 4
Preparing the rotary remote 4
Setting the clock 5
Cassette Player
Listening to a tape 5
Playing a tape in various modes 6
Radio
Memorizing stations automatically
— Best Tuning Memory (BTM) 7
Memorizing only the desired stations 7
Receiving the memorized stations. 7
RDS
Overview of the RDS function 8
Displaying the station name 8
Re-tuning the same programme automatically -Alternative Frequencies (AF) 9
Listening to traffic announcements 9
Preseting the RDS stations with AF and TA data 10
Locating a station by programme type 11
Setting the clock automatically 11
Other Functions
Using the rotary remote 12
Adjusting the sound characteristics 13
Muting the sound. 13
Changing the sound and beep tone 13
With Optional Equipment
CD/MD Changer
Playing a CD/MD 14
Scanning the tracks - Intro scan. 15
Playing tracks repeatedly -Repeat play 15
Playing tracks in random order Shuffle play 15
Additional Information
Precautions 16
Maintenance. 17
Dismounting the unit 17
Location of controls 18
Specifications 19
Troubleshooting guide 20
Index 22
Getting Started
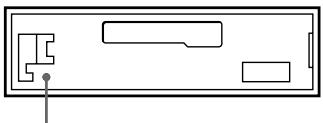
Resetting the unit
Before operating the unit for the first time or after replacing the car battery, you must reset the unit.
Press the reset button with a pointed object, such as a ball-point pen.
Reset button
Note
Pressing the reset button will erase all the memorized programme and memory functions.
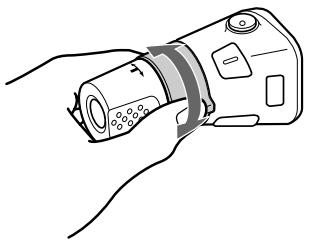
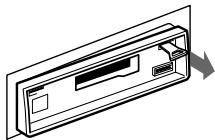
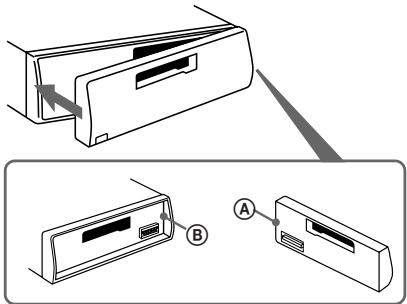
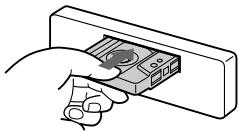
Detaching the front panel
The front panel of this unit can be detached to prevent the unit from being stolen.
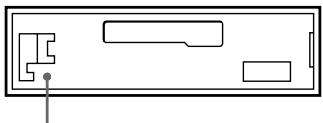
1 Press OFF.
2 Press (RELEASE) to open up the front panel, and detach the panel by pulling it towards you.
Notes
- Be sure not to drop the panel when detaching it from the unit.
- If you press (RELEASE) to detach the panel while the unit is still turned on, the power will automatically turn off to protect the speakers from being damaged.
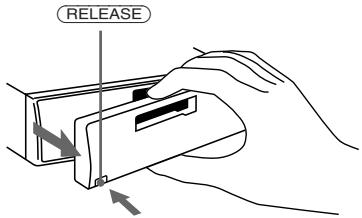
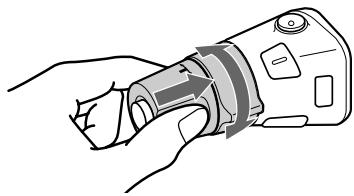
Attaching the front panel
Attach part A of the front panel to part B of the unit as illustrated and push until it clicks.
Notes
- Make sure the front panel is the right way up when attaching it to the unit as it cannot be attached upside down.
- Do not press the front panel hard against the unit when attaching it to the unit. It can easily be attached by pressing it lightly against the unit.
- When you carry the front panel with you, put it in the supplied front panel case.
- Do not press hard or give excessive pressure to the display windows of the front panel.
- Do not expose the front panel to direct sunlight, heat sources such as hot air ducts or leave it in a humid place. Never leave it on the dashboard etc. of a car parked in direct sunlight where there may be a considerable rise in temperature inside the car.
Caution alarm
If you turn the ignition key to the OFF position without removing the front panel, the caution alarm will beep for a few seconds (only when the POWER SELECT switch is set to the A position).
If you connect an optional power amplifier and do not use the built-in amplifier, the beep tone will be disabled.
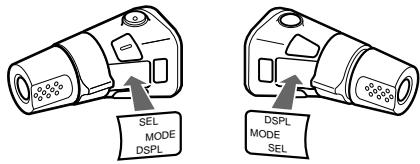
Preparing the rotary remote
When you mount the rotary remote, attach the label in the illustration below.
Setting the clock
The clock has a 24-hour digital indication.
For example, setting it to 10:08
1 Press OFF or DSPL during operation.
2 Press DSPL for two seconds.

The hour digit blinks.
1 Set the hour digits.

to go forward
to go backward

Press SEL momentarily.

The minute digit blinks.
Set the minute digits.

to go forward
to go backward

3 Press DSPL momentarily.

The clock activates.
Note
If the POWER SELECT switch on the top of the unit is set to the 3 position, the clock cannot be set unless the power is turned on. Set the clock after you have turned on the radio.
Cassette Player
Listening to a tape
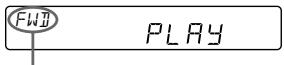
Insert a cassette.
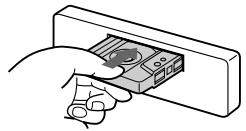
Playback will start automatically.
If a cassette is already inserted, press SOURCE repeatedly until "PLAY" is displayed.

The side facing up is being played.

The side facing down is being played.
Tip
To change the tape transport direction, press MODE) (▶) during tape playback.
| To | Press |
| Stop playback | OFF |
| Eject the cassette | ▲ |
Fast-winding the tape
During playback, press either side of (SEEK/AMS) more than two second.

Fast-forward
Rewind
To start playback during fast-forwarding or rewinding, press MODE (▶).
Locating the beginning of a track
Automatic Music Sensor (AMS)
You can skip up to nine tracks at one time.
During playback, press either side of (SEEK/AMS) momentarily.

To locate the succeeding tracks
To locate the preceding tracks
Note
The AMS function may not work when :
- the blanks between tracks are shorter than 4 seconds
- there is noise between tracks
- there are long sections of low volume or quiet sections.
Changing the displayed items
Each time you press DSPL during tape playback, the displayed item changes as follows:

* While the AF/TA function activated.
Playing a tape in various modes
Searching for the desired track - Intro scan
Press ① during playback.
"INTRO" appears on the display.
The first 10 seconds of all the tracks are played.
When you find the desired track, press again. The unit returns to the normal playback mode
Playing tracks repeatedly -Repeat play
Press ② during playback.
"REP" appears on the display.
When the current played track is over, it will be played again from the beginning.
To cancel this mode, press again.
Switching to the radio while fast-winding a tape
Automatic Tuner Activation (ATA)
Press ⑤ during playback.
"ATA" appears on the display.
When fast-forwarding or rewinding with (SEEK/AMS) for two seconds, the tuner will turn on automatically.
To cancel this function, press ⑤.
Skipping blanks during tape playback — Blank skip
Press ⑥ during playback.
"BL.SKIP" appears on the display.
Blanks longer than eight seconds will automatically be skipped during tape playback.
To cancel this function, press 6.
Playing a CrO_2 or metal tape
Press 4 when you want to listen to a CrO2 (TYPE II) or metal (TYPE IV) tape.
"MTL" appears on the display.
To cancel this function, press 4.
Radio
The frequency ranges this unit can receive and memorize are 87.5-108.0MHz (FM1, FM2) and 65.0-74.0MHz (FM3).
Memorizing stations automatically
Best Tuning Memory (BTM)
This function selects from the currently received band the stations with the strongest signals and memorizes them in order of their frequency.
PREVENTING ACCIDENTS!
When tuning in while driving, use the automatic tuning or memory preset search function instead of manual tuning.
1 Press SOURCE repeatedly to select the tuner.
Each time you press (SOURCE), the source changes as follows:

2 Press MODE repeatedly to select the band.
Each time you press MODE, the band changes as follows:

3 Press (SENS/BTM) for two seconds.
Notes
- During FM1 and FM2 band reception, the BTM function searches only the 87.5-108.0MHz frequency range, and during FM3 band reception, it searches only the 65.0-74.0MHz frequency range.
- The unit will not store stations with weak signals on the preset number buttons. If there are only a few stations received, some preset number buttons will remain empty.
- When there is a preset number indicated on the display, the unit will store stations on all preset number buttons from the one currently displayed.
Memorizing only the desired stations
Up to 6 stations on each band (FM1, FM2, FM3, MW and LW) can be stored on the preset number buttons in the order of your choice. Therefore, 18 FM stations can be memorized. If you try to store another station on the same preset number button, the previously stored station will be erased.
1 Press (SOURCE) repeatedly to select the tuner.
2 Press MODE repeatedly to select the band.
3 Press (SEEK/AMS) to search for the station you wish to store on a preset number button.
4 Press the desired preset number button (1) to (6) for two seconds.
The number of the selected preset number button appears on the display.
Receiving the memorized stations
1 Press (SOURCE) repeatedly to select the tuner.
2 Press MODE repeatedly to select the band.
3 Press the preset number button (① to ⑥) momentarily on which the desired station is stored.
Tip
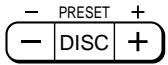
Press either side of PRESET/DISC to receive in order the stations stored in the memory (Preset Search Function). During FM1 or FM2 reception, the FM3 band cannot be received directly with PRESET/DISC because the frequency ranges are different. Select the band with MODE.
If FM stereo reception is poor
— Monaural mode
Press (SENS/BTM) momentarily until "MONO" lights up on the display.
The sound will improve, but it will become monaural. (The "ST" indication will disappear.)
Changing the displayed items
Each time you press DSPL, the display changes between the frequency and the clock.
If you cannot tune in a preset station
Press either side of (SEEK/AMS)
momentarily to search for the station (automatic tuning).
Scanning stops when a station is received. Press either side of the button repeatedly until the desired station is received.
Note
If the automatic tuning stops too frequently, p
(SENS/BTM) momentarily until "LCL" lights up on the display (local seek mode). Only the stations with relatively strong signals can be tuned in.
Tip
If you know the frequency, press and hold either side of
SEEK/AMS until the desired station is received (manual tuning).
RDS
Overview of the RDS function
Radio Data System (RDS) is a broadcasting service that allows FM stations to send additional digital information along with the regular radio programme signal. Your car stereo offers you a variety of services. Here are just a few: Re-tuning the same programme automatically, Listening to traffic announcements and Locating a station by programme type.
The RDS function is available only for FM1 and FM2 bands.
Notes
- Depending on the country or region, not all of the RDS functions are available.
- RDS may not work properly if the signal strength is weak or if the station you are tuned in is not transmitting RDS data.
Displaying the station name
The name of the station currently received lights up on the display.
Select an FM station.
When you tune in an FM station that transmits RDS data, the station name lights up on the display.
F1 F M
Note
The *indication means that an RDS station is being received.
Changing the displayed items
Each time you press DSPL, the displayed items change as follows:
Frequency Time Station name
Note
"NO NAME" lights up if the station received does not transmit RDS data.
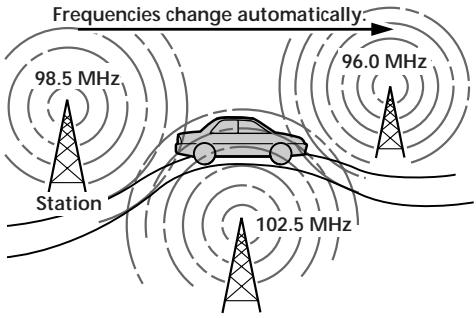
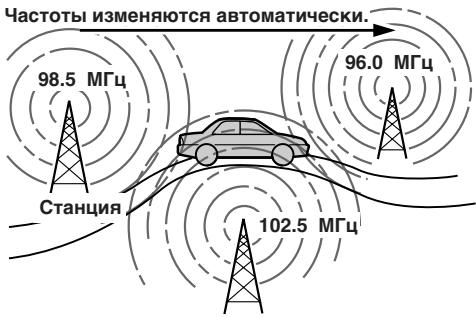
Re-tuning the same programme automatically
Alternative Frequencies (AF)
The Alternative Frequencies (AF) function automatically selects and re-tunes the station with the strongest signal in a network. By using this function, you can continuously listen to the same programme during a long-distance drive without having to re-tune the station manually.
1 Select an FM station.
2 Press / TA until "AF" lights up on the display.
The unit starts searching for an alternative station with a stronger signal in the same network.
Notes
- When the / TA button is pressed during FM3 band reception, the band changes automatically to FM1.
- When there is no alternative station in the area, and you don't need to search for an alternative station, turn the AF function off by pressing (AF/TA) until "AF" disappears.
Changing the displayed items
Each time you press / TA , the displayed items change as follows:

- Select this to turn on both AF and TA functions.
Notes
- "NO AF" and the station name flashes alternately, if the unit cannot find an alternative station in the network.
- If the station name starts flashing after selecting a station with the AF function on, this indicates that no alternative frequency is available. Press (SEEK/AMS) while the station name is flashing (within eight seconds). The unit starts searching for another frequency with the same PI (Programme Identification) data ("PI seek" appears and no sound is heard). If the unit cannot find another frequency, "NO PI" appears, and the unit returns to the originally selected frequency.
Listening to a regional programme
The "REG" (regional on) function of this unit lets you stay tuned to a regional programme without being switched to another regional station. (Note that you must turn the AF function on.) The unit is factory preset to "REG" but if you want to turn off the function, do the following.
Press AF/TA for more than two seconds until "REG" disappears.
Note that turning the "REG" function off might cause the unit to switch to another regional station within the same network.
Note
This function does not work in the United Kingdom and in some other areas.
Listening to traffic announcements
The Traffic Announcement (TA) and Traffic Programme (TP) data let you automatically tune in an FM station that is broadcasting traffic announcements even though you are listening to other programme sources.
Press AF/TA until "TA" or "AF TA" lights up on the display.
The unit starts searching for traffic information stations. "TP" lights up on the display when the unit finds a station broadcasting traffic announcements. When the traffic announcement starts, "TA" flashes, then flashing stops when the traffic announcement is over.
Tip
When the traffic announcement starts while you are listening to another programme source, the unit automatically switches to the announcement and goes back to the original source when the announcement is over.
Notes
- "NO TP" flashes for five seconds if the received station doesn't broadcast traffic announcements. Then, the unit starts searching for a station that does broadcast traffic announcements.
- When the "EON" indication appears with "TP" on the display, the current station makes use of broadcast traffic announcements of other stations in the same network.
To cancel the current traffic announcement
Press AF/TA momentarily.
To cancel all traffic announcements, turn off the function by pressing / TA until "AF" disappears.
Presetting the volume of traffic announcements
You can preset the volume level of the traffic announcements beforehand, so you will not miss the announcement. When a traffic announcement starts, the volume will be automatically adjusted to the preset level.
1 Select the desired volume level.
2 Press ③ while holding down SEL. "TA VOL" appears and the setting is stored.
Receiving emergency announcements
If an emergency announcement comes in while you are listening to the radio, the programme will be automatically switched to the announcement. If you are listening to a source other than the radio, the emergency announcements will only be heard if you set AF or TA to on. The unit will then automatically switch to these announcements no matter what you are listening to at the time.
Presetting the RDS stations with AF and TA data
When you preset the RDS stations, the unit stores each station's data as well as its frequency, so you don't have to turn on the AF or TA function every time you tune in the preset station. You can select different settings (AF, TA, or both) for individual preset stations, or the same setting for all preset stations.
Presetting the same setting for all preset stations
1 Select an FM band.
2 Press / TA repeatedly and select either "AF", "TA" or "AF TA" (for both AF and TA functions). Note that turning the "AF TA" function off stores RDS stations as well as non-RDS FM stations.
3 Press SENS/BTM for two seconds.
Presetting different settings for each preset station
1 Select an FM band, and tune in the desired station.
2 Press / TA repeatedly and select either "AF", "TA" or "AF TA" (for both AF and TA functions).
3 Press the desired preset number button for two seconds until "MEM" appears. Repeat from step 1 for presetting other stations.
Tip
If you want to change the preset AF and/or TA setting after you tuned in the preset station, you can do so by turning on/off the AF or TA function.
Locating a station by programme type
You can locate the station you want by selecting one of the programme types shown below.
Note
If the countries or regions where EON data is not transmitted, you can use this function only for the stations you have tuned in once.
| Programme types | Display |
| News | NEWS |
| Current Affairs | AFFAIRS |
| Information | INFO |
| Sports | SPORT |
| Education | EDUCATE |
| Drama | DRAMA |
| Culture | CULTURE |
| Science | SCIENCE |
| Varied | VARIED |
| Popular Music | POP M |
| Rock Music | ROCK M |
| Middle of the Road Music | M.O.R. M |
| Light Classical | LIGHT M |
| Classical | CLASSICS |
| Other Music Type | OTHER M |
| Weather | WEATHER |
| Finance | FINANCE |
| Children's programmes | CHILDREN |
| Social Affairs | SOCIAL A |
| Religion | RELIGION |
| Phone In | PHONE IN |
| Travel | TRAVEL |
| Leisure | LEISURE |
| Jazz Music | JAZZ |
| Country Music | COUNTRY |
| National Music | NATION M |
| Oldies Music | OLDIES |
| Folk Music | FOLK M |
| Documentary | DOCUMENT |
| Not specified | NONE |
Note
You can not use this function in some countries where no PTY (Programme Type selection) data is available.
1 Press (PTY) during FM reception until "PTY" lights up on the display.
$$ \boxed { \begin{array}{c c} P T y & I N F O \ \hline \end{array} } $$
The current programme type name appears if the station is transmitting the PTY data. "-----" appears if the received station is not an RDS station or if the RDS data has not been received.
Note
The PTY function is not available for the FM3 band.
2 Press PTY repeatedly until the desired programme type appears.
The programme types appear in the order as shown in the above table. Note that you cannot select "NONE" (Not specified) for searching.
$$ \begin{array}{c c} \text {P T Y} & \text {S P O R T} \ \hline \end{array} $$
3 Press either side of (SEEK/AMS).
The unit starts searching for a station broadcasting the selected programme type. When the unit finds the programme, the programme type appears again for five seconds.
"NO" and the programme type appear alternately for five seconds if the unit cannot find the programme type and it returns to the previous station.
Setting the clock automatically
By receiving CT (Clock Time) data, the clock of this unit can be set automatically.
During FM reception, press ② while pressing SEL.
"CT" will be displayed, and the clock will be set.
$$ \begin{array}{c c} F M & \text {口} \ & \text {口} \ \hline \end{array} $$
To cancel the CT function
Repeat the above procedure.
Notes
- The CT function may not work even though an RDS station is being received.
The time set by the CT function may not be exact.
Using the rotary remote
The rotary remote works by pressing buttons and/or rotating controls.
You can control the optional CD/MD changer by the rotary remote.
By pressing buttons (the SOURCE and the MODE buttons)
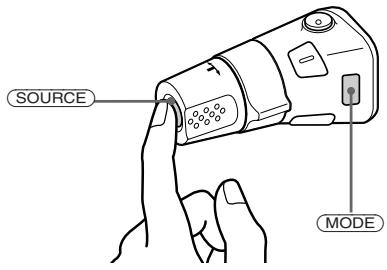
Every time you press SOURCE, the source changes as follows:
TAPE TUNER CD/MD
Pressing MODE changes the operation in the following ways:
- the tape transport.
- the band, FM1 FM2 FM3 MW LW .
- the CD / MD changer.
Tip
You can turn on this unit by pressing (SOURCE) on the rotary remote.
By rotating the control (the SEEK/ AMS control)
Rotate the control momentarily and release it to:
- Locate the beginnings of the tracks on the tape. Rotate and hold the control, and release it to fast-wind the tape. To playback, rotate and hold the control again, and release it.
- Locate a specific track on a disc. Rotate and hold the control until you locate the specific point in a track, then release it to start playback.
- Tune in the stations automatically.
Rotate and hold the control to tune in the specific station.
By rotating the control while pushing in (the PRESET/DISC control)
Push in and rotate the control to:
- Receive the stations memorized on the preset buttons.
- Change the disc.
Other operations
Rotate the VOL control to adjust the volume.
Changing the operative direction
The operative direction of controls is factory preset as in the illustration below.
If you need to mount the rotary remote on the right side of the steering column, you can reverse the controls operative direction.

Press SEL for two seconds while pushing in the VOL control.
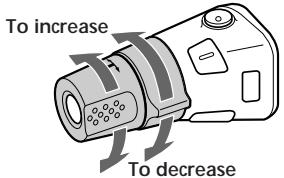
Adjusting the sound characteristics
1 Select the item you want to adjust by pressing repeatedly. VOL (volume) BAS (bass) TRE (treble) BAL (balance) FAD (fader)
2 Adjust the selected item by pressing either (±) or (一)
Adjust within three seconds after selecting. (After three seconds the button will again serve as the volume control button.)
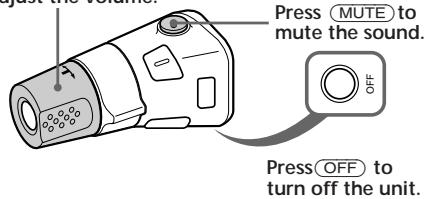
Muting the sound
Press MUTE. The "MUTE" indication flashes.
To restore the previous volume level, press again.
Tip The unit decreases the volume automatically when a telephone call comes in (Telephone-mute function).
Changing the sound and beep tone
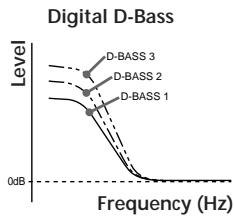
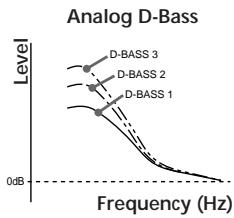
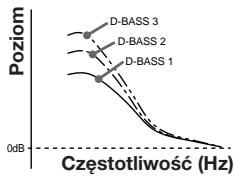
Boosting the bass sound — D-bass
You can enjoy clear and powerful bass sound. The D-bass function boosts the low frequency signal with a sharper curve than conventional bass boost.
You can hear the bass line more clearly even if the vocal sound is the same volume. You can emphasize and adjust the bass sound easily with the D-BASS control. This effect is similar to the one you get when you use an optional subwoofer system.
Moreover, the Digital D-bass* function creates even sharper and more powerful bass sound than Analog D-bass.
Adjusting the bass curve
Turn the D-BASS control to adjust the bass level (1, 2 or 3). "D-BASS" * appears in the display.
To cancel, turn the control to the OFF position.
- If the CD changer has the digital D-bass function, "DIGITAL D-BASS" appears on the display during CD playback.
Note If the CD changer does not have a D -bass function, the bass sound may be distorted when the volume is increased. In this case, turn on the D-BASS control and adjust the volume.
Muting the beep tone
Press 6 while pressing SEL.
To obtain the beep tone again, press these buttons again.
Note
If you connect an optional power amplifier and do not use the built-in amplifier, the beep tone will be disabled.
Changing the illumination color
Press ① while pressing SEL.
You can choose the color between amber and green.
With Optional Equipment CD/MD Changer
You can control up to five CD/MD changers with this unit.
Playing a CD/MD
Press (SOURCE) until the desired changer indication appears on the display.
CD/MD playback starts.
When a CD/MD changer is connected, all the tracks play from the beginning.
Note
Even if you select an MD changer, "CD" appears in the display.
Selecting CD/MD changers (when several CD/MD changers are connected)
Press MODE repeatedly to select the desired CD/MD changer.
Changing the displayed items
Each time you press DSPL during CD/MD playback, the item changes as follows:
Elapsed playback time Clock
Locating a specific track
Automatic Music Sensor (AMS)
During playback, press either side of (SEEK/AMS) once for each track you wish to skip the tracks.

To locate the succeeding tracks
To locate the preceding tracks
Locating a specific point in a track
- Manual Search
During playback, press and hold either side of SEEK/AMS. Release the button when you have found the desired part.

To search forward
To search backward
Switching to other discs
During playback, press either side of PRESET/DISC.
To return to the previous disc
To advance to the next disc
Scanning the tracks
— Intro scan
The first 10 seconds of all the tracks on the current disc are played in order. After the first disc is over, the next disc is played.
Press ① during playback.
"INTRO" appears on the display.
When you find the desired track, press again. The unit returns to the normal CD/MD playback mode.
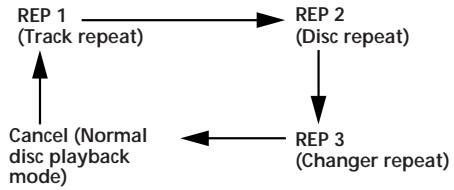
Playing tracks repeatedly
— Repeat play
To repeat a track
Press ② repeatedly during CD/MD playback until "REP 1" is displayed.
To repeat a disc
Press ② repeatedly during CD/MD playback until "REP 2" is displayed.
To repeat all the discs in the current changer
Press ② repeatedly during CD/MD playback until "REP 3" is displayed.
Each time you press ② the display changes as follows:
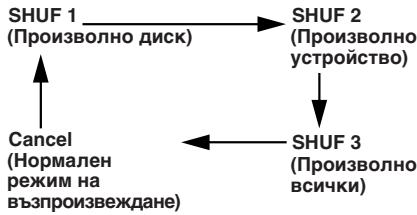
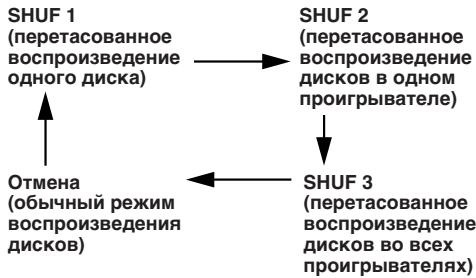
Playing tracks in random order — Shuffle play
To play the tracks on the current disc in random order
Press ③ repeatedly during CD/MD playback until "SHUF 1" is displayed.
To play all the discs in the changer in random order
Press ③ repeatedly during CD/MD playback until "SHUF 2" is displayed.
To play all the discs in the current connected changers in random order
Press ③ repeatedly during CD/MD playback until "SHUF 3" is displayed.
Each time you press ③ the display changes as follows:
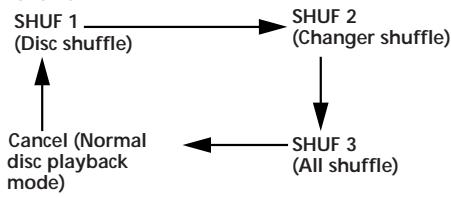
If you press ① during shuffle play, the first 10 seconds of all tracks will be played in random order.
Precautions
- If your car was parked in direct sunlight resulting in a considerable rise in temperature inside the car, allow the unit to cool off before operating it.
- If no power is being supplied to the unit, check the connections first. If everything is in order, check the fuse.
- If no sound comes from the speakers of a 2-speaker system, set the fader control to the center position.
- When the tape is played back for a long period, the cassette may become warm because of the built-in power amplifier. However, this is not a sign of malfunction.
If you have any questions or problems concerning your unit that are not covered in this manual, please consult your nearest Sony dealer.
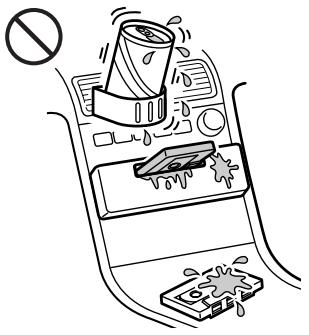
To maintain high quality sound
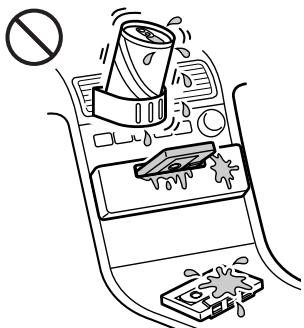
If you have drink holders near your audio equipment, be careful not to splash juice or other soft drinks onto the car audio. Sugary residues on this unit or cassette tapes may contaminate the playback heads, reduce the sound quality, or prevent sound reproduction altogether.
Cassette cleaning kits cannot remove sugar from the tape heads.
Notes on Cassettes
Cassette care
- Do not touch the tape surface of a cassette, as any dirt or dust will contaminate the heads.
- Keep cassettes away from equipment with built-in magnets such as speakers and amplifiers, as erasure or distortion on the recorded tape could occur.
- Do not expose cassettes to direct sunlight, extremely cold temperatures or moisture.
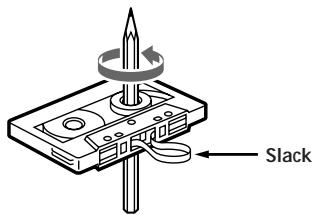
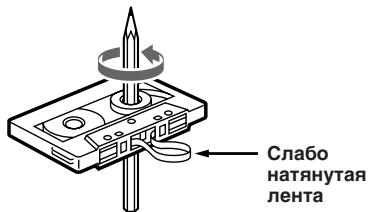
- Slack in the tape may cause the tape to be caught in the machine. Before you insert the tape, use a pencil or similar object to turn the reel and take up any slack.
Distorted cassettes and loose labels can cause problems when inserting or ejecting tapes. Remove or replace loose labels.

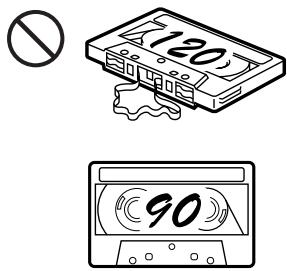
Cassettes longer than 90 minutes
The use of cassettes longer than 90 minutes is not recommended except for long continuous play. The tapes used for these cassettes are very thin and tend to be stretched easily. Frequent playing and stopping of these tapes may cause them to be pulled into the cassette deck mechanism.

Maintenance
Fuse Replacement
When replacing the fuse, be sure to use one matching the amperage rating stated on the fuse. If the fuse blows, check the power connection and replace the fuse. If the fuse blows again after replacement, there may be an internal malfunction. In such a case, consult your nearest Sony dealer.
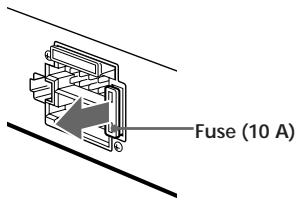
Warning
Never use a fuse with an amperage rating exceeding the one supplied with the unit as this could damage the unit.
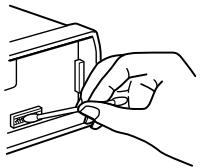
Cleaning the Connectors
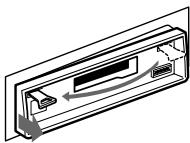
The unit may not function properly if the connectors between the unit and the front panel are not clean. In order to prevent this, open the front panel by pressing (RELEASE), then detach it and clean the connectors with a cotton swab dipped in alcohol. Do not apply too much force. Otherwise, the connectors may be damaged.
Main unit
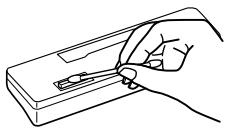
Back of the front panel
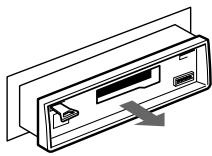
Dismounting the unit
1

2
3
4
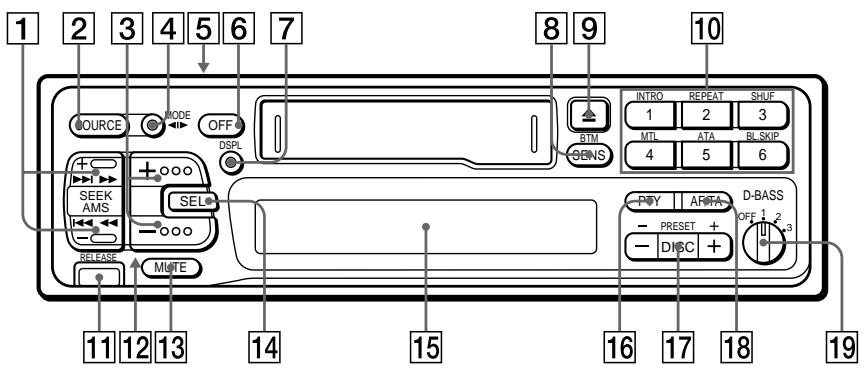
Location of controls
Refer to the pages for further details.
SEEK/AMS button 5,6,7,8,9,11,14,15
SOURCE button (TAPE/TUNER/CD/MD) 5, 7, 14
3 (+ - ) (volume/bass/treble/balance/fader control) button 13
4 MODE () button During Tuner reception: BAND select 7 During Tape playback: Transport direction cha During CD/MD playback Changer select 14
5 POWER SELECT switch (located on the top of the unit) See "POWER SELECT Switch" in the Installation/Connections manual.
6 OFF button 4,5
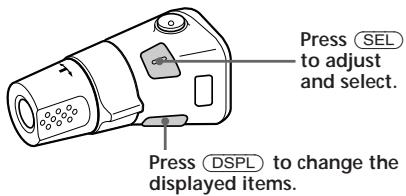
DSPL(displaymodechange/time set) button5,6,8,14
8 SENS/BTM (sensitivity adjust/Best tuning memory function) button 7, 8, 10
9 (eject) button 5
During radio reception: Preset number buttons 7
During tape/CD/MD playback:
① INTRO button 6, 15
② REPEAT button 6, 15
③ SHUF (Shuffle) button 15
MTL button 6
⑤ ATA (Automatic Tuner Activation) button 6
⑥ BL.SKIP (Blank Skip) button 6
11 RELEASE(front panel release) button 4,17
Reset button (located on the front side of the unit hidden by the front panel) Press this button when you use this unit for the first time, when you have changed the car battery, or when the buttons of this unit do not function properly.
13 MUTE button 13
14 SEL (control mode select) button 5, 10, 11, 13, 14
15 Display window
16 PTY (programme type) button 11
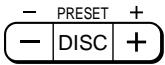
17 PRESET/DISC button 7, 15 During Tuner reception: Preset stations select 7
During CD/MD playback: Disc change 15
18 AF/TA (alternative frequency/traffic announcement) button 9, 10
19 D-BASS control 13
Specifications
| Cassette player section | General | ||
| Tape track | 4-track 2-channel stereo | Outputs | Telephone mute control lead |
| Wow and flutter | 0.08 % (WRMS) | ||
| Frequency response | 30 - 18,000 Hz | Power amplifier control lead | |
| Signal-to-noise ratio | 61 dB (TYPE II, IV) | ||
| 58 dB (TYPE I) | Power antenna control lead | ||
| Tuner section | Line out (1) | ||
| FM | Tone controls | Bass ±8 dB at 100 Hz | |
| Tuning range | FM1, FM2: 87.5 - 108.0 MHz | Treble ±8 dB at 10 kHz | |
| FM3: 65.0 - 74.0 MHz | Power requirements | 12 V DC car battery (negative ground) | |
| Antenna terminal | External antenna connector | Approx. 188 × 58 × 181 mm (w/h/d) | |
| Intermediate frequency | 10.7 MHz | Dimensions | Approx. 182 × 53 × 164 mm (w/h/d) |
| Usable sensitivity | 8 dBf | Mounting dimensions | |
| Selectivity | 75 dB at 400 kHz | Mass | Approx. 1.2 kg |
| Signal-to-noise ratio | 63 dB (stereo), 65 dB (mono) | Supplied accessories | Parts for installation and connections (1 set) |
| Harmonic distortion at 1 kHz | Rotary commander RM-X2S (1) | ||
| 0.5 % (stereo), 0.3 % (mono) | Front panel case (1) | ||
| Separation | 35 dB at 1 kHz | Optional accessories | Bus cable (supplied with an RCA pin cord) |
| Frequency response | 30 - 15,000 Hz | RC-61 (1 m), RC-62 (2 m) | |
| Capture ratio | 2 dB | RCA pin cord | |
| MW/LW | RC-63 (1 m), RC-64 (2 m), | ||
| Tuning range | MW: 531 - 1,602 kHz | RC-65 (5 m) | |
| LW: 153 - 281 kHz | Optional equipment | CD changer CDX-705, CDX-605 (10 discs), CDX-T65, CDX-T62 (6 discs) MD changer MDX-61 Source selector XA-C30 | |
| Antenna terminal | External antenna connector | ||
| Intermediate frequency | 10.71 MHz/450 kHz | ||
| Sensitivity | MW: 30 μV | ||
| LW: 50 μV | |||
| Power amplifier section | |||
| Outputs | Speaker outputs (sure seal connectors) | ||
| Speaker impedance | 4 - 8 ohms | Design and specifications are subject to change without notice. | |
| Maximum power output | 35 W × 4 (at 4 ohms) | ||
Troubleshooting guide
The following checklist will assist in the correction of most problems you may encounter with your unit.
Before going through the checklist below, refer to the operating procedures.
General
| Problem | Cause/Solution |
| No sound | ·Adjust the volume with ⊙. ·Set the fader control to the centre position for 2-speaker systems. |
| Indications do not appear on the display window. | Remove the front panel and clean the connectors. See “Cleaning the Connectors” in “Maintenance” for details. |
| No beep tone. | ·An optional power amplifier is connected and you are not using the built-in amplifier. ·The beep tone is muted (page 14). |
Tape playback
| Problem | Cause/Solution |
| Playback sound is distorted. | Contamination of the tape head. → Clean the head. |
| The AMS does not operate correctly. | ·There is noise in the space between tracks. ·A blank space is too short (less than four seconds). ·▷ on (SEEK/AMS) is pressed immediately before the following track. ·▷ on (SEEK/AMS) is pressed immediately after the track starts. ·A long pause, or a passage of low frequencies or very low sound level is treated as a blank space. |
Radio reception
| Problem | Cause/Solution |
| Preset tuning is not possible. | • Store the correct frequency. • The broadcast is too weak. |
| Automatic tuning is not possible. | The broadcast is too weak.→Use manual tuning. |
| The "ST" indication flashes. | • Tune in precisely. • The broadcast is too weak. →Press (SENS/BTM) to enter the MONO mode. |
RDS functions
| Problem | Cause/Solution |
| The RDS function does not operate | The RDS function is available only for the FM1 and FM2 bands. |
| A SEEK starts after a few seconds of listening. | The station is non-TP or weaken signal. → Press (AF/TA) until “AF TA” disappears. |
| No traffic announcements | • Activate “TA”. • The station does not broadcast any traffic announcements despite being TP. → Tune in another station. |
| PTY displays “NONE”. | The station does not specify the programme type. |
Disc play
| Problem | Cause/Solution |
| Playback sound skips. | A dusty or defective disc. |
Error displays (when the optional CD/MD changer(s) is connected)
The following indications will flash for about five seconds and an alarm sound will be heard.
| Display | Cause | Solution |
| NO MAG | The disc magazine is not inserted in the CD/MD changer. | Insert the disc magazine with discs into the CD/MD changer. |
| NO DISC | No disc is inserted in the disc magazine. | Take out the magazine and insert a disc. |
| NG DISCS | A CD/MD cannot play because of some problem. | Insert another CD/MD. |
| ERROR | The disc is dirty. | Clean the disc. |
| The disc is inserted upside down. | Insert the disc correctly. | |
| RESET | The CD/MD changer cannot be operated because of some problem. | Press the reset button on the unit. |
| HI TEMP | The ambient temperature is more than 50°C. | Wait until the temperature goes below 50°C. |
If the above-mentioned solutions do not help to improve the situation, consult your nearest Sony dealer.
Index
A
Alternative Frequencies (AF) 9
Automatic Music Sensor (AMS) 6
Automatic tuning 7
Automatic Tuner Activation (ATA) 6
B
Bass 13
Balance 13
Beep tone 14
Best Tuning Memory (BTM) 7
Blank skip 6
C
Caution alarm 4
CD playback 14
Clock 5
D, E
D-Bass 13
Display 6,8,9,14
F, G, H
Fader 13
Fast-forward 5
Front panel 4
Fuse 17
I, J, K
Intro scan 6,15
L
Local seek mode (LCL) 8
M, N, O
Manual search 15
Manual tuning 7
MD playback 14
METAL 6
Monaural mode 8
Mute 13, 14
P, Q
Preset search 7
Programme Type (PTY) 11
R
Radio 7
Radio Data System (RDS) 8, 9, 10
Repeat play 6, 15
Reset 4
Rewind 5
Rotary remote 4, 12, 13
S
Shuffle play 15
T, U, V, W, X, Y, Z
Tape playback 5
Telephone-mute 13
Traffic Announcement (TA) 9,10
Traffic Programme (TP) 9
Treble 13
Witamy!
Analogogy system D-BASS
Automatic Tuner Activation (ATA) 7
Best Tuning Memory (BTM) 8
Bezpiecznik 20
UcTpoIcTbO 3a cMaHa Ha CD/MD
Bb3npo3Bexkahe Ha CD/MD 16
IperJIeI Na 3aInci —ФункцЯ Intro scan 16
IocneIOBaTeJIHO Bb3POnI3BExJaHe Ha 3aIncn -ФункцЯ Repeat play ....17
Bb3npoun3BexJaHe Ha 3aIncn B npoun3BoJeH pei - FyHKzirn Shuffle play .........17
DonblHnTeHa HhΦopMaζη
Mepkn 3a 6e3oNaChocT 18
PoiDJIbpxKaHe 19
CbaIHe Ha anapaTa 20
Pa3noJoxeHneHa ypeDnTe 3a ynpabJIeHne 21
Texnueckx xapaKtepcntukn 22
PbKOBOdTO 3aOTcPaHBAHe Ha HEN3npaBHOCTN 23
UHdEKC 25
NoctabrHe Ha NmceBnnaHeI
PpIJIeTe DeTajna A KbM DeTaiJa B Ha anapata, KaKTo e noka3aHo Ha qHyrpaTa N HAtncHe Tdo npuippaKaBaHe.
3a6eJekn
- YBepete ce, Ye IinueBnna naHEn e o6bphat npabINHO harope npri NocTabaHTo My KbM anapata, TbN KaTO ToI He MoKe da bDe noCTaben, Ako e o6bphat o6bpaHo.
JIueBnT NaHEn He 6Ba Da ce HaTnCKa CInHo KbM anapata npn NoCTabHeTo My. IocTabHeTo Ha NaCeBna NaHEn MoKe Da cTaHe C JekO npNTnCKaHe Ha NaHEn KaMb anapata.
Посрави Te nizebna naHelen B doctabnna KaIbФ 3a Hoche, KOrato ro BImate Cbc Ce6e cn. - He natackaiTe CUNHIO Hne pOJaIaJIte Ha rOJIaMO hanepeKeHHe Bu3ayalHInTe ekpaHn Ha IuIeBnnaHEn.
He n3naraIte IInueBnaHEn Ha Bb3dEeCTBneToHa dIpeKTHa CnblYeBa CBETNIHa, Ha n3TOuHnIu HToNIIHa KATO Bb3dyXOBOn 3a NapHO, KaKTo H He FO octTabraIte HA BlJxHo MCTo. HnKora He OCTabraIte IInueBnaHEn Ha apMaTyPhoTc TaBNo HnHa dpyrN OTKpHTN MeCTa B ABTOMoBHn, NapKnPAn NOD INpeKTHa CnblHyeBa CBETNIHa, KbTeO e Bb3MOxHOr TempePaTyPa T B KyTeTo da Ce NOBNIu 3NaHTeJIHO.
PpeynpeDnteHcnrHan
B cnyaui, ye nocTaBnTe KJIouca 3a 3anaIbAne B noLoXeHne OFF, 6e3 da cTe cBaIiIn IInueBnnaHEn, ue npOzByu npEdupeDnteHcNHaB N pOdbLnKeHne Ha HAnKoLKO cekyHn (cAmO, aKO npEbnIOUcbatJeTIP POWER SELECT e noCTaBeH B noLoXeHne A).
B cnyaui, ye cte CBp3aII DonbHInTeIe HycnBaTeJI He n3noN3BaTe BrpaJeHHa, npdeynpeDnteHHaT CnHaJI 6bJe De3aKTHBnPAH.
HaTushe 6yToHa ④ ,Korato nckaTe Da Bb3npOn3BExJaTe OT JeHtA TnCrO2 (TYPE II) nJn metal (TYPE IV).
Ha ekpaHa ce noRBA uHdNkaun "MTL".
3a da anyunpaTe deiCTBnETo Ha cyHKnIraTa, HATNCHEte 6byToHa ④.
PádrnoanapaT
YeCTOTHTHe 06XBaTn, KOINTOTo3n anapaT MoXe Da npiema ca 87,5-108,0MHz (FM1, FM2) n 65,0-74,0MHz (FM3).
-ФункцЯ Best Tuning Memory (BTM)
C nomouTa Ha Ta3n yHKunr OTe Kuyuunr YecToTeH 06XBaT Ce 36bnpat CaMO CTaHUNTE C Hau-CINEN CNHAN CE 3anamETraBAT PpeHa Ha TxAxHaTa YecToTA.
PNEJOTBPATBAHE HA INHUYDEHTN! Ipn HactpoiBaHe NO Bpeme Ha 0oOpnpaHe, n3non3BaiTe FyHKuTAta 3a ABTomAtuHa hactpoika NIN FyHKUrTa 3a TbpcHe Na npedBapnteJIHO 3aAnMeTeHn CTaHcN BMecTo pbUHa Hactpoka.
1 HatnckaTe NocleIOBaTeHNo 6yToHa SOURCE,3a Da n36epeTe 3a n3TOUHNK paAnopapaTa. Ppi BCaKO HATnCKaHe Ha 6yToHa SOURCE n3TOUHKbT Ce IpOMehra, KaKTo CJIeDbA: TAPETUNER CD/MD
2 HaTnCKaIte NoCJIeIOBaTeJIHo 6yToHa MODE),3a Da n36epTe YecTeToEH oxbat. BceKn PbT, KOraTO haTnCHeTe 6yToHa MODE),YecTOTHIaT 6xBAt Ce IpomEnH, KaKTo cIeDbA: FM1 FM2 FM3 LW Mw
3 HaTmChTe 6byToHa (SENS/BTM) 3a DBe ceKyuHn.
IpoDbIkaBaHa cIeDbauaTa CtpaHua
3a6eJekn
-По врeme на ппимане B obxbaTn FM1 n FM2,Функлгда BTM npetbpcBa calmo cheCTOTHnOBxbaT 87.5-108,OMHz,a npn paanOpnpemane BobxbaT FM3,npebpcBa calmo cheCTOTHnOBxbaT 65.0-74,OMHz.
AnapaTbT HMa Da 3aamMeTBA paNIOCTaHcN cNoIcnuHaJIc HomepnpaHNTe 6yToHn 3a npedapntela HacTroKa. B Cnyau, ye Morat da c npemat dobe No-manko cTAHcNt OTHomepnpaHTe 6yToH, HAKON 6yToH nOe OCTaH THeN3POJ3BaHn.
B cnuya, Ye ha ekpaHa IMa noka3an Homep Ha byTOH, anapatbT ue 3anaMeTba RpaNocTaHm H BcNn Homepapanu HtoTo 3na npEdBaPntenHa HacTpOka OT Hero Harope.
3anametyahe cmo HaXeJahnTepaNocTaHcIM
OT BCEKN 06XBaT MoRat Da 6bJaT 3aapanMeTeHn Do 6 paNIOCTaHcHn (FM1, FM2, FM3, MW n LW) c NOMOHTa HnomepnpaHnTe 6byToHn 3a npEeBapuTeHa hAcTPOka B pe n Po BaW n36Op.
CneIOBaTeJIHo, B o6XbAT FM moraT da ce 3anaMeTt 18 paIIOCTaIuN.
B cIyau, ye nckate da 3anaMeTnTe HOba paIIOCTaIuN CBeue I3PON3BaH HomepIpuh
6byToH, ue Ce n3Tpne PpeDNIshaTa
3anaMeTeHa paIIOCTaIuN.
1 HatackaTe NocneDoBaTeHNo 6byToHa SOURCE,3a da n36epete 3a n3TOuHnK paDnoanapata.
2 HaTnCKaIte NoCJIeIOBaTeJIHo 6bToHa MODE),3a Da n36epTe HeCTOTHnO 6xbat.
3 HaTnCKaIte 6byToHa (SEEK/AMS), 3a da HamePHTe paAnOCTaHcNtTa, KOYTO NCKaTe Da 3aNaMeTHe C HOMepnPan6 byToH 3a PpeBapnteJIHa HacTPOJa.
4 HaTnCHeTe n 3aApbXkTe 3a OKoJIO DBe ceKyHdN JxelaHnH Homepnpan 6yToH (OT ①do ⑥).
Homepbt Ha n3bpaHn8 6yToH 3a npedBaPteJIHa HAcTpoIka Ce NOBRAHa ekpaHa.
HnIkaJyraTAt "0" O3Haayaba, Ye B Mometa npneMaTe RDS paAnocTaHnIa.
IpoDbJxKaBa Ha cIeIbAaTa cTpaHnca
CmHa Ha eKpaHHa Ta HnDnKaun
При BCЯКо HaTиСkaHе Ha 6уТоHa (DSPL), ce ИЗМЕнэ ekранHaTa ИнДиКaция, KaKTo C№ДВа:
YecToTa BpeMe NMe Ha cTaHcNIA
3a6eJekka
Инданацета "NO NAME" cBETBa, aKo CTaHцета, korTo npneMaTe, He n3JIbYBa RDS dAnHn.
A B T O M A T N U H O П reн actpoиBaH e Ha С bшаТа paДиОCTaHцИ —ФУнкцИАlternative Frequencies (AF)
ФункцитА Alternative Frequencies (AF) abTomatuHOnИЗираипгс actpoьа CTaHcTtA c Hai-ciIneH CnHnAOT eJHa paIIO mpeka.C nOMoTuTa Ha Ta3NФункци, Bne moKTe Da cnUwate HeNpeKbCHaTo eJHa nCbua paIIOCTaHcNpo Bpeme Ha nbIro nbTyBaHe,6e3Ja e NeO6xOIMO pBvHo da npehactpoBATEpaIIOCTaHcNtA.

1 N36peTe FM cTaanua.
2 HatncheTe 6byToHa (AF/TA),doKaTo Ha ekpaHa CBeThe HndnkaunTa "AF".
AnapaTbT 3anOuBa TbpcHeTo Ha anTepeHaTHBHa paDIOCTaHcNt O T CbUaTa paDIO MpeKa, HO C NIO-CINJIeH CnIHaI.
3a6eJekn
Пин haTCHaT 6yToH (AFTA), NO BpMe Ha npiemeHaB 6xbat FM3, 6xbaTbT aBtOMaTHHO ce CmErOT FM3 hAMF1.
Bcnya,YeBaPOnHaHMAanTePhaTnBHa paAnocTaanu n3a Bace He eHeo6xOAnMo da Tbpcnte DpyraTe Takaba, n3KnIOyete fynKUHTA AF,KaTo HATNCHE ToByoTA (AF/TA),doKato INmkaunTa“AF”n3e3eOT ekpAna.
CmHa Ha ekpaHHaTa HΦopMaun
При BCЯКо HaTnCKaHe Na 6byToHa AF/TA, nOKa3BaHaTa INHΦopMaцЯ Ce N3MeHЯ, KaKTO cIeJbA.

- ɪn36epeTe Tɔba, 3a eɪnHObpeMeHHo AKTIVBɪpaHe Ha ΦyHKʌŋte AF n TA.
3a6eJekn
- INДИКAZIMЯТa "NO AF"и Имeto Ha
РаДИСОТАнUGИТа ce peДУВAT C MИАla CBETЛHа
НЕ КрANA, AkO anapaTbT He MOKEда Намери
АЛТЕРATHINBA CTAHUNI OR PdIMOMPEXЯТа.
B cnuyai,ye imeto ha padnocctaunra 3anohe da CBETN C MNaOaHa CBETNHa, CneI n3bnpaHe Ha daHena paadnocTaunz, npn AKTNBaHpaФyHKuIN AF, TOBA O3HaCaba, ye Hmra aNTepHnatNBH yecToTn Ha pa3noJOnKeHne. HatncHete 6byToHA (SEEK/AMS),DOKATO IMeTO Ha cTAHcUNrTa CBETN C mRaUa cCBTnHa (B pAMKHe Ha 8 cekyn). Anapatb3 zanOuBa TbpceHMe HA dpyrn YecToTn CbC bShte DaHHN 3a IpOrpMaHa INeHTnFpKaua PI ("PI seek" ce NoRBA Be3 3ByKOB cInHan Ha ekpana). B cnuyai, ye anapatbT He MoKeJa hamePi dpyrN YecToTn, noRBA Ce "NO PI" n anapatbT ce BpbIa KbM NpboHOaANHO n36paHnte YecToTn.
Cnyuane Ha pernohaJHa nporpama
Функцита“REG”(ВКлоча ретионалha) HaTo3n anapat BnДaba ВьзмхнocT da octaHeTe HacstpoeHn HaДaDEHa pereNoHaJIHa nporpama,6e3 Da ce npeBKNIOUbaTe Ha Dpyra pernoHaIHa nporpama.(OTbEnJexete,Ye Tpr6BaDA n3KIIOuHTe phHKzurTa AF.) AnapaTbTe e fo6pnHNo HAcSTpoeHn Ha“REG”, HO aKO NCKaTe DA n3KlIOUHTe phHKzurTa, HanpaBeTe CLEdHOTO.
HaTnCHeTe 6byToHa AF/TA n3aDpBxTe 3a NOBeYe OT DBe CeKynD, DOKaTO HnDnKaunTa "REG" n3ye3He.
3a6eJekTe, Ye m3KJIIOUBAHeTo Ha ФункиЯТа "REG" може длпрдзВиka превкliOuBaHTo Ha anapata Ha дpyra pernoHaJIHa CTaHcIЯ OT cbuaTa paДИО Мржka.
3a6eJexkka
Ta3nФункиЯ He pa60r N O6eHHeHTo KpaIcTBo, KaKTo IN B HЯkon dpyrN obNaCTn.
3arnyuabaHe Ha 3Byka
HATNCHETe 6yToHa MUTE
3aRnyuabaHe Ha 3ByKOBnCnHnA
HaTnCHte 6yToHa ⑥,doKaTo HATnCKate 6yToHa SEL.
HaTncheTe OTHOBo Te3n 6yToHn, 3a Da aKtINBnPate IpeDynpeDInTEHnCnHnI.
3a6eJexka
Bcnyaay,ce Cbpxete DOnbNHTeH eYCNNBATEn Hne 3nON3BaTe BrpaDEHn yCUNBATeN,3ByKOBnTcHnAan 6bEde3aKTNBnPAH.
CmHa Ha zBeta Ha OCBetIeHneTo.
HaTnCHete 6byToHa ① ,DOKaTO HaTnCKate 6byToHa SEL.
Mokete da n3bupaTe mekdy kblT n 3eJIeH cBrt.
Bne moxete da ynpabJIbArte do 5 ycTpoIcTBa 3a cMaHa Ha CD/MD c nOmoUta Ha To3n anapaT.
HaTnCKaIte 6yToHa MODE
nocneDobatEnHO,3aJa n3bepeTe JeenaHOTO yctpoCTBO 3a CmHa Ha CD/MD.
ПомmaHa Ha ekpaHHaTa HhOpMaun
BnHaN KOraTo HATINCHe 6bToHa DSPL no BpeMe Ha Bb3npOn3BExkDaHe Ha CD/MD, ekpaHnHaTnHΦopMaunCe npOMeH, KaKTo CneDbA:
U3MnHaNo BpeMe Ha YacOBHnK
Hamipane Ha onpeidenen 3annc
-ФункцЯ Automatic Music Sensor (AMS)
ПО ВРЕме на Вьзпpon3Вждане,НатиckайтеблдуOTСТРANITEHa 6byToHa (SEEK/AMS), NO eINH nTbT 3a BCEKN 3aПИС, KOITOn NCKaTeДа npeckoYnTe.

3aHamnpaHeHaCleDbaun3aannc
3a Hamipane Ha npdeuHn 3annc
Hamipane Ha onpeJeIeHo MHeTo
-Функцma Manual Search
ПО ВЕме на Вьзпpon3Вевкданe натис悔у 3адрьхтешда OT стразн'te на 6утона (SEEK/AMS).
Ocbo6oTe 6yToHa, Cnei KaTo HamepTe JeklaHOTo MRCTO.

3a TbpcHe Hnpe
3a TbpcHe Ha3aI
PpeBKnIOUbaHe Ha dpyr n DnCKOBe
ПО Врeme на Вьзпpon3Вждане Натисные edna на остразнite на 6утона (PRESET/DISC).
3aBpshaheKbM npednweH dck
3a npemHaBaHe KbM cIeBauDnCK
PperIeHa3aIncs
-ФункцИIntro scan
IocneIOBATEHNOceBb3npoIN3BExJaT nbpBnTe DeceT cKyHnOT BCNUKN 3aNNcHa TeKyuNnDnCK.CeJ Kpa Ha NpBpuNnDnCK, ce Bb3npoIN3BExJa CNeDBAunrT.
HaTnCHete 6yToH ① NO BpeMe Ha Bb3Pon3BexJahe.
Ha ekpaHa ce noBBA uHnkaunra "INTRO".
Korato HamepuTe XeIaHnI 3aInc,HaTINcHete OTHOBO 6yToHa.YpeBbT Ce BpUca B HOpMaJIe Pekm 3a Bb3PpON3BeXdaHe Ha CD/MD.
3a noBtapRHe Ha dNcK
HaTnckaIte NocJeDoBaTeJIHo 6yToH ② NO BpeMe Ha VB3npOn3BExJaHe Ha CD/MD,doKaTo Ce nOraBn HndnKaunr "REP2".
3a NOBTOPOH Bb3npOn3BeXdaHe Ha BCNUKIN DnCKOBE B TEKUoTO YCTPOINCTBO 3a CMHa Ha DnCKOBe
HaTnckaIte nocJeDoBaTeJIHo 6yToH ② no BpeMe Ha Bb3npOn3BExJaHe Ha CD/MD,doKaTo ce nOraBn HndnKaunr "REP 3".
BceknT KOrato HATNCKate 6yToH ② INΦopMaunraHa ekpaHa ce npOMeHa, KaTO cIeBa?

3a Bb3npoN3BExJaHe B npoN3BOJeH pei Ha BCnKu DNCKOBE OT BCnKu CBp3aHn B MOMeHTa yCTpoNCTBa 3a CMHa Ha DNCKOBe.
HaTnCKaIte 6yToHa ③ nocJIeIOBaTeIHO NO BpeMe Ha b3npOu3BexKdAHe OT CD/MD,doKaTo HA ekpAna ce noRbN uHdNkaCuaTa "SHUF 3".
Bcekn nIbT Korato HataChete 6byToHa ③ Noka3BaHata Ha ekpaHa INΦOpMaunCe npomeha KAKTO cIeBa:
B cnya, ye haTnche 6ytoh ① no BpeMe Ha b3npOn3BeKdAne B npOn3BoHe npD, nbpBnTe 10 cekyn ot BCnu 3aIncN ue ce b3npOn3BeDat B npOn3BoNe npD.
IpnBb3npoun3BexJaHeOTCD/MD: 13,16
5 Ппевклюватей POWER SELECT (pa3noJoxeH ha ropHaTa cTpaHa Ha anapata) 4, 5
BnKTe pa3dJeI "PpeBkIIOuBaTeI POWER/SELECT" B pkoBOIDCTBOTO 3a INctaIInpaHe/Cbbp3BaHe.
6 BytoH OFF 5,6
7 ByToH DSPL (cMaHa Ha peXmHa Ha ekpaHa/CBepBaHe Ha BpeMeTo) 5,6, 10,16
8 ByToH SENS/BTM (sensitivity adjust/ФункцЯ Best tuning memory) 8, 12, 23
9 ByToH (eject) 6
10Пи радионпеманe: HomepupaHn 6yToHn 3a npedBapntHa NaCTpoiKa 8
PnBb3npoN3BekDahe ot CD/MD:
① BytoH INTRO 6, 15, 16
② ByToH REPEAT 7,17
③ ByToH SHUF (Shuffle) 11, 17
④ ByToH MTL 7
⑤ ByToH ATA (Automatic Tuner Activation) 7
⑥ ByToH BL.SKIP (Blank Skip) 7, 15
11 BytoH REaLSE (ocbo6oxdaBa liueBnaHe) 4
12 Byton Reset (pa3noJoxhen Ha npedHaTa cTpHa Ha anapaTa n Ckpnt Poi JnueBnaHeI)
HaTnCHeTe To3n 6yToH npn
IbPBOHaJNo NpysKaHe Ha anapaTa, npn
CMraHa aKymyJatOpHata 6aTePnI INn
KOraTO 6yToHIne Ha anapaTa He
fynuHnHpaT npaBnHIO.
13 ByToH MUTE 15
14 ByToH SEL (n36Op Ha pexmHa ynpaBHeHne) 11, 13, 14, 15
15 Ekpan
16 BytoTH PTY (Tnnporpama) 12, 13
17 ByToH PRESET/DISC Pn paIIOnpHeMaHe: 36op Ha npEaBapTeJIHO HAcTpoeHa CTaHcIg 8,14
PnB3npoN3BexJaHe Ha CD/MD: 14,16
18 Bytoh AF/TA (alternative frequency/traffic announcement) 10, 11, 12, 13, 24
19 Perynatop D-BASS 15
TexhnueckxapaKtepncnK
Pa3dJI kacetofoH
ЛeHTOBIПИСТI 4-ПИСТОВ,2-KaHaJIHo cTepeo
TpenteneиИЗкрвапь 0,08% (WRMS)
YecToTHaXapaKTePncTnka 30-18.000 Hz HnBO CngHaN/zhm 61 dB (TYPE II, IV) 58 dB (TYPE I)
Pa3dJI paIIOanapat FM
| Приеман обхьат | FM1, FM2: 87,5-108,0 MHz |
| FM3: 65,0-76,0 MHz | |
| Антынен Кунлунг | Быншen антынен Кунлунг |
| Мекдиноа честоа | 10,7 MHz |
| Използbaема чьвс捜телюст | 8 dBf |
| Чьвс捜телюст | 75 dB по 400 kHz |
| Ниво сигнал/шум | 63 dB (стео), 65 dB ( моно) |
| Харmonчни ИЗкр��ваимя р�п 1 кHz | 0,5% (стео), 0,3% ( моно) |
| Раздение | 35 dB по 1 KHz |
| Чебъ�тахаразкетероста | 30 - 15.000 Hz |
| Ниво на захьат | 2 dB |
MW/LW
| Оxbват 3а насточа | MW: 531 - 1.602 kHz LW: 153 - 281 kHz |
| Антынен купунг | Бышиен аntөнен купунг |
| Мөждинна честоа | 10,71 MHz/450 kHz |
| ЧУВСТВИТЕЛНOCТ | MW: 30 μV LW: 50 μV |
Pa3dJ ycnBATEI
Tbpche no npeBapuTeHa hactpoiKa 6
TnHa nporpama (PTY) 12, 13
Φ,X,
Функциг Alternative Frequencies (AF) 10
ФункцЯ Automatic Music Sensor (AMS) 6, 16
Функць自动Tuner Activation (ATA) 7
Функциг Best Tuning Memory (BTM) 7
ФункцДIGITAL D-BASS (D-BASS) 15
Функлma Intro scan 6,16
Функца Local seek mode (LCL) 9
ФункцЯ Traffic Announcement (TA) 11
Функци亚 TrafficProgramme(TP) 11
Функлuar Radio Data System (RDS) 9,10,11
U, U, U, b, I0, r
YacobHmK 5
Isten hozta!
DIGITALIS D-BASSZUS (D-Bass) 14
E
Egyensúly 13
Elnémitas 8
IpeepHaayanom noJb3ObaHnA
Ipehenactpoika annapaata. 4
Chrtne npeedne nahein 4
IIOIroTOBka K IOnb3OBAHnIO BpaaIooIMcA INCTAHUONHHbIM NpeeklHouateTeIeM 5
YcTaHOBka YacOB 5
MarHntofoh
IpocnyuBaHne MaHnHTbIX 3aIncei .6
Pa3nHbIe peKmbl BocnpOn3BeJeHnMaHHTHO 3aINCS
PapnopnpemHK
ABTomatueckn BBOpaNIOCTaHcN B nAMTb
- 3aIOMHHaHHe ONTImaJIbHOHaCTpoKn
(BTM). 7
BvOB B nAMrTb ToJIbKO Tex CtaHcI, KOToPbIe Bac INTepeCyIOT 8
BknHoueHne XpaHnIuXcB NpMaTn padnoctaun 8
RDS
Ob3op 9
HnDnKaZnaHa3BaHnA CtaHn 9
ABytomatuecka nepenactpoika ToJ Xe npoIpaMMbl
-AltepHaTnBhIe YacToTbI (AF) 10
PpocnyuBaHne DopoxKbIX Coo6eHnI ....10
IpeynctaHOBKa cTaNcuiRDS cDaHHbIMN AF n TA. 11
ObnapyKeHne cTahun no Tnny nporpaMMbl 12
ABTomatuecka yctahOBka yacob 13
PpOuHneФyHKU
Пльзовные врашаюшмс
пегекlioчatelem Дистанционно
унравлия … 13
Perynipobka napameTpob 3ByuHaHna.15
OTKJIIOUeHHe 3Byka 15
IodctpoiKa 3ByuHnMaHHTOblI ToHaJIbHOCTn npEduPpeDnteJbHOrO CnHaHa .15
DonoHnTeIbHa aannapaTypa
Mhoro3apAHybI KOMnakr/MD- npOnrpBaTeJb
Bocnpoun3BeDeHne KOMNaKT/MD-dncka ....16
CkaHnpoBaHnne IdoPoxKe - CkaHnPbaHnne IO BCtynTeJIbHbIM fpaarmEtam 17
Повторное ВOCпpon3БeДЕНЕ Дорожек
- Повтор ВOCпpon3БeДЕНЯ ..... 17
Bocnpoun3BedeHne dopoxek B cnyaHno nocneIOBaTeIbHocTn -IpepeTaOcbAHoe Bocnpoun3BedeHne..18
DOnOpHnTeJIbHaN HhΦopMaζη
Mepbl npedoctopoxhoctn 18
YxOJ 3a annapaTOM. 19
Демонтах пибopa 20
PacnoJoxHeOpraHOBynpaBHeHn 21
Texnueckne daHhble 22
PykoBoDCTBO no yctpaHEnHn HenoJaOK ..23
AilpaBHTbIy yka3aTeJIb 25
Переньстюка annapaşa
Ipejde, Yem HauaTb Nolb3OBaTbCmargHnToJIoN, a TaKxne Nocne 3aMeHbAkkymyJrTopa B abTomObUne annapatHeo6xoDIMO 3aHOBO HaCTpOnTb.
Дяг STOrO haxmTe KhoNkу nepeHaCTpoKn KaKIM-JIb6 3aOcTpeHbIM ppeMeTOM, HapnMep shapNKOBy pyKoN.
Khonka nepenactpoKn
PpmeaHne
PnnaHaxatm KhonKnpeepHaactpOKnBce XpaHauIeNcB nAMTn pOrpAmMbI nDaHHbIe CTnPdAOTC.
Сныпецпeredи панели
IpypeoxpahenH npnbopa ot BOpOBCTBa eero nepeHNnnaHeJb MOKeT 6bIt ChrTa.
1 HaxmTe OFF
2 Haxmte (RELEASE), 706bl OTKpbItb nepeHIOI naHJIb n CHIMTE ee, BbITrmba Ha Ce6J.

PpmeuHn
- He yrhoHnte naHEnb npn cHrTm ee c npmbopa.
- Ecnn Bbl haxmete (RELEE) dnn CHTnnaHnei, KOrJa npNbOpE eJe BKIOUeH, NITAHHe aBTOMaTHueCKN oTKKnOuNTcR, YTObJI 3auNTtB rPOMKOrOBOpNTeN O TNOPEXKeHN.
YctanOBKa nepeDneH naheN
CoéHnHTe qactb AHa nepeDnei nanei C actbyo B Ha npnbope, KaK nokaHa H nnIOCTpaun, N haxmTe Do ueNka.

PpmeaHn
- Y6eIntecb,чTo nepeHnra NaHeIb HaxOOnTcR naPBOw CTOpOH N BBePx npu yCTaHOBKe ee B npIObOp, nOckONbky OHa He MOKeT 6bITb yCTAHOBNeHa HAObOPt.
He npo3BODIte CnIbHO haKaTna Ha nepeHNO naneB B CTOpOH npi6Opa npu yctaHOBe ee B npi6Op. OHa moKeT 6bITb yCTaHOBnEHa JERKIM HaxKaTneM B CTOpOH npi6Opa. - Ecnn BbI bepeTe nepeDnIO npaHnb c co6oB, nOmeuaiTe ee BO BXoJauN B KOMnNeKt cyTnAp.
He OKa3bIbaTe CnIbHOrO DaBNeHnHa OKoUKO nucnnner nepedne nnheN.
He noDBepraiTe nepeHIOI naHb npMOMy BO3dEHTBNO COnHeHbIX LyueH, TropuNX NCTOCHIKOB,TAKINK KaB ATOMbOHNbNA PeNb H He OCTabJIte ee BO BLaJxHOM MeHe. HnKorDa He OCTabJIte ee Ha npBOpHOJ DoCKe I T.D. ABTOMbON, 3anapKOBAHHORo NOD pRmblm COJIHeHbIM CBeTOM, IRe BO3MOXHO 3HaUHTeNBHOe NOBbIeHne TEMpePaTybl BHyTpNi CaNoHa ABTOMbON.
PpeynpeTeIbHbI cnHaI
EcnBbYcTaHOBnIN KInOu 3aKunraHnB V no3nIOo OFF, He oTcoeDnHnB nepeDIO IO naHeIb, npeDynpEnTeNbHbN CnTHaIb 6ydet CblIeH HeckONbKO cKeYnD (ToIbKO eCInn nepeknIOuTeJIb POWER SELECT yCTaHOBJEN B no3nIOo A).
EcIn BbI noDKlOuHTe DoONHnTeBhBHy yCUNNTeB MOUHOCTN H He 6yDeTe IcNObl30BaTb BCTPOeHNbHy ycNJNTeB, npEduPnDEiNTbHbHy CnHaJb 6yDet BByKIOUCh.
UcTaHOBnTe CnΦpbI YacOB.

Дляпелемшени Впешд.
Длп поемецни Ha3aI

2 Haxmnte n 6bictpo OTnyctnTe SEL.

Ludpa MNHyT Mmraet.
3 YcTaHOBNTe cHΦpbl MNHyT.

Длп поемецни Ha3aI
Длп поемецни Вперд.

3 HaxMMTe n 6bictpo OTnyctnTe DSPL.

YacblakTNBpIOTCA
PpmeaHne
Ecnn nepeekuoyatenb POWER SELECT ha Bepxnei naheHn npbiopa yctahOBnEH b nozuiIO 8, yacbl He CMORYt 6bIb YCTaHOBInebl Do Tex nop, noka npbiop He BkIoueH. YctaHOBIne T acbl nocle BKIOUHEN CNTEmbl.
ПрослuyшваимеMaRGHTHbIX 3aПиceseI
YctaHOBnTe Kaccety.
Bocnpoun3BeDeHneHaunHaeTcABTOMATueeKn.
EcInB MaHHTOPOHe yKe eCTb KaCCeTa, HAKIMaIte KHOKNy SOURCE DoTex nop, noka Ha dncnnee He noaBntc cNoBO "PLAY".
Bocnpon3BODITcSTOpHa,6paueHnaBBepx.

Bocnpon3BODNTCCTOPoHa,6paueHHaBHn3.
Cobet
YTObI N3MEHnB HApNpABJIeHHe DnBXeHnRA JeHTb BO BpEMBOCpON3BeDEHnHAxMNTe KHNKy MODE
ФункцИАMSTMOжТ He cpa6oTaTb,ecn:
Iay3bI MEXdy DOpOxKamn npoDJIkaIOCTcMeHbIe YetbIep XeKYnd
B nay3ax mejky dopoxxkamnpncyTCTByeT yum
B 3aIncn IMeIOCTc IINHHbIe yuactkn c IOHNJKeHHOn rIpomKoCTbIO INN 6e3 3Byka.
CmeHa npaMeTpOB, BbIBoDmblx Ha nucnle
При Кадом Накати [DSPL] BO Время BOCPON3BeDEHIN NOKa3aHINДИСПЛЕ N3MeHЯHTCnEduYUOIM O6pa3OM:

- Pπu BkLHoueHnO ΦyHKUIN AF/TA.
Pa3JIuHbIe peXnMbI BOCpOu3BeDeHnMaRHTHOJ 3aINCH
MaHHToΦoH BOCPON3BOJNT nepBbIe DeceTb CeKyHd KaXDoI DopoXKn, 3aIncAHoN Ha JeHTe.
Haiy Huyhnyo dopoxky, Haxmte ty xekhoNky eue pa3.
MaHnToΦoH Bo3BpaaetaCTc B O6bIyHbIpeXmBOCpOuN3BeDeHnI.
Повторгoe npocnyuBaHnedoPoXeK —ПовторвocnpoN3BeDeHn
Bo BpeMa BocnpOn3BeDeHnHaXmnte ②.
Ha nucnlee noBraTeCra HaDnncb"REP".
По Okончани BOCpon3BedeHЯ TEkyшдорожкп Oна 6удET NOBTOpeHa OT HaçaJa Do KOHua.
YTo6bI OTMeHHTb NOBTOpHOe BOCPOn3BeDeHHe, CHOBA HaKMITE Ty Xe KHOKNy.
Tenepb npn BOCPON3BeHm MaHHTofoh 6byet aBTOMaTHueCKn PpOyCKaTb NaY3bl DInHOB 60lee BOCBM NcKuHd.
ДЯТМЕнБIЭТОФУHKUNHЯKMITE ⑥.
Bocnpoun3BeDeHne Kaccet CJeHTOn Tnna CrO2 nI mTaJI
ДЯ BOCPON3BedeHЯ JENTbI CrO2
(TYPE II) nnn metann (TYPE IV)
HaxMNTe ④.
Ha nCnIe NOBnErc HaDnncbMTL
HTO6bI OTMeHnITb 3OT pEXKIM, HaxMnTe ④.
Радиорпемнк
B 3aBnCIMOCTN OCTpaHbI N pERNoHa MOrY T6blTbdoCTyHbI He BCE yHKLmR RDS.
- RDS MoKTe He pa6oTaTb npaBnHbNo npn Cna6Om
CunHe IuN ecn CTaNzH, Ha KOTpyu Bbl
HaCTponNcB, He nepedaert DaHbIe RDS.
Инданкацnia Ha3BaHnA CTaHcN
Ha3BaHne npHHMaemOcTaHcN 3aRopaetcHa dncnnee.
BbI6epnte cTaHcMio FM.
Ecnn BbI NaCTponnncb Ha cTaHnIO FM, KOTOPaI nepedaet daHHble RDS, Na3BaHne cTaHcN 3aRopaETcHa DaCnnee.
F1 BBC 1 F1
PpmeaHne
Индана "уka3ыBaet,чToбILA npHЯТа CTahnRDS.
I3meHeHne noka3aHn DncnpeA
PnKaJOM Haxatm DSPL nokaahnaI DCnpeI N3MeHryOTc CneDyUOIM O6pa30M:
Uactota Bpemra Ha3BaHne cTaHcnn
Приимechанинe
"NO NAME" zaropaetc, ecnn npinraTcTanuHne nepeaet daHHbx RDS.
—AInbTepeHaTnBhble yactoTbI (AF)
Функця сьтэрпнвьхчacToT (AF)
aBtOMaTnueckN BbIbnpaET n
peHaeCTpAnBaET cTaHcIIO C hAn6OJIeE
CINbHbIM CnHrAIONB pAnIOTpANcIQUHOHON
ceTn.CncIPOBzOBaHNEM 3ToI ΦyHKZm BlMoKTe He nppepbIBHO cLyuTaB OdHy n Ty Je
PpOrpAMMy BO BpEm AINTEbHbIX Poe3DOK,
6e3 TOrO YTObblpeHaCTpAnBaT bCTaHcIIO
BpyHyIO.
1 BbIepeHte cTaHcHIO FM.
2 Haxmte AF/TA DO NOBJIeHnHa dncJIee "AF".
Pπb6op NaHnHaet NONCK aIbTepeHATNBHO CTaHcIM C 6OJIe CEINbHbIM CnHrHaJOM B TOJ Xe paAnOTpaHCnAUHOHcETN.
PpmeaHn
- Ecnn Haaatb AF/TA B dnaana3oHe FM3, dnaana30 h aTOMaTHueeCKN 3MeHReTcra HA FM1.
- ECNIN B DaHNOH MECTHOET ANbTePHaTnBHOI CTaHcNIN Bam He HcyHXO OcyIeCTBnJIb TE IONCK, BbIKJIOUHTe DfYHKuNIO AF haxTaHE (AF/TA), TAK YTO6bl "AF"NCyE3No C nCnIeN.
U3meHHe noka3aHm ducnJeA
TINbI pnporpaMM NOBBIAJIOCTCB OINcaHHOM BblSe npraKe.3aMeTbTe,HTO Bbl He MoXkeTe Bbl6paTb dJa noncKa "NONE" (Be3 onpeDeHEny).
PTY SPORT
3 Haxmnte Ondhy n3 cToPOH (SEEK/AMS).
Пибор НачнhaeТ поСCTaHцИ,Трансируошь ВьбразньтпnporрамMbI. Пи淘汰ждениnporрамMbITnnporрамMbI ChOBA nOBJIЯТСЯнЯТБCEKYHD.
"NO" nonepemHNo nOABnIOTcHa
dncnnee Ha nTb cekynd, eCNI pnp6Op He
MOKeT hauTN daHHbI TIN npOrpaMMbl, i
pnp6Op Bo3BpaaaeTcK npdeIduysei
CTAHm.
A B T O M A T N U C E C K A Y C T A H O B K A Y a c o B
PnnpneMe daHbIX CT (BpeM) yacbl daHHoro npnbopa moryt 6bItb yctaHOJIeHbI aBTOMATUeCKN.
Bo Bpem npnemaB dnaana3OHe FM haxmTe ②, ydepXHBaHaxkatoi SEL.
Ha nucnlee noBnaetc“CT”,uacbyctaHaBnBaIOTc.
FMI

ДЯТМЕнБIФУHKUINCT
IobtopTe OINcaHHyIO BbIe npoedpy.
PpmeaHn
-Функлг CT moket He pa6oTaTb,Даж ecnnpHЯ rctaR RDS.
Bpemy, yctahOBJIeHHe c nOMoIbIO yHKUIM CT, MOXET He 6bl ToYHbIM.
Прочne Функции
Ecnn MHOro3apraHbI npOnrpbIbaTeN bKOMnakT- nDCOB He Cha6JehФyHKuJeN D-bass, 6acobB 3Byk MOKeT paCCTpanBaTcR npN NOblSeHm yOBOH rPOMKOCTN.
B 3TOM cIyae noBepHnTe peryIaTOp D-BASS n noDCTpoIe yPoBeHb rPOMKoCTn.
OTKlIouHHe npEduynpeDuTeJbHOro cnHaJa
YdepxmbaB HaxaTOM NIOJKeHn KhONky ,HaxMnte 6.
YTO6bI CHOBA BKJIOUHTb IpeDynpeDITbHBHm CnHaN, HAXMNTe 3TN KHOKN CHOBA.
PpmeaHne
Cbnyae npncoeiHHeHnI DOONHNTeHBO BcHHeOYcHNTeHn HcNtBObaHn ERO BMeCTO BCTPOEHHOYcHNTeHn MARHTOnbl npdUnpTeHbHb CnHaJ ONKIOUaETcR.
U3MeHHeToHaNoDCBETKn
YdepxmbaB HaxaTOM NIOLOXeHnKhONky (SEL), HaXMnte 1.
BbMOKeTe BbIbpaTb Ha CBOI BKyc IOcBETKy B 3eJIeHbIX ININ opAHXeBbIX TOHaX.
Донон'tьнай саappaTypaMHorO3apAHybIKomnaKT/MD- npOnrpbIbATEJB
MarHnToJa nO3BoJnReT Bam ynpaBnTb pa60To HeCKoJIbKnx (DIO nIaTI) NOkLIuOeHHbIX K Hei MHOrO3apArdhblX kOMnakT/MD-npOurPbIbATEJe.
Bocnpon3BveDHeNe kompaKT/MD-dncka
Haxmaite KhoNky SOURCE, noka Ha dncnlee He noBtca HndkaTop hXhoro Bam npOnrpBaTeIa.
Bocnpoun3BeDHeNKeompaKT/MD-ДИSCa NaHaeTc.
Пи подклочени komпakт/MD-npOnIrpblBaTeЯ BCE doPoJKNДИСКАВОсрпоЗвадяс с haЧана.
Pnmeuahne
JaKe KOrda BbI BbIb6IpaTe MD-mpOnrPbIbAteNb,Ha Iucnnee BbICBeuHBaEtcYka3aTeNb "CD".
Bb6op kOMnakr/MD-npOuRpbIbaTeJIa (ecnn K MarHToJe nOdkJIIOUeHO HeckoJbKO kOMnakr/MD- npOnRpbIbaTeJIe)
BbIbepnte HxKbI KOMnKaT/MD- npOnrpbBaTeIb NocJeIOBaTeJIbHbIM HaKaTneM KHONK MODE
CmeHa npaMeTpOB, BbIBoDmblx Ha dncnle
При Кадом На Кати КНОнь Врем ВOCпюЗБеDEнь KMпakT/MD-ДИСКА НдИСПЕЛЕ NOCLEDOВATEJBHOB YBIBOДТСА:
Bpemcnaana Yacbl Bocnpon3BedeHn
HaxoKeHHe HxKHOI DOpOxKn — ABTOMaTnueckn My3bIkaJIbHbI ceHcop (AMS)
Bo BpemBocnpn3BeDeHnOdHOKpaTHo HaxMnte OndHy n3 CTOpOH (SEEK/AMS) DnA KaXdoN DopoxKn, KOTopyu Bbl XOTNe npOnyctntb.

Bocpn0n3BOaTcnaepbBte 10 ckyHd KaKdoi n3 dOPOkNNHa TeKyuSeM dNcKe B ToI NocLeDObaTeNbHOCTN, B KOTopoON Hn Ha HEM pacnoLoXeHb. IIO OKOHaHN nepBBOrO DNCKa HauHnaet BOCpn0n3BOaNTbCn CNeDuOuN nnck.
Haxmte BO BpemB BocnpOn3BepeHnKhONky ①.
Ha dncnnee noBnaeTc cNoBo "INTRO".
IocJe HaxoJdeHnryKHOJdoPOxKn HaxMITE KHOIIky eue pa3. Ppi 3tOM MaHHTOJa BO3BpaauaetcB O6bIHyIpeXIM BOCpOn3BeDeHnKOMNaKT/MD-DnCKOB.
Bocnpon3BedeHne DopoxkeB cIyauHNoi NocJeDoBaTeJbHOCTn
—Pepetacobahhoe Bocnpon3BedeHne
YtobI BocnpOn3BecTn B CnyuaHNoi NocJeIOBaTeJIbHOCTN BCE DOpoxKu Bbl6paHHoro DnCKa,
HaxmMaTe Ha KhoNky ③ BO BpEmBaBocPon3BeHeHHKOMnAaT/MD-DnCka, NOKa Ha DnCnJIe He NoRbTcHaDnncb"SHUF1".
YTo6bI BocnpOn3BecTu B ClyuayHOn IocNeIOBaTeJIbHOCTNu BCE DnCKN B npOnrpbIbATEne,
HAXIMaTe Ha KHONky ③ BO BpEmr BOCnpOn3BeDeHn KOMNaKT/MD-DnCKa, NOKa Ha DCnPJIee He NOrBNTcHaDnNCb "SHUF2".
YtobI BocnpOn3BecTu B clyuahHOn IocneIOBaTeJIbHOCTu BCE DNCKN B NOdkluoyehhblx nponrpblBaTeJAX
HAXIMaTe Ha KHONky ③ BO BpEmr BOCnpOn3BeDeHn KOMNaKT/MD-dnCKa, NOKa Ha DCnPJIee He NoRbNTcHaDnNCb "SHUF 3".
Pn KaXdOM Haxatm KhoKKn ③ Ha DnCpIee NocJeDObaTeJbHO NOBnTc:
EcnB Bo BpemnpepTaobHoro
BOCPPOM3BeDnHn HkXaTb KONKy ①,TO B
CnyauHNoN OocNeDobatEnbHOCTn 6ydyT
BOCPPOM3BODNTCBnBCTynNTebhBie ppaMeHTbl
BcexdoPOxek npOdoNKnTeNbHOCTbno 10
CeKYnd KaKdbI.
Mepbl npeodoctopoXHOCTHN
- EcIn Baaw abTomobnB 6bl 3anapKOBan B COJIHHeuHOM MecTe, YTO pINbENo K CNIbHOMy HArpeBy Bo3dyxa B caIOHe, daIte annapaTy OCTbITb pePeI erO BKJIQUeHNeM.
- EcIn OTCyTCTByeT NHTaHne MaHHTOJIbI, npexJe Bcero npOBepbTe KOHTaKtBi. EcIn OHn B nopAKe, npOBepbTe npedoxpaHnteB.
- Ecni y Bac nodkloueHO Tolfko Dba rpoMKOROBOpTEnIa N 3ByK He cbluHEn, ycTaHOBtpe peryIaTOp 6aJaanca nepeDnHex n 3aDnHex rpoMKOROBOpTeIe B cpeDHee noLOXKeHne.
- PπnДπnteIbHOM npocLyuWuBaHm OJHOH ToJ KACCetbl OHa MOKeT HarpeTcR O T BCTpoEHNOrO yCNIHTeJI. 3To He ABnEeTCr npn3HaKOM HeNCnpaBHOCTN.
Ecni npi noJIb3OBAHm MaHnHTOnoI y Bac Bo3HNKHyT BOpCbI INI np6JIeMbI, He paccMOTpeHHBe B HactOrae I NcHTpyKUn, npocIM Bac o6paTntbcr K 6bnXaIWeMy dInlepy fnpMbI Sony.
Bo n36eKaHne yxuDseHnKaueCTBa 3Byka
EcInno6In3OcTnOT MaHHTOnbI B BaWe mABTOMO6Ine paCNOJIOKeHbI NOCTaBKn DnA CTaKaHOB, CneDInTe, Tc06bI cOKn INn DpyrHe npoxnAnTeNbHbe HAnNTKn He npOJIINCb Ha annapat. CaxapHbI HAnET, OCTabWsiNc OTH Nx DeTaJIx MaHHTOnbI NnHa MaHHTHOJLeHTe, MoKet 3aqr3HNbBOcPON3BOJDAuHne rOLOBKn, YXdUHtB KaueCTBO 3ByaHnI INn BOo6e CDeJaTB BOCpON3BeDEHne 3Byka HeBO3MOXhBIM.
3aŋp3HHeHHbIe caxapOM MaHHToΦOHbIe rOLOBKn He NODaIOCTc ONUCTKe C NOMOu bU qNCTaXn PnCnOCo6JIeHn.
OKacceTax
YxOД 3a Kaccetamn
He npikacaiTecb K MaHHTHOJ HeTe, TaK KaK JIO6aI rpa3b NII NpJIb Ha ee NOBepxHOCTn 3aPra3HReT RoIOBKn MArHNTODOHa.
-ДержктЕ kaccetы ВдANNOT annapaTypbl,В KOTOPOI nmeOTcMaHNTbl (HAnpIMep,OT rPOMKOROBOPuTeNeI yCUNITeNeI),Tak KaB B pOtNBHM Cnyae 3aNcBa HaJeHTe MoKeT 6bITb CTepTa UNI NcNOppeHa.
- ObeperaTe KaccetbI OT npramoro nonaHaHn COJIHeuHbIX LyYe,OT CINbHOro MOpO3a n CbIpocTn.
Cna6oe HnTJxKeHne IeHTbI B KaccTe MoKET npNBeCTNI K ee BTaRnBaHIO B JeHTOnpOToXKnBMy MexAHn3M. PpeD yCTaHOBKO KACCtBI NOdTAnHITe B Hei cNa6 HOATaHHTyOJeHTy, NpOBepHyB OndHy n3 KaTyWeK C NOMoubIo KapaHaDaWa aHaNoTlHOro pEdmeta.
-Дeформачи Корпуca касст ИИN OTCTaIOUJIne OT HIX HaKLeIKN MOryT 3aTpYdHrTb YcTaHOBKY KAcCt ИИX n3BNeUeHne N3 MaHNToФОHa. EcIIN HaKLeIka OTCTaET OT KAcCtBJ, OToPbUTe nIIN 3aMeHInTe ee.

KaccetbIc npoOJXnTeJIbHOCTbIO 3ByuHaHr60Je90 MNHyT
Kaccetamn c npoIOnkntbHocTbO 3ByaHn8 60nee 90 MNHT NpIb3ObaTbcr He peKOMeHdyeTcR, 3a nckNIOueHEm CnyaAEB DInTeBHorO HnpepbIBHOBOCnpON3BeDEHn. PIIeHka B TaKnx KacceTaX OChEh ToKHKa IJIeKo pactraINBaETcR. Pnq TAcTOM BKNIOueHm N OCTaHOBKe BOCpON3BeDEHn OHa MOKet BTARNBaTbcR B MExAHn3M MaHHTofoHa.
Yxoid 3a annapatom
3aMeHa npedeoxpaHnteNei
DIGITAL D-BASS (D-Bass) 15
Ducnnei 6,8,10,16
Dopoxhna nporpamma (TP) 10
Dopoxhoe coo6eHne(TA) 10,11
E,X,3,N,K
3anomnhaHne onTmMaIbHoN hAcToPOnK
(BTM) 7
M
MeCTbI NOncK (LCL) 9
METAL 7
H
Hn3Kne YacTObI 15
0
OTKJIIOUHHeN3ByKa 15
#
Pepednnaheb 4
IpeemOTkaJIeHTbI 6
IpeemotkaHa3aD 6
IpepehacTroika 4
Ipeetacobahhoe Bocpon3BedeHne 18
IobTop BocnpOn3BeDeHn6,16,17
PonckBpyHy10
Ponck no namrtn 7,8
PpeoXpaHnteIb 19,20
PpeynpeintenbHbCnHa1 16
Iponyck nay3 7
P
Paio 7
PexmMOHO 8
Pунай Настponka 7
C
Cunhan TpeBorN 4
CnCTema paAnoJaHHbIX (RDS) 9,10,11
CkaHnpoBaHnE BCTyNITeIbHbIX
φparmteOB 6,17
T, Y,Φ,X,U,Y,I,I,I,Ib,I,O,A
TeIeponHa nay3a 15
Tn nporpammbi (PTY) 12
Yacbl 5