
CHCP33D - Hi-Fi System SONY - Free user manual and instructions
Find the device manual for free CHCP33D SONY in PDF.

User questions about CHCP33D SONY
0 question about this device. Answer the ones you know or ask your own.
Ask a new question about this device
Download the instructions for your Hi-Fi System in PDF format for free! Find your manual CHCP33D - SONY and take your electronic device back in hand. On this page are published all the documents necessary for the use of your device. CHCP33D by SONY.
USER MANUAL CHCP33D SONY
Mini Hi-Fi Component System
Operating Instructions EN
Mode d'emploi F
Manual de Instrucciones E
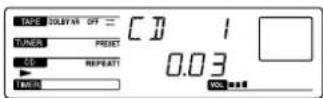
C
WARNING
To prevent fire or shock hazard, do not expose the unit to rain or moisture.
To avoid electrical shock, do not open the cabinet. Refer servicing to qualified personnel only.
Do not install the appliance in a confined space, such as a bookcase or built-in cabinet.
Laser component in this product is capable of emitting radiation exceeding the limit for Class 1.

This appliance is classified as a CLASS 1 LASER product. The CLASS 1 LASER PRODUCT MARKING is located on the side exterior.

This caution label is located inside the unit.
Welcome !
Thank you for purchasing the Sony Mini Hi-Fi Component System. This stereo system is packed with fun features. Here are just a few:
- DBFB (Dynamic Bass Feedback) system that boosts low frequency range audio to provide deep, powerful bass through the two-way bass reflex speakers
- A preset feature that lets you store and recall up to 40 (30, for customers in Latin-America and Australia) of your favourite radio stations
- A preset equalizer that lets you adjust the audio quality to fit five music types
- A timer that lets you set the CD player, tape player or radio to turn on and off whenever you want
- A dual tape deck that lets you record from the radio, CD player or from the other tape deck and relay play from both decks
- A remote that lets you control the music from your seat
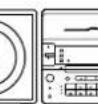
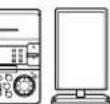
The CHC-P33D consists of the following things:
Main unit: HCD-H33D
— Speaker system: SS-S33D
— Woofer: SS-W33D
Table of Contents
Chapter 1: Setting Up
Connecting the Stereo 4
Installing the Speakers 5
Inserting the Batteries 6
Setting the Clock 6
Chapter 2: the CD Player
Playing a CD (normal play) 7
Playing Tracks in Random Order (shuffle play) 8
Playing Tracks in the Desired Order (programme play) 8
Playing Tracks Repeatedly (repeat play) 9
Chapter 3: the Radio
Listening to the Radio 10
Presetting Radio Stations 11
Playing Preset Radio Stations 11
Chapter 4: the Tape Player
Playing a Tape 12
Recording a CD 13
Recording a CD: Specifying Tape Length (time edit) 13
Recording a CD: Specifying Track Order (programme edit) 14
Recording From the Radio 15
Recording From Another Tape (dubbing) 15
Chapter 5: Sound Adjustment
Adjusting the Sound 17
Selecting the Audio Emphasis 17
Chapter 6: Additional Features
Falling asleep to Music 18
Waking Up to Music 18
Timer-Recording Radio Programmes 19
Connecting Optional Equipment 20
For Your Information
Precautions 21
Troubleshooting Guide 21
Maintenance 22
Specifications 22
Index to Parts and Controls 23
Index 24
Chapter 1: Setting Up
Connecting the Stereo
Installing the Speakers
Inserting the Batteries
Setting the Clock
EN
4
Connecting the Stereo
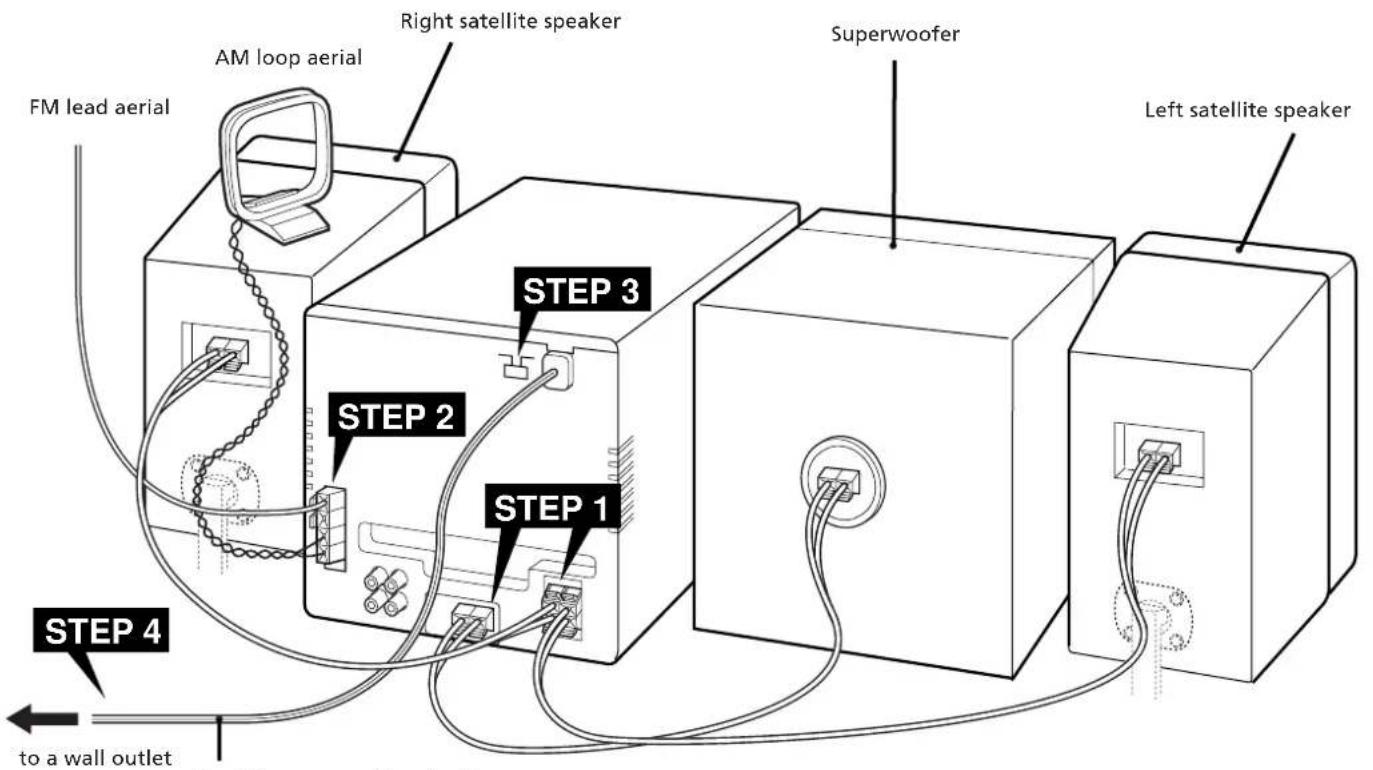
Use the illustrations below to connect your stereo.
If you want to connect any optional components to the stereo, see "Connecting Optional Equipment" in Chapter 6.
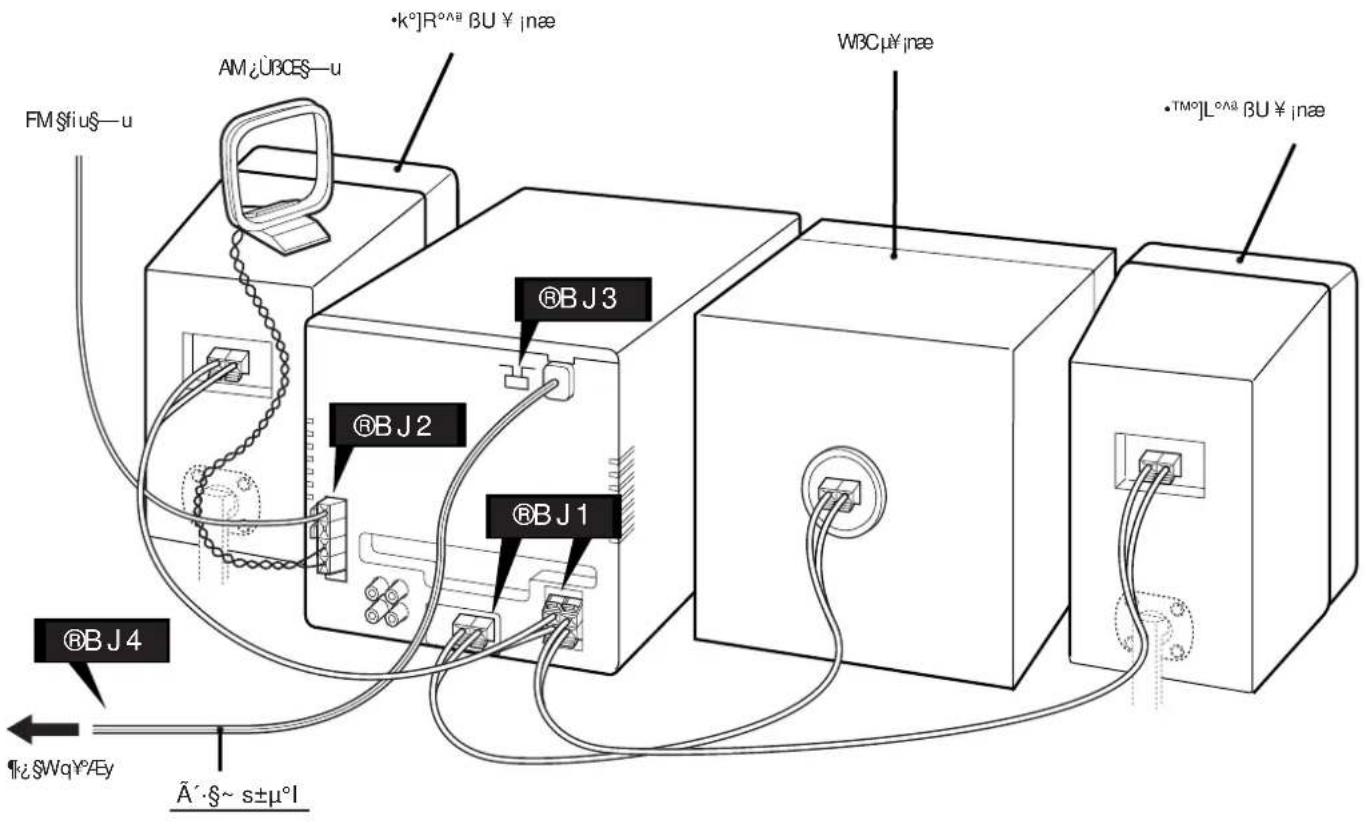
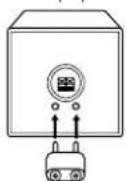
STEP1 Connecting the Speakers
For speakers installation, see "Installing the Spearkers".
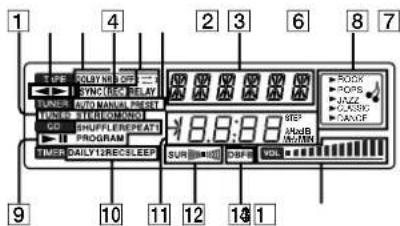
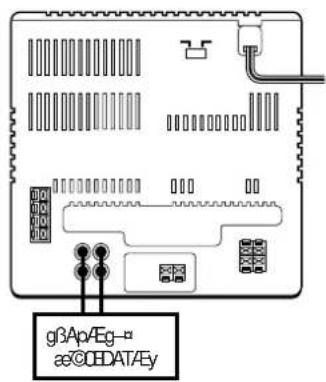
Right (R) and Left (L) satellite speakers Connect the right speaker to the R connectors and the left speaker to the L connectors. Connect the grey cords with white stripes to and the solid grey cords to
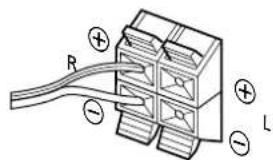
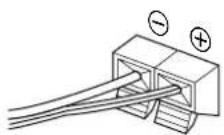
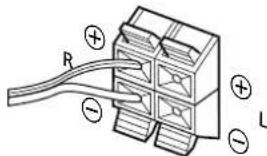
Superwoofer
Connect the superwoofer to the WOOFER connectors. Connect the grey cord with red stripes to and the solid grey cord to .
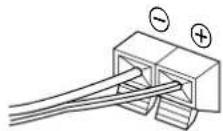
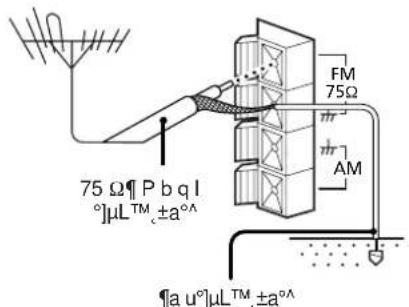
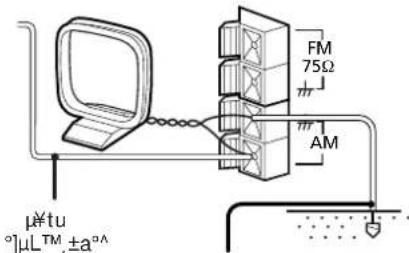
STEP2 Connecting the Aerials
FM lead aerial (supplied)*
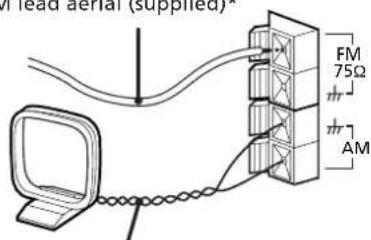
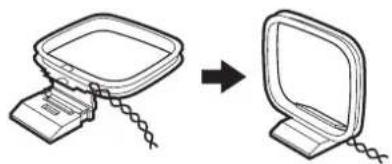
AM loop aerial (supplied)
- Note: Extend horizontally
AM loop aerial connection
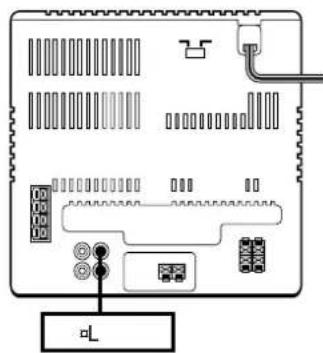
Connect the supplied loop aerial to the AM and the m terminals.
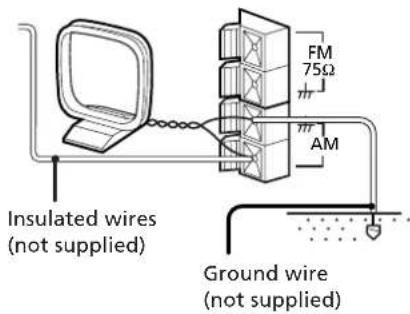
To improve the FM reception
Connect an outdoor FM aerial to the FM 75Ω terminal, using a 75-ohm coaxial cable.
Important
Ground the external aerial from terminal against lightning. To prevent a gas explosion, do not connect the ground wire to a gas pipe.

To improve the AM reception
After you connect the AM aerial, connect a 6- to 15-meter (20- to 50- feet) insulated wire to the AM terminal. Connect the terminal to earth.
Important
Ground the external aerial from m terminal against lightning. To prevent a gas explosion, do not connect the ground wire to a gas pipe.
Do this connection last!
EN
5
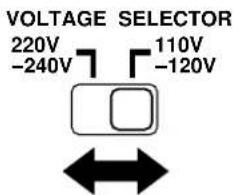
STEP3 Adjusting the Operating Voltage (except for Australian model)
Before connecting the power, set VOLTAGE SELECTOR to the position of the local power line voltage.
STEP4 Connecting the Power
Connect the mains lead to a wall outlet after you have made all the above connections.
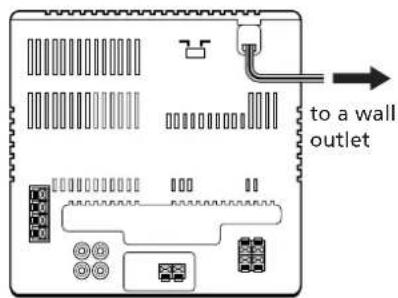
Plug Adaptor
If the plug on this unit does not fit your wall outlet, remove the plug adaptor attached to the plug (except for Latin American countries and Australia).
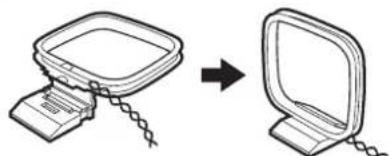
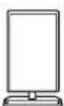
Installing the Speakers
Proper speaker positioning is essential in order to achieve directional effects and diffused ambience.
When you install the speakers, refer to the following instructions.
Once you have determined the final placement, fasten the speakers to the speaker stands.
Note
Do not install the woofer close to the unit, and do not place the woofer above or below the unit. Otherwise, the vibration from the woofer may cause mechanical noise or "skipping".
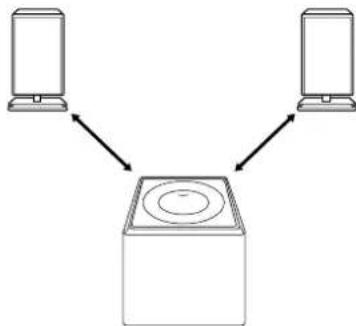
When installing the speakers on either side of the main unit
Place the superwoofer between the two satellite speakers.

When installing the satellite speakers away the superwoofer
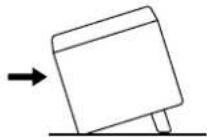
1 Insert the supplied stand into the rear of the superwoofer.
2 Install the superwoofer between the satellite speakers with its front panel facing upward.
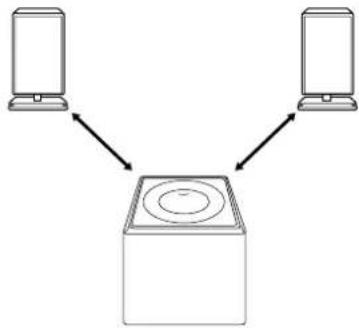
When installing the satellite speakers away from each other
Position the satellite speakers so they face toward your listening position.


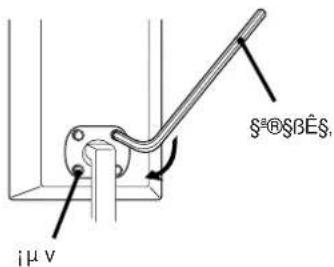
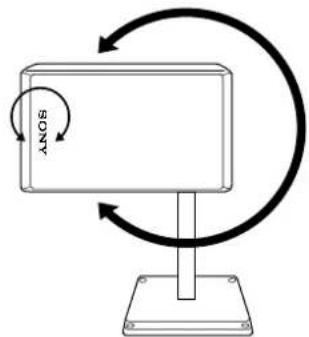
Fastening the speaker stands
1 Fasten the four screws loosely using the supplied wrench.
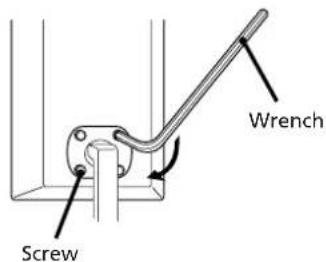
2 Rotate the speaker to the desired position. You can also rotate the Sony logo.
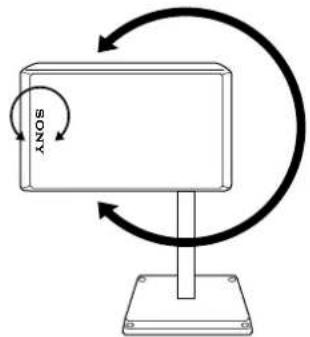
3 Tighten the screws.
Note
Tighten the screws securely to prevent mechanical noise.
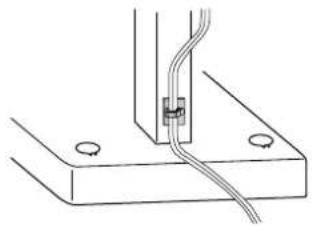
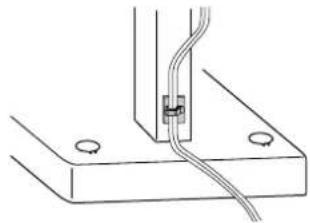
To attach the cord holder to the speaker stand
Peel off the sheets covering the cord holders and attach the holders to the speaker stands.
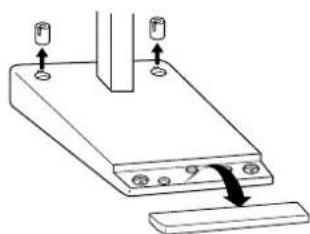
When attaching the speakers to the wall
1 Detach the caps and plates from the speaker stands.
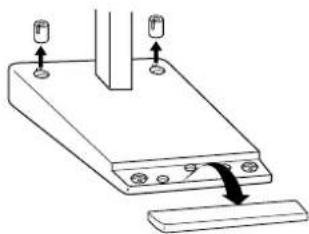
Chapter 1: Setting up
2 Use a screw driver to attach the stands to the wall with four wood screws (not supplied).
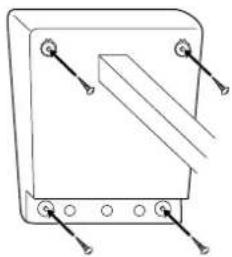
3 Re-attach the caps and plates to the speaker stands.
Note
Before attaching the speakers, check the strength of the wall and the length of the wood screws to prevent the speakers from falling down.
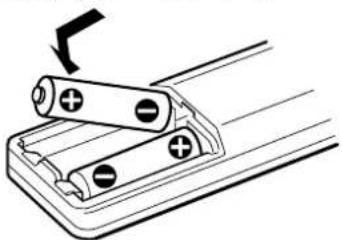
Inserting the Batteries
Insert two R6 (size AA) batteries in the supplied remote for remote control.
1 Open the lid.
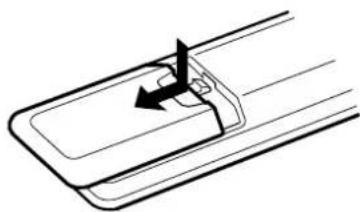
2 Insert two R6 (size AA) batteries. Match the + and - indications to the diagram in the battery compartment.
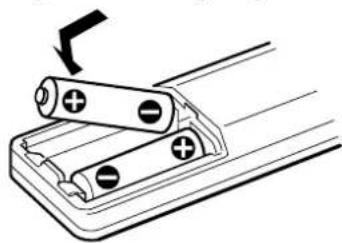
3 Close the lid.
Battery life
You can expect the remote to operate for about six months (using Sony SUM-3 (NS) batteries) before the batteries run down. When the batteries no longer operate the remote, replace both batteries with new ones.
To avoid battery leakage
If you are not going to use the remote for a long time, remove the batteries to avoid damage caused by corrosion from battery leakage.
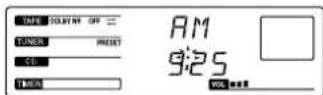
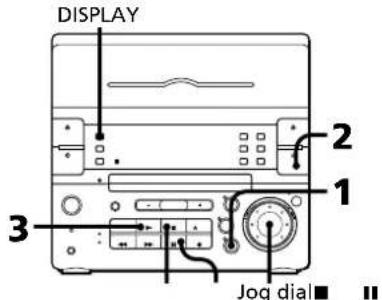
Setting the Clock
The built-in clock shows the time in the display. You need to set the clock to utilise the timer-activated features of your stereo system.
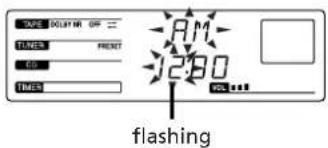
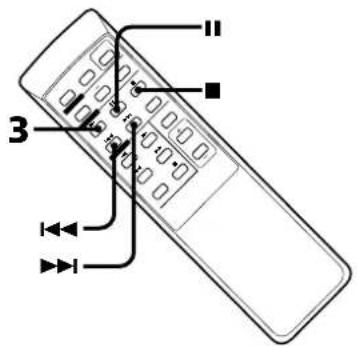
1 Press CLOCK SET.
The hour indication begins flashing.
2 Set the current hour by turning the jog dial until the correct hour appears.
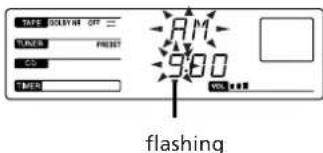
3 Press ENTER/NEXT.
The minutes indication begins flashing.
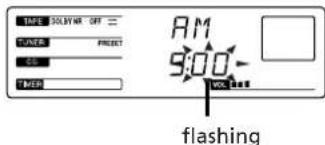
4 Set the current minute dial until the correct m

5 Press ENTER/NEXT.
The clock starts running and the upper dot flashes. Use the time signal to set the clock accurately.
The upper dot flashes for the first half of a minute (0 to 29 seconds), and the lower dot flashes for the last half of a minute (30 to 59 seconds).
To check the time while power is on Press DISPLAY.
The current time appears for a few seconds.
To correct the clock setting
Repeat steps 1 to 5.
Chapter 2: the CD Player
Playing a CD (normal play)
You can play CDs in four modes: normal, shuffle, programme and repeat. The mode decides which tracks (songs) you will listen to, in which order and whether or not they will repeat.
Before you play the CD, decrease the sound level by pressing VOLUME - to avoid damaging the speakers.
Playing a CD (normal play)
Playing Tracks in Random Order shuffle play)
Playing Tracks in the Desired Order (programme play)
Playing Tracks Repeatedly (repeat play)
1 Press CD.
2 Press OPEN/CLOSE CD and place a CD on the disc tray.

with the label side up
3 Press
The disc tray closes and play starts.
Playing time
| To | Press |
| Stop play | ■ |
| Pause | ■ |
| Resume play | ■ |
| Remove the CD | OPEN/CLOSE CD |
To find the beginning of a track
Automatic Music Sensor (AMS)
You can locate the beginning of a track while the track is playing or while it is in pause mode.
To locate the beginning of the current or preceding track, turn the jog dial counterclockwise (or press on the remote) until you find the desired track.
To locate the beginning of the succeeding track, turn the jog dial clockwise (or press on the remote) until you find the desired track.
To find a point in a track
You can find a particular point in a track while the track is playing or while it is in pause mode.
This operation is not possible with the remote.
| To | Do this |
| Find forward quickly in a track | Hold down ▲ and release it at the desired point. |
| Go backwards quickly in a track | Hold down ▲ and release it at the desired point. |
| Search quickly without listening | Press ▲ and hold down ▲ or ▲. Press ▲ again at the desired point. |
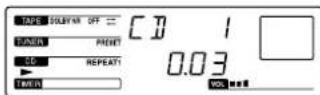
To check the remaining time
Press DISPLAY repeatedly.
Each time you press DISPLAY while playing a CD, the display changes as follows:
Playing time on the current track
Remaining time on the current track
Remaining time on the CD
Clock (appears for a few seconds)
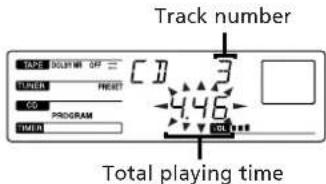
To check the total playing time and the total number of tracks
Press DISPLAY in stop mode. When you press DISPLAY again, the display shows the clock display for four seconds and returns to the previous indication.
continue to next page
continued
One Touch Play feature
Press CD when the power is off.
You can listen to the CD without pressing any other buttons when a CD is in the player.
Automatic Source Selection
If you press CD while you are listening to other sound source, the CD player is selected and playback starts automatically.
If there is no CD in the player
"NO DISC" appears in the display. Press OPEN/CLOSE CD to open the disc tray.
Playing Tracks in Random Order (shuffle play)
You can play all the tracks on the CD in random order.
Use the buttons on the unit to do this operation.
1 Press CD.
2 Press OPEN/CLOSE CD and place a CD on the disc tray. Then, press OPEN/CLOSE CD again to close the disc tray.
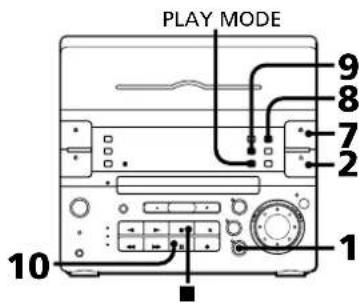
3 Press PLAY MODE repeatedly until "SHUFFLE" appears in the display.
4 Press
"..." appears and then all the tracks play in random order.
To cancel shuffle play
Press PLAY MODE repeatedly until "SHUFFLE" disappears from the display, and tracks continue playing in their original order.
If you press PLAY MODE to display
"SHUFFLE" during normal play
You can play all the tracks on the CD in random order.
To skip an undesired track
Turn the jog dial clockwise (or press on the remote).
Playing Tracks in the Desired Order (programme play)
You can programme up to 32 tracks to play in any order you choose.
1 Press CD.
2 Press OPEN/CLOSE CD and place a CD on the disc tray. Then, press OPEN/CLOSE CD again to close the disc tray.
3 Press PLAY MODE repeatedly until "PROGRAM" appears in the display.
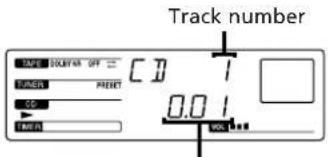
4 Turn the jog dial to choose a track. The track number and the total playing time appear in the display.
If you want to choose this track, go to the next step. If not, turn the jog dial again to choose another track.
5 Press ENTER/NEXT.
The chosen track number and total playing time appear in the display. If the track number and the total playing time disappear before you press ENTER/NEXT, go back to step 4.
6 Repeat steps 4 and 5 to programme the remaining tracks you want to play in the order you want them to play.

Press
All the tracks play in the order you chose.
| To | Do this |
| Stop play | Press■ |
| Cancel the programme play | Press PLAY MODE repeatedly until "PROGRAM" disappears |
| Programme another track at the end | Turn the jog dial to choose a track and press ENTER/NEXT |
| Erase the entire programme | Press■ once in stop mode, twice during play |
To change the order of programmed tracks
To change the order, erase the entire programme and create a new one.
After all the programmed tracks have been played
The programme order remains stored in the CD player's memory, so that you can listen to the same programme again by just pressing.
Note
If - - - - - appears instead of the total playing time, this means:
the total programmed time has exceeded 100 minutes, or
- you have programmed a track number which exceeds 20.
Playing Tracks Repeatedly (repeat play)
You can choose between two different repeat play modes. One repeats all the tracks in the current play mode; the other repeats a single track.
Use the buttons on the unit to do this operation.

Repeating all the tracks (in any play mode)
1 Press REPEAT once so that "REPEAT" appears in the display.

2 Press
Repeating a single track (in normal play mode only)
Press REPEAT repeatedly while playing the desired track until "REPEAT 1" appears in the display.
To cancel repeat play
Press REPEAT repeatedly until "REPEAT" or "REPEAT 1" disappears from the display.
Note
The unit does not repeat only a track during shuffle and programme play.

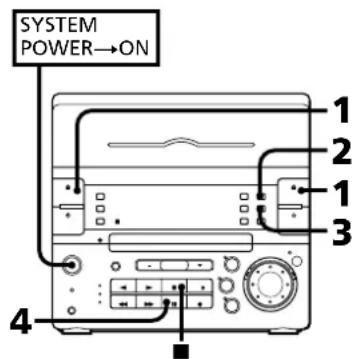
Listening to the Radio
Presetting Radio Stations
Playing Preset Radio Stations
Listening to the Radio
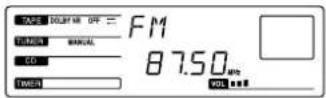
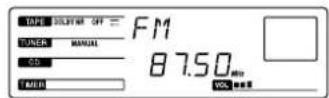
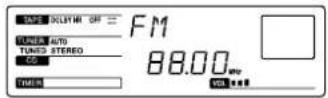
When you want to play a radio programme, you can have the tuner automatically scan the radio frequencies and tune in the stations with clear signals. This feature saves you time in searching for stations with clear signals. However, stations with weak signals may be skipped by automatic tuning. Manually tune in the ones skipped by automatic tuning.
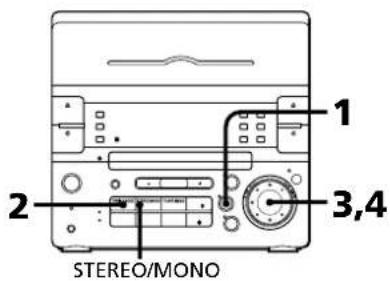
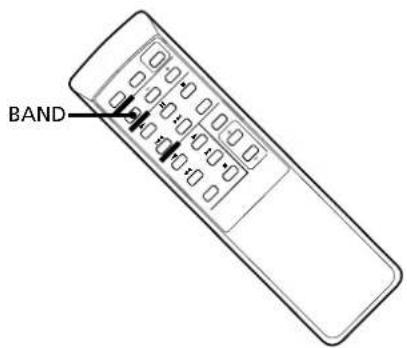
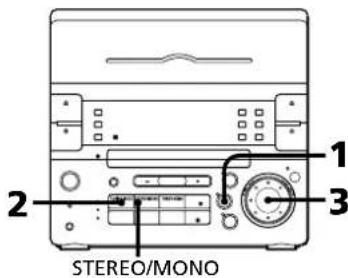
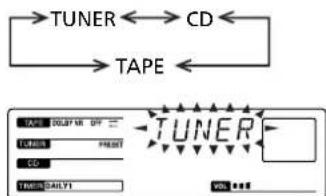
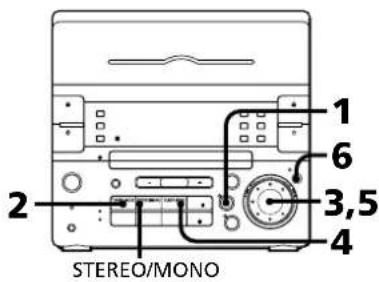
1 Press TUNER/BAND (or BAND on the remote) repeatedly until the band you want appears in the display. As you press TUNER/BAND, the band changes as follows:
Latin-American and Australian models:

Other models:

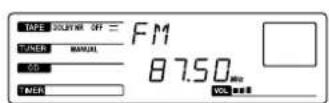
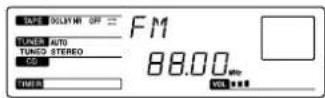
2 Press TUNING MODE repeatedly until "AUTO" appears in the display.
3 Turn the jog dial clockwise to scan a higher frequency station. To tune in a lower frequency station, turn the jog dial counterclockwise. The tuner starts scanning radio frequencies automatically, and stops when it finds a clear station. "TUNED" appears in the display. "STEREO" also appears if the FM station tuned is broadcasting in stereo.
4 If you do not want to listen to the station selected, turn the jog dial again to restart the scan.
When the desired station is not tuned in
Automatic tuning may skip the station with a weak signal. Tune in the station manually.
1 Press TUNING MODE repeatedly until "MANUAL" appears in the display.
2 Keep turning the jog dial until the desired station is tuned in.
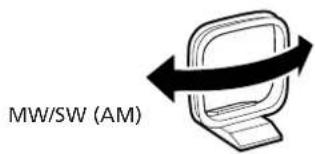
To improve MW/SW (AM) broadcast reception
Reorient the supplied AM loop aerial for MW/SW (AM).

To change the MW(AM) tuning interval(except for the Middle Eastern model)
The MW(AM) tuning intervals is preset to 9kHz in the factory. If you need to change the interval to 10kHz , do as follows:
1 Turn on the power.
2 Change the band to MW(AM).
3 Turn off the power.
4 Press TUNER/BAND while pressing FUNCTION.
After changing the MW(AM) tuning interval, reset the MW(AM) preset radio stations. To reset the interval to the factory setting, follow the same procedure.
When an FM programme is not clear to receive
Press STEREO/MONO so that "MONO" appears in the display. There will be no stereo effect, but the reception will improve. Press STEREO/MONO again to restore the stereo effect.
One Touch Play feature
Press TUNER/BAND when the power is off.
You can listen to the last received station without pressing any other buttons.
Automatic Source Selection
If you press TUNER/BAND while you are listening to other sound source, the tuner is selected and the last received station plays automatically.
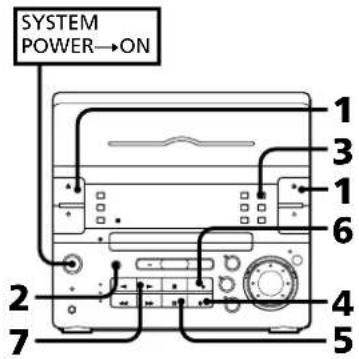
Presetting Radio Stations
You can store radio frequencies in the tuner's memory to tune in your favourite stations quickly. You can preset up to 20 FM stations, 10 MW stations and 10 SW stations in any order (20 FM and 10 AM stations for Latin America and Australia). Use the buttons on the unit to do this operation.


1 Press TUNER/BAND (or BAND on the remote) repeatedly until the band you want appears in the display.
Latin-American and Australian models:

Other models:

2 Press TUNING MODE repeatedly until "AUTO" appears in the display.
3 Turn the jog dial to tune in the station you want to store.
4 Press TUNER MEMORY. "MEMORY" and the preset channel number appear in the display.
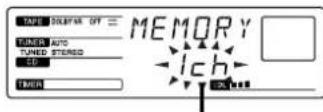
Preset channel number
5 Turn the jog dial to display the preset channel number you have decided on, while "MEMORY" is lit.
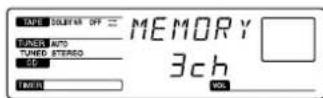
6 Press ENTER/NEXT.
The station is stored at the preset channel number you have decided on.
7 Repeat steps 3 to 6 for each station you want to store.
To erase a stored station
Store a new station at a previously used preset channel number. It will erase the old station and replace it with the new station.
If you have trouble storing a station
Make sure "MEMORY" is lit in the display. If not, press TUNER MEMORY again so that "MEMORY" appears (for about eight seconds) in the display, and then proceed with steps 5 and 6.
Playing Preset Radio Stations
Once you have preset the stations, use the jog dial to quickly tune in your favourite stations.
1 Press TUNER/BAND (or BAND on the remote) repeatedly to select the desired band.
Latin-American and Australian models:

Other models:

2 Press TUNING MODE repeatedly until "PRESET" appears in the display.
3 Turn the jog dial (or press PRESET (+ / - ) on the remote) to tune in a preset station. The station frequency appears and the station begins broadcasting.

Playing a Tape
Recording a CD
Recording a CD: Specifying Tape Length (time edit)
Recording a CD: Specifying Track Order (programme edit)
Recording From the Radio
Recording From Another Tape (dubbing)
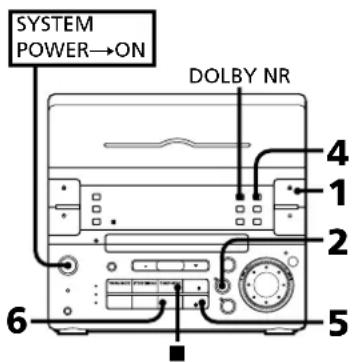
Playing a Tape
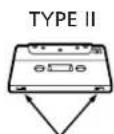
You can use TYPE I (normal), TYPE II (CrO_2) and TYPE IV (metal) tapes. When you insert a tape, the deck detects the tape type automatically.
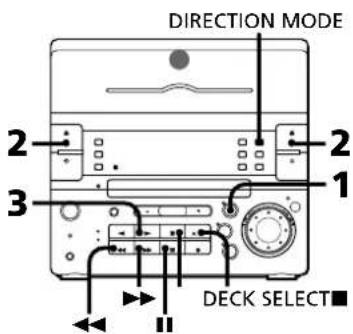
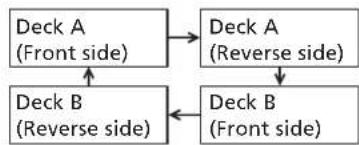
1 Press TAPE.
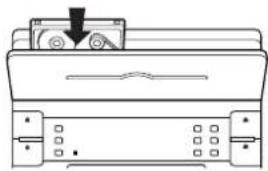
2 Press EJECT to open the tape compartment. Insert a recorded tape in deck A or B with the tape side down and the side you want to play facing forward. Push the center of the lid (in the illustration above) to close the compartment. The tape will start playing from the front side.
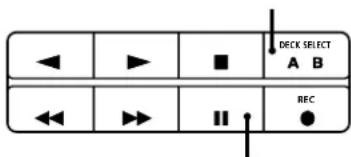
3 Press (to play the front side) or (to play the reverse side). The tape starts playing. If you set tapes in both decks, press DECK SELECT to choose the deck you want to use.
| To play | Press DIRECTION MODE to select |
| One side of the tape | → |
| Both sides* | (←) |
| Both decks in succession** | RELAY |
- The deck stops automatically after repeating the sequence five times.
** See "To play both decks in succession (relay play)".
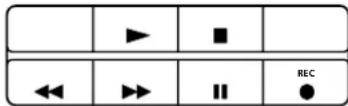
| To | Press |
| Stop play | ■ |
| Pause (only deck B) | II |
| Resume play after pause (only deck B) | II |
| Fast forward | ▶for front side ←for reverse side |
| Rewind | ▶for front side ▶for reverse side |
| Remove the tape | ≌EJECT |
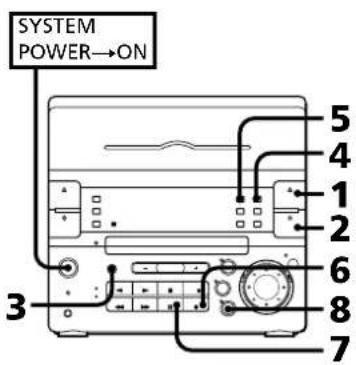
To play both decks in succession (relay play)
Rclay play always follows the following sequence.When the reverse side of the tape in deck B finishes playing, the following sequence continues four more times.
1 Press EJECT and insert recorded tapes in both decks.
2 Press DIRECTION MODE repeatedly until "RELAY" appears in the display.
3 Press or
To cancel relay play
Press DIRECTION MODE repeatedly until " " or "< "> appears in the display.
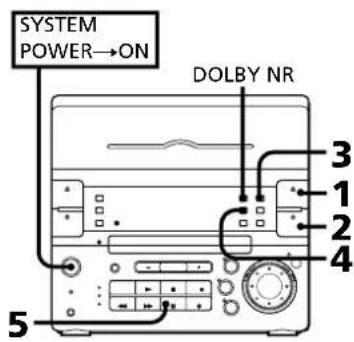
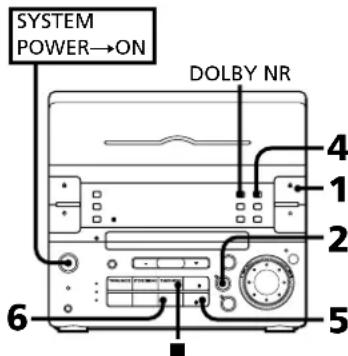
When listening to a tape recorded with the Dolby* B-type noise reduction system
Press DOLBY NR so that "DOLBY NR B" appears in the display.
The setting effects both decks. Dolby noise reduction system reduces tape hiss noise in low-level high-frequency signals.
- Dolby noise reduction manufactured under license from Dolby Laboratories Licensing Corporation.
"DOLBY" and the double-D symbol are trademarks of Dolby Laboratories Licensing Corporation.
One Touch Play feature
Press TAPE when the power is off. You can listen to the tape without pressing any other buttons when a tape is in the deck. When a tape is not in the deck, the system will just turn on.
Automatic Source Selection
If you press TAPE while you are listening to other sound source, the tape deck is selected and the play starts automatically.
Recording a CD
You can record from a CD to a tape. You can also record the sound adjusted by the equalizer onto a tape (See "Selecting the Audio Emphasis).
Use TYPE I (normal) or TYPE II (CrO_2) tapes. Do not use TYPE IV (metal) tapes for recording.
To listen to other sources while recording, you must stop recording.
Recording a CD Automatically
By using CD SYNCHRO button, you can record from a CD to a tape quickly. Use the buttons on the unit to do this operation.
1 Press EJECT DECK B and insert a blank tape into deck B with the side you want to record on facing forward. Recording will start from the front side of the tape, unless you have changed the playing direction before recording. Make sure the tabs on the cassette have not been removed.
2 Press OPEN/CLOSE CD and place a CD. Then, press OPEN/CLOSE CD again to close the disc tray.
3 Select dual or single-sided recording.
| To record | Press DIRECTION MODE to select |
| One side | ← |
| Both sides* | ← or RELAY |
- Recording always stops at the end of the reverse side. Be sure to start from the front side.
4 Press CD SYNCHRO. Deck B stands by for recording.
5 Press to release recording pause. Recording starts. After about 10 seconds, the CD starts playing.
To stop recording Press
To activate DOLBY NR
When you want to reduce the hiss noise in low-level high-frequency signals, press DOLBY NR so that "DOLBY NR B" appears in the display after step 3.
Adjusting the volume or DBFB will not affect the recording level
But these controls will change the sound levels you hear through speakers or headphones.
Recording a CD Manually
You can record a CD as you like, for instance, record just the songs you want or record from the middle of the tape.
1 Press EJECT DECK B and insert a blank tape into deck B with the side you want to record on facing forward. Recording will start from the front side of the tape, unless you have changed the playing direction before recording. Make sure the tabs on the cassette for deck B have not been removed.
2 Press OPEN/CLOSE CD and place a CD. Then, press OPEN/CLOSE CD again to close the disc tray.
3 Press FUNCTION repeatedly until "CD" appears in the display.
4 Select dual or single-sided recording.
| To record | Press DIRECTION MODE to select |
| One side | ← |
| Both sides* | ← or RELAY |
- Recording always stops at the end of the reverse side. Be sure to start from the front side.
5 When you want to reduce the hiss noise in low-level high-frequency signals, press DOLBY NR so that "DOLBY NR B" appears in the display.
6 Press REC. Deck B stands by for recording.
7 Press to release recording pause. Recording starts.
Press CD. The CD starts playing.
To stop recording Press
Recording a CD: Specifying Tape Length (time edit)
You can have the stereo system create programmes based on the tape length. The CD player makes programmes that will fit the tape length. For example, if you use a 40-minute tape to record a 46-minute CD, the CD player will automatically choose tracks that will fit within the 40-minutes, filling as much of the tape as possible. The player will not programme those tracks with numbers greater than 20. Use the buttons on both the unit and the remote to do this operation.
1 Press CD.
2 Press OPEN/CLOSE CD and place a CD. Then, press OPEN/CLOSE CD again to close the disc tray.
3 Press EDIT. "TIME EDIT" appears in the display.
continue to next page
continued
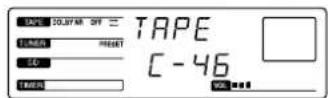
4 Press or on the remote to designate the tape length.
Choose the indication for tapes of a corresponding minute length. Choose "HALF" if you want the CD player to play just half the total playing time of the CD.
As you press the button, the indication changes as follows:
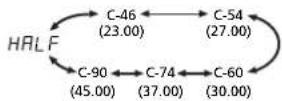
Note
You cannot select "HALF" when you want to record CD with more than 20 tracks.
5
Press EDIT.
The CD player determines the tracks to be recorded on side A automatically.
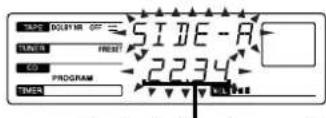
Total playing time on side A
6
When you want to record on both sides, press EDIT again.
The CD player determines the tracks to be recorded on side B.
When you want to record only on side A, press to stop the indication from flashing.
7
Press EJECT DECK B and insert a blank tape into deck B with the side you want to record on facing forward.
Recording will start from the front side of the tape, unless you have changed the playing direction before recording.
Make sure the tabs on the cassette have not been removed.
8
Select dual or single-sided recording.
| To record | Press DIRECTION MODE to select |
| One side | ← |
| Both sides* | ← or RELAY |
- Recording always stops at the end of the reverse side. Be sure to start from the front side.
9
Press CD SYNCHRO.
Deck B stands by for recording.
10 Press to release recording pause. Recording starts. After about 10 seconds, the CD starts playing.
To stop recording
Press
To cancel time edit
Press PLAY MODE.
To select the desired tracks beforehand
You can place priority on some tracks to be recorded by selecting them before programming (only up to 20 tracks). See "Playing Tracks in the Desired Order (programme play)".
To activate DOLBY NR
When you want to reduce the hiss noise in low-level high-frequency signals, press DOLBY NR so that "DOLBY NR B" appears in the display after step 8.
Recording a CD: Specifying Track Order (programme edit)
You can adjust the total recording time to the tape length while making a programme.
1 Press CD.
2 Press OPEN/CLOSE CD and place a CD. Then, press OPEN/CLOSE CD again to close the disc tray.
3 Press PLAY MODE repeatedly until "PROGRAM" appears in the display.
4 Turn the jog dial to choose a track.
5 Press ENTER/NEXT.
6 Repeat steps 4 and 5 to programme the remaining tracks you want to record on side A in the order you want them to be recorded.
7 Press to pause recording at the end of side A. The total playing time "0.00" is displayed.
8 Repeat steps 4 and 5 to programme the remaining tracks you want to record on side B in the order you want them to be recorded.
9 Press EJECT DECK B and insert a blank tape into deck B with the side you want to record on facing forward. Recording will start from the front side of the tape, unless you have changed the playing direction before recording. Make sure the tabs on the cassette have not been removed.
10 Select dual or single-sided recording.
| To record | Press DIRECTION MODE to select |
| One side | ← |
| Both sides* | ← or RELAY |
- Recording always stops at the end of the reverse side. Be sure to start from the front side.
11 Press CD SYNCHRO.
Deck B stands by for recording.
12 Press to release recording pause. Recording starts.
After about 10 seconds, the CD starts playing.
To stop recording
Press
To cancel programme edit
Press PLAY MODE.
To activate DOLBY NR
When you want to reduce the hiss noise in low-level high-frequency signals, press DOLBY NR so that "DOLBY NR B" appears in the display after step 10.
Recording From the Radio
You can record from the tuner onto a tape. Use TYPE I (normal) or TYPE II (CrO_2) tape.
1 Press EJECT DECK B and insert a blank tape into deck B with the side you want to record on facing forward. Recording will start from the front side of the tape, unless you have changed the playing direction before recording. Make sure the tabs on the cassette have not been removed.
2 Press TUNER/BAND several times until the desired radio band appears.
3 Tune in the radio station you want to record. (See "Listening to the Radio" or "Playing Preset Radio Stations" for details.)
4 Select dual or single-sided recording.
| To record | Press DIRECTION MODE to select |
| One side | ←→ |
| Both sides* | ←→ or RELAY |
- Recording always stops at the end of the reverse side. Be sure to start from the front side.
5 Press REC. Deck B stands by for recording.
6 Press to release recording pause. Recording starts.
To stop recording Press
To reduce noise during MW/SW (AM) recording
If a whistling noise is heard while recording, reorient the AM loop aerial for optimum reception.
To activate DOLBY NR
When you want to reduce the hiss noise in low-level high-frequency signals, press DOLBY NR so that "DOLBY NR B" appears in the display after step 4.
Recording From Another Tape (dubbing)
Dubbing Another Tape Automatically
You can record the whole tape onto another automatically by using high speed dubbing. Use the buttons on the unit and TYPE I (normal) or TYPE II (CrO_2) tape for dubbing.
1 Press EJECT DECK A and DECK B and insert a recorded tape in deck A with the side you want to play facing forward.
Also, insert a blank tape into deck B with the side you want to record on facing forward.
Recording and playback will start from the front side of the tape, unless you have changed the playing direction before recording.
Make sure the tabs on the cassette for deck B have not been removed.
2 Choose how you want the tape to be recorded and press DIRECTION MODE.
| Indicator | Operation |
| ← | Dubbing stops at the end of one side. |
| (→) | When the tape in one deck comes to the end of the front side, it reverses immediately regardless of the tape position in the other deck. |
| RELAY | When the tape in one deck reaches the end of its front side, it stops until the other tape come to its end, and then both tapes reverse together. |
3 Press HIGH SPEED DUBBING. Deck B stands by for recording.
4 Press II. The tape starts dubbing at high speed. When the tape has started dubbing from the reverse side in RELAY and mode, dubbing will stop at the end of the reverse side.
To stop dubbing
Press
You do not have to press DOLBY NR for high speed dubbing
The tape in deck B is automatically recorded in the same state as the tape in deck A.
continue to next page
Dubbing Another Tape Manually
When you want to dub only part of the tape, dub manually at normal speed. Use TYPE I (normal) or TYPE II (CrO2) tape for recording.
1 Press EJECT DECK A and DECK B and insert a recorded tape in deck A with the side you want to play facing forward.
Also, insert a blank tape into deck B with the side you want to record on facing forward.
Recording and playback will start from the front side of the tape, unless you have changed the playing direction before recording.
Make sure the tabs on the cassette for deck B have not been removed.
2 Press FUNCTION repeatedly until "TAPE" appears in the display.
3 Select dual or single-sided recording.
| To record | Press DIRECTION MODE to select |
| One side | ← |
| Both sides* | ← or RELAY |
- Recording always stops at the end of the reverse side. Be sure to start from the front side.
4 Press REC. Deck B stands by for recording.
5 Press to release recording pause. Recording starts.
6 Press DECK SELECT so that the "A" lights up.
7 Press The tape on deck A starts playing.
To stop recording Press. To stop the other deck, press DECK SELECT and then
Notes
- Do not switch to the other functions. If you do so, the recording stops.
- You cannot dub the tape recorded with the DOLBY NR B effect onto another tape with the DOLBY NR B effect off.
- If you want to dub the tape not recorded with the DOLBY NR B effect onto another tape with the DOLBY NR B effect on, press DOLBY NR so that "DOLBY NR B" appears in the display after step 3.
Chapter 5: Sound Adjustment
Adjusting the Sound
Selecting the Audio Emphasis
Adjusting the Sound
To fully enjoy the sound coming from your stereo system, make the following audio adjustments. See sections following this one for additional sound adjustments.
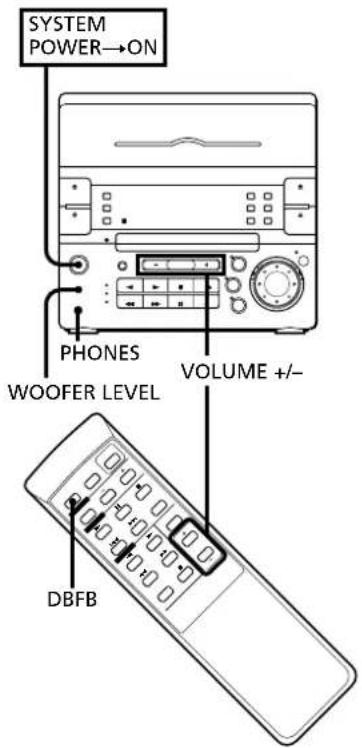
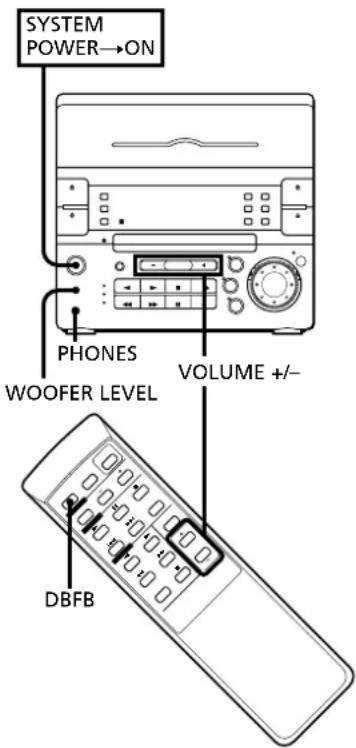
To adjust the volume
Press VOLUME + / - on the unit or the remote.
To reinforce bass
Press DBFB* so that "DBFB" appears in the display.
To cancel DBFB, press DBFB again.
- DBFB = Dynamic Bass Feedback
To adjust the woofer level
Press WOOFER LEVEL to light either the "HIGH", "MID", or "LOW" indicator according to your preference.
To listen through the headphones
Connect the headphones to PHONES jack. No sound will come from the speakers.
Selecting the Audio Emphasis
Your stereo system has been factory set to five specially recommended audio emphases. Choose from among these five preset settings according to the type of music you are listening to.
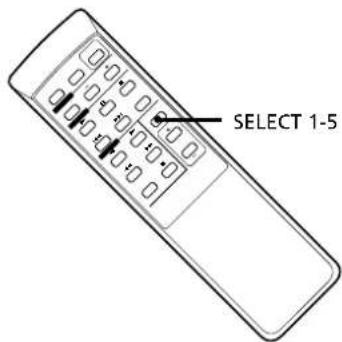
Press SELECT 1-5 on the remote.
The preset setting appears in the display. When you select the audio emphasis with surround effect, "SUR" appears in the display.
| Select | To get |
| ROCK | Powerful, clear sounds, emphasizing low and high audio |
| POPS | Light, bright sounds, emphasizing high and middle range audio |
| JAZZ | Percussive sounds, emphasizing bass audio |
| CLASSIC | Broad, open sounds with plenty of reverberation |
| DANCE(SALSA)* | Passionate vocal sounds with strong rhythm emphasizing middle and low audio |
| DANCE** | Sounds similar to a disco by intensifying bass sound |
- For Latin American model
** For other models
To cancel the audio emphasis
Press SELECT 1-5 repeatedly until the preset setting disappears in the display.
Notes
In the following cases, ensure to cancel the audio emphasis mode.
- When you record a CD whose recording sound level is too high onto a tape: there may be cases where the playback sound of that tape becomes distorted with the audio emphasis effect on.
- When you play a tape which is recorded with the audio emphasis effect on: the tape is played with the audio emphasis effect being put on twice and the playback sound may become distorted.
Chapter 6: Additional Features
Falling asleep to Music
Waking Up to Music
Timer-Recording Radio Programmes
Connecting Optional Equipment
Falling asleep to Music
You can set the stereo system to turn off automatically so you can go to sleep to music.
Before setting sleep timer, make sure the clock has been set correctly.
You can use sleep timer together with the timer for waking up to music.

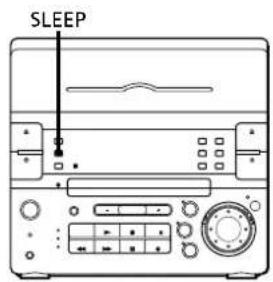
1 Play your favourite sound source (a tape, the tuner or CD).
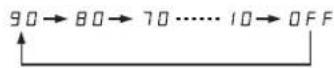
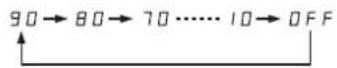
2 Press SLEEP while the source is playing to choose how long you want the music to play.
"SLEEP" and minutes indication appear for a few seconds in the display. As you press SLEEP, the indication decreases by ten minutes from 90 to 10.
The power will turn off after 90 to 10 minutes depending on the length of time you chose.
To cancel the sleep timer
Press SLEEP repeatedly until "SLEEP OFF" appears in the display.
To check the remaining time before the sleep timer turns off the system
Press SLEEP once.
The remaining time is displayed in minutes for several seconds.
To change the preset time while the sleep timer is on
Press SLEEP several times until the desired length of time indication appears.
Note
While the sleep timer is activated, the wake up timer and recording timer functions do not work.
Waking Up to Music
You can wake up to music at the preset time. You only need to set the timer once. Before setting the timer, make sure the clock has been set correctly. The preset timer activates at the same time every day. To wake up to the sound of the radio, be sure to preset the station you want to listen to beforehand. (See "Presetting Radio Stations").
1 Prepare the sound source.
To wake up to a radio
Tune in the desired preset station.
To wake up to the sound of a CD
Insert a CD. If you want to play it from a desired track, do the necessary procedures for programmed CD play. (See "Playing Tracks in the Desired Order".)
To wake up to the sound of the tape
Insert a tape with the side you want to play facing towards you. If you insert the tapes in both decks, you will hear the sound from deck A.
2 Press VOLUME + / - to adjust the volume.
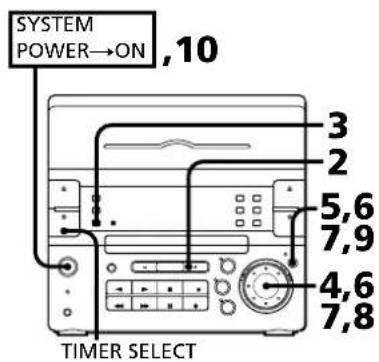
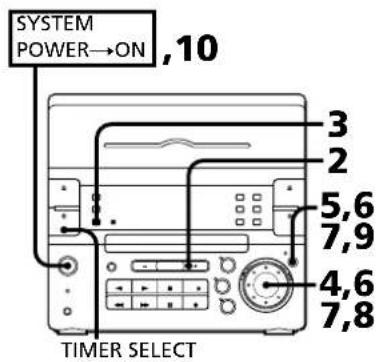
3 Press TIMER SET.
"DAILY 1" begins flashing.
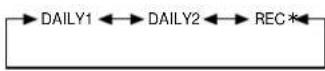
4 Turn the jog dial to select "DAILY 1" or "DAILY 2". As you turn the jog dial, the indication changes as follows:
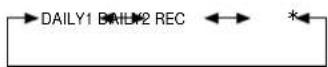
- When you set the timer to record the radio, you select "REC". (See "Timer-Recording Radio Programmes".)
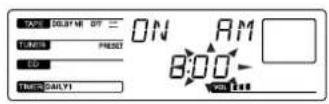
5 Press ENTER/NEXT. The hour digit flashes and "ON" appears in the display.
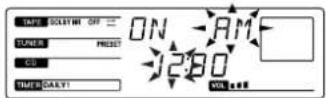
6 Set the hour you want the music to come on by turning the jog dial, then press ENTER/NEXT. The minutes flash.

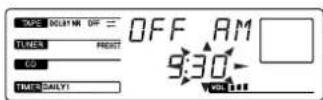
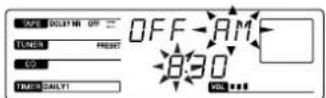
Set the minutes in the same way. "OFF" appears and the hour digits flash again.

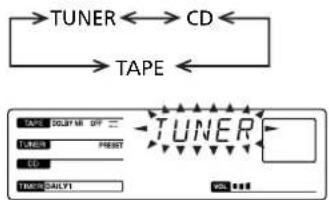
7 Set the hour you want the music to go off by turning the jog dial, then press ENTER/NEXT. Set the minutes in the same way. The sound source flashes.
8 Choose a sound source by turning the jog dial. The display changes as follows:
9 Press ENTER/NEXT. The preset items appear in the display sequentially.
10 Press SYSTEM POWER to turn off the system. At the preset time, the power will go on and the music will play. At the turn-off time, the power will go off again.
To cancel the timer Press TIMER SELECT repeatedly until "TIMER OFF" appears in the display.
To check the timer settings Press TIMER SELECT to select "DAILY 1" or "DAILY 2".
To change timer settings Repeat steps 1 to 9.
If you want to wake up to the other CD or track Change to the other CD or programme the other tracks (see "Playing Tracks in the Desired Order"), and turn off the system.
Timer-Recording Radio Programmes
You can set the timer to record the radio. This timer works only once for each setting. Preset the station beforehand. (See "Presetting Radio Stations"). Make sure the clock is set correctly.
1 Press TUNER/BAND repeatedly until the band you want appears in the display.
2 Press TUNING MODE repeatedly until "PRESET" appears in the display.
3 Turn the jog dial to tune in a preset station.
4 Press TIMER SET.
5 Turn the jog dial to select "REC".
6 Press ENTER/NEXT. The hour digit flashes.
7 Set the hour you want to start recording by turning the jog dial, then press ENTER/NEXT. The minutes flash.

Set the minutes in the same way. "OFF" appears and the hour digits flash again.

8 Set the hour you want to stop recording by turning the jog dial, then press ENTER/NEXT. Set the minutes in the same way. The preset items appear in the display sequentially.

9 Press EJECT DECK B and insert a tape into deck B with the side you want to record facing towards you (front side). Recording always starts from the front side. If necessary select the direction mode. You can use TYPE I (normal) or TYPE II (CrO2) tape.
10 Press SYSTEM POWER to turn off the system. At the preset time, the power will go on and the volume level is automatically set to the minimum.
To cancel the timer Press TIMER SELECT repeatedly until "TIMER OFF" appears in the display.
To check the timer settings Press TIMER SELECT repeatedly until "REC" appears in the display.
To change timer settings Repeat steps 1 to 9.
If the power is turned on at the preset time The sound source will automatically change to the tuner, but tuner recording will not start.
Connecting Optional Equipment
For greater enjoyment of your stereo system, you can connect other components to the stereo. You can connect:
an MD deck
a DAT deck
- headphones
a turntable
Connecting an MD Deck or a DAT Deck for Analog Recording
You can record analog signals from the sound sources of this stereo to an MD deck or DAT deck.
You can also listen to the sound from an MD deck or DAT deck by pressing FUNCTION repeatedly to select MD.
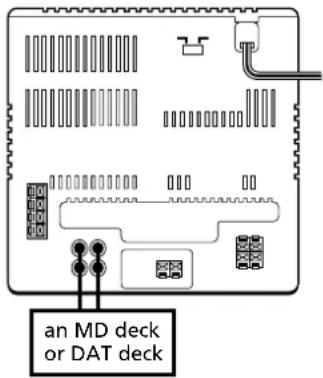
| Connect | With |
| LINE IN jack of the MD deck or DAT deck | MD OUT jacks |
| LINE OUT jack of the MD deck or DAT deck | MD IN jacks |
Use audio cords and make sure to connect the plugs to jacks of the same colour. Then press FUNCTION to select the sound sources.
Connecting Headphones
You can connect the headphones (stereo phone jack) to the PHONES jack.
Connecting a Turntable
You can connect a turntable to MD IN jacks. Before you connect, check which type of turntable you have.
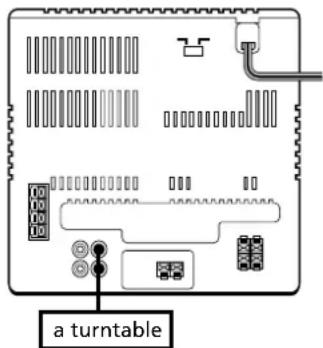
| Is the turntable supplied with a phono equalizer? | Connect with |
| Yes | MD IN jacks |
| No | MD IN jacks using a MM cartridge equalizer and connecting cable (not supplied) |
For Your Information
Precautions
Troubleshooting Guide
Maintenance
Specifications
Index to Parts and Controls
Index
Precautions
If you have any questions or problems concerning your stereo system, please consult your nearest Sony dealer.
On safety
The unit is not disconnected from the AC power source (mains) as long as it is connected to the wall outlet, even if the unit itself has been turned off.
- Unplug the system from the wall outlet (mains) if it is not to be used for an extended period of time. To disconnect the cord (mains lead), pull it out by the plug. Never pull the cord itself.
- Should any solid object or liquid fall into the component, unplug the stereo system and have the component checked by qualified personnel before operating it any further.
The mains lead must be changed only at the qualified service shop.
On installation
Place the stereo system in a location with adequate ventilation to prevent heat buildup in the stereo system.
On condensation in the CD player component
If the system is brought directly from a cold to a warm location, or is placed in a very damp room, moisture may condense on the lens inside the CD player. Should this occur, the CD player will not operate. Remove the CD and leave the system turned on for about an hour until the moisture evaporates.
To save a tape permanently
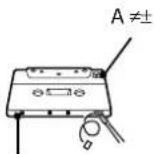
To prevent a tape from being accidentally recorded over, break off the cassette tab from side A or B as illustrated. If you later want to reuse the tape for recording, cover the broken tab with adhesive tape.
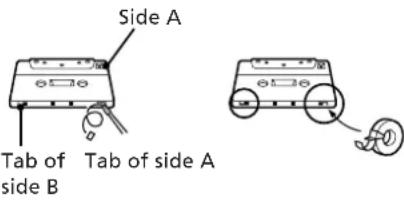
When you are using a type II (CrO2) tape, be careful not to cover the detector slots which allow the tape player to automatically detect the type of tape.

Troubleshooting Guide
If you run into any problem using the stereo, use the following check list and first check the following points:
The mains lead is connected firmly.
The speakers are connected correctly and firmly.
Should any problem persist after you have made the checks below, consult your nearest Sony dealer.
Tuner
"STEREO" flashes in the display.
Adjust the aerial.
Severe hum or noise.
Adjust the aerial.
The signal strength is too weak. Connect the external aerial.
Connect the ground wire.
A stereo FM programme cannot be received in stereo.
Press STEREO/MONO so that "STERFO" appears.
Tape Player
The tape does not record.
No tape in the tape compartment.
The tab has been removed from the cassette.
The tape has reeled to the end.
The tape does not record nor playback or there is a decrease in sound level.
→ The heads are dirty. Clean them.
Magnetic deposits have built-up on the record/playback head*.
There is excessive wow or flutter, or the sound drops out.
The capstans or pinch rollers are contaminated*.
The tape does not erase completely.
Magnetic deposits have built-up on the record/playback heads*.
Noise increases or the high frequencies are erased.
Magnetic deposits have built-up on the record/playback heads*.
- See "Maintenance."
continue to next page
continued
CD Player
The disc tray does not close.
The CD is not placed correctly.
The CD will not play.
The CD is dirty.
The CD is inserted label side down.
→ The player is in pause mode.
Moisture condensation has builtup. Leave the system turned on for about an hour until the moisture evaporates.
Play does not start from the first track.
The CD player is in programme or shuffle mode. Press PLAY MODE repeatedly so that "PROGRAM" or "SHUFFLE" disappears.
"4 is displayed.
on the unit was repeatedly pressed at the end of the CD. Turn the jog dial counterclockwise (or press on the remote) to return to the normal display.
General
There is no sound.
Press VOLUME ^+
The headphones are connected. Disconnect them.
Sound comes from one channel or unbalanced left and right volume.
Check the speaker connections of the inoperative channel.
The left and right sound are reversed.
Check the speaker connection and speaker placement.
Bass is lacking or the location of the musical instruments is apparently imprecise.
Check the speaker connection for proper phasing.
There is severe hum or noise.
TV or VCR is too close to the stereo system. Move the stereo system away from the TV or VCR.
"AM 12:00" flashes in the display.
A power interruption occurred. Set the clock and timer settings again.
The remote does not function.
The batteries have run down. Replace both batteries.
There is an obstacle between the remote and the system. Remove the obstacle.
Restoring the Factory Settings
Unplug the mains lead and then plug it back into the wall outlet.
Keep DISPLAY and FUNCTION pressed and press TAPE.
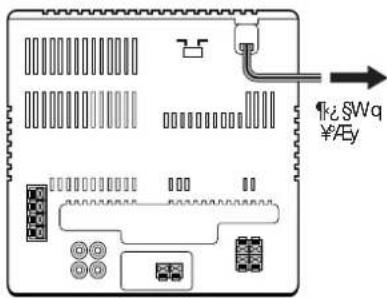
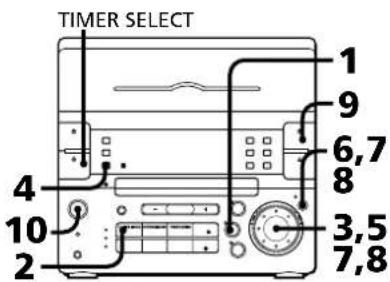
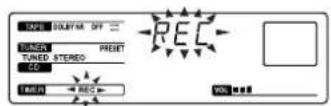
Maintenance
To clean the tape heads and tape path
Contaminated tape heads cause poor recording or sound drop-out in playback. We recommend cleaning after every 10 hours of operation.
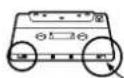
Open the tape compartment and wipe the heads, the pinch rollers and the capstans with a cleaning swab slightly moistened with cleaning fluid or alcohol. Wipe the parts shown below.
Deck A
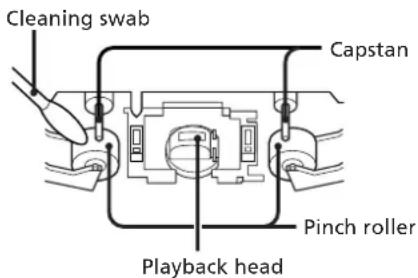
Deck B
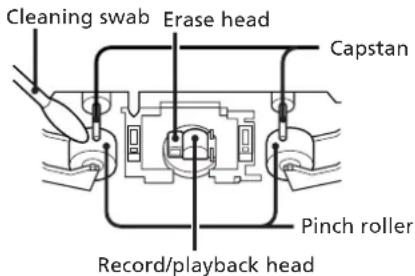
Insert a tape when the areas cleaned are completely dry.
To demagnetize the tape heads
After 20 to 30 hours of use, enough residual magnetism will have built up on the heads to begin to cause loss of high frequencies and hiss. At this time, demagnetize the heads and all metal parts in the tape path with a commercially available tape head demagnetizer. Refer to the instructions of the demagnetizer.
To clean the cabinet
Use a soft cloth slightly moistened with mild detergent solution.
To clean the CD
When a CD is dirty, clean it with a cleaning cloth. Wipe the CD from the centre out.
Notes on CD
- Do not use solvents such as benzene, thinner, commercially available cleaners, or anti-static spray intended for vinyl LPs.
- If there is a scratch, dirt or fingerprints on the CD, it may cause a tracking error.
Specifications
CD player section
System Compact disc digital audio system
Laser Semiconductor laser ( = 780nm)
Emission duration: continuous
Laser output Max 44.6 W^*
- This output is the value measured at a distance of 200 mm from the objective lens surface on the Optical Pick-up Block with 7 mm aperture.
Wavelength 780-790 nm
Frequency response
2 Hz - 20 kHz
Signal-to-noise ratio
More than 65 dB
Dynamic range
More than 97 dB
Tuner section
FM stereo, FM/AM superheterodyne tuner
FM tuner section
Tuning range 87.5 - 108.0 MHz (50 kHz step)
Aerial FM lead aerial
Aerial terminals
75 ohm unbalanced
Intermediate frequency
10.7 MHz
AMtuner section
Tuning range For Latin-American model:
AM: 531-1,710 kHz (with
the tuning interval set at
9 kHz)
530 - 1,710 kHz (with the
tuning interval set at
10 kHz)
For Australian model:
AM: 531 - 1,602 kHz (with
the tuning interval set at
9 kHz)
530 - 1,710 kHz (with the
tuning interval set at
10 kHz)
For other models:
MW: 531-1,602 kHz (with
the tuning interval set at
9 kHz)
530-1,710 kHz (with the
tuning interval set at
10 kHz)
SW:5.95-17.90MHz
Aerial AM loop aerial
External aerial terminals
Intermediate frequency
450 kHz
Tape player section
Recording system
4-track 2-channel stereo
Frequency response
(DOLBY NR OFF)
40-13,000 Hz (±3 dB),
using Sony TYPE I cassette
40-14,000 Hz (±3 dB),
using Sony TYPE II cassette
Wow and flutter
0.1% WRMS ± 0.3% (DIN)
Amplifier section
Peak music power output
600W
Continuous RMS power output
Satellite: 10W + 10W (4 ohms at
1 kHz, 10% THD)
Superwoofer: 35 W (6 ohms at
60 Hz, 10% THD)
Inputs
MD IN: Sensitivity 450mV
impedance 47 kilohms
Outputs
MD OUT: Sensitivity 250mV
1kilohms
PHONES (stereo phone jack):
accept headphones of
8 ohms or more.
Speaker section
Satellite speaker SS-S33D
Speaker system
Full range
Speaker units 6 cm dia., cone type
Enclosure type Closed type (with supplied
speaker stand)
Rated impedance
4 ohms
Frequency response
180 Hz - 20 kHz
Dimensions Approx. 110·185
100 mm (w/h/d) (per
speaker, incl. front grille)
Approx. 120 - 130mm
(w/d) (pedestal)
Mass Approx. 1.8kg per speaker
with speaker stand
Superwoofer SS-W33D
Speaker system
Full range
Speaker units 13 cm dia., cone type
Enclosure type Bass reflex type
Rated impedance
6 ohms
Frequency response
40-180Hz
Dimensions Approx. 225·210
295 mm (w/h/d) incl.
front grille
Mass Approx. 4.8kg
Supplied accessories
AM loop aerial (1)
Remote (1)
Sony SUM-3 (NS) batteries (2)
FM lead aerial (1)
Speaker cords (3)
Supporter (1)
Cord holders (2)
Wrench (1)
General
Power requirement
Australian model:
240VAC,50/60Hz
Other models:
110-120Vor220-240V
AC, 50/60 Hz
Adjustable with the voltage
selector
Power consumption
85W
Dimensions Approx. 225·210
235 mm (w/h/d) incl.
projecting parts and
controls
Mass Approx. 4.8kg
Design and specifications are subject to
change without notice.
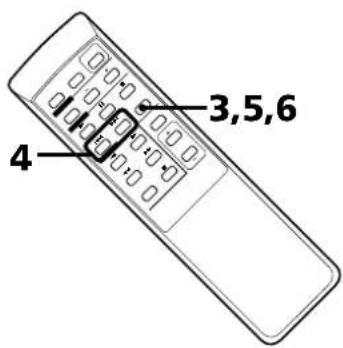
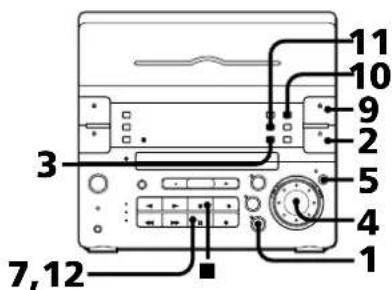
Index to Parts and Controls
Refer to the pages indicated in parentheses
for how to use the controls.
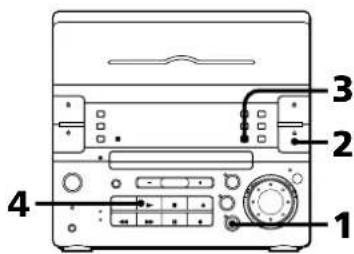
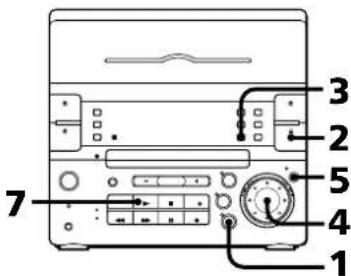
Front Panel
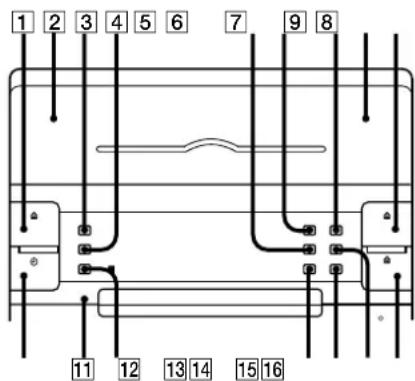
1 EJECT DECK A button (12)
2 DECK A (12)
3DISPLAY button (6,7)
4 SLEEP button (18)
5 CD CYNCHRO button (13)
DOLBY NR button (12)
7 DIRECTION MODE button (12)
DFCKB (13)
9 EJECT DECK B button (13)
TIMER SELECT button (19)
CLOCK SET button (6)
12 TIMER SET button (18)
13 PLAY MODE button (8, 14)
14 REPEAT button (9)
15 HI-SPEED DUBBING button (15)
16 ≡ OPEN/CLOSE CD button (7)
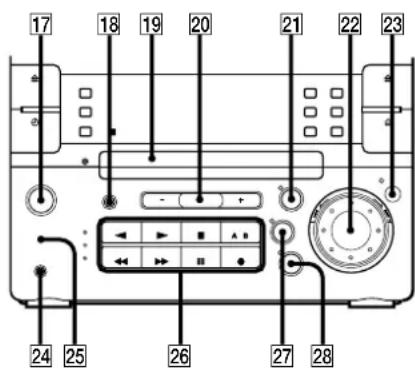
continue to next page
continued
19 Disc tray (7)
20 VOLUME + / - button (17)
TAPE button and lamp (12)
22 Jog dial (6,7,10,14,18)
23 ENTER/NEXT button (6, 8, 11, 14, 19)
24 PHONES jack (stereo phone jack) (17, 20)
25 WOOFER LEVEL button (17)
26 Operating buttons*7,10,12,19
27 TUNER/BAND button and lamp (10)
28 CD button and lamp (7)
\*Operating buttons
The buttons you can operate for CD player, timer, or tape player light up.
CD player
| REC |
Tuner
| TURING MOOF TYPE | HETERENTIREND | ||
| REC |
Tape player

Note
A or B lights up when you operate CD player or tuner. However, you can ignore it.
Rear Panel
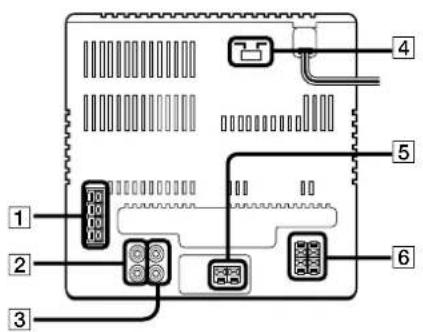
Aerial terminals (4)
MD OUT jacks (20)
3 MD IN jacks (20)
Voltage Selector (5) (Except for Australian model)
5 Woofer connectors (4)
Speaker connectors (4)
Remote
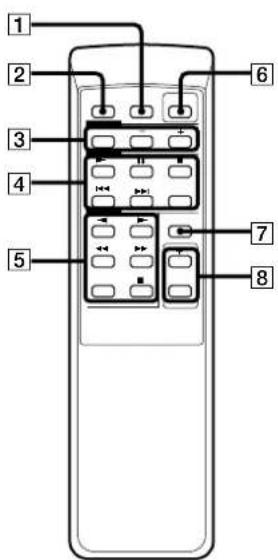
SLEEP button
DBFB button (17)
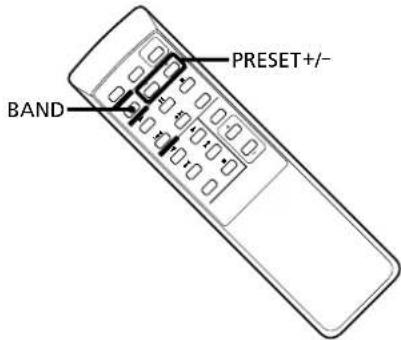
3 Tuner operating buttons BAND button PRESET + / - button
CD operating buttons
▶ (play) button
I (pause) button
stop) button
14/ button (7,14)
EDIT button (13)
5 Tape operating buttons
(1) (reverse side/front side) play
buttons
stop) button
//buttons
DECK SELECT button
SYSTEM POWER switch
SELECT 1-5 button (17)
VOLUME + / - buttons
Display Window
Tuner indications (10)
2 Tape play indications (12)
3 DOLBY NR indication (12)
4 CD SYNCHRO indication (13)
5 Tape direction indications (12)
6 AUTO/MANUAL/PRESENT indications (10)
7 Function indications (6,8,10,14,19)
Audio emphasis indications (17)
9 CD play mode indications (7)
10 Timer indications (19)
1 Frequency/time indication (6, 10)
12 SUR indication (17)
13 DBFB indication (17)
VOLUME indication (17)
Index
Adjusting
the sound 17
Aerials 4
AMS7
CD player 7
Clock setting 6
Connecting
optional equipment 20
the aerials 4
the power 5
the speakers 4
the stereo 4
DBFB 17
Dolby NR (noise reduction) 12
Dubbing 15
Headphones 17, 20
Inserting batteries 6
Installing the speakers 5
Maintenance 22
Normal play 7
One touch play 8, 11, 12
Optional equipment 20
Parts identification 23
Playing
a CD (normal play) 7
a tape 12
preset radio stations 11
tracks in random order (shuffle play) 8
tracks in the desired order
(programme play) 8
tracks repeatedly (repeat play) 9
Precautions 21
Programme play 8
Radio stations
presetting 11
tuning in 10
Recording
a CD 13
a radio programme 15
another tape (dubbing) 15
timer recording 19
Recording CDs
specifying tape length (time edit) 13
specifying track order (programme
edit) 14
Relay play 12
Repeat play 9
Selecting the audio emphasis 17
Shuffle play 8
Sound adjusting 17
Speakers 4
Tape player 12
Timeedit13
Timer
falling asleep to music 18
timer recording 19
waking up to music 18
Troubleshooting guide 21
Tuner 10
Voltage selector 5
Woofer level 17
AVERTISSEMENT
- DBFB = Dynamic Bass Feedback
La cinta no se borra Completely.
| TUNING MODE TUNESTHERMOWING | ||
| REC |
Decks de cassettes
E-SSTM p/EGs-UoOwLg@'TM/EguC
CLASS 1 LASER PRODUCT
LUOKAN 1 LASERLAITE
CLASS 1 LASERAPPARAT
AAm-kf@UG@pVgE
°CLASS1LASER°E\~°CbA
mTM-1s@Op/EgC~TME-O
CLASS1 LASER PRODUCT ^A
CAUTION : INVISIBLE LASER RADIATION WHEN OPEN.
ADVARSEL : USYNLD LASERSTRALING VED ABNING NAR DESIGNATION OF EUR USD AT FUNCTION. UMDGA UDS AETTELE FOR STRALING
VARO! AVATTAESSA JA SUOJALUKITUS OHITETTAESSA DLET ALTININA LERSATELEYLLE.
WARNING : LASERSTRALING NAR DENNA DEL AR OPPNAD OCH SPARREN AR URXOPPLAD.
ADVARSEL USYNLIG LASERSTRALING NAR DEKSEL APNES UNNGA EKSPONERING FOR STRALEN.
atM N-±
OKfbaae
C
WTMOfU
P1-20O1SONYg3AHi-FiXμT8tCE@ce-CE°C-aflEin@tCE-1 1nTTM·oT°C2f@%SSSLμCz@USUG
DBFB] ABCμSoeiX°@tCEAipW±jBCμWSUTm inwOaL2UBCμSoEgYmaeY@-HJTM SOTM BCμC
w°A+i±z||SJSJB@40"@SB"wSCEDw30 qxowTMqx°C
w130°ae·CE@'ae,μE-HaeA|X5y,TM μ°-°C
@wE..ae“±z]wpEgpeAocetaaeeCEff'peaepz3±ETM/AE..@E¥) @C^±q°C
-°dAeO'Atz+qTμa°BpAgaeCE±q8%Loε±ao"μ°A¶i¶E@, dAeyTM±sO@oC
a+±ae°zS£·-」AeY11K·a3±aefiB@ae@oOμ°/°C
• CHC-P33D·βtSUFIC°S²G
一 DaeGHCD-H33D
°-yine@CTCEGSS-S33D
-BCμ¥inae°GSS-W33D
·y0
f1°G@w
sμ·fEinμT4
JWAAJnae5
Aq91:6
WwA...f6
f2°GCD aa
@OpEg-°]·±@Oμ°7
UBB@O°=±]·UNB@Oμ°A8
B±E TMβ<@O°÷¶±βμ{β<@Oμ°A8
Soe¥O°:91±°]Soe¥Oμ° 9
f3°G¶μae
^ 10
w*q-x11
^ · x11
f4°Goεaαe
Ooe±a 12
± q p / E g - ^ 13
± q p / E g - ^ ^0 G ^ @ w o e ± a ^T M ^ ] / E ^ s 0 E ^ A 13
±qpAg-0'μG',@w²||β<°]μ{B<SOeO°A 14
aqTmuae0μ15
± q8% .Loe ± a0^ ^o] 15
f5°Ginμ'ae,
ae,in μ 17
OAc·μC W·[±] 17
f6°GTM.
μ°μ°÷SJC 18
· SF^ = 0U8^ 18
wAe...ae0"qXoS"dd 19
s±μOi·U] 20
TM. [IAE
Bce-CE'eTM N21
G²Y±¥M, n 21
22
WAB
OGMM+OoeTM-B2B
0jSfi 24
f1 °G

s±pfl Ein μT
WAWY
A
JOWAE.f1
s±μ·f1 Ein μT
"SUos±μzTM·fEinμT°C
TgN+UuOoOi UxTus 8fEin μ TaA-i f6 TM oB sμoO i C
@BJ1
s±μ¥jnae
¥JrreeTMWAA"--"BwA
¥inae ^ 巴 ^ 心
•TMO[CL@M·kRABBUina
±N·k¥ jnss ±μR ±μY°A™jnaes
±uBIL ±y°A@o±a°-0aTm qae...u
A0-1.aa...u±8°C
WBCu¥nae
±NWBCμYnae ±@WOOFERμZ
a+0a+u+0A- u+0C
@B.J2
s+8-u
FM Sfi uS-uTTM,±a°
AMUBCES-uTm±a
G ·± i
AMUBCES-uTMs
±NTM. ±aTM;UBCES—us±JAMM
B0μFM
s±μS@"FMS—u8FM75
Ω
SAsuueu-CE75 PbqPC
n@u
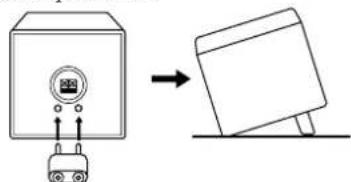
±qh,§1B,~°S—u±μnla u·H@ep
qC"Beez"uA-SnNua+αE-AfSiWc
B0μAM
±uINAMS-uSB°A-A±uS@±6@15
AaTM-TM μT ur@AM >S°C±N m >S±μa°C
n@μ
±q,>SIB.~°S—u±μnna u·H@ep
cC@e-AEzJrA-S3jauu#-Aefi
SWC
[ua]uTMs+a
BBJ3
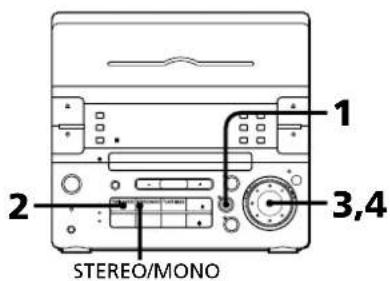
ae,afifiB@qj£] oD'w
A
bs±μq·H'eA ±NVOLTAGE
SELECTORqg2foAoea@TM @wU1nag
£TM mC
VOLTAGE SELECTOR
220V 110V


BJ4
s±μq
B@INSW±s±SB'ABY±NACq¥/ABy±,SWq'AYswC
y^2 = y + 4
TMY2YTMGSEAAxSWSyAeyA BY-8SU AIPYQYSWTM Y+muee9sB, WEAeMoDWzOoC
WAAYJnae
SFIRSEVEFTMGcMinXYETMgAeeAI TMyinaetmO'nTMoC
mWYJAAE.A—FISUC@C
H@M@wSftm?ABY±N#eeCTGW
@U¥jnae·xT$W°C
^*
BCμ¶nneBCEEaTMCEEae¶WAAASSEbB3Cμ
¥1nae©Cofbaee eTM SWSCESU±CBh+NH20
BCμyineTMAEyBee±Oeepn@CE
B1μ°C
ByreeAAbbDceeUus@%AE.
+NWBCμ¥jneat m@BUPjnea SS

NPBUynee~)WBCμynaeWAAE.
1 ±NTaTM[SY@]WBCμjneI±C
WBC V / mm
2 +NWBCμ¥naeAWAb@BUB¥nae SS°A@BceBCμ¥nae e ±-SWC
B. BUYJnae @
-8a3BUNae£±Vμ±z·TMmC


CTOW¥nae·x
1-CTM±aTM S@SBS,SSWU4OTWJμ v-HGTOWjnae-X°C
2 +-4yine@UfWTM mC SonyeAEESA[rs]±-+
3B·SWUμV°C
μ >TiyUiμ+H@ee±O@einC
ntNae..uB@AIPyme..xTAE...
Eha..uB@SWAO.AatNae..uB@TM.ApYme
xTISW°C
NnreeAeSNAE...
1@SUjinesxTWSMnOMoC
2·CE4S%o[μV°]μLTM±aN·NxT-@T@W]b

SWC
3 ±N°SU™,nM,TMO AInae·x] SWC
A'Inae eAs@Cw-A'ds@SUaeTM+GMTOWX[TM iVTMOTB A-HeeY inae ± SUOTMIM
Aqil
TbTM.aTaBaaeSWASJ,“R6"3 0a qC
- ¥] q96e“a8°oC

2 A\$J R"R6"3 a qC C@e°oBt·O 9qE<°S ce-TM oBc-B°,°C
3 SW qic
qR
B. 0^0^ H'e'ABA8ceCEaa+ae S6
SBS[OoCESONYSUM-3NSa q
ClqscotfB@aaaE..ABY-Buy
sC
iBkqjG iBkqjG 1
TMY800eCE+aaE...A@SsuQJ2OfS
HKBqjG|GgKaiaae-aeC
OWE..fi
8yoeYo 0oC@yO
soy.1bO uSSTM.±A-tS@yO
uoey S@ sIc
aef3-CEDeeSWTMs%+80C

CE¥.°1±S1°.U1U0°U1°0A 1°S@REPEAT%°A@eX{°BREPEAT® °]SCE¥°,°C

2°SUG1%oC
$0e¥_E||S|°]U°±°Oμ°°A @Qu'fIwTMΦSVE...ASoe ¥SU REPEAT%°°BREPEAT1°X{,°C
n-SSOY@QPE... $oe¥~SUREPEAT%#.BREPEAT®CCBREPEAT1°TM,·AE·°C@U,·ae°C
TM 1bUNBcTtMubCtTOUSSAeeNSEuSOyCOS@

· ^ 1ae
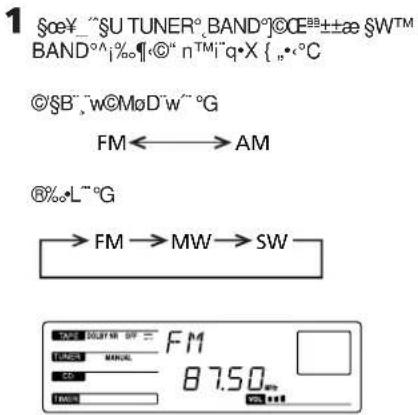
nO'pae/AE...°A'0a"±¥qx LWvHJSHMTMq×°C²-0±¥2±z YAM3%oqxTM/EA...°C T°O'Aq×s°HJipTMGS'/EzA10' 0"±N V"q×oCyn'SJ"q×oA-CES, '0°C

1 0e¥“U TUNER° BAND°@CEa+±ae $WTM BAND°1‰¶©"nTMq×{,°C “$U TUNER° BAND i%AE...°ATM"q±NB@ ¶p $U °S°G

2 SooY"SUTUNING MODE°]°0001%。 8 AUTO°X{°C
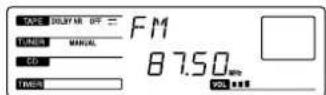
3 AE...wEIV+L'L'HTWv TM qxCn 'JBCWqxA..A-Hf AE...wEIV+L'L'C 0ae+Nqqa@SyqxwVAn 1bHMqxC IPAE....X{BTUNED@Sw'0a..C IpTMG'STMMqxO-fI EinS°A-NIP AE....X{BSTEREO@F Eina..C
4 pTMGSEQ·SJTMQx°A·A±a+L LAA@±yOc
IS20+ SJCnqxAe... 1o"·O+VH'AzTM qx°Af A...A-CEs,oo'SETMK'SJC
1 ce¥ ~SUTUNINGMODEi%%X{°BMANUAL°,°C
2 S-±L L' SJ" nTq x°C
BMOwSW]AMoAsTMP s'ae,MWw]AMaCtM TM aTM AMUBCES-UC
nBOMWoJAMoA'0"°jE...°SSTMF°£
MW°]AM°TM Su²t w™ '0"° J'O 9kHz°C ¶p BO '0"° J'10kHz°A -μ¶p SuaB@G
- ¥]q°C
2BOTMIqMWoJAMoAOC
3 ±^^
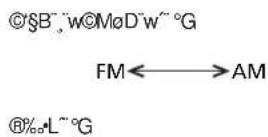
4 "FUNCTION%°AIPAE....$U TUNER°,BAND°C B°,MW°]AM°'°iSβ°'A 's w'MW°]AM°q-x°C n'¥_iSu't]@wTM '°'E...°A-CETPm#afB@C
IFM ^TM M E
i°SUSTEREO°MONO°ABoeBMONO°
X{°CFA...A~μEinEfTMG°AITBO
μTMTMPC
JA°SUSTEREO/MONOHHYFInEfTMG°
E@OμΦ
qμA...°A°SUTUNER°BAND%°C ±z'K·iS2·A"·U'U1%."·SWA·A·T·TM q×°C
in oOee
iμ@%·Lin TUTUNER°BAND
%E...A'ooByoOSW↑A'TM qpxTq
q@OuC
W"qX
B, qxWvllssJ'0"aeTM sxcxae-HK t'SJflwTMqx°C Aahjw~20"FM qxA10MWqxOM 10 SW qxA-i CEUNB【ssSJC°SB",wMDoDw"20" FM@M10"AM qxC°A CEDeaW%B@fB@C

2 SOTUNINGMODE%BAUTO*X
3 +0-+L" L-H'SJ@n#SSJTM q*OC
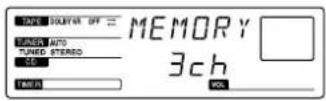
4 ~SUTUNERMEMORY%°C
%MEMORY@GmW~CDWD±N×f
°C
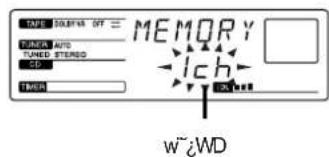
5BMEMORYGueA..A+--L"L·H*@MwTMWCD
6 ~SUENTERoNEXTi%oC qxBYjssu@MwWwWDOC
7 sceY_BJ36-HsSJU@nTMq-x°C n@y+h@ssTmqxE... YbswssuqxtMwZWDswsJqxA..A-TMhsqx+NQ@y-hnNSB-Hs ssJq-x°C
JQX.E...TGuoD TTMEMORYOB-X@ueC IPTMG@ABY-JA@TUNER MEMORY 1%oCEBMEMORYx{..°]S8"O A μM:JEBJ50M6C
Bosμ(BaE...°A±zaiaei0"μE...°H XoεaTM°C
1 UCDj%%C
2 ^ OPEN°,CLOSECD1%°A A@OS@+ CD°CμM'.¶A' S@ ¶△OPEN°,CLOSECD H¶'pEg-¶L'C
3 SoeY"SUPLAYMODE°@Oμ°00A%oX{βPROGRAM°@]μ{Bαa,°C
4 +0-+L" L-HoOoo-S@ J\$SPC
5 UENTER°,NEXT°,0E\$J°,8%°,1%°,oC
6 Soe¥BJ4@M5μ n°°B ±ETM β°°f b A±SWTM-BE±±sFβ℃
7ISFA ±TM 'ABY'SU II%·H',±μ°C;Oμ/E...°30.00°8Y·X{,°C
8 SooB.4@M5μn~°B±ETMB ±SWTM—BE:1sulB°C
9 ~S U ≡EJECT DECKB1% ¶b·dEy B$§ A
$@TMσ±a°A'no'μ±¥~°C
£'D±z'ba'μ'εSSBÖ:SF©OμSEIV°AB_
'h°A°μ£±N±qσe±aTM°±]°C
Tₐ°c±daSWTM w°Sp₁'O'B_0'~3ae.°²
QBECC
10ooee-+oCEe+LFC
| no~ | ^SU DIRECTION MODE%*H0Oee |
| ˆ± | ← |
| ~±* | (→)@CERELAY |
*0'uF±SOfOa-±TM,°C"GS@@wn±q 0±0" °C
11\~SUCDSYNCHRO]pAeg-IP BB\%oC d/EyBByBeoo"OCTAOC
12 "SUII%·Hfj@Ooo" ^ ± C 10°A pEg -°]CDoK}O O
n±S0UVE.. ~\$U ■1%°C
n-μβεEAE.. SUPLAYMODEj%oC
naE'380CoeBCE/E.. nOspBCqTM;W/HSSTMReRaein A...A@bBJ10S3'-SUDOLBYNR%°A@ce X°DOLBY NR B°,°C
±q"μae0"μ
iNqx0"μo°Bieae±a°C0±@ce°CTYPEI 1°-,±a°CETYPEII]CrO2±a°ce±a°C
1SU≌EJECTDECKB|‰]b·dEyBSSAS@TMo±a°A'no'μ±Y~°C£D±zbo'peSSBO-SF@OμSSEV°AB_h0'μ±Nqos±aTM°±@PCTa:dasWTM Jw. SpI OB_°B 8ae.°QBECC
2 SUTUNER°BAND°]°aa°TMiqOaI%o 9nT mueaTM TM qX{,°C
3 ^ ^T Mq· x^^]^ - - 18
4 0Oe-±@CEE ±o°C
no" ^SU DIRECTION MODE%HooE
E±
\~ ±^* CERELAY
* 2±SOA-±TM°C@@wn±q ^ 一 ±0 C
5 "SU●REC"o" ^ai%c^o C dEyBByBeeo"CETM A℃
6 ^· ⑧ ^ ^ ± ^ }@|o"μ°C
nS0UVE... -\~S U ■ % °C
bMWwSWaAMo"uSSnYOSpeinAe... 0"uSSpTMGuoO'SinSz-Z'A'aa,S@SU AMUBCES-uTMSEIM3%ABCEIHTMtpm mC
noE'8sOCAeCEAE.. nOSpBCqTM;WVHSSTM*RnAsn AE...A#bBBJ4S3°SUDOLBYNR%°A@oeX {BDOLBY NR B*°
±q8%。L ce±a0" μ°],@0" μ°
90° 80^ 30^ · Oe ± a
iBQCETMt,@o"muOtaNae," 0"muao@oaeaSWOCoeCEDeaWsi%eefi B@C .CEoaea-iCETYPE]°-,±a°CE TYPEII]CrO2±a°ce±a°C
1SU≌EJECTDECKA%°CEDECKB°C
dEyAsASJswoTMo"μa"A"nOμ
±¥~°C
b-dEyBSSASJSG@TM oεa"A"no"μ
¥~°C
£D'pbo"μ'eABO$F@OμSEV'AB_h'A
0μ@M@Oμ±N+qoeaTMo±)PC
Ta{dEyBSSd±aSWTMw*Spj'O3_O
~Be,°QBE2℃
2 Oeae aea 15E
| ,·<∅ | a@ |
| ← | '@@' μ±SO|bs@ ±TM,°C |
| (>) | |S@"d/EyTM ce±a-@|@±TM ,AE...°AμL -°S@"d/EySW TM ce±a-@|S|mm°A'eTM:A+N BY |CI A-°C |
| RELAY | |S@"d/EyTM ce±a-@|@±TM ,AE...°A·|K ±SU@'μ@tS@ "d/EyTM ce±aS] -@ |,AE...°A μM'@,ce±aS~S@ _|CI A-°C |
3“SUHIGHSPEEDDUBBING]TMt"®@ 0"uA1%o°C dEyBβYβec"μCTM"A°C
4 % C ce±aBY@TM+la.8@o"μClo±a-CE RELAY@μSO^M()°q"O±qA-±} @R@o"μE...°A@o"μB±N±bA-± TM,°C
ntS0'@o'μE.. -‘SU ■%°C
TM,®©"μSS£~"SUDOLBYNRI%·d/EyBTMøa±N@ao"®@U-d/EyASSøaP@A-UTMSEe°C
±μSU →
S,Ⅱa,®⑩‰μ8‰.Loe±a
Hzun'@oessaSSTMs@°S/EsEeA...A CES.80"μSETMkCE+tiE.EBCOae ± a·iCTYPEI]°-,a0°CETYPEII]CrO2 ± a0°C
1°SU≌EJECTDECKAJ%@MDECKBj%°C
b·d/EyASSASJswo"μ±aA"nOμ
±¥~°C
b·d/EyBSSASJ@TMoe±aA"no"μ
¥~°C
£Dfoe"μeAO SFC@OμSEV'AB_ho"
μ@M@Oμ±N±qσaTMA±j@PC
Tf·d/EyBSS·d±aSWTMw·Spi'OB_
'O'Ba,°QBE£°C
2 oo¥ ~U FUNCTION i‰!°BTAPE®X{
3 0e-±@CE E ±μC
| no" | ^SU DIRECTION MODE |%%=H0Oae: |
| ˆ± | ← |
| ~ˆ±* | CROERLAY |
*0'μΩ±SOFbA-±TM°C'GS@@wn±q 0 ±" °C
4°SU●REC°o"μ°A1%°C dEyBβYβe0"μ·CTM" A°C
5SU11%·Hf@Oo"μ°±°C 1@1o"μ°C
6 "SU DECK SELECT°]dAeyOae.0%oA@ce -I'G°BA°@C
7SU1%oC dEyATM0"μaβY)@OμoC
ntScoUe... -SU %oC n +tS@dEyEa...A- "SUDECK SELECT i%oAm' -SU i%oC
T
•∅''μSSSS•ISY''®‰•L•∅°AB'_ha'' μ±N|±SOSU®°C
•°CE DOLBY NR B /E fTM GoTM 0' μa°OS£O± †®°R@±aDOLBY NR B /E fTM TM ¥_BOce ±aTM°C
¶tpTMG n±q°CE DOLBY NR B AEfTMGoæaA…°A-¶bBJB3§β’°SUDOLBYNRI%°A@oX {°BDOLBYNR B®’°C
f5°G
in ^_· ,·
'ae,in μ
TgntBctzTMIeinmuTCEpuOAB TmTgAIB@fipsuTaeoC TmT in aae-A -SU+TM@oC
ae,in μ
Ooae:μW[]
'ae,μq ^ SU - Dae^ OE^aa + ± ae SWTM VOLUME°ce°- %oC
· [± j3C^ SUDBFB*%°A@ce°DBFB*X{,°On—DBFB40E...°A-JA*S@JDBFB 9%oC
*DBFB®A3Cμ$0eIX
nae,βQyineqA.. 一 ^ ± z flw'SUWOOFERLEVEL·H1 G'BHIGH®°A'BMID®°A@CE'BLOW®',· oOC
mCEJae·AE... ±NJae±μ¥@IPHONES¥°C¥inaeβY #£μoinμ°C
Ooae<μW·[±j
±zTM·fEjnμT@CESwBsuT@W5
yOS/AjinW+EfTMG°C-H/Eae+ZnTMμ 12 5
A±q5yjinW+EfTMGSSoOce@OECE°C

SU±ae SWTM SELECT 1-5°CSuT] @WBYX{,°C+zeOee±aU-jn/EfTMGTin W[±j4°/A...A±N×{βSUR|I|I|I|I|I|I|I|I|I|I|I|I|I|I|I|I|I|I|I|I|I|I|I|I|I|I|I|I|I|I|I|I|I|I|I|I|I|I|I|I|I|I|I|I|I|I|I|I|I|I|
| oOe | HjUto |
| ROCK | ±βT SOTM° AM ¥ in°A* [±βTC μ°CM TM WVC |
| POPS | ®TMQ°A®β÷in°A*[±]TM°BSS₂WvSUInzWC |
| JAZZ | ® ∏in°A*[±βTC μ°W°C |
| CLASSIC | ®eβ°A]©TOM in μ°A¶]±a¶ §·¥1TM •E V¶Tin°C |
| DANCE(SALSA)* | ±a*[±βSFFSS°ABC μcWTM ±jC'μTM °°OPTM qin |
| DANCE** | ®W±βSFBC μTM®R U μTAEfTMCC |
- @$B" "w" **@%oL"
n--LWt@E.. S0eY^SUSELECT1°-5%uT]wAE C
TM 10pSUIMTME..AS@Gwn-μW
Iaqp/Eg 一 ^ 一 JCD°0°@e±A/E...CETM"μ QsTMPAtmGQOcataE...A@ceCEmuWj AEfTMGAnμN-oΦoU°C
TMGHμWt@OS@CEμWt@Ef TMGo'μTM oeaA..°AIT μWt@EfTMG. 8,0°AGOoJiOt·cU°C
-μ²SJC E
一 S F ^ 2 ÷ 0 U 圆
@wAE...ae0"qx'so"
s±μoO·U]
μα μ°÷SJC E
jGwflEinmuT@CEq ±^ A H'KOSf1aμuμ°SJC0C GNCBvWAE..aHeAQAE..fTMVE... REOSHHIPAE.BQCECEWwAE..aGmF=OU @TMwAE.28C
1COWTm]oe+AμeCE CD
2OμSSSUSLEEP]CEVAA%+HoOeeOμ TM/EA...OTM°C 0BSLEEP@MSf1·BYX{.2A3fiC@SSUSLEEP%ASf1.±N90H10Sf1-EqYQy10°C “+z0oWTM A90@10TMAE...OTM'g L°AqβY#±°C
n £CEOv@wA...aeA... $oe¥ "SUSLEEP1% ¶°BSLEEP OFF® °] CE0V ^ q^*X {...°C
pCEOWWE.e^BtCEqHeQdTMae-BE AE. . -S@SLEEP%oC -BE.E... 3y+Hsif,°-f1oC
ICEO@WE. aetquVE...pTmGnBOW.E. 8Sleep1%X @" nTMTM A.... C
TM CEBVWAE.aaQe%AE..AdUBGwE.aeGMO μwAE.aaO4TOSC_B@CETMoC
SF ^0÷
'lowwE..@ECOuA..ASFp+0U @Czun@WS@W.E.aaKIECOWWE aesB@AS@w-TVE..fIOBOSFE. @EC WwE.aqIbOS-PEE. @EeOcPtpMGOCE Tpua-suZoAh w'SJnTM qx°C 1-Bw-qx@o
1@MgMn℃
Tμa°μOu° SJnTMW°qxC
CD@oU8
AGOS@±CDOPtMgQ·Y'Gw=1E...A h W°B@nnsuβcTMDC@Oμ°β°β
·0e±aOμoU@' ASJoεaA"nOμ±Y-°C||pTMG||b@-d /EySS £ASFoeaABY±N®dEAATM©O μ°C
2 UVOLUME 一 一 _ c ^ - 一 _ c ^ - 一 _ 0 ^ - 一 _ 0 ^ - 一 _ 0 ^ - 一 _ 0 ^ - 一 _ 0 ^ -
3 "SUTIMERSET@WAE...ae]w%^%°C°BDAILY1@BY]O{°C
4 +L LHOOe·BDAILY@CE 3DALLY2@C±-L'LAE...°A,±N B@fpsUBoG
WwE.aa0"uuE..Aoo BREC@C]-"BwE...eoo"qx's 8o
5°SU ENTER°NEXT°E£S°@‰°°C -|f||°] ∩ {},{},°°BON°°C

6 +H L·L·H Wn·Y} μ°TM-If1A…
E'AmM·SUENTERNXTI%°C-If1@M
@WSF'AFSf[9]@{°C
PTM@wSf°C
°BOFF°X{,·ff"-lfA}©{
°C
7 ++L L·H@wn^gμ°TM-Ifj/EA... @E°AuM~~SUENTER°NEXT1‰°C #PTM@WSfA.E..@EC jn±N)@{°C

8 +a-+L'L-HoOeaein°C ±N3@1p5u-SG
9°SU ENTER°NEXT°J@E$J°,8%°,°1%°C w'μ·y±N vS@X{,°C
10 ~SUSYSTEM POWER@tCEq%H°±@tCEq°C Fw/AE...AaM@¥qOμ°CObFw'qE...Aq±NJa A°C
n-£@wA...aeAE... $oe¥~SUTIMERSELECT®@wA...ae0° ae°%°°BTIMER OFF°*X{°°C
vAdwE..gWE.. SUTIMERSELECT1%·HoOae°BDAILY 1@CCE°BDAILY2°C
mRO@WE.ajwE.. SceY@BU1@9C
TmGn@%LCD@CE1oU@E… -BO°@%LCD@CES@%L+μB@A #±@CtCE° C 一"B"3 ±ETM Bx@O²+
@wA.E...aeooqoxo'so'y
WwE...ae-hoqxgocwE...ee
C@f@wB@CES@PwW"inq ×^^]^- w^ ^*O^ SHTAE..fTOBOTAE.C
1 SooY ^SUTUNER°,BAND°'°ae °TMi "q"%%,°"nTM TM"qX{,°C
2 $ee¥“SU TUNER MODE°]°°°°°‰
°C°BPRESET°®X{,°°C
3 +a-+L'L'H'SJS@"w-wqxC
4 "SUTIMER SET % w / E aa w ^ 一 % 。 ^ 一 C
5 +L" L-HoOaeoBREC@]o"u
6 UENTER°NEXT] 00^ 1f|10]O|I{°C
7 ++L" L+H]w n)@o" μTM-|f i/E... @E°AμM.°SUENTERO, NEXTi‰°C §£f i

PTMMSfA.EBC ^ F F^ ± N· X^*A|^-1f_i|^2f_iA {C

8 ±-L'L+H@wn±Soo"μTM-IffAe... @E"AUM."SUENTER°NEXT1%°C PTM-HwSfE..@EC w'μy±NvS@*X,°C
9SU△EJECTDECKB°dEyB±a°1%o
TbDyBSSASJSG@"oeaA"no"μ
±y-0]0±OAc
0"μf+q0±jO℃nA..S]ioOeeSETV
OTMOC
CTAPEI]−,a°CETYPEII]CrO2
aOaTeaC
10 ~SUSYSTEMPOWER1%·H±@CE q°C @IFwA.E...@EAE...°AgNTn-¥°A@) -B@wUAspTMμqSU-℃
n--£wAe...aeAe... oe¥“UTIMERSELECT%!”°BTIMER OFF°®X{,°℃
nAIDOWE.eqWWE..
SooY" SUTIMERSELECTI%BREC 0 ^ ^ × ^* C
mOwE..agWE.. -ScyBBJ189C
W/E. @EoMg #q
in±N@jAsi¥'0"°A¶¶$£} @ iE¶'0"°e 0" μ°C
s±μ0Oi·U]
±z·H±N8%L[XYμT]s±μ@a·fl EinμT@CE+HK-XS@...@BC@μT@ CE@±@oceG
·MD]g3A pEg-Ey
- DAT /Ey
·
·0dinae
s±μS@·x MD /Ey©CE DAT /Ey i¶E " i 0" μ
iNfEin μT@tCESSTM in A·H"ii
jno®iMDEy©CEDAT/Ey°C
¶pTMGSeey_“SUFUNCTION%°Aooe- MD
¶°A...$]¶-MDEy©CEDAT/EyTM©Oμ°C
s+μ
①
MD AeyCE DAT AeyTM LINEMD OUToJ0E·X°ANo]UOESJAOY°S'
MD AeyCE DAT AeyTM LINEMD INoJ0EJSJOAOTo]UOe-XoAoyS'
@oeCInWae..uT¥Y±p@PPTMycEy°Cmu‘SUFUNCTION1%·HoOoein
s±μTae
±N'ae°·fEin'ae-¥/Ey°s±μ@i PHONES¥8°C
sμdinae
-±N Ls±μ@IMD IN ¥°A s±μ' e°A -iA'dS@SU±zTM LTM °P°C
L'OB⊥a10dineeB° 0aeH
s4@
MD IN ¥°S'
•CE MM SfVEvβ°o ae
A+NTOCTOBHTBNBTM2=2x B'ACOIOE.E. "S"Ahttp/Egooaae S"TM 2E0BNEASUSsTSD0zadp@oeCEOTVE...A 2-8'SUooaae SJTMCDAOJQo...9OO TmsS@SpA...1SSUsj-0osZSFs-BooCEC
O:@joea
80000000000000000000000000000000000000000000000000000000000000000000000000000000000000000

B±TM A ±TMJw·$piI jw·$piI
@oe-CEYFIEC02foea/EA..A0-TM\SNBO 1SFOeaa"cA¥S'H'K"ae aen0f00cA¥ XfoaTM"°oC
A¥
"GaY±¥M'n
CEHEnTaeA..AtztpTMGooUuVUoVDAQ-;A'dSUO8-HM·CESUTm2vS@A d°G
-PCO2CuO3-B+3POPC
-inaertOB-s+oQTTmV@T°C 2s@A'dLSSUHJUxAPtTMG8S2011 -MxvDAE...ABY2--OxxTTMTGonPox@LC
O"aeπ
=·e9SSOC√focBSTEREO@C
→QaeS—QuC
fYTMgEYU@CeeAenC
QaeS-QuC
HπS/AeC·s-≥0u℃
→s#qC
H=Et FMTT·y£20+①f-∈t≠T°C
→°SUSTEREO,MONO,%%@o8x<°BSTEREO@,℃
foe
JooaS£o"°C
→joea<@OSnApetaC
→dAaSWTMJWwSpjQOBE∞£SFC
→coe±aSw-@ISF...℃
10a+82e0--S1SEC@O-CEFOBCn--SU-AC
→coeYS"↑F°CΩ-·H≤M±O²C
→0°.C@joe.YSWpanjoeC
TmL'OMjWwwnooA@CEI#oC
→DxΩO@CEU±aΩ≈fS*°C
focase00T@YoBn.℃
→σ°©O≠joejYSWwnjoeC
WSeHn@CExTM, WZBnQyHPC
→0°,@C>coe,YSW|zonfoc°C
*00-∑β≠0°8C
πp4Egoae
CDJQLVSSW
→CD8S1F1A@OBxPC
CDSE20@C>℃
→ npEgcof-CD°SFC
→CDTASoeSFC°PK-±±Y-SU°C
00aaBBe>>oo±100C
→SbOOSUSBNEAeE°C
Yβ)T@TEQnQ°Aa°¶[OMs]
1SpE...BNNaeESUSg-0s2SF
±∞SU≠0
TM.1VAE
→SW≠0
$E0+q=fS@*[↑|S|c]@C≠°C
SUVOLUME 品 %C
aaan2s+cdTaa-CB,8SUC
in@u@S@?WIDCE+TMKooQSEo0C
→Aa-d-LincWhDS@%TMJ¥/maenTMJs+X TMJA°C
•TMOB
→AaTmM-OMOTIMC
SIOBC=CCgI aemnSEIeMSE=QTcO
→A"da=inaTmJsS+O"OBaaPC
fYZTMgEyU@CeeTINC
→πeae@CEo"vaa"aaaTM0fEiinT @c@OImA2B T@CEaee
aemSSSOCV(0BAM12°G00°@C
→∞OrLn+qFc≠∑s≥@WlnVE...f@MOW AE..aefC
1+2+3+4+5+6+7+8+9+10+11+12+13+14+15+16+17+18+19+20+21+22+23+24+25+26+27+28+29+30+31+32+33+34+35+36+37+38+39+40+41+42+43+44+45+46+47+48+49+50+51+52+53+54+55+56+57+58+59+60+61+62+63+64+65+66+67+68+69+70+71+72+73+74+75+76+77+78+79+80+81+82+83+84+85+86+87+88+89+90
→πqf2°BnSFq°CBU¥πqf2°C
BaaenOMTBCESBOYVTMTM°C 280VVTMTM°C
「¥_Sut≥]@w
SWoOyEy@gueaeTmGooAFAA ±%SWC "DISPLAYOMFUNCTION"SU TAPE%°C
0
SNP%o, YoMioaQoD
ceYfSFA-0000ECEOoo
CzAinBOceCEpE...K2-5M%8@TTPC
¥0pea'°A•CE≤M%CE¥CEY,≤MP%≤G
CCexj0JooYBUBaO.SCEoO.CnC Tm2°SCPnoo
dEyA
≤MP%CE¥YCE
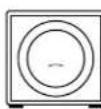
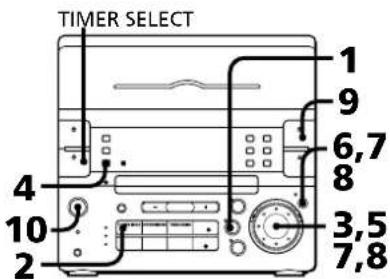
![SONY CHCP33D - 「¥_Sut≥]@w - 1](/content/2026/03/510407/images/0b4fd91913c1feccbaf8d03065df154443bf308ba2757909325c19c0d0c8abba.jpg)
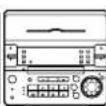
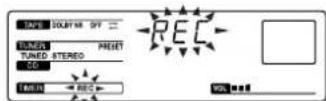
dEy B
![SONY CHCP33D - 「¥_Sut≥]@w - 2](/content/2026/03/510407/images/fc48cdd98aa3573881507794c3da1d754e8b0f41139e43a9f29428428e6b5c81.jpg)
≤MP%oanLTM≥°S∠∑∞·Bπ.SzJSFS~TASJoe ±a°C
JoeYjoe
aeaeB0eCERL20BBOSpAe...°AfoeY
SWK+NoOfs≥focfoce+ccTm;WoofooOR
"ReetinC0rAE..A0+CE+tofocyHfoeeer@
foeaqDSWTMtf2S@MjoeYonEhyocC
O--hooeeTMfoeCE@/E-C
n≤M%ae¥VE.
CEn·S"Yi∑@MTf-fae0≤G
MNP%pEg0gF/E..
πp/Agcoa-°]CD°A#FFoA+OCE≤M0%oCE°
\~SB°CΩ-CDTMJSSsifV~0°℃
-SEBCEO-PBCKBeeA0VMA<mae 08SCEM%aa0C9EbeeReP0EgeoTneM %allp/Egoj-CDN
CWBWipTGMgTgEeTMOAALMSF@CEQd12,ILoAIK 02y181U-0aOC
≥ W / E
1pEgceae≥S
@CE Sp"ooj-△frinzW8t<CE
ipEgee tae..EepEgee
780nm
aEGfUAE.0G2sfu
EgE-X 2A\$j44.6W
*aE-X"Olbz- ± a 7mmS'AE|ae-B≥ESITM TM,VETM+200mm>BY+o
TMPO
TMFT 780-790 nm
2Hz - 20kHz
HepTG 65dB-HSW
97CB+HSW
Ω'0"aeC°S
FMfEIn*AFM*AMW*AEtOa
FMΩ'0"ae≥S
Ω"87.5-108.0MHz]50kHzΩ
0"0°π]°
S-2u FMfrcuS-2u
SΩu7S 75ΩSE-0
SSW 10.7MHz
AMΩ"ae=
Ω"°S≥U @SB",w""π°C
AM°G531-1,710 kHz°]Ω'°"
0°nj≥J@w©U9kHz
530-1,710 kHz°] ^^ ^
≥JGwU10kH2°
DwTgG
AM°G531-1,602 kHz]Ω°
0°nj≥]@w@U9kHz
530-1,710kHz]Ω"°πj
≥J@W@U10kHz
8%LTTG
MW°G531-1,602 kHz]Ω'
0πj≥]wU9kHz
530-1,710kHz]Ω°°
≥G@w@U10kHz°
SWG5.95-17.90MHz
S-ΩU AMUBCES—Ωu°A~≥°S-ΩuJ. 51
SSW 450kHz
= = 35
0708tCE 4/E11O2;WnD·f-En
DWVTO DOLBY NR OFF
40-13,000Hz(±3dB)
@ce·CESONYTYPEI·d±a
40-14,000 Hz(±3dB)
@ceCESONTYTYPEII-d±a
0.1% WR [°±0.3%] DIN
O'Sjaer°S
AeP≠n≠∞|≤v0E·X
600W
≥sFURMS*≤vOEtX
≤BUNneerG 10W+10W]1kHzA...4°A
10cHj°TMj·ΦUa
WBCy[naaG35W]60Hz/E.6%A
10Chj·"TMj·ΦU°A
eEJf-SI
MDIN°G F^± 450mV^TM^ ,47k
0E·XJ S1
MDOUT°G F± 250mV°A1kΩ
PHONES]·Ein'ae°G
aaA·CEBcHsWTMfTaeoC
1mer ≥ 0.5t
≤BU¥nne nSS-S33D
¥jinaen@CE Wz
Y=naeEES] @mTMOA@A2@BCE'≥
CTM,±aTM¥jinae·xT
VBCWTM3 4Ω
WvT≥ 180Hz~20kHz
SyySo 110°-ooTM 185°-ja
100mm]βt·≠±AEE]°
120°—130mm]UEy
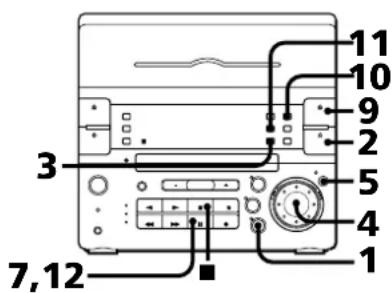
18 FUNCTION*]·0+%]13°
[9]CD"npAegoof-0aTQL7
20VOLUME°oae°-0]≠∞qW°¥0°1%。 17°
[21]TAPE°]oe±a%@MoO°]12°A
[22]∑LΩ²◇ΩL²]6°A7°A10°A14°A18°
23ENTER°NEXT°]0E\$J°.8%。11%%°]6A 8°A11°A14°A19°
[24PHONES]ae°¥°S°]·fl≈Ein'ae°¥° S°A01]17°A20°
20 WOOFERLEVEL°]BC≠∞≠naeπq≠σA1%°]17°
26 aefi3@%*7°A10°A12°A19°
[27 TUNER°,BAND]Ω'0"aen°,TM'q°A1%o@M0O°]10°
[28] CD%@MoO°]7°
*aefiB@j%
tp/EgpeA2o'aeA@CEpeaxpee"aefiB@
TMj%%NH'C
piPyEgoee
O"ae

foetaxqae
A@CEB
J0Oae·dAeYBAE...HIG
TM
1zaf3@pEgpee@CE02aevE..AAOBHH
G°C10°O·iH8∞-°C
±0SU≠0
→±SW≠0
≠±TMO
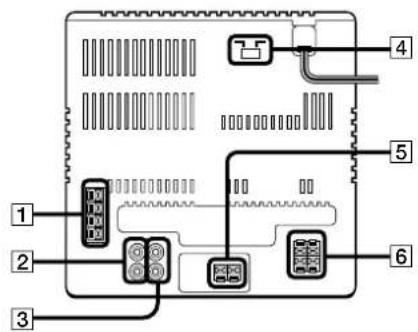
1S—ΩuJ·Slo4A
MDOUT]gB3Aπp/EG∞f-0E·X°Y°S° 120°
MD IN°MD0EJSJ¥°S°A°]20°
4nq20Oaeaeen°]40°]DwTn
5BCxYinaneTcY°4
6]yinanentocY]40
4 DdefB%
$$ \begin{array}{l} \geqslant 0 \text{⑥} \neq x \text{①} \text{A} _ {1} \ \left[ \begin{array}{l} \text {1 9 9 9} \end{array} \right] ^ {\circ} \geqslant \pm \stackrel {\circ} {\pm} \uparrow \% \ \text{口} \text{口} \pm \text{S} \text{O} ^ {\circ \text{A}} \% \ 144 / 1441\% ]7^{\circ}A14^{\circ}\Lambda \ E D I T ^ {\circ} ] \Omega s o E ^ {\circ} \Lambda_ {1} \ \end{array} $$
5 fce±aefB@%
$$ \begin{array}{l} \neq \dot{A} - \theta \neq \pm^{\circ}, \bullet \neq \pm^{\circ} (\odot) \neq \infty \% \ \text{日} \times \pm 80 \% \approx 1 \% \ \Delta \Delta \Delta \Delta \Delta \Delta \Delta \Delta \Delta \Delta \Delta \Delta \Delta \Delta \Delta \Delta \Delta \Delta \Delta \Delta \Delta \Delta \Delta \Delta \Delta \Delta \Delta \Delta \Delta \Delta \Delta \Delta \Delta \Delta \ \mathrm {DECKSELECT} ^ {\circ} ] \mathrm {d} / \mathrm {E y o} \mathrm {O a e} ^ {\circ \mathrm {n}} \% \ \end{array} $$
SYSTEMPOWER@t≤CEq∑Ω^0v
7 SELECT 1°-5%]17%
[8]VOLUME°ce°.°]x°qQW°Y0A1%。
$$ \approx_ {n} \cdot < o c ^ {\circ} $$
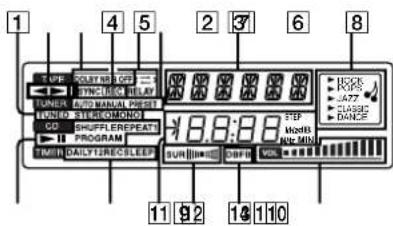
a+π
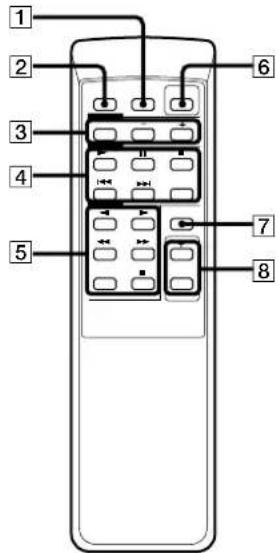
PRESET°00°,-]IW"\(...0%
0iSfi
AMS 7
JWTTAY¥1nean5
≥°Uv-BC23
8
qnpAEGoofo-0 13
$$ \cdot^ {\prime \prime} C W J O E \pm a ^ {T M ^ {\prime \prime}} \circ \circ / A E \dots \circ \circ \Omega s o \ddot {E} ^ {\circ} \wedge 1 3 $$
$$ \because \mathrm {C W} ^ {\circ} [ \beta \pm \partial \partial \beta \ll ] _ {\infty} (\beta \ll \Omega s 0 \bar {E} ^ {\circ} \wedge 1 4 $$
$$ \pm q \neq \infty \text {a} 0 ^ {\prime \prime} \neq \infty 1 5 $$
$$ \pm q 8 \% \circ \cdot L o a e \pm a ^ {\prime \prime} \neq \infty^ {\prime} , \text {⑥} \infty^ {\prime} \neq \infty^ {\prime \prime} \wedge 1 5 $$
$$ \text {C W F E} \dots \text {a n e} 7 ^ {\prime} = 1 9 $$
@Joe±a12
DBFB 17
DolbyNR°]3°S0YOoe[1A 12
Ef≤O07°A10°A12
BC≠x≠naermq≠17
mJcEoOae-ee
CwAE.aen
$$ \approx \infty \neq \infty^ {2} \left| S J J C E 1 8 \right. $$
$$ \left(\mathrm {W} / \mathrm {E} \dots \text {a e n o} ^ {\prime \prime} = 4 9 \right. $$
$$ \approx \cdot S F \neq \infty^ {2} | \dot {0} \dot {U} ^ {\prime \prime} 1 8 $$
17°A20
@
$$ \left. \odot O m p / E g o n \circ [ - ] C D ^ {p a \circ} ] \circ \pm \odot O \neq_ {\infty} \circ \right. ^ {7} $$
$$ \circ \mathbb {O} j o e \pm a 1 2 $$
$$ \pi w \sim \pi q \cdot x 1 1 $$
$$ \cdot \dot {U} \Sigma N \partial \partial B ^ {\prime \prime} \odot O ^ {\prime \prime} [ \text {且} ] ^ {\prime \prime} \cdot \dot {U} \Sigma N \odot O ^ {\prime \prime} \circ^ {\circ} A B $$
$$ \left. \odot W \odot \partial B \odot \odot O ^ {0} \right] [ \text {士} ] \propto \left[ \text {B} \odot \odot O \odot \circ \circ^ {\circ} A \right. $$
$$ S _ {0} e ^ {\prime} \text {C O} ^ {2} + 1 0 S e ^ {\prime} \text {C O} ^ {\prime} = 0. 9 g $$
$ce¥ C0∞ 9
GaY¥Mn21
±xSO@≠12
@C0" 15
≥S+0
$$ \left. \circ \hat {O} _ {1} \cdot \hat {U} _ {\geq 1} \right] \geq \Delta 2 0 $$
$$ \S - \Omega u 4 $$
$$ \pi q \sum \Omega 5 $$
$$ \yen 7 \text {i n a e n} 4 $$
$$ \cdot 1 \approx \dot {E} _ {1} n \approx \infty \cdot T \leq C E 4 $$
rp/Egxaee-7
$$ \cdot U S N G O \approx 8 $$
$$ A E \dots f _ {1} > 2 @ w 6 $$
$$ \left[ \circ \alpha e ^ {\prime} C E ^ {\prime} e ^ {\prime} \Sigma^ {T M} \Sigma N 2 \right] $$
$$ ^ {\Omega} \mathrm {S} ^ {\Omega} \Omega \mathrm {q} \cdot \mathrm {x} $$
$$ \pi w ^ {\sim} 1 1 $$
$$ \Omega \S J 1 0 $$
jn 一 ~ o ~ ^ ~ a ~ _ 出 17
Ae...oQsoE 13
^_n
$$ j n \neq \infty 1 7 $$
S—ΩU4
Oo"en 10
7 22
$$ \begin{array}{l} \hat {O} \hat {O} _ {1} \cdot \hat {U} \geq 2 \Delta 2 0 \ \hat {O} \hat {C} e: i n \hat {W} [ + ] 1 7 \ \yen 1 n a e \eta 4 \ \pi A \pi a _ {1} 2 e \ 0 \pm ⑥ ① \neq \infty 7 \ \end{array} $$