Trinitron KVDZ29M81 - Projector SONY - Free user manual and instructions
Find the device manual for free Trinitron KVDZ29M81 SONY in PDF.
User questions about Trinitron KVDZ29M81 SONY
0 question about this device. Answer the ones you know or ask your own.
Ask a new question about this device
Download the instructions for your Projector in PDF format for free! Find your manual Trinitron KVDZ29M81 - SONY and take your electronic device back in hand. On this page are published all the documents necessary for the use of your device. Trinitron KVDZ29M81 by SONY.
USER MANUAL Trinitron KVDZ29M81 SONY
Operating Instructions
GB
- Before operating the unit, please read this manual thoroughly and retain it for future reference.
Mode d'emploi
FR
• Dangerously high voltages are present inside the TV.
• TV operating voltage: 110 – 240 V AC.
- Do not plug in the power cord until you have completed making all other connections; otherwise a minimum leakage current might flow through the antenna and other terminals to ground.
- To avoid battery leakage and damage to the remote, remove the batteries from the remote if you are not going to use it for several days. If any liquid leaks from the batteries and touches your skin, immediately wash it away with water.
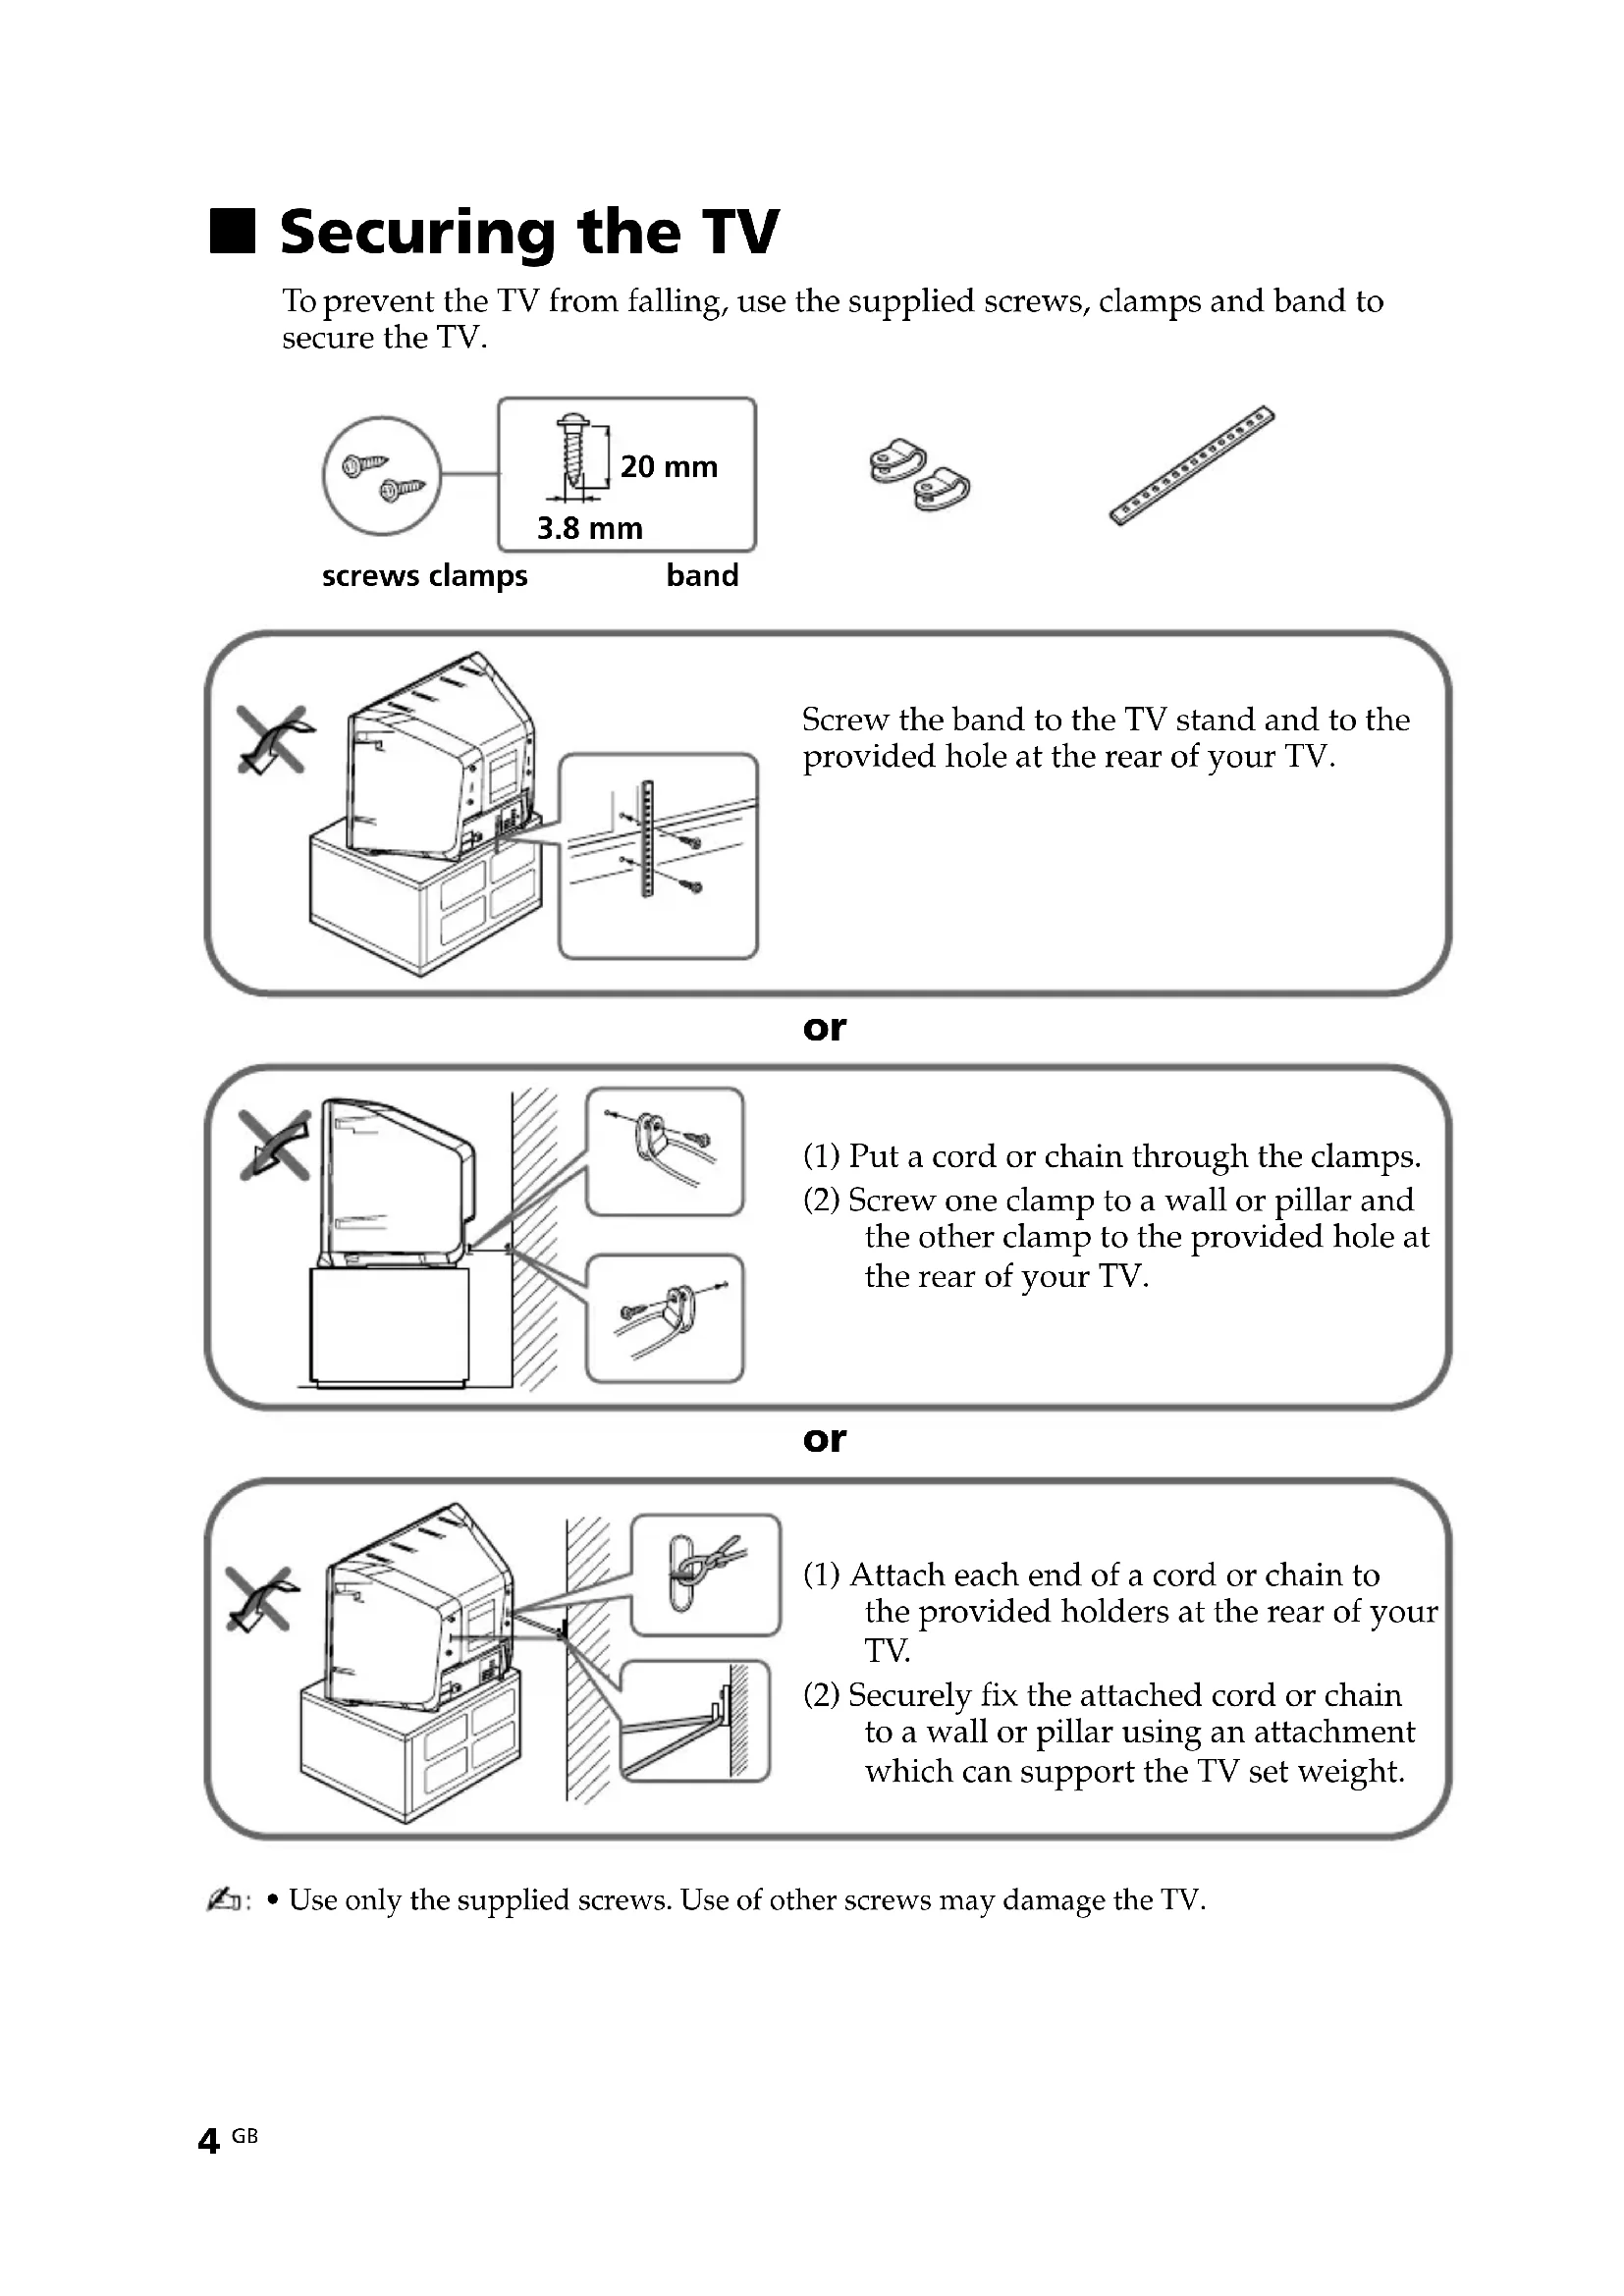
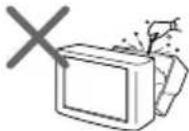
 For your own safety, do not touch any part of the TV, the power cord and the antenna cable during lightning storms. For your own safety, do not touch any part of the TV, the power cord and the antenna cable during lightning storms. | 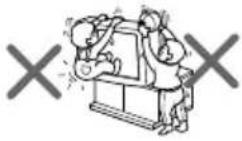 For children's safety, do not leave children alone with the TV. Do not allow children to climb onto it. For children's safety, do not leave children alone with the TV. Do not allow children to climb onto it. | 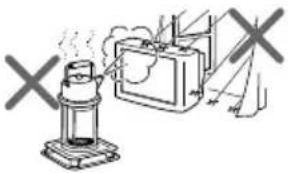 Toprevent fire or shock hazard, do not expose the TV to rain or moisture. Toprevent fire or shock hazard, do not expose the TV to rain or moisture. |
 Do not place any objects on the TV. The apparatus shall not be exposed to dripping or splashing and that no objects filled with liquids, such as vases, shall be placed on the apparatus. Do not place any objects on the TV. The apparatus shall not be exposed to dripping or splashing and that no objects filled with liquids, such as vases, shall be placed on the apparatus. | 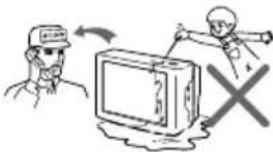 Do not operate the TV if any liquid or solid object falls into it. Have it checked immediately by qualified personnel only. Do not operate the TV if any liquid or solid object falls into it. Have it checked immediately by qualified personnel only. | 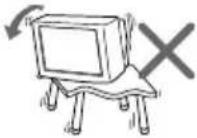 Install the TV on a stable TV stand and floor which can support the TV set weight. Ensure that the TV stand surface is flat and its area is larger than the bottom area of the TV. Install the TV on a stable TV stand and floor which can support the TV set weight. Ensure that the TV stand surface is flat and its area is larger than the bottom area of the TV. |
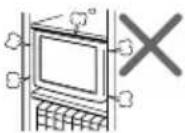 Do not block the ventilation openings of the TV. Do not install the TV in a confined space, such as a bookcase or built-in cabinet. Do not block the ventilation openings of the TV. Do not install the TV in a confined space, such as a bookcase or built-in cabinet. | 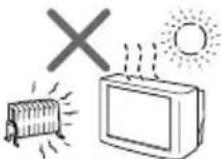 Your TV is recommended for home use only. Do not use the TV in any vehicle or where it may be subject to excessive dust, heat, moisture or vibrations. Your TV is recommended for home use only. Do not use the TV in any vehicle or where it may be subject to excessive dust, heat, moisture or vibrations. | 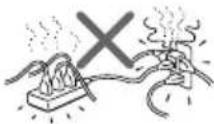 Do not plug in too many appliances to the same power socket. Do not damage the power cord. Do not plug in too many appliances to the same power socket. Do not damage the power cord. |
 Do not open the cabinet and the rear cover of the TV as high voltages and other hazards are present inside the TV. Refer servicing and disposal of the TV to qualified personnel. Do not open the cabinet and the rear cover of the TV as high voltages and other hazards are present inside the TV. Refer servicing and disposal of the TV to qualified personnel. | 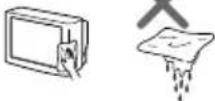 Clean the TV with a dry and soft cloth. Do not use benzine, thinner, or any other chemicals to clean the TV. Do not attach anything (e.g., adhesive tape, cellophane tape, glue) on the painted cabinet of the TV. Do not scratch the picture tube. Clean the TV with a dry and soft cloth. Do not use benzine, thinner, or any other chemicals to clean the TV. Do not attach anything (e.g., adhesive tape, cellophane tape, glue) on the painted cabinet of the TV. Do not scratch the picture tube. | 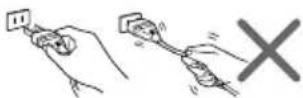 Pull the power cord out by the plug. Do not pull the power cord itself. Even if your TV is turned off, it is still connected to the AC power source (mains) as long as the power cord is plugged in. Unplug the TV before moving it or if you are not going to use it for several days. Pull the power cord out by the plug. Do not pull the power cord itself. Even if your TV is turned off, it is still connected to the AC power source (mains) as long as the power cord is plugged in. Unplug the TV before moving it or if you are not going to use it for several days. |
Table of Contents
Installation
Securing the TV 4
Getting Started 5
Setting up your TV ("Initial Setup") 6
Connecting optional components 7
Overview of Controls
TV buttons and remote control 8
Menu Adjustment
WEGA GATE navigator 10
"Settings" Adjustment 11
"Picture" setting.... 12
"Sound" setting 14
"Wide Screen" setting 15
"Channel Setup" setting 16
"Setup" setting 18
Additional Information
Troubleshooting 20
Specifications .... Back cover
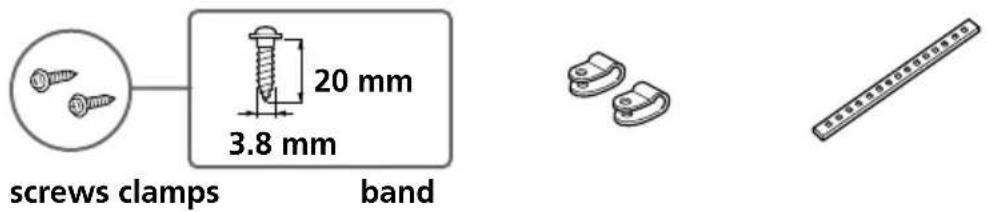
■ Securing the TV
To prevent the TV from falling, use the supplied screws, clamps and band to secure the TV.
text_image
screws clamps 20 mm 3.8 mm band
natural_image
Technical illustration of a mechanical assembly with a crosshair icon and magnified detail showing internal components (no text or symbols)Screw the band to the TV stand and to the provided hole at the rear of your TV.
or
text_image
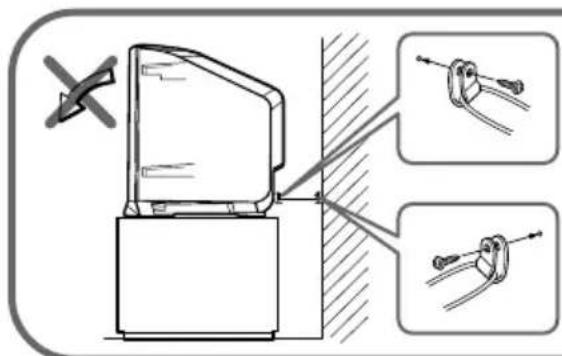
Diagram illustrating a mechanical device with labeled parts and two close-up insets showing tool positioning.(1) Put a cord or chain through the clamps.
(2) Screw one clamp to a wall or pillar and the other clamp to the provided hole at the rear of your TV.
or
text_image
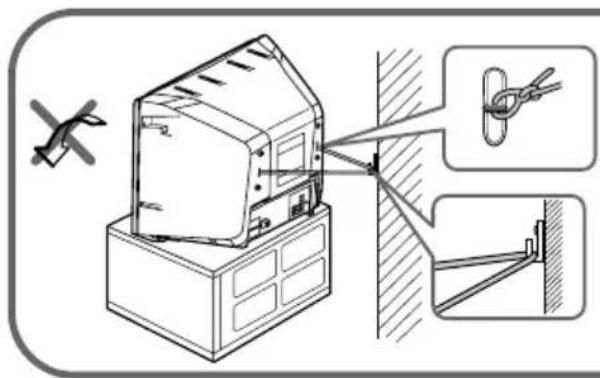
Technical diagram showing installation of a device with labeled components and connection details(1) Attach each end of a cord or chain to the provided holders at the rear of your TV.
(2) Securely fix the attached cord or chain to a wall or pillar using an attachment which can support the TV set weight.
- Use only the supplied screws. Use of other screws may damage the TV.
■ Getting Started
natural_image
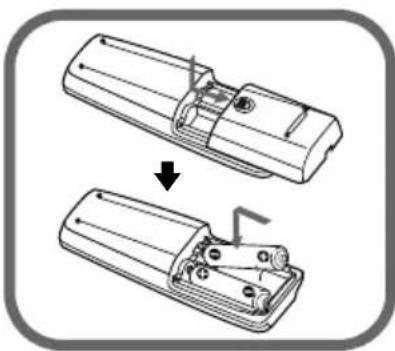
Diagram showing two views of a device with internal components, one being rotated and the other assembled (no text or symbols)Step 1
Insert the batteries (supplied) into the remote.
Do not use old or different types of batteries together.
natural_image
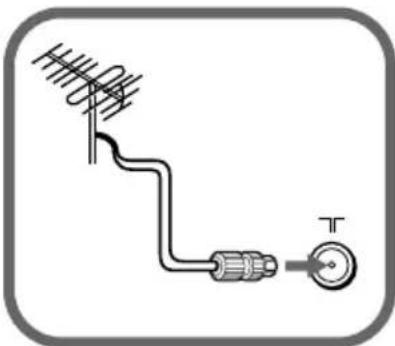
Diagram of an antenna with a coil, connected to a sensor and a dial (no text or symbols)Step 2
Connect the antenna cable (not supplied) to (antenna input) at the rear of the TV.
☐: • Y ou can also connect the TV to other optional components (see page 7).
text_image
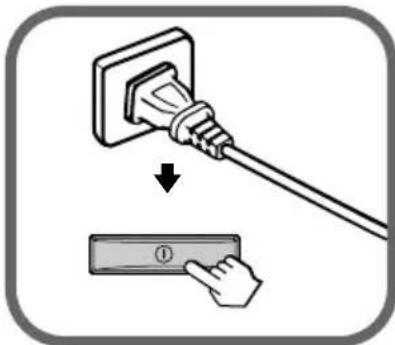
Diagram showing how to switch a power plug into a socket, with a hand pointing to the socket.Step 3
Plug in the power cord, then press ① on the TV to turn it on.
☐: • The ⏻ (standby) indicator flashes green for a few seconds when turning on the TV. This does not indicate a malfunction.

text_image
Initial Setup Language: English 中文 Inu Select ①② Confirm ③ End(WALL LIST)Step 4
Set up the TV by following the instructions of the "Initial Setup" menu (see page 6).
■ Setting up your TV ("Initial Setup")
When you turn on your TV for the first time, the "Initial Setup" menu will appear. You can adjust settings below using the buttons on the remote control or TV front panel. Press , , or to select or adjust items, then press 📋.
1 Select the desired menu language.
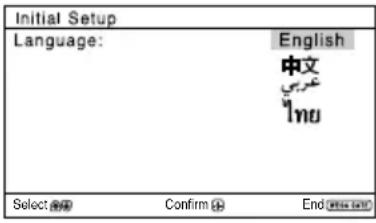
text_image
Initial Setup Language: English 中文 Inu Select: Confirm End2 Select "Yes" to preset the channels automatically. To skip automatic channel presetting, select "No".

text_image
Initial Setup First please connect cable/ antenna Start Auto Program now? Yes No Select OK Confirm OK End3 The "Program Sorting/Edit" menu enables you to sort and edit the channels (see page 16).
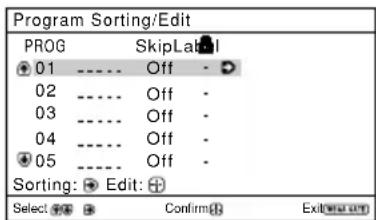
text_image
Program Sorting/Edit PROG SkipLabel 01 ---- Off - 02 ---- Off - 03 ---- Off - 04 ---- Off - 05 ---- Off - Sorting: Edit: Select: Confirm: Exit water4 Adjust the bars on the top and bottom of the menu if they are slanted.
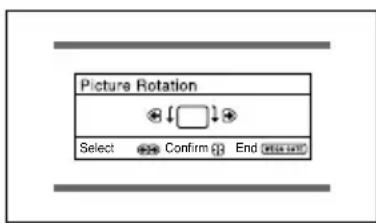
text_image
Picture Rotation Select Confirm End5 Adjust the upper and lower bars if they are not equally positioned to the top and bottom of the screen.
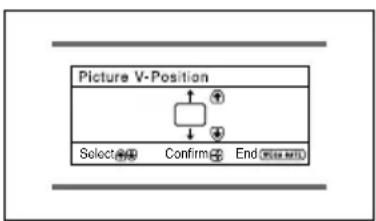
text_image
Picture V-Position Select 0.00 Confirm End (RGB/12)6 To prevent this "Initial Setup" menu from appearing again when you turn on the TV by pressing ①, select "No". To allow this menu to appear again, select "Yes".
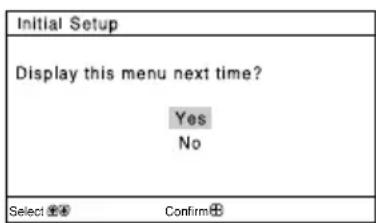
text_image
Initial Setup Display this menu next time? Yes No Select Ⓧ️ Confirm⊕☐: • You can immediately go to the end of the "Initial Setup" menu by pressing WEGA GATE.
- Before adjusting "Picture Rotation" and "Picture V-Position", keep electrical equipment (external speakers) away from the TV to avoid magnetic disturbance.
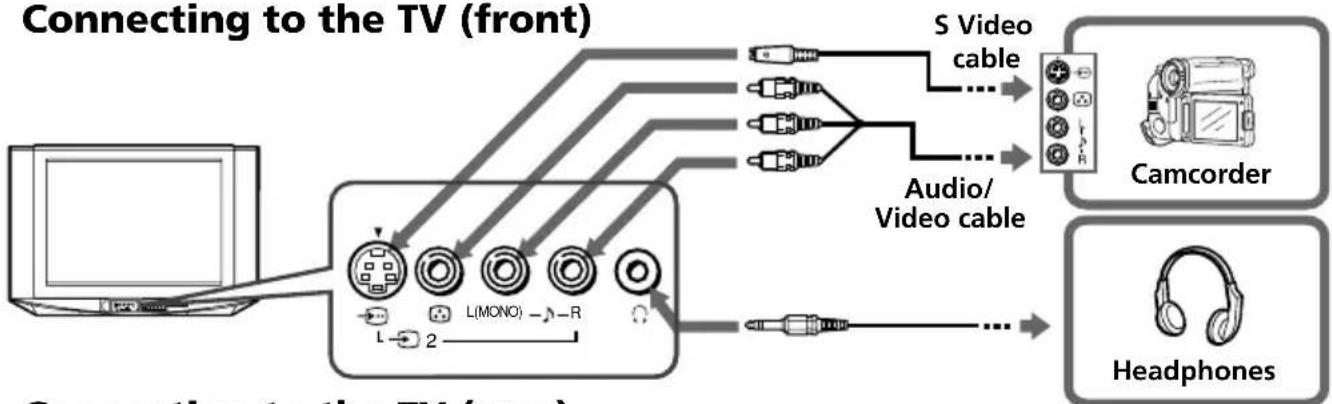
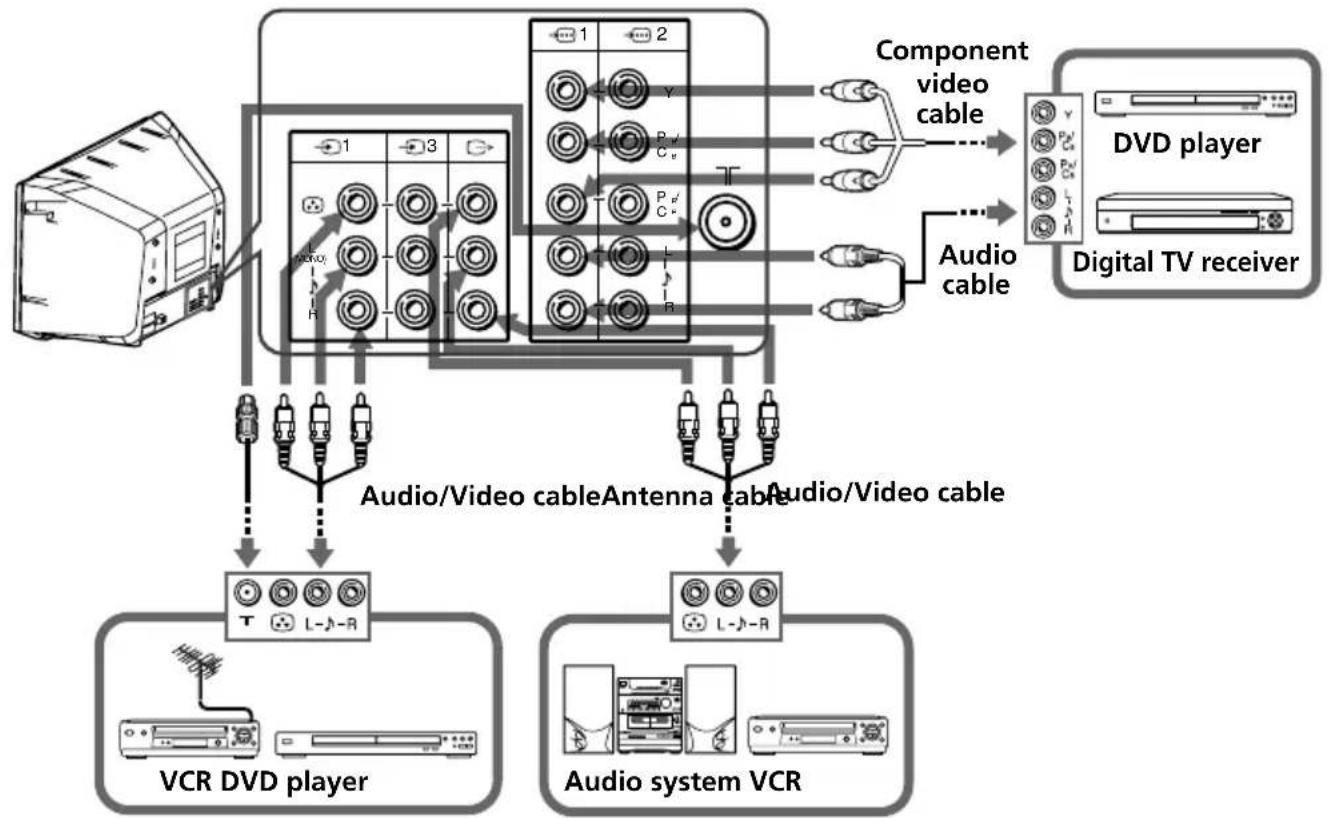
■ Connecting optional components
You can connect a wide range of optional components to your TV. Connecting cables are not supplied.
Connecting to the TV (front)
flowchart
graph LR
    A["Computer"] --> B["Switch"]
    B --> C["L(MONO) - R"]
    C --> D["Audio/Video cable"]
    D --> E["S Video cable"]
    E --> F["Camcorder"]
    F --> G["Headphones"]
    G --> H["Headphones"]
Connecting to the TV (rear)
flowchart
graph TD
    A["Oscilloscope"] --> B["Component video cable"]
    B --> C["DVD player"]
    B --> D["Digital TV receiver"]
    B --> E["Audio cable"]
    E --> F["Audio/Video cable"]
    E --> G["Antenna cable"]
    G --> H["Audio/Video cable"]
    H --> I["VCR DVD player"]
    H --> J["Audio system VCR"]
- If you connect a VCR to (antenna input), preset the signal output from the VCR to the program number 0 on the TV (see page 17).
- When both (S video) and (video) for 2 are connected at the same time, (S video) is automatically selected. To view (video), disconnect the S video cable.
- The component video terminals on your DVD player are sometimes labeled Y/C B /C R , Y/P B /P R , Y/C b /C r or Y/B-Y/R-Y.
- If you select "HD/DVD 1" or "HD/DVD 2" on your TV screen, the signal from the (monitor output) terminals will not be output properly. This does not indicate a malfunction.
• The TV accepts the following signal formats:
| Total scanning lineEffective scanning linefV (Hz) | 1125i1080i 720p50/60 | 750p576p 5750/60 | 625p6i 480p 480i50 | 625i50 | 525p60 | 525i60 |
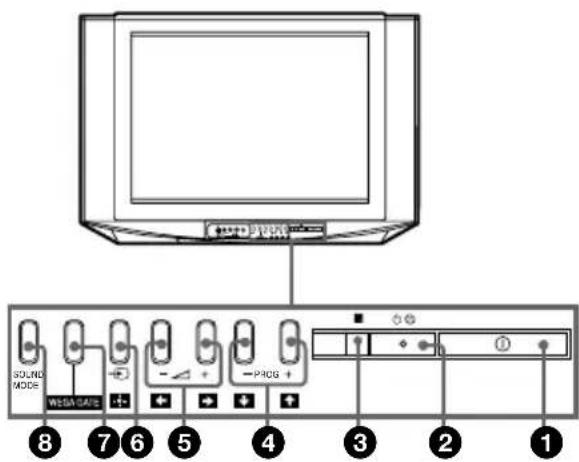
■ TV buttons and remote control
text_image
SOUND MODE WESM GATE - ▲ - PROG + 8 7 6 5 4 3 2 1① Turn off or turn on the TV.
② Wake Up indicator.
② Standby indicator.
3 Remote control sensor.
④PROG +/- Select program number.
5 + / - Adjust volume.
6→ Select TV or video input.
4,5 ↑, ↓, ← → Select or adjust items.
6 Confirm selected items.
⑦ WEGA GATE Display or cancel WEGA GATE menu.
⑧ SOUND MODE Select sound mode options with a 5-Band Graphic Equalizer display (see page 14).
WEGA GATE menu operations (see page 10)
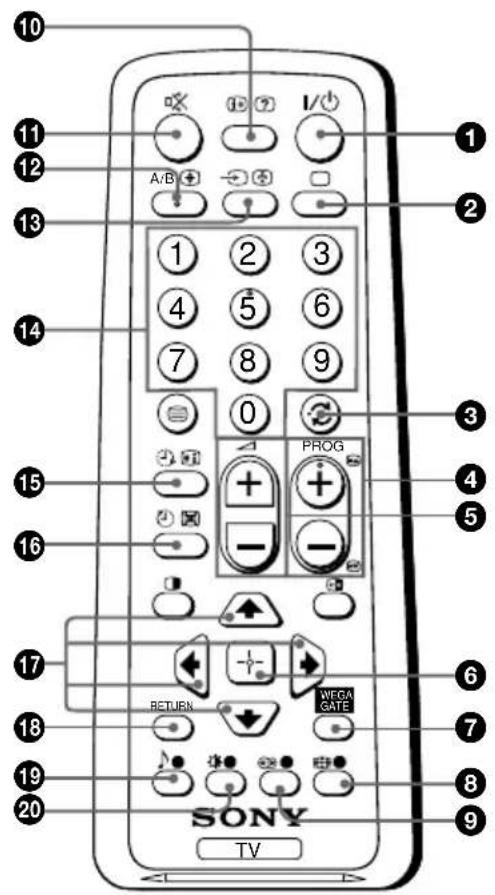
text_image
10 11 12 13 14 15 16 17 18 19 20 1 2 3 4 5 6 7 8 9 0 PROG - - RETURN WEGA GATE SONY TV① I/⏻ Turn off temporarily or turn on the TV.
② □ Display the TV program.
3 Jump to last program number that has been watched for at least five seconds.
4PROG +/- Select program number. To select quickly, press and hold until the desired program number appears.
⑤ + / - Adjust volume.
⑧ Change the picture size:
"4:3", "16:9" (16:9 wide mode).
9 Select surround mode options (see page 14).
10 i+ Display on-screen information.
⑪Mute the sound.
12 A/B Not function for your TV.
13 Select TV or video input.
14 0 - 9 Input numbers. For program numbers 10 and above, enter the second digit within two seconds.
19
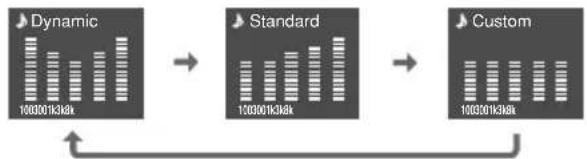
Select sound mode options with a 5-Band Graphic Equalizer display:
"Dynamic", "Standard", "Custom"* (see page 14).
flowchart
graph LR
    A["Dynamic\n100001k3kb"] --> B["Standard\n100001k3kb"]
    B --> C["Custom\n100001k3kb"]
    A -->|Arrow| C
* When the "Custom" mode is selected, you can receive the last adjusted sound settings from the "Sound Adjustment" option in the menu.
20 Select picture mode options: "Vivid", "Standard", "Custom"* (see page 12).
* When the "Custom" mode is selected, you can receive the last adjusted picture settings from the "Picture Adjustment" option in the menu.
WEGA GATE menu operations (see page 10)
6 Confirm selected items.
⑦ WEGA GATE Display or cancel WEGA GATE menu.
17 ↑, ↓, ←, → Select or adjust items.
18 RETURN Return to the previous level.
Timer operations
15 Set TV to turn on automatically according to the desired period of time (Wake Up Timer) (max. of 12 hours). The indicator on TV lights up amber once you set the wake up timer. If no buttons or controls are pressed for more than one hour after the TV is turned on using the wake up timer, the TV automatically goes into standby mode.
16 SeTV to turn off automatically according to the desired period of time (Sleep Timer) (max. of one hour and 30 min.).
Teletext operations (green icon)
Display Teletext broadcast: Teletext → Teletext and TV → TV. If there is no Teletext broadcast, only "100" is displayed at the top left corner of the screen.
Display Teletext service contents.
0 - 9 Input three digits Teletext page number.
▲, ▼ Display the next or previous page.
Stop Teletext display from scrolling.
Reveal concealed information.
Enlarge the Teletext display.
Show TV screen while waiting for Teletext page. Enter the Teletext page number that you want to refer to, then press ☒. When the page number is displayed, press ☒ to show the text.
( red, green, yellow, blue) Access the corresponding colored FASTEXT menu. The FASTEXT feature can be used only when the FASTEXT broadcast is available.
Teletext is automatically cancelled when there is no signal or the frequency of input signal is not within the proper range.
PIP operations
□, ←, ↑, ↓, ←, →
Not function for your TV.
Manufactured under license from BBE Sound, Inc.
Licensed by BBE Sound, Inc. under one or more of the following US patents: 5510752, 5736897. BBE and BBE symbol are registered trademarks of BBE Sound, Inc.

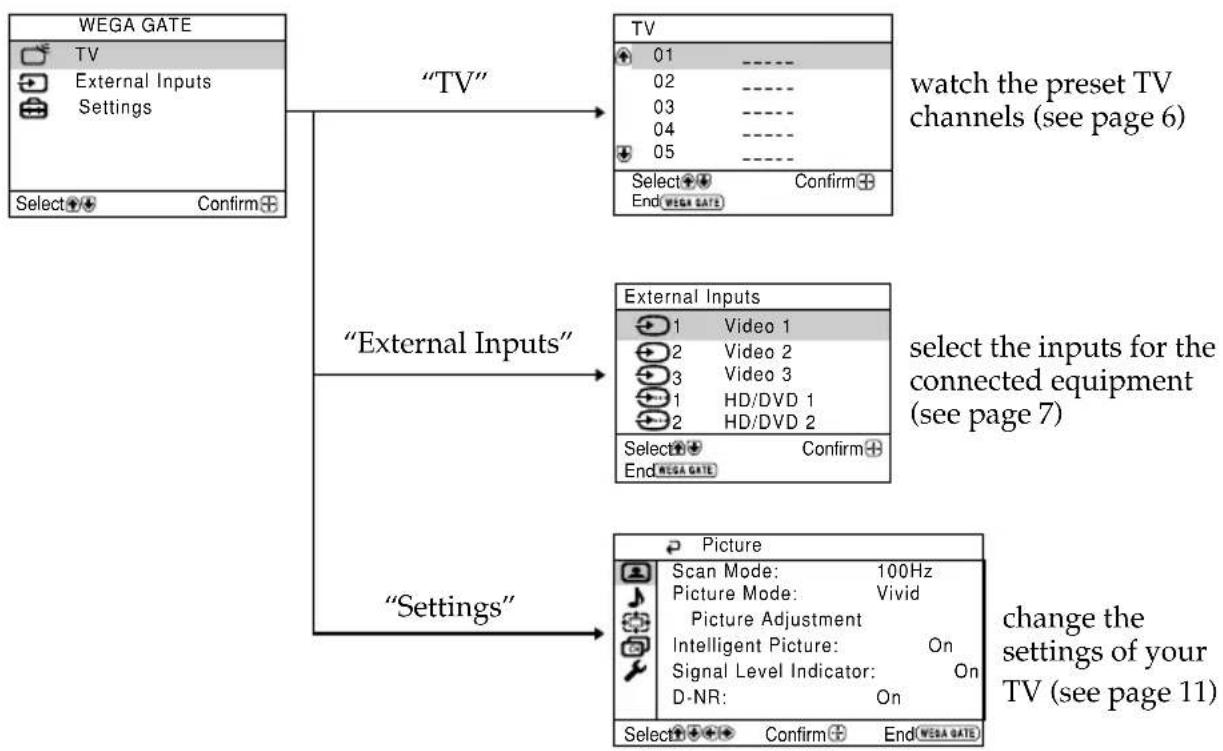
■ WEGA GATE navigator
WEGA GATE is a gateway that allows you access to preset TV channels, connected external inputs and "Settings" menu.
flowchart
graph TD
    A["TV"] --> B["External Inputs"]
    A --> C["Settings"]
    B --> D["Watch the preset TV channels (see page 6)"]
    C --> E["select the inputs for the connected equipment (see page 7)"]
    D --> F["Change the settings of your TV (see page 11)"]
    E --> F
How to use WEGA GATE

text_image
WEGA GATE → WEGA GATE TV External Inputs Settings Select Confirm(1) Press WEGA GATE to display or cancel the WEGA GATE menu.

text_image
TV 01 ---- 02 ---- 03 ---- 04 ---- 05 ---- Select: Confirm End: MEGA GATE(3) Press or to select the desired item.
text_image
TV 01 ---- 02 ---- 03 ---- 04 ---- 05 ---- Select●● Confirm● End MEGA GATE(2) Press (b) to confirm your selection or go to the next level.
text_image
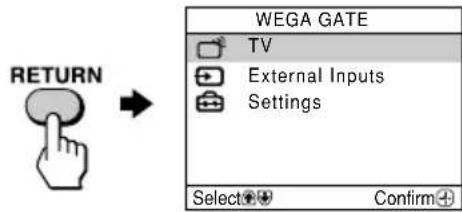
RETURN WEGA GATE TV External Inputs Settings Select Confirm(4) Press RETURN to move to the previous level.
- When a feature is dimmed in the menu, it is not selectable.
- The WEGA GATE, and , , , buttons on the front panel can also be used for the operations above.
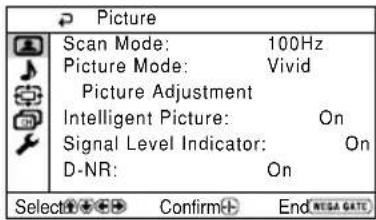
■ "Settings" Adjustment
You are able to change the settings of your TV from "Settings" in WEGA GATE menu (see page 10). The following is an overview of the items that can be adjusted.
text_image
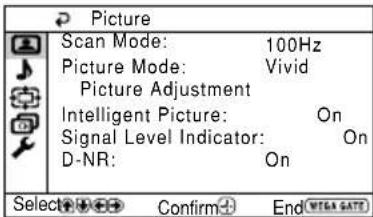
Picture Scan Mode: 100Hz Picture Mode: Vivid Picture Adjustment Intelligent Picture: On Signal Level Indicator: On D-NR: On Select+/- Confirm-End NEGA GATE"Picture" (see page 12)
"Scan Mode": "100Hz" → "Progressive"
"Picture Mode": "Vivid" → "Standard" → "Custom"
"Picture Adjustment": "Picture", "Brightness", "Color", "Hue", "Sharpness", "Color Temperature", "VM", "Reset"
"Intelligent Picture": "On" → "Off"
"Signal Level Indicator": "On" → "Off"
“D-NR”: “On” → “Off”
text_image
Sound Sound Mode: Dynamic Sound Adjustment Balance Intelligent Volume: Off Surround: Off Select Confirm End MEGA GATE"Sound" (see page 14)
"Sound Mode": "Dynamic" → "Standard" → "Custom"
"Sound Adjustment": "Adjust", "Reset"
"Balance"
"Intelligent Volume": "On" → "Off"
"Surround": "Movie" → "Sports" → "Off"
text_image
Wide Screen Wide Mode: 4:3 Auto Wide: On Select Confirm End MEGA GATE"Wide Screen" (see page 15)
"Wide Mode": "16:9" → "4:3"
"Auto Wide": "On" → "Off"
text_image
Channel Setup Auto Program Manual Program Program Sorting/Edit Select Confirm End NEGA GATE"Channel Setup" (see page 16)
"Auto Program"
"Manual Program"
"Program": "00" - "99"
"TV System": "B/G" → "I" → "D/K" → "M"
text_image
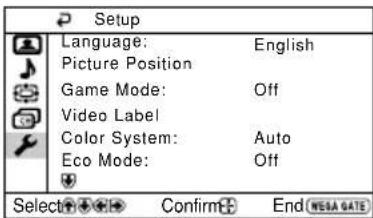
Setup Language: English Picture Position Game Mode: Off Video Label Color System: Auto Eco Mode: Off Select+ + + Confirm+ End+ HTG+ GAT"Setup" (see page 18)
"Language": "English" → "中文" (Chinese) → "Egypt" (Arabic) → "Thai"
"Picture Position": "Picture Rotation", "Picture V-Position"
"Game Mode": "On" → "Off"
"Video Label"
"Color System": "Auto" → "PAL" → "SECAM" → "NTSC3.58" → "NTSC4.43"
"Eco Mode": "On" → "Off"
"Factory Settings": "Yes" → "No"
■ "Picture" setting
Press WEGA GATE and select "Settings". Make sure the "Picture" icon (☐) is selected, then press ☐.
| Picture | |
| Scan Mode: 100Hz | |
| Picture Mode: Vivid | |
| Picture Adjustment | |
| Intelligent Picture: On | |
| Signal Level Indicator: On | |
| D-NR: On | |
| Select+/-+→ Confirm+ End-REGA GATE | |
"Scan Mode" Choose either "100Hz" (reduce flicker on the screen to provide a stable picture) or "Progressive" (reduce jitter of any small areas or scanning lines on the screen).
"Picture Mode" Choose either "Vivid" (bright, contrast and sharp), "Standard" (normal) or "Custom"*.
"Intelligent Picture" Optimize picture quality. Press or to select "On", then press 📄. To cancel, select "Off", then press 📄
"Signal Level Indicator" Display the signal level when the "Intelligent Picture" is functioning. "Intelligent Picture Signal Level" indicator will be displayed, followed by picture improvement when you change the program number or the input mode.

red amber green (weak) (average) (good)
Press or to select "On", then press + .
To cancel, select "Off", then press + Intelligent Picture" is still functioning.
"D-NR" Reduce noise level automatically to get optimum picture. (Digital Noise Press ↑ or ↓ to select "On", then press 🧑. Reduction) To cancel, select "Off", then press 🧑
* You can adjust the setting to your personal preference in the "Picture Adjustment" option only when the "Custom" mode is selected (see page 13).
- “Scan Mode” is not selectable when “Game Mode” is turned to “On”. “Scan Mode” is not available for HD (high-definition) and progressive input signals.
- "D-NR" is not available in HD and progressive input signals.
- "Signal Level Indicator" does not function in "HD/DVD 1" and "HD/DVD 2" input modes.
Adjusting the "Picture Adjustment" items under "Custom" mode
1 Press ↑ or ↓ to select either "Picture" (contrast), "Brightness", "Color", "Hue" (color tones), "Sharpness", "Color Temperature" (choose either "Cool", "Neutral" or "Warm") or "VM" (choose either "High", "Low" or "Off"), then press 🔒 Selecting "Reset" will set your TV to the factory settings.
2 Press ↑, ↓, ← or → to adjust the setting of your selected item, then press ⏻.
3 Repeat the above steps to adjust other items. The adjusted settings will be received when you select "Custom".
- “Hue” can be adjusted for the NTSC color system only. - Reducing “Sharpness” can also reduce picture noise.
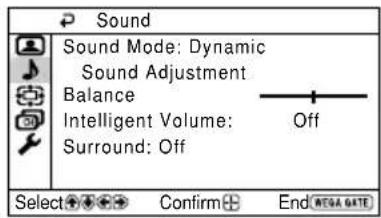
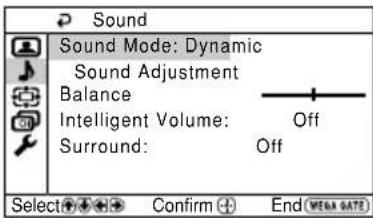
■ "Sound" setting
Press WEGA GATE and select "Settings".
Press or to select the "Sound"
icon (♩) then press .
text_image
Sound Sound Mode: Dynamic Sound Adjustment Balance Intelligent Volume: Off Surround: Off Select+ + + + Confirm + End WENA DATE"Sound Mode" Choose either "Dynamic" (low and high tones), "Standard" (voice and high tones) or "Custom"*.
"Balance"
Press or to emphasize the left speaker. Press or to emphasize the right speaker.
"Intelligent Volume" Adjust the volume of all program numbers and video inputs automatically.
Press ↑ or ↓ to select "On", then press 📊. To cancel, select "Off", then press 🌐
"Surround" Choose either "Movie" (cinema surround effect for stereo sound), "Sports" (simulated stadium effect for monaural sound) or "Off".
* You can adjust the setting to your personal preference in the "Sound Adjustment" option only when the "Custom" mode is selected.
Adjusting the "Sound Adjustment" items under "Custom" mode
The 5-Band Graphic Equalizer feature allows you to adjust sound frequency settings of "Custom" mode in the menu.
1 Make sure that "Adjust" is selected, then press
Selecting "Reset" will set your TV to the factory settings.
2 Press ← or → to select the desired sound frequency, then press ↑ or ↓ to adjust the setting and press ⊕.
The adjusted settings will be received when you select "Custom".
- Adjusting higher frequency will affect higher pitched sound and adjusting lower frequency will affect lower pitched sound.
- You may display the settings directly by using the SOUND MODE button on the TV front panel (see page 8) or button on the remote control (see page 9).
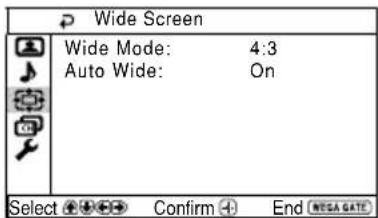
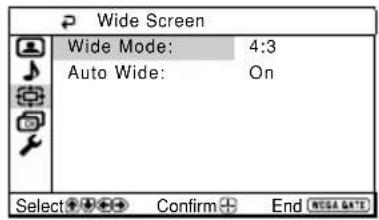
■ "Wide Screen" setting
Press WEGA GATE and select "Settings". Press or to select the "Wide Screen" icon (☐), then press ☐
text_image
Wide Screen Wide Mode: 4:3 Auto Wide: On Select Confirm End WEGA DATE"Wide Mode" Change the size of the picture when receiving wide-mode (16:9)
picture signal.
Choose "16:9".
To restore the normal picture size, select "4:3", then press
"Auto Wide" Display the picture in optimum wide screen automatically when you choose "On".
To cancel, select "Off", then press
- Y ou can also change to wide-mode picture size by pressing the button on the remote control (see page 8).
- “W ide Mode” is not selectable for HD (1080i, 720p) input signals. For HD (1080i, 720p) input signals, your TV will always display wide mode picture.
- "Auto Wide" is only available when receiving 576i, 480p and 480i input signals.
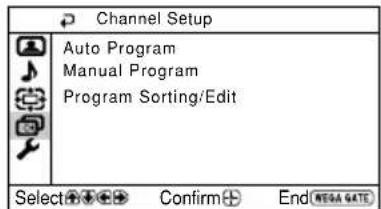
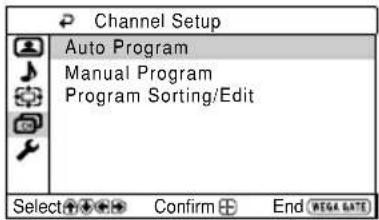
■ "Channel Setup" setting
Press WEGA GATE and select "Settings". Press or to select the "Channel Setup" icon (☐), then press ☑
text_image
Channel Setup Auto Program Manual Program Program Sorting/Edit Select Confirn End"Auto Program" Preset channels automatically.
"Manual Program" Manually preset desired channels and channels that cannot be preset automatically (see Presetting channels manually in page 17).
"Program Sorting/Edit"
Sort and edit the channels.
(a) If you wish to keep the channels in the current condition, press WEGA GATE to exit.
(b) Press or to select the program number with the channel you wish to change. The selected channel will appear on the screen.
(c) If you wish to store the channels in a different order:
(1) Press to enter sorting mode.
(2) Press or to select the new program number position for your selected channel, then press .
Press ➤ until the mode that you wish to edit is highlighted: Label, Skip, 🔍block symbol). Then press 🔍.
(1) To label, press or to select the alphanumeric characters for the label. Then press
(2) To skip the program number, press or to select "On". Then press 📋 You can skip this program number when using PROG +/-
(3) To block unwanted program number, press or to select Then press .
Press WEGA GATE to exit.
- If you preset a blocked program number, that program number will be unblocked automatically.
- If you sort a blocked program, that program will remain blocked.
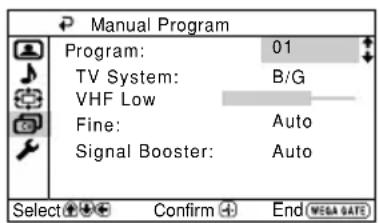
Presetting channels manually
1 After selecting "Manual Program", select the program number to which you want to preset a channel.
(1) Make sure "Program" is selected, then press
(2) Press or until the program number you want to preset appears on the menu, then press
text_image
Manual Program Program: 01 TV System: B/G VHF Low Fine: Auto Signal Booster: Auto Select Confirm End MEGA DATE2 Select the desired channel.
(1) Make sure either "VHF Low", "VHF High" or "UHF" is selected, then press
(2) Press or until the desired channel's broadcast appears on the TV screen, then press
3 If the sound of the desired channel is abnormal, select the appropriate TV system.
(1) Press or to select "TV System", then press
(2) Press or until the sound becomes normal, then press
4 If you are not satisfied with the picture and sound quality, you may be able to improve them by using the "Fine" tuning feature.
(1) Press or to select "Fine", then press ✉
(2) Press or to select "Manual", then press
(3) Press , , or until the picture and sound quality are optimal, then press + . The + or - icon on the menu flashes while tuning.
5 If the TV signal is too strong (picture distorted; picture with lines; signal interference) or weak (snowy picture), you may be able to improve the picture quality by setting the "Signal Booster" feature.
(1) Press or to select "Signal Booster", then press
(2) Press or to select either "Off"(for picture distorted; picture with lines; signal interference) or "Auto" (for snowy picture), then press 📋.
■ "Setup" setting
Press WEGA GATE and select "Settings". Press or to select the "Setup" icon ( ), then press [+] .
| Setup | ||
| Language: | English | |
| Picture Position | ||
| Game Mode: | Off | |
| Video Label | ||
| Color System: | Auto | |
| Eco Mode: | Off | |
| Select ⚪ ⚪ ⚪ Confirm ⚪ End ⚪ ⚪ ⚪ ⚪ ⚪ ⚪ ⚪ ⚪ ⚪ ⚪ ⚪ ⚪ ⚪ ⚪ ⚪ ⚪ ⚪ ⚪ ⚪ ⚪ ⚪ ⚪ ⚪ ⚪ ⚪ ⚪ ⚪ ⚪ ⚪ ⚪ ⚪ ⚪ ⚪ ⚪ | Select ⚪ ⚪ ⚪ ⚪ ⚪ ⚪ ⚪ ⚪ ⚪ ⚪ ⚪ ⚪ ⚪ ⚪ ⚪ ⚪ ⚪ ⚪ ⚪ ⚪ ⚪ ⚪ ⚪ ⚪ ⚪ ⚪ ⚪ ⚪ ⚪ ⚪ ⚪ ⚪ ⚪ $ | Confirm ⚪End ⚪ ⚪ ⚪ ⚪ ⚪ ⚪ ⚪ ⚪ ⚪ ⚪ ⚪ ⚪ ⚪ ⚪ ⚪ ⚪ ⚪ ⚪ ⚪ ⚪ ⚪ ⚪ ⚪ ⚪ ⚪ ⚪ ⚪ ⚪ ⚪ ⚪ ⚪ ⚪ ⚫$ |
| "Language" Change the menu language.Press ↑ or ↓ to select either "English", "中文" (Chinese), "( Arabic) or "Y" (Thai), then press . |
| "Picture Position" Adjust the picture position when it is not aligned with the TV screen.Press ↑ or ↓ to select "Picture Rotation" or "Picture V-Position", then press ⏻Press ↑, ↓, ← or → to adjust the picture position, then press ⏻. |
| "Game Mode" Adjust the picture setting that is suitable to view video games.Press ↑ or ↓ to select "On", then press ⏻.To cancel, select "Off", then press ⏻ |
| "Video Label" Label the connected equipment. |
| (1) Press ↑ or ↓ to select the input you want to label, then press ⏻. |
| (2) Press ↑ or ↓ to select the label options: "Video 1" / "Video 2" / "Video 3" / "HD/DVD 1" / "HD/DVD 2", "VCR", "SAT", "Game" or "Edit"*, then press ⏻ |
| * You may edit the video label to your favorite name. Press ↑ or ↓ to select alphanumeric characters for the label, then press ⏻ |
| "Color System" Select the color system. Press ↑ or ↓ to select either "Auto", "PAL", "SECAM", "NTSC3.58" or "NTSC4.43", then press 📋Normally, set this to "Auto". |
| "Eco Mode" Reduce power consumption of your TV to save energy. Press ↑ or ↓ to select "On", then press 📋. When you press 📋or turn on the TV, Eco Mode ( 🎨 symbol will appear on the screen for a while. To cancel, select "Off", then press 📋 |
"Factory Settings" Reset your TV to factory settings.
Press ⊕ and press ↑ or ↓ to select "Yes", then press ⊕.
Your TV will go blank for a few seconds, then the "Initial Setup" menu will appear.
To cancel, select "No", then press ☐
- Y ou cannot adjust "Picture Rotation" and "Picture V-Position" when HD (1080i, 720p) signals are input.
- "Game Mode" is available only when receiving signals through the → (video input), ←(S-video input) or (component video input) terminals.
- When HD or progressive signals are input, "Game Mode" does not function.
Troubleshooting
If you find any problem while viewing your TV, you can either use the “Factory Settings” function (see page 19) or check the Troubleshooting guide below. If the problem persists, contact your Sony dealer.
Snowy picture, noisy sound
- Check the antenna setup and other connections.
- P reset the channel manually again (see page 17).
- Set the "Signal Booster" to "Auto" (see page 17) or try using an external booster.
Distorted picture, noisy sound
- Set the "Signal Booster" to "Off" (see page 17), or turn off or disconnect any external booster in use.
Good picture, noisy sound
- Select the appropriate "TV System" (see page 17).
No picture, no sound
- Check the power cord, antenna setup and other connections.
- Press I/⏻ (power) to turn on the TV.
- Press ① (main power) on the TV to turn off the TV for about five seconds, then turn it on again.
Good picture, no sound
- Press + to increase the volume level or press to cancel the muting.
Dotted lines or stripes
- Do not use a hair dryer or other equipment near the TV.
- Check the antenna setup.
Double images or "ghosts"
- Use the fine tuning ("Fine") function (see page 17).
- Check the antenna setup or use a highly directional antenna.
- T urn off or disconnect any external booster in use.
No color
- Adjust the "Color" level from "Picture Adjustment" (see page 13).
- Select the appropriate "Color System" (see page 18).
- Check the antenna setup.
Picture slant
- Keep external speakers or other electrical equipment away from the TV. The magnetic disturbance from these equipments or the direction of the earth's magnetic field may affect the TV.
- Adjust the "Picture Rotation" or "Picture V-Position" (see page 18).
Abnormal color patches
- Keep external speakers or other equipment away from the TV. Do not move the TV while the TV is turned on. Press ① (main power) on the TV to turn off the TV for about 15 minutes, then turn it on again to demagnetize the TV.
Teletext display is incomplete (snowy picture or double images).
- Check the antenna setup and other connections.
- Set the "Signal Booster" to "Auto" (see page 17) or try using an external booster.
- Use the fine tuning ("Fine") function (see page 17).
The ⏻ (standby) indicator on your TV flashes red several times after every three seconds.
- Count the number of times the ⏻ (standby) indicator flashes. Press Ⓐ (main power) to turn off your TV. Contact your nearest Sony service center.
The TV screen sometimes goes blank for slightly longer than usual during channel change.
- The “Signal Booster” is functioning to detect a weak signal. This does not indicate a malfunction.
Cannot play shooting games.
- Some shooting games which involve pointing a light beam at the TV screen with an electronic gun or rifle cannot be used with your TV. For details, see the instruction manual supplied with the video game software.
TV cabinet creaks.
- Changes in room temperature sometimes make the TV cabinet expand or contract, causing a noise. This does not indicate a malfunction.
A small "boom" sound is heard when the TV is turned on.
- The TV's demagnetizing function is working. This does not indicate a malfunction.
Horizontal thin lines appear on the TV screen.
- The visible lines that sometimes appear on your TV screen are shadows from the damper wires used to stabilize the aperture grille of the Trinitron picture tube. This does not indicate a malfunction.
AVERTISSEMENT
natural_image
Diagram showing a helicopter flying near a building with an inset close-up of a vertical ruler and alignment tools (no text or symbols)text_image
Diagram illustrating a mechanical or electrical setup with labeled components and directional arrows, including a crosshair symbol.text_image
Technical diagram showing installation of a building with crane and safety instructions, including magnified views of the installation detail.natural_image
Diagram showing two views of a device with internal components, one being rotated and the other assembled (no text or symbols)1re étape
natural_image
Diagram of a satellite antenna connected to a power supply (no text or symbols)2e étape
text_image
Diagram showing how to switch a power plug into a socket, with a hand pointing to the socket.3e étape
text_image
Initial Setup First please connect cable/ antenna Start Auto Program now? Yes No Select Ⓧ Confirm Ⓧ End Ⓧtext_image
Initial Setup Display this menu next time? Yes No Select Ⓧ Confirm⊕text_image
Picture Scan Mode: 100Hz Picture Mode: Vivid Picture Adjustment Intelligent Picture: On Signal Level Indicator: On D-NR: On Select Confirm End MEGA GATE«Picture» (voir page 12)
text_image
Sound Sound Mode: Dynamic Sound Adjustment Balance Intelligent Volume: Off Surround: Off Select Confirm End(NEGA GATE)text_image
Wide Screen Wide Mode: 4:3 Auto Wide: On Select Confirm End NEGA GATE«Wide Screen» (voir page 15)
text_image
Channel Setup Auto Program Manual Program Program Sorting/Edit Select Confirm End(NEGA GATE)«Channel Setup» (voir page 16)
«Auto Program»
«Manual Program»
text_image
Setup Language: English Picture Position Game Mode: Off Video Label Color System: Auto Eco Mode: Off Select Confirm End(MEGA GATE)«Setup» (voir page 18)
«Language»: «English» → «中文» (Chinois) → «عربي» (Arabe) → «lingu» (Thailandais)
| Picture | |
| Scan Mode: 100Hz | |
| Picture Mode: Vivid | |
| Picture Adjustment | |
| Intelligent Picture: On | |
| Signal Level Indicator: On | |
| D-NR: On | |
| Select | Confirm End |
text_image
Sound Sound Mode: Dynamic Sound Adjustment Balance Intelligent Volume: Surround: Off Off Select Confirm End (MEGA GATE)text_image
Wide Screen Wide Mode: 4:3 Auto Wide: On Select Confirm End MEGA GATEtext_image
Setup Language: English Picture Position Game Mode: Off Video Label Color System: Auto Eco Mode: Off Select Confirm End WEGA DATE«Language» Changer la langue des menus.
natural_image
Technical illustration of a helicopter hovering above a device with a magnified inset showing the measurement scale (no text or symbols present)ب
natural_image
Diagram showing two views of a battery internal structure before and after disassembly, with no text or symbols present.2 مرحله
text_image
Diagram showing how to switch a power plug into a socket, with a hand pointing to the socket.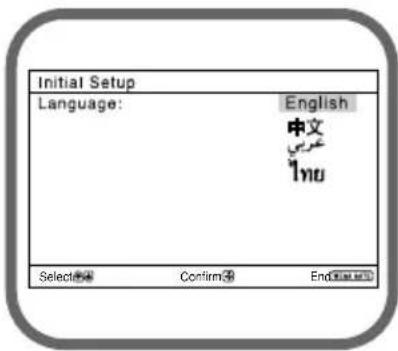
text_image
Initial Setup Language: English 中文 1nu Select② Confirm③ End④text_image
Initial Setup First please connect cable/ antenna Start Auto Program now? Yes No Select 14 Confirm 2 End Date 3 10text_image
Picture V-Position Select ✓ Confirm ✓ End OK ✓ M10text_image
Initial Setup Display this menu next time? Yes No Select Ⓧ Confirm Ⓧ(16:9) "16:9", "4:3"
"Sharpness", "Color Temperature",
"VM", "Reset"
"Intelligent Picture": "On" → "Off"
"Signal Level Indicator": "On" → "Off"
"D-NR": "On" → "Off"
"Sound Adjustment": "Adjust", "Reset"
"Balance"
"Intelligent Volume": "On" → "Off"
"Surround": "Movie" → "Sports" → "Off"
"Wide Mode": "16:9" → "4:3"
"Auto Wide": "On" → "Off"
text_image
Picture Scan Mode: 100Hz Picture Mode: Vivid Picture Adjustment Intelligent Picture: On Signal Level Indicator: On D-NR: On Select Confirm End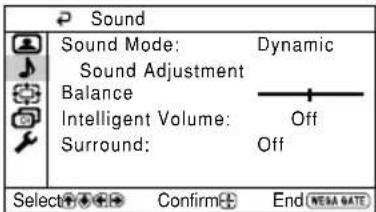
text_image
Sound Sound Mode: Dynamic Sound Adjustment Balance Intelligent Volume: Off Surround: Off Select Confirm End NEMA DATE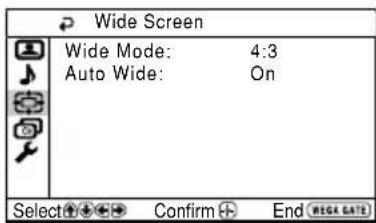
text_image
Wide Screen Wide Mode: 4:3 Auto Wide: On Select Confirm End WEG DATE"TV System": "B/G" → "I" → "D/K" → "M"
text_image
Channel Setup Auto Program Manual Program Program Sorting/Edit Select Confirm End MEGA GATE"Game Mode": "On" → "Off"
"Video Label"
"Color System": "Auto" → "PAL" → "SECAM" → "NTSC3.58" →
"NTSC4.43"
"Eco Mode": "On" → "Off"
"Factory Settings": "Yes" → "No"
text_image
Setup Language: English Picture Position Game Mode: Off Video Label Color System: Auto Eco Mode: Off Select Confirm End WEGA GATE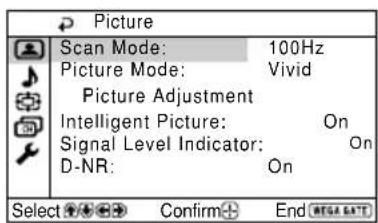
text_image
Picture Scan Mode: 100Hz Picture Mode: Vivid Picture Adjustment Intelligent Picture: On Signal Level Indicator: On D-NR: On Select ⚪ ⚪ ⚪ Confirm ⚪ End MEGA SATT"Settings" را فشار داده و WEGA GATE دکمه
| Sound | ||
| Sound Mode: | Dynamic | |
| Sound Adjustment Balance | ||
| Intelligent Volume: | Off | |
| Surround: | Off | |
| Select | Confirm | End (MEGA GATE) |
"Settings" را فشار داده و WEGA GATE دکمه
text_image
Wide Screen Wide Mode: 4:3 Auto Wide: On Select Confirm End MEGA GATEtext_image
Channel Setup Auto Program Manual Program Program Sorting/Edit Select Confirm End MEGA GATE"Settings" را فشار داده و WEGA GATE دکمه
| Setup | ||
| Language: | English | |
| Picture Position | ||
| Game Mode: | Off | |
| Video Label | ||
| Color System: | Auto | |
| Eco Mode: | Off | |
| Select ⚪ ⚪ ⚪ Confirm ⚫ End ⭕WEGA SATS | ||
| • و "Picture Rotation" و : و "Picture Rotation" و و "Picture Rotation" و و "Picture Rotation" و و "Picture Rotation" و و "Picture Rotation" و و "Picture Rotation" و و "Picture Rotation" و و "Picture Rotation" و و "Picture Rotation" و و "Picture Rotation" و و "Picture Rotation" و و "Picture Rotation" و و "Picture Rotation" و و "Picture Rotation" و و "Picture Rotation" و و "Picture Rotation" و و "Picture Rotation" و و "PictureRotation" و و "PictureRotation" و و "PictureRotation" و و "PictureRotation" و و "PictureRotation" و و "PictureRotation" و و "PictureRotation" و و "PictureRotation" و و "PictureRotation" و و "PictureRotation" و و "PictureRotation" و و "PictureRotation" و و "PictureRotation" و و "PictureRotation" و و "PictureRotation" و و "PictureRotation" و و "PictureRotation" و و"Game Mode" و و "Game Mode" و و "Game Mode" و و "Game Mode" و و "Game Mode" و و "Game Mode" و و "Game Mode" و و "Game Mode" و و "Game Mode" و و "Game Mode" و و "Game Mode" و و "Game Mode" و و "Game Mode" و و "Game Mode" و و "Game Mode" و و "Game Mode" و و "Game Mode" و و "Game Mode" w |
natural_image
Technical illustration of a mechanical assembly with an airplane and a magnified inset showing a measurement scale (no text or symbols present)و
natural_image
Diagram showing two mechanical components with a downward arrow indicating a process (no text or symbols present)الخبوة
AOPSL KABIL HOOATI (dGQIL MHEWOTI)
text_image
Diagram showing how to switch a power plug into a socket, with a hand pointing to the socket.14
text_image
Initial Setup Language: English 中文 "Inu" Initial Setup" Select ① Confirm ② Endow ③text_image
تائيم/تحير البرامج PROG OK OK OK OK OK OK OK OK OK OK OK OK OK OK OK OK OK OK OK OK OK OK OK OK OK OK OK OK OK OK OK OK OK OK OK OK OK OK OK OK OK OK OK OK OK OK OK OK OK OK Ok OK OK OK OK OK OK OK OK OK OK OK OK OK OK OK OK OK OK OK OK OK OK OK OK OK OK OK OK OK OK OK OK OK OK OK OK OK OK OK OK OK OK OK OK OK OK OK OK OK OAKIDtext_image
User Search User Search: User Search: User Security: User Security: User Security: User Security: User Security: User Security: User Security: User Security: User Security: User Security: User Security: User Security: User Security: User Security: User Security: User Security: User Security: User Security: User Security: User Security: User Security: User Security: User Security: User Security: User Security: User Safety User Safety User Safety User Safety User Safety User Safety User Safety User Safety User Safety User Safety User Safety User Safety User Safety User Safety User Safety User Safety User Safety User Safety User Safety User Safety User Safety User Safety User Safety User Safety User Safety User Safety User Safety User Safety User Safety User Safety User Safety User Safety User Safety User Safety Other
وXCETR «Eagedadats». WEGA GATE اضغط
اضغط ↑ او ↓ ل bakingتار علامة « صوت » (♪)
. ئم اضغط
| KV-DZ29M81 | Note | |
| Power requirements | 110-240 V AC, 50/60 Hz | |
| Power consumption (W) | Indicated on the rear of the TV | |
| Television system | B/G, I, D/K, M | |
| Color system | PAL, PAL 60, SECAM, NTSC3.58, NTSC4.43 | |
| Teletext language | English, Farsi (Persian), French | |
| Channel coverageB/G | VHF: E2 to E12 /UHF: E21 to E69 /CATV: S01 to S03, S1 to S41 | |
| I | UHF: B21 to B68 /CATV: S01 to S03, S1 to S41 | |
| D/K | VHF: C1 to C12, R1 to R12/UHF: C13 to C57, R21 to R60 /CATV: S01 to S03, S1 to S41, Z1 to Z39 | |
| M | VHF: A2 to A13 /UHF: A14 to A79 /CATV: A-8 to A-2, A to W+4, W+6 to W+84 | |
| T (Antenna) | 75-ohm external terminal | |
| Audio output (Speaker) | 10 W + 10 W | |
| Number of terminal(Video) | Input: 3 Output: 1 Phono jacks; 1 Vp-p, 75 ohms | |
| ( Audio) | Input: 5 Output: 1 Phono jacks; 500 mVrms | |
| (S Video) | Input: 1 Y: 1 Vp-p, 75 ohms, unbalanced, sync negativeC: 0.286 Vp-p, 75 ohms | |
| (Component Video) | Input: 2 Phono jacks;Y: 1 Vp-p, 75 ohms, sync negative P_B/C_B : 0.7 Vp-p, 75 ohms P_R/C_R : 0.7 Vp-p, 75 ohms | |
| ( Headphone) | Output: 1 Stereo minijack | |
| Picture tube | 29 in. | |
| Tube size (cm) | 72 | Measured diagonally |
| Screen size (cm) | 68 | Measured diagonally |
| Dimensions (w/h/d, mm) | 794 × 590 × 507 | |
| Mass (kg) | 47 |
Design and specifications are subject to change without notice.