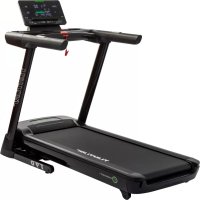
Endurance T90 - Treadmills TUNTURI - Free user manual and instructions
Find the device manual for free Endurance T90 TUNTURI in PDF.



| Product type | Electric treadmill |
| Brand | Tunturi |
| Model | Endurance T90 |
| Dimensions (unfolded) | 193.0 × 82.5 × 149.0 cm |
| Dimensions (folded) | 137.0 × 82.5 × 155.0 cm |
| Device weight | 117 kg |
| Maximum user weight | 150 kg (330 lbs) |
| Power supply | 210-240 V~, 50-60 Hz |
| Speed | 0.8 - 24.0 km/h (0.5 - 15.0 mph) |
| Incline | 0 - 15% (adjustable in 1% increments) |
| Training programs | 36 preset programs (P1-P36), 3 user programs (U1-U3), HRC (heart rate control), Body Fat, target countdown |
| Display | Multi-screen LED: speed, incline, distance, time, steps, heart rate, calories |
| Connectivity | Bluetooth for mobile app (iOS and Android), USB charging port (5 V/1 A) |
| Heart rate measurement | Hand grip sensors (contact); compatible with chest strap (optional) |
| Safety | Safety key, emergency stop (red button), circuit breaker, grounding |
| Lubrication | Automatic reminder every 300 km; use a suitable lubricant |
| Maintenance | Clean with a soft damp cloth; vacuum under the belt; do not use solvents |
| Warranty | According to local conditions; covers manufacturing defects |
| Spare parts | Available from the dealer |
Frequently Asked Questions - Endurance T90 TUNTURI
User questions about Endurance T90 TUNTURI
0 question about this device. Answer the ones you know or ask your own.
Ask a new question about this device
Download the instructions for your Treadmills in PDF format for free! Find your manual Endurance T90 - TUNTURI and take your electronic device back in hand. On this page are published all the documents necessary for the use of your device. Endurance T90 by TUNTURI.
USER MANUAL Endurance T90 TUNTURI
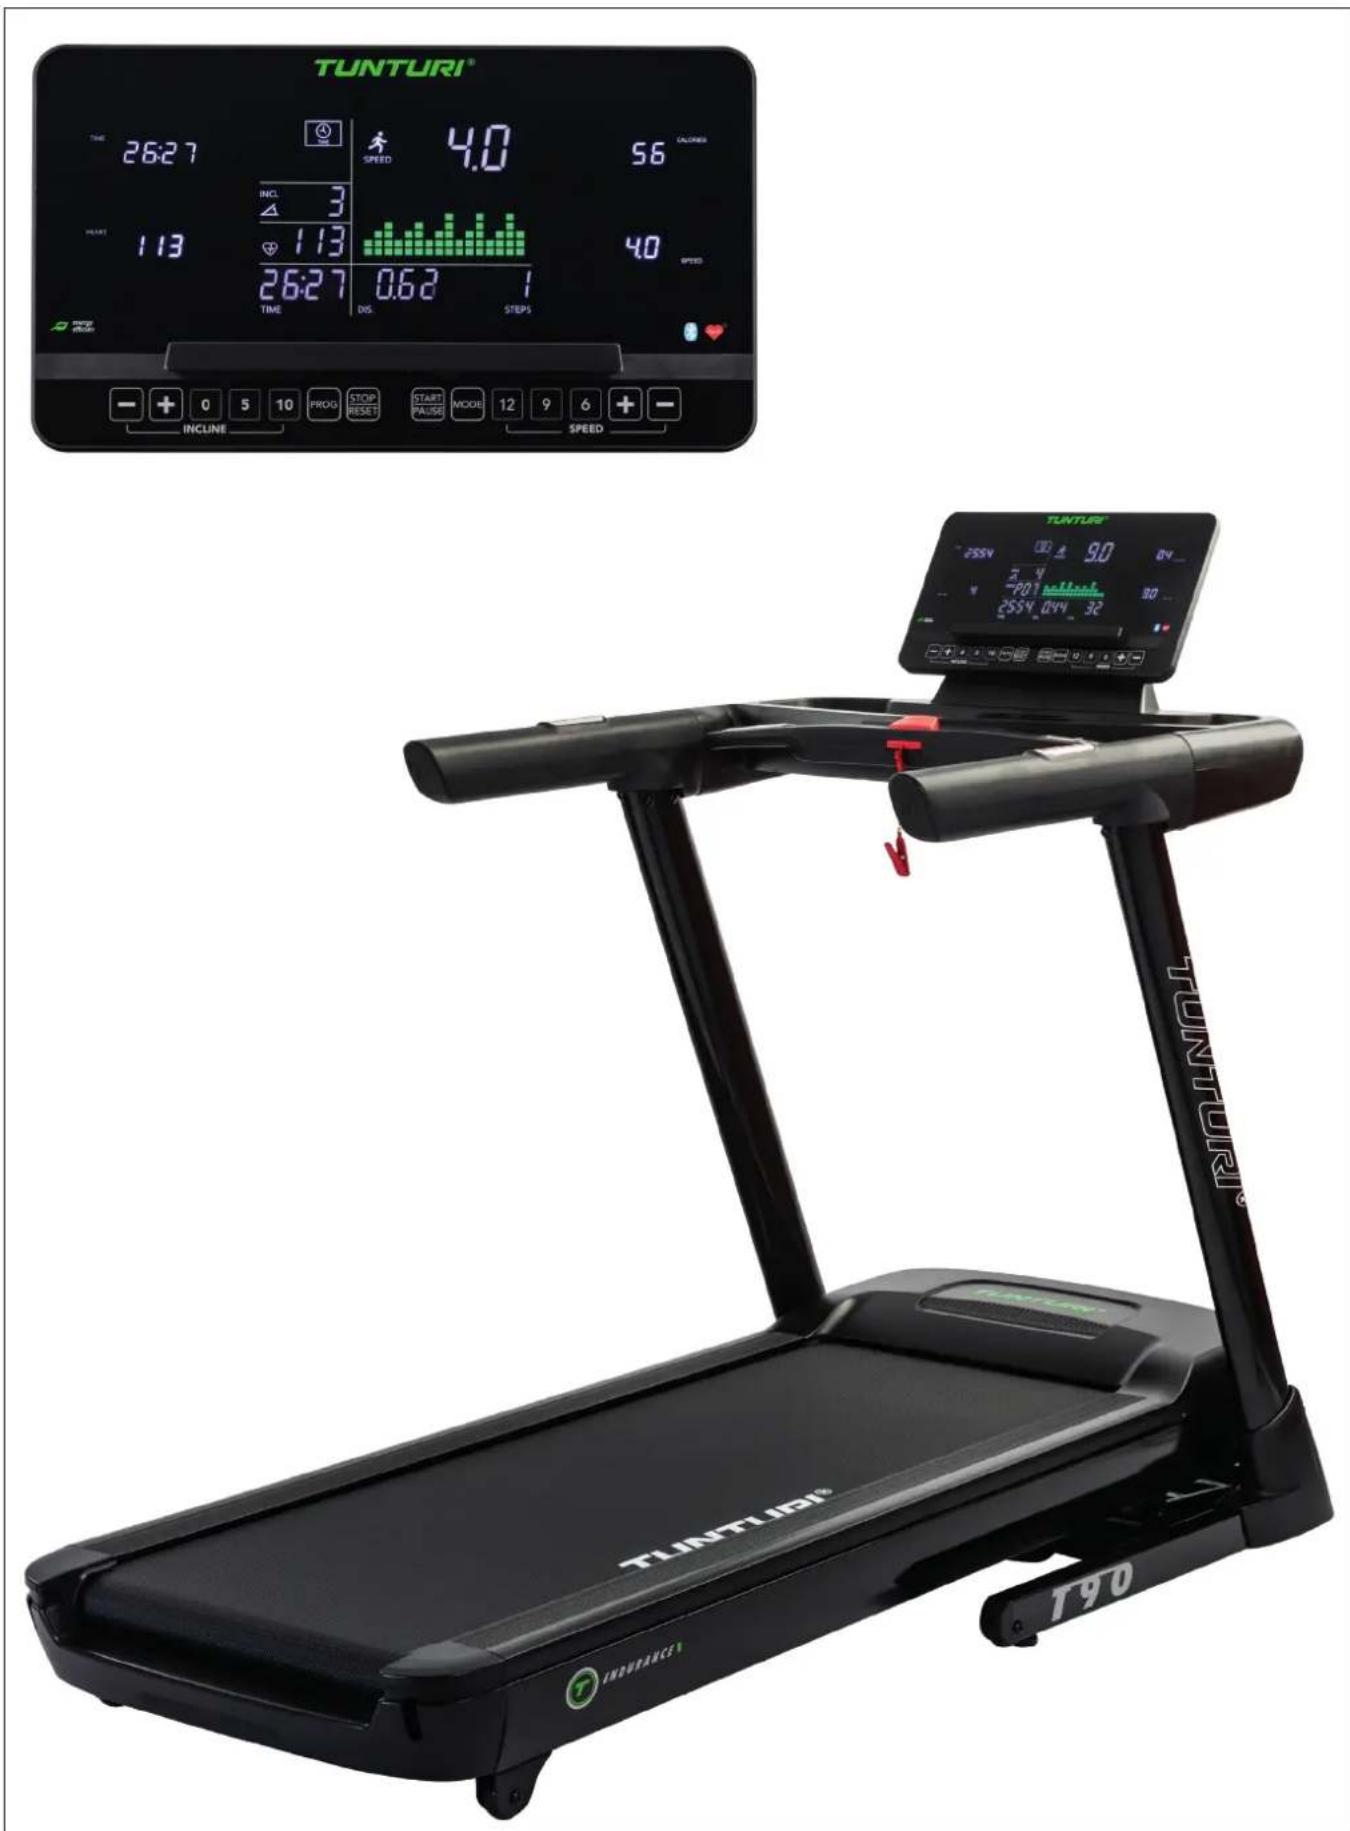
T90 Treadmill Endurance
GB User manual 17 - 27
DE Benutzerhandbuch 28 - 39
FR Manuel de l'utilisateur 40 - 51
NL Gebruikershandleiding 52 - 63
IT Manuale d'uso 64 - 75
ES Manual del usuario 76 - 87
SV Bruksanvisning 88 - 98
SU Käyttöohje 99 - 109

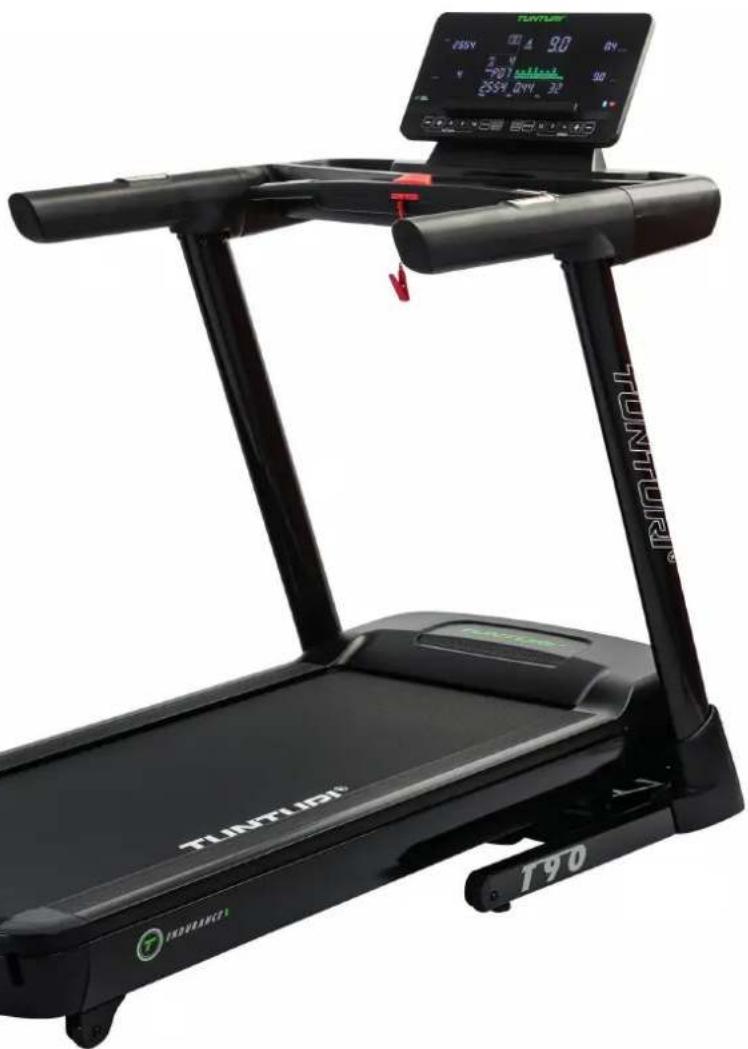
natural_image
Black TUNFLOR treadmill with digital display and brand logo, no visible text or symbols on the device itself.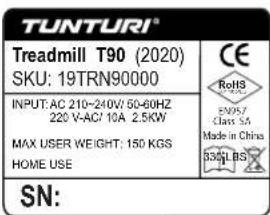
Attention, Achtung, Attention, Attentie, Attenzione, Atención, Giv akt, Huomio
- Please read this user manual carefully prior to using this product.
- Lesen Sie sich vor dem Gebrauch des Produkts diese Bedienungsanleitung sorgfältig durch.
- Veuillez lire attentivement le présent manuel de l'utilisateur avant d'utiliser ce produit.
- Lees deze gebruikershandleiding zorgvuldig voordat u dit product gaat gebruiken.
- Leggere attentamente questo manuale dell'utente prima di utilizzare il prodotto.
- Antes de utilizar este producto, lea atentamente este manual de usuario.
- Läs den här användarhandboken noggrant före användning av den här produkten.
- Lue tämä käyttöohje huolellisesti ennen tämän tuotteen käyttöä.

natural_image
Icon depicting a document with a globe symbol and 'WWW' text, no readable text or symbols beyond the icon itself.A
B
C
D-0
natural_image
Pure geometric diagram of a rectangle divided by diagonals and a central cross (no text or symbols)D-1
natural_image
Pure geometric diagram of a square divided by two diagonals (no text or symbols)
natural_image
Pure geometric diagram of a square divided by two diagonals into four triangles (no text or symbols)D-2
natural_image
Two identical gray squares with diagonal lines dividing the square into two triangles (no text or symbols)D-3
natural_image
Pure geometric diagram of a square divided by two diagonal lines forming an X (no text or symbols)
natural_image
Pure geometric diagram of a square divided by four diagonals (no text or symbols)D-4
natural_image
Pure geometric diagram of a square divided by two diagonal lines forming an X (no text or symbols)
natural_image
Pure geometric diagram of a square divided by two diagonals into four triangles (no text or symbols)E-1
E-2
F-1
natural_image
Illustration of a treadmill with a red arrow indicating motion, and a magnified view showing a lock mechanism (no text or symbols)F-2

F-3
natural_image
Line drawing of a person using a treadmill to lift a horizontal surface (no text or symbols)F-4
natural_image
Line drawing of a treadmill with a person running on its side, showing the motion and component placement (no text or symbols)F-5
Scan to see YouTube tutorial
F-6
G
| Step 1 2 3 | 4 5 6 | 7 8 9 | 10 11 12 | 13 14 15 | 16 | |||||||||||||
| P1 | KM/H 1.0 | 3.0 | 3 | 0 | 7.0 | 7.0 | 5.0 | 5.0 | 5.0 | 7.0 | 7.0 | 5.0 | 5 | 0 | 5.0 | 5.0 | 3.0 | 2.0 |
| INCL. 2 | 6 | 6 | 8 | 6 | 6 | 4 | 4 | 6 | 2 | 2 | ||||||||
| P2 | KM/H 2.0 | 3.0 | 3 | 0 | 6.0 | 5.0 | 5.0 | 8.0 | 5.0 | 5.0 | 6.0 | 8.0 | 8 | 0 | 8.0 | 5.0 | 4.0 | 3.0 |
| INCL. 3 | 9 | 9 | 9 | 2 | 2 | 8 | 8 | 4 | 4 | 4 | ||||||||
| P3 | KM/H 2.0 | 3.0 | 5 | 0 | 5.0 | 7.0 | 7.0 | 8.0 | 5.0 | 5.0 | 6.0 | 8.0 | 8 | 0 | 8.0 | 5.0 | 4.0 | 3.0 |
| INCL. 1 | 3 | 4 | 5 | 7 | 7 | 4 | 4 | 6 | 3 | 2 | 2 | |||||||
| P4 | KM/H 2.0 | 2.0 | 3 | 0 | 5.0 | 5.0 | 5.0 | 8.0 | 8.0 | 8.0 | 8.0 | 5.0 | 5 | 0 | 5.0 | 3.0 | 3.0 | 2.0 |
| INCL. 3 | 6 | 6 | 6 | 9 | 9 | 9 | 9 | 6 | 6 | 2 | 2 | |||||||
| P5 | KM/H 3.0 | 4.0 | 5 | 0 | 6.0 | 7.0 | 8.0 | 9.0 | 10.0 | 10.0 | 10.0 | 9.0 | 8.0 | 7 | 0 | 5.0 | 4.0 | 3.0 |
| INCL. 2 | 4 | 4 | 8 | 6 | 6 | 6 | 8 | 7 | 6 | 5 | 1 | 1 | ||||||
| P6 | KM/H 3.0 | 4.0 | 5 | 0 | 5.0 | 6.0 | 6.0 | 7.0 | 7.0 | 7.0 | 9.0 | 9.0 | 10.0 | 10.0 | 11.0 | 5.0 | 3.0 | |
| INCL. 1 | 8 | 8 | 8 | 8 | 7 | 7 | 7 | 5 | 5 | 3 | 1 | |||||||
| P7 | KM/H 3.0 | 4.0 | 9 | 0 | 4.0 | 1.0 | 4.0 | 10.0 | 4.0 | 9.0 | 4.0 | 8.0 | 4.0 | 11.0 | 0 | 5.0 | 3.0 | 2.0 |
| INCL. 1 | 4 | 4 | 4 | 6 | 6 | 8 | 8 | 10 | 10 | 10 | 6 | 2 | ||||||
| P8 | KM/H 3.0 | 5.0 | 8 | 0 | 3.0 | 5.0 | 7.0 | 9.0 | 3.0 | 5.0 | 7.0 | 10.0 | 3.0 | 5.0 | 7.0 | 11.0 | 5.0 | |
| INCL. 3 | 8 | 8 | 3 | 7 | 7 | 3 | 6 | 6 | 3 | 5 | 5 | |||||||
| P9 | KM/H 3.0 | 7.0 | 9 | 0 | 4.0 | 7.0 | 10.0 | 4.0 | 7.0 | 11.0 | 5.0 | 7.0 | 12.0 | 4.0 | 7.0 | 12.0 | 6.0 | |
| INCL. 3 | 6 | 3 | 7 | 3 | 8 | 8 | 9 | 3 | 3 | 7 | 7 | |||||||
| P10 | KM/H 3.0 | 5.0 | 6 | 0 | 6.0 | 6.0 | 9.0 | 10.0 | 6.0 | 6.0 | 9.0 | 10.0 | 6.0 | 6.0 | 6.0 | 11.0 | 3.0 | |
| INCL. 2 | 7 | 7 | 5 | 5 | 8 | 8 | 8 | 8 | 4 | 4 | ||||||||
| P11 | KM/H 4.0 | 5.0 | 7 | 0 | 9.0 | 0.0 | 11 | 0 | 9.0 | 6.0 | 8.0 | 9.0 | 10.0 | 10.0 | 11.0 | 9.0 | 6.0 | 5.0 |
| INCL. 1 | 6 | 6 | 3 | 3 | 7 | 4 | 4 | 4 | 6 | |||||||||
| P12 | KM/H 4.0 | 6.0 | 10 | 0.0 | 10.0 | 7.0 | 10 | 0.0 | 10.0 | 10.0 | 7.0 | 7.0 | 10.0 | 10.0 | 10.0 | 6.0 | 5.0 | |
| INCL. 3 | 8 | 6 | 9 | 5 | 5 | 8 | 8 | 4 | 4 | 4 | ||||||||
| P13 | KM/H 4.0 | 12.0 | 4.0 | 12.0 | 4.0 | 12.0 | 4.0 | 12.0 | 4.0 | 12.0 | 4.0 | 12.0 | 4.0 | |||||
| INCL. 4 | 8 | 10 | 12 | 4 | 8 | 10 | 12 | 4 | 10 | 12 | ||||||||
| P14 | KM/H 2.0 | 3.0 | 3 | 0 | 6.0 | 9.0 | 11.0 | 3.0 | 6.0 | 9.0 | 11.0 | 3.0 | 6.0 | |||||
| INCL. 5 | 9 | 11 | 12 | 5 | 9 | 11 | 12 | 5 | 9 | 11 | 12 | |||||||
| P15 | KM/H 4.0 | 6.0 | 1.0 | 11.0 | 9.0 | 6 | 0 | 11.0 | 9.0 | 6.0 | 11.0 | 9.0 | 6.0 | |||||
| INCL. 2 | 3 | 4 | 5 | 6 | 7 | 8 | 8 | 7 | 6 | 5 | 4 | |||||||
| P16 | KM/H 2.0 | 4.0 | 4.0 | 12.0 | 4.0 | 12.0 | 4.0 | 12.0 | 4.0 | 12.0 | ||||||||
| INCL. 2 | 4 | 5 | 6 | 2 | 4 | 5 | 6 | |||||||||||
| P17 | KM/H 2.0 | 2.0 | 2.0 | 4.0 | 6.0 | 6.0 | 11.0 | |||||||||||
| INCL. 2 | 4 | 6 | 8 | 10 | 12 | 12 | 12 | |||||||||||
| P18 | KM/H 3.0 | 6.0 | 3.0 | 6.0 | 6.0 | 6.0 | 6.0 | |||||||||||
| INCL. 2 | 6 | 8 | 2 | 6 | 8 | 2 | ||||||||||||
| P19 | KM/H 4.0 | 12.0 | 4.0 | 12.0 | 4.0 | 12.0 | ||||||||||||
| INCL. 10 | 8 | 6 | 4 | 10 | 8 | 6 | ||||||||||||
| P20 | KM/H 5.0 | 13.0 | 5.0 | 13.0 | 5.0 | 13.0 | ||||||||||||
| INCL. 12 | 8 | 2 | 12 | 8 | 2 | 12 | ||||||||||||
G
| P21 | KM/H 2.0 | 6.0 | 2 | 0 | 6.0 | 1 | 1.0 | 2.0 | 6.0 | 11.0 | 2.0 | 6.0 | 11.0 | 2.0 | 6 | 0 | 11.0 | 2.0 | 6.0 | |||||||
| INCL. 12 | 9 | 3 | 12 | 9 | 3 | 12 | 9 | 3 | 12 | 9 | 3 | |||||||||||||||
| P22 | KM/H 4.0 | 6.0 | 1 | 1.0 | 6.0 | 2.0 | 11 | 0 | 6.0 | 2.0 | 11.0 | 6.0 | 2.0 | 11.0 | 6.0 | 2.0 | 11.0 | 6.0 | 0 | |||||||
| INCL. 2 | 4 | 10 | 2 | 4 | 10 | 2 | 6 | 8 | 12 | 6 | 8 | 12 | 2 | |||||||||||||
| P23 | KM/H 4.0 | 6.0 | 1 | 1.0 | 6.0 | 6.0 | 2.0 | 11.0 | 6.0 | 6.0 | 2.0 | 11.0 | 6.0 | 6.0 | 0 | 2.0 | 11.0 | 6.0 | ||||||||
| INCL. 2 | 3 | 4 | 5 | 6 | 6 | 7 | 8 | 10 | 11 | 12 | 12 | 12 | 10 | 2 | ||||||||||||
| P24 | KM/H 4.0 | 6.0 | 1 | 1.0 | 6.0 | 4.0 | 11 | 0 | 6.0 | 4.0 | 11.0 | 6.0 | 4.0 | 11.0 | 6.0 | 4.0 | 11.0 | 6.0 | 0 | |||||||
| INCL. 4 | 4 | 5 | 6 | 7 | 8 | 10 | 10 | 12 | 12 | 12 | 12 | 12 | 12 | 10 | 2 | |||||||||||
| P25 | KM/H 5.0 | 13.0 | 5.0 | 13.0 | 5.0 | 13.0 | 5.0 | 13.0 | 5.0 | 13.0 | 5.0 | 13.0 | 5.0 | 13.0 | 5.0 | 13.0 | 5.0 | 13.0 | 5.0 | 13.0 | ||||||
| INCL. 5 | 9 | 11 | 12 | 5 | 9 | 11 | 12 | 5 | 9 | 11 | 12 | 5 | 9 | 11 | 12 | |||||||||||
| P26 | KM/H 3.0 | 4.0 | 4 | 0 | 7.0 | 10.0 | 12 | 0 | 4.0 | 7.0 | 10.0 | 12.0 | 4.0 | 7.0 | 10.0 | 12.0 | 4.0 | 7.0 | ||||||||
| INCL. 6 | 10 | 12 | 12 | 6 | 10 | 11 | 12 | 6 | 10 | 12 | 6 | 10 | 12 | 12 | ||||||||||||
| P27 | KM/H 5.0 | 7.0 | 1 | 2.0 | 12.0 | 10.0 | 7.0 | 12.0 | 12.0 | 10.0 | 7.0 | 12.0 | 12.0 | 10.0 | 7.0 | 12.0 | 12.0 | |||||||||
| INCL. 3 | 4 | 5 | 6 | 7 | 9 | 8 | 9 | 9 | 8 | 7 | 6 | 5 | 4 | 3 | ||||||||||||
| P28 | KM/H 3.0 | 5.0 | 5 | 0 | 13.0 | 5.0 | 13 | 0 | 5.0 | 13.0 | 5.0 | 13.0 | 5.0 | 13.0 | 5.0 | 13.0 | 5.0 | 13.0 | ||||||||
| INCL. 3 | 5 | 6 | 7 | 3 | 5 | 6 | 7 | 3 | 5 | 6 | 7 | |||||||||||||||
| P29 | KM/H 3.0 | 3.0 | 3 | 0 | 5.0 | 7.0 | 7.0 | 10.0 | 12.0 | 12.0 | 3.0 | 5.0 | 7.0 | 7.0 | 12.0 | 12.0 | 10.0 | |||||||||
| INCL. 3 | 5 | 7 | 9 | 11 | 12 | 12 | 12 | 12 | 12 | 11 | 9 | 7 | 5 | 3 | ||||||||||||
| P30 | KM/H 4.0 | 7.0 | 4 | 0 | 7.0 | 7.0 | 4.0 | 7.0 | 7.0 | 4.0 | 7.0 | 7.0 | 4 | 0 | 7.0 | 7.0 | 4.0 | 7.0 | ||||||||
| INCL. 3 | 7 | 9 | 3 | 7 | 9 | 3 | 7 | 9 | 3 | 9 | 3 | |||||||||||||||
| P31 | KM/H 5.0 | 13.0 | 5.0 | 13.0 | 5.0 | 13.0 | 5.0 | 13.0 | 5.0 | 13.0 | 5.0 | 13.0 | 5.0 | 13.0 | 5.0 | 13.0 | 5.0 | 13.0 | ||||||||
| INCL. 11 | 9 | 7 | 5 | 11 | 9 | 7 | 5 | 11 | 9 | 7 | 5 | |||||||||||||||
| P32 | KM/H 6.0 | 14.0 | 6.0 | 14.0 | 6.0 | 14.0 | 6.0 | 14.0 | 6.0 | 14.0 | 6.0 | 14.0 | 6.0 | 14.0 | 6.0 | 14.0 | 6.0 | 14.0 | ||||||||
| INCL. 12 | 9 | 3 | 12 | 9 | 3 | 12 | 9 | 3 | 12 | 9 | 3 | |||||||||||||||
| P33 | KM/H 3.0 | 7.0 | 3 | 0 | 7.0 | 12.0 | 3.0 | 7.0 | 12.0 | 3.0 | 7.0 | 12.0 | 7.0 | 7.0 | 12.0 | 3.0 | 7.0 | |||||||||
| INCL. 12 | 10 | 4 | 12 | 10 | 4 | 12 | 10 | 4 | 12 | 10 | 4 | 4 | ||||||||||||||
| P34 | KM/H 5.0 | 7.0 | 1 | 2.0 | 7.0 | 3.0 | 12 | 0 | 7.0 | 3.0 | 12.0 | 7.0 | 3.0 | 12.0 | 7.0 | 3.0 | 12.0 | 7.0 | ||||||||
| INCL. 3 | 5 | 11 | 3 | 5 | 11 | 3 | 7 | 12 | 7 | 9 | 12 | 3 | ||||||||||||||
| P35 | KM/H 5.0 | 7.0 | 1 | 2.0 | 7.0 | 7.0 | 3.0 | 12.0 | 7.0 | 7.0 | 3.0 | 12.0 | 7.0 | 7.0 | 3.0 | 12.0 | 7.0 | |||||||||
| INCL. 3 | 4 | 5 | 6 | 7 | 8 | 9 | 11 | 12 | 12 | 12 | 12 | 11 | 3 | |||||||||||||
| P36 | KM/H 5.0 | 7.0 | 1 | 2.0 | 7.0 | 5.0 | 12 | 0 | 7.0 | 5.0 | 12.0 | 7.0 | 5.0 | 12.0 | 7.0 | 5.0 | 12.0 | 7.0 | ||||||||
| INCL. 5 | 5 | 6 | 7 | 8 | 9 | 11 | 11 | 12 | 12 | 12 | 12 | 11 | 3 |
H
natural_image
Two black Tunkturi treadmills shown from different angles, no visible text or symbols on the devices themselves.Index
Welcome....17
Safety warnings....17
Electrical safety 18
Assembly instructions....18
Description illustration A....18
Description illustration B....18
Description illustration C....18
Description illustration D....18
Accessories (fig. H)....18
Workouts....19
Exercise Instructions....19
Heart rate 19
Use....20
Adjusting the support feet....20
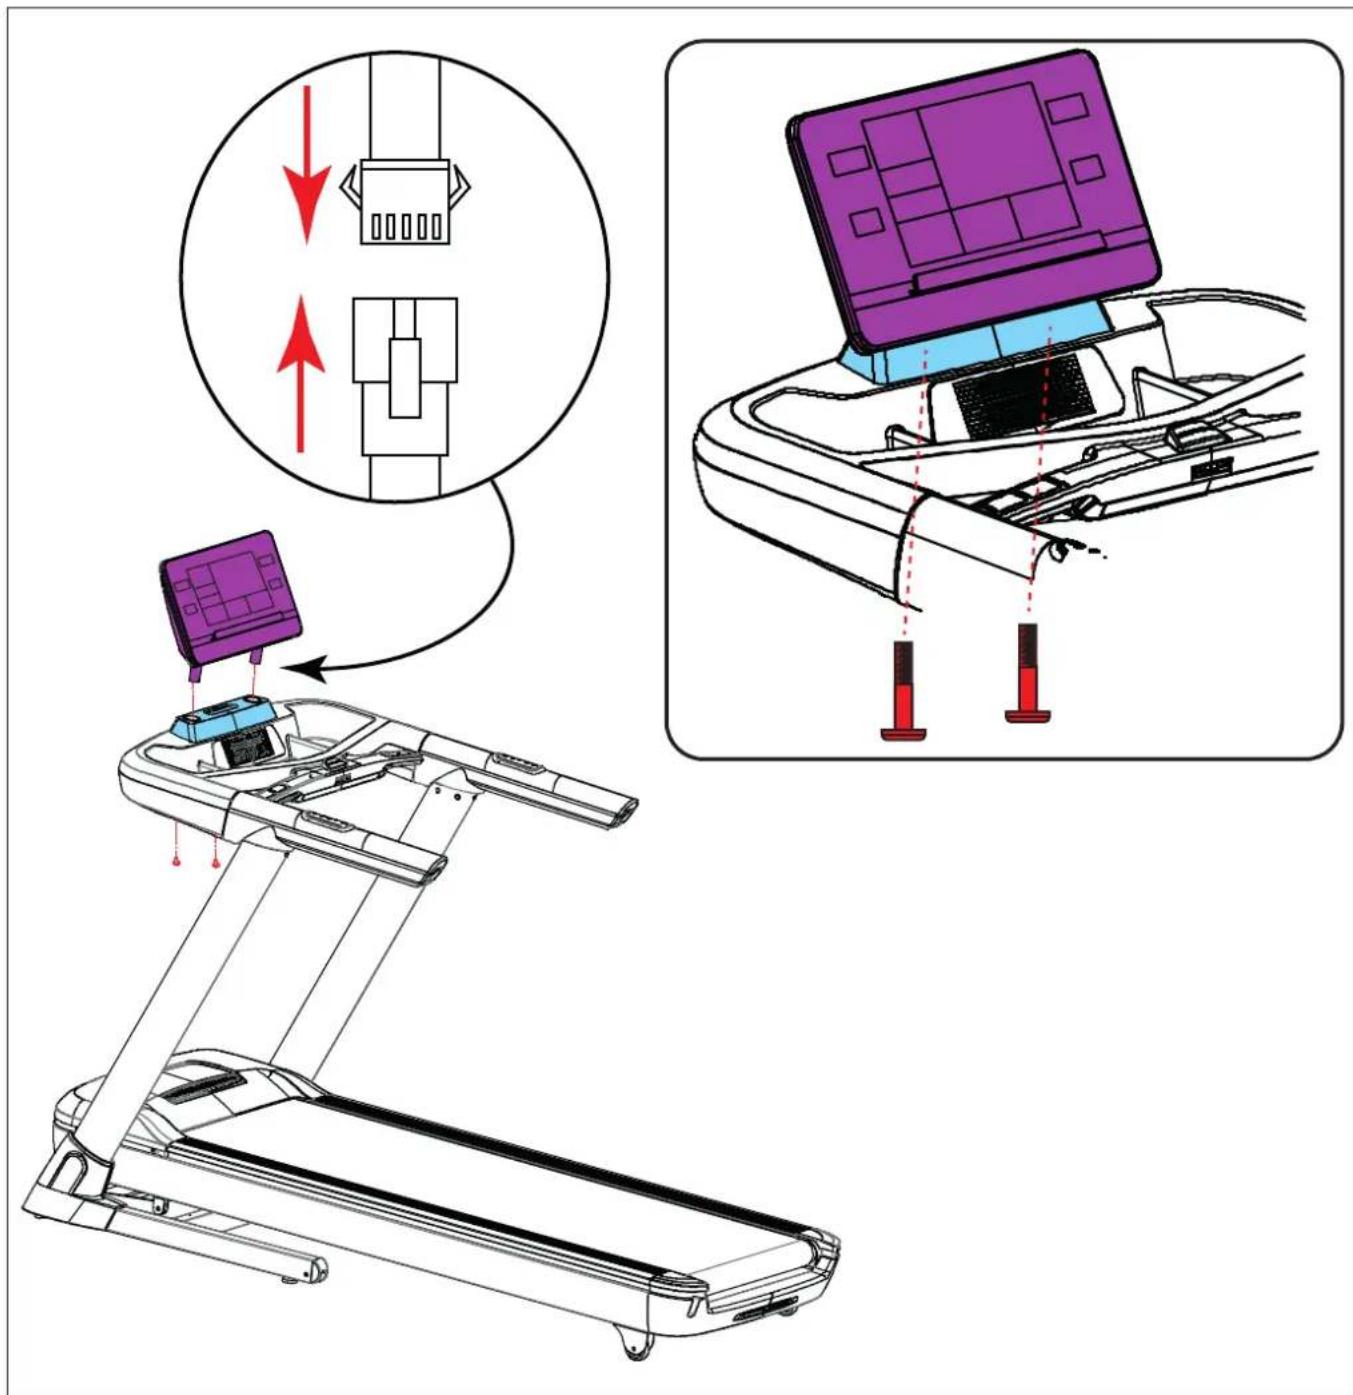
Console (fig. E-1) 20
Buttons....21
Explanation of display items 21
Explanation of displays acoustic beep....21
USB function....21
Programs ......22
Quick start....22
Target countdown mode (P0)....22
End your workout....22
Pre-set Programs (P1\~P36)....22
User programs (U01\~U03)....22
Body Fat....22
HRC Program 23
ERP Function....23
Bluetooth & APP 23
Cleaning and maintenance....23
General Cleaning 24
Belt and Running Deck....24
Lubrication (fig. F-6) 24
Belt adjustments....24
Troubleshooting 25
Error codes....25
Oil....25
E5 25
E7 25
Metric/ Imperial setting....25
Transport and storage 26
Additional information 26
Warranty....26
Technical data....27
Declaration of the manufacturer ....27
Disclaimer....27
Welcome
Welcome to the world of Tunturi!
Thank you for purchasing this piece of Tunturi equipment.
Tunturi offers a wide range of home fitness equipment, including crosstrainers, treadmills, exercise bikes, rowers, strength benches and multi stations. The Tunturi equipment is suitable for the entire family, no matter what fitness level. For more information, please visit our website www.tunturi.com
Important Safety Instructions
This Owner's Manual is an essential part of your training equipment: reading all instructions in this manual before you start using this appliance. The following precautions must always be followed:
Safety warnings
WARNING
- Read the safety warnings and the instructions. Failure to follow the safety warnings and the instructions can cause personal injury or damage to the equipment. Keep the safety warnings and the instructions for future reference.
WARNING
- Heart rate monitoring systems may be inaccurate. Over exercise may result in serious injury or death. If you feel faint stop exercising immediately.
- The equipment is suitable for domestic and professional use only (e.g. hospitals, fire stations, hotels, schools etc.).
- The use of this equipment by children or persons with a physical, sensory, mental or motorial disability, or lack of experience and knowledge can give cause to hazards. Persons responsible for their safety must give explicit instructions or supervise the use of the equipment.
- Before starting your workout, consult a physician to check your health.
- If you experience nausea, dizziness or other abnormal symptoms, immediately stop your workout and consult a physician.
- To avoid muscular pain and strain, start each workout by warming up and finish each workout by cooling down. Remember to stretch at the end of the workout.
- The equipment is suitable for indoor use only. The equipment is not suitable for outdoor use.
- Only use the equipment in environments with adequate ventilation. Do not use the equipment in draughty environments in order not to catch a cold.
- Only use the equipment in environments with ambient temperatures between 10 °C\~35 °C. Only store the equipment in environments with ambient temperatures between 5 °C\~45 °C.
- Do not use or store the equipment in humid surroundings. The air humidity must never be more than 80%.
- Only use the equipment for its intended purpose. Do not use the equipment for other purposes than described in the manual.
- Do not use the equipment if any part is damaged or defective. If a part is damaged or defective, contact your dealer.
- Keep your hands, feet and other body parts away from the moving parts.
- Keep your hair away from the moving parts.
- Wear appropriate clothing and shoes.
- Keep clothing, jewellery and other objects away from the moving parts.
- Make sure that only one person uses the equipment at a time. The equipment must not be used by persons weighing more than 150 kg (330 lbs).
- Do not open equipment without consulting your dealer.
Electrical safety
(Only for equipment with electric power)
- Before use, always check that the mains voltage is the same as the voltage on the rating plate of the equipment.
- Do not use an extension cable.
- Keep the mains cable away from heat, oil and sharp edges.
- Do not alter or modify the mains cable or the mains plug.
- Do not use the equipment if the mains cable or the mains plug is damaged or defective. If the mains cable or the mains plug is damaged or defective, contact your dealer.
- Always fully unwind the mains cable.
- Do not run the mains cable underneath the equipment. Do not run the mains cable underneath a carpet. Do not place any objects on the mains cable.
- Make sure that the mains cable does not hang over the edge of a table.
- Make sure that the mains cable cannot be caught accidentally or tripped over.
- Do not leave the equipment unattended when the mains plug is inserted into the wall socket.
- Do not pull the mains cable to remove the mains plug from the wall socket.
- Remove the mains plug from the wall socket when the equipment is not in use, before assembly or disassembly and before cleaning and maintenance.
CAUTION
- If voltage varies by ten percent (10%) or more, the performance of your treadmill may be affected. Such conditions are not covered under your warranty. If you suspect the voltage is low, contact your local power company or a licensed electrician for proper testing.
CAUTION
- Route the power mains cord away from any moving part of the treadmill including the elevation mechanism and transport wheels.
Grounding Instructions
This product must be grounded. If the treadmill's electrical system should malfunction or breakdown grounding provides a path of least resistance for electric current, reducing the risk of electric shock. This product is equipped with a cord having an equipment-grounding plug. The plug must be plugged into an appropriate outlet that is properly installed and grounded in accordance with all local codes and ordinances.
WARNING
- Improper connection of the equipment-grounding conductor can result in a risk of electric shock. Check with a qualified electrician or serviceman if you are in doubt as to whether the product is properly grounded. Do not modify the plug provided with the product if it will not fit the outlet; have a proper outlet installed by a qualified electrician.
Assembly instructions
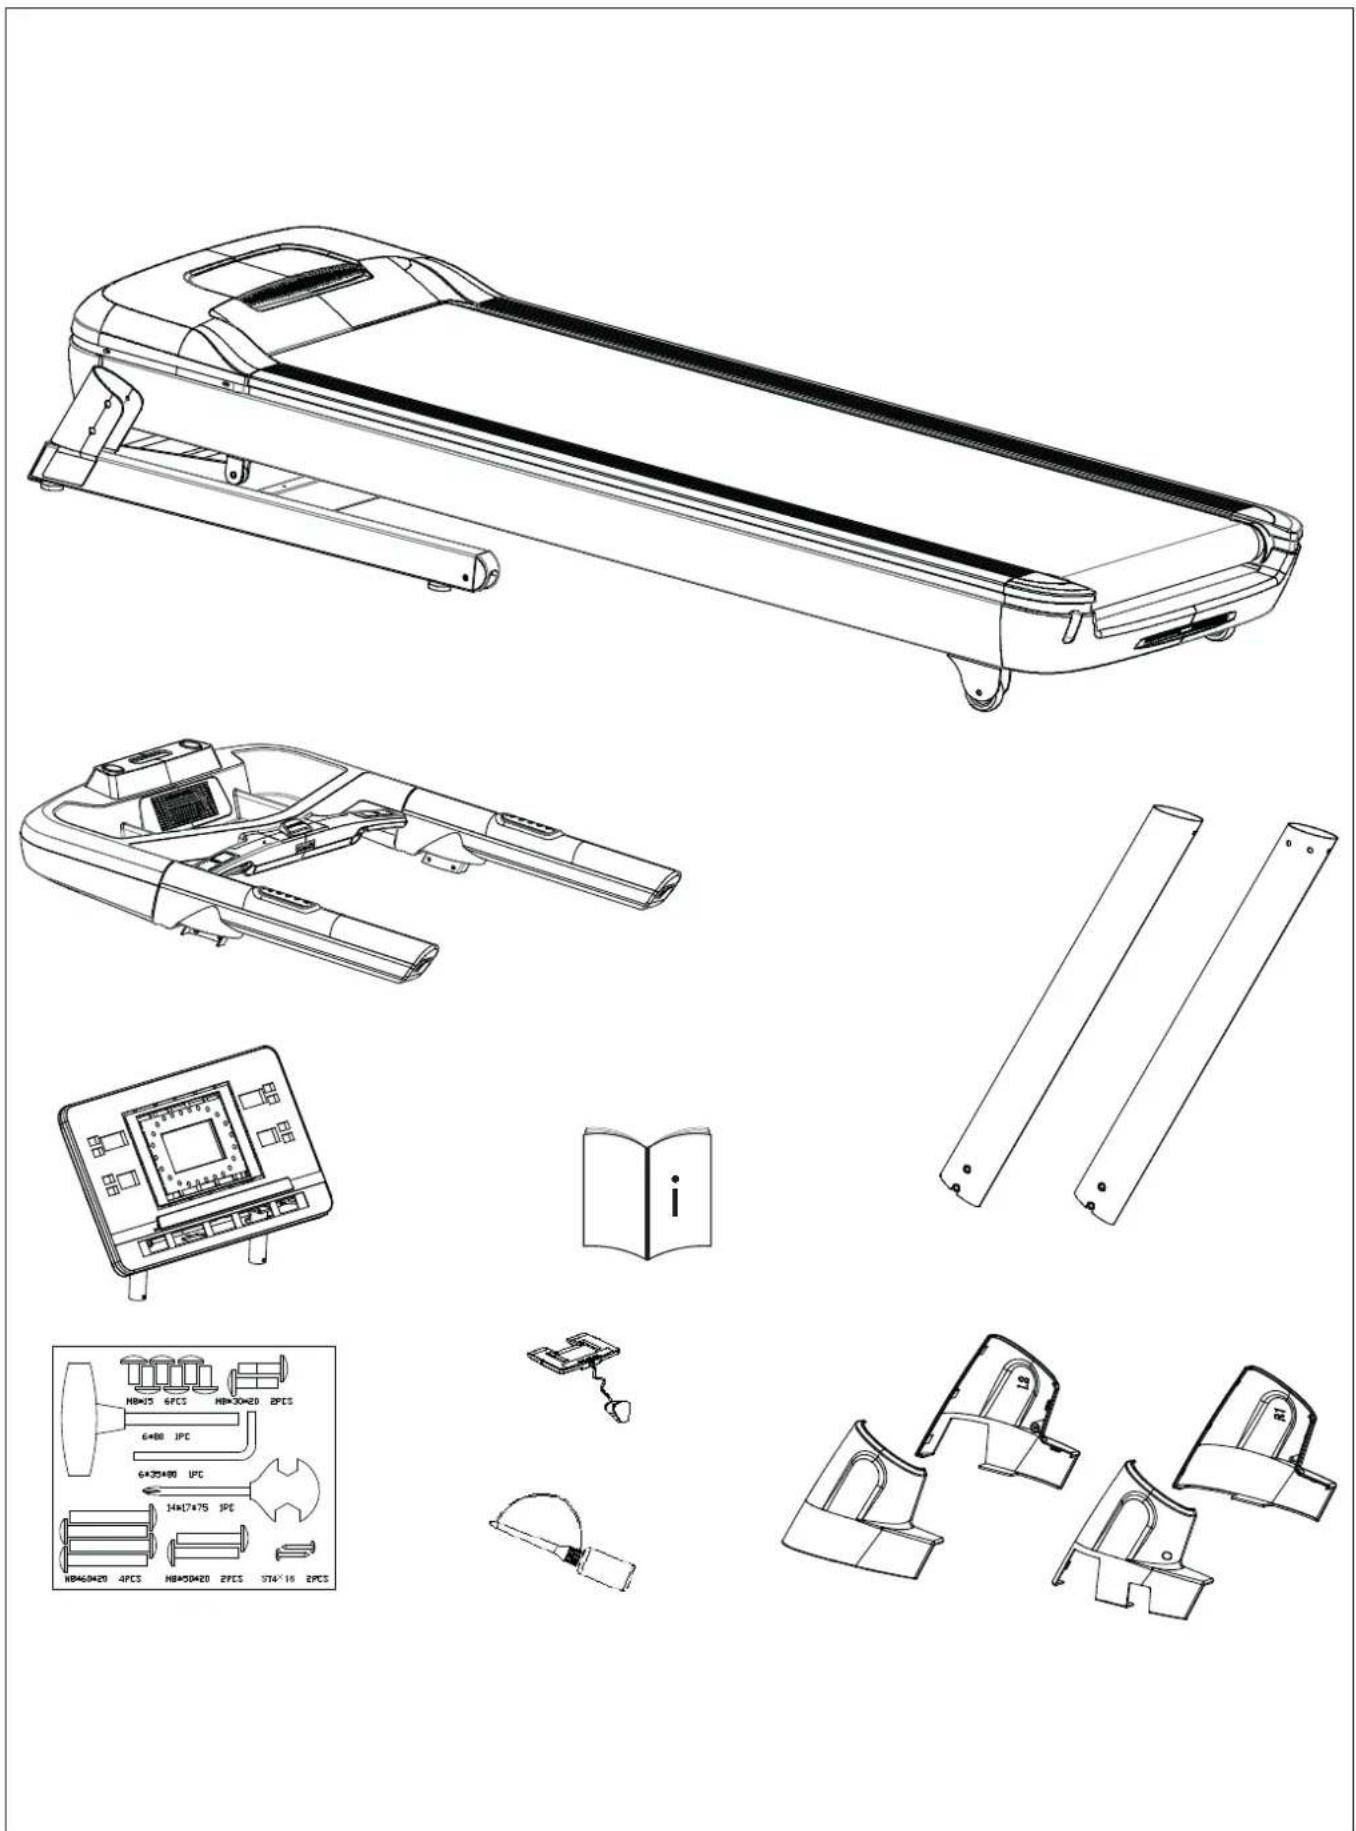
Description illustration A
The illustration shows what the trainer will looks like after the assembly is completed.
You can use this as a reference during your assembly, but do follow the assembly steps always in the correct sequence as showed in the illustrations.
Description illustration B
The illustration shows what components and parts you should find when un-boxing your product.
NOTE
- Small parts can be hidden/ packed in hollow spaces in the Styrofoam product protection
- If a part is missing, contact your dealer.
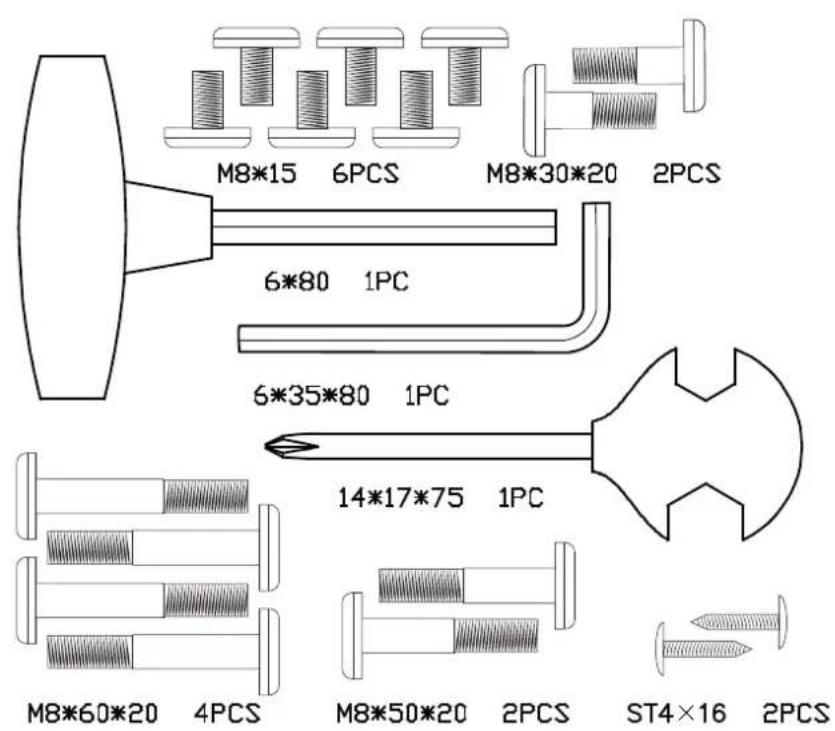
Description illustration C
The illustration shows the hardware kit that comes with your product. The hardware kit contains bolts, washers, screws, nuts etc. and the required tools to properly fit your trainer.
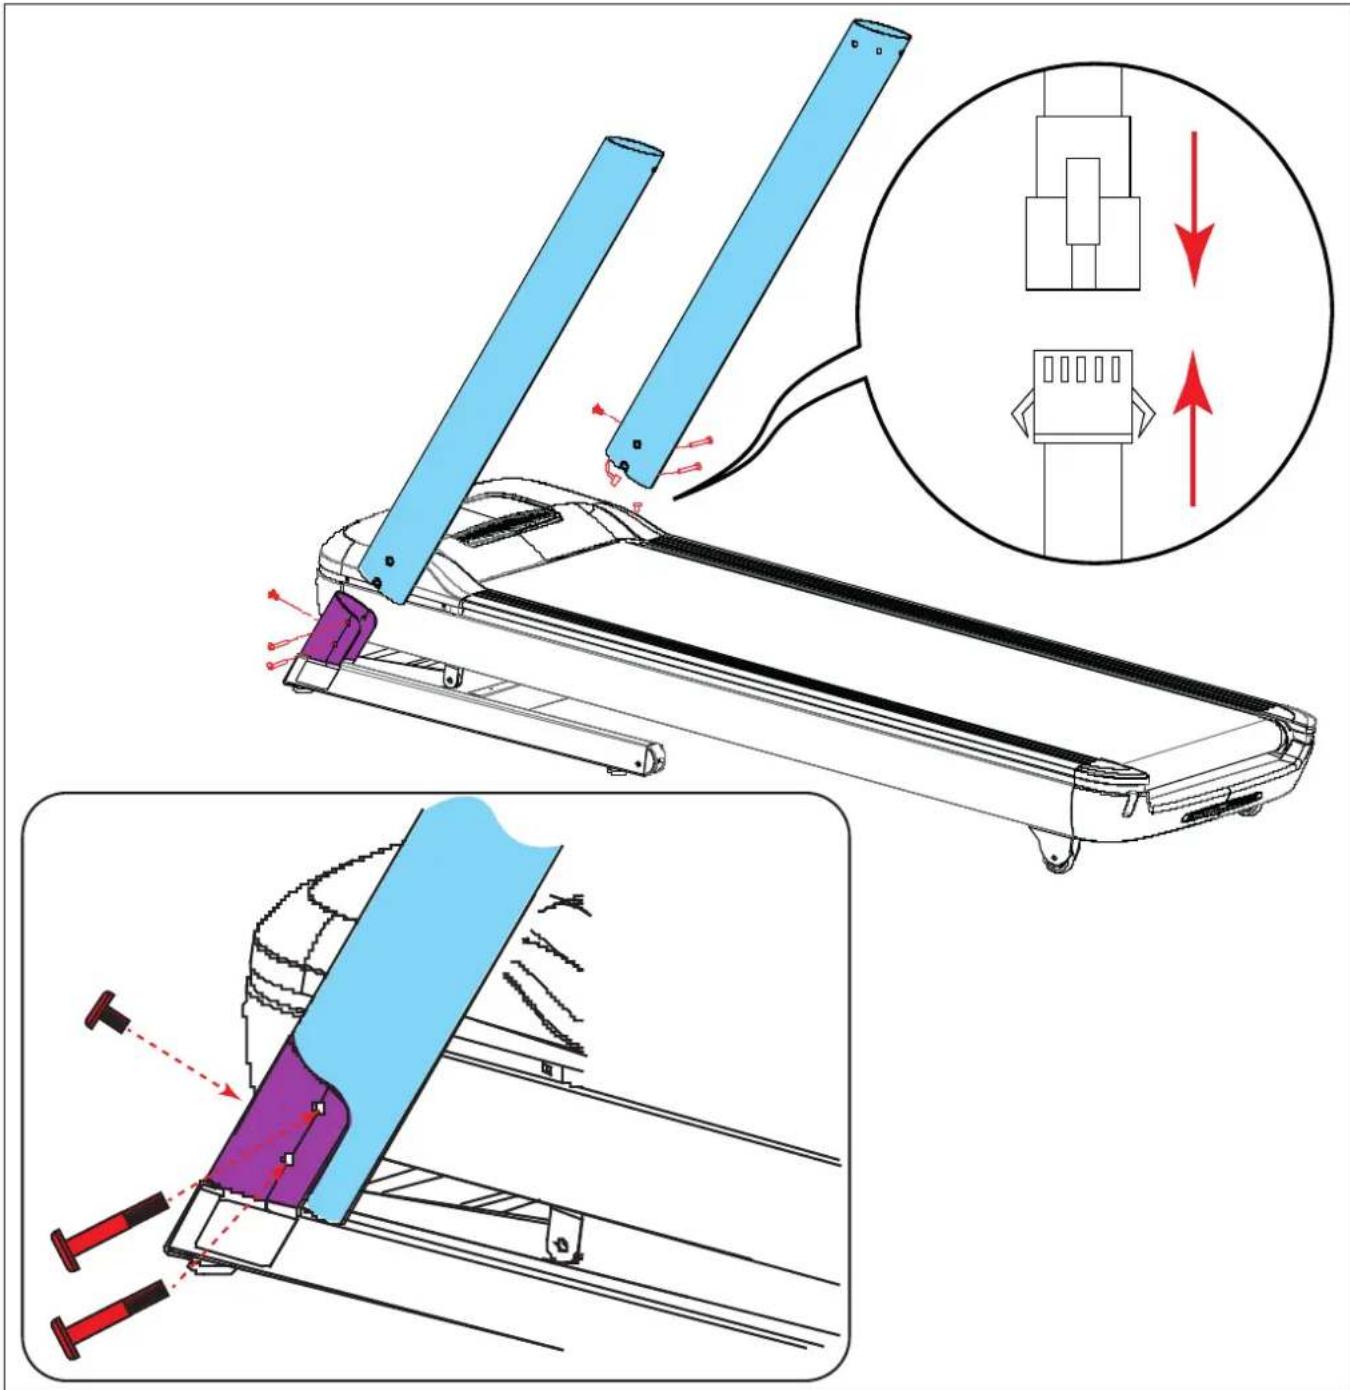
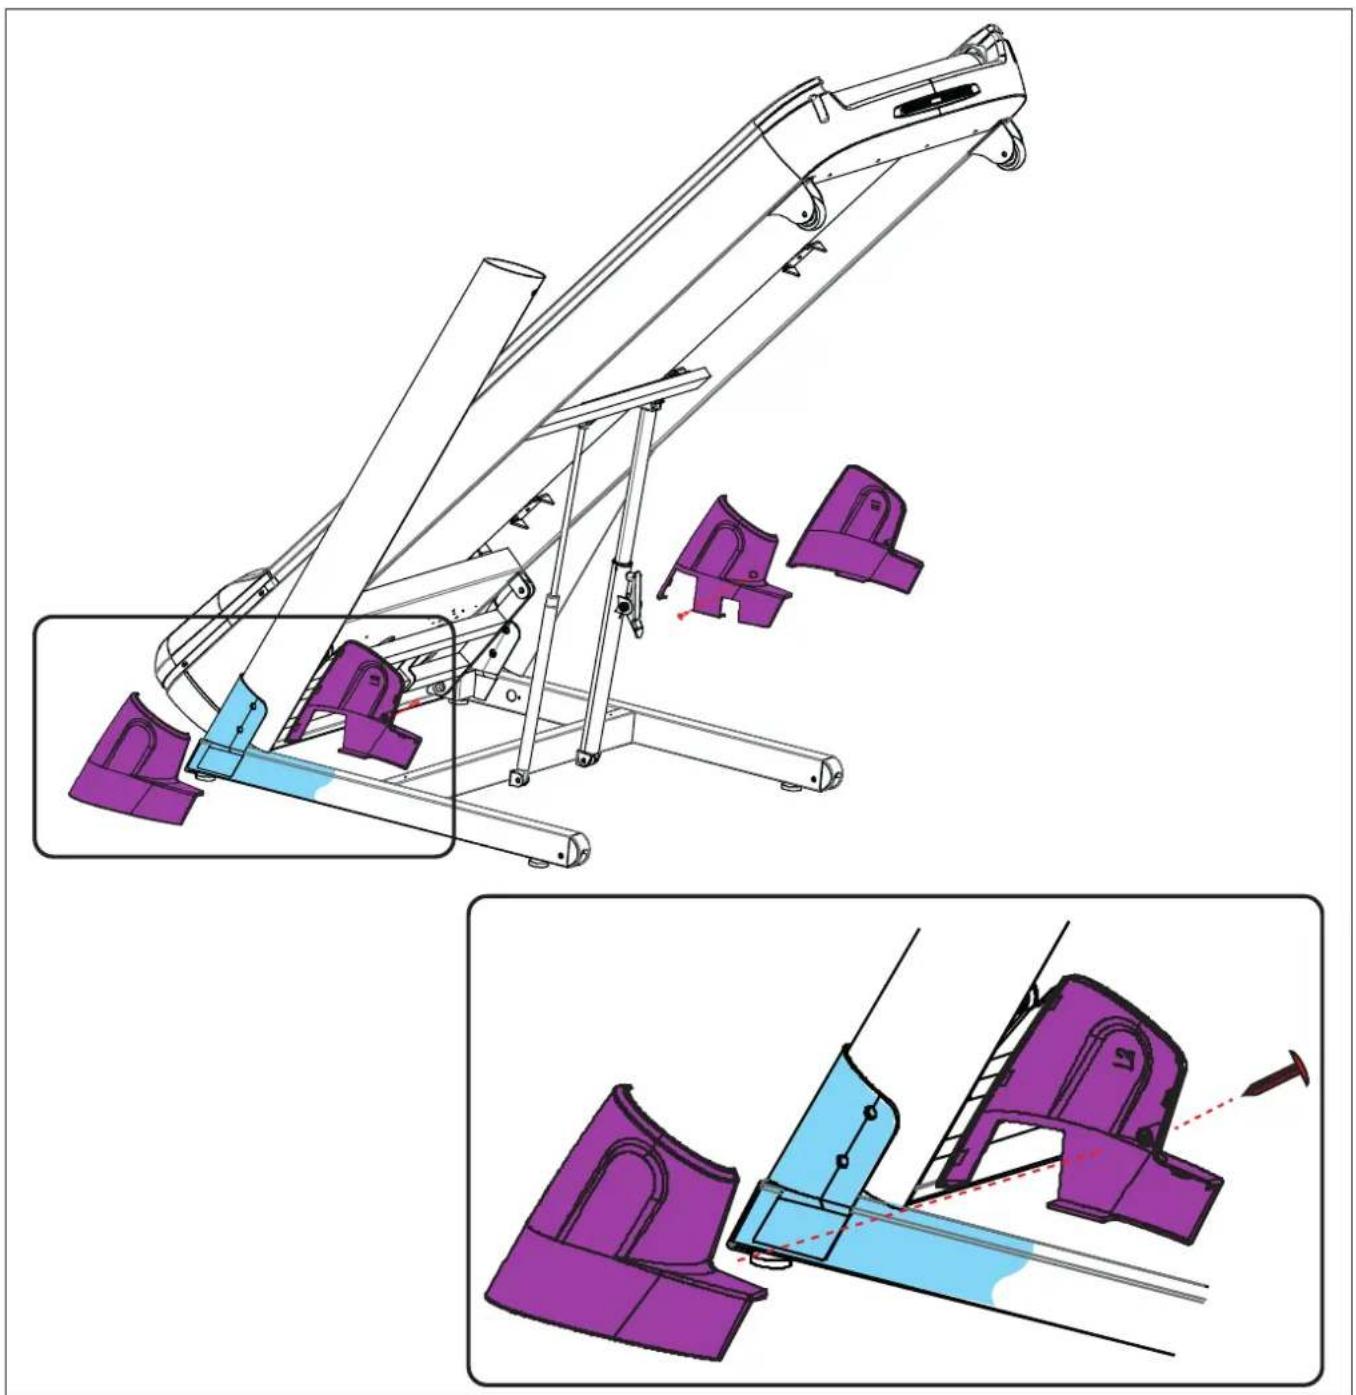
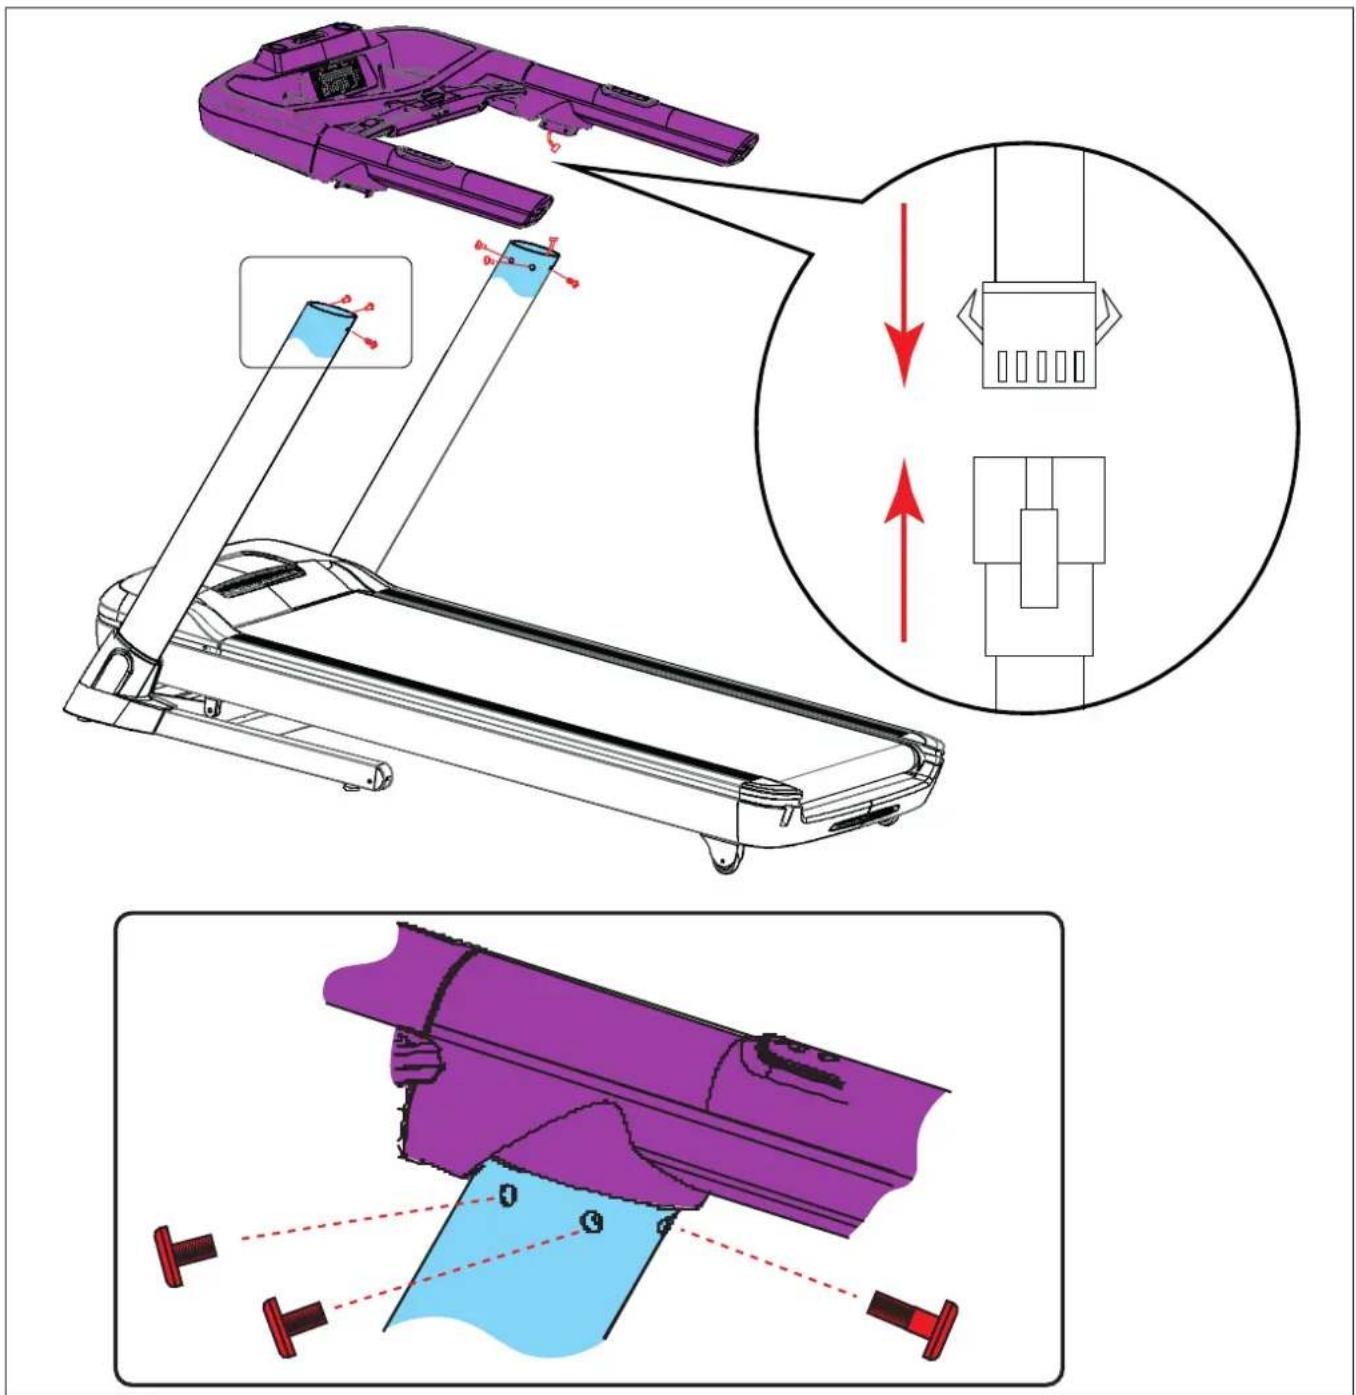
Description illustration D
The illustrations shows you in the correct following order how to assembly your trainer best.
NOTE
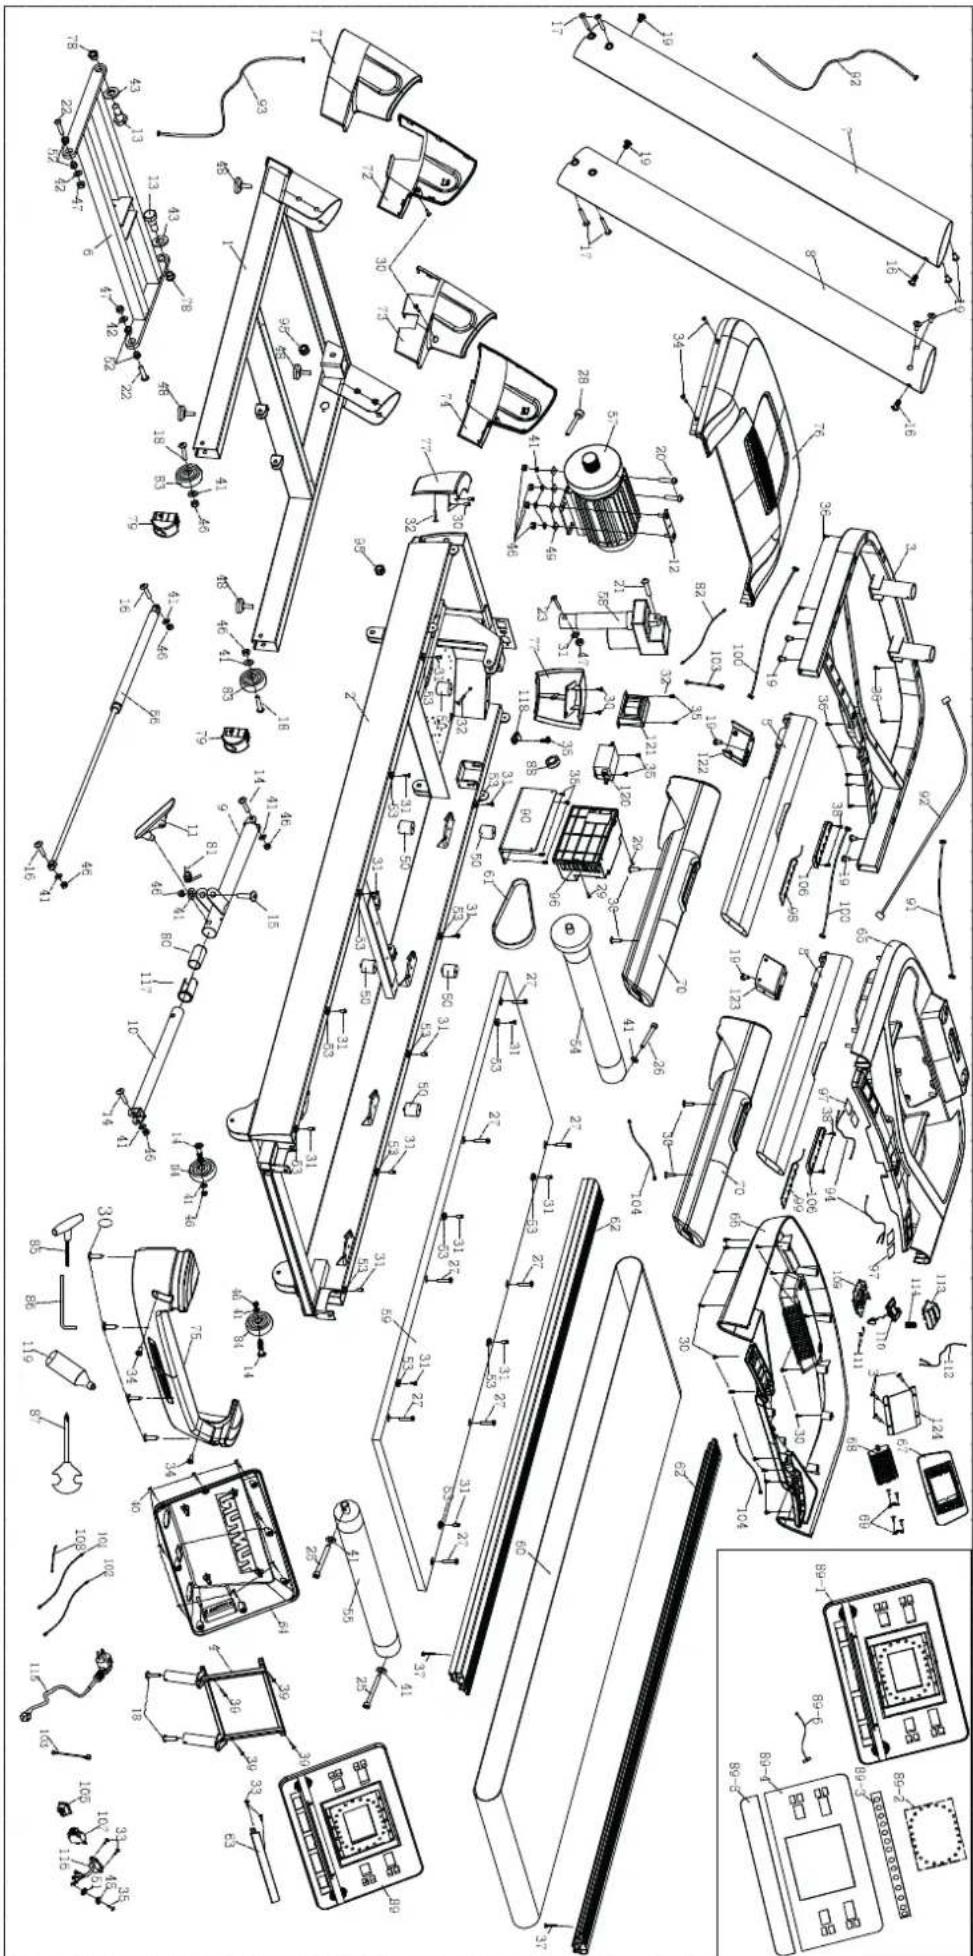
- Part numbers shown in the assembly steps are commencing with the spare part drawing that can be found in the online full version user manual.
WARNING
- Assemble the equipment in the given order.
- Carry and move the equipment with at least two persons.
CAUTION
- Place the equipment on a firm, level surface.
- Place the equipment on a protective base to prevent damage to the floor surface.
- Allow at least 100 cm of clearance around the equipment.
- Refer to the illustrations for the correct assembly of the equipment.
NOTE
- Save the tools provided with this product, after you completed the product assembly, for future service purposes.
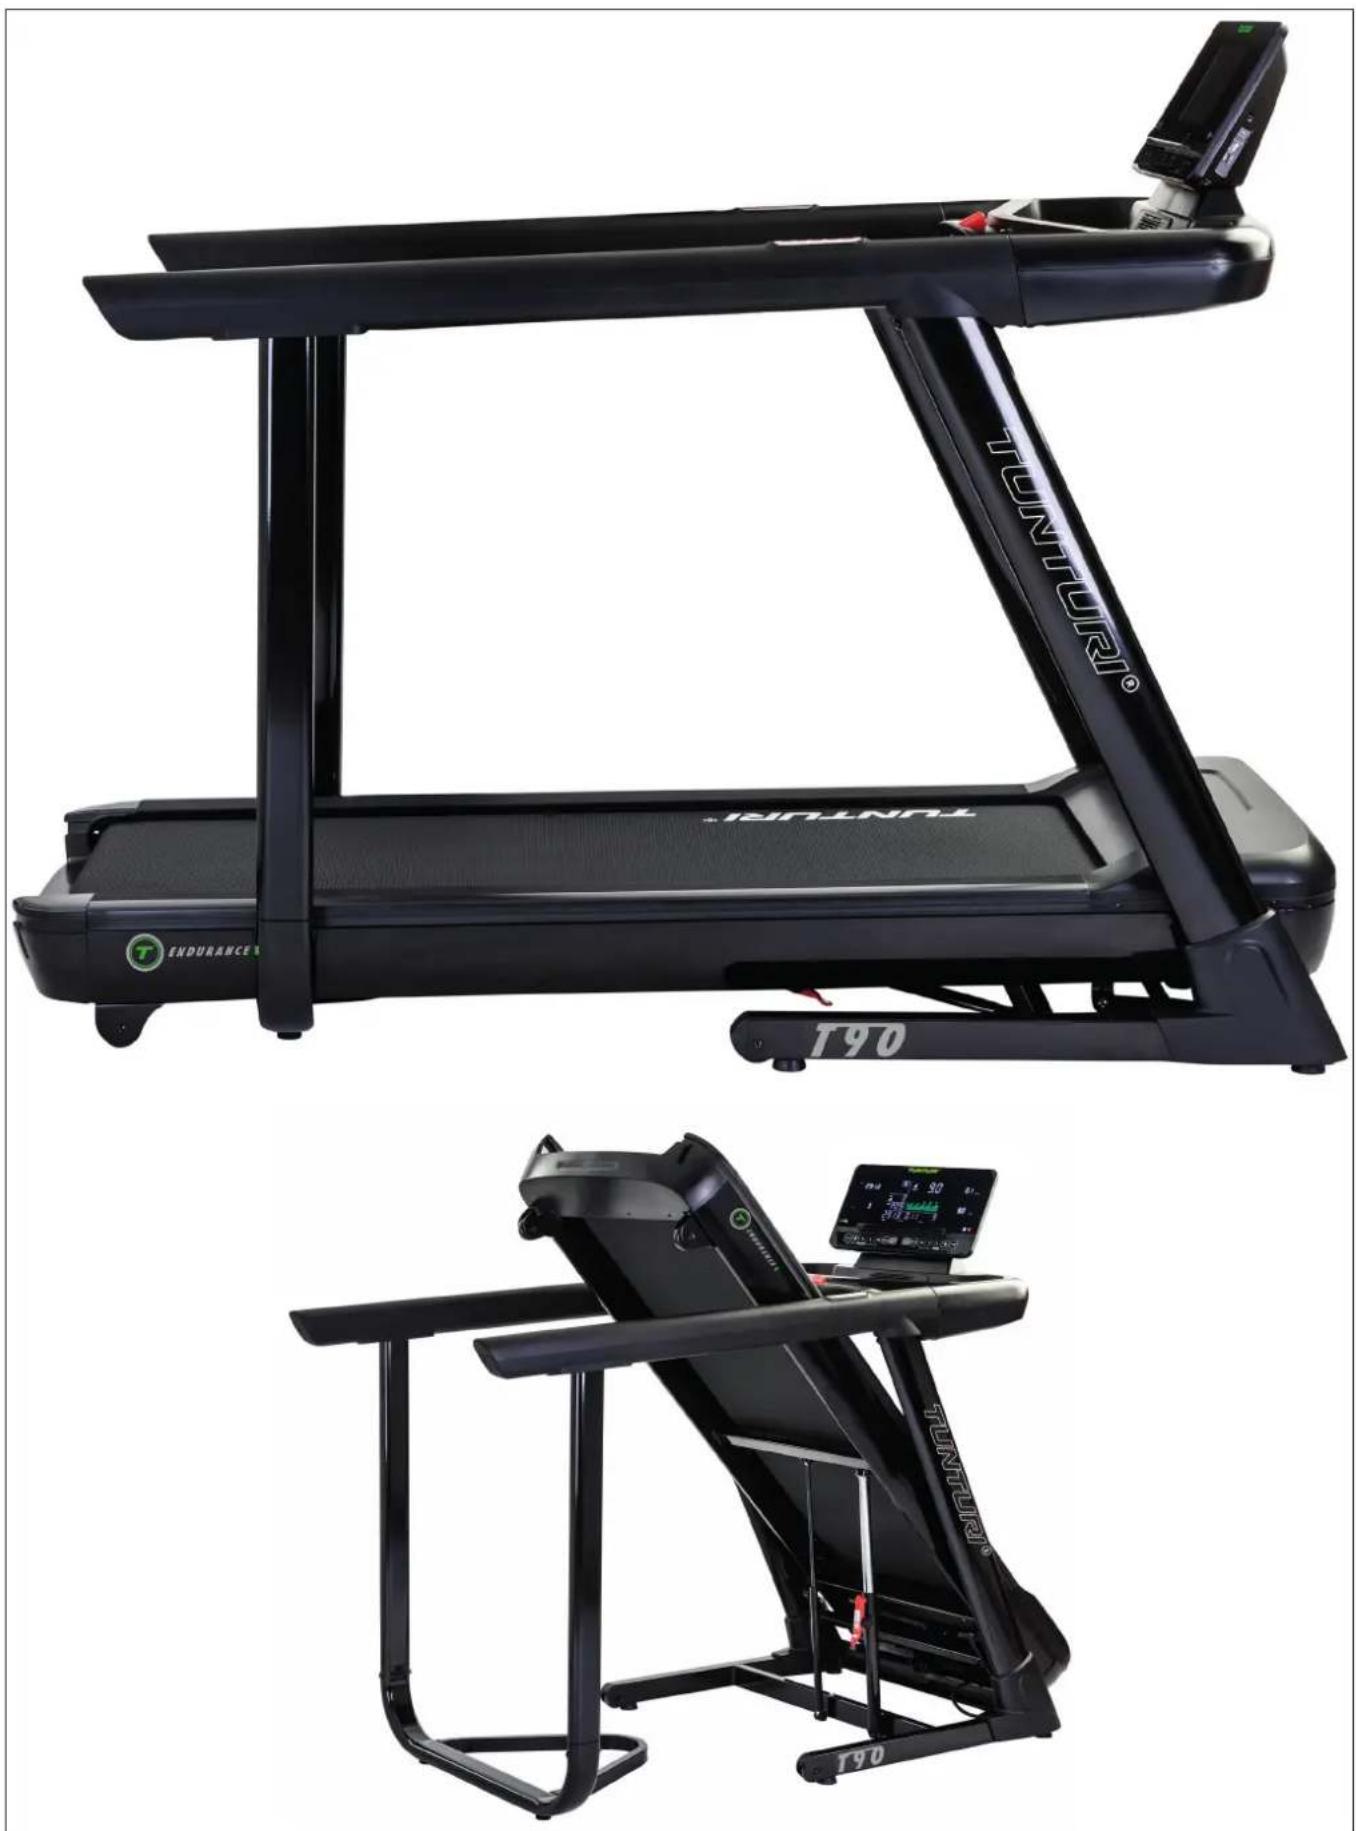
Accessories (fig. H)
NOTE
- The shown illustration shows how the trainer will look with the suitable extended handrails.
- The additional extended handrails can be purchased as an accessory.
• Article nr: 19TRNRH000
Contact your dealer for further information.
Workouts
The workout must be suitably light, but of long duration. Aerobic exercise is based on improving the body's maximum oxygen uptake, which in turn improves endurance and fitness. You should perspire, but you should not get out of breath during the workout.
To reach and maintain a basic fitness level, exercise at least three times a week, 30 minutes at a time. Increase the number of exercise sessions to improve your fitness level. It is worthwhile to combine regular exercise with a healthy diet. A person committed to dieting should exercise daily, at first 30 minutes or less at a time, gradually increasing the daily workout time to one hour. Start your workout at low speed and low resistance to prevent the cardiovascular system from being subjected to excessive strain.
As the fitness level improves, speed and resistance can be increased gradually. The efficiency of your exercise can be measured by monitoring your heart rate and your pulse rate.
Exercise Instructions
Using your fitness trainer will provide you with several benefits, it will improve your physical fitness, tone muscle and in conjunction with a calorie controlled diet help you lose weight.
The warming up phase
This stage helps get the blood flowing around the body and the muscles working properly. It will also reduce the risk of cramp and muscle injury. It is advisable to do a few stretching exercises as shown below. Each stretch should be held for approximately 30 seconds, do not force or jerk your muscles into a stretch - if it hurts, STOP
The exercise phase
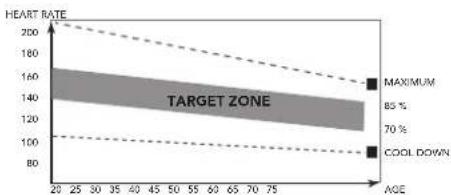
This is the stage where you put the effort in. After regular use, the muscles in your legs will become more flexible. Work to your but it is very important to maintain a steady tempo throughout. The rate of work should be sufficient to raise your heart beat into the target zone shown on the graph below.
line
| AGE | HEART RATE | | --- | ---------- | | 20 | 200 | | 35 | 160 | | 50 | 120 | | 65 | 100 | | 75 | 80 |This stage should last for a minimum of 12 minutes though most people start at about 15-20 minutes
The cool down phase
This stage is to let your Cardiovascular System and muscles wind down. This is a repeat of the warm up exercise e.g. reduce your tempo, continue for approximately 5 minutes. The stretching exercises should now be repeated, again remembering not to force or jerk your muscles into the stretch.
As you get fitter you may need to train longer and harder. It is advisable to train at least three times a week, and if possible space your workouts evenly throughout the week.
Muscle toning
To tone muscle while on your fitness trainer you will need to have the resistance set quite high. This will put more strain on our leg muscles and may mean you cannot train for as long as you would like. If you are also trying to improve your fitness you need to alter your training program. You should train as normal during the warm up and cool down phases, but towards the end of the exercise phase you should increase resistance making your legs work harder. You will have to reduce your speed to keep your heart rate in the target zone.
Weight loss
The important factor here is the amount of effort you put in. The harder and longer you work the more calories you will burn. Effectively this is the same as if you were training to improve your fitness, the difference is the goal.
Heart rate
Pulse rate measurement (hand pulse sensors)
The pulse rate is measured by sensors in the handlebars when the user is touching both sensors at the same time. Accurate pulse measurement requires that the skin is slightly moist and constantly touching the hand pulse sensors. If the skin is too dry or too moist, the pulse rate measurement will become less accurate.

NOTE
- Do not use the hand pulse sensors in combination with a heart rate chest belt.
- If you set a heart rate limit for your workout, an alarm will sound when it is exceeded.
Heart rate measurement (heart rate chest belt) NOTE
- A chest strap does not come standard with this trainer. When you like to use a wireless chest strap you need to purchase this as an accessory.
The most accurate heart rate measurement is achieved with a heart rate chest belt. The heart rate is measured by a heart rate receiver in combination with a heart rate transmitter belt. Accurate heart measurement requires that the electrodes on the transmitter belt are slight moist and constantly touching the skin.
If the electrodes are too dry or too moist, the heart rate measurement will become less accurate.

WARNING
- If you have a pacemaker, consult a physician before using a heartrate chest belt.

CAUTION
- If there are several heart rate measurement devices next to each other, make sure that the distance between them is at least 1.5 metres.
- If there is only one heart rate receiver and several heart rate transmitters, make sure that only one person with a transmitter is within transmission range.

NOTE
- Do not use a heart rate chest belt in combination with the handpulse sensors.
- Always wear the heart rate chest belt under your clothes directly in contact with your skin. Do not wear the heart rate chest belt above your clothes. If you wear the heart rate chest belt above your clothes, there will be no signal.
- If you set a heart rate limit for your workout, an alarm will sound when it is exceeded.
- The transmitter transmits the heart rate to the console up to a distance of 1 metre. If the electrodes are not moist, the heart rate will not appear on the display.
- Some fibers in clothes (e.g. polyester, polyamide) create static electricity which can prevent accurate heart rate measurement.
- Mobile phones, televisions and other electrical appliances create an electromagnetic field which can prevent accurate heart rate measurement.
Maximum heart rate (during training)
The maximum heart rate is the highest heart rate a person can safely achieve through exercise stress. The following formula is used to calculate the average maximum heart rate: 220 - AGE. The maximum heart rate varies from person to person.

WARNING
- Make sure that you do not exceed your maximum heart rate during your workout. If you belong to a risk group, consult a physician.
Beginner
50-60% of maximum heart rate
Suitable for beginners, weight-watchers, convalescents and persons who have not exercised for a long time. Exercise at least three times a week, 30 minutes at a time.
Advanced
60-70% of maximum heart rate
Suitable for persons who want to improve and maintain fitness. Exercise at least three times a week, 30 minutes at a time.
Expert
70-80% of maximum heart rate
Suitable for the fittest of persons who are used to long-endurance workouts.
Use
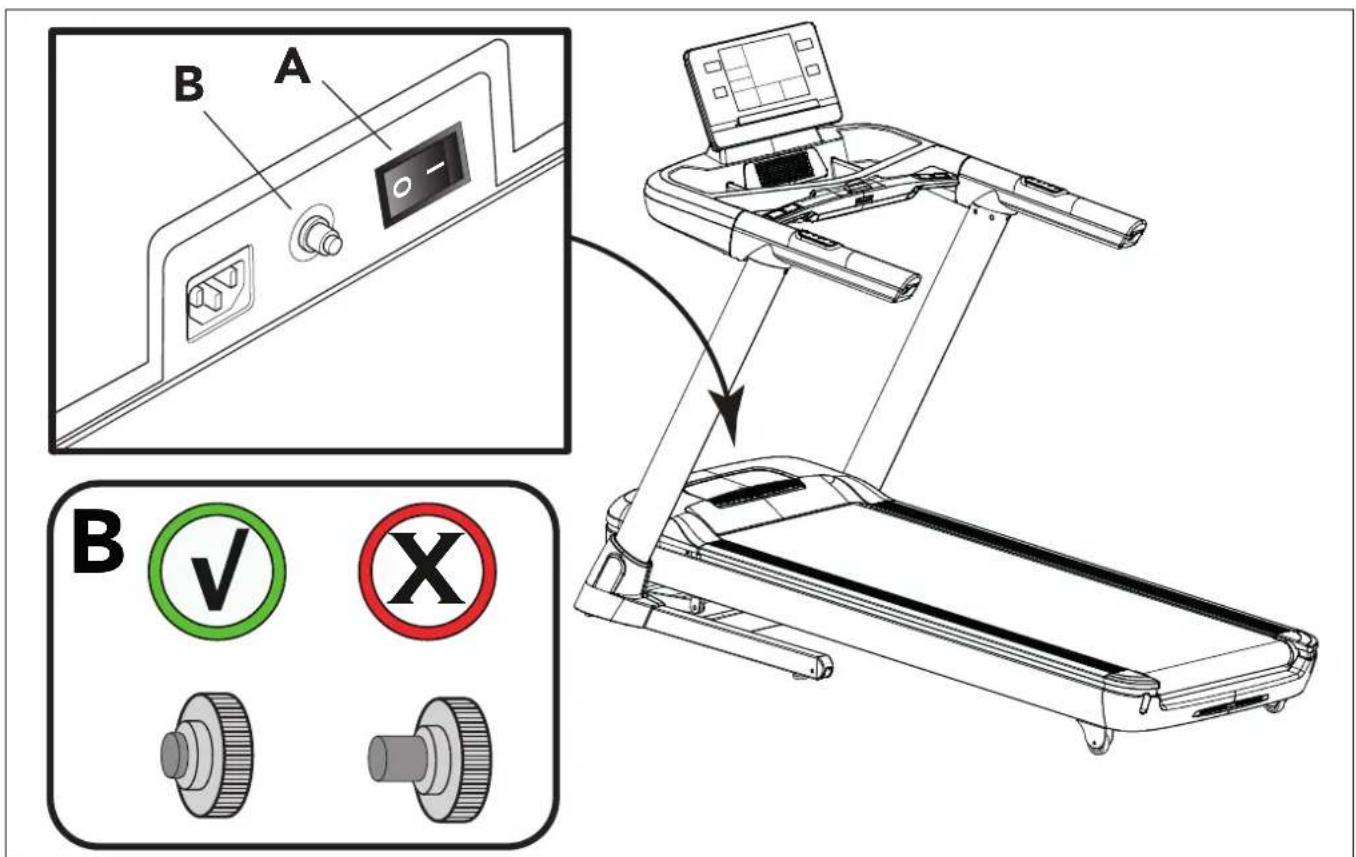
Master power switch (fig. E-2A)
The equipment is equipped with a master power switch to shut down the equipment completely.
To start the equipment:
- Insert the mains plug into the equipment.
- Insert the mains plug into the wall socket.
- Set the master power switch to the on position.
To stop the equipment:
- Set the mains power switch to the off position.
- Remove the mains plug from the wall socket.
- Remove the mains plug from the equipment.
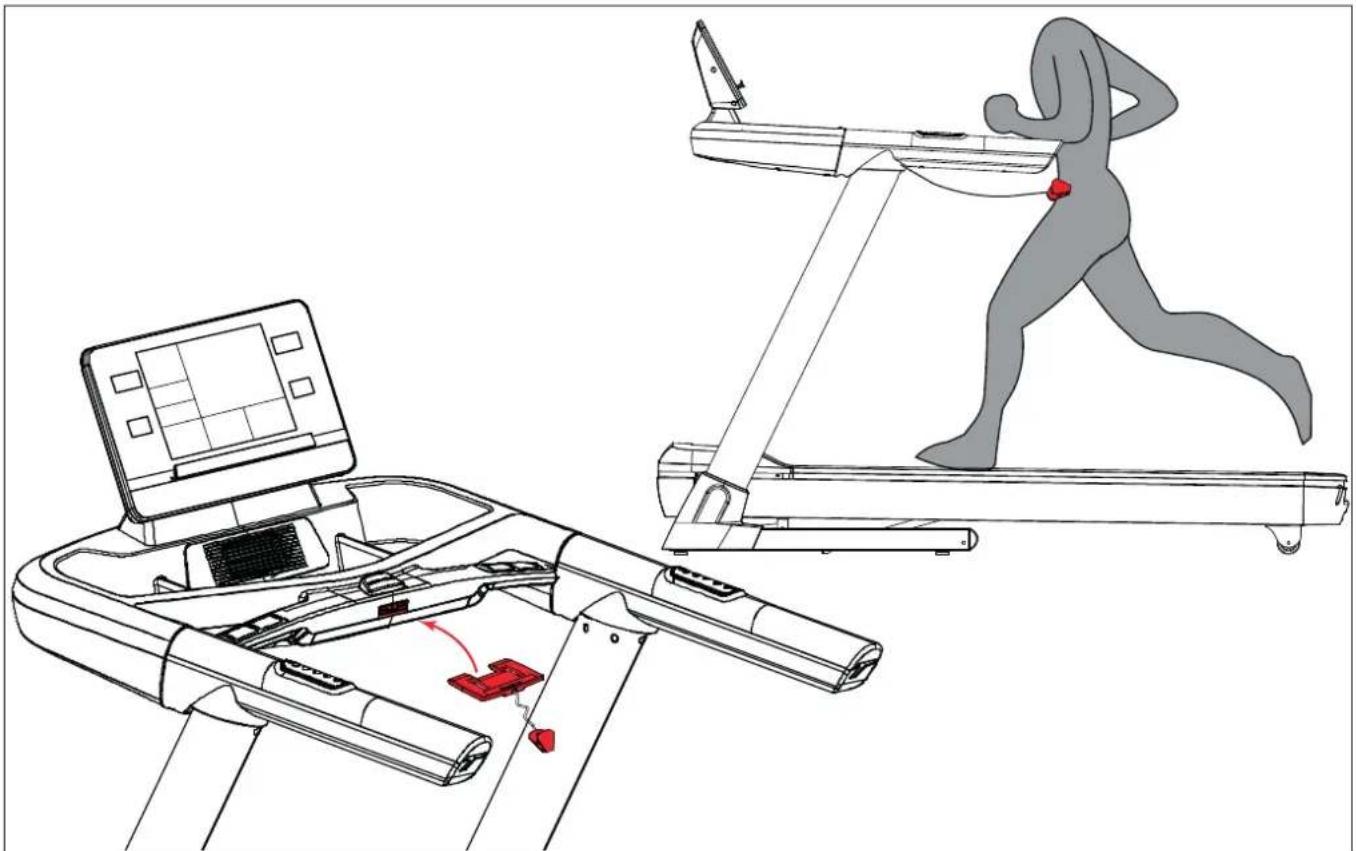
Safety key (Fig F-4)
The equipment is equipped with a safety key that must be properly inserted into the console to start the equipment. If your safety key is pulled out partly it will activate the emergency mode and will have the equipment stop immediately.
- Insert the safety key into the slot in the console by pressing in it inwards.
- Make sure that the clip of the safety key is properly attached to your clothing.
Make sure the clip attached to your clothing is attached firm enough so it can pull out the safety key when needed.

NOTE
- The safety key cannot be removed from the unit, as it is a fixed structure.

NOTE
- Console will show E7 code when safety key is not in (correct) position during start up.
Circuit breaker (Fig. E-2B)
The equipment is equipped with a circuit breaker that interrupts the circuit when the electricity load is above the maximum capacity. When this occurs, the circuit breaker must be pressed.

WARNING
- Before pressing the circuit breaker, remove the mains plug from the equipment.
If the equipment shuts down, proceed as follows to restart the equipment:
- Remove the mains plug from the equipment.
- Press the circuit breaker to restart the equipment.
- Insert the mains plug into the equipment.

NOTE
- Some circuit breakers used in homes are not rated for high inrush currents that can occur when a treadmill is first turned on or even during normal use. If your treadmill is tripping the circuit breaker (even though it is the proper current rating and the treadmill is the only appliance on the circuit) but the circuit breaker on the treadmill itself does not trip, you will need to replace the breaker with a high inrush type. This is not a warranty defect. This is a condition we as a manufacture have no ability to control.
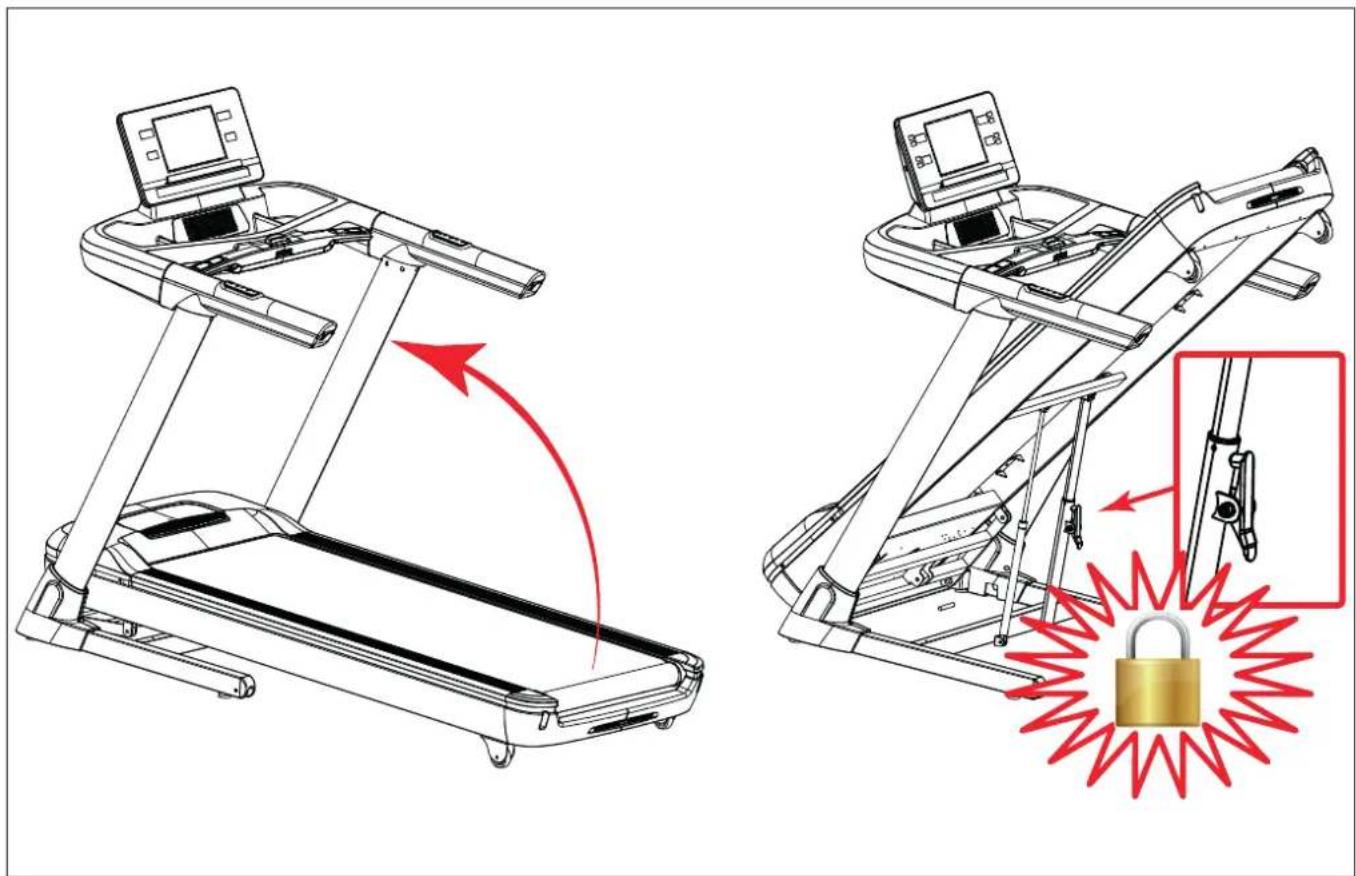
Unfolding and folding the equipment (fig. F1-F2)
The equipment can be unfolded for use (fig. F1) and folded for transport and storage (fig. F2).
Refer to the illustrations for the correct way of unfolding and folding the equipment.

CAUTION
- Before folding the equipment, make sure that the incline is 0. If the incline is not 0, folding will damage the mechanism.
Adjusting the support feet
The equipment is equipped with adjustable support feet. If the equipment feels unstable, wobbly, or not levelled well, these support feet can be adjusted to make the required corrections.
- Turn the support feet in/ out as required to put the equipment in a stable and as well possible levelled position.
- Tighten the locknut's* to lock the support feet.

QUICK TIP
- It is easier to do this with two persons, so one person can tilt the equipment, while the other makes the needed adjustment.

Click to see our supportive YouTube video https://youtu.be/E_7agKqaUlc

NOTE
- The equipment is most stable when it is as low to the floor as possible. Therefore, start to level the equipment by turning all support feet fully in, before turning out the required support feet to stabilize and level the equipment.
Console (fig. E-1)

CAUTION
- Keep the console away from direct sunlight.
- Dry the surface of the console when it is covered with drops of sweat.
- Do not lean on the console.
- Only touch the display with the tip of your finger. Make sure that your nails or sharp objects do not touch the display.
NOTE
- The console switches to standby mode when the equipment is not used for 4 minutes.
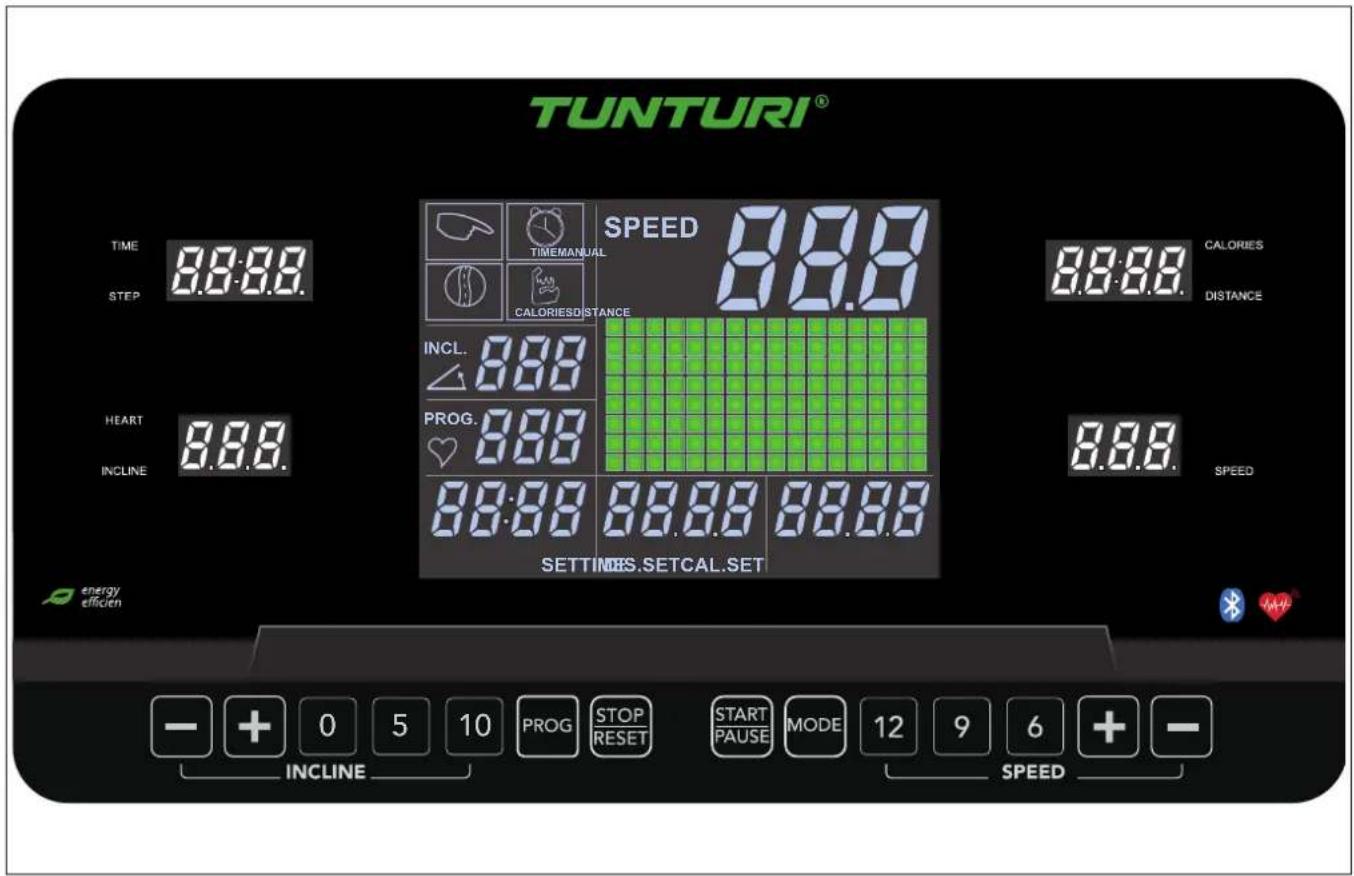
Buttons
Emergency
- Press the Red Emergency button will activate the Emergency stop, stopping the running belt movement rapidly.
- Pressing the emergency button will cause the safety key to pop out slightly, avoiding to restart the treadmill accidentally.
- Push the safety key back into it's slot fully to deactivate the emergency stop mode.
Stop/ Reset
- Press once, stop workout/ treadmill gently.
- Press twice, stop workout/ treadmill more rapidly.
- Reset console when press and hold for 2 seconds in "stop mode"
- Start selected workout, or restart pause workout when being in pause mode.
- Pause active workout.
Start/ Pause
Prog
- Press to Cycle through the possible programmes. (P0/ P1\~P36/ U01\~U03/ HRC1\~HRC3/ FAT)
Mode
- Cycle between target setting parameters in programming mode.
- Reset time target when setting time goal for "P1\~P36" programs.
- Press to freeze the displayed multi display scanning LED displays when in exercise mode.
- Press again to unfreeze and activate scanning mode again.
Speed +
- Increases the speed (0.8 \~ 24.0 km/h).
- Pressing once increases the speed 0.1 km/h.
- Pressing and holding for two seconds will increase the speed faster.
- Scroll programs and change values in programming mode.
Speed -
- Decreases the speed (0.8 \~ 24.0 km/h).
- Pressing once decreases the speed 0.1 km/h.
- Pressing and holding for two seconds will decrease the speed faster.
- Scroll programs and change values in programming mode.
Speed hot keys:
Speed Hot Keys are set as 6, 9, 12.
For example, the speed changes from any speed to 9 km/h by pressing the Speed Hot Key 9.
Handle bar speed quick-access keys:
-
- Same as Speed +.
-- Same as Speed -.
- Same as Speed +.
Incline +
- Increases the incline (0 \~ 15 +1).
- Scroll programs and change values in programming mode.
Incline -
- Decreases the incline (0 \~ 15 -1)
- Scroll programs and change values in programming mode.
Incline hot keys.
Incline Hot Keys are set as 0, 5, 10.
For example, the incline level changes from any level to 5 by pressing the Incline Hot Key 5.
Handle bar incline quick-access keys:
-
- : Same as Incline +.
--: Same as Incline -.
- : Same as Incline +.
Explanation of display items
Speed
- Shows the actual treadmill speed in workout mode.
- Shows target speed in programming mode.
- Shows program selection when being in program mode.
Incline
- Shows the actual treadmill incline in workout mode.
- Shows target incline in programming mode.
Distance
- Shows the ran distance workout mode.
- Shows left distance when workout in countdown mode.
- Shows the target distance when being in programming mode.
Time
- Shows the ran time in workout mode.
- Shows left time when workout in countdown mode.
- Shows the target time when being in programming mode.
Steps
Console is able to count the amount of steps during your workout, when keeping your speed higher than 3.0 km/h and user weight is at least 40 kg.
Heart
- Shows the pulse rate in workout mode, or "P" when no pulse is measured.
Calories
- Shows the consumed K .calories in workout mode.
- Shows left K. calories when workout in countdown mode.
- Shows the target K. calories when being in programming mode.
NOTE
- This data is a rough guide for comparison of different exercise sessions which cannot be used in medical treatment.
Scan
- Display for "Time/ Step", "Heart/ Incline" & "Calories/ Distance" scans every 5 seconds.
- To freeze your preferred display press Mode, press mode again to unfreeze and activate Scan mode again.
Explanation of displays acoustic beep
The console is designed to notify the user with an acoustic beep. This is to make the user aware of the change for safer workout. The console will notify the user when:
- When you reach a goal that has been pre-set.
- To announce a speed or incline change because or the selected program.
USB function
The user can connect their device to charge during workout. Voltage/ Current: 5VDC/ 1.0 Amp
Programs
Quick start
- Press "Start/ Pause" button to start your workout without any pre-set settings.
- Treadmill will start at minimum speed of 0.8 Km/h, and maintains the current set incline setting.
- Adjust Speed / Incline manually at any time to change your workout, and stop/ pause at anytime.
Target countdown mode (P0)
Machine should be in start up mode to access the Target Countdown mode.
Press and hold "Stop/ Reset" button for 2 seconds to set treadmill in start up mode.
- Press "Mode" button to select target countdown mode:
- Training mode 1: Time target. Use "Speed/ Incline + & -" keys to adjust value. Default 30:00 min. Range 5:00\~95:00 ± 1:00.
- Training mode 2: Distance target. Use "Speed/ Incline + & -" keys to adjust value. Default 1.00 km. Range 1.00\~99.00 ± 1.0.
- Training mode 3: Calories countdown. Use "Speed/ Incline + & -" keys to adjust value. Default 50. Range 20\~9990 ± 10.
- Press "Start/ Pause" button to start your workout directly when setting your desired target.
NOTE
- When set a target, the treadmill will stop automatically when preset target is reached.
- It is only possible to set one target.
End your workout
- Pause your workout at any time by press "Start/ Pause" button once.
Display will show "PAUS" when being in pause mode. Max pause time is 4.30 min. - Press "Start/ Pause" button to resume training when being in "PAUS" mode.
- Press "STOP" once button to stop workout.
- Press "STOP" twice to reset console.
Pre-set Programs (P1\~P36)
The equipment has 36 pre-set programs with different profiles. (Table fig. G.)
- Press "Prog" buttons to select "P1\~P36" program, press "Mode" button to confirm.
- Set your desired workout time Use "Speed/ Incline + & -" keys to adjust value. Default 30:00 min. Range 5:00\~95:00 ± 1:00.
- Press "Start/ Pause" button to start your workout.
NOTE
- The speed and incline are controlled based on the selected program.
- An acoustic beep will notify the user that there will a speed and/or incline adjustment within a few seconds.
- The duration of each segment is 1/16th of the set workout time.
- Speed and incline can be changed at all times, but will only affect the active profile segment. The program will follow the profile again when changes to the next profile segment.
User programs (U01\~U03)
The equipment has 3 user programs.
Each user program can be adjusted to personal requirements. Each user program has 16 steps. The speed and the incline can be set for each step. Each steps takes 1/16th of the total amount of time.
- Press "Prog" buttons to select "U-1\~U-3" program.
- Set your desired workout time Use "Speed/ Incline + & -" keys to adjust value. Default 30:00 min. Range 5:00\~95:00 ± 1:00.
- Press "Start/ Pause" button to start your workout.
Profile programming mode.
- Press "Prog" button and select U-1/ U-2 or U-3.
- Press "Mode" button to open programming mode for speed first profile segment.
Set your desired speed values for the first segment of the program by using the "Speed + & -" keys and confirm the setting with "Mode" button. - Programming mode for speed segment 2 opens. Program all speed segments as done for segment 1.
- Programming mode for incline will open, Set your desired incline values for the first segment of the program by using the "Incline + & -" keys and confirm the setting with "Mode" button.
- Programming mode for incline segment 2 opens. Program all incline segments as done for segment 1.
- When confirming the 16th segment, the time window will blink to set the desired training time.
- Press and hold "Mode" button for 3 seconds to store your programmed profile.
- Set your desired workout time Use "Speed/ Incline + & -" keys to adjust value. Default 30:00 min. Range 5:00\~95:00 ± 1:00.
- Press the "Start/ Pause" button to start the program.
NOTE
- Programmed user program will be saved automatically so they can be used next time.
Body Fat
The Body Fat program is to indicate your fiscal state based on your body parameters and heart rate.
- Press "Mode" button to open programming mode.
- Press "Prog" buttons to select "8-1"
program, press "Mode" button to confirm. - The display shows "F1" (SEX). The display shows "1"
Press "Speed/ Incline + & -" buttons to select:
1: Male/ 2: Female press "Mode" button to confirm. - The display shows "F2" (Age). The display shows "25" Press "Up/Down" buttons to select:1\~99 press "Mode" button to confirm.
- The display shows "F3" (Heigth). The display shows "170" cm Press "Up/Down" buttons to select: 100\~220 cm press "Mode" button to confirm.
- The display shows "F4" (Weigth). The display shows "70"kg Press "Up/Down" buttons to select: 20\~150 kg press "Mode" button to confirm.
- The display shows "F5" (Active)
Hold the hand grip pulse measurement pads to activate the "FAT" measurement.
In about 5\~10 seconds the result will be shown. See "Result calculation".
CAUTION
- Holding the contact hand-grip heart rate measurement pads is required for this function.
Result calculation:
- BODY TYPE: (Body Fat ratio; 9 types)
• FAT 0\~17 Underweight
• FAT 18 \~ 24 Standard
• FAT 28 \~ 28 Overweight
• FAT 29 \~ Up Obesity. - BF = Body Fat ( in ratio % )
- Error code "ER" will show if no heart rate was detected during the BF measurement process.
- Press "Stop/ Reset" button to leave Body Fat program.
HRC Program
The HRC program is a speed controlled program based on your heart rate. The speed will automatically increase when your heart rate is under target, and decrease when over target.
- Press "Prog" buttons to select "HRC"
HRC1: Pre-set maximum. Speed limit is 8 km/h.
HRC2: Pre-set maximum. Speed limit is 12 km/h.
HRC3: Pre-set maximum. Speed limit is 22.0 km/h. program, press "Mode" button to confirm.
- Set your age the display shows "25"
Press "Up/ Down" buttons to select:1\~99 press "Mode" button to confirm.
- Target heartrate will be show, based on your set age. Target heart rate = (220-age) x0,6.
Press "Up/ Down" buttons to change target value 60\~200) press "Mode" button to confirm.
- Set your workout time the display shows "30:00" Press "Up/Down" buttons to select: 5:00\~99:00 press "Mode" button to confirm.
- Press the "Start/ Pause" button to start the program.
HRC operating function:
- HRC programs starts with a one minute warm up time. (speed will not auto adjust)
- The initial speed is 1.0 km/h, this can be adjust to a comfortable warm up speed manually.
- Console checks heart rate every 30 seconds and controls the speed as below
| Heart rate parameter speed adjust | |
| 29+ BPM Under target + 2.0 Km/h | |
| 6~29 BPM Under target + 1.0 Km/h | |
| 0~5 BPM Under target No adjust | |
| 0~5 BPM Over target No adjust | |
| 6~29 BPM Over target - 1.0 Km/h | |
| 29+ BPM Over target - 2.0 Km/h |
NOTE
- Incline setting is not controlled in HRC program mode but can be controlled by user at any time to intensify or ease your workout.
• Speed can be changed by user at all times.
- When speed is over the pre set speed limit it will auto adjust to pre set speed setting automatically.
- If no heart rate is detected, the treadmill will stop workout.
CAUTION
• Heart rate measurement is required for this function.
ERP Function
ERP function can shut your treadmill in sleep mode automatically when being without operation for 4:30 minutes.
You can turn this function On and off by:
- When treadmill is in "start up mode" press and hold "Mode" button for 3 seconds to switch between On and Off mode.
- Display shows "1111" indicates On mode. Machine will turn to sleep mode after 4:30 minutes being idle.
- Display shows "2222" indicates Off mode. Machine will not turn into sleep mode after 4:30 minutes being idle.
CAUTION
• We recommend to set ERP function in On mode always.
Bluetooth & APP
- This console can connect with an APP on a smart device by Bluetooth (iOS & Android).
- Establish the Bluetooth connection only via the connection mode on the installed APP on your smart device.
- Tunturi only provides the option to connect your fitness console throughout a bluetooth connection. Therefore Tunturi cannot be held responsible for damage, or malfunctioning of products other than Tunturi products.
- Check the website for extra information.
NOTE
Cleaning and maintenance
WARNING
- Your trainer requires monthly maintenance, even when not being used.
- Before cleaning and maintenance, remove the mains plug from the wall socket.
-
Do not use solvents to clean the equipment.
-
Do not block the ventilation openings. Keep the ventilation openings clear from dust, dirt and other obstructions.
- Clean the equipment with a soft, absorbent cloth after each use.
- Clean the visible parts of the equipment with a vacuum cleaner with a small suction nozzle
- Regularly check that all screws and nuts are tight.
CAUTION
- We recommend to use indoor shoes only on your treadmill. When you don't have these we do recommend to check the soles of your footwear before using them on your treadmill. The treadmill is not sustainable for dirt from outdoors.
General Cleaning
Dirt, dust, and pet hair can block air inlets and accumulate on the running belt. On a monthly basis: vacuum underneath your treadmill to prevent build-up.
UNPLUG POWER CORD BEFORE THIS TASK.
Belt Dust
This occurs during normal break-in or until the belt stabilizes. Wiping off excess dust with a damp cloth will minimize build-up.
Belt and Running Deck
Your treadmill uses a very high-efficient low-friction bed.
Performance is maximized when the running deck is kept clean and free from dust and dirt. Dirt and dust particles between running deck and running belt will damage your running deck surface affecting your performance and product lifetime.
How to clean running deck
Use a soft, dry, non-abrasive cloth to wipe the edge of the belt and the area between the belt edge and frame. try to reach under the running belt edges too, to remove the dirt build up on the edges too.
How to clean running belt surface
Firstly use a nylon scrub brush to remove the loose particles from the running belt surface. Than use wrung out damp cloth (no cleaners or abrasives) to gentle clean the top of the textured belt. Allow the belt to fully dry before using.

NOTE
- When your belt too dirty to clean with water only, you can use a mild soap, but never a lubricant solvent.
- Prevent that the solution comes between running deck and running belt at all times.
This should be done on a regular basis to extend belt and running deck life.
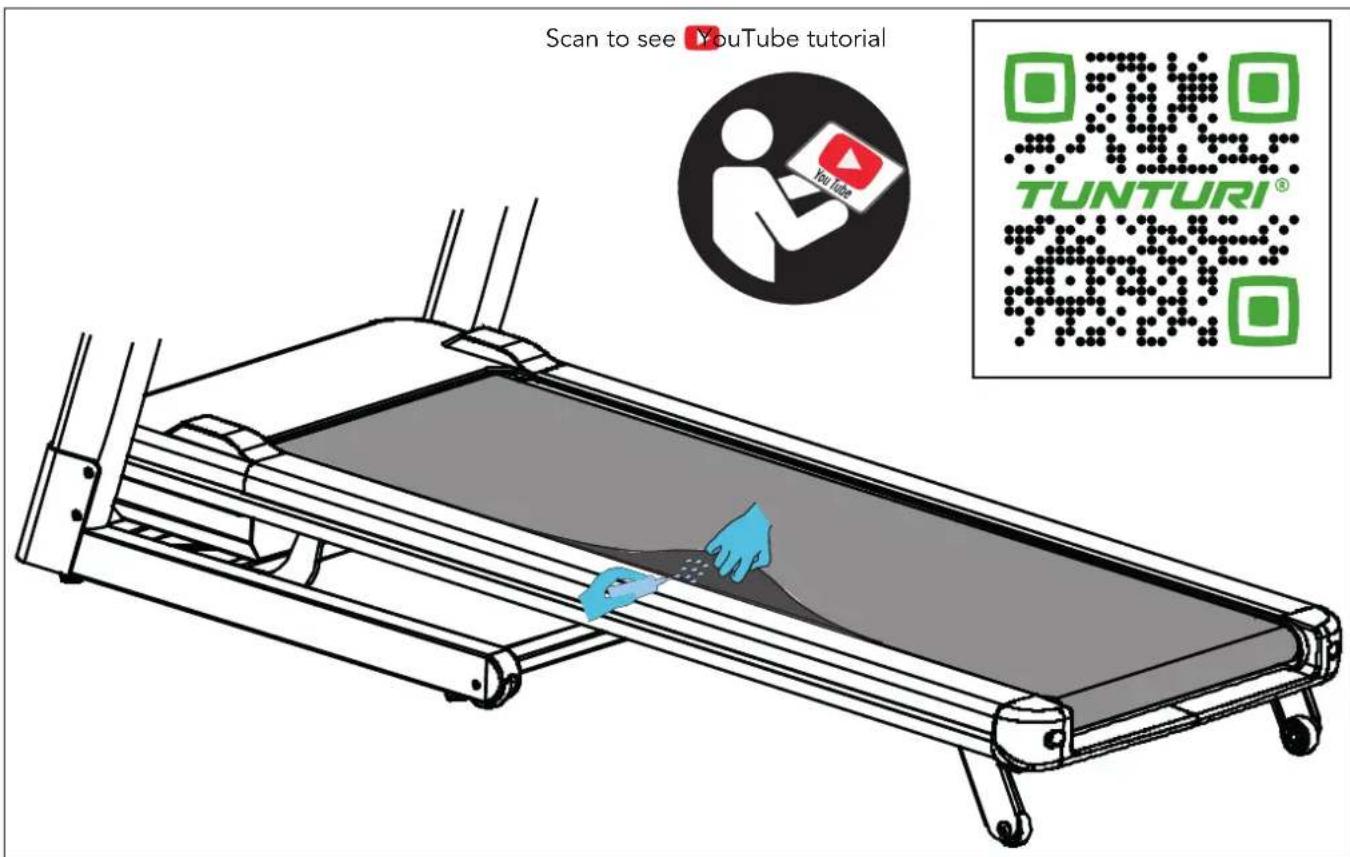
Lubrication (fig. F-6)

NOTE
- The Treadmill running belt is pre lubricated before fitting on your treadmill during the production of the unit. Therefore it is not needed to lubricate the running belt when taken into use for the first time.
The running belt must be checked for lubrication condition regularly. Therefore the treadmill comes with a 300 hours reminder function. The "TIME WINDOW" will display "OIL" and will make an acoustic beeping sound every 10 seconds to remind you. Follow the below checking procedure and eliminate the "OIL" message and acoustic warning signal by pressing and hold the "STOP" button for at least 3 seconds during this warning signal.

WARNING
- Before lubrication, remove the mains plug from the wall socket.

CAUTION
- We recommend to check the running belt lubrication at least once every month, as more factors than time can be effective to the lubricant conditions.
-
Only lubricate the running belt if necessary. If you apply too much lubricant, the running belt will slip easily due to lack of friction.
-
Stand steadily on the running belt.
- Take hold of the front handlebar and push the running belt with your feet so that it slides back and forth. The running belt must move smoothly and evenly without making sound.
- If the running belt does not move smoothly and evenly or if the running belt does not move at all, touch the underside of the running belt with your fingertips to check the lubrication:
- If you feel lubrication or your fingertips are shiny, there is sufficient lubrication on the running belt.
- If you do not feel lubrication or your fingertips are dusty or rough, apply lubricant (±10 ml.) in the middle of the running deck under the running belt and let the equipment operate at 5km/h for at least 5 minutes.
- After lubrication, do not fold the equipment before having done a workout for 2 minutes with a speed of at least 5km / h . This will cause the lubricant being fully absorbed by the running belt and being spread evenly.

NOTE
- When 5 km/h is too fast for you, do walk at your desired speed, but extend the duration to at least 5 minutes.

Click to see our supportive YouTube video https://youtu.be/ceaOYnofY5k
Belt adjustments
The performance of your treadmill is dependent on the frame running on a reasonably level surface. If the frame is not level, the front and back roller cannot run parallel, and constant belt adjustment may be necessary.
The treadmill is designed to keep the running belt reasonably centred while in use. It is normal for some belts to drift near one side while the belt is running with no one on it. After a few minutes of use, the running belt should have a tendency to centre itself. If, during use, the belt continues to move toward one side, adjustments are necessary.
EXCEPTION
During rehabilitation where the user is using one leg much stronger than the other, it might happen that the running belt drifts to one side. In these cases you should not adjust unless the running belt does not centre itself during normal condition usage.
Belt tension adjustment
Adjustment must be made from the rear roller. The adjustment bolts are located at the end of the step rails in the end caps.
- Tighten the rear roller bolts (clockwise) only enough to prevent slippage at the front roller. Turn both running belt tension adjustment bolts in increments of 1/4 turn each and inspect for proper tension by walking on the belt at a low speed, making sure the belt does not slip. Keep tensioning the bolts until the belt stops slipping.
- If you feel the belt is tight enough, but it still slips, the problem may be a loose Motor drive belt under the front cover.
- Do Not Over-tighten Over tightening will cause belt damage and premature bearing failure.

Click to see our supportive YouTube video https://youtu.be/pp4_4bL1MXo
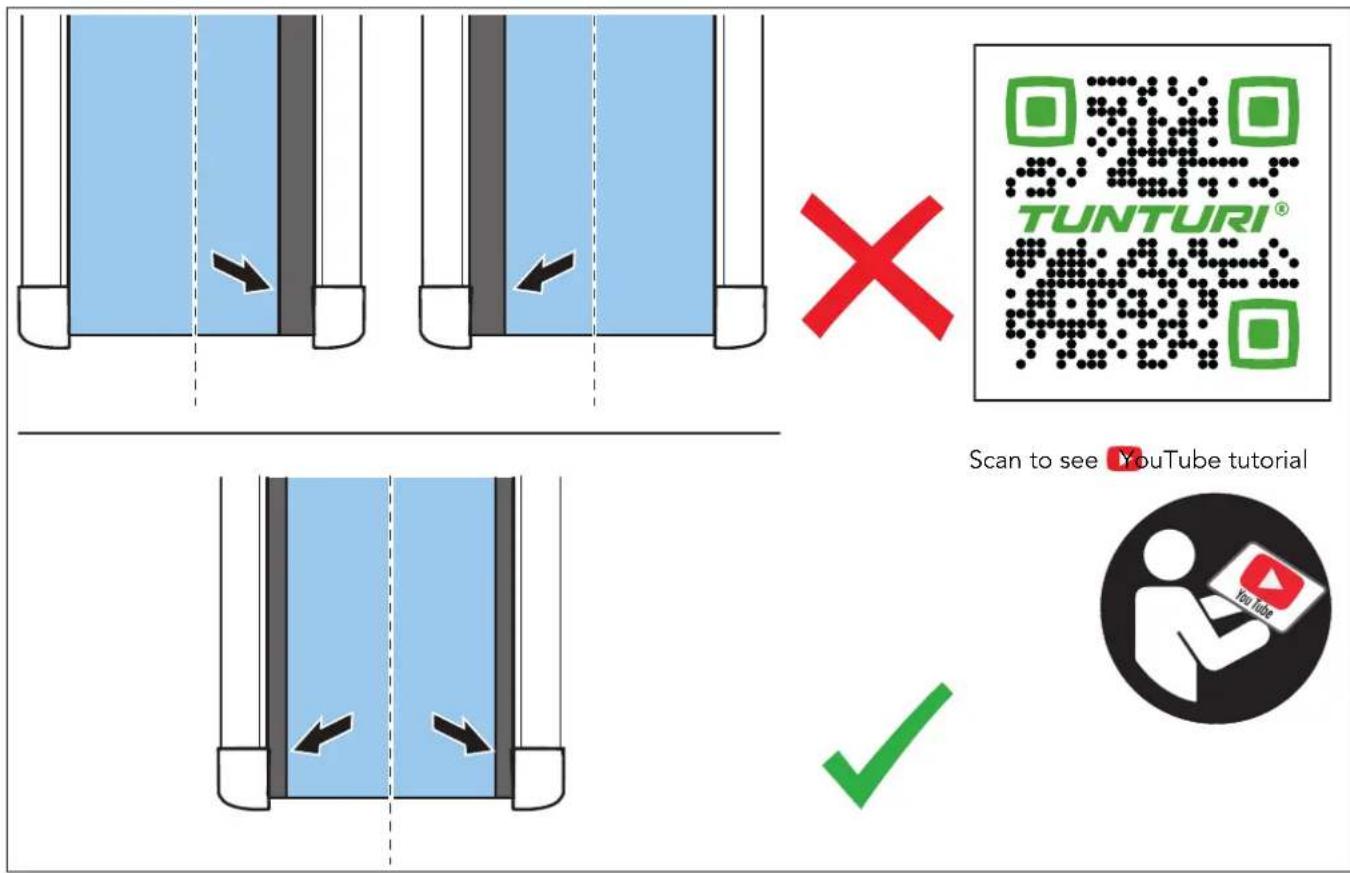
Centre the running belt (fig. F-5)
Centre the running belt is needed when your running belt is not tracking in the centre of your running surface. This is noticed easily when the gap between side landing and running belt is significantly bigger on one side compared to the other side.
This can be caused by a few reasons, such as:
REASON 1
You do a workout using one leg more powerful in push off during your workout. This causes the belt being pushed aside, but will correct automatically when let the running belt run unloaded for a few minutes.
REASON 2
Your treadmill is not levelled horizontally, where gravity pulls the running belt slowly to the lowest end of the treadmill. This must be corrected by levelling the treadmill correctly. as this cannot be solved by any other adjustment.
REASON 3
The running belt is not centred correctly between the front and rear roller drum. This needs be corrected by adjusting the running belt tracking as described below.
To adjust the running belt's tracking use the Allen key being provided with your treadmill.
- Set your treadmill at a speed of ± 5 km/h, not running on it.
- When the running belt is tracking to the right side.
Turn the left-hand rear roller adjustment bold, located on the rear end in a socket in the rear roller cover, counter clockwise for 1/4 turn.
- When the running belt is tracking to the left side.
Turn the right-hand rear roller adjustment bold, located on the rear end in a socket in the rear roller cover, counter clockwise for 1/4 turn. - Await ±2 minutes to give the running belt the time to respond to the adjustment before repeating the adjustment steps if needed to get to the desired result.

NOTE
- Remember, a small adjustment can make a big difference, so make the adjustments with small steps at the time.

Click to see our supportive YouTube video https://youtu.be/qx5AvTv00J4
The belt may require periodic tracking adjustment depending on use and walking/running characteristics. Some users will affect tracking differently. Expect to make adjustments as required to centre the tread-belt. Adjustments will become less of a maintenance concern as the belt is used. Proper belt tracking is an owner responsibility common with all treadmills.

NOTE
- Damage to the running belt because of incorrect running-belt adjustments is not covered by the products warranty.
Troubleshooting
Despite continuous quality control, defects and malfunctions caused by individual components may occur in the equipment. In most cases it's unnecessary to take the whole device in for repair, as it's usually sufficient to replace the defective part.
If the equipment does not function properly during use, contact your Tunturi dealer immediately. Always give the model and serial number of your equipment. Please state also the nature of the problem, conditions of use and purchase date.
If you require spare parts, always give the model, serial number of your equipment and the spare part number for the part you need.
The spare part list is at the back of this manual. Use only spare parts mentioned in the spare part list.
Error codes
If the display shows an error code
(marked with "E" + number), restart the equipment and check whether the display still shows the error code. If the display still shows the error code, immediately contact the dealer.
Oil
OIL is not an error code, see "Lubrication"
E5
Means a power fault.
When rebooting the T90 treadmill it is important to await at least 30 seconds. The treadmill must be 30 seconds in off mode before starting up again. When restart too fast, E5 will appear always.
This because the AC motor motor controller needs longer time to fully shut down, and keeps processing even after console is shut in off mode already for at least 15 seconds.
Solve the problem by shut down the treadmill by turning the power switch in off mode. Await 30 seconds and turn power switch in ON mode again. E5 error code should not appear anymore.
If error code keeps coming still, contact your dealer for service.
E7
Console will show E7 code when safety key is not in (correct) position during start up.
E7 is not an error code, see "Safety key"
Metric/ Imperial setting
When displayed speed is not matching your expectation the machine might be set in incorrect setting.
Metric: Min./ Max. speed/:
0.8 Km/h/ 24.0 km/h.
Imperial: Min./ Max. speed/:
0.5 Mls/h/ 15.0 Mls/h.
Switch units by:
In mode "ON":
Press and hold "Prog" & "Speed -" button for 3 seconds.
Console shows S-01 mode:
- 0.6 When switched to Imperial mode.
- 1.0 When switched to Metric mode.
- Press "Mode" button to switch setting.
Press "Start/ Pause" button to confirm setting and go back to user mode again.

https://youtu.be/KOxl5obz-RQ
Transport and storage

WARNING
- Before cleaning and maintenance, remove the mains plug from the wall socket.
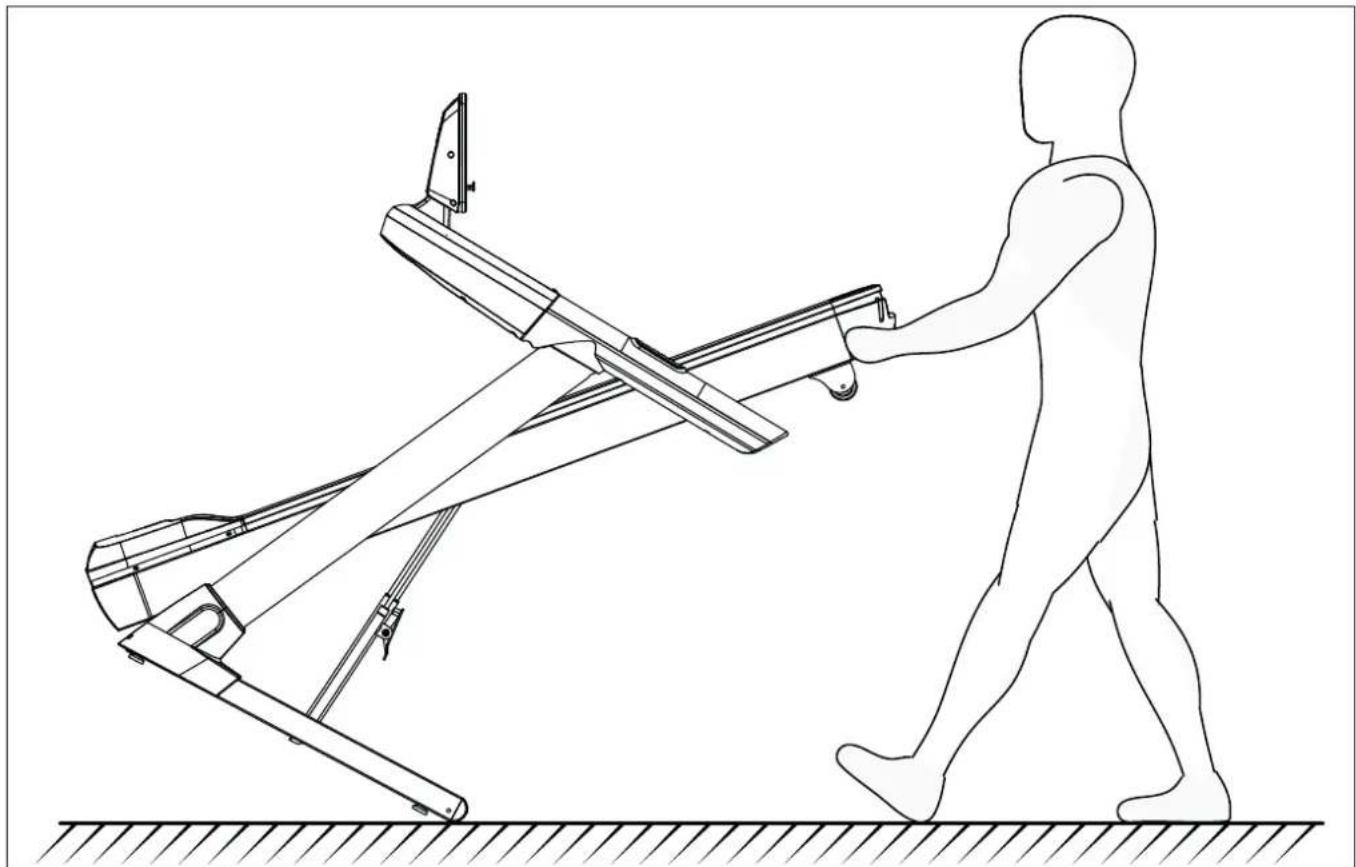
- Carry and move the equipment with at least two persons.
- Make sure that there are no other persons or objects under the equipment.
- When folding the folding the equipment, make sure that you hear the equipment lock into position to prevent the equipment from dropping back down.

CAUTION
- Before folding the equipment, make sure that the incline is 0%. If the incline is not 0%, folding will damage the mechanism.
- Move the equipment as shown (fig. F3). Move the equipment and carefully put the equipment down. Place the equipment on a protective base to prevent damage to the floor surface. Move the equipment carefully over uneven surfaces. Do not move the equipment upstairs using the wheels, but carry the equipment by the handlebars.
- Store the equipment in the upright position (fig. F1). Store the equipment in a dry place with as little temperature variation as possible.
Additional information
Packaging disposal
Government guidelines ask that we reduce the amount of waste material disposed of in land fill sites. We therefore ask that you dispose of all packaging waste responsibly at public recycling centres.
End of life disposal
We at Tunturi hope you enjoy many years of enjoyable use from your fitness trainer. However, a time will come when your fitness trainer will come to the end of its useful life. Under 'European WEEE Legislation you are responsible for the appropriate disposal of your fitness trainer to a recognised public collection facility.
Warranty
Tunturi purchaser's warranty
Warranty terms
The consumer is entitled to the applicable legal rights stated in the national legislation concerning the commerce of consumer goods. This warranty does not restrict these rights. The Purchaser's Warranty is only valid if the item is used in an environment approved by Tunturi New Fitness BV, and is maintained as instructed for that particular equipment. The product-specific approved environment and maintenance instructions are stated in the "user manual" of the product. The "user manual" can be downloaded from our website. http://manuals.tunturi.com
Warranty conditions
The warranty conditions commence from the date of purchase. Warranty conditions may vary per country, so please consult your local dealer for the warranty conditions.
Warranty coverage
Under no circumstances shall Tunturi New Fitness BV or the Tunturi Distributor be liable by virtue of this warranty or otherwise for any special, indirect, secondary or consequential damages of any nature arising out of any use or inability to use this equipment.
Warranty limitations
This warranty covers manufacturing defects in the fitness equipment as originally packed by Tunturi New Fitness BV. The warranty shall apply only under conditions of normal, recommended use of the product as described in the Owner's Manual and providing that Tunturi New Fitness BV's instructions for installation, maintenance and use have been complied with. Neither Tunturi New Fitness BV's nor the Tunturi Distributors'
obligations apply to defects due to reasons beyond their control. The warranty applies only to the original purchaser and is valid only in countries where Tunturi New Fitness BV has an authorised importer. The warranty does not extend to fitness equipment or components that have been modified without the consent of Tunturi New Fitness BV. Defects resulting from normal wear, misuse, abuse, corrosion, or damage incurred during loading or transportation are not covered.
The warranty does not cover sounds or noises emitted during use where these do not substantially impede the use of the equipment and where they are not caused by a fault in the equipment.
The warranty does not cover defects arising from the failure to carry periodic maintenance as outlined within the Owner's Manual for the product. Furthermore, the warranty does not cover defects arising from usage and storage within an unsuitable environment as described within the Owner's Manual which should be indoors, dry, dust and grit free and within a temperature range of +15°C to +35°C. The warranty does not cover maintenance activities, such as cleaning, lubricating, and normal part adjustments, nor installation
procedures that customers can accomplish themselves, such as changing uncomplicated meters, pedals and other similar parts not requiring any dismantling/reassembling of the fitness equipment. Warranty repairs carried out by other than authorised Tunturi representatives are not covered.
Failure to follow the instructions given in the Owner's Manual will invalidate the product's warranty.
Technical data
| Parameter Unit of measurement Value | ||
| Mains voltage VAC 210~240 | ||
| Mains frequency HZ 50~60 | ||
| Speed Km/H 0.8~24.0 | ||
| Incline Step 0 ~ 15 | ||
| Length / (folded) Cm | 193.0 / (137.0) | |
| Length / (folded) Inch | 76.0 / (53.9) | |
| Width Cm 82.5 | ||
| Width Inch 32.5 | ||
| Height / (folded) | Cm 149.0 / (155.0) | |
| Height / (folded) | Inch 58.7 / (61.0) | |
| Weight | Kg | 117.0 |
| Weight | Lbs 257.9 | |
| Max. user weight | Kb | 150 |
| Max. user weight | Lbs 330 | |
| HR. ReceiverHeartratemeasurementavailable via: | Handgrip contact5.3~ 5.4 Khz.BLE BTANT+ | ☑☑☒☒ |

NOTE
- To learn the product dimensions and functional dimensions please review illustration J
Declaration of the manufacturer
Tunturi New Fitness BV declares that the product is in conformity with the following standards and directives: EN-957- (SA), 2014/30/EU. The product therefore carries the CE label.
04-2020
Tunturi New Fitness BV
Purmerweg 1
1311 XE Almere
The Netherlands
Disclaimer
© 2020 Tunturi New Fitness BV
All rights reserved.
- The product and the manual are subject to change.
- Specifications can be changed without further notice.
- Check our website for the latest user manual version.
Deutsch
line
| ALTER | PULS | |-------|------| | MAXIMAL | 85% | | 70% | 70% | | ABKÜHLEN | 70% |Tunturi New Fitness BV
Purmerweg 1
1311 XE Almere
The Netherlands
Haftungsausschluss
© 2020 Tunturi New Fitness BV
line
| AGE | RYTHME CARDIAQUE | | --- | --- | | 20 | 200 | | 75 | 160 | | 100 | 120 |Tunturi New Fitness BV
Purmerweg 1
1311 XE Almere
Pays-Bas
© 2020 Tunturi New Fitness BV
line
| Metric | Value | | ---------- | ----- | | MAXIMUM | 85% | | COOL DOWN | 70% |Tunturi New Fitness BV Purmerweg 1 1311 XE Almere The Netherlands
Disclaimer
Tunturi New Fitness BV
Purmerweg 1
1311 XE Almere
Paesi Bassi
© 2020 Tunturi New Fitness BV
Rango 5:00\~95:00 ± 1:00.
Tunturi New Fitness BV
Purmerweg 1
1311 XE Almere
The Netherlands
© 2020 Tunturi New Fitness BV
line
| | Value | | ------ | ----- | | MAXIMAL | 85% | | KYLA NER | 70% |0.8 Km/h/ 24.0 km/h.
Imperial: Min./ Max. Hastighet:
0.5 Mls/h/ 15.0 Mls/h.
Byt enheter genom:
I läge "ON":
Håll knappen "Prog" & "Speed -" intryckt i 3 sekunder.
Tunturi New Fitness BV
Purmerweg 1
1311 XE Almere
Nederländerna
Friskrivning
© 2020 Tunturi New Fitness BV
Tunturi New Fitness BV
Purmerweg 1
1311 XE Almere
Alankomaat
Vastuuvapauslauseke
© 2020 Tunturi New Fitness BV
| No. Description Specs Qty | |||
| 1 Base frame 1 | |||
| 2 Main Frame 1 | |||
| 3 Console frame 1 | |||
| 4 Display frame 1 | |||
| 5 Handle bar frame 2 | |||
| 6 Incline frame 1 | |||
| 7 Upright post (L) 1 | |||
| 8 Upright post (R) 1 | |||
| 9 Outside extension tube 1 | |||
| 10 Inside extension tube 1 | |||
| 11 Side landing frame 1 | |||
| 12 Motor installation panel | 1 | ||
| 13 | Hex half thread screw | M12×∅14×35×19 | 2 |
| 14 | Allen C.K.S half thread screw | M8×40×20 | 4 |
| 15 | Allen C.K.S half thread screw | M8×45×20 | 1 |
| 16 | Allen C.K.S half thread screw | M8×30×20 | 4 |
| 17 | Allen C.K.S half thread screw | M8×60×20 | 4 |
| 18 | Allen C.K.S half thread screw | M8×50×20 | 4 |
| 19 | Allen C.K.S full thread screw | M8×15 | 8 |
| 20 | Hex full thread screw | M8×25 | 2 |
| 21 | Allen C.K.S full thread screw | M10×35×15 | 1 |
| 22 | Allen C.K.S full thread screw | M10×35×20 | 2 |
| 23 | Allen C.K.S full thread screw | M10×65×20 | 1 |
| 24 | Allen socket full thread screw | M8×15 | 2 |
| 25 | Allen socket full thread screw | M8×75 | 2 |
| 26 | Allen socket full thread screw | M8×65 | 1 |
| 27 | Allen countersunk head full thread screw | M6×30×∅16 | 8 |
| 28 | Hex full thread screw | M8×40 | 1 |
| 29 | Philips C.K.S. full thread screw | M4×20 | 2 |
| 30 | Philips C.K.S.self-tapping screw | ST4×16 | 38 |
| 31 | Philips C.K.S.self-tapping screw | ST4×16 | 20 |
| 32 | Philips C.K.S.self-tapping screw | ST4×50 | 2 |
| 33 | Philips countersunk head self-tapping screw | ST3×10 | 4 |
| 34 | Philips C.K.S. full thread screw | M5×10 | 6 |
| 35 | Philips C.K.S. full thread screw | M4×10 | 9 |
| 36 | Philips C.K.S.self-tapping screw | ST4×16 | 11 |
| 37 | Philips C.K.S.self-tapping screw | ST4×40) | 4 |
| 38 | Philips pan head. full thread screw | M3×28 | 4 |
| 39 | Philips C.K.S.self-tapping screw | ST4×20 | 4 |
| 40 | Philips washer head end cutting.self-tapping screw | ST4×12 | 8 |
| 41 flat washer | ∅8 | 19 | |
| 42 flat washer | ∅10 | 7 | |
| 43 flat washer | ∅14 | 2 | |
| 44 spring washer ∅8 | 2 | ||
| 45 spring washer ∅5 | 3 | ||
| 46 Hex nut | M8 | 13 | |
| 47 Hex nut | M10 | 3 | |
| 48 Adjusting foot pad | ∅35×37×12×M8 | 4 | |
| 49 Square cushion | 35×35×5.0×∅8 | 4 | |
| 50 Cylinder cushion | ∅30×30×M6×6 | 6 | |
| 51 | Serrated Lock Washers | ∅5 | 3 |
| No. | Description | Specs | Qty |
| 52 Incline shaft sleeve 25 × 17 × 10 × 6 × 14 | |||
| 53 Round slide rail guider 25 × 5 × 4.5 20 | |||
| 54 Front roller 120 × 75 × 20 × 619 × 661 1 | |||
| 55 Rear roller 63 × 17 × 586 × 646 TPI 1 | |||
| 56 Hydraulic 702 × 330 × 10 × 8.2 × 600N 1 | |||
| 57 Motor AC220V/4500RPM/ 35 1 | |||
| 58 Incline motor 110mm/AC220V(222mm 1 | |||
| 59 Running deck | 1350 × 650 × t21 | 1 | |
| 60 Running belt | 3260 × 550 × t1.8 | 1 | |
| 61 Motor belt | 200/ PJ8 | 1 | |
| 62 Side landing | 93 × 36.5 × 1424 | 2 | |
| 63 IPAD holder | 1 | ||
| 64 console back housing | 480 × 270 × 83 | 1 | |
| 65 Console shell (up) | 908 × 458 × 130 | 1 | |
| 66 Console shell (down) | 908 × 458 × 100 | 1 | |
| 67 Outlet assembling part | 6750/300 × 84 × 25 | 1 | |
| 68 Outlet | 1 | ||
| 69 Pressing plate | 22 × 7.0 × 6.0 | 2 | |
| 70 PU handle bar cover | 636 × 64 × 137 | 2 | |
| 71 Base cover L (L) | 295 × 92 × 228 | 1 | |
| 72 Base cover L (R) | 295 × 92 × 228 | 1 | |
| 73 Base cover R (L) | 295 × 92 × 228 | 1 | |
| 74 Base cover R (R) | 295 × 92 × 228 | 1 | |
| 75 Rear cover | 737 × 157 × 147 | 1 | |
| 76 Motor cover | 739 × 382 × 95 | 1 | |
| 77 Front base cover | 148 × 88 × 111.5 | 2 | |
| 78 Powder metallurgy set | 24 × 19 × 14 × 14 × 3 | 2 | |
| 79 Curve open tube plug | 40 × 60 × 2.0 | 2 | |
| 80 Hollow round tube plug | 31.5 × 55 | 1 | |
| 81 Common cylindrical spiral torsion spring | 2219/ 14 × 2 × 14 | 1 | |
| 82 Power line | 1 | ||
| 83 Wheels | 62 × 8.0 × t22 | 2 | |
| 84 Wheels | 62 × 8.0 × t22 | 2 | |
| 85 T shape wrench | 6 × 80 | 1 | |
| 86 L shape wrench | 6 × 35 × 80 | 1 | |
| 87 Cross open wrench | 14 × 17 × 75 | 1 | |
| 88 Magnet ring | 31 × 19 × t16 | 1 | |
| 89 Console | 1 | ||
| 90 Inverter fix plate | 6741CA-01 | 1 | |
| 91 Communication wire | L-250mm | 1 | |
| 92 Communication wire | L-1200mm | 2 | |
| 93 Communication wire | L-800mm/ 10 × 650 | 1 | |
| 94 Handle pulse communication wire | L-800mm | 2 | |
| 95 wire protect ring | 21 × 12 × 9 | 2 | |
| 96 Inverter | 1 | ||
| 97 Handle pulse set | t0.3×42×60 | 4 | |
| 98 Incline handle quick key PCB | L-450mm | 1 | |
| 99 Speed handle quick key PCB | L-450mm | 1 | |
| 100 Handle pulse set wire | L-1100mm | 2 | |
| 101 Power line | L-350mm/1.5mm2 | 1 | |
| 102 Power line | L-350mm/1.5mm2 | 1 | |
| No. Description Specs Qty | |||
| 103 Communication line( ground line) L-200mm/1.5mm2 2 | |||
| 104 Communication line( ground line) L-200mm/1.5mm2 2 | |||
| 105 Switch 1 | |||
| 106 Handle quick key cover 126×34.5×12 2 | |||
| 107 Self-reset switch 10A/ 250VAC 1 | |||
| 108 Power line L-100mm 1 | |||
| 109 Safety key fix plate 106×54×18 1 | |||
| 110 Safety key pull piece L-700mm 1 | |||
| 111 Safety key clips t0.8×29×5 2 | |||
| 112 Safety key connecting wire L-500mm 1 | |||
| 113 Safety key press piece 83.5×42.7×33.2 1 | |||
| 114 Pressure spring ∅11.8×∅0.8×24 1 | |||
| 115 Seperated power cord 3×1.5mm2 /2000 1 | |||
| 116 Seperated power cord socket 1 | |||
| 117 Hollow round tube plug ∅35×t1.2 3 | |||
| 118 Cable clamp 3/8(UC-2) 2 | |||
| 119 Silicon oil 50ml 1 | |||
| 120 filter 10A 1 | |||
| 121 Choke 1 | |||
| 122 Console frame bracket L t3.0×125×120/1260×3000 1 | |||
| 123 Console frame bracket R t3.0×125×120/1260×3000 1 | |||
| 124 Outlet cover t1.0×125×92/1260×3000 1 | |||
TUNTURI®
FEEL BETTER EVERY DAY
TUNTURI NEW FITNESS B.V.
Purmerweg 1
1311 XE Almere
The Netherlands
P.O. Box 60001
1320 AA Almere
The Netherlands
info@tunturi.com
www.tunturi.com

/TunturiNLBE
/TunturiFitness

/Tunturi_NLBE
/Tunturi_Fitness

Tunturi
Tunturi Service

- T90 Treadmill Endurance
- Attention, Achtung, Attention, Attentie, Attenzione, Atención, Giv akt, Huomio
- D-2
- Index
- Welcome
- Safety warnings
- Electrical safety
- CAUTION
- Grounding Instructions
- WARNING
- Assembly instructions
- Description illustration A
- Description illustration B
- NOTE
- Description illustration C
- Description illustration D
- Accessories (fig. H)
- Workouts
- Exercise Instructions
- The warming up phase
- The exercise phase
- The cool down phase
- Muscle toning
- Weight loss
- Heart rate
- Pulse rate measurement (hand pulse sensors)
- Heart rate measurement (heart rate chest belt) NOTE
- Maximum heart rate (during training)
- Beginner
- 50-60% of maximum heart rate
- Advanced
- 60-70% of maximum heart rate
- Expert
- 70-80% of maximum heart rate
- Use
- Master power switch (fig. E-2A)
- To start the equipment:
- To stop the equipment:
- Safety key (Fig F-4)
- Circuit breaker (Fig. E-2B)
- Unfolding and folding the equipment (fig. F1-F2)
- Adjusting the support feet
- QUICK TIP
- Console (fig. E-1)
- Buttons
- Emergency
- Stop/ Reset
- Start/ Pause
- Prog
- Mode
- Speed +
- Speed -
- Speed hot keys:
- Handle bar speed quick-access keys:
- Incline +
- Incline -
- Incline hot keys.
- Handle bar incline quick-access keys:
- Explanation of display items
- Speed
- Incline
- Distance
- Time
- Steps
- Heart
- Calories
- Scan
- Explanation of displays acoustic beep
- USB function
- Programs
- Quick start
- Target countdown mode (P0)
- End your workout
- Pre-set Programs (P1\~P36)
- User programs (U01\~U03)
- Profile programming mode.
- Body Fat
- Result calculation:
- HRC Program
- HRC operating function:
- ERP Function
- Bluetooth & APP
- Cleaning and maintenance
- General Cleaning
- Belt Dust
- Belt and Running Deck
- How to clean running deck
- How to clean running belt surface
- Lubrication (fig. F-6)
- Belt adjustments
- EXCEPTION
- Belt tension adjustment
- Centre the running belt (fig. F-5)
- REASON 1
- REASON 2
- REASON 3
- Troubleshooting
- Error codes
- Oil
- E5
- Means a power fault.
- E7
- Metric/ Imperial setting
- Switch units by:
- Transport and storage
- Additional information
- Packaging disposal
- End of life disposal
- Warranty
- Tunturi purchaser's warranty
- Warranty terms
- Warranty conditions
- Warranty coverage
- Warranty limitations
- Declaration of the manufacturer
- Disclaimer
- Deutsch
- Haftungsausschluss
- Byt enheter genom:
- Friskrivning
- Vastuuvapauslauseke
Brand : TUNTURI
Model : Endurance T90
Category : Treadmills